
VirtualBox 7 is a popular virtualization software that allows users to run multiple operating systems on a single physical host. With its latest release, VirtualBox 7, users can now take advantage of even more features and enhancements.
This guide will show you how to install VirtualBox 7 on Linux Mint, a Ubuntu-based Linux distribution known for its user-friendliness, reliability, and great support. So, whether you are a beginner or an experienced user, this guide will provide the steps to set it up on your Mint system successfully.
VirtualBox is available for installation from the Linux Mint 21 “Vanessa” repositories, but the version is 6.1. However, VirtualBox 7 was recently released, and it offers significant advantages over its predecessor, such as:
- Full virtual machine encryption support
- Support for UEFI SecureBoot and TPM 1.2/2.0
- Enhanced 3D support
- Automated virtual machine builder
- Integration with Oracle Cloud Infrastructure (OCI)
Fortunately, there is an effortless way to install VirtualBox 7 on Linux Mint, which we will show you in this guide.
The tutorial will use the sudo command and assuming you have sudo privileges.
Step 1: Import VirtualBox’s Repo GPG Key
VirtualBox 7, as previously stated, is not available in the Linux Mint 21 repositories. So, we’ll add it to our Mint system. But first, import the Oracle VirtualBox GPG keys that sign the software.
Open the terminal and run the following command:
wget -O- https://www.virtualbox.org/download/oracle_vbox_2016.asc | sudo gpg --dearmor --yes --output /usr/share/keyrings/oracle-virtualbox-2016.gpgCode language: JavaScript (javascript)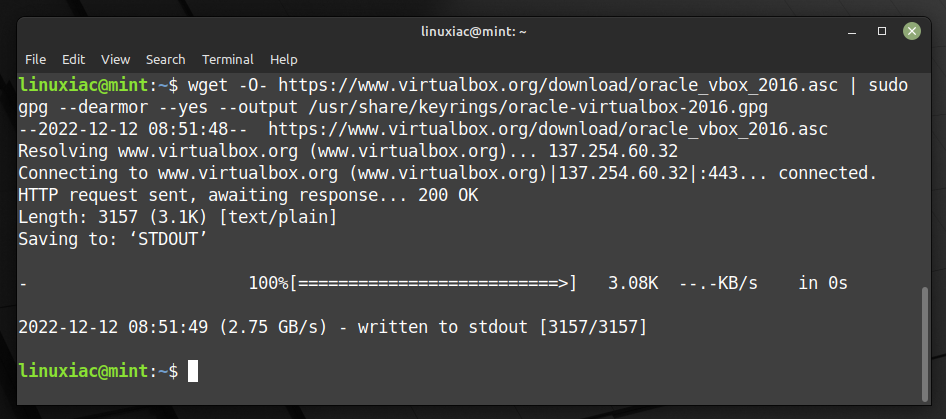
We can now proceed to import the official VirtualBox repository.
Step 2: Add Official VirtualBox Repository
After importing the GPG keys, we’ll add the official VirtualBox repository to our Linux Mint system. This implies that the update package will be made available with the rest of your system’s regular updates if a new version is released.
echo "deb [arch=amd64 signed-by=/usr/share/keyrings/oracle-virtualbox-2016.gpg] http://download.virtualbox.org/virtualbox/debian jammy contrib" | sudo tee /etc/apt/sources.list.d/virtualbox.listCode language: PHP (php)
Step 3: Run System Update
Before we proceed with VirtualBox installation on our Linux Mint 21 system, we should refresh the packages list to make the system aware of the newly added VirtualBox repository’s packages. So, run the below command to update the APT repositories index.
sudo apt update
As you can see from the image above, our new VirtualBox repository is now available and ready to be used.
Step 4: Install VirtualBox 7 on Linux Mint 21
Everything is already prepared for the actual installation. Now, to install VirtualBox on Linux Mint 21, run the following commands:
sudo apt install virtualbox-7.0Code language: CSS (css)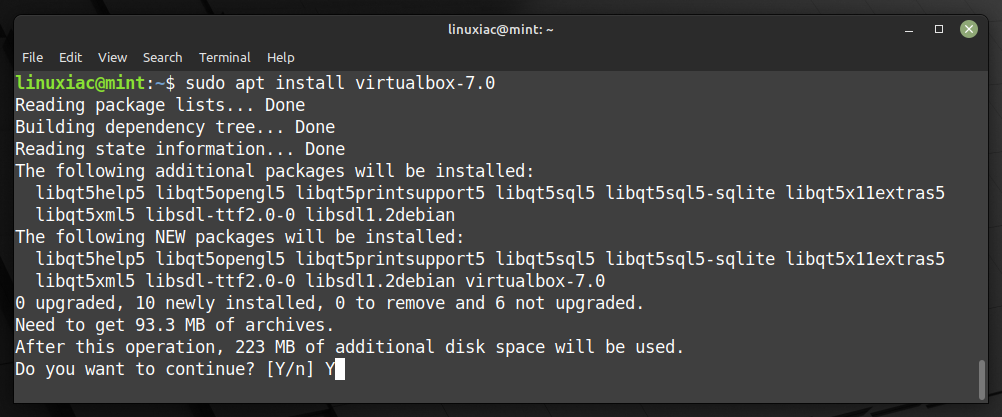
Wait for the installation to complete. The VirtualBox is now installed and ready to be used on your Linux Mint 21 system.
Step 5: Install VirtualBox Extension Pack
This is an optional step, but I strongly encourage it because it will make working with VirtualBox on your Ubuntu system easier and more convenient. VirtualBox Extension Pack unlocks many great features, such as:
- Oracle Cloud Infrastructure (OCI) integration
- VirtualBox Remote Desktop Protocol (VRDP)
- Host webcam passthrough
- Disk and full VM encryption
Let’s highlight one peculiarity here. The installed VirtualBox Extension Pack’s version is highly recommended to match the version of VirtualBox installed on your Ubuntu 22.04 system.
So, to verify the exact version of the installed locally VirtualBox, you can use vboxmanage, a build-in VirtualBox’s command:
vboxmanage -v | cut -dr -f1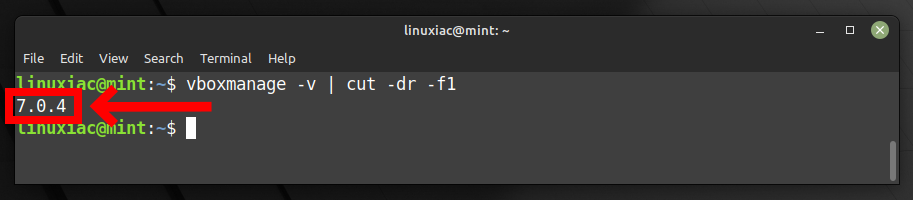
As you can see, the version of Virtualbox installed is 7.0.4. Therefore, you must then download the Extension Pack with the same version.
However, if your VirtualBox installation version is different, replace both places containing 7.0.4 in the command below with the actual version. In addition, you can also go straight to the downloads page and look at the available versions.
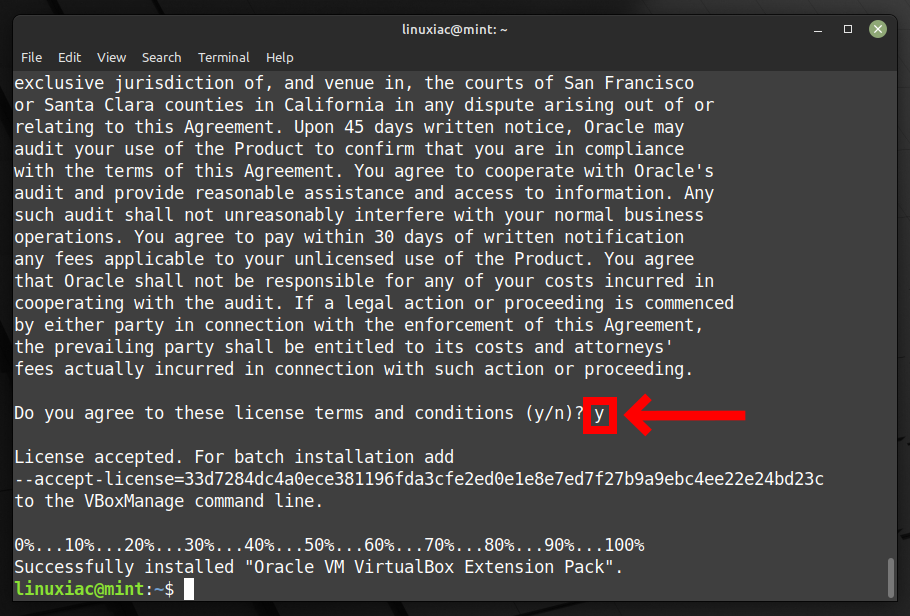
wget https://download.virtualbox.org/virtualbox/7.0.4/Oracle_VM_VirtualBox_Extension_Pack-7.0.4.vbox-extpackCode language: JavaScript (javascript)Next, to install the VirtualBox Extension pack, run the vboxmanage command as follows:
sudo vboxmanage extpack install Oracle_VM_VirtualBox_Extension_Pack-7.0.4.vbox-extpackCode language: CSS (css)You will be prompted to agree the Oracle’s license terms and conditions. So, type “y” to confirm and press Enter.
Additionally, you can verify installed VirtualBox’s extension pack version by running the following:
vboxmanage list extpacksCode language: PHP (php)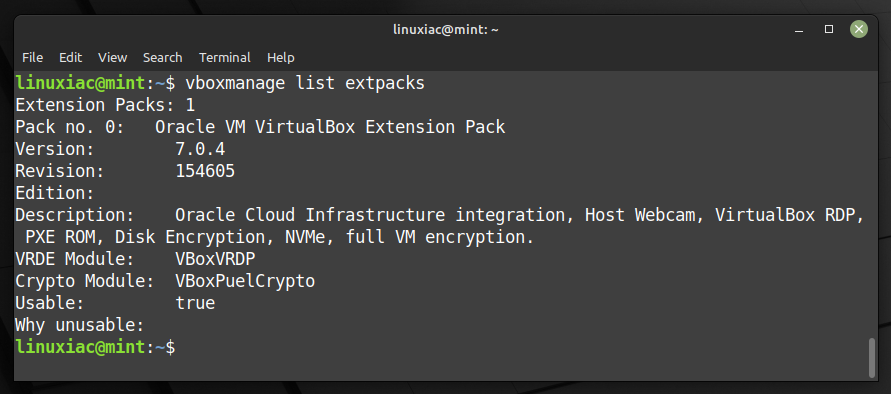
Step 6: Add User to vboxusers Group
Before using VirtualBox, you should add your user account to the vboxusers group. This is quick and simple to accomplish by running:
sudo usermod -a -G vboxusers $USERCode language: PHP (php)Now perform a reboot. After login, check that you are in the vboxusers group with this command:
groups $USERCode language: PHP (php)
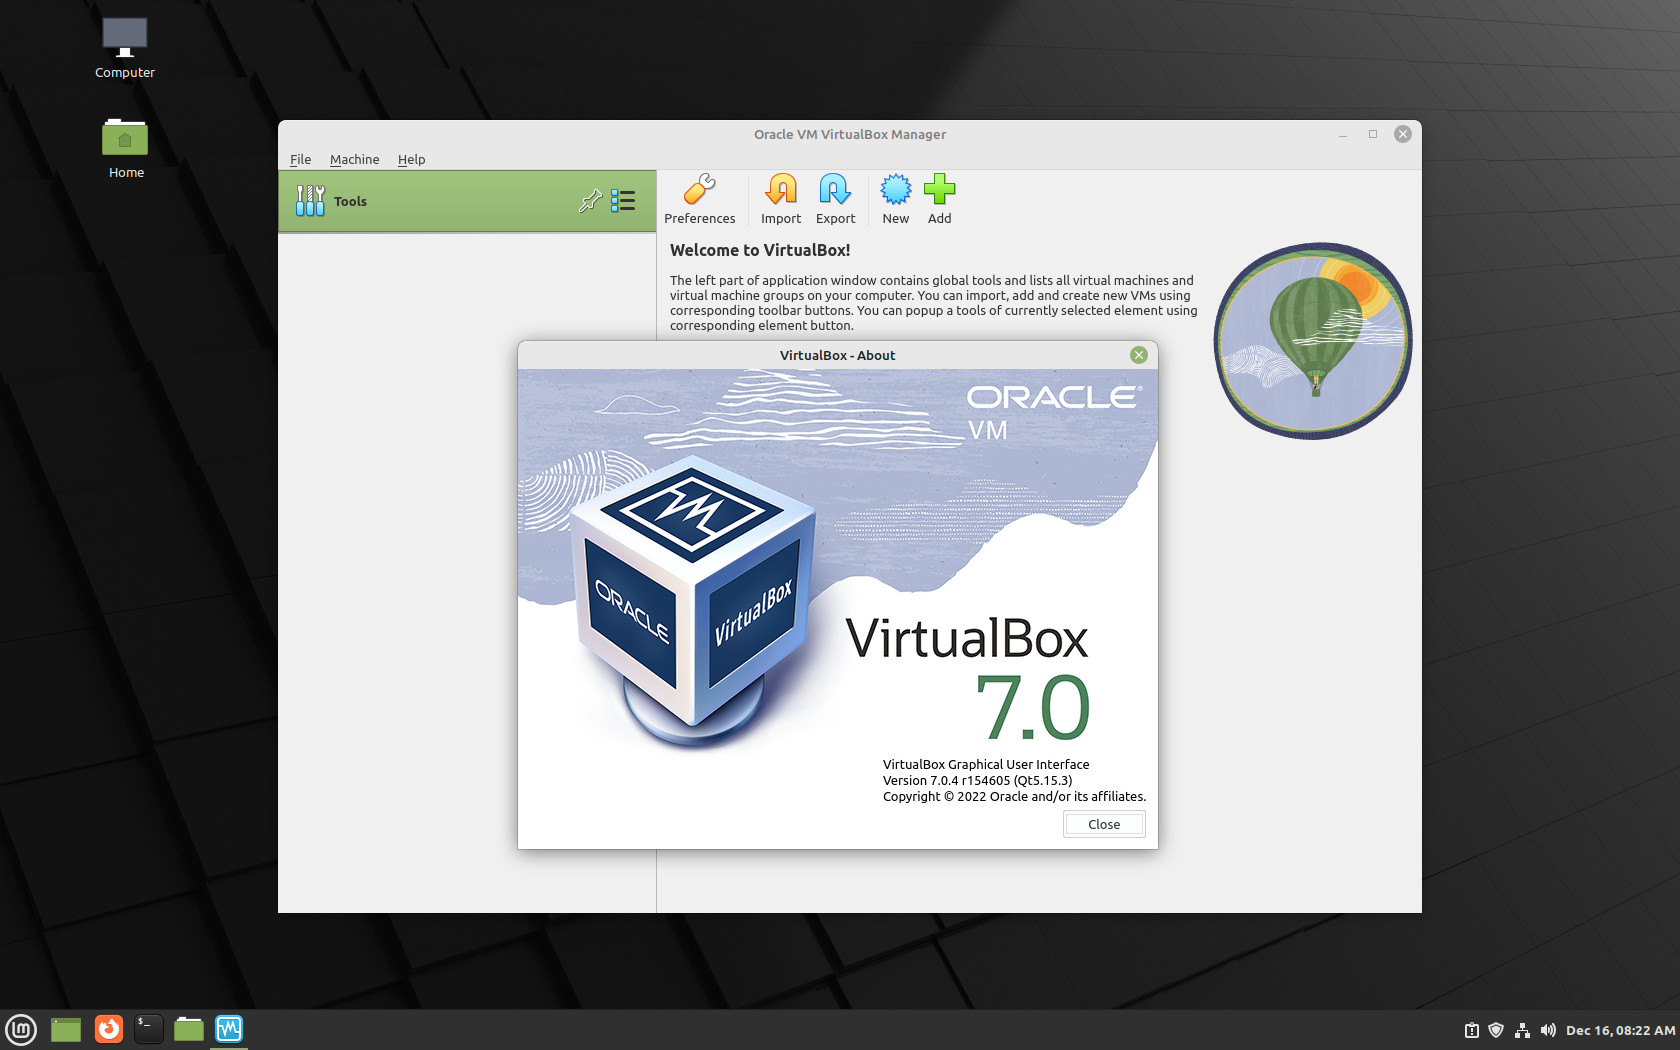
Step 7: Running VirtualBox on Linux Mint 21
You can start using VirtualBox by launching it from the Linux Mint start menu.

Conclusion
That concludes our guide on installing VirtualBox on Linux Mint 21. We hope you find this guide helpful. Thanks for your time!
We recommend checking the official documentation for individuals who want to learn more about the features offered by VirtualBox and how to use them effectively.
Finally, you can use VirtualBox in an entirely headless mode to turn your server into a virtualization environment. To learn more about utilizing this VirtualBox feature, check out our guide: “How to Setup and Manage VirtualBox VMs on a Headless Server.”
Thanks for using this tutorial. Your feedback and comments are most welcome.


Thank you!!! Works
Thank you Bobby, you will forever look like all these three kings, and I’m the little fellow down in the corner seeking help <3
Haha, that was funny! You've got a great sense of humor, Leo. 😄
You’re going to get a lot more people coming here because the kernal update linux mint currently automatically applies breaks Virtualbox 6.1, posting it here to help search engines pick it up.
"ERROR [COM]: aRC=NS_ERROR_INVALID_ARG (0x80070057) aIID={4680b2de-8690-11e9-b83d-5719e53cf1de} aComponent={DisplayWrap} aText={Argument aWidth is invalid (must be aWidth != 0 && aWidth <= 32767)}, preserve=false aResultDetail=0"
You’ll get this in your logs and your VM will die on startup. Remove Virtualbox 6.1 with “Apt purge” and then follow this guide and they will work again.
Thanks Bobby!
The command in Step 1 did not complete for me at first. I eventually closed the terminal window. On the second attempt, I preceded your command with ‘sudo ‘ to be prompted for my password. Then I ran the command a second time without preceding it with ‘sudo “ and the command completed successfully. I’m a bit of a Linux noob, though. Maybe this will help someone else. I skipped Step 5, as I’m not sure I need the extension features yet. VirtualBox 7.0.20 is now installed on Linux Mint 21.3. I like that this version of VirtualBox uses the dark theme that I set in Linux. Thank you for the great tutorial. It is more straightforward than some others I read.
Hat gut funktioniert. Habe auch das Linux – mint. Die Virtualbox 6.1 funktioniert plötzlich nicht mehr. Stürzte einfach ab beim aufstarten. Dann habe ich Ihr Vorgehen nachvollzogen, und siehe da, es funktionierte ! Die alten virtuellen Installationen wurden übernommen. – TipTop.
Step 1 fails because http://www.virtualbox.org resolves to an IPV6 address which is not contactable. Adding -4 as an option to the wget command fixes it.
Thanks Bobby for your very clear howto.
Usually I install things with the Software Manager. But VirtualBox 6.1.xx did not run on a practically new installed Linux Mint. All kind of dependency errors.
Updated Linux Mint today to Victoria.
Then tried your instructions and they worked! Nanolinux worked in seconds. 🙂
Did not do steps 5 & 6. For some reason step 5 is not needed (yet?). Will try later to install a Linux and check if there is a problem.
Can you explain why the user account should be part of the vboxusers group?
(Btw nice that this works via email and not logging in on Gmail or that kind of stuff.)
Thanks again and greetings from Nederland, Martin.
Hi Martin,
Without being part of the vboxusers group, a user may lack the permissions needed for certain VirtualBox functionalities, such as having access to USB devices within the virtual machines. But more importantly, membership to vboxusers ensures the user has the necessary permissions to create, modify, and execute virtual machines without access issues. Greetings to Nederland! 🙂
Best,
Bobby
Thank you for the useful tutorial. All worked flawless. I had 6.1 installed and even after installing the extension pack the usb devices were not detected. Now with 7.0.12 the problem is solved. 🙂
Great and useful article.
I only needed the steps to install the Extension Pack, which worked perfectly.
I wish I had’ve found the article prior to faffing around with instructions for installing VB on another nameless site.
Thank you.
Hi Z,
I’m happy that our tutorial was helpful to you. We always aim to provide the best explained and pre-tested procedure.
Best,
Bobby
Good simple explanation for linux mint ignoramus!
All worked well! Thanks
Cannot launch ubuntu because:
The VirtualBox Linux kernel driver is either not loaded or not set up correctly. Please try setting it up again by executing
‘/sbin/vboxconfig’
as root.
If your system has EFI Secure Boot enabled you may also need to sign the kernel modules (vboxdrv, vboxnetflt, vboxnetadp, vboxpci) before you can load them. Please see your Linux system’s documentation for more information.
where: suplibOsInit what: 3 VERR_VM_DRIVER_NOT_INSTALLED (-1908) – The support driver is not installed. On linux, open returned ENOENT.
Well presented article and steps worked flawlessly – thank you!
Thanks, done this and now trying to start a vm:
“The Vitualbox kernel modules do not match this version of Virutalbox. Executing /sbin/vboxconfig may correct this.”
vboxconfig executed without problems but problem still persists.
Any hints?
Hi Jan,
It looks like you you have a mismatched install. So, you must purge the VirtualBox’s repo version before installing the latest official one.
First, find all packages on your system related to VirtualBox with “
sudo dpkg -l | grep virtualbox“. Then uninstall them with “sudo apt purge [package_name_here]” and repeat the guide. I hope this solves the problem.Best,
Bobby
This has been a fantastic tutorial, and it has helped me as I’ve had to purge and reinstall Virtualbox. It would be wonderful if you would add a section on installing with Secureboot and a section for having Virtualbox installed, then turning secureboot on with the subsequent needed validation.
Hallo Bobby,
hervorragende Anleitung! Hat wunderbar ohne Fehler funktioniert. Konnte in einigen Minuten von VB 6 auf die aktuelle Version upgraden.
Gruß Dieter
This doesn’t work.
The command “sudo apt install virtualbox-7.0” fails. It says:
“vboxdrv.sh: failed: Cannot unload module vboxdrv.
vboxdrv.sh: failed: Cannot unload module vboxdrv.
There were problems setting up VirtualBox. To re-start the set-up process, run
/sbin/vboxconfig
as root. If your system is using EFI Secure Boot you may need to sign the
kernel modules (vboxdrv, vboxnetflt, vboxnetadp, vboxpci) before you can load
them. Please see your Linux system’s documentation for more information.”
Running “sudo /dbin/vboxconfig” just reprints the same error.
My system has secure boot turned off.
I was able to get past this error finally by searching for vboxdrv and deleting all files with that name in them. Then rebooting.
Install worked fine after that.
I run windows 10 in the VB.
Unfortunately, the USB support does not work.(USB device cannot be connected)
Inside the USB Configuration the USB setting is not enabled.(grayed)
Does anyone have a solution?
Good article 🙂
migrate 6.1 to 7.0.6 easily thanks to you.
Just install extension pack directly from graphic Virtual box application.
Great article. Very well explained with all the accompanying screenshots just great. Many Thanks
I so much appreciate your article! Thank you very much. I was using 6.1 and ran across your site and followed your directions and they were flawless.
Hi Ken,
Glad to be of help. 🙂
Thanks for reading Linuxiac!
Best,
Bobby
I recommend using https:// instead of http:// in the repo url that is added to the virtualbox.list file.
Some people like to claim that package signing is good enough for security, but it’s vulnerable to replay attacks, privacy issues, and it won’t hurt you to use https so why not.