
VirtualBox is free cross-platform virtualization software that may be installed as application software on any operating system. It allows you to run virtual machines (VMs) on a single physical machine and use them alongside the actual machine.
Each virtual machine can run its operating systems, such as Linux, Windows, Unix, and Solaris.
Most VirtualBox users believe that VirtualBox is solely meant for usage only on a desktop environment, where virtual machine management is accomplished through the VirtualBox GUI.
However, VirtualBox can run on headless servers, and headless VirtualBox VMs can be handled remotely using an external VirtualBox front-end client.
But first, let us clarify what we mean by the term “headless server.” A headless server is simply a computer that does not have a display, mouse, keyboard, or other peripherals.
So, in our case, the term refers to a server that does not have a graphical environment installed and is administered remotely, most commonly via SSH.
This guide will show you how to install VirtualBox on a headless server and manage the virtual machines running on it using the RemoteBox application.
Step 1: Install VirtualBox
In this guide, we will install our headless VirtualBox server on Ubuntu 22.04. However, if you’re using another Linux distro as a server, such as Debian, or one of the Red Hat derivatives such as AlmaLinux or Rocky Linux, our excellent guides below will help you install VirtualBox.
- How to Install VirtualBox 7 on Ubuntu 22.04 in a Few Easy Steps
- How to Install VirtualBox on Debian 12 (Bookworm)
- Install VirtualBox on Manjaro Linux
- How to Install VirtualBox 7 on AlmaLinux / Rocky Linux
- How to Install VirtualBox on Arch Linux
- VirtualBox 7 on Linux Mint 21: A Complete Installation Guide
- VirtualBox 7 on Fedora: A Complete Installation Guide
VirtualBox is available for installation in the Ubuntu official repositories. Unfortunately, the version there is not the most up-to-date. So, to use the most recent version, which at the time of writing is VirtualBox 7.0, we will install it from the officially available VirtualBox repository.
To ensure that the packages we receive to install the VirtualBox are genuine, first, we should download and import the VirtualBox signed GPG keys on our Ubuntu system.
wget -O- https://www.virtualbox.org/download/oracle_vbox_2016.asc | sudo gpg --dearmor --yes --output /usr/share/keyrings/oracle-virtualbox-2016.gpgCode language: JavaScript (javascript)After importing the GPG keys, we’ll add the official VirtualBox repository. This implies that the update package will be made available with the rest of your system’s regular updates if a new version is released.
Type the command shown below.
echo "deb [arch=amd64 signed-by=/usr/share/keyrings/oracle-virtualbox-2016.gpg] http://download.virtualbox.org/virtualbox/debian $(lsb_release -cs) contrib" | sudo tee /etc/apt/sources.list.d/virtualbox.listCode language: PHP (php)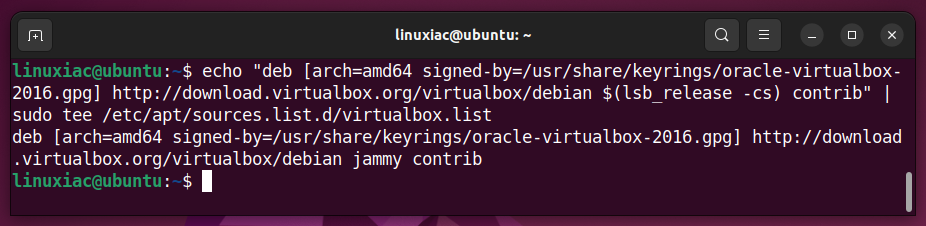
Before we proceed with VirtualBox installation on our Ubuntu system, we should update the list of available packages. So, run the below command to update the repositories index.
sudo apt update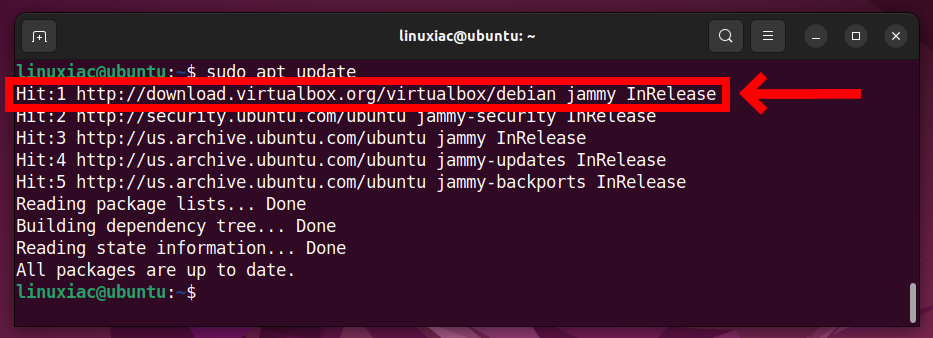
As you can see, our new VirtualBox repository is now available and ready to be used. So everything is already prepared for the actual installation.
Finally, we installed VirtualBox on our Ubuntu system using the apt command.
sudo apt install VirtualBox-7.0Code language: CSS (css)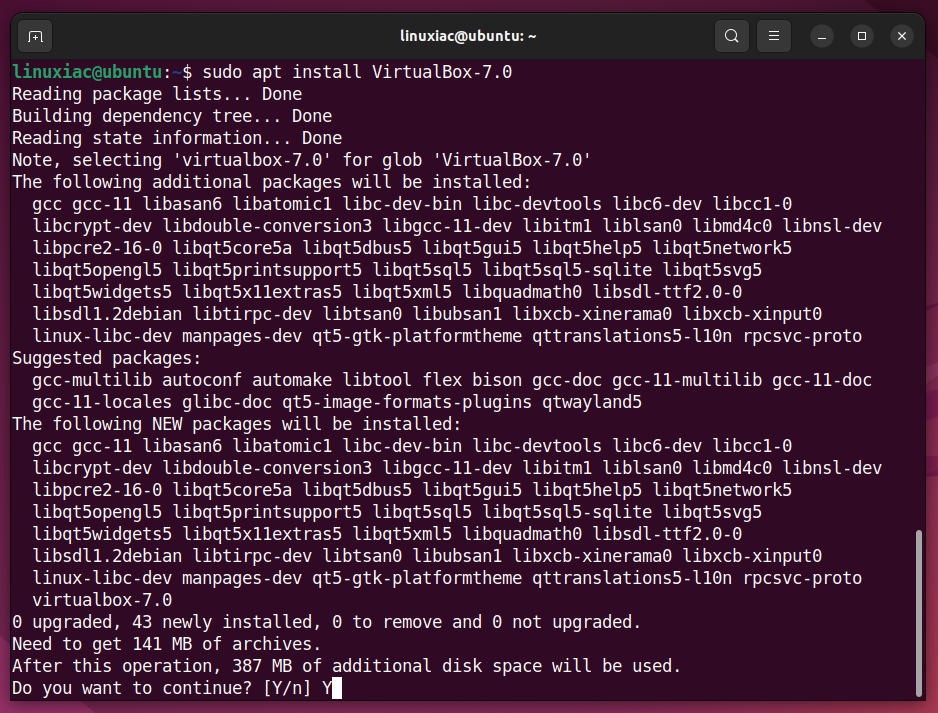
Many installation packages will be displayed as VirtualBox dependencies. This should not bother you. To confirm, type “Y” and press Enter.
Wait for all of the packages to finish installing before proceeding. VirtualBox is now installed on our Ubuntu system. It’s time to move on to the next step.
Step 2: Install VirtualBox Extension Pack
Because our VirtualBox server is headless, we need to use a special protocol called VirtualBox Remote Desktop Protocol (VRDP) to communicate with it remotely. This feature is supplied by installing an additional software package, VirtualBox Extension Pack.
However, we should mention something important here. The VirtualBox Extension Pack’s version must match the version of VirtualBox installed. The simplest method to check this is to run:
vboxmanage -v | cut -dr -f1
As you can see, the version of Virtualbox installed is 7.0.2. Therefore, we need to download the Extension Pack with the same version.
So, use the below wget command to download the Extension Pack for VirtualBox.
If your installed version is different, replace both places containing 7.0.2 in the command below with the current version. In addition, you can also go straight to the downloads page and look at the available versions.
wget https://download.virtualbox.org/virtualbox/7.0.2/Oracle_VM_VirtualBox_Extension_Pack-7.0.2.vbox-extpackCode language: JavaScript (javascript)Next, to install the VirtualBox Extension pack, run the vboxmanage command as follows:
sudo vboxmanage extpack install Oracle_VM_VirtualBox_Extension_Pack-7.0.2.vbox-extpackCode language: CSS (css)When prompted to accept Oracle’s license terms and conditions, type y and press Enter to confirm.

You can verify that the extension pack was installed correctly by running:
vboxmanage list extpacksCode language: PHP (php)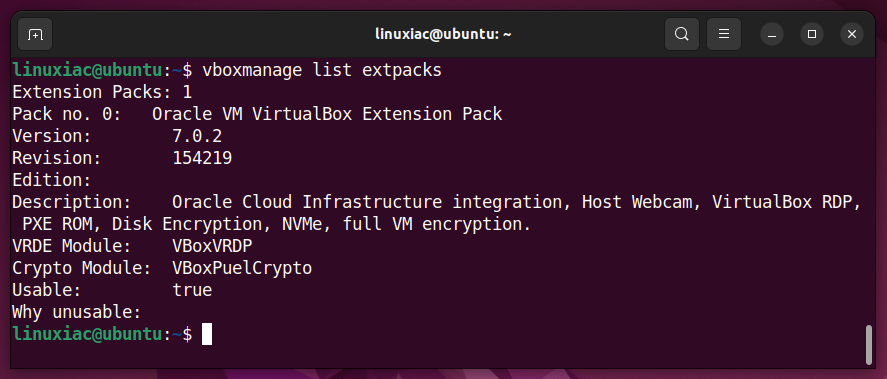
Step 3: Configure the VirtualBox Server
We’ll configure our headless VirtualBox server to accept remote connections in this step. This is done because the virtual machines running on it will be managed remotely from another computer using the RemoteBox app.
First, we’ll create a user with a name, for example, vbox, who must be a member of the vboxusers group. We will use this user later to log in remotely to our headless VirtualBox server.
After creating the vbox user, please give it a password and remember it. We’ll need it soon.
sudo useradd -m -d /home/vbox -g vboxusers -s /bin/false vbox
sudo passwd vboxCode language: JavaScript (javascript)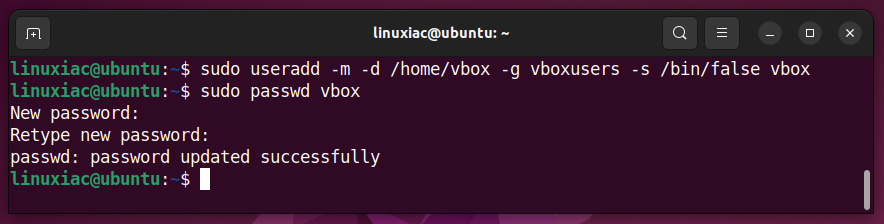
Next, we need to create a file called virtualbox in the /etc/default directory.
sudo vim /etc/default/virtualboxCode language: JavaScript (javascript)Then we added the following content to it.
VBOXWEB_USER=vbox
VBOXWEB_PASSWD=password
VBOXWEB_HOST=192.168.122.197
VBOXWEB_TIMEOUT=0
Of course, replace the password string in the lines above with the password you set for the vbox user and the server’s IP address in the VBOXWEB_HOST line with the current one for your installation.
Finally, restart the vboxweb-service service.
sudo systemctl restart vboxweb-serviceCheck the service to ensure if it works after restarting.
sudo systemctl status vboxweb-service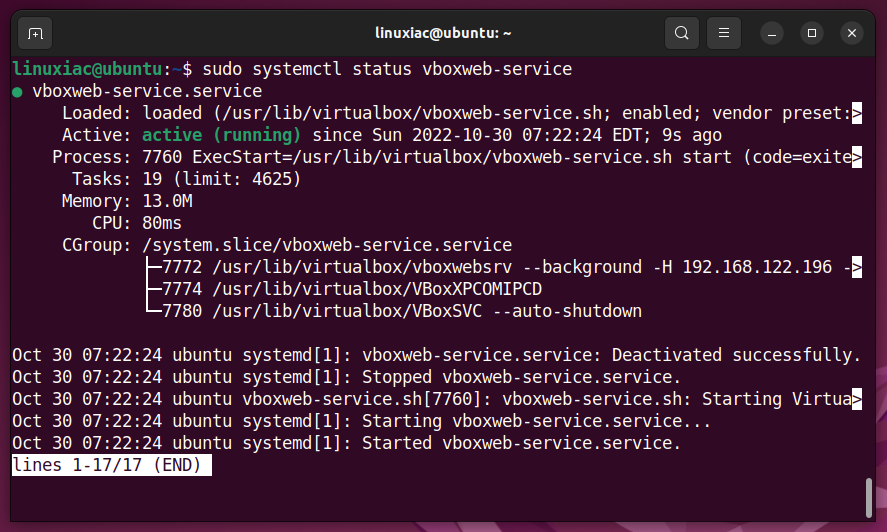
Great! Everything seems to be functioning normally.
Check that port 18083 on the server hosting your headless VirtualBox installation is open. It is required for RemoteBox and VirtualBox to communicate with each other successfully.
Step 4: Install RemoteBox
RemoteBox is a free and open-source VirtualBox front-end client that allows you to remotely manage a VirtualBox installation, including its guests, and interact with them as if they were running locally.
However, before installing RemoteBox, we must install the dependencies required for RemoteBox to function correctly. We’ll show you how to install them on several of the most popular Linux distributions.
Ubuntu / Debian / Linux Mint
sudo apt install libgtk3-perl libsoap-lite-perl freerdp2-x11 tigervnc-viewerAlmaLinux / Rocky Linux
sudo dnf install perl-Gtk3 perl-SOAP-Lite perl-libwww-perl freerdp tigervnc xdg-utilsFedora
sudo dnf install perl-Gtk3 perl-SOAP-Lite freerdp tigervnc xdg-utilsThen download the latest up-to-date version of the RemoteBox app, which at the time of writing is 3.1. You can check here which is the latest version.
wget https://remotebox.knobgoblin.org.uk/downloads/RemoteBox-3.1.tar.bz2Code language: JavaScript (javascript)Using the command below, uncompress the downloaded file.
bunzip2 RemoteBox-3.1.tar.bz2Code language: CSS (css)Finally, unpack the tar file.
tar xvf RemoteBox-3.1.tarCode language: CSS (css)Step 5: Run RemoteBox and Connect It to VirtualBox
Now that we have everything in place, we can launch RemoteBox and connect it to our headless VirtualBox server.
First, enter into the RemoteBox-3.1 directory, then launch the application.
cd RemoteBox-3.1/
./remotebox
When the GUI opens, enter the required information.
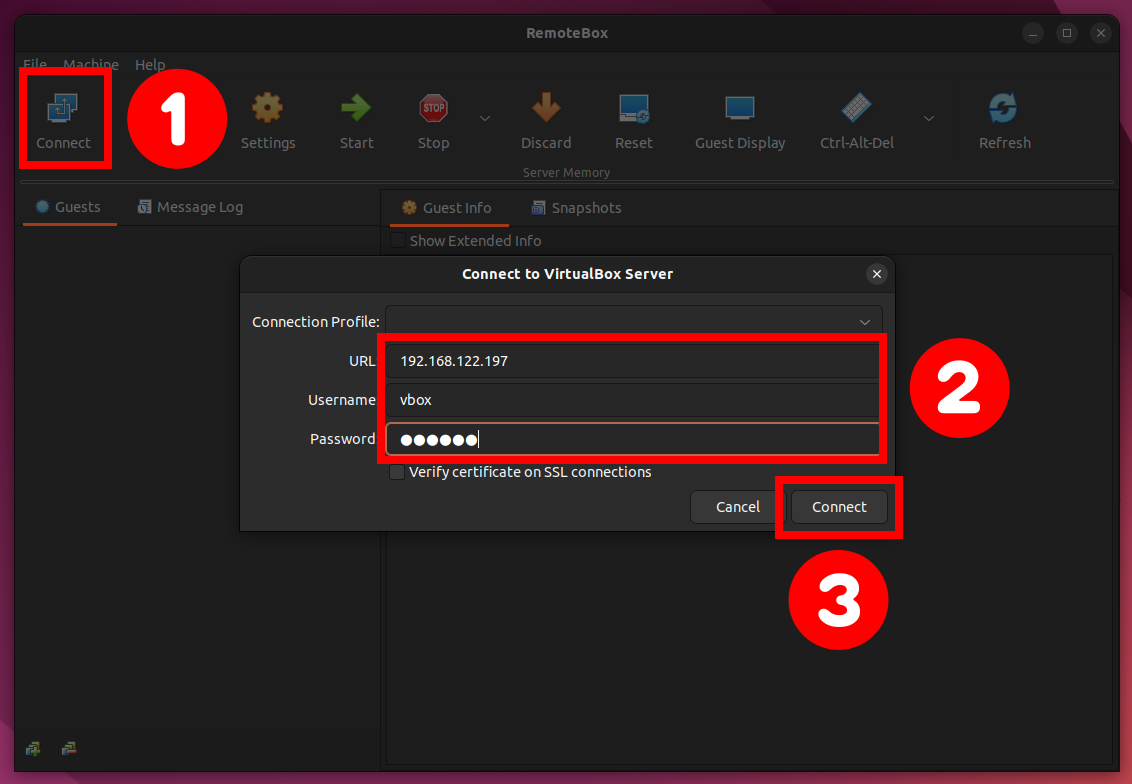
Once connected, you can use the RemoteBox application to interact with your remote VirtualBox server in the same way you would with the standard VirtualBox GUI interface.
Step 6: Attach ISO File to VirtualBox via RemoteBox GUI
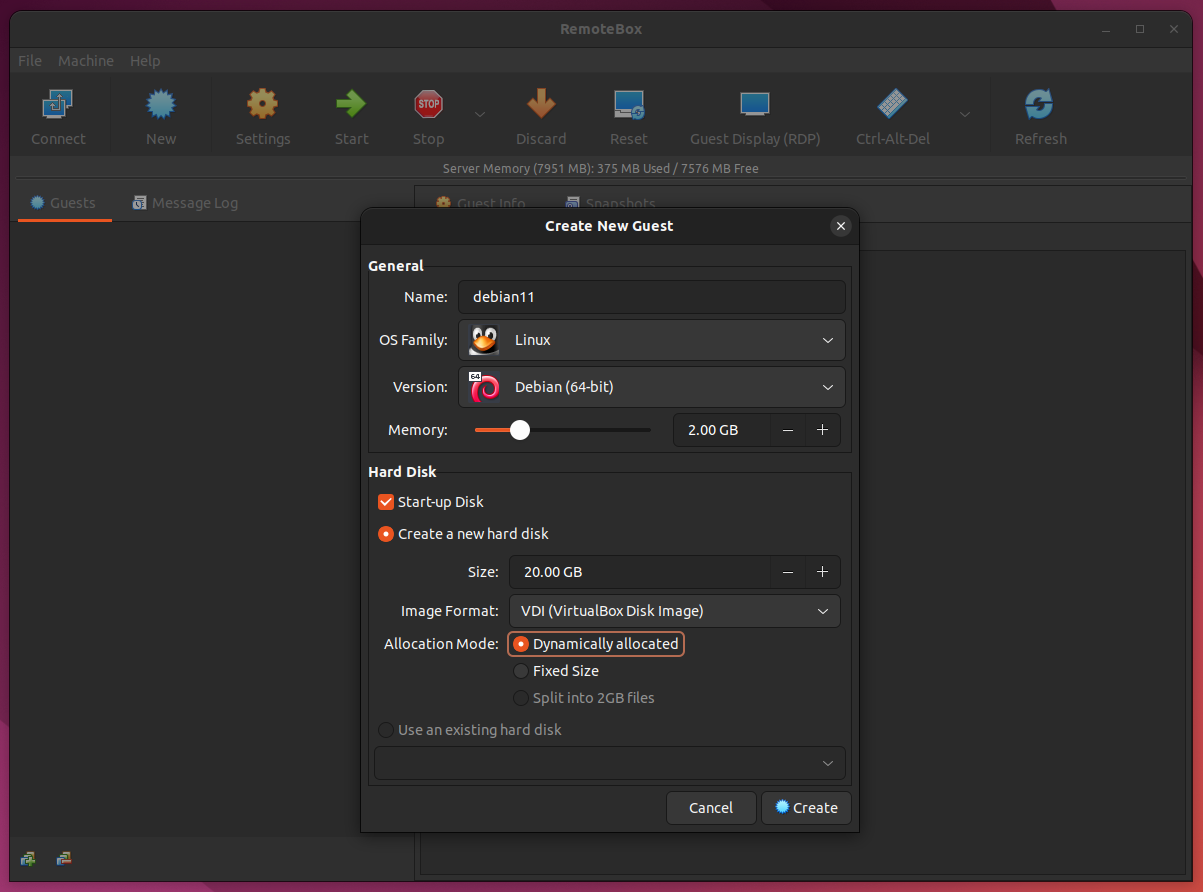
There is one more thing that the regular user may struggle with. When creating a virtual machine with RemoteBox, how do you specify the installation ISO image? Let us show you how simple it is.
As shown in the previous example, assume we want to create a new Debian 11 virtual machine. It displays in the left panel when we have set it up and confirmed using the “Create” button. However, before we start it, we must specify the installation ISO file.
Log in via SSH to the remote headless VirtualBox server and download the installation ISO file with a program like wget.
The following is an example command for downloading the ISO image to the /tmp directory:
wget -P /tmp/ https://cdimage.debian.org/debian-cd/current/amd64/iso-cd/debian-11.3.0-amd64-netinst.isoCode language: JavaScript (javascript)Of course, you could download the installation ISO file to your local desktop machine first and then use the scp command to transfer it to the remote VirtualBox server.
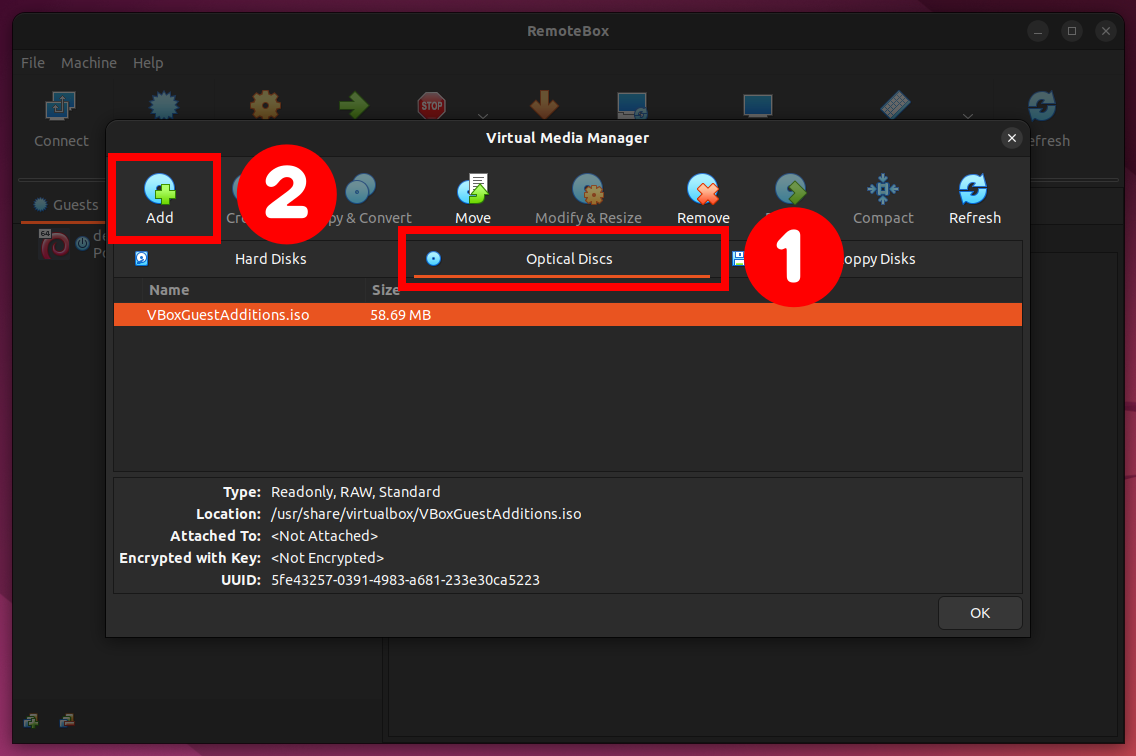
The ISO file must then be added to “Virtual Media Manager” to be available for selection in the RemoteBox GUI. First, go to the “File” menu and pick “Virtual Media Manager.”

“Virtual Media Manager” will appear. This is where we add our ISO files or create the virtual hard disks that will be used in our VMs. Select the “Optical Discs” tab and press the “Add” button.
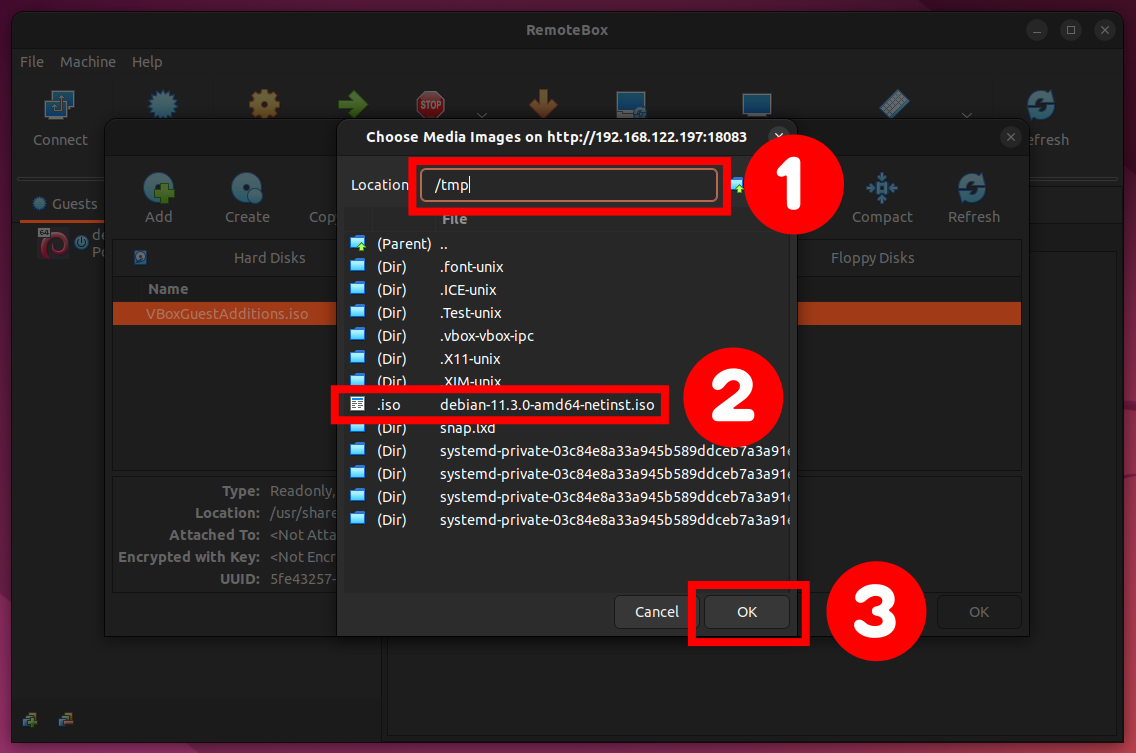
Navigate to the directory storing the installation ISO file in the “Location” area, pick it, and confirm with the “OK” button.
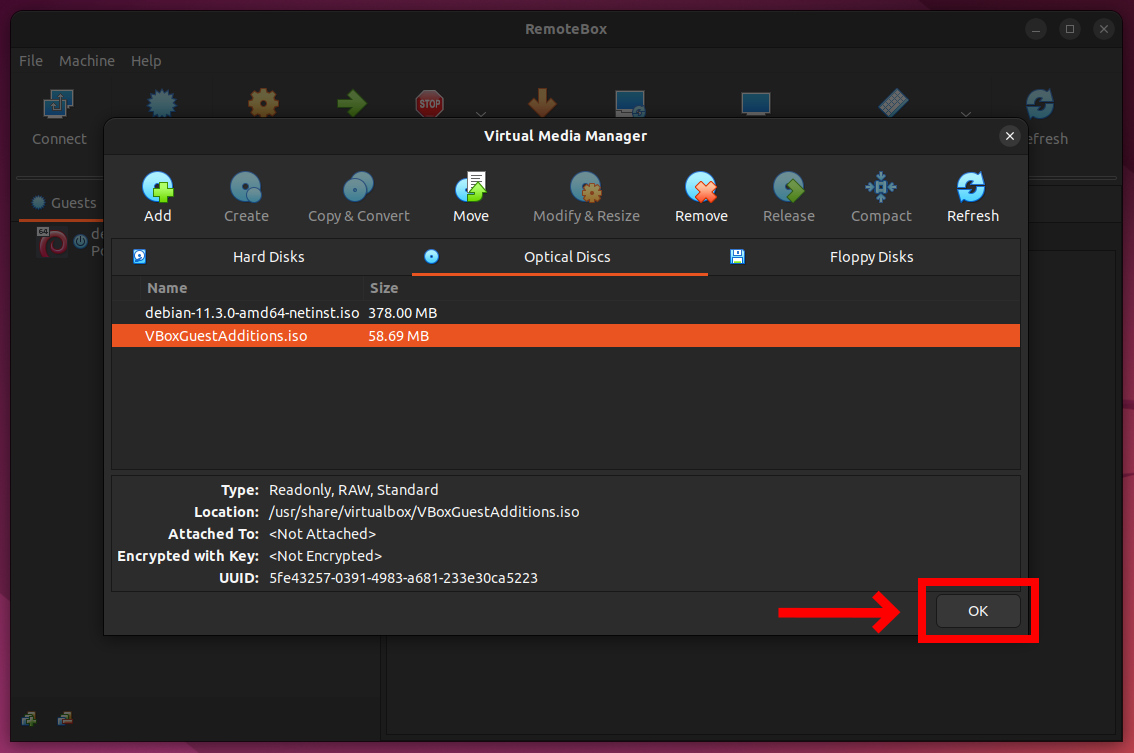
The file has been successfully added to “Virtual Media Manager.” Confirm pressing “OK.”
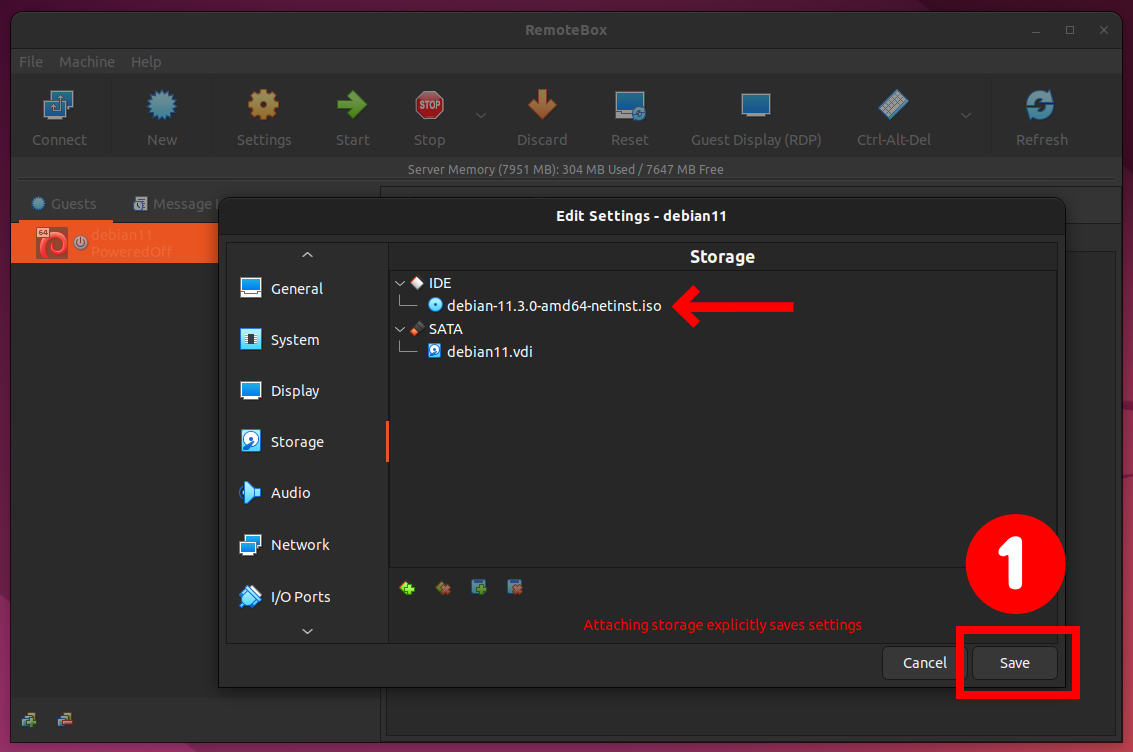
Following the procedures below to add the ISO file to the virtual CD drive. First, choose the virtual machine and then “Settings.” Then, pick “Storage” and “Empty Drive” in the opening window.
Select the “Optical Discs” option by clicking the small choosing floppy icon with the “+” sign. Next, choose the ISO installation file from the available files that appear.
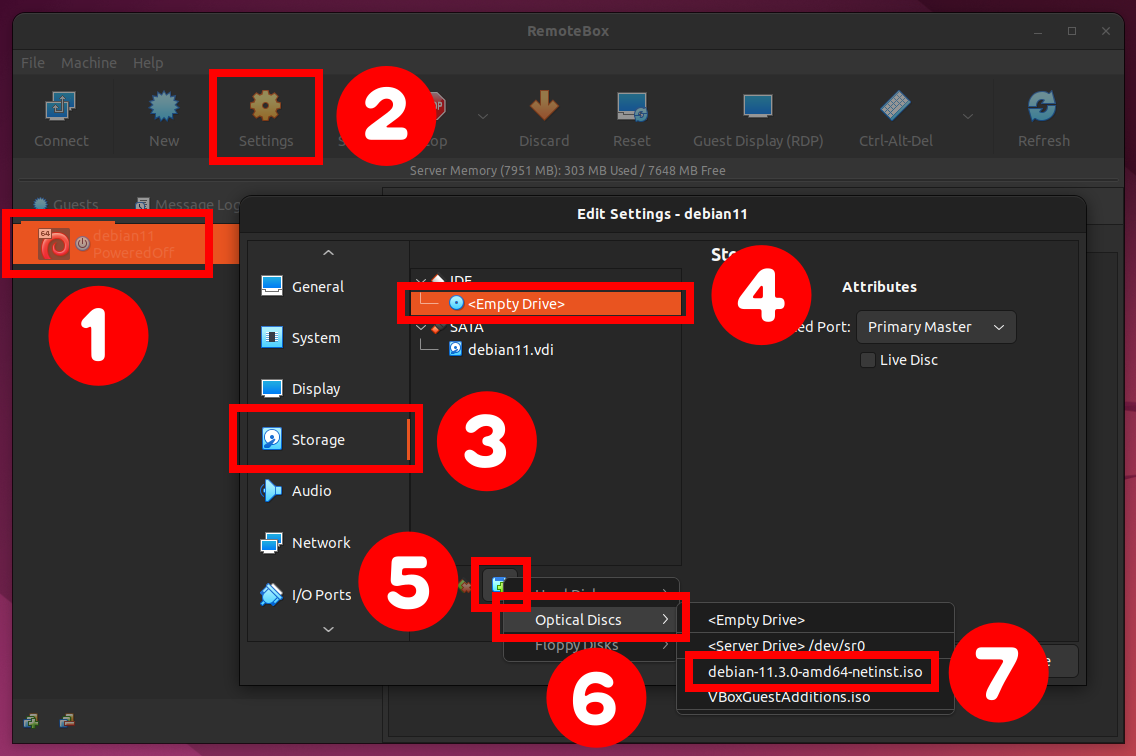
As a result, the file will be mounted. To save your changes, click the “Save” button.
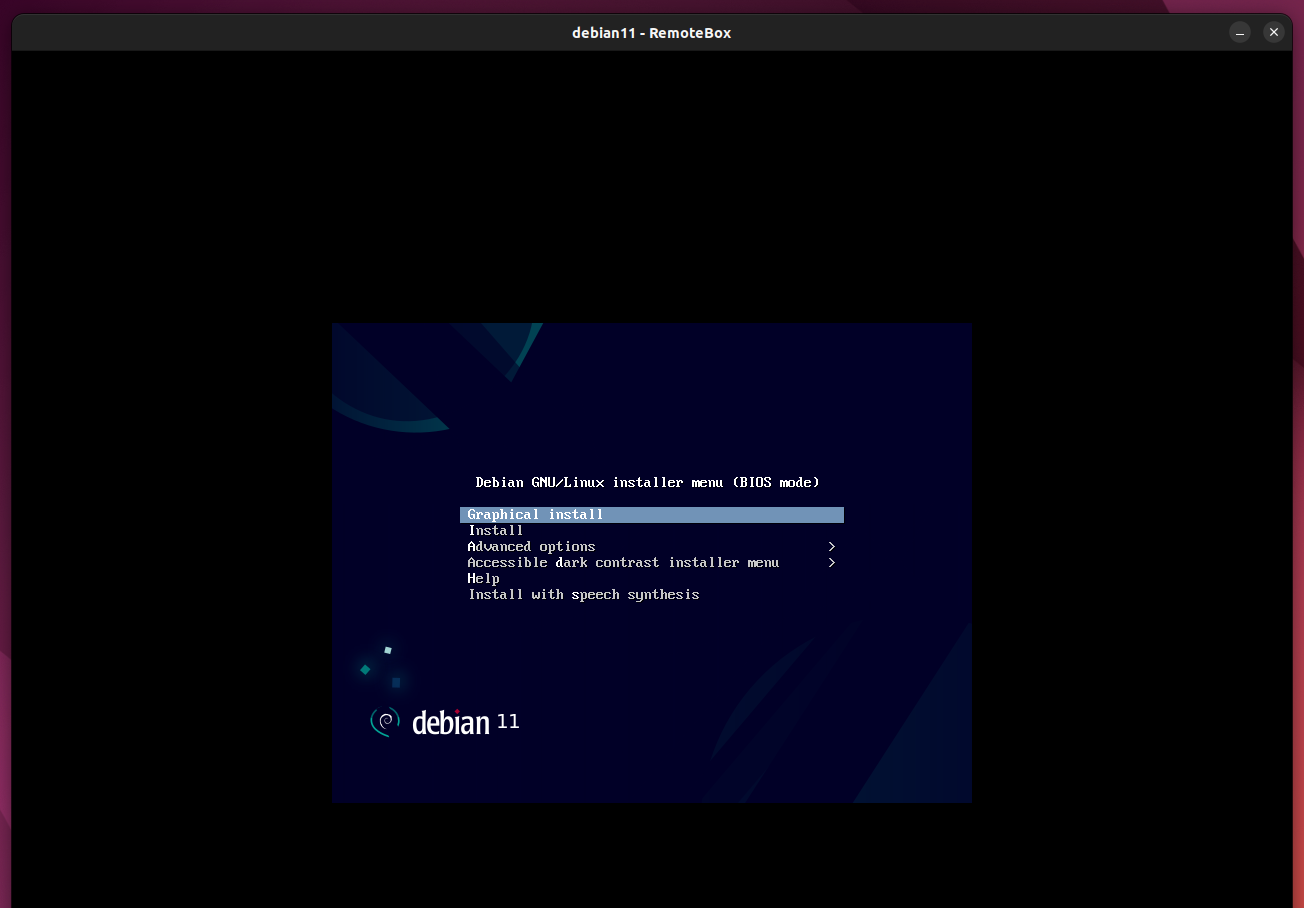
Finally, start your virtual machine to proceed with the installation.
Conclusion
This guide showed you how to install and configure VirtualBox on a remote headless server and remotely control its virtual machines with the RemoteBox app.
We are convinced that you will find widespread use for it, as VirtualBox is one of the most popular virtualization applications among home users and developers.
Thank you for following our guidance. Any feedback is much appreciated!


Great article – agree with comment below that vbox user needs a shell too.Also I had to set ownership of /var/log/vbox to vbox:vboxusers or the vboxweb service stops after a few seconds (as it can't write to the log file).
Great article and worked flawlessly on ubuntu 22.04 and virtualbox 7.08
A follow-up guide to Auto Starting a VM at boot would be awesome as I followed your instructions easily.
Thank you
This article is very useful. However, it does not quite work as written, at least on debian 11 host. The suggested method to create user ‘vbox’ sets it up with /bin/false as shell, which means no shell. However, when the service starts, a shell is required by the startup script. I had to change the shell to be the normal /usr/bash and then the service started. Note that the service reports correct startup with the original method even though it does not actually start.
So, instead of
sudo useradd -m -d /home/vbox -g vboxusers -s /bin/false vbox
I had to use
sudo useradd -m -d /home/vbox -g vboxusers -s /bin/bash vbox
Thank you!
ufw allow 3389:4389/tcp
ufw allow 3389:4389/udp
If not set this is necessary to get RDP “guest display” to work.
RemoteBox does not connect to VirtualBox. Just goes away after clicking connect with not error of any kind.
Hello Bobby,
Great article thank you so much for your hard work. I have a question though. Where does the (Step 4: Install RemoteBox) get installed? On the Virtualbox server? On the Client (My PC)? I know it’s a stupid question but I don’t want to assume anything.
Thank you again,
Michael
Hi Michael,
There are no stupid questions. 🙂
RemoteBox must be installed on your desktop pc/laptop from which you will remotely connect to the VirtualBox headless server.
Best,
Bobby
Thank you Bobby, I appreciate the help. Happy Thanksgiving to you and your family.
This is the error I am getting:
*** unhandled exception in callback:
*** Can’t locate object method “format_secondary_markup” via package “Gtk3::MessageDialog” at /home/centurion030/RemoteBox-3.1/share/remotebox/rbox_err.pl line 143.
Everything seems good except trying to add an iso image. I click add and no other menu option shows.
Thanks so much for the detailed article!