
- Alpine Linux Advantages
- 1. Download Alpine’s Installation ISO Image
- 2. Prepare Live Bootable USB
- 3. Boot Alpine’s Installation Program
- 4. Start the Alpine Linux Installation
- 5. Post Installation Steps
- 6. Install Desktop Environment on Alpine Linux
- Install, Remove, and Update Packages with APK on Alpine Linux
- Conclusion
You’re in the right place if you’re seeking a lightweight and customizable Linux experience. Alpine Linux, known for its minimalistic design and enhanced security, offers a refreshing alternative to traditional distributions.
Moreover, Alpine is a systemd-free operating system, which means it does not use the systemd system as its default init system. Instead, it relies on OpenRC – an init system and service manager- providing a simple and modular initialization process while efficiently managing system services.
Although the distribution’s biggest strength is on the server side, especially in containerization, more experienced Linux users will find in Alpine the flexibility, simplicity, and speed that they have been looking for in their desktop system.
So, are you ready? Let’s dive in and unleash the power of Alpine Linux!
Alpine Linux Advantages
Before we go into how to install Alpine and add a desktop environment to it, let’s take a quick look at the main benefits of using Alpine.
Lightweight and minimalistic: Alpine Linux is designed to be lightweight, making it ideal for resource-constrained systems. It consumes minimal disk space and has low memory requirements, resulting in improved performance.
Enhanced security: With a strong emphasis on security practices, Alpine employs advanced measures such as stack protection, hardened kernel, and Address Space Layout Randomization (ASLR). Its minimal package set reduces the attack surface and ensures a more secure desktop environment.
Customizable: The distro offers flexibility and customization options, allowing you to tailor your desktop environment to suit your preferences. You can choose from various lightweight window managers, desktop environments, and software packages.
Powerful package manager: Alpine utilizes an efficient and reliable package manager called APK (Alpine Package Keeper). It provides a vast repository of packages, making installing and updating software on your system easy.
Container-friendly: Alpine Linux is widely used in containerized environments due to its small size, fast boot time, and reduced attack surface. It is an excellent choice for running Docker containers, enabling efficient resource utilization.
Active community and support: Alpine Linux is widely used in containerized environments due to its small size, fast boot time, and reduced attack surface. As a result, it is an excellent choice for running Docker containers, enabling efficient resource utilization.
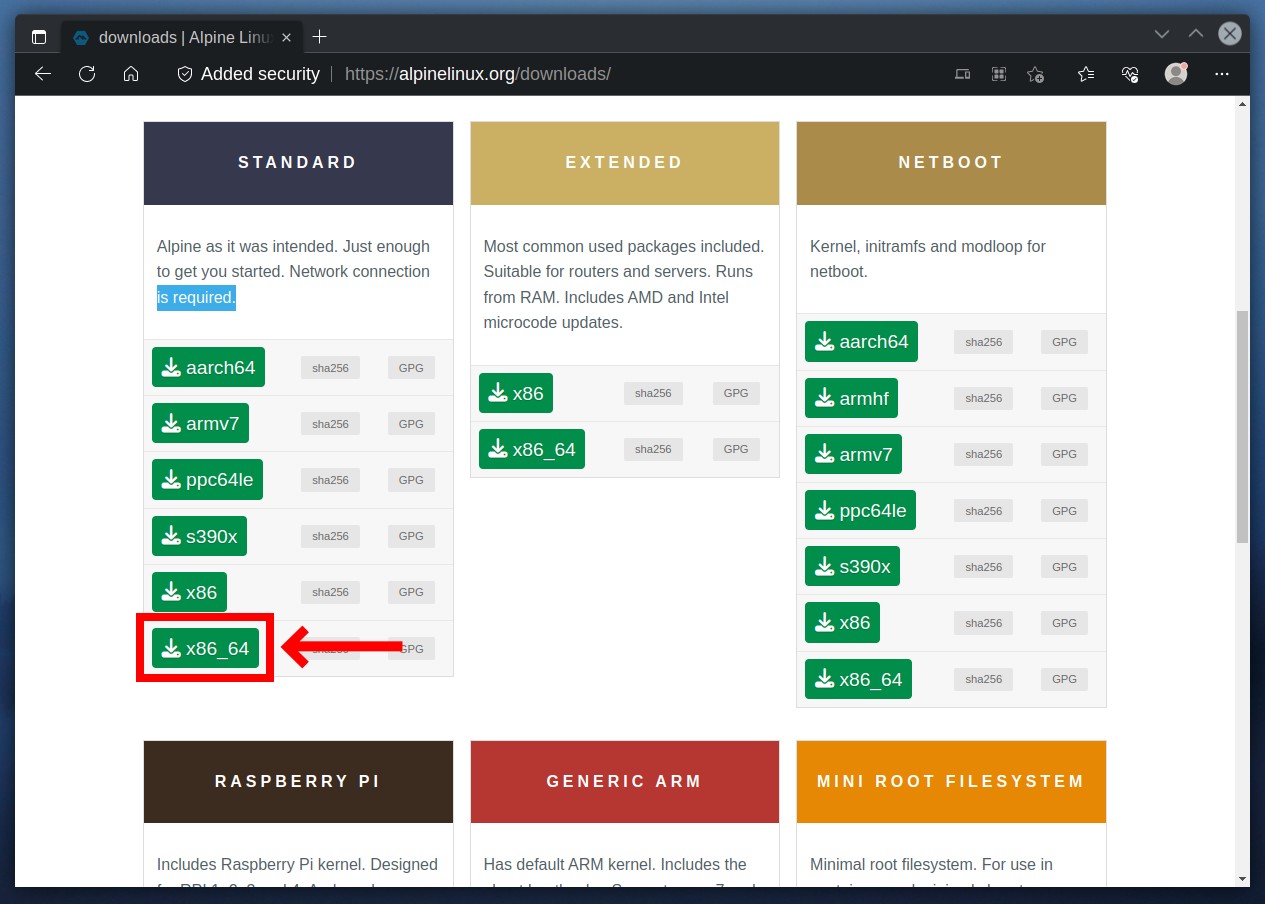
1. Download Alpine’s Installation ISO Image
The first step in Alpine Linux installation is, of course, to download the installation ISO image. Visit the download page at https://alpinelinux.org/downloads/ and click the “x86_64” button in the “STANDARD” section.
Wait for the download to complete. This should be done quickly, as the Alpine installation image is relatively small (under 200 MB).
2. Prepare Live Bootable USB
The next step is to prepare a live Alpine installation USB by writing the ISO you downloaded to it. There are many ways to do this, but one of the easiest is using the dd command.
Of course, if you choose to perform the Alpine installation in a virtual machine using software like VirtualBox or similar, you can skip this step and directly load the Alpine ISO there.
Because Alpine is a very light and minimalist Linux distribution (considering that we will add a desktop environment), installing it on a virtual machine with 2 GB of memory and 10 GB of disk space would be sufficient.
3. Boot Alpine’s Installation Program
Once you have booted into the Alpine ISO, you will be presented with the screen as one shown below.
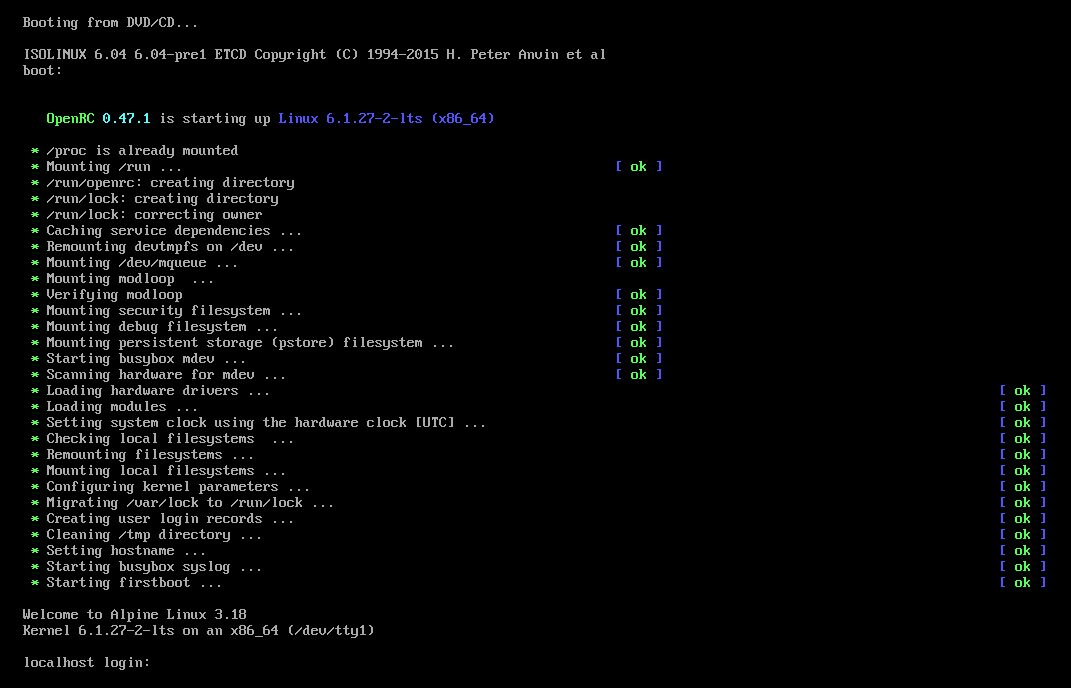
This is the time to clarify that Alpine Linux installation, like Arch or Slackware, is entirely terminal-based. However, this should not bother you because the actions are simple and detailed below.
4. Start the Alpine Linux Installation
Log in as “root.” The system will not prompt you for a password; you will be taken directly to the shell. Type “setup-alpine” and press “Enter” to begin the Alpine installation.
setup-alpine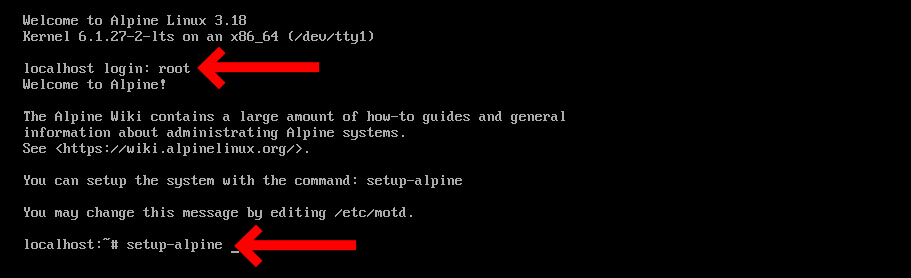
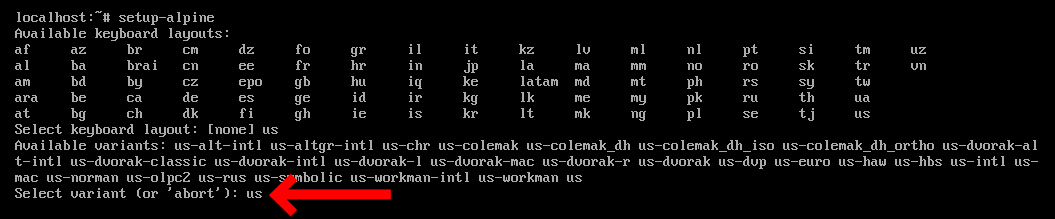
4.1 Setup Keyboard
The first step is to set up your keyboard layout. The various keymaps are available, so we will use the “us” that meets our needs. Of course, if you use another one, look for it in the list and enter the correct one.

Then select the keyboard variant. Here again, we choose just “us.”
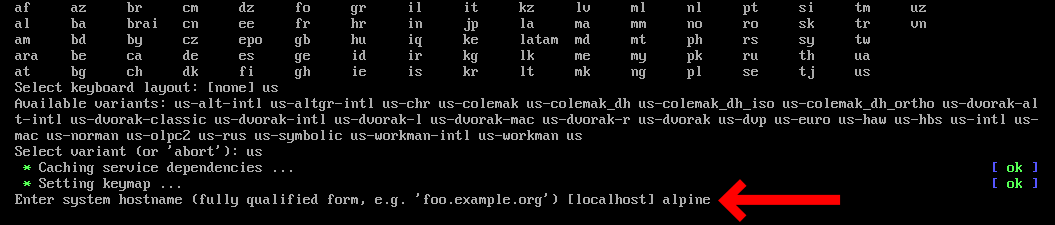
4.2 Set Hostname
Next, you need to set the hostname. We choose to use “alpine,” but you can type in another, then confirm by pressing the “Enter” key.
4.3 Set up Network Connection
It’s time to set up the network connection. Alpine Linux will try to detect your network interfaces automatically. It’s the “eth0 ” (in our case), so we confirm the selection by pressing “Enter.”

However, if your network interface is not identified automatically, you can type “?” for more information.
In the next step, you can manually set the IP address of your network interface. However, since we have DHCP, the default option for configuring it, we hit “Enter” once more to accept that option.

We answer “n” to the next question since we don’t want to make extra manual network interface configurations.

You should now have a properly configured network interface, so it’s time to move on to the next step.
4.4 Setting up Root Password
Set the password for the root user by entering it twice. Don’t worry that there is no regular user account set to use on your Alpine desktop system. We’ll add it a little later.

4.5 Set the Time Zone
Next, let’s configure the timezone. In our case, we will use “America/New_York.” To see your exact syntax, type “?” and you’ll be presented with a list of all available ones.
Accept the default “none” value to opt out of proxy configuration.

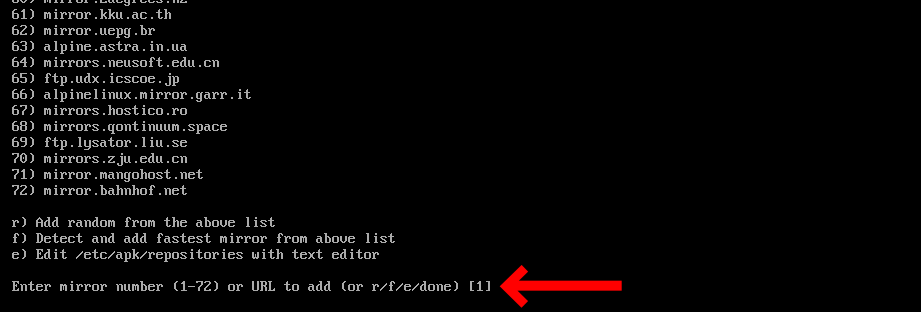
4.6 Select Alpine Linux Mirror
Choose the primary mirror that will serve as the software source for your Alpine system. Option 1 is our default, but if you prefer another, please provide its number.
4.7 Setup a Regular User Account
Enter the required information, such as username and full name, and set a password for the account that will operate your Alpine Linux desktop system.
Additionally, you can enter the SSH key for the newly created user account. Since we don’t have one, we choose the default value “none.”

4.8 Choose Secure Shell Daemon
Alpine offers two primary secure shell daemons – OpenSSH and Dropbear. The latter is simpler but has its key format, so we stick with the widely used OpenSSH. Hit “Enter” to accept the default value.

4.9 Disk Partitioning
Select the disk that will be used for your Alpine installation. In our case, this is “vda.”

You will be given to choose between several options on how the installation will be performed. Let’s take a look at them.
- System disk mode (sys): a traditional hard-disk install that creates three partitions on the selected storage device, “/boot,” “swap,” and “/” (the filesystem root). Most suitable for generic desktop machines.
- Data disk mode (data): This mode runs from system RAM but swaps storage, and the entire “/var” directory gets mounted from a persistent storage device. Helpful in having RAM-accelerated servers.
- Crypt: As the names suggest, you can set up an encrypted LUKS volume. You will be asked again for “sys” or “data” mode.
- LVM: Enable logical volume manager and ask again for “sys” or “data” mode.
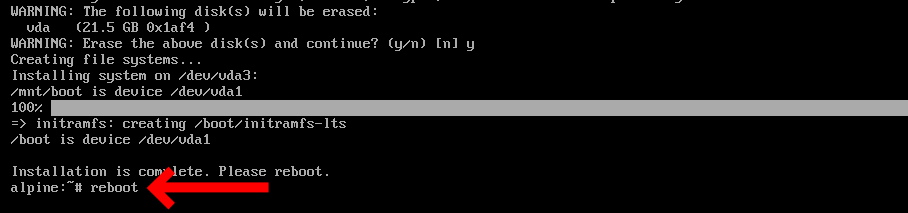
Since we are installing a desktop system, we select the “sys” mode and confirm by hitting “Enter.”

The installer will warn you that all information on the disk will be erased. Type “y” and hit “Enter.”

The installation will take up to a minute. Once complete, reboot the system.
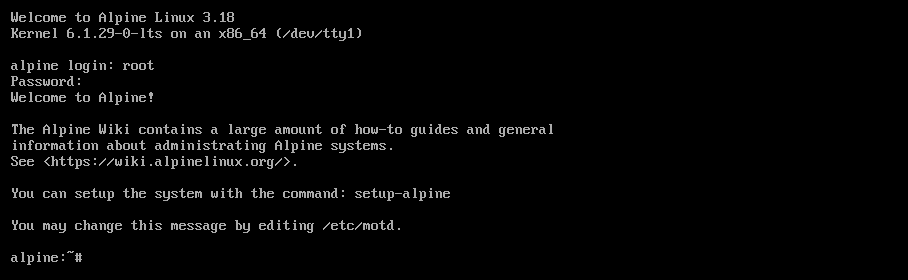
Your newly installed Alpine system will load. Log in as user “root” and use the password you set during installation.
5. Post Installation Steps
We will perform simple actions to make our newly installed Alpine system more user-friendly and software-rich.
Edit the “/etc/apk/repositories” file and remove the comment (#) before the community repository line to enable it. Then, save the file and exit.
vi /etc/apk/repositories
It contains software made by users in teams with Alpine’s developers and is well-near integrated with the Alpine packages.
Next, we’ll install a Bash shell (which isn’t installed by default) and the “sudo” command. Finally, we’ll add our user to the “wheel” group so that we can execute commands with root privileges and set his default shell to Bash.
apk add bash bash-completion sudo shadow
echo '%wheel ALL=(ALL) ALL' > /etc/sudoers.d/wheel
adduser linuxiac wheel
usermod -s /bin/bash linuxiacCode language: JavaScript (javascript)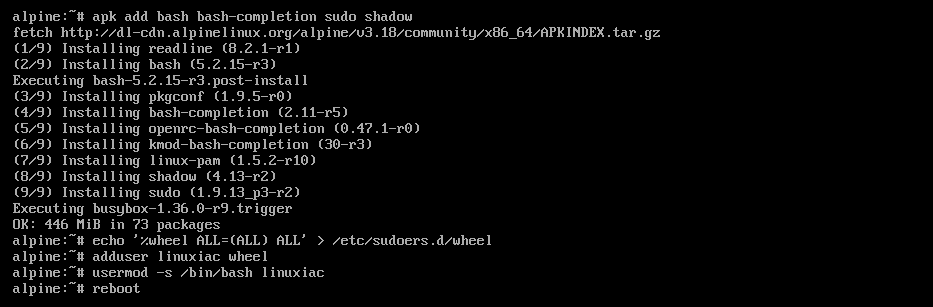
Finally, reboot the system.
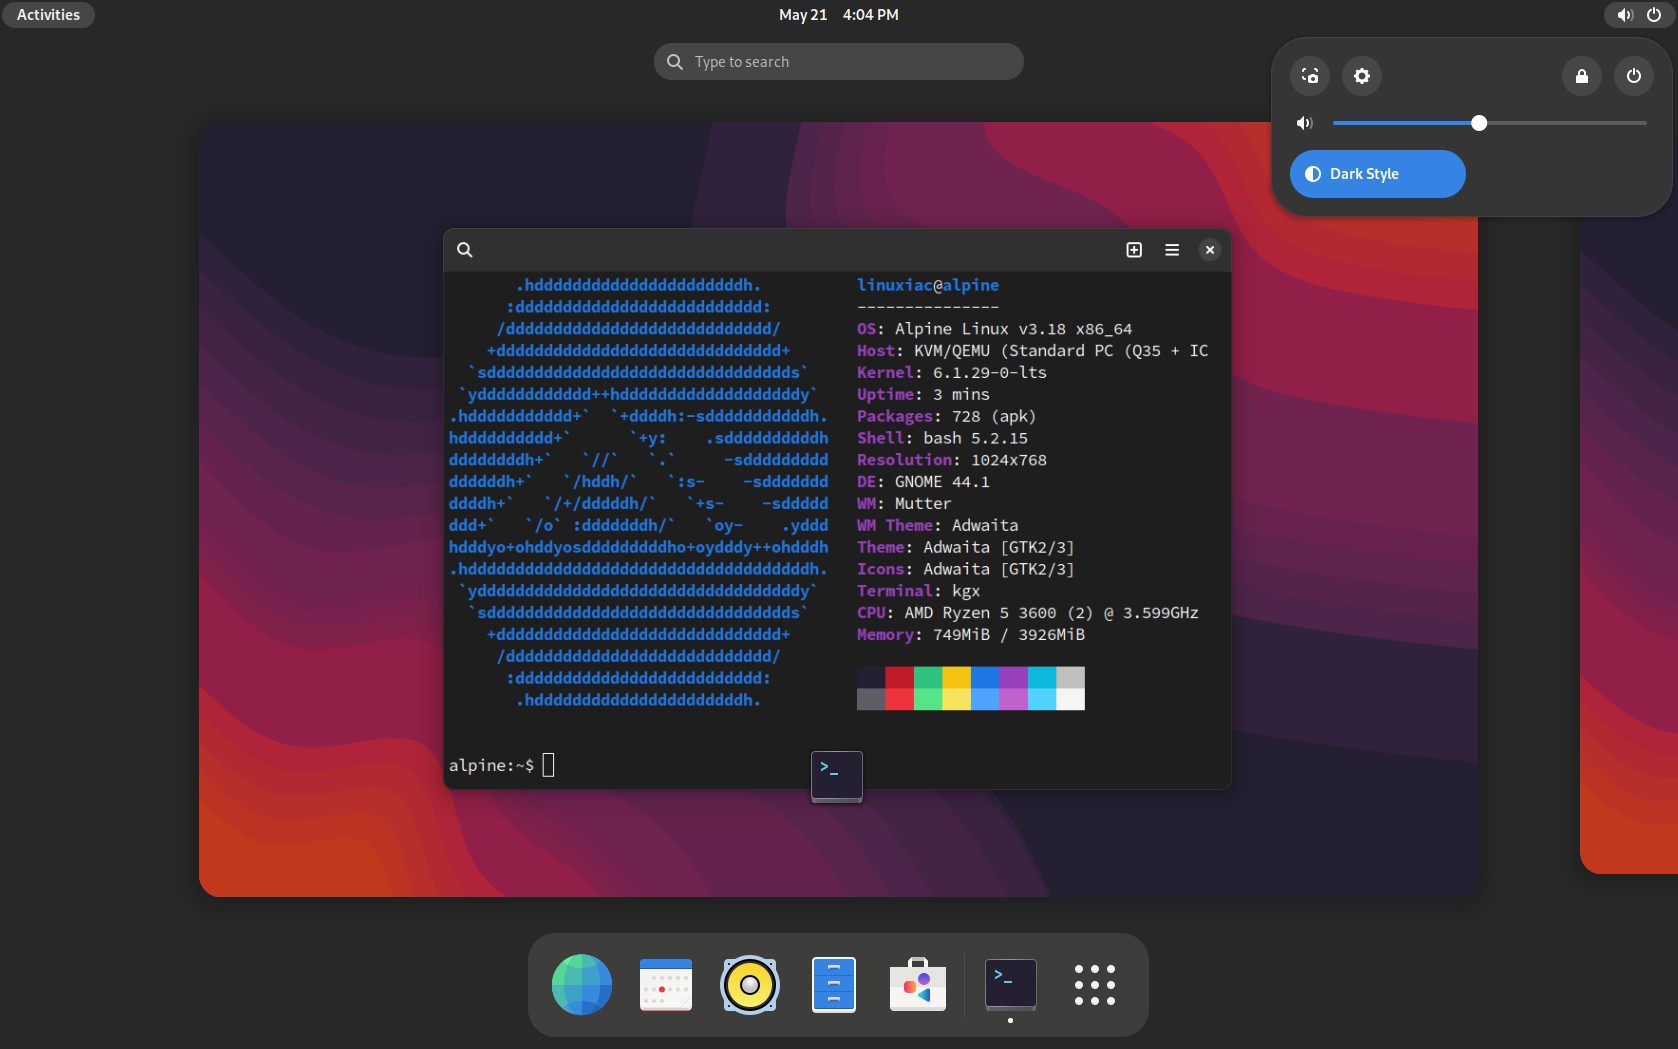
6. Install Desktop Environment on Alpine Linux
Here’s where APK, Alpine Linux’s trusty package manager, steps into the spotlight. If it’s new to you, we highly recommend getting acquainted with it before diving into the commands below.
Don’t worry; we’ve made this easy for you with our comprehensive and user-friendly guide, “Alpine User’s Guide to APK: How to Manage Packages.” It’s a great starting point for your journey with the apk command. Now, back to the topic.
Once the base Alpine system is installed, we can move on to the next step – installing the desktop environment. We’ll show you how to install three of the most popular ones, KDE Plasma, GNOME, and Xfce, so you can choose the one you prefer.
But first, however, we need to prepare the system for the desktop environment.
6.1 Setting up X-Window
Alpine Linux provides users with the “setup-xorg-base” command. This standalone script automatically configures a graphical environment, installing basic Xorg packages and udev, and is also required for Wayland sessions. Type the following command:
setup-xorg-baseAll the packages needed to run the desktop environment will be automatically installed.
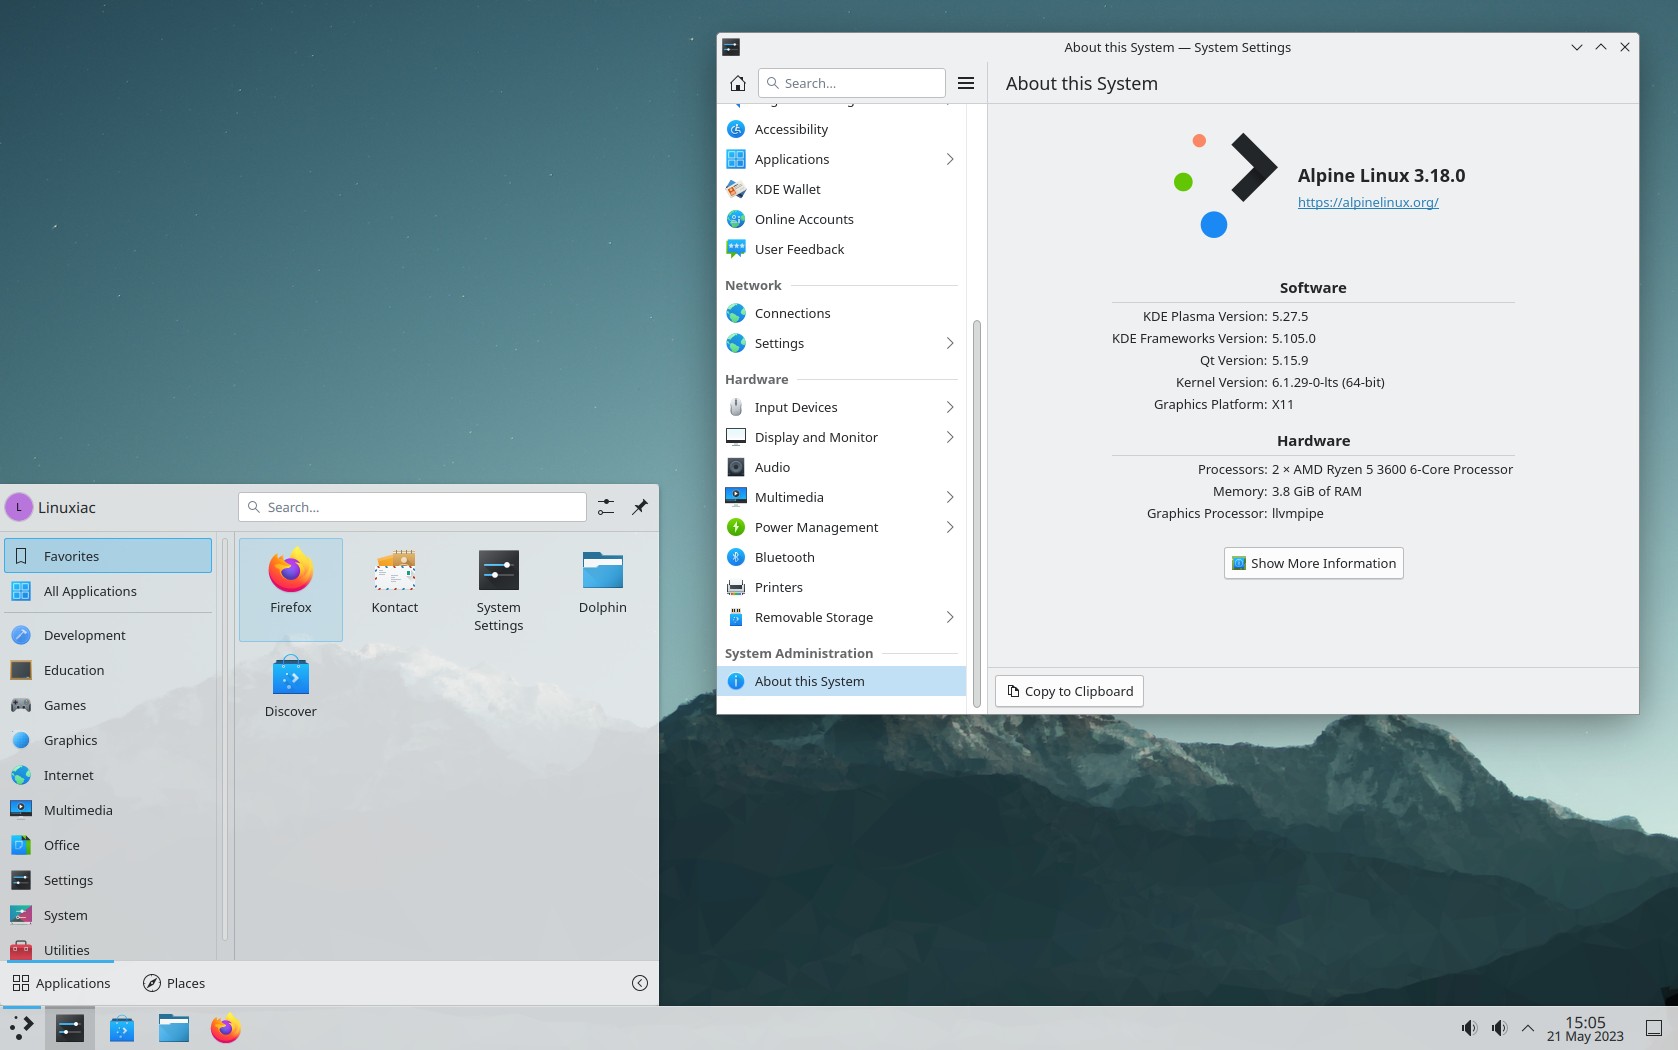
6.2 Install KDE Plasma on Alpine Linux
KDE Plasma is a desktop environment that provides a user-friendly and customizable interface for Linux-based operating systems. It is known for its modern and visually appealing design, flexibility, and extensive customizability.
Enter the following command to install the Plasma desktop on your Alpine Linux system.
apk add plasma elogind polkit-elogindThis will install the Plasma desktop, as specified by the “plasma” meta package, the SDDM display manager, and other goodies.
Please remember that this will only install the base Plasma desktop environment.
Suppose you want to add any of its many applications to enjoy its full power. In that case, you must install some of the Plasma metagroups packages shown below using Alpine’s APK package manager.
- kde-applications-accessibility
- kde-applications-admin
- kde-applications-base
- kde-applications-edu
- kde-applications-games
- kde-applications-graphics
- kde-applications-multimedia
- kde-applications-network
- kde-applications-pim
- kde-applications-sdk
- kde-applications-utils
- kde-applications-webdev
Or you can use the command below to install them all at once, which is the approach we will use.
apk add kde-applicationsLet’s install the Firefox browser now because the Plasma desktop doesn’t have one by default.
apk add firefoxInstall additional fonts to make working with the Alpine system more visually pleasing.
apk add font-terminus font-inconsolata font-dejavu font-noto font-noto-cjk font-awesome font-noto-extra font-liberationFinally, set the SDDM display manager automatically to start on boot and reboot the system.
rc-update add sddm
reboot
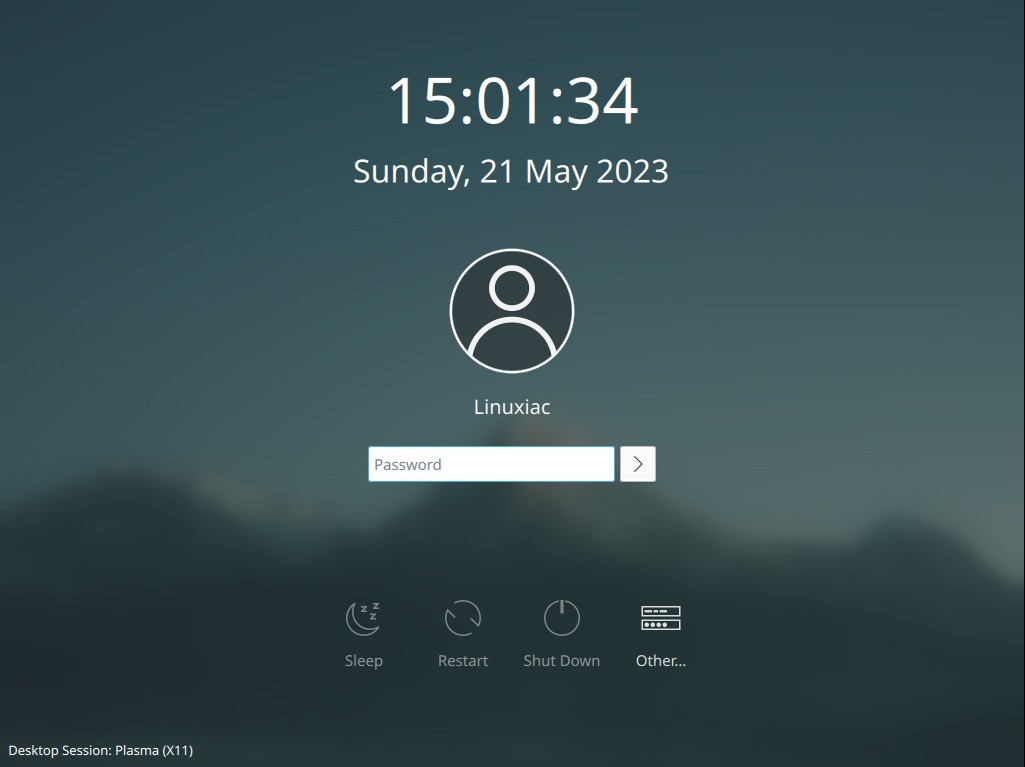
After the restart, you will be greeted by the SDDM login manager. Enter the username and password for the user you created earlier and enjoy the KDE Plasma desktop.
6.3 Install GNOME on Alpine Linux
The GNOME desktop environment is easy to install on Alpine Linux. First, run the command below to get a basic GNOME installation.
setup-desktop gnomeOnce all packages have been downloaded and installed, perform the following command to allow GNOME Software to manage APK packages:
rc-update add apk-polkit-server defaultCode language: JavaScript (javascript)Add some additional fonts for a more visually pleasing GNOME experience.
apk add font-terminus font-inconsolata font-dejavu font-noto font-noto-cjk font-awesome font-noto-extra font-liberationFinally, install the Firefox web browser and reboot the system.
apk add firefox
reboot
The GDM login manager will greet you. So log in and enjoy GNOME.
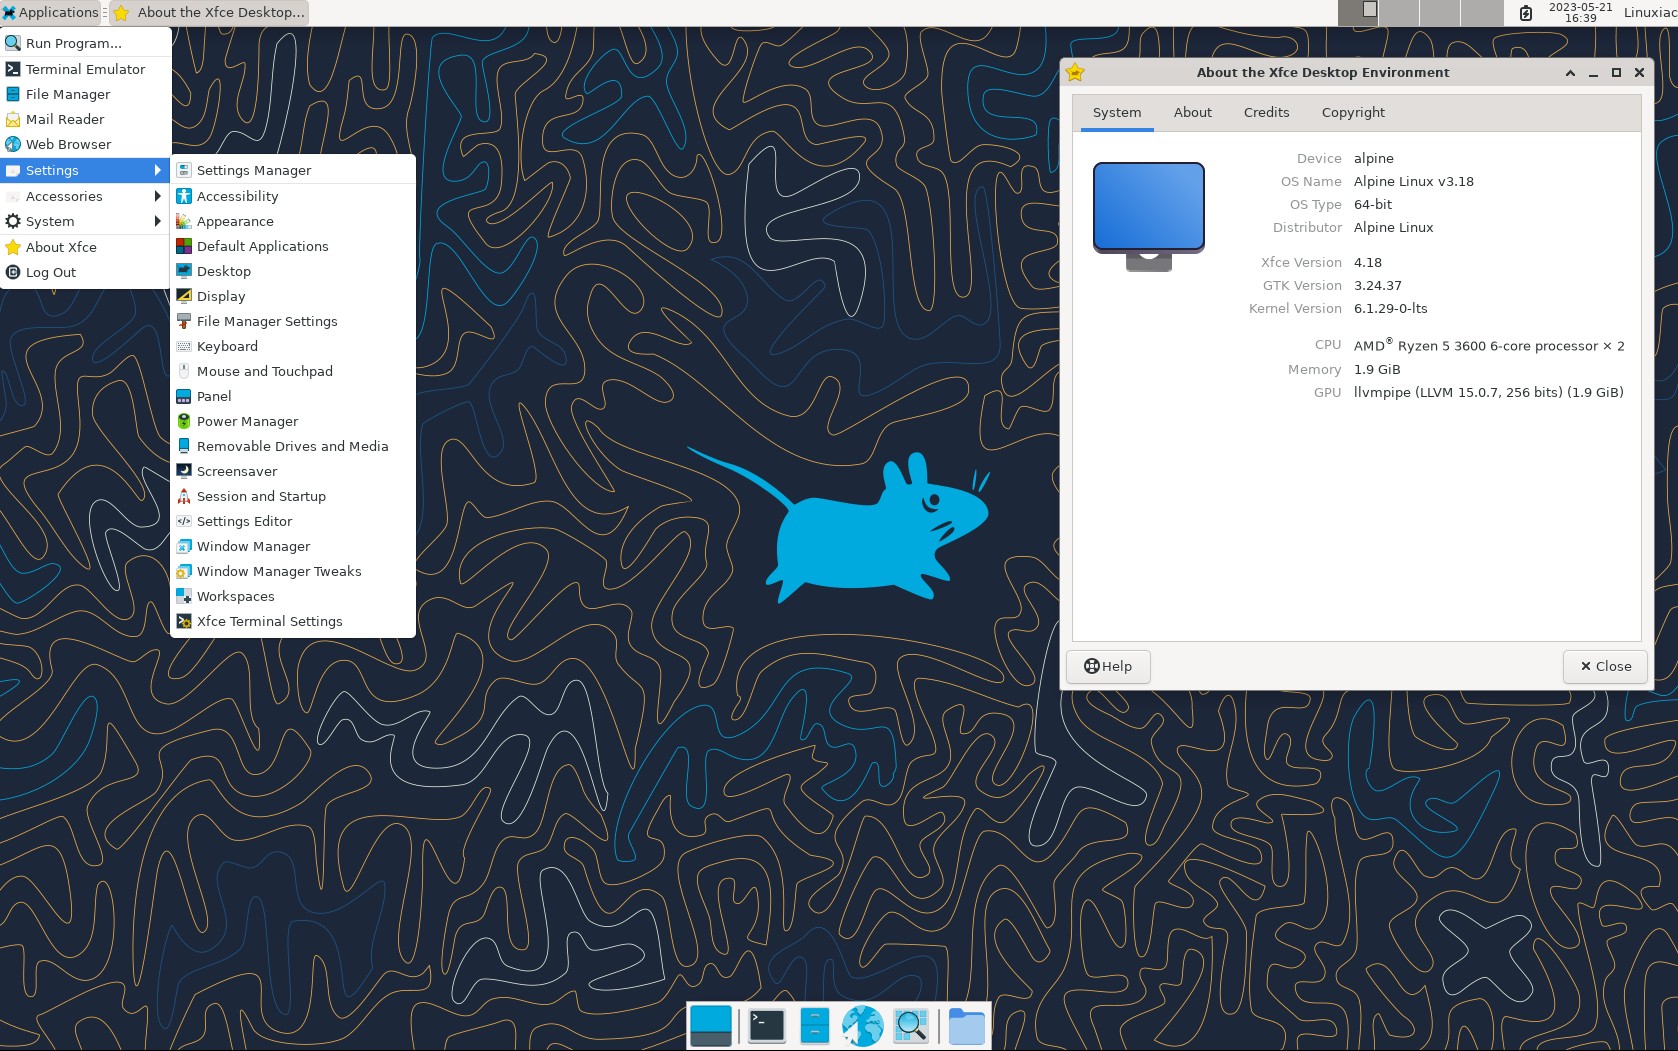
6.4 Install Xfce on Alpine Linux
Xfce is lightweight, efficient, and visually appealing while using minimal system resources desktop environment, so it’s a perfect match for your Alpine system. Here’s how to install it.
First, execute the following command to install the basic Xfce desktop, LightDM login manager, and Firefox:
apk add xfce4 xfce4-terminal xfce4-screensaver lightdm-gtk-greeter dbus firefoxNext, install some additional fonts:
apk add font-terminus font-inconsolata font-dejavu font-noto font-noto-cjk font-awesome font-noto-extra font-liberationEnabled LightDM and D-Bus services to start up on boot automatically:
rc-update add dbus
rc-update add lightdm
And finally, reboot the system:
rebootThe LightDM login manager will greet you, and after logging in, you will experience one of the fastest-running systems you have ever encountered.
Install, Remove, and Update Packages with APK on Alpine Linux
APK (Alpine Package Keeper) is Alpine’s package manager, allowing users to search, install, remove, and update software on Alpine-based systems.
Below is a quick guide on how to use it, which, as you’ll see, is very easy. Moreover, if you have previous experience with other package managers such as APT, DNF, or Pacman, you’ll immediately feel at home with APK.
Search for Packages
apk search <package_name>Code language: HTML, XML (xml)Install Packages
apk install <package_name1 package_name2 ...>Code language: HTML, XML (xml)Remove Packages
apk del <package_name1 package_name2 ...>Code language: HTML, XML (xml)Update/Upgrade System
apk update
apk upgrade
Cleaning Cache
apk cache cleanConclusion
Installing Alpine Linux and setting up a desktop environment is a straightforward process that provides a lightweight and secure operating system for various purposes.
Following the steps outlined in this guide, users can enjoy the benefits of Alpine Linux’s minimalistic design and efficient resource utilization. In addition, the distro offers a reliable and secure foundation, whether for a lightweight server, a desktop, or a development environment.
To learn more about Alpine, check out the official documentation or visit the project’s website.
So, what do you think of Alpine? Feel free to express your opinion or ask questions in the comments below.


Thanks, it was helpful!
For Xcfe, there's a problem with the greeter that doesn't take the keyboard layout into account. This is quite a common bug with lightdm.
You have to edit /usr/share/X11/xorg.conf.d/10-quirks.conf (for example) and add
(where "fr" must be replaced with your keyboard rule, that you can find in /usr/share/X11/xkb/rules/base.lst)
Alpine can be fast, but it's a real pain to configure. There's not even a man nor the base documentation, at the beginning, so you have to painstakingly install all the *-doc packages you can find – some are unavailable – and install other basic tools like a decent bash (the default is old sh), sudo, etc., and configure them.
Using it with VirtualBox is even more tedious if you want the guest additions. I could finally mount the shared folders, but I gave up on the auto-resize feature of the vbox window. The fact is, there isn't much documentation except for the simple things. The OS is obviously rather meant for embedded devices and containers. On the other hand, it's streamlined and rather quick to start.
I forgot. Good luck with the numlock – another long-time bug in Linux distros with VirtualBox. The "restore num lock state on startup" option of the keyboard panel is ignored.
If you want numlock to behave normally with VirtualBox, the easiest is to type this command (assuming you're either in the VirtualBox installation directory or set the path to it):
where "machine-name" is the name of your virtual machine, as you see it in VirtualBox.
That happened to me at first. I had to switch from Wayland to X11. It worked fine after that.
I have installed both KDE and Gnome. How do I easily switch between them during login?
XFCE works if you use the `setup-desktop` script as mentioned in the Alpine wiki. You can use it to install Gnome, KDE and Mate as well.
XFCE instructions do not work. Blank screen.
dropping to cli shows xserver connection refused.
Seems this setup instructions are no longer correct or maintained (note same fault in previous posters)
The KDE instructions didn’t work. I just get a blank screen.
Hi. After intalation xfe4 or another Shell 3 monitor do not display screen (input not supported). How to change display properties or enter to safe mode?
Best regards
Simon
Is it possible to install from Wifi? I tried APK in the ASH install shell but no luck. I did something similar with Arch. Thanks
Hi Bob!!!
I’m tried to install wayland as graphic server, and flwm as desktop, and I tried;
“apk add wayland”
“apk add wayland-utils”
“apk add flwm”
But,… I still can’t start wayland as a server,… and I can´t run flwm (Message “Can´t open display”),… I missed something,… right?,… but,… what?
(Alpine Linux v3.19 Standard x86_64)
Thanks!!!
i have an alpine vm (4.19.84-0-virt #1-Alpine SMP Wed Nov 13 09:52:17 UTC 2019 x86_64 Linux
) i want to upgrade it offline is there any ways to do it.
I was experimenting with different desktops (plasma, xfce4) using setup-desktop.
Now that I have a preference (xfce), I’m looking to remove the plasma desktop and all it’s packages that are not required by other system components.
So far, my search resulted in little information on cleanly removing a desktop environment.
Any suggestions?
Hi and thanks for your help .
My question to you for help is . Post Installation Steps
We will perform simple actions to make our newly installed Alpine system more user-friendly and software-rich.
Edit the “/etc/apk/repositories” file and remove the comment (#) before the community repository line to enable it. Then, save the file and exit.
How do you remove the # . I am very new to Linux and probably picked a too hard for a new user but i just can’t work out how . I probably made a mistake in setup . I am using a Macbook Pro running a virtualbox trying to add a desktop to Alpine . I have installed xfce from your instructions, but really would like to install kde plasma .
Hi Alan,
The thing to do is to open the file in question (“/etc/apk/repositories“) with a terminal text editor such as nano.
nano /etc/apk/repositoriesIf you don’t have it (the nano text editor), you can install it by running as root the following command:
apk add nanoOnce you open the file, you will see that the line looks like this:
#http://dl-cdn.alpinelinux.org/alpine/v3.18/community
The goal is to make it look like this:
http://dl-cdn.alpinelinux.org/alpine/v3.18/community
by removing the “#” symbol at the beginning of the line, which is a comment symbol, so anything else after it is ignored. By removing it, the repository is now taken into account by the OS.
Best,
Bobby
There is a mistake, it’s not rc-service add sddm it’s rc-update add sddm
Hei Bob, I tried install Alpine xfce4 on My old Acer laptop 32 bit. No gui interfaces appears only cli login, if I run startx nothing only error message no X server Available. Can I fix it? Thanks for reply. Sincerly, Henry.
That is exactly the issue since 4 years minimum. I was hoping, that somebody eventually finds out and posts an solution to that obvious fault. In 64bit machines the graphical login manager works, as it should. But not on 32bit machines.
I tried everything I found – and I had some success a few years ago with plasma. but unfortunately I forgot about it – and I thought: surely today people fixe this flaw and it is written about it. I suppose I am still naive…