
Slackware is the oldest actively maintained Linux distro. Its first release dated back in July 1993, almost 29 years ago. But what’s really amazing is that even after 29 years, Slackware is still Slackware. I mean that the installation process and wizard appear to be the same. The method of operation remains unchanged.
So, Slackware is a fantastic Linux distro, but many people do not use it since it is difficult to install. Moreover, you will often hear that this is a distro targeted the advanced Linux users.
Well, I will not argue whether this is true or not. But I will show you how easy it is to install Slackware Linux and get started with it. So let our Slackware installation journey begin.
Step 1: Download the Slackware Installation ISO Image
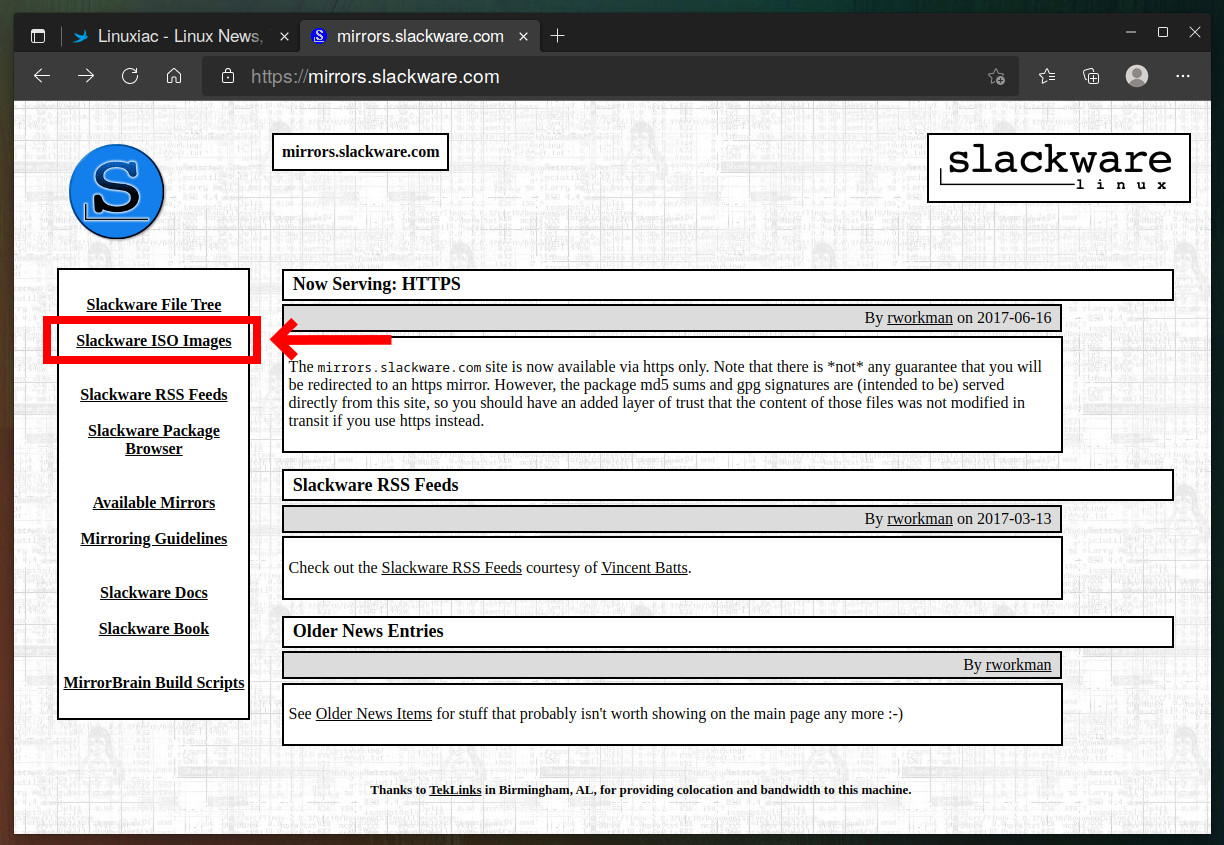
As we informed you, Slackware 15.0 was recently released, so the first step is to get the installation ISO image file. First, visit the Slackware Linux download page at https://mirrors.slackware.com and click on the menu link on the left, “Slackware ISO Images.”
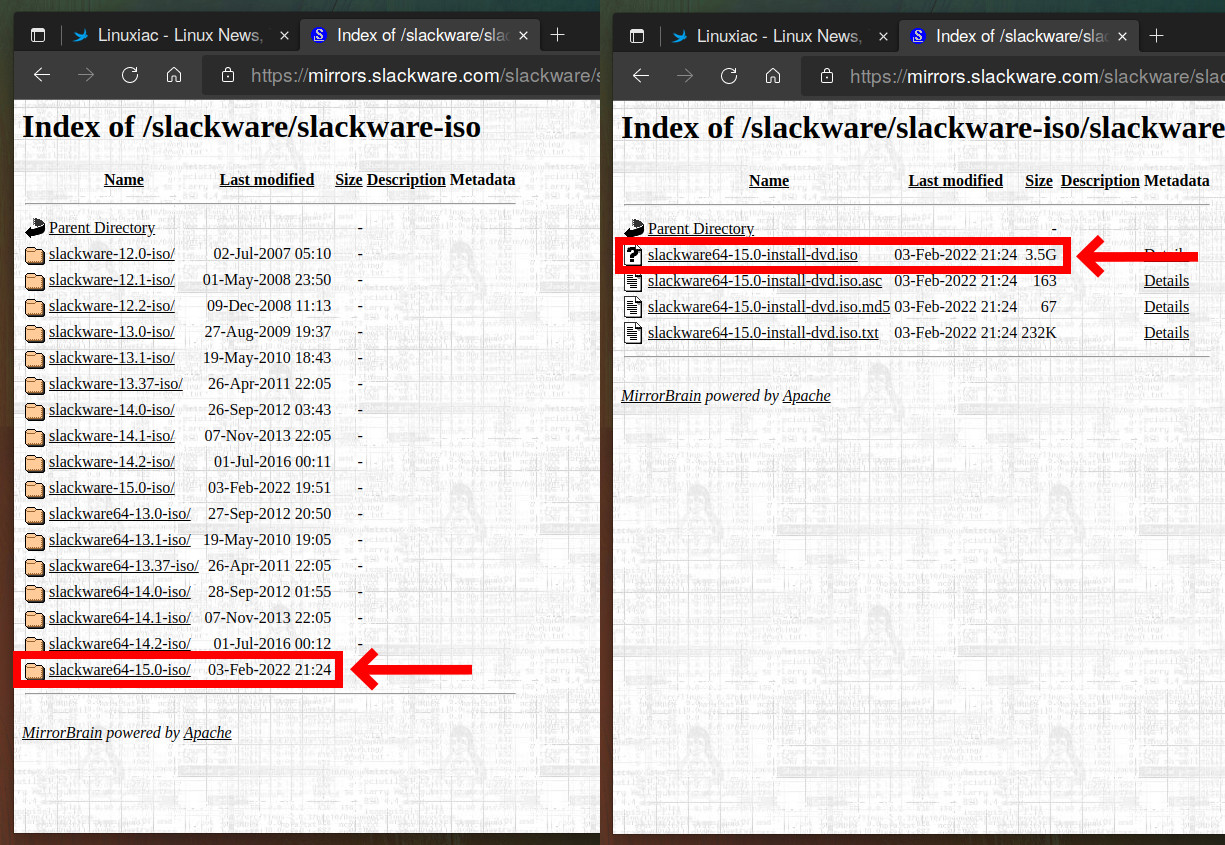
You will be taken to a page containing Slackware releases for the last 15 years. Click on the folder containing the 64-bit version of Slackware 15 and download the slackware64-15.0-install-dvd.iso installation ISO image.
Since the file is large, 3.5GB, I recommend downloading it with a tool like wget. To do this, run in your preferred terminal emulator:
wget https://mirrors.slackware.com/slackware/slackware-iso/slackware64-15.0-iso/slackware64-15.0-install-dvd.isoCode language: JavaScript (javascript)Step 2: Prepare Live Bootable USB
Once your Slackware Linux ISO file finishes downloading, you will have to create a live USB of Slackware Linux from the ISO you just downloaded. There are many ways to prepare a live USB, one of them is by using the dd command.
Alternatively, you can use applications such as Etcher or Ventoy, which are also good options for creating a bootable USB drive.
Step 3: Boot Slackware 15 Live USB
Once you have created a live USB for Slackware Linux, shut down your computer, plug the USB into it, and boot your system.
Please keep in mind that you may not be able to boot from the Live USB with Secure Boot enabled. Instead, you’ll need to enter the UEFI menus and disable Secure Boot since Slackware does not currently work if Secure Boot is enabled.
But before we move on to the installation process, let’s say a few words about the Slackware installer itself.
The distro does not offer a graphical installer that most Linux users are used to these days, but only a text-based one. But don’t panic because the installation program itself is a step-by-step process. In fact, it is effortless once you understand it.
Step 3.1: Boot Into Installation Program
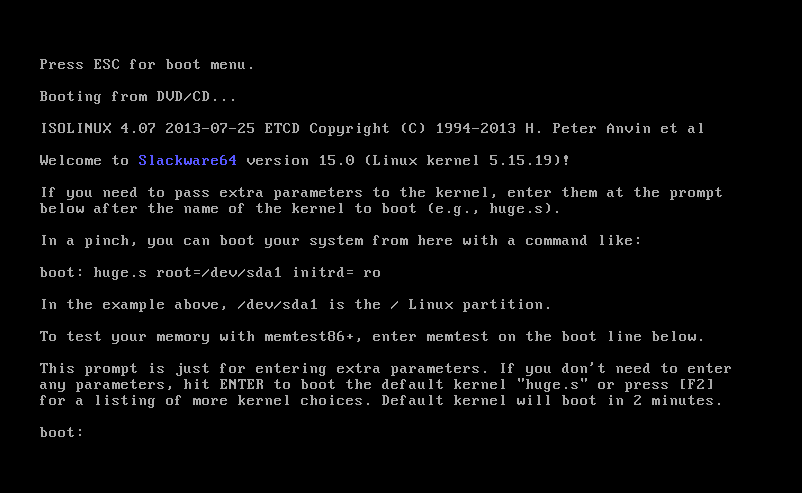
So, once you have correctly booted into the Slackware ISO, you should see something similar to the image shown below. Press Enter to continue.
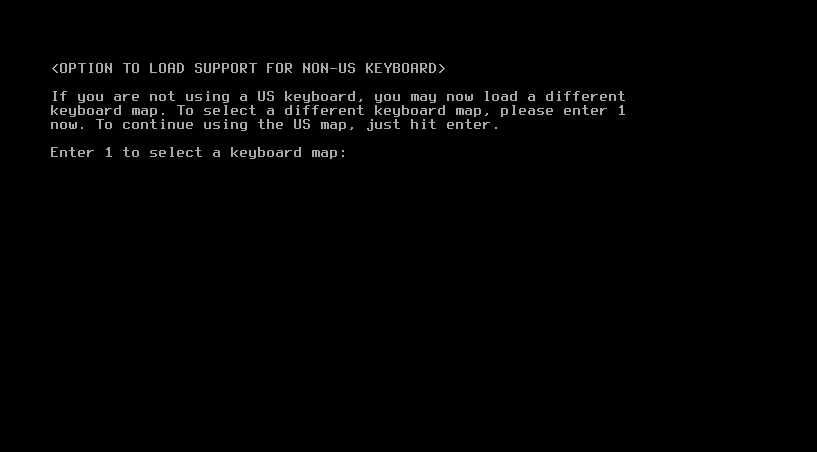
Step 3.2: Select Keyboard
Suppose you want to select a different keyboard from the US; press 1 to select it. However, since the default US keyboard mapping is what we want, we press Enter to accept the default suggestion and move on.
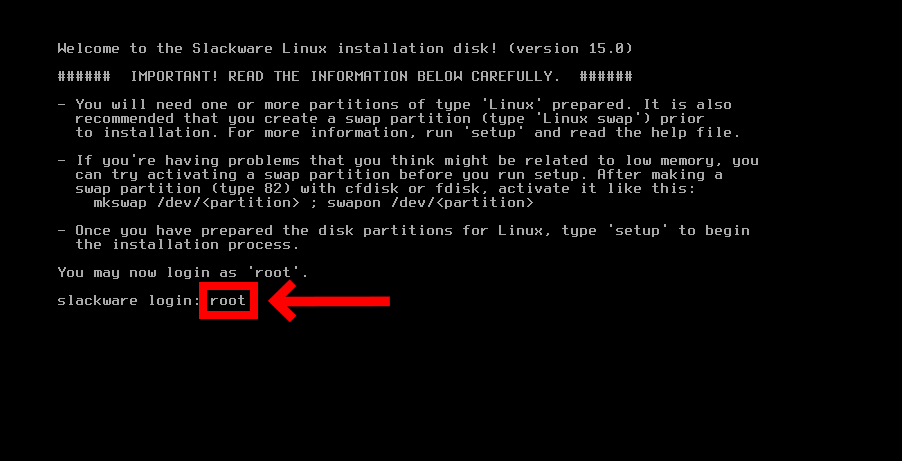
Step 3.3: Logging Into the Installer
Now that the default keyboard layout has been selected, Slackware displays the login screen. Type root and press Enter to proceed to the next step, which is disk partitioning.
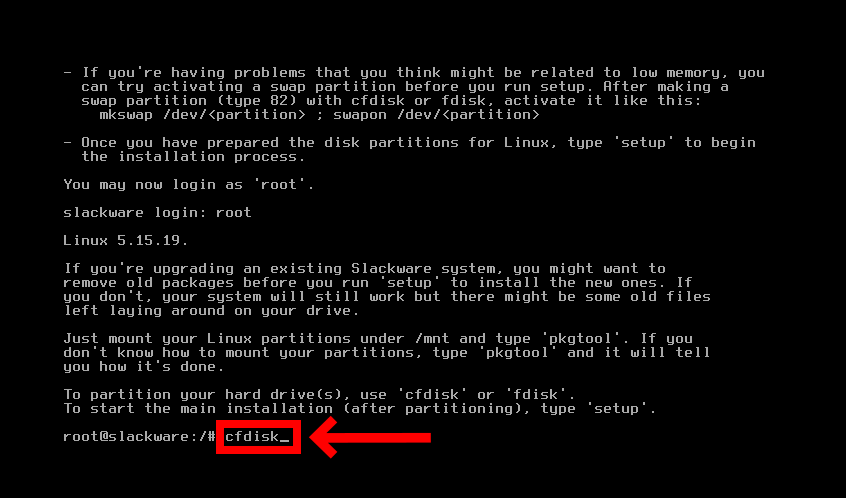
Step 4: Disk Partitioning
Now you need to partition the disk before running the setup program. Type cfdisk to open up the partition manager.
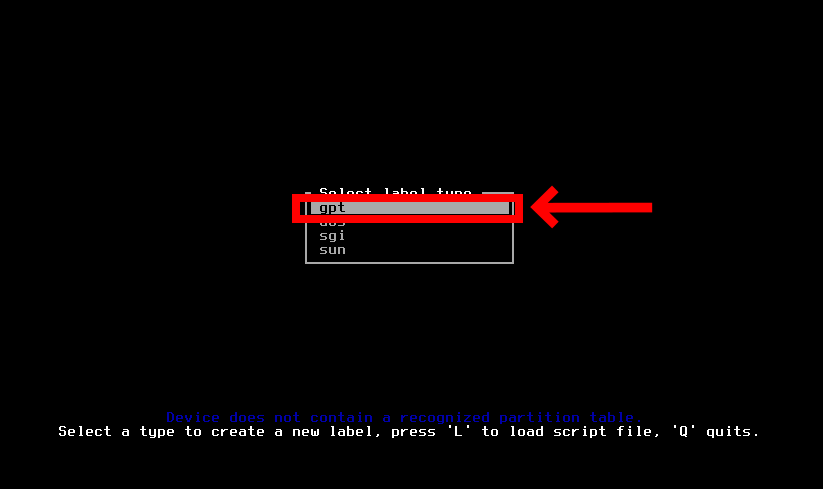
Select gpt and hit Enter to proceed.
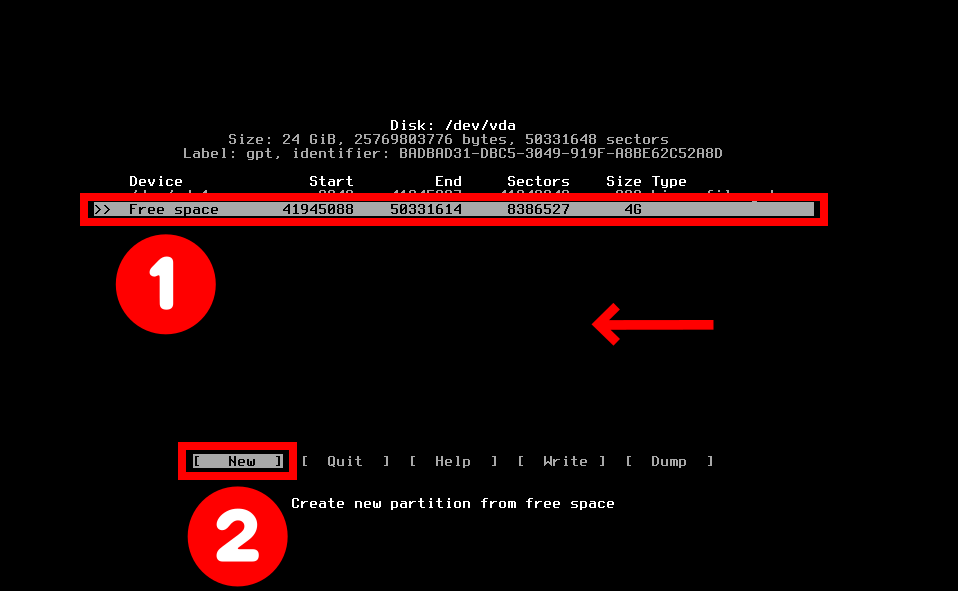
Step 4.1: Create Root Partition
Then select Free Space and hit on New from the bottom menu. You can navigate through the menu options using the Tab or arrow keys.
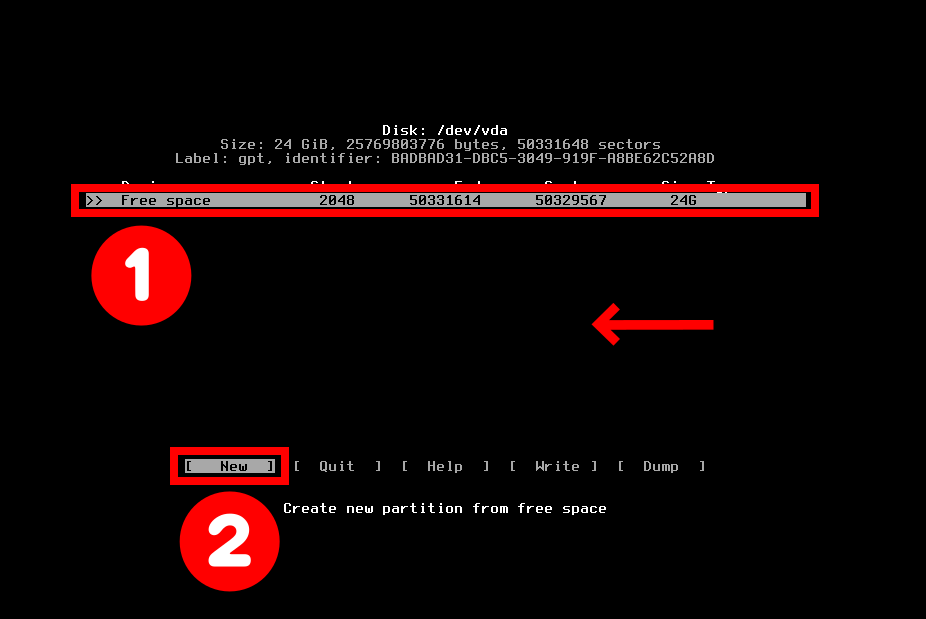
Use the partition manager to create a Root (/) partition. Give the space you want, for example, 20GB (20G), and press the Enter key.

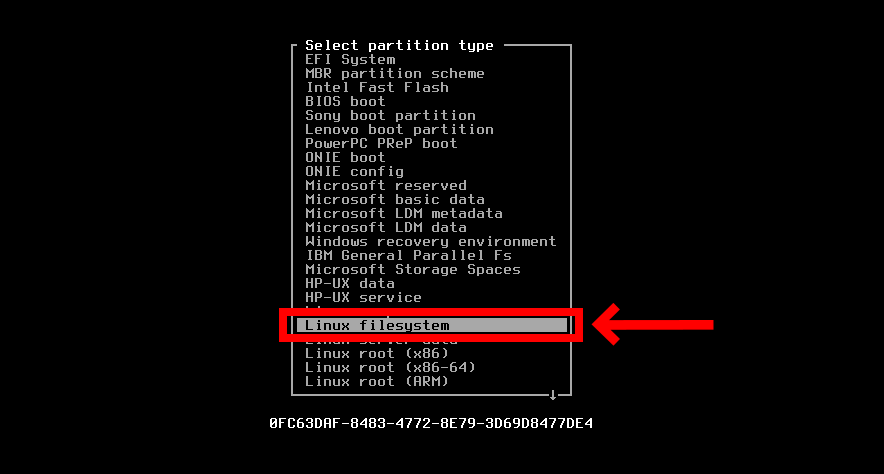
Select Type from the bottom menu with the /dev/vda1 partition still selected.
Note: In your case, the partition may have another name such as /dev/sda1, /dev/sdb1, etc. This is not a problem and should not worry or confuse you.

Use the up and down arrow keys to select Linux filesystem as type and hit Enter.
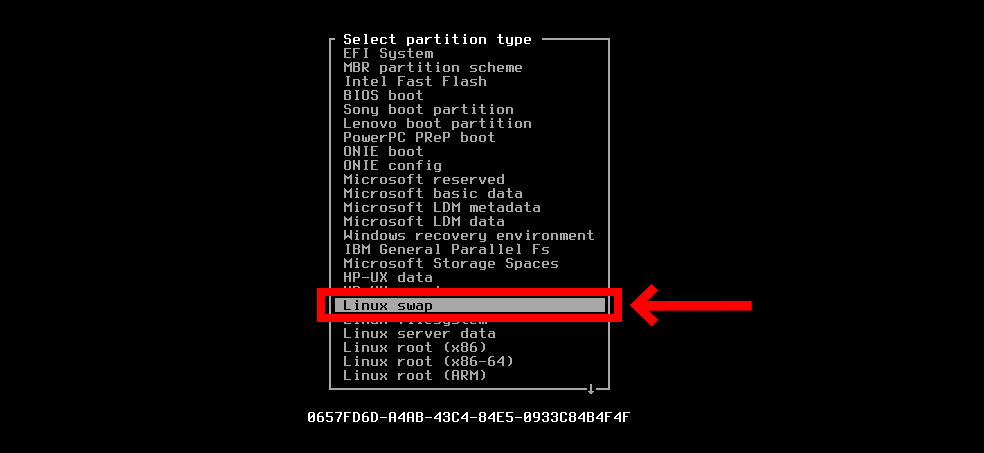
Step 4.2: Create Swap Partition
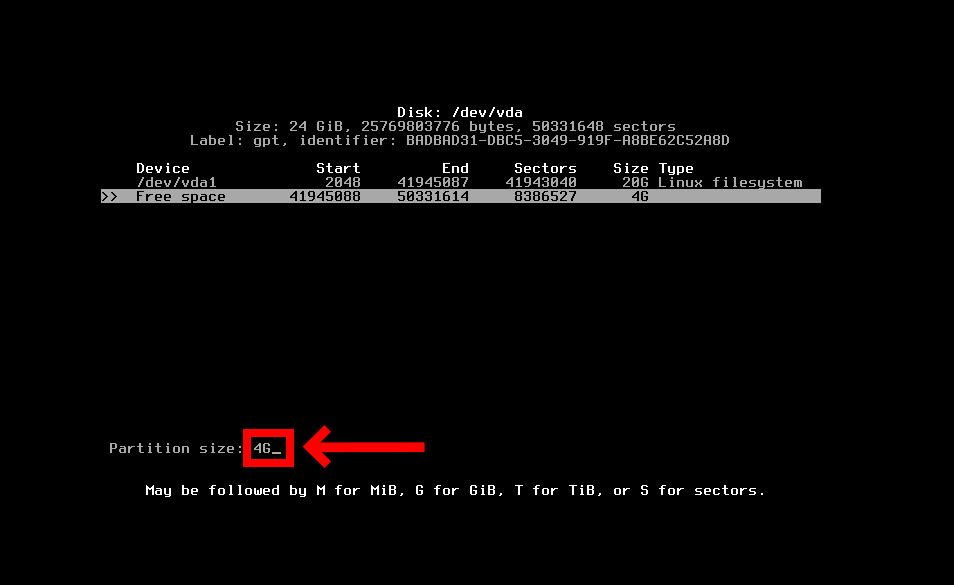
Now let’s create the Swap partition using the same procedure. Select the remaining Free space again and hit on New.
Type the partition size in GB (4G) and press the Enter key.
Select Type from the bottom menu with the /dev/vda2 partition still selected.
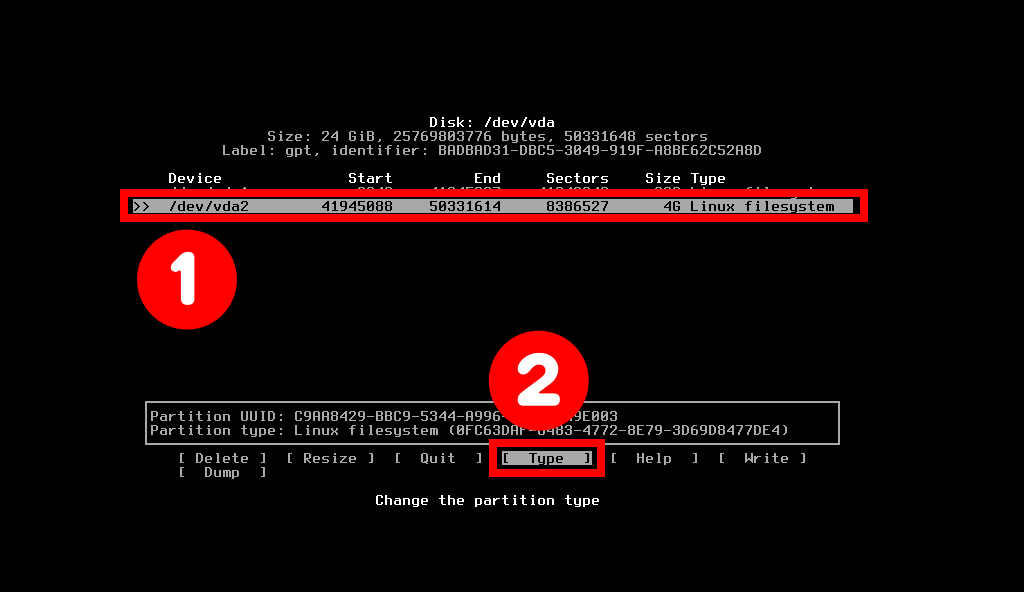
Use the up and down arrow keys again to select Linux swap as type and hit Enter.
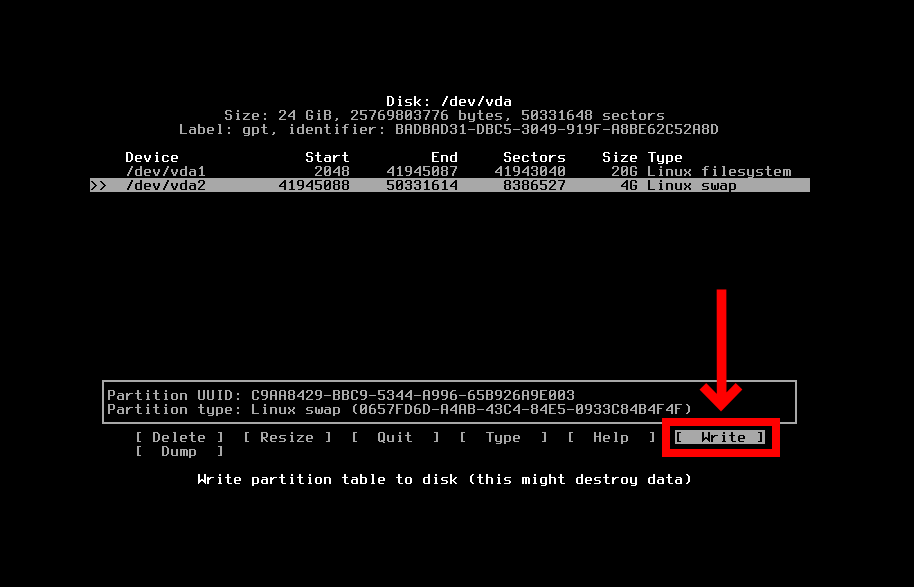
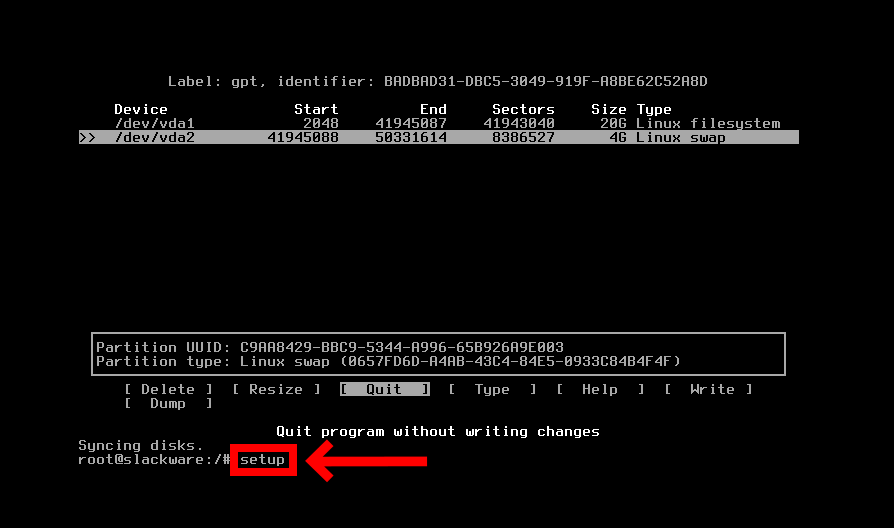
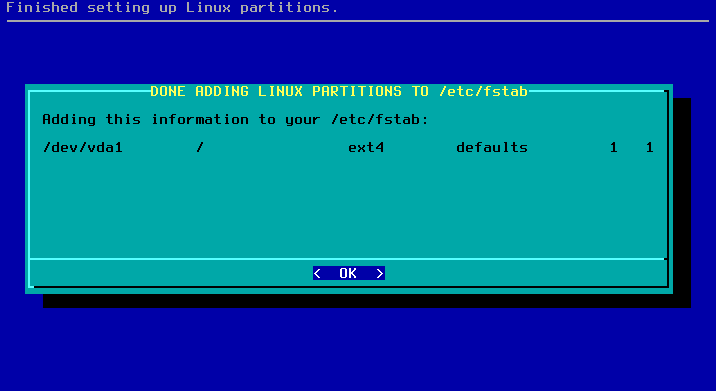
Step 4.3: Write Changes to Disk
Now it’s time to save the changes to the disk. Select the Write option and hit Enter.
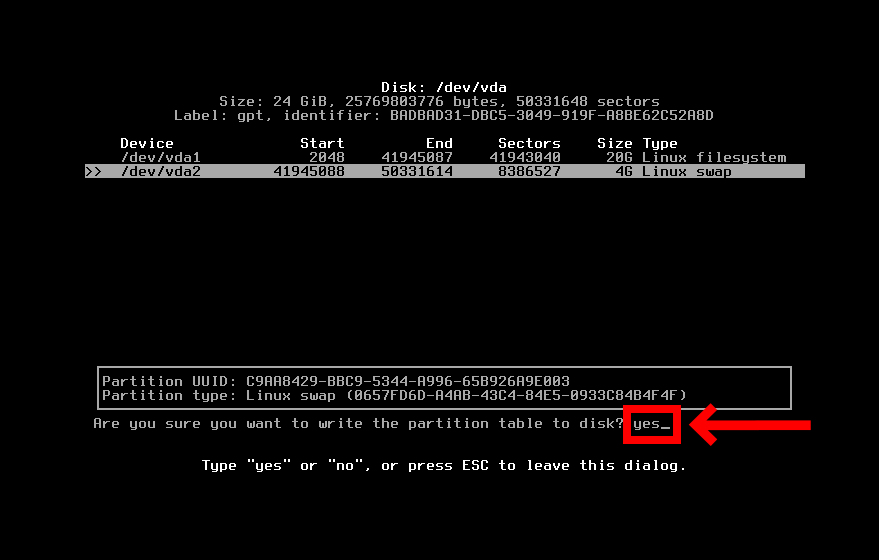
Type yes and press the Enter key.
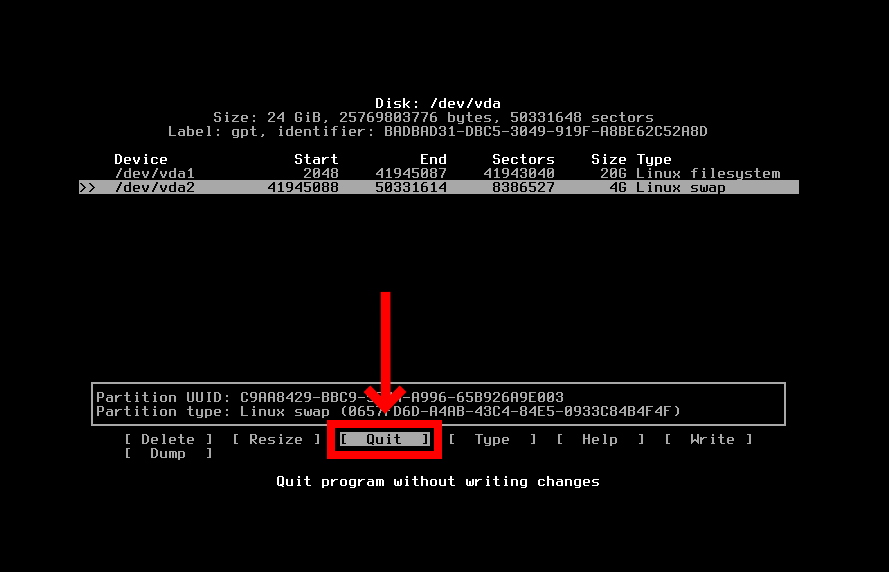
Finally, we’re done here. Select Quit and press Enter to do so.
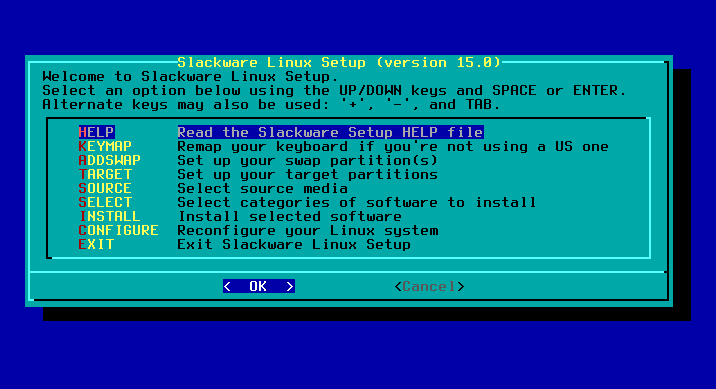
Step 5: Launch Setup Program
Now that your partitions are ready, launch the Slackware installer by typing setup and pressing Enter.
You will be greeted by the screen shown in the image below.
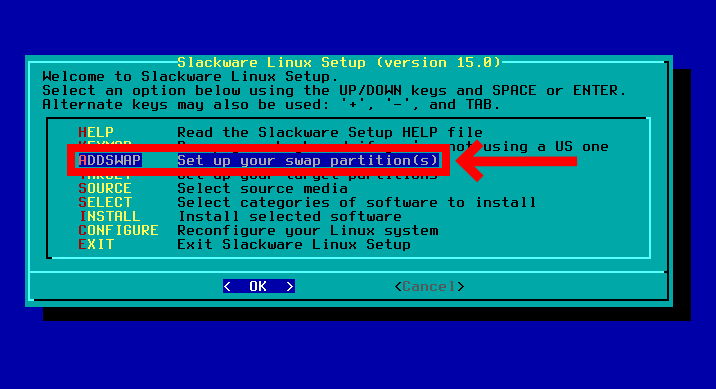
Step 6: Setting Up Swap Partition
Select the ADDSWAP option and hit Enter.
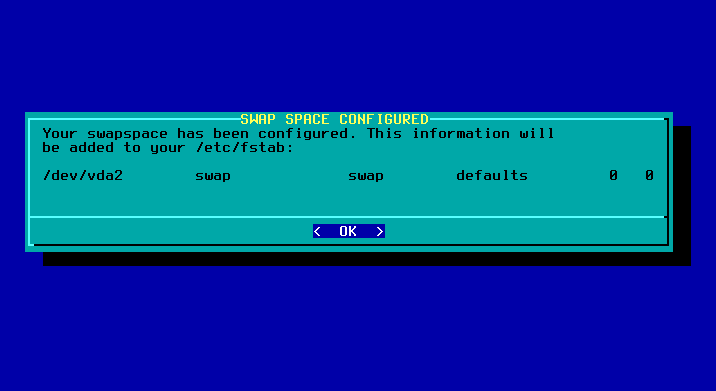
The Slackware installer will autodetect and display the swap partitions on your hard drive, allowing you to select one to format and enable. Just press Enter.
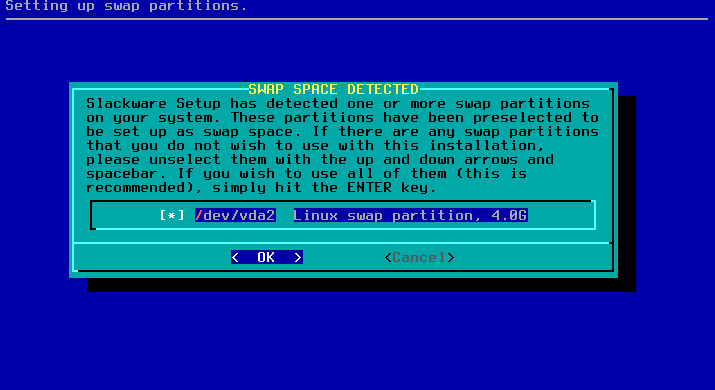
Next, choose No to skip checking for bad blocks.

The installer will inform you that the swap partition has been successfully configured. Press the Enter key to continue to the next step.
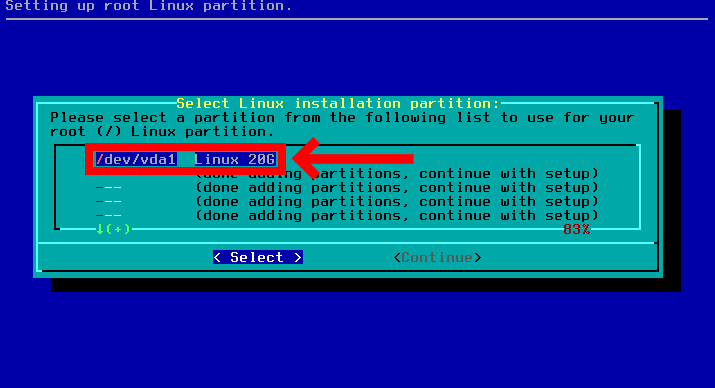
Step 7: Setting Up Root Partition
Next, the installer will ask you to choose the default partition to install Slackware on. Use the up and down arrow keys to select your root partition (/); in our case, this is /dev/vda1 and press Enter.
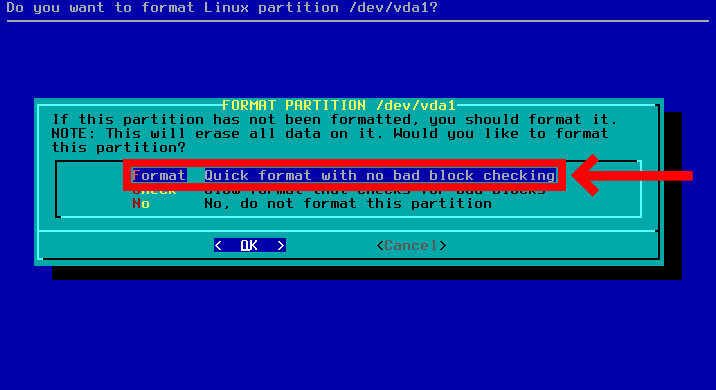
On the next screen, select the Format option and hit Enter.
Now choose the filesystem to use. Choose ext4 and press the Enter key.
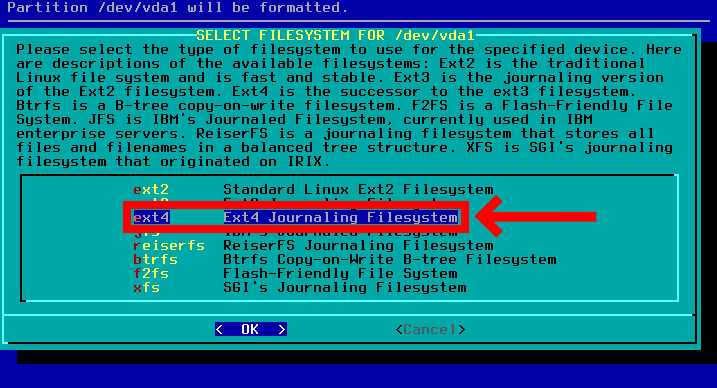
The installer will inform you that the root partition has been successfully configured. Press the Enter key to continue to the next step.
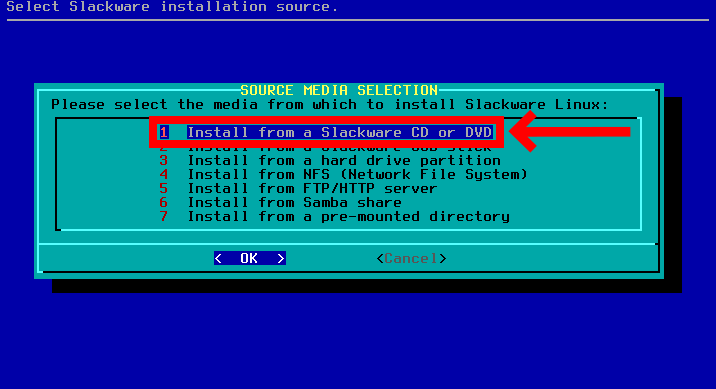
Step 8: Select Slackware Installation Source
The source section is where you select the source media from which you install Slackware.
Choose the Install from a Slackware CD or DVD if you’ve burned the ISO to a disk or installing Slackware Linux on a virtual machine via software such as VirtualBox.
Of course, select the Install from Slackware USB stick option if you have prepared an installation USB stick and will install Slackware directly on your server, laptop, or desktop computer.
We install it on a virtual machine in this tutorial, so we choose option 1.
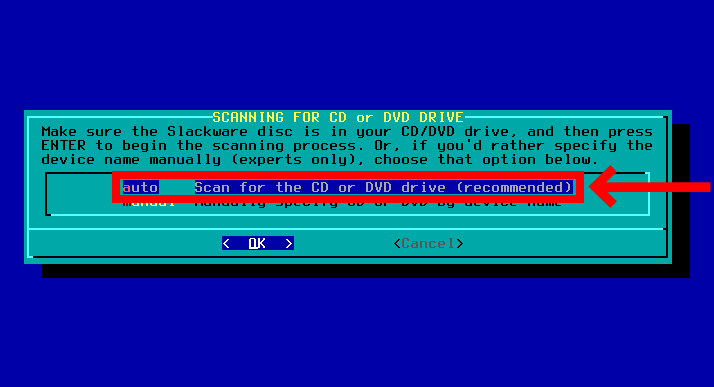
Select the auto option and press Enter on the next screen.
Step 9: Select Software to Install
Now the Slackware installer will list some categories of software to pick from. If you are not sure exactly which to choose, it’s best to go with the defaults. So, press Enter to move next.
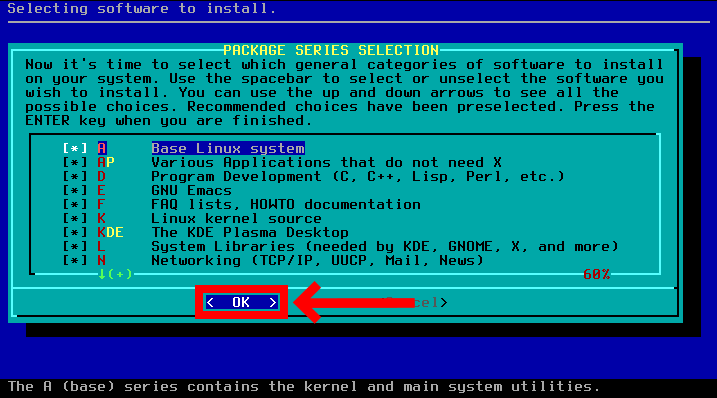
On the next screen, use the up and down arrow keys to select the full option and press Enter on the keyboard.
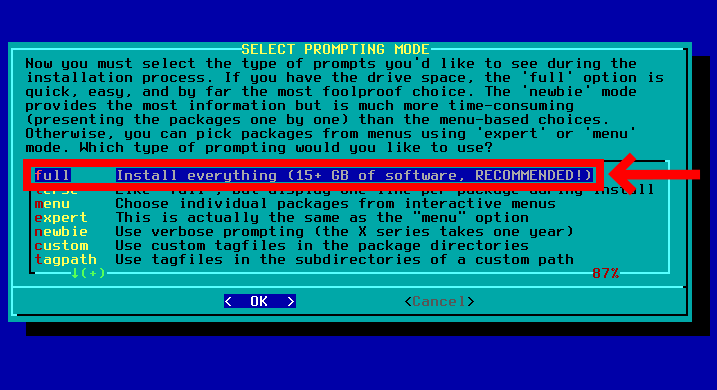
Slackware will start installing itself on your hard drive. However, it will take some time, so be patient and wait for the installation to complete.
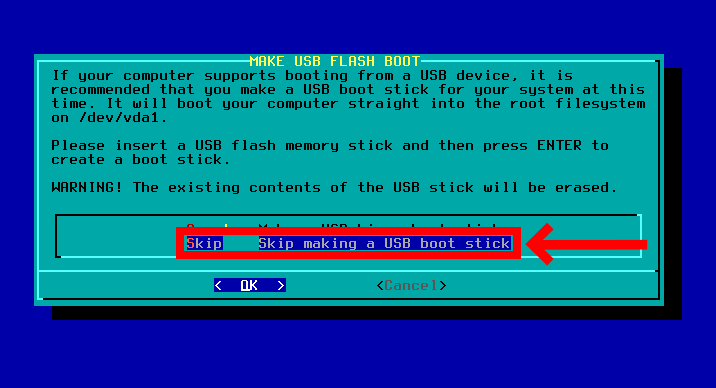
Step 10: Configuring the Bootloader
After the Slackware Linux installation completes, the installer will provide you the option to build a USB boot drive. Choose Skip and hit Enter.
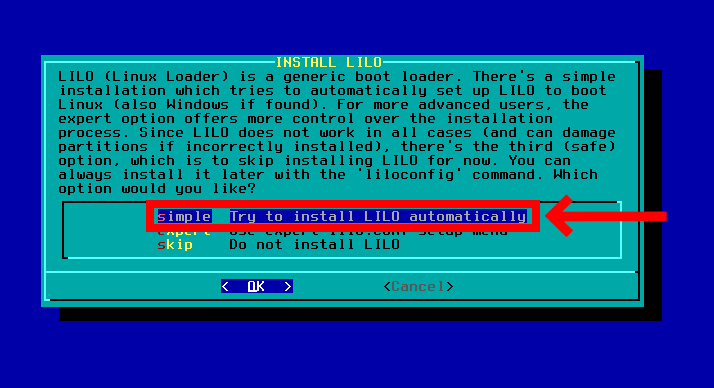
Then the installer prompts you to install the LILO bootloader. If Slackware is the only operating system on your computer, choose simple and press the Enter key. If you are dual-booting, the expert option is a better choice.
In this guide, we choose the simple option because Slackware 15 will be the only operating system on our computer.
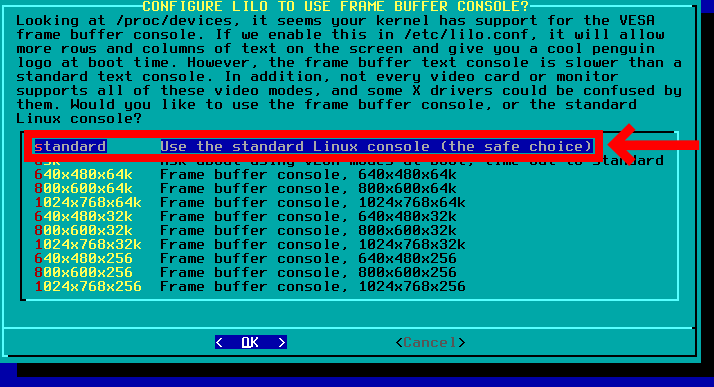
You can select a resolution for your text console on this screen. My recommendation is to stick with the default one. So choose standard and hit Enter.
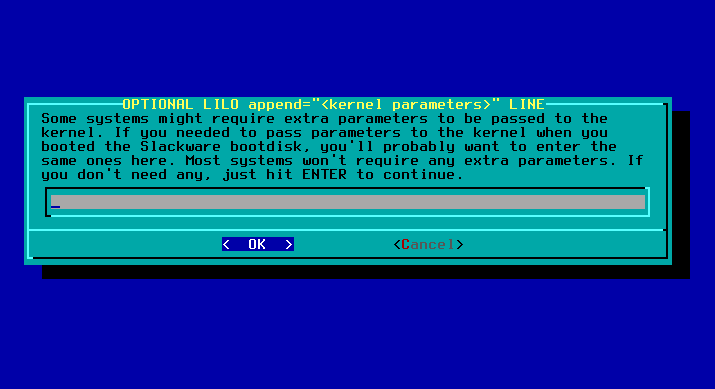
Don’t type anything on the next screen; just press Enter.
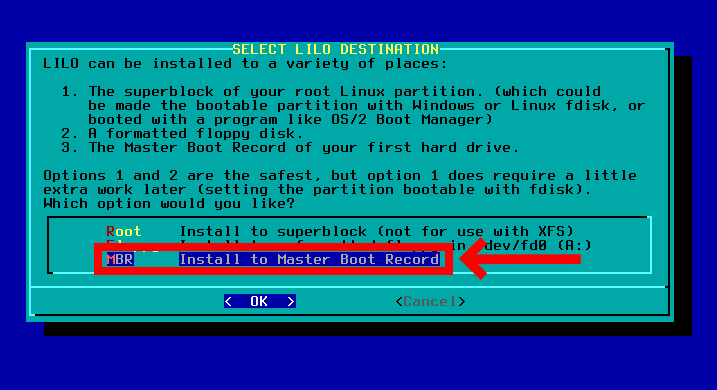
The final step in LILO bootloader configuration is to specify where the bootloader should be installed. If you want to use another operating system with a different bootloader, select the Root option. Otherwise, go with MBR.
Because we are installing Slackware 15 as the single operating system on our computer, we stick with the MBR option.
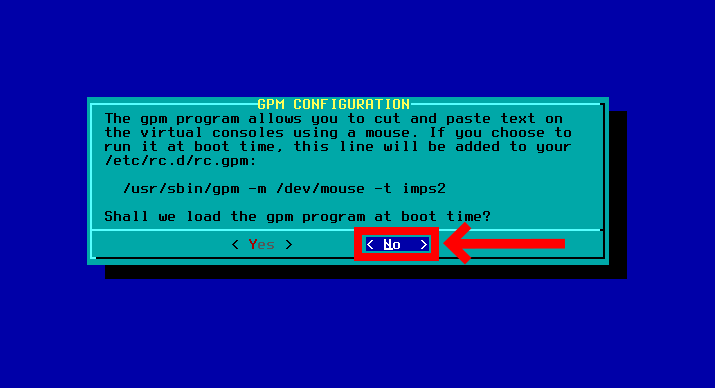
On the next screen, choose No and press the Enter key.
Step 11: Configuring the Network
Now it’s time to configure the network. Select Yes and hit Enter to be guided through the process of configuring your internet connection in your new Slackware 15 installation.

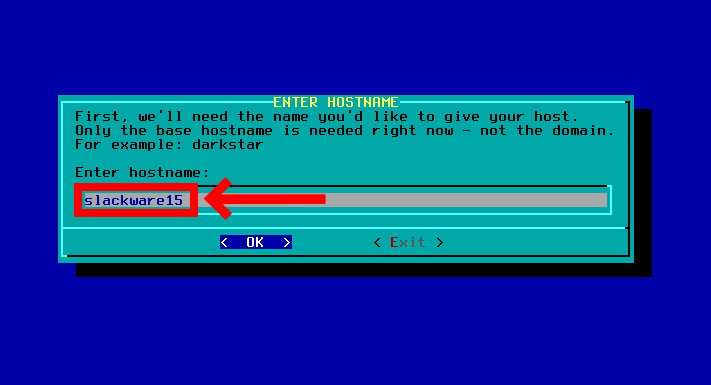
First, you need to set the hostname. So, enter the name under which you want your new Slackware 15 installation to appear on the network. In this guide, we choose to use slackware15 as a name.
Enter your choice and confirm by pressing Enter.
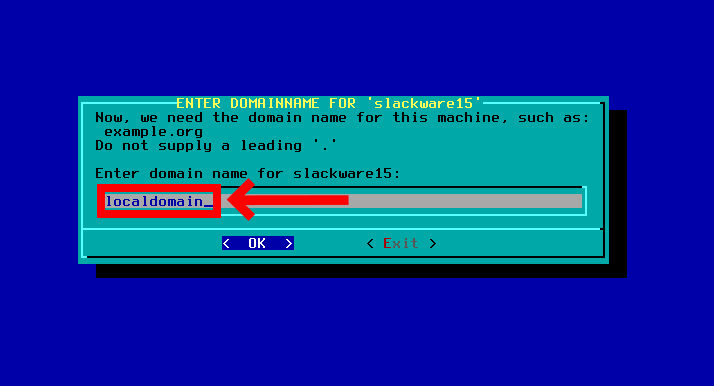
Next, you need to set the domain name. Type localdomain and hit Enter.
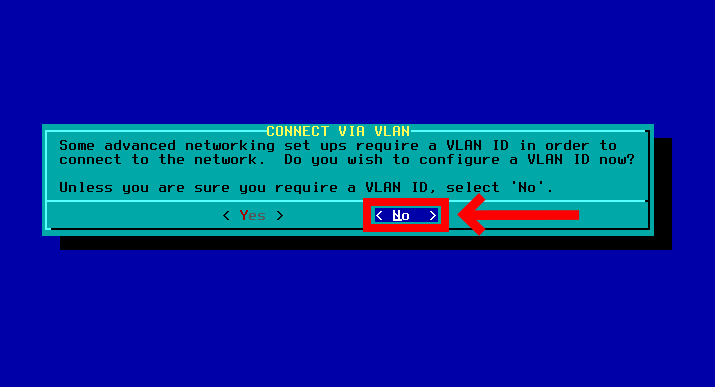
From the next screen, select No and press Enter to continue.
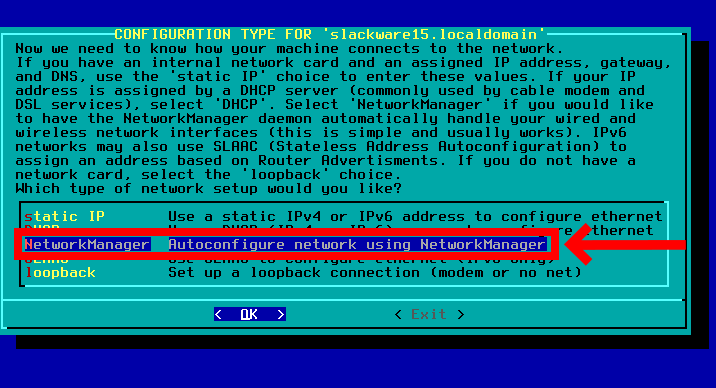
Pick NetworkManager to handle your wired and wireless network devices and press Enter.
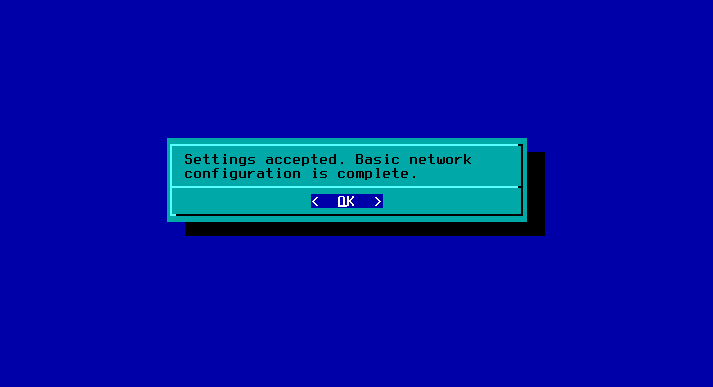
Finally, confirm your choice to complete the network configuration by selecting Yes.
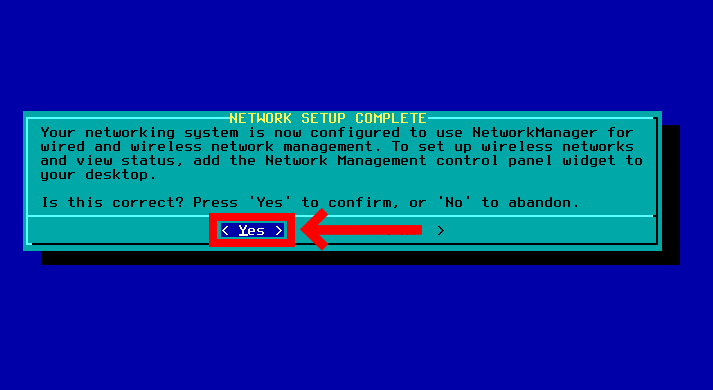
Hit Enter once again.
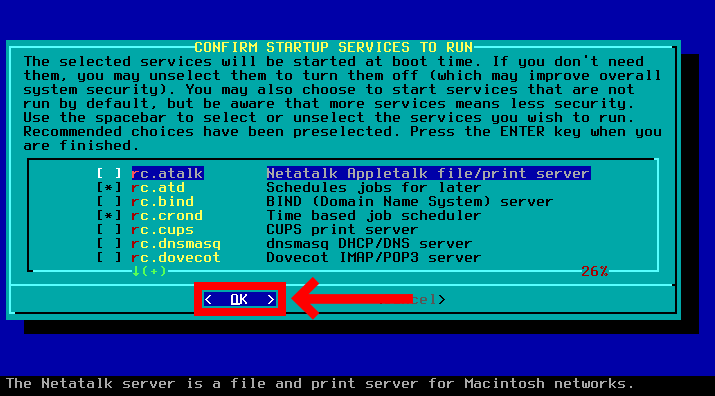
Step 12: Configure Startup Services
After configuring the network, the next decision is which services will be launched at boot time. Again, my advice is to accept the default suggestions and confirm with the OK button.
Choose No on the next screen and press Enter.
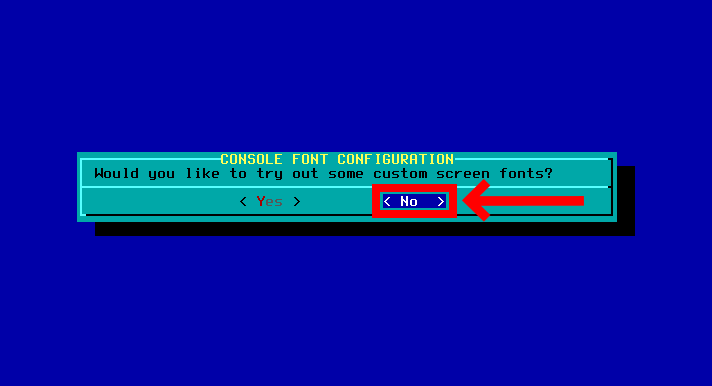
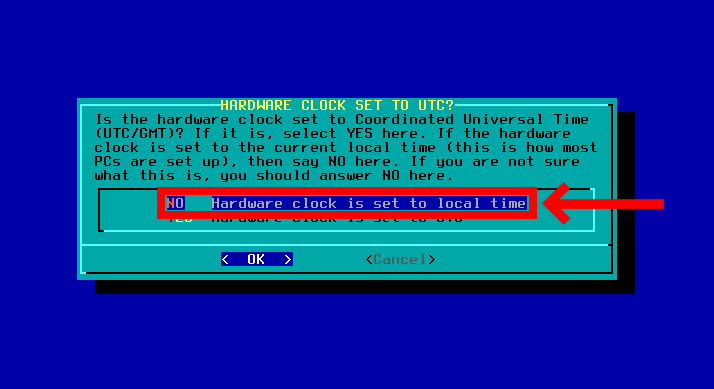
Step 13: Configure Hardware Clock
Setting up your PC’s hardware clock is next. Choose NO and hit Enter to proceed to the Time Zone configuration.
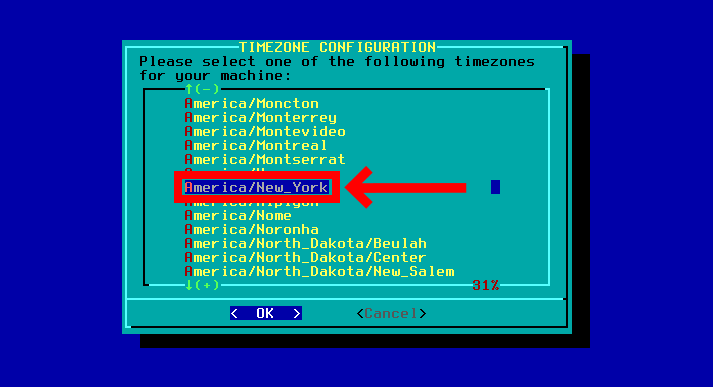
Step 14: Configure Time Zone
Find your preferred timezone, highlight it, and press the Enter key to apply it. In our case, I choose America/New_York.
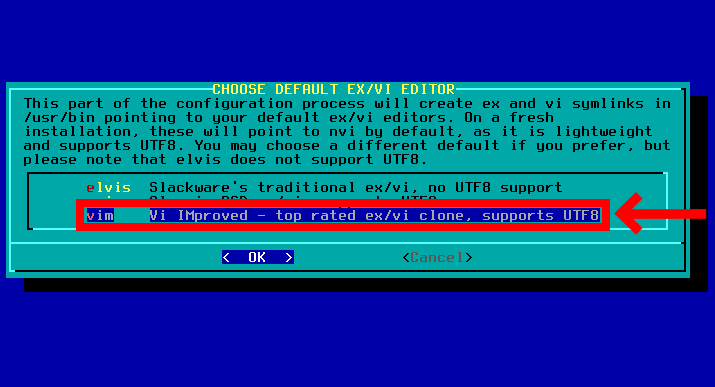
Step 15: Choose Default Terminal Editor
The Slackware installer lets you set the default terminal text editor on the next screen. Choose vim and press the Enter key to proceed to the next screen.
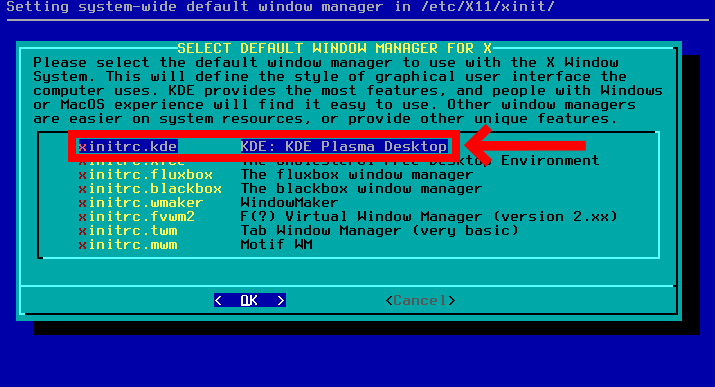
Step 16: Choose Default Window Manager
Now it’s time to set the default desktop environment. My advice is to choose KDE. Hit the Enter key. We’re almost done with the installer.
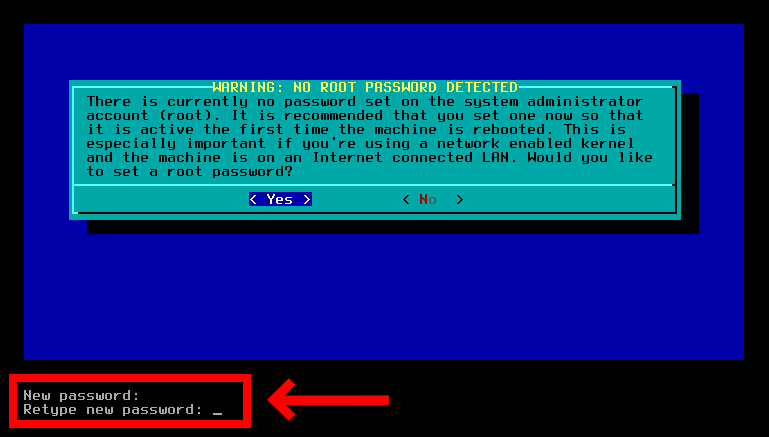
Step 17: Set Root Password
The last step and the Slackware 15 installation will be over is to set the root user password. Select Yes and hit Enter to continue.
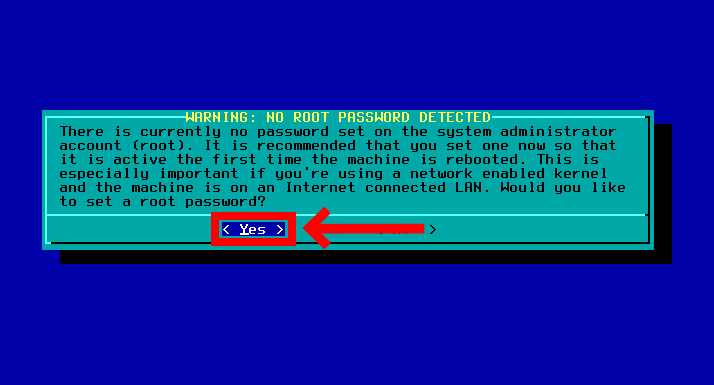
Type and retype the root user password and hit Enter.
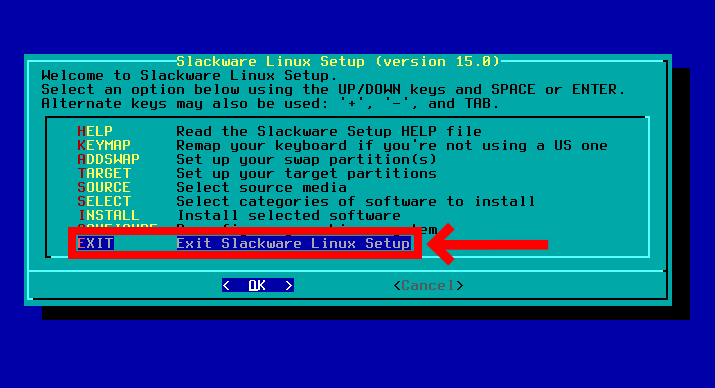
The installer will inform you that the configuration process of your new Slackware 15 system is complete. Just press the Enter key.

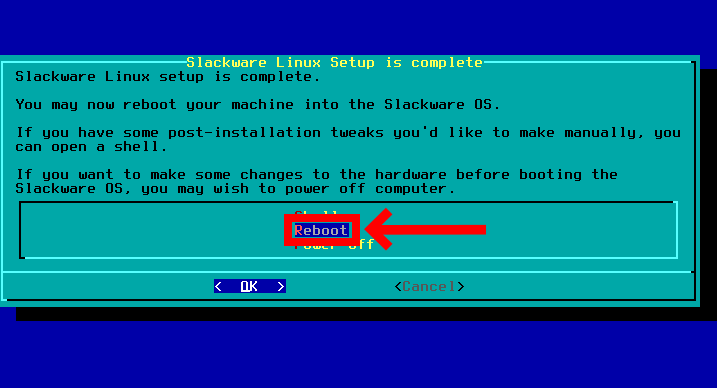
Step 18: Reboot Your System
You’ll be returned to the main menu. Select EXIT, and hit Enter.
On the next screen, just hit Enter again.
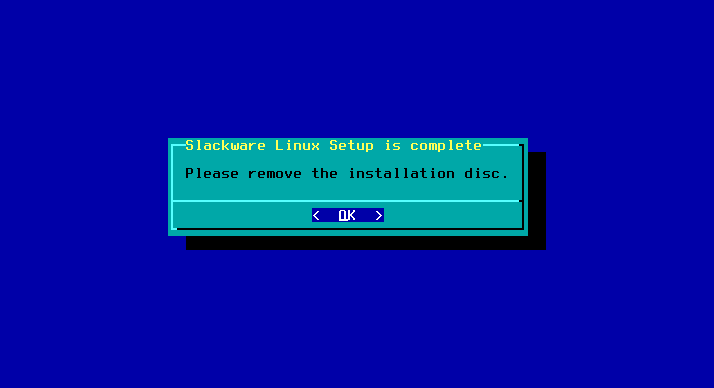
Finally, choose Reboot and confirm by pressing the Enter key.
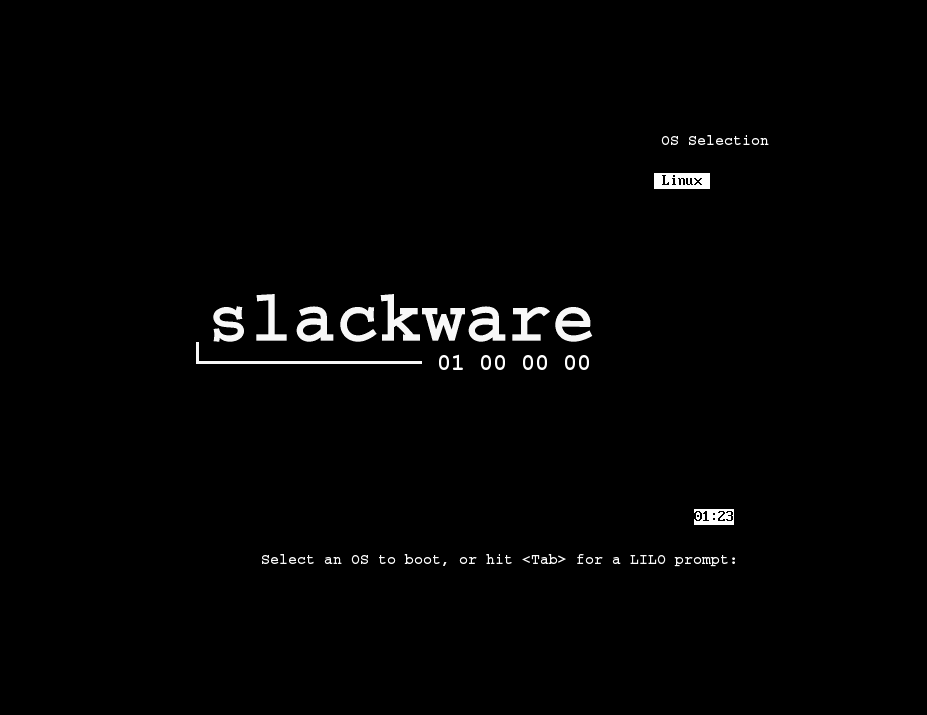
After the reboot, you’ll be greeted by Slackware’s LILO bootloader screen. Just press Enter to boot into your newly installed Slackware 15 Linux system.
Step 19: Creating Regular User
During the installation of your new Slackware 15 system, it may have struck you that no user account was created for you to carry out your daily work. We will do that in the next step.
After the system reboot, log in with the root user. For this guide, we have chosen to create a user account named linuxiac. But, of course, you can select a name entirely of your choosing.
useradd -m -g users -G wheel,floppy,audio,video,cdrom,plugdev,power,netdev,lp,scanner -s /bin/bash linuxiac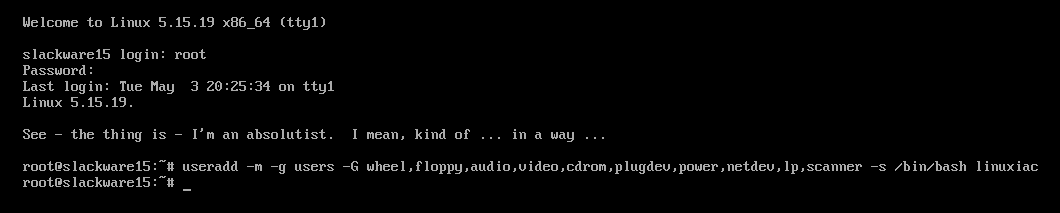
Run the passwd command, followed by the username, to change the password. Next, you’ll be asked to enter and confirm the new user’s password.
passwd linuxiac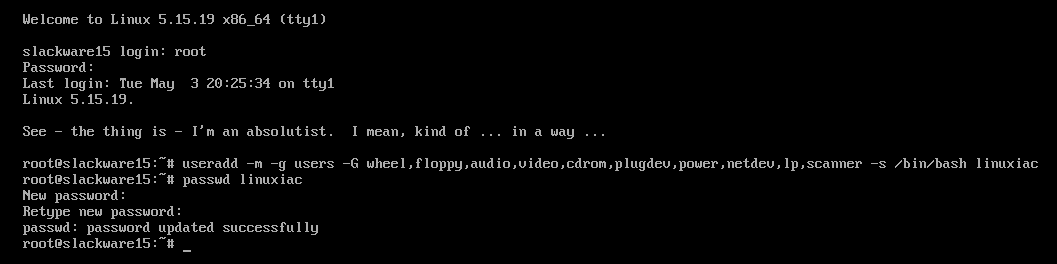
We are done with that here. One final touch remains – telling our Slackware 15 Linux system to start the graphical login manager automatically.
Step 20: Graphical Login
To start with a graphical login screen on boot instead of Slackware’s default console login, change the default run level from 3 to 4 in the /etc/inittab file.
Open the file by typing the command below, edit the displayed line and save the change.
vim /etc/inittab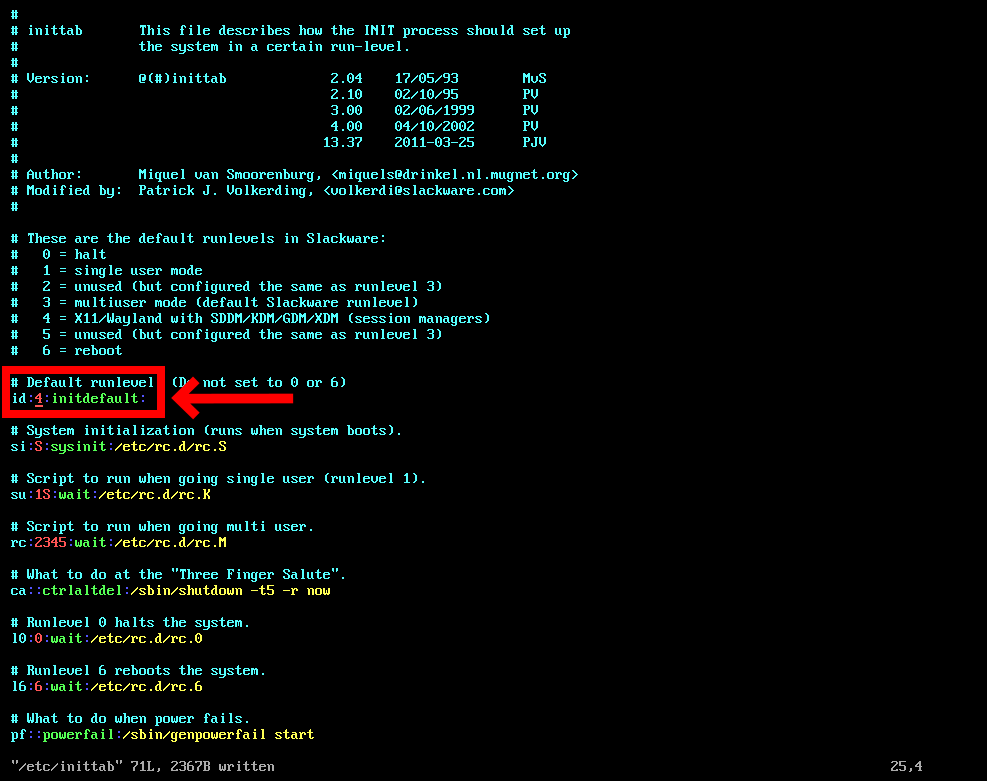
That’s all. All that’s left to do is reboot your Slackware 15 Linux system.
rebootStep 21: Log in to Your New Slackware 15 Linux Installation
After the reboot, you’ll get a graphical login.
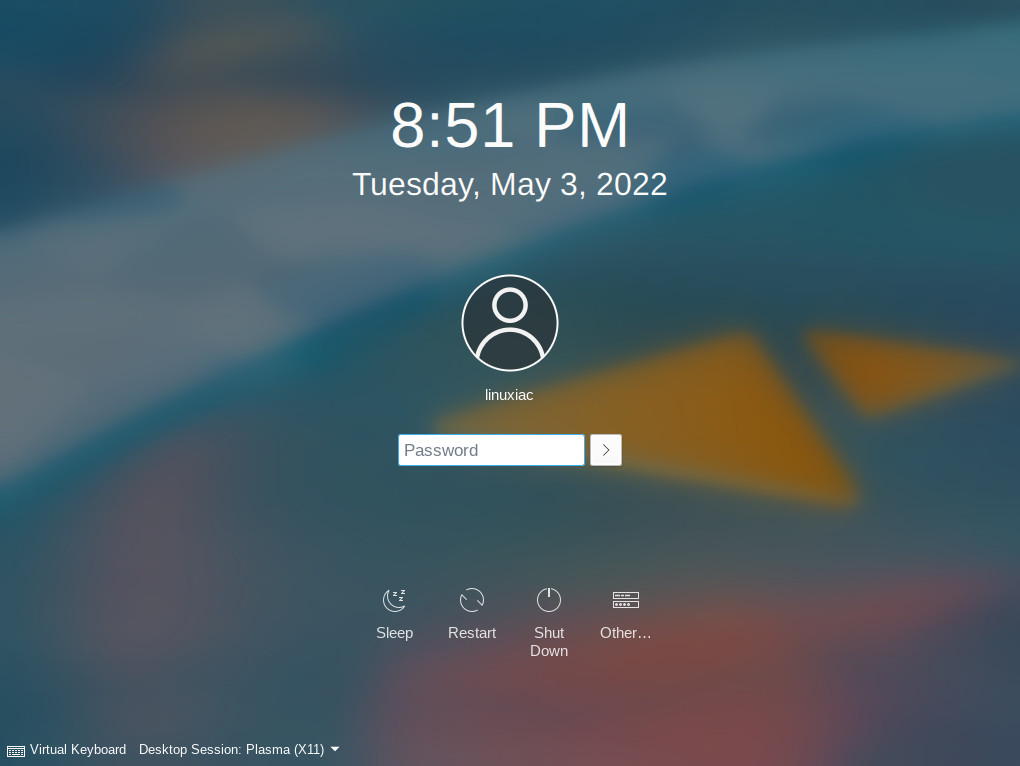
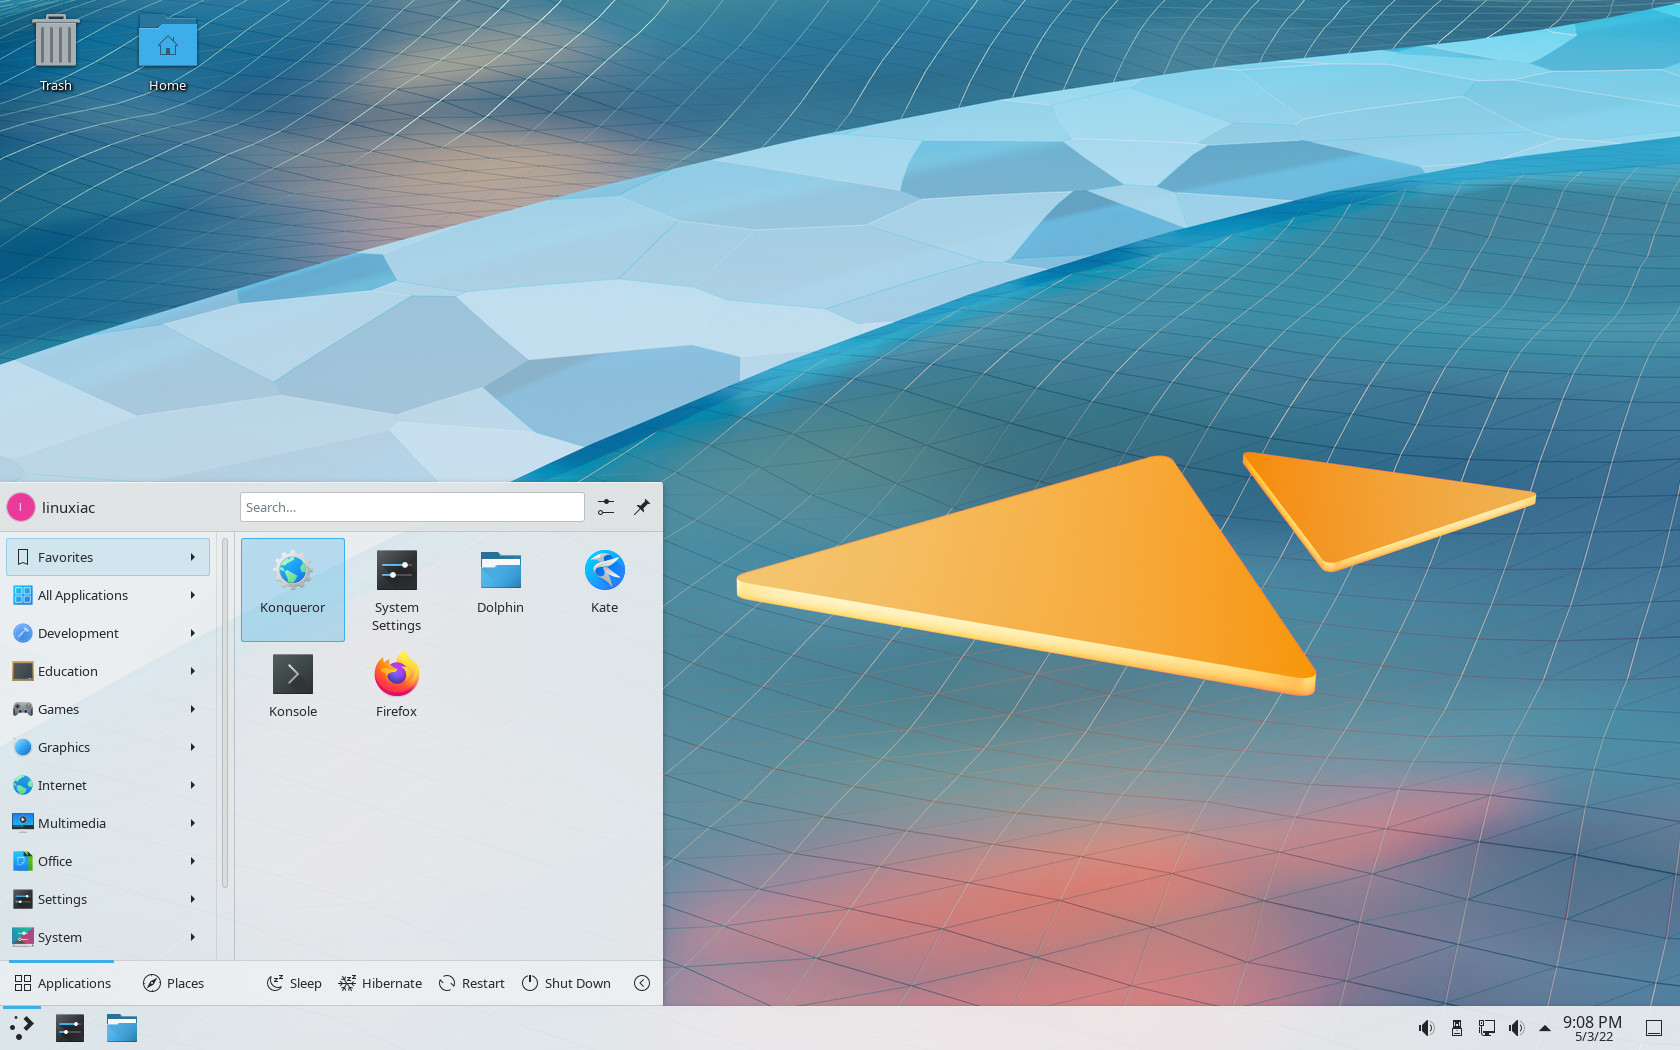
That’s it! You have every reason to be proud of yourself for your effort during every step of the Slackware installation process. Now log in and start using your new Slackware 15 Linux system.
Some Post-Installation Steps
So, you already have a running Slackware 15 Linux system and probably already want to try installing some software?
Before do that, you need to perform some little actions. First, you must enable at least one of the official mirrors containing packages for Slackware. A list of available mirrors for your Slackware version can be found in the /etc/slackpkg/mirrors file.
Open the file as a root user in a text editor like Nano or Viм and remove the comment from a single mirror URL.
vim /etc/slackpkg/mirrors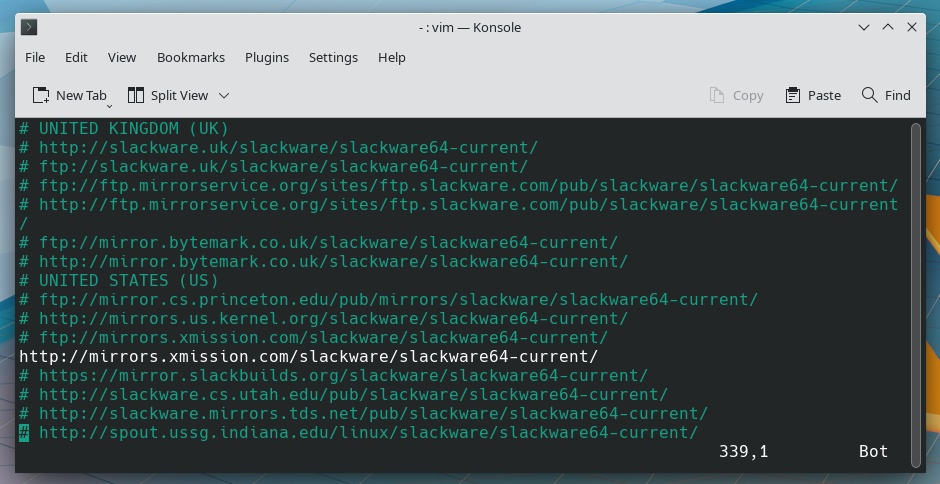
Save the file and exit. Next, you need to initialize slackpkg’s database by running as the root user:
slackpkg update gpg
slackpkg update
The slackpkg update command connects to a Slackware mirror to update your computer’s local package information database but does not actually install any package.
To update your Slackware Linux installation to the latest patches, type:
slackpkg update
slackpkg install-new
slackpkg upgrade-all
slackpkg clean-systemCode language: JavaScript (javascript)
Of course, if the full system upgrade includes updating the Linux kernel, run the command below as root user to update the information in the Lilo boot loader. Otherwise, after reboot, you may end up with a non-booting system.
liloWell, that was all. So from here on, it’s all in your hands!
Conclusion
Slackware is an independent Linux distro developed by Patrick Volkerding that doesn’t follow any particular period to release a new version like Ubuntu or rolling release distros. Instead, building Slackware aims to give exceptional stability, so there isn’t a new version released every year.
Last but not least, please consider supporting Patrick and his family by visiting his Patreon Page, choosing a membership category, and becoming a Patron. More on the topic here: Donating to Slackware.
So, I attempted to cover everything about how to install Slackware Linux and make the process as simple as possible for you. I know it was long, but you can surely accomplish it with a bit of patience and be proud to be a Slackware user.
It has been a pleasure, and I hope you find this helpful guide. Thanks for using it!
If you want to share your experience with the Slackware installation process, please feel free to leave your comment below.


This is a very good step-by-step tutorial for installing and configuring Slackware. Things have definitely changed in the past 20 some years. Slackware was the first Linux distro that I had ever used and at that time I had to install it from downloaded floppy disk images which was a lot of disk and hours of burning all the images to disk. I had to learn how to install and configure everything from trial and error and lots of web searches for fixing issues with X Windows. This is a good document and is very clear for a beginner to install and use Slackware. I used these instructions to install into VirtualBox with no issues. Definitely do not miss the 20+ floppy disk installation process. The GUI text configuration setup is still there. Good to see that Slackware is not gone.
You need to correct or add a few things:
1. The way you have written this as if 20 GB space is needed for root partition and 4GB space is needed for swap. Well, you need to allocate 2x RAM for swap and the REST of the hard drive for root otherwise this thing does not quite wor (I mean it will still install but you need a lot of post installation woes)
2. You need to allow ONLY ONE mirror,NOT at least one. You may want to correct that line.
3. The user management is tricky, you copied verbatim from slackbook, but I think people will still need to do visudo sudo and edit the file to remove comments from lines that will enable the users on wheel and sudoers to be root
4. Not everyone is familiar with vim (ugh!), so you needed to mention that to edit vim, they need to press i first and edit the file. After editing, they need to hit esc button first and then do :wq to save the file and exit
Other than these things, thanks and congratulations for writing this much needed tutorial. Slackware’s own documentation is a good attempt but outdated.
Maybe it is out of scope, but a mention of SlackBuilds (https://slackbuilds.org/) might be useful. The Slackware project maintains a large ecosystem of software, but for most users they will soon find something is not part of the default system. SBo provides a unified set of tools for installing loads of software, and I imagine that most people who use Slackware use SBo as well — correct me if I am wrong. I don’t think the article ought to explain SlackBuilds, but I think it ought to point to it.
I think one thing that sets Slack apart is it use on older hardware. The 32-bit option, the SMP vs nonSMP kernels, the control you have over the system, the lack of systemd, it means you can get useful work out of older computers. I had an Intel Atom netbook, came with Windows 7. Windows 10 ran too slow; so did Debian MATE. Switched to Slack and it was like a new machine.
If you like Mate, you can install it on Slackware via Slackware.Uk site. I don’t remember which directory, but one of them has the packages. You can also try cinnamon as well. Hope that helps!
I have an atom netbook as well, but Packard Bell has everything locked down on it for booting of anything but the emmc2 drive. I checked the bios, which had every option under the sun except for booting off usb or SD card.
Is it my imagination but i can’t see the step where lilo was installed. Without a boot manager installed , slackware would not be able to reboot .
Hi Andy,
Please, look again at “Step 10: Configuring the Bootloader” 🙂
Best,
Bobby
Not familiar with Slackware, the first thing I would like to discover is what would be the strong benefit of using Slackware. The technical details, complex or simple, would come next if I am convinced.
I got into slackware simply because of low hardware requirements (300 MB of RAM for a clean startup of nothing non-essential in 2018-2023), having issues with outdated laptop not supporting W7 (and W10 was, although supported, too much for it). Slackware came as a recommend from someone I regard highly and who is a developer and linux admin since 90s (before linux admin was linux admin, a thing).
I didn’t struggle with the initial installation, because the only real requirement of the installation is the ability to read words, it’s literally all explained in the very setup you perform. Now, the fact that I am a curious one and have to know what I’m using cost me between a fortnight and a month, but the rewards were tremendous. I learned how to configure my system the way I wanted it to be configured, learned how to compile a kernel and run a custom one ( I thought it was a requirement for one troublemaking wifi driver, kernel pre-build patch became available by the time I finished the kernel-learning process )
From day one I liked the feeling that I installed everything I wanted and nothing I didn’t, but the full slackware install is pretty broad anyway. You get not one but two office suits (Calligra,OpenOffice), several different browsers,mail clients, various C++ dev tools.
Nothing you do ever can mess the system up, so long as you don’t call the root’s name in vain. (Let you figure that one out, why is it so)
Installation of additional software is also a learning curve of a fortnight or so, to really come to grips as to what is happening “under the bonnet” but by no means insurmountable.
Now, for the best part:
Everything I setup on that laptop five years ago still runs today, perfect as the first day. Reliability, durability, stability. No sudden updates to mess up your workflow. No sudden antivirus issue. No change in how the system loads, what it loads (or not) and how it responds to you, the user, the way you want it to.
I can’t imagine a more stable and reliable workstation, once setup, than a Slackware. You press the power button, the system loads, and you can go to work. When finished, you shut it down and that’s that. Rinse, repeat, and after 40 years of that go retire.
No BS, just work done.
That laptop sits on standby and as a media server for in-house LAN and while I got to upgrading my hardware, I never again went back to runny-nows (Windows) except for some middle-ancient games that still aren’t covered by either Steam or Wine (or CrossOver–> Wine upgraded,paid software) and for that, win7 works just fine in a VM.
Hi!
I went from Debian to Arch to Slackware. I use it mainly as a hobbyist. I have a running server with some services and a laptop on which I program in Python and C++.
Why did I go to Slackware? In Debian I needed some newer packages so I went to Arch. In Arch I had problems with systemd and after reading up on it I didn’t like it and found Slackware as a systemd free system.
After using Slackware for a while I just love it. It’s easy and simple. I learn as I go on and I feel that I have full control.
When installing packages I know exactly what I install.
I know which services I want to start at startup with easily configurable bash scripts.
The community is great, both on IRC and on Linuxquestions.org, or .com. 🙂
The docs are good.
But most of all I like the simplicity and the control I feel that I have.
Hey Michael,
This is quite well said! Perhaps I should have made some similar generalization in the article above – a systemd-free, simplicity, and complete control over the system. 🙂
Best,
Bobby
Hi Bobby!
Thanks! You cannot remember everything. 🙂
And I think your installation instructions are great. I haven’t read everything in detail but looking it through I very well remember the steps of the installation.
The funny thing is that it might seem daunting with all those steps but it’s quite a fun and easy task which will teach you a whole lot.
Thank you for your kind words, Michael, and for reading Linuxiac!
Yes, at first glance, it seems complicated with all these steps, but it is misleading and not true. In fact, once worked out, the whole basic installation process takes no more than 20 minutes.
Best,
Bobby
Maybe mention what is NOT supported by installer/system: no LVM/LUKS in installer, maybe no Wayland in system ?
Wayland is installed on system by default. LVM/LUKS is supported – You have to make all yourself, prepare all partitions before You run setup. Google it!
No need to google it, as Slackware comes with documentation 🙂
https://mirrors.slackware.com/slackware/slackware64-15.0/README_LVM.TXT
https://mirrors.slackware.com/slackware/slackware64-15.0/README_CRYPT.TXT