
Creating a bootable USB from an ISO image on Linux is a great way to install a new operating system or try a new distribution. With the help of a bootable USB, you can easily boot your computer from the USB drive and install the operating system directly to your hard drive.
There are several methods to create a bootable USB from an ISO in Linux, as users often prefer to use GUI apps such as Etcher or Ventoy for this purpose. But there is an easy command line way, too.
Using the built-in dd tool in Linux, you can make bootable ISO for any operating system. The good news is that most Linux distributions have preinstalled it by default.
This guide will walk you through creating a bootable USB drive from an ISO image on Linux using the dd command to have your bootable USB drive ready for action in just minutes without wasting time installing additional applications.
What is dd Command in Linux?
The dd (data duplicator) utility is a powerful command-line tool that makes copies using block by block from one device to another. So we can use it for data backup and restoration from one device to another.
However, you may have heard the app’s nickname, “data destroyer,” because this command is capable of causing significant damage. For example, if you specify by mistake the wrong destination, as the root partition of your disk rather than your USB device, you will end up with a destroyed operating system.
So, remember to double-check your syntax before executing any dd command to avoid irreparable errors and losing your data.
How to Create Bootable USB from ISO File on Linux
This assumes you already have an ISO file that you want to move to an external thumb drive; type USB storage volume.
1. Find the USB Device Name
First, connect the USB device and find the name under which it is presented on your computer. You can do this easily using the lsblk command.
lsblk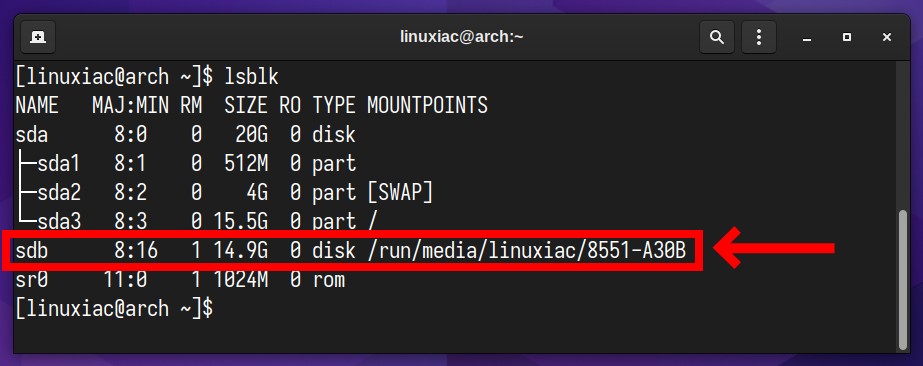
As you can see, it is mounted as “sdb” in our case and can thus be accessed with its full path as “/dev/sdb.” However, if you have multiple USB sticks already connected to your system, the drive you’d like to target might be “/dev/sdc,” “/dev/sdd,” etc.
2. Unmount and Format the USB Device
After confirming your target drive, you need to unmount it before formatting it.
sudo umount /dev/sdb*Next, we need to format the unmounted drive. Let’s do this with the following command:
sudo mkfs.vfat -I /dev/sdb3. Create a Bootable USB Using the dd Command
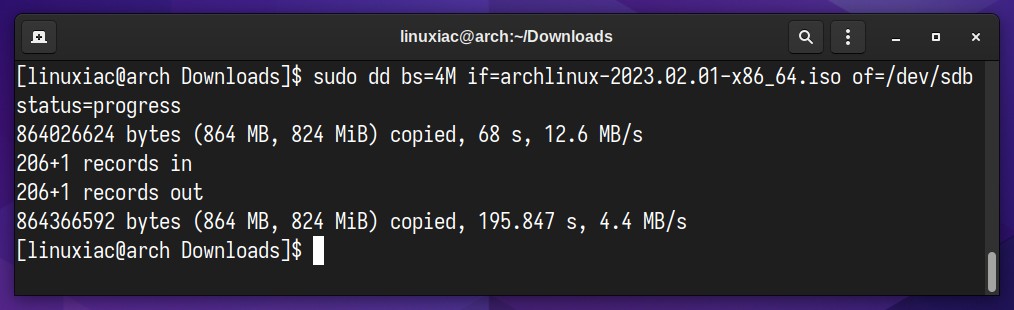
We’re ready to copy the ISO file to the USB drive using the dd command. I’d recommend navigating to the directory where you downloaded the ISO. Let’s say you put it in your user’s “Downloads” directory.
cd ~/DownloadsSince we’re already in the right directory, we can use the following command to write ISO to USB and create a bootable USB stick:
sudo dd bs=4M if=filename.iso of=/dev/sdb status=progressCode language: JavaScript (javascript)Where “filename.iso” is, of course, replaced by the actual name of your ISO file.
- bs: Sets the default block size.
- if: Stands for “input file.” It is used to specify the location of the ISO file.
- of: Stands for “output file.” It sets where to write the ISO file. In our case, it is “/dev/sdb.”
The dd command will copy the ISO file’s contents to your USB stick. This may take several minutes to execute. You should see something like these results returned:
That’s all. You can use the USB drive as Linux installation media or a software installer when the process is finished. You can also use the same method to turn an installation ISO image file into a bootable USB stick.
Conclusion
Creating a bootable Linux USB drive from an ISO file is relatively straightforward. The general steps involve selecting the ISO image and target USB drive, then executing the writing process to transfer the image to the USB.
For more about the dd command in Linux, consult its manual page.
Thanks for using this tutorial. Your feedback and comments are most welcome.


dd apparently turned my vfat filesystem into an iso9660. I did not remount and check after the dd but only after I loaded slack15 iso.
The “dd” command is awfully slow because the default block size is too small for modern usage (512 bytes).
Using more sensible values such as: “dd if=… of=… bs=1M” will lower execution time tremendously.
The “sudo mkfs.vfat /dev/sdb” step is unnecessary and can be skipped. ‘dd’ is going to overwrite it, anyway.
Writing a bootable Windows 10 iso does not work this way.
This may be due to:
~$: man mkfs.vfat
“…
BUGS mkfs.fat can not create boot-able filesystems. This isn’t as easy as you might think at first glance for various reasons and has been discussed a lot already. mkfs.fat simply will not support it 😉 “
this is really well written. would be interesting to see an article about how the formatting was chosen and what are the considerations.
I believe that depends on the size of the required install and the operating system in use. If you’re installing a windows OS I believe NFTS is the desired format, and in other cases FAT32 works. Although fat32 has a size limitation so sometimes you’ll need exFAT instead.
Thanks, amazing tutorial!
P.S. If “sudo mkfs.vfat /dev/sdb” gives “Partitions or virtual mappings on device ‘/dev/sdb’, not making filesystem” error, try overriding with -I ( sudo mkfs.vfat /dev/sdb -I )
lsblk will show you partitions of drive /dev/sdb
Try to use /dev/sdb1 where sdb1 is the partition of that drive
lsblk will show you partitions of drive /dev/sdb
Try to use /dev/sdb1 where sdb1 is the partition of that drive