
- What Is Restic?
- What Can Restic Do?
- How Does Restic Work?
- How to Install Restic on Linux
- Creating a Restic Repository
- Backup Data Using Restic
- List Snapshots
- Show Differences between Two Snapshots
- List Files in the Restic Snapshot
- Restore Data Using Restic
- Restore Only Specific Files
- Delete Snapshots from the Repository
- Show Basic Statistics
- Automatically Passing a Password to Restic
- Conclusion
When working with computers, data backup is a critical and mandatory component. Losing personal files on your home computer or data stored on company servers can have significant emotional and financial consequences.
Implementing a reliable backup solution for your data is more than necessary and can prove invaluable to you and your business. What’s better if it is entirely free? Please meet Restic.
What Is Restic?
Restic is a free, secure, fast, efficient, and reliable backup solution that works smoothly with many local and remote/cloud backend storage systems.
The software is open-source and cross-platform, which means it works with various operating systems, including Linux, Windows, macOS, FreeBSD, and OpenBSD. But first, let’s look at what the Restic backup solution offers.
What Can Restic Do?
Restic is a modern backup tool with excellent efficiency that can back up your files from Linux, macOS, Windows, and BSD to various storage types, including self-hosted and online services. To be more specific, Restic natively supports the following backup backends:
- Local Directory
- SFTP server (via SSH)
- HTTP REST Server
- Amazon S3
- Google Cloud Storage
- Microsoft Azure Blob Storage
- OpenStack Swift
- BackBlaze B2
In addition to the above, Restic can use almost any cloud service as its backend with the help of Rclone.
How Does Restic Work?
Restic takes snapshot backups of data and saves them in a backup location known as a repository. This means that only the initial backup will transfer all information. On each subsequent backup, Restic will only transfer the files that have been modified in the meantime in the new snapshot, which significantly speeds up the process.
Each snapshot has a unique ID that can be used to gain access to that snapshot. On top of that, Restic is designed to protect your data from such attackers; thus, it uses cryptography to ensure the confidentiality and integrity of the data.
This means that access to each snapshot is protected by a password set when created, so retrieving the stored data is impossible without it.
But simply performing a backup isn’t the end of the story. The more critical aspect is reliable data restoration. Restic has also considered this, allowing you to verify the consistency of each snapshot, confirming that the data can be properly restored if needed.
So much for the technical details. Instead, it is time to talk about Restic’s most crucial feature – ease of use. It does not require you to be a high-tech user. Even beginners will have no difficulty using it, as ease of use is one of the guiding principles upon which this fantastic open-source backup solution is designed.
But first, let’s look at how to install Restic on Linux before we show you how to use it for backup and data restoration.
How to Install Restic on Linux
Restic is simple to install because it is available in all major Linux distributions’ official repositories.
Ubuntu / Debian / Linux Mint
Run the following command using the APT package manager:
sudo apt install resticFedora
Restic is available in Fedora’s default repositories. To install it, execute the following:
sudo dnf install resticRocky Linux / AlmaLinux / CentOS
For RHEL-based distributions, you should install the EPEL repository (if not already installed) on your system, then use the DNF package manager to install Restic.
sudo dnf install epel-release
sudo dnf install restic
Arch Linux
To install Restic, Arch users only need to execute the following Pacman command:
sudo pacman -S resticopenSUSE
openSUSE users should run the following commands using the Zypper package manager:
sudo zypper install resticCreating a Restic Repository
The first step is to create a new repository. This is where our backups will be stored. Restic will store backup data in this repository, and each backup activity will create a new snapshot.
Create Local Restic Repository
The command below will create a local repository “backups” in your $HOME directory.
restic init --repo ~/backups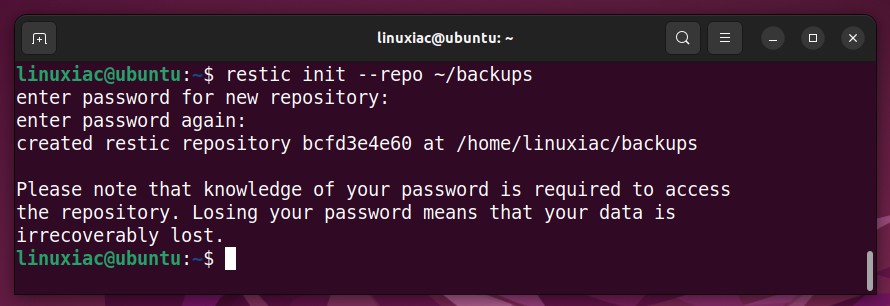
It is important to note that you will be prompted to enter and confirm the password Restic will use to protect the stored data. To access this repository later, you must remember the password. Otherwise, access to the repository’s data will be impossible.
Create Remote Restic Repository
Of course, you can also create the Restic repository on a remote server, for example, one with an integrated RAID solution specifically designed for reliable data storage.
We will take advantage of Restic’s default SFTP (SSH) capabilities to do this. For example, the following command will create a new repository on a remote server (192.168.122.25) in the directory “/srv/backups.”
restic init --repo sftp:root@192.168.122.25:/srv/backupsCode language: JavaScript (javascript)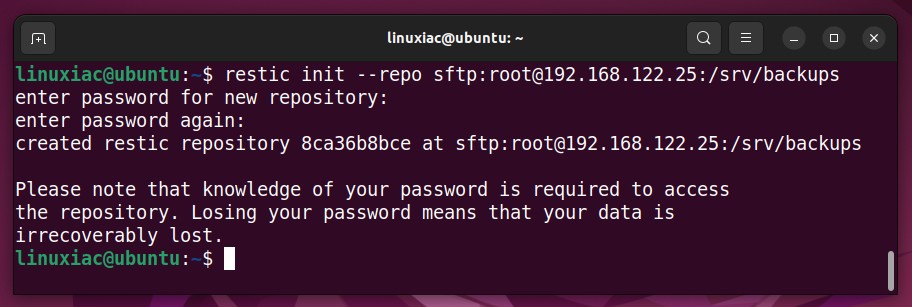
Given that Restic relies on SSH for remote access, it is a good idea to have previously generated and exchanged SSH keys between the computer from which you run Restic commands and the remote server where the Restic repository is hosted. This will give you SSH passwordless access and make operations much more effortless.
Backup Data Using Restic
Now that we’ve seen how to create a Restic repository let’s look at how to back up data.
Backup Data to a Local Repository
Creating Restic backup is very simple. The command below backs up the contents of the directory “myfiles” to the Restic “backups” repository. As you can see, both directories are in our home directory.
restic backup ~/myfiles --repo ~/backupsCode language: JavaScript (javascript)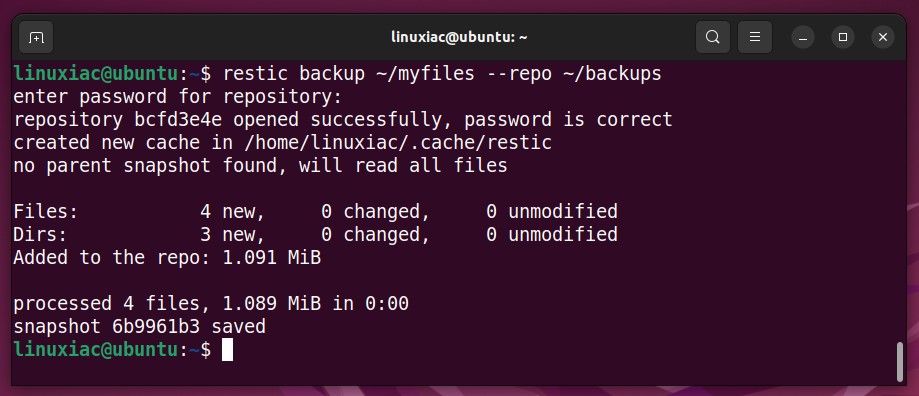
The command above created a new backup snapshot with the ID 6b9961b3. But before performing any operations, you will be prompted for the password you specified when creating the repository. We remind you once again that access to the repository is impossible without it.
Now, let’s break down the command syntax above to make things more transparent:
- restic: The restic command
- backup: Оption telling Restic to create a new snapshot
- ~/myfiles: The directory to backup
- –repo: Indicates repository
- ~/backups: Restic repository
This should give you a good understanding since all other Restic commands use the same syntax logic.
Backup Data to Remote Repository
Backing up to a remote repository with Restic is similar to the previous example. The only difference is that the path to the remote repository is specified using syntax very similar to that used by the SCP command but with added sftp: prefix, which specifies the backend used, in this case, sftp (SSH).
To learn more about SFTP, check out our “FTP vs. FTPS vs. SFTP: The Difference Explained” guide.
restic backup ~/myfiles --repo sftp:root@192.168.122.25:/srv/backupsCode language: JavaScript (javascript)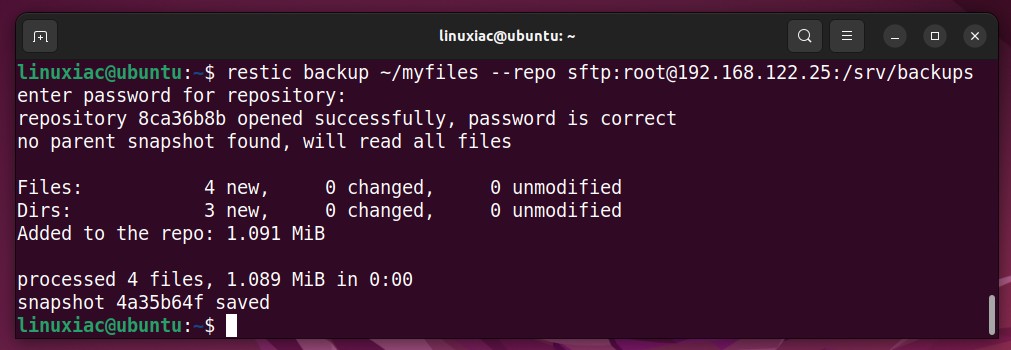
List Snapshots
One of the basic operations you will use frequently is viewing the list of snapshots made so far. To list the available snapshots in a Restic repository, run the following:
restic snapshots --repo ~/backups/Code language: JavaScript (javascript)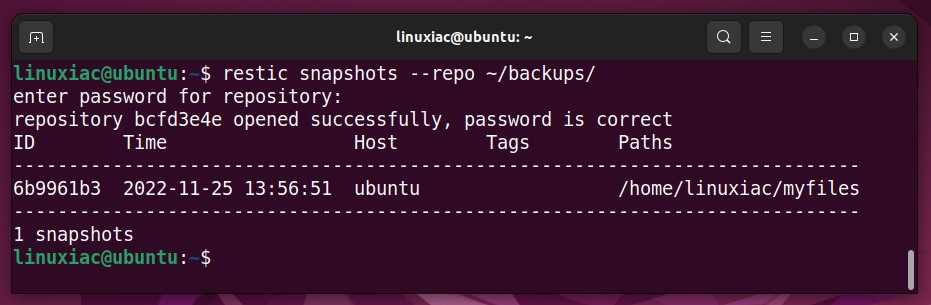
The fields shown provide essential info about the snapshots in the Restic repository.
- ID: The snapshot’s unique identifier
- Time: The precise time, day, month, and year when the snapshot was taken
- Host: The host from which the snapshot is created
- Tags: Snapshot-associated tags (if any)
- Paths: The full path of the backed-up directory
Let’s now add a new file and delete two others in the “myfiles” directory, then back it up in a familiar way.
restic backup ~/myfiles --repo ~/backupsCode language: JavaScript (javascript)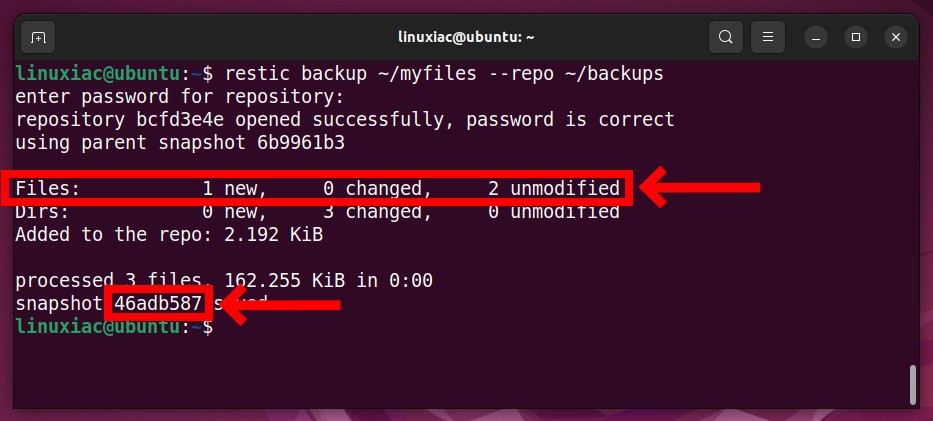
As we can see from the command output, a new snapshot with the ID 46adb587 has been produced, and only the new file we provided has been added. This is how Restic works. In other words, it does an incremental backup, taking only the recently changed files and not the entire backup.
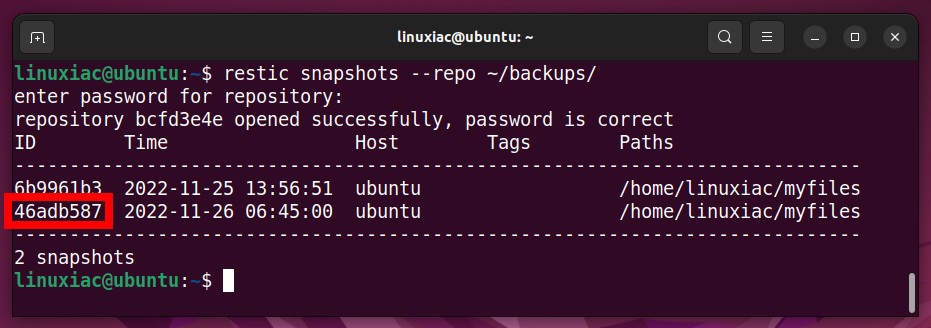
We will see the newly created 46adb587 one when we list the snapshots again.
Show Differences between Two Snapshots
So far, so good. However, the number of created snapshots will increase over time. You could have dozens or hundreds of them. And if you need to recover data, you’ll want to use the one that most closely matches the file state you’re looking for. To do so, you should be able to compare the differences between individual snapshots.
Restic makes this task easy; use the diff option and pass two IDs of existing snapshots to see what the differences in the files between them are.
restic diff 6b9961b3 46adb587 --repo ~/backups/Code language: JavaScript (javascript)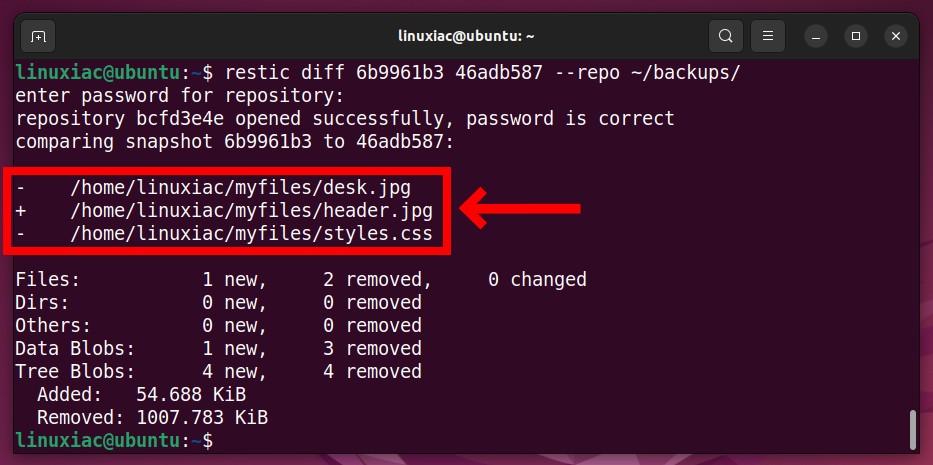
As we can see, two files have been removed (“desk.jpg” and “styles.css”), and one has been added (“header.jpg”). The “-” symbol at the beginning of the line indicates a removed file, while the “+” symbol denotes an added one.
List Files in the Restic Snapshot
Another useful feature provided by Restic is the ability to view the files contained in a specific snapshot. We specify the snapshot by passing its ID to the ls option.
For example, for a snapshot with ID 46adb587, the command would be as follows:
restic ls 46adb587 --repo ~/backups/Code language: JavaScript (javascript)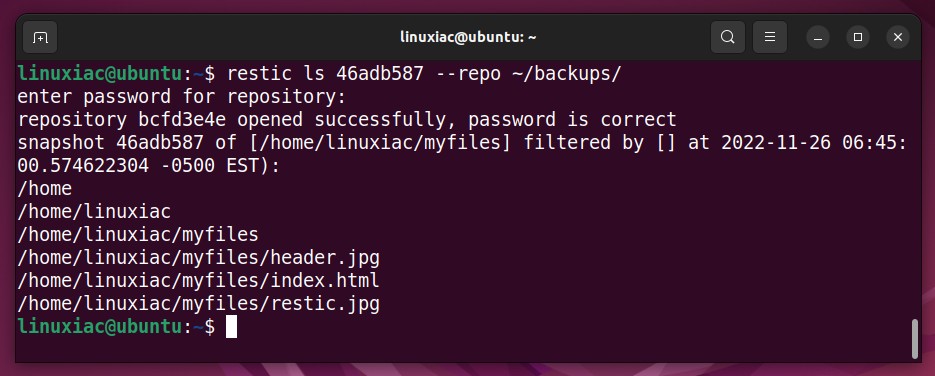
Restore Data Using Restic
Restoring from a Restic backup is a simple task. Once again, you only need the ID of the Restic snapshot from which you want to restore the data.
restic restore 46adb587 --repo ~/backups/ --target ~/tmpdataCode language: JavaScript (javascript)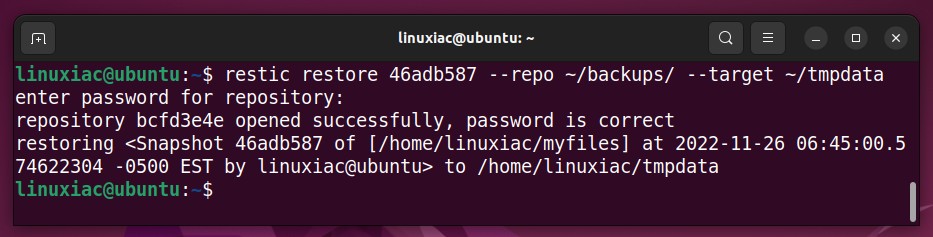
In the example above, by using the keyword “restore” and “--target” options, we instructed Restic to restore the snapshot’s data to the “tmpdata” directory. Restic will create the directory if it does not already exist.
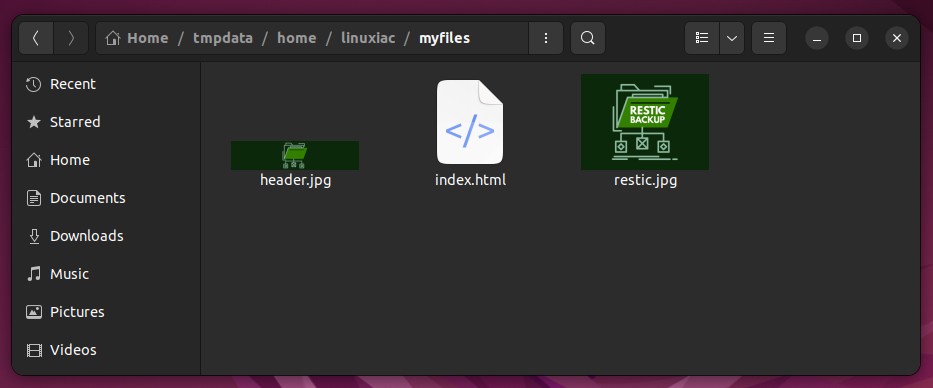
You can now view the files using your file manager.
Data restoration from a remote Restic repository is similar. The command would be as follows:
restic restore 46adb587 --repo sftp:root@192.168.122.25:/srv/backups --target ~/tmpdataCode language: JavaScript (javascript)Restore Only Specific Files
When we only need a single file or directory from a snapshot, restoring the entire snapshot is unnecessary. However, using the “--include” option, Restic allows us to restore what we need.
Let’s start with a list of the files in the snapshot with ID 46adb587.
Suppose we only want to restore image files with the “.jpg” extension. To accomplish this, we would use the following command:
restic restore 46adb587 --repo ~/backups/ --target ~/tmpdata --include '/home/linuxiac/myfiles/*.jpg'Code language: JavaScript (javascript)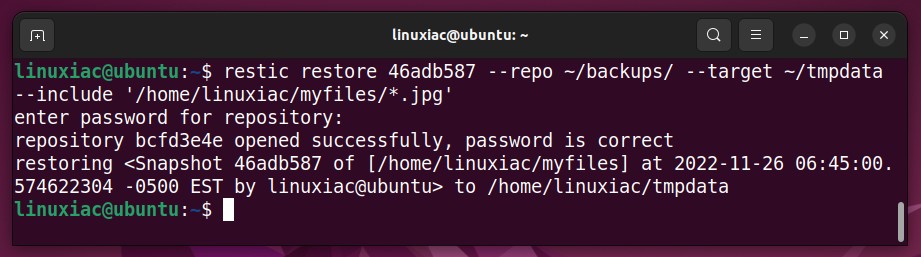
This example gives you a good foundation to build variations on which exact directories and files you want to restore.
Delete Snapshots from the Repository
At some point, the number of snapshots may grow significantly, necessitating the removal of some older ones that you no longer needs. Here’s how you can do it.
First, let’s list the snapshots currently available in the Restic repository.
restic snapshots --repo ~/backups/Code language: JavaScript (javascript)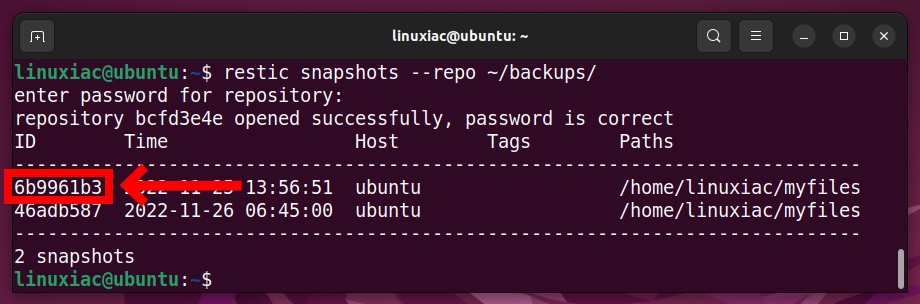
Assume we want to delete the snapshot with ID 6b9961b3. We’ll accomplish this by passing the “forget” option to the restic command followed by the snapshot’s ID:
restic forget 6b9961b3 --repo ~/backups/Code language: JavaScript (javascript)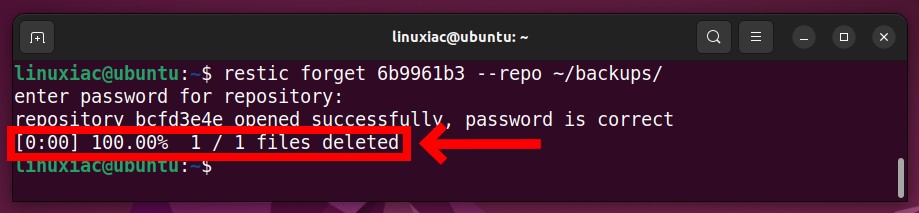
When we look at the list of snapshots again, we can see that the deleted one is no longer among them.

However, the data referenced by files in this snapshot is still in the repository, so let’s clean it up.
restic prune --repo ~/backups/Code language: JavaScript (javascript)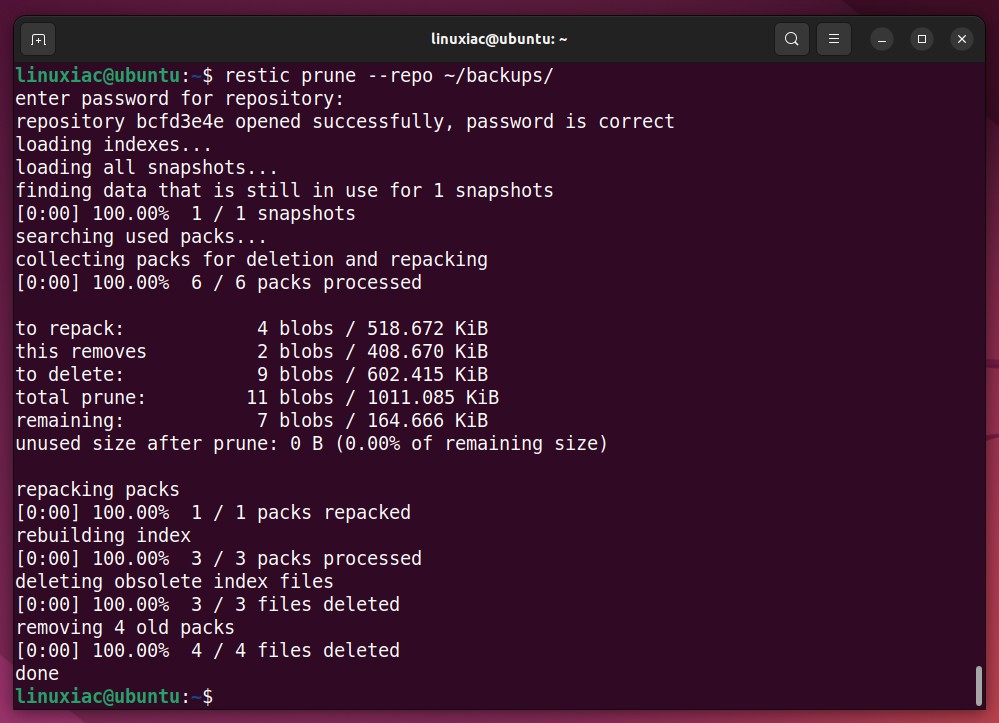
Of course, there is an easier way to remove snapshots we no longer need. However, if we have several hundred of them, it would be tedious and time-consuming to remove them one by one.
Instead, we can use the command below to specify that Restic must keep only the three most recent snapshots, and all others should be removed.
restic forget --repo ~/backups/ --keep-last 3Code language: JavaScript (javascript)Show Basic Statistics
We can get summary information about a specific Restic repository, such as the number of snapshots, total number of files, and repository size, by using the following command:
restic stats --repo ~/backups/Code language: JavaScript (javascript)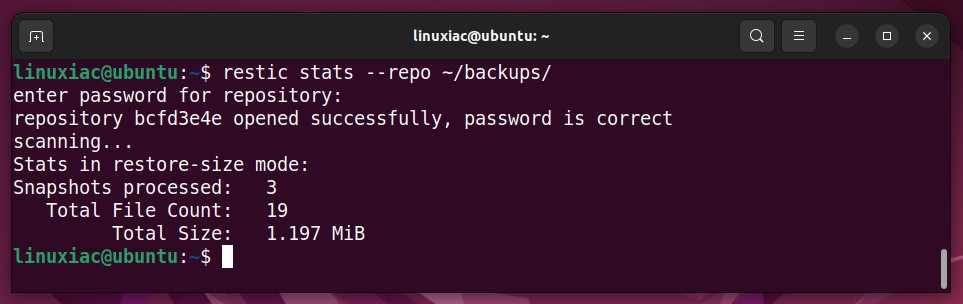
Similarly, using its ID, we can get summary information on a specific snapshot in the repository.
restic stats 46adb587 --repo ~/backups/Code language: JavaScript (javascript)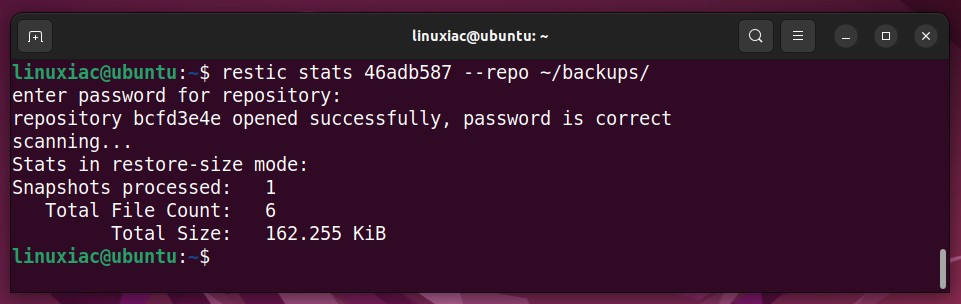
Automatically Passing a Password to Restic
Having to provide a password every time you run a restic command can become annoying, especially if you use it frequently. Furthermore, it limits your ability to automate the snapshot creation process using tools like Cron because it involves user intervention.
Fortunately, there is a solution to this inconvenience. The password for a specific Restic repository can be saved in a text file and then passed to the restic command. Here’s how to put it into action.
Using your preferred editor, create a new file, for example, “.resticpass,” and enter your repository’s password. Next, set its permissions so that you are the only one who can read and edit its content.
There are two ways to do this by using the chmod command, so choose either one.
chmod 600 .resticpass
chmod u+rw,go-rwx .resticpassCode language: CSS (css)
Finally, let’s test it by passing the “--password-file” parameter followed by the password file path to the restic command:
restic snapshots --repo ~/backups/ --password-file ~/.resticpassCode language: JavaScript (javascript)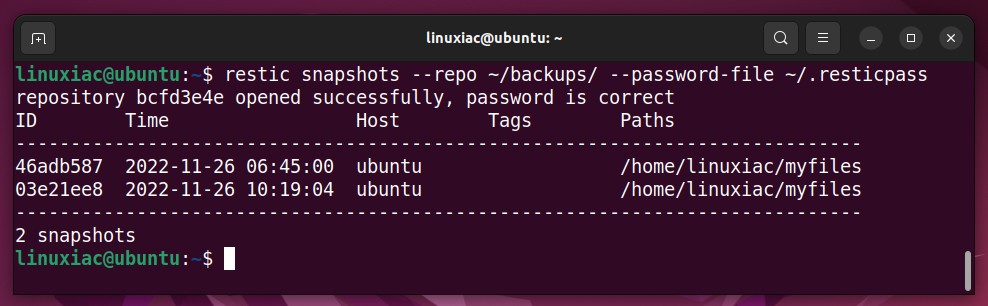
As you can see, Restic no longer requires you to enter a password to access the snapshot repository.
Conclusion
Restic is a highly reliable, powerful, and secure tool that may provide you with peace of mind knowing your important data is properly backed up. Of course, its capabilities extend beyond what I’ve shown here, so I strongly advise you to read its documentation.
What you learn in this guide provides you with a solid foundation on which to build a Restic-based backup solution tailored to your specific needs. Any comments and recommendations are welcome in the section below.


Hi Bobby,
I agree with the previous posters: This is a really successful, practical tutorial for the basic use of restic.
Thank you very much!
Kind regards
Volker
Hiya, Bobby
This tutorial is really great. It covers all of the basics in an easy to understand way.
I currently use timeshift to backup my Debian laptops but I would like to use restic instead.
Would you consider providing a bare metal backup/restore using restic tutorial in an future article?
I’ve found some posts on the restic forum on this topic, but found them confusing.
Thank you very much.
Mr. Borisov, this is simply the best tutorial I have ever seen on Restic. I’ve bookmarked it and I use it. Nothing else I’ve read has come close. It’s a very hard cli program to me and other articles just don’t make it as easy and understandable as you do. To take the very technical and make it do-able for the average linux guy like me is a gift.
Thank you.
Hi Brent,
Thank you for your kind words! I’m pleased to know that we have been of help to you.
Best,
Bobby