
In an era where data privacy and control are paramount, having a personal cloud server has become increasingly desirable. Nextcloud, a powerful open-source software, allows you to create your cloud storage solution, enabling seamless file synchronization, sharing, and collaboration.
Moreover, by offering a self-hosted cloud storage platform, Nextcloud allows you to take control of your data, eliminating the need to rely on third-party providers and ensuring your files and sensitive information remain secure and within your reach.
In the upcoming sections of this guide, we will provide detailed instructions on setting up Nextcloud using Docker Compose. We will cover the deployment process, configuration options, and essential tips to optimize your Nextcloud experience.
You’ll have a fully functional private cloud server by the end, granting you unparalleled control and security over your data. So, let’s dive in!
Prerequisites
Of course, having Docker and Docker Compose installed is required to deploy a containerized Nextcloud. So, if you don’t already have Docker installed, any of the following guides will be helpful:
- How to Install Docker on Ubuntu 24.04
- How to Install Docker on Debian 12 (Bookworm)
- How to Install Docker on AlmaLinux / Rocky Linux
- How to Install Docker on Fedora
- How to Install Docker on Linux Mint 22
- How to Install Docker on Arch Linux
- How to Install Docker on Raspberry Pi
The other essential component is Docker Compose. Remember, it is provided separately from Docker. Therefore, you must Install Docker before adding Docker Compose; otherwise, Compose will not function.
Installing it is pretty simple, even if it is not already on your Linux system. To install Docker Compose, type the following two commands:
sudo curl -L "https://github.com/docker/compose/releases/latest/download/docker-compose-linux-$(uname -m)" -o /usr/local/bin/docker-compose
sudo chmod +x /usr/local/bin/docker-composeCode language: Bash (bash)
Install Nextcloud with Docker Compose
To install Nextcloud, we’ll use five separate containers: Caddy, Nginx, MariaDB, Redis, and Nextcloud itself. We’ll deploy them together using Docker Compose.
Why do we need five containers? Let me explain. You can set up a full-featured Nextcloud instance using only its own image, but this deployment is more for testing purposes and has some limitations.
Furthermore, when problems arise, you need more flexibility to detect and fix them, which is easier to accomplish when you containerize the service into separate components.
At the same time, the approach we chose with five separate containers provides excellent flexibility and high configurability. Most importantly, it is prepared for high workload levels, making it a suitable and reliable solution for production-ready cases with many users and multiple concurrent connections.
Finally, we’ll mention that our Nextcloud installation will use a valid FQDM (Fully Qualified Domain Name), “nextcloud.tmplinux.com,” as the domain name on which the service will be accessible and for which Caddy will automatically issue a valid SSL certificate. Of course, you need to replace this name with the one you own and use in the configurations below.
With everything out of the way, let’s move on to the actual Nextcloud installation and review each container in depth during our deployment.
Setting Up Environment
The first step is to create the folder in which our Docker Compose deployment files will be placed. Then switch to it; from here on, you need to execute all commands further down in this guide from that location.
mkdir nextcloud
cd nextcloudCode language: Bash (bash)
Using your preferred text editor, create a “.env” file. It will contain the environment variables needed to configure our Nextcloud containerized instance.
nano .envCode language: Bash (bash)The “.env” file in Docker lists key pair values used to store configuration parameters and environment variables for your Dockerized application.
This way, you achieve centralized configuration, making it easy to manage and update without modifying the main application deployment file – “docker-compose.yaml,” which we will get to a little later.
Paste the following content into it, then save the file and exit.
MYSQL_ROOT_PASSWORD=your_password
MYSQL_USER=nextcloud
MYSQL_PASSWORD=nextcloud_password
MYSQL_DATABASE=nextcloud
MYSQL_HOST=db
REDIS_HOST=redis
OVERWRITEPROTOCOL=https
TRUSTED_PROXIES=caddy
APACHE_DISABLE_REWRITE_IP=1
OVERWRITEHOST=nextcloud.tmplinux.comCode language: Bash (bash)
Now, let’s break down the syntax and explain the meaning of each value.
- MYSQL_ROOT_PASSWORD The password that will be set for the MariaDB root superuser account.
- MYSQL_USER: Sets a name for the user interacting with the Nextcloud database.
- MYSQL_PASSWORD: Sets a password for the user interacting with the Nextcloud database.
- MYSQL_DATABASE: Sets the name of the Nextcloud database.
- MYSQL_HOST: The service name we set in the “docker-compose.yaml” file for the MariaDB container.
- REDIS_HOST: The service name we set in the “docker-compose.yaml” file for the Redis container.
- OVERWRITEPROTOCOL: Set the protocol of the proxy (Caddy) service. In our case, we’ll use HTTPS.
- TRUSTED_PROXIES: Allows the Nextcloud container to get the visitor’s real IP address sent by the Caddy container.
- APACHE_DISABLE_REWRITE_IP: Disable the IP addresses to be rewritten.
- OVERWRITEHOST: Set the proxy hostname.
Make sure to replace the values for “MYSQL_ROOT_PASSWORD,” “MYSQL_USER,” “MYSQL_PASSWORD,” “MYSQL_DATABASE,” and “OVERWRITEHOST” with the ones you want.
Create Docker Network
Let’s now create our Docker network and name it “nextcloud_network.”
docker network create nextcloud_networkCode language: Bash (bash)By doing this, we ensure that all containers in our Nextcloud installation have network visibility with each other so they can interact. At the same time, the Nextcloud stack will be isolated from the other Docker containers on our host.
Caddy Web Server
First thing first, make sure that no other web server or reverse proxy is already running on the host you will be deploying Nextcloud to that uses ports 80 and 443. In this case, the netstat command is your best friend (here’s our detailed guide on the topic).
netstat -tulnpCode language: Bash (bash)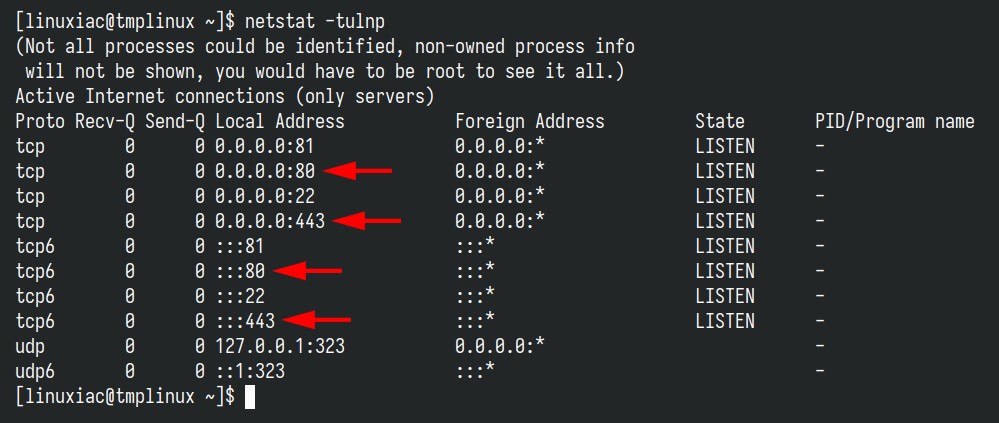
If lines in the command output like the above indicate that ports 80 and 443 are already in use, then you obviously have services using them. If it’s another container, you’ll need to stop it and switch to using a reverse proxy service, with Nginx Proxy Manager being probably the easiest solution to implement technically. Here’s our guide on the subject.
However, if you are running Docker containers on your host and already accessing them using some other reverse proxy software in front of them, such as Nginx, Nginx Proxy Manager, Traefik, Caddy, HAProxy, etc., you should do the following.
In the final “docker-compose.yaml” file (provided below), remove the entire section containing the “caddy” service. Additionally, also remove all the “labels” part from the “web” service.
Lastly, remember to update the “networks” section in the deployment settings for any containers currently using the “reverse_proxy” Docker network we set up earlier so they connect to the network used by your reverse proxy software.
Most importantly, make sure to direct your proxy to the “web” service on port 80. Given your experience managing your own reverse proxy solution, I suppose you are skilled enough to handle this task. Since the setup process varies for each reverse proxy software, detailed instructions are outside the scope of this guide.
Of course, if the above doesn’t apply to your setup, feel free to continue with the guide as usual.
Caddy is a versatile, simple, lightning-fast web server that functions as a reverse proxy. It is well known for its ability to automatically issue Let’s Encrypt SSL certificates, making it an ideal candidate for our Nextcloud installation.
In our case, Caddy will act as a reverse proxy server, sitting in front of Nextcloud, forwarding requests and delivering the responses back to the clients.
Below is the Caddy service section from our “docker-compose.yaml” file. Please do not copy it yet; the final and complete version of the file can be seen further down in this guide.
We’re just showing it here to explain how it works, which also applies to all the following snippets (Nginx, MariaDB, Redis, and Nextcloud) of our containerized services below.
caddy:
    image: lucaslorentz/caddy-docker-proxy:ci-alpine
    container_name: reverse-proxy
    ports:
      - 80:80
      - 443:443
    environment:
      - CADDY_INGRESS_NETWORKS=nextcloud_network
    networks:
      - nextcloud_network
    volumes:
      - /var/run/docker.sock:/var/run/docker.sock
      - caddy_data:/data
    restart: unless-stoppedCode language: YAML (yaml)
Caddy is the only container in our dockerized deployment that exposes ports (80 and 443), allowing the Nextcloud installation to be accessible from the outside world.
All other containers in our Nextcloud stack do not expose ports; instead, they communicate with one another via service names within the isolated “nextcloud_network” Docker network we previously defined.
Because Caddy needs to scan Docker metadata, looking for labels indicating that it should serve a specific container, we mount the Docker socket on the host with that of the container.
After finding labels, it generates an in-memory “Caddyfile” (a main Caddy web server configuration file) with site entries and proxies pointing to the Docker service by their DNS name or container IP.
Finally, we also ensure data persistence by creating a named Docker volume.
Nginx Web Server
Because we are using Nextcloud’s FPM Docker image, we need another container to proxy the requests to the Nextcloud container itself. For this purpose, we will use the Nginx web server. Logically, we named the service “web.”
web:
    image: nginx:alpine
    container_name: nextcloud-web
    networks:
      - nextcloud_network
    links:
      - nextcloud
    labels:
      caddy: nextcloud.tmplinux.com
      caddy.reverse_proxy: "{{upstreams}}"
      caddy.header: /*
      caddy.header.Strict-Transport-Security: '"max-age=15552000;"'
      caddy.rewrite_0: /.well-known/carddav /remote.php/dav
      caddy.rewrite_1: /.well-known/caldav /remote.php/dav
      caddy.rewrite_2: /.well-known/webfinger /index.php/.well-known/webfinger
      caddy.rewrite_3: /.well-known/nodeinfo /index.php/.well-known/nodeinfo
    volumes:
      - nextcloud_data:/var/www/html:z,ro
      - ./nginx.conf:/etc/nginx/nginx.conf:ro
    restart: unless-stoppedCode language: YAML (yaml)
We set all the above labels in the “labels” section, where the Caddy requires reverse proxy service to communicate with the Nginx container.
Important! Don’t forget to replace the line (“caddy: nextcloud.tmplinux.com“) with your actual domain name in the final version.
We create a Docker volume called “nextcloud_data” to persist the Nextcloud installation files, which will also be used in the Nextcloud container below.
Additionally, for Nginx to forward the requested PHP files (Nextcloud is a PHP application) to the Nextcloud container for execution, its configuration must be modified. We accomplish this by mounting our custom “nginx.conf” file inside the container.
Create an “nginx.conf” file and paste the contents below. Then, save the file and exit.
nano nginx.confCode language: Bash (bash)worker_processes auto;
error_log /var/log/nginx/error.log warn;
pid /var/run/nginx.pid;
events {
worker_connections 1024;
}
http {
include /etc/nginx/mime.types;
default_type application/octet-stream;
log_format main '$remote_addr - $remote_user [$time_local] "$request" '
'$status $body_bytes_sent "$http_referer" '
'"$http_user_agent" "$http_x_forwarded_for"';
access_log /var/log/nginx/access.log main;
sendfile on;
#tcp_nopush on;
server_tokens off;
keepalive_timeout 65;
#gzip on;
upstream php-handler {
server nextcloud:9000;
}
server {
listen 80;
client_max_body_size 512M;
fastcgi_buffers 64 4K;
gzip on;
gzip_vary on;
gzip_comp_level 4;
gzip_min_length 256;
gzip_proxied expired no-cache no-store private no_last_modified no_etag auth;
gzip_types application/atom+xml application/javascript application/json application/ld+json application/manifest+json application/rss+xml application/vnd.geo+json application/vnd.ms-fontobject application/x-font-ttf application/x-web-app-manifest+json application/xhtml+xml application/xml font/opentype image/bmp image/svg+xml image/x-icon text/cache-manifest text/css text/plain text/vcard text/vnd.rim.location.xloc text/vtt text/x-component text/x-cross-domain-policy;
add_header Referrer-Policy "no-referrer" always;
add_header X-Content-Type-Options "nosniff" always;
add_header X-Download-Options "noopen" always;
add_header X-Frame-Options "SAMEORIGIN" always;
add_header X-Permitted-Cross-Domain-Policies "none" always;
add_header X-Robots-Tag "noindex, nofollow" always;
add_header X-XSS-Protection "1; mode=block" always;
fastcgi_hide_header X-Powered-By;
root /var/www/html;
index index.php index.html /index.php$request_uri;
location = / {
if ( $http_user_agent ~ ^DavClnt ) {
return 302 /remote.php/webdav/$is_args$args;
}
}
location = /robots.txt {
allow all;
log_not_found off;
access_log off;
}
location ~ ^/(?:build|tests|config|lib|3rdparty|templates|data)(?:$|/) { return 404; }
location ~ ^/(?:\.|autotest|occ|issue|indie|db_|console) { return 404; }
location ~ \.php(?:$|/) {
rewrite ^/(?!index|remote|public|cron|core\/ajax\/update|status|ocs\/v[12]|updater\/.+|oc[ms]-provider\/.+|.+\/richdocumentscode\/proxy) /index.php$request_uri;
fastcgi_split_path_info ^(.+?\.php)(/.*)$;
set $path_info $fastcgi_path_info;
try_files $fastcgi_script_name =404;
include fastcgi_params;
fastcgi_param SCRIPT_FILENAME $document_root$fastcgi_script_name;
fastcgi_param PATH_INFO $path_info;
#fastcgi_param HTTPS on;
fastcgi_param modHeadersAvailable true;
fastcgi_param front_controller_active true;
fastcgi_pass php-handler;
fastcgi_intercept_errors on;
fastcgi_request_buffering off;
}
location ~ \.(?:css|js|svg|gif)$ {
try_files $uri /index.php$request_uri;
expires 6M;
access_log off;
}
location ~ \.woff2?$ {
try_files $uri /index.php$request_uri;
expires 7d;
access_log off;
}
location /remote {
return 301 /remote.php$request_uri;
}
location / {
try_files $uri $uri/ /index.php$request_uri;
}
}
}Code language: Nginx (nginx)You can find more about PHP-FPM in our dedicated guide.
MariaDB Database
Nextcloud offers the flexibility to choose between different database options, including SQLite and MySQL/MariaDB. The database stores various types of Nextcloud data, including user accounts, file metadata, sharing permissions, app configurations, and more.
While SQLite is a lightweight, serverless database engine that stores data in a single file, using it with Nextcloud is only recommended in test scenarios or when you don’t expect to have server load and usage from multiple users.
At the same time, MariaDB is designed to handle larger datasets and higher concurrent connections efficiently. So, as Nextcloud grows and handles more users and data, MariaDB’s performance advantages become evident. That’s why we will use it in our production-ready deployment.
We named our MariaDB service “db.”
db:
    image: mariadb:lts
    container_name: mariadb-database
    command: --transaction-isolation=READ-COMMITTED --log-bin=binlog --binlog-format=ROW
    networks:
      - nextcloud_network
    volumes:
      - db_data:/var/lib/mysql
    environment:
      - MYSQL_ROOT_PASSWORD
      - MYSQL_USER
      - MYSQL_PASSWORD
      - MYSQL_DATABASE
    restart: unless-stoppedCode language: YAML (yaml)
As you can see, there’s little to say here. First, check that the MYSQL environment variables are set correctly in the “.env” file. Like in the other snippets above, we provide a Docker volume that keeps our MariaDB data surviving between container restarts.
Redis Cache
Redis operates by storing key-value pairs in memory, resulting in lightning-fast operations. When a client requests data, such as the result of a database query, the application first checks if the data exists in the Redis cache.
If the data is found, it can be retrieved directly from Redis, avoiding the need to perform the costly operation again. This leads to significant performance improvements, as accessing data from memory is much faster than retrieving it from disk – more about this in our guide.
Since Nextcloud generates a lot of database queries, resulting in lower application performance, bringing Redis into our dockerized Nextcloud installation offloads work from the MariaDB server while making Nextcloud significantly more performant.
redis:
    image: redis:alpine
    container_name: redis-dbcache
    networks:
      - nextcloud_network
    restart: unless-stoppedCode language: YAML (yaml)
As you can see, further configuring the Redis container is unnecessary. It will just run and carry out its functions.
Nextcloud
This Nextcloud container will provide us with the desired self-hosted cloud storage and collaboration platform.
nextcloud:
    image: nextcloud:stable-fpm
    container_name: nextcloud-app
    networks:
      - nextcloud_network
    volumes:
      - nextcloud_data:/var/www/html:z
      - ./php-fpm-www.conf:/usr/local/etc/php-fpm.d/www.conf:ro
    environment:
      - MYSQL_USER
      - MYSQL_PASSWORD
      - MYSQL_DATABASE
      - MYSQL_HOST
      - REDIS_HOST
      - OVERWRITEPROTOCOL
      - OVERWRITEHOST
      - TRUSTED_PROXIES
      - APACHE_DISABLE_REWRITE_IP
    restart: unless-stopped
    depends_on:
      - caddy
      - db
      - redisCode language: YAML (yaml)
In the “environment” section, we supply the information required for the Nextcloud container to connect to the database. We also specify the name of the Redis service to interact with and a few more variables needed for Nextcloud to function correctly.
We also define the local Docker volume that will provide persistence for the Nextcloud application files.
However, to guarantee Nextcloud’s performance, we need to adjust some PHP settings. To accomplish this, create a “php-fpm-www.conf” file and paste the following content into it.
nano php-fpm-www.confCode language: Bash (bash)user = www-data
group = www-data
pm = dynamic
pm.max_children = 281
pm.start_servers = 140
pm.min_spare_servers = 93
pm.max_spare_servers = 187Code language: Bash (bash)As you may have noticed, we are mounting this file in the Nextcloud container and replacing the original one.
Nextcloud Background Jobs
The final component of our Nextcloud installation is a container that performs some background system functions required to keep the Nextcloud container itself in good working condition.
cron:
    image: nextcloud:stable-fpm
    container_name: nextcloud-cron
    networks:
      - nextcloud_network
    volumes:
      - nextcloud_data:/var/www/html:z
    entrypoint: /cron.sh
    restart: unless-stopped
    depends_on:
      - db
      - redisCode language: YAML (yaml)
It uses the same Nextcloud Docker image as before, except its sole purpose is running the built-in “cron.sh” file regularly.
Nextcloud’s Docker Compose File
Let’s now assemble all of the previous pieces into a final version of our Nextcloud dockerized app. First, create a “docker-compose.yaml” file and paste the following content.
nano docker-compose.yamlCode language: Bash (bash)services:
caddy:
image: lucaslorentz/caddy-docker-proxy:ci-alpine
container_name: reverse-proxy
ports:
- 80:80
- 443:443
environment:
- CADDY_INGRESS_NETWORKS=nextcloud_network
networks:
- nextcloud_network
volumes:
- /var/run/docker.sock:/var/run/docker.sock
- caddy_data:/data
restart: unless-stopped
web:
image: nginx:alpine
container_name: nextcloud-web
networks:
- nextcloud_network
links:
- nextcloud
labels:
caddy: nextcloud.tmplinux.com
caddy.reverse_proxy: "{{upstreams}}"
caddy.header: /*
caddy.header.Strict-Transport-Security: '"max-age=15552000;"'
caddy.rewrite_0: /.well-known/carddav /remote.php/dav
caddy.rewrite_1: /.well-known/caldav /remote.php/dav
caddy.rewrite_2: /.well-known/webfinger /index.php/.well-known/webfinger
caddy.rewrite_3: /.well-known/nodeinfo /index.php/.well-known/nodeinfo
volumes:
- nextcloud_data:/var/www/html:z,ro
- ./nginx.conf:/etc/nginx/nginx.conf:ro
restart: unless-stopped
db:
image: mariadb:lts
container_name: mariadb-database
command: --transaction-isolation=READ-COMMITTED --log-bin=binlog --binlog-format=ROW
networks:
- nextcloud_network
volumes:
- db_data:/var/lib/mysql
environment:
- MYSQL_ROOT_PASSWORD
- MYSQL_USER
- MYSQL_PASSWORD
- MYSQL_DATABASE
restart: unless-stopped
redis:
image: redis:alpine
container_name: redis-dbcache
networks:
- nextcloud_network
restart: unless-stopped
nextcloud:
image: nextcloud:stable-fpm
container_name: nextcloud-app
networks:
- nextcloud_network
volumes:
- nextcloud_data:/var/www/html:z
- ./php-fpm-www.conf:/usr/local/etc/php-fpm.d/www.conf:ro
environment:
- MYSQL_USER
- MYSQL_PASSWORD
- MYSQL_DATABASE
- MYSQL_HOST
- REDIS_HOST
- OVERWRITEPROTOCOL
- OVERWRITEHOST
- TRUSTED_PROXIES
- APACHE_DISABLE_REWRITE_IP
restart: unless-stopped
depends_on:
- caddy
- db
- redis
cron:
image: nextcloud:stable-fpm
container_name: nextcloud-cron
networks:
- nextcloud_network
volumes:
- nextcloud_data:/var/www/html:z
entrypoint: /cron.sh
restart: unless-stopped
depends_on:
- db
- redis
networks:
nextcloud_network:
external: true
volumes:
caddy_data: {}
db_data: {}
nextcloud_data: {}Code language: YAML (yaml)Remember to replace the “web” -> “labels” section line “caddy: nextcloud.tmplinux.com” with the domain name that will serve your Nextcloud installation.
Starting Nextcloud with Docker Compose
Finally, we can run our dockerized Nextcloud stack using Docker Compose. To do this, execute the command below from the “nextcloud” directory where our “docker-compose.yaml” file is located.
Start and run the containers in the background:
docker-compose up -dCode language: Bash (bash)The Docker images will start downloading. Depending on your internet connection speed, the entire procedure can take seconds to a few minutes.
In the end, you should see a screen similar to the one below, informing you that your dockerized Nextcloud installation has been successfully deployed and is up and running.
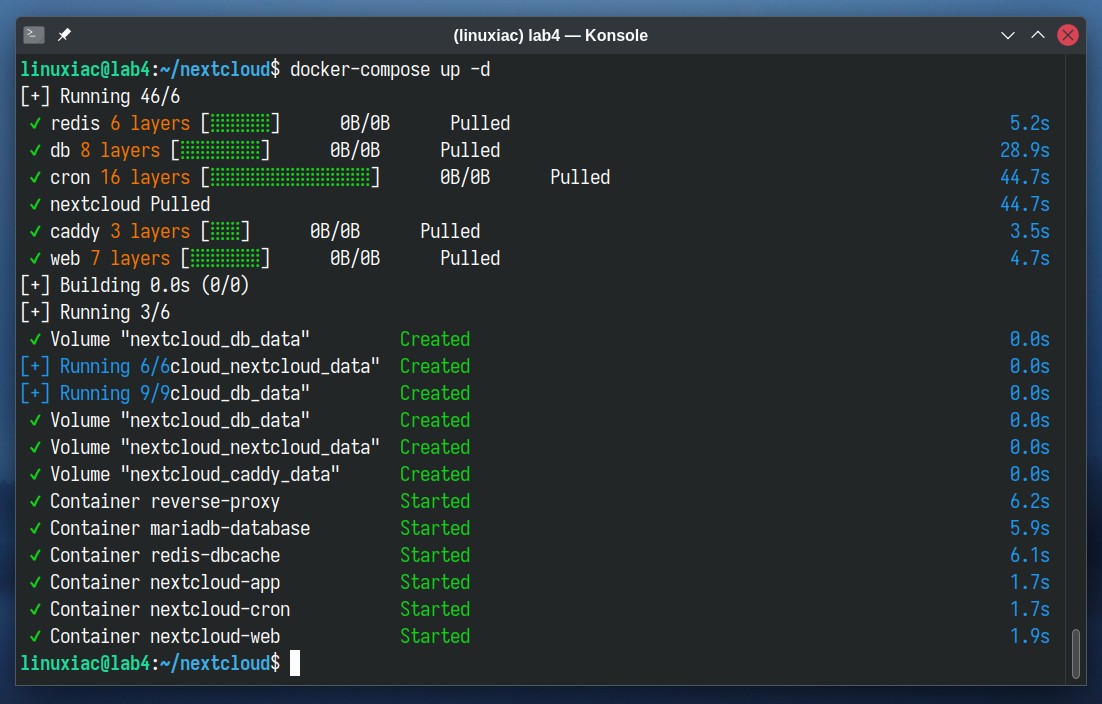
The initial delay of the containers’ start will only be the first time because Docker must download images from the Internet. After that, all subsequent runs will take seconds since they will be already available locally on your Linux system.
Nextcloud Post-Installation Steps
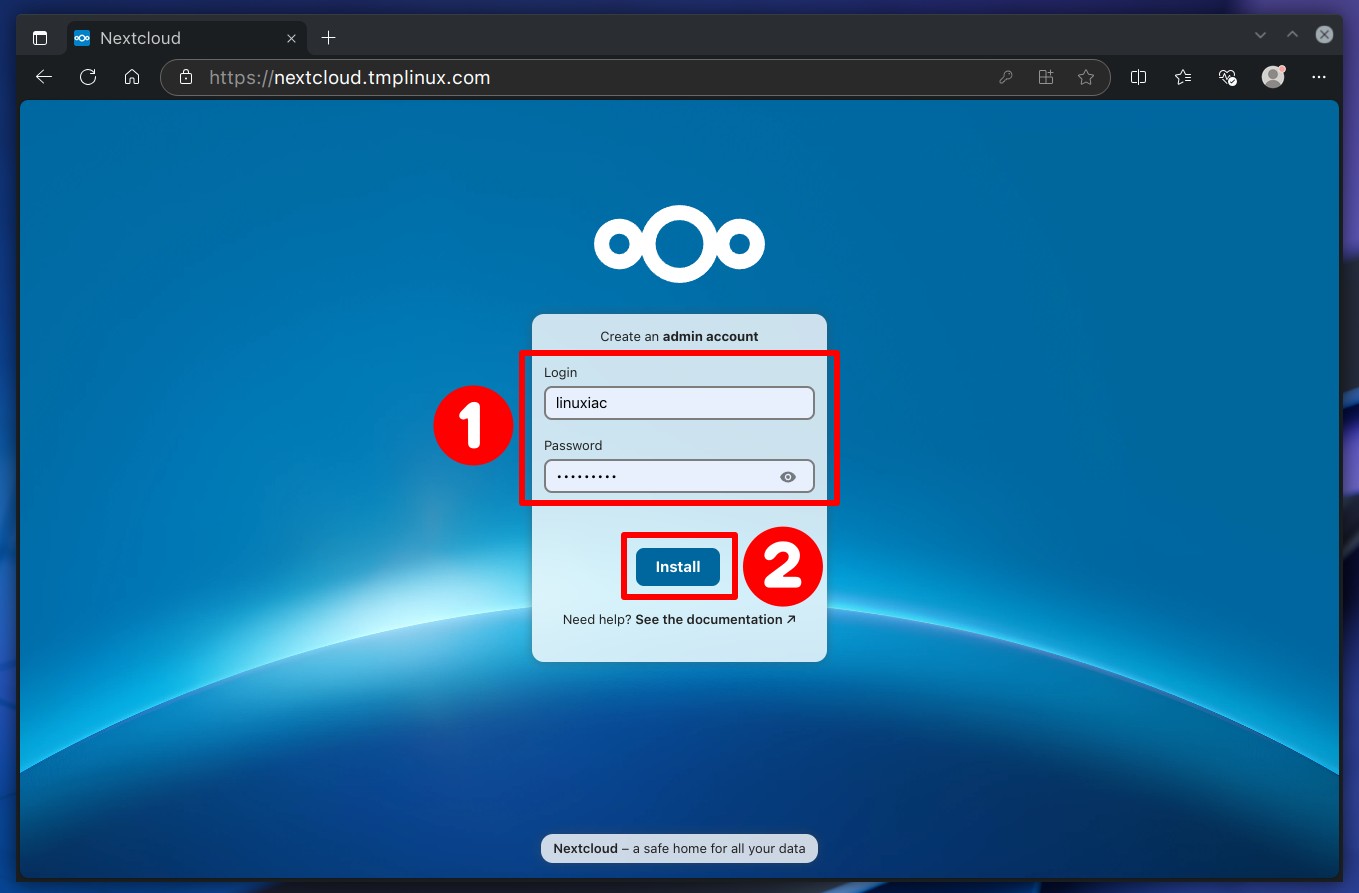
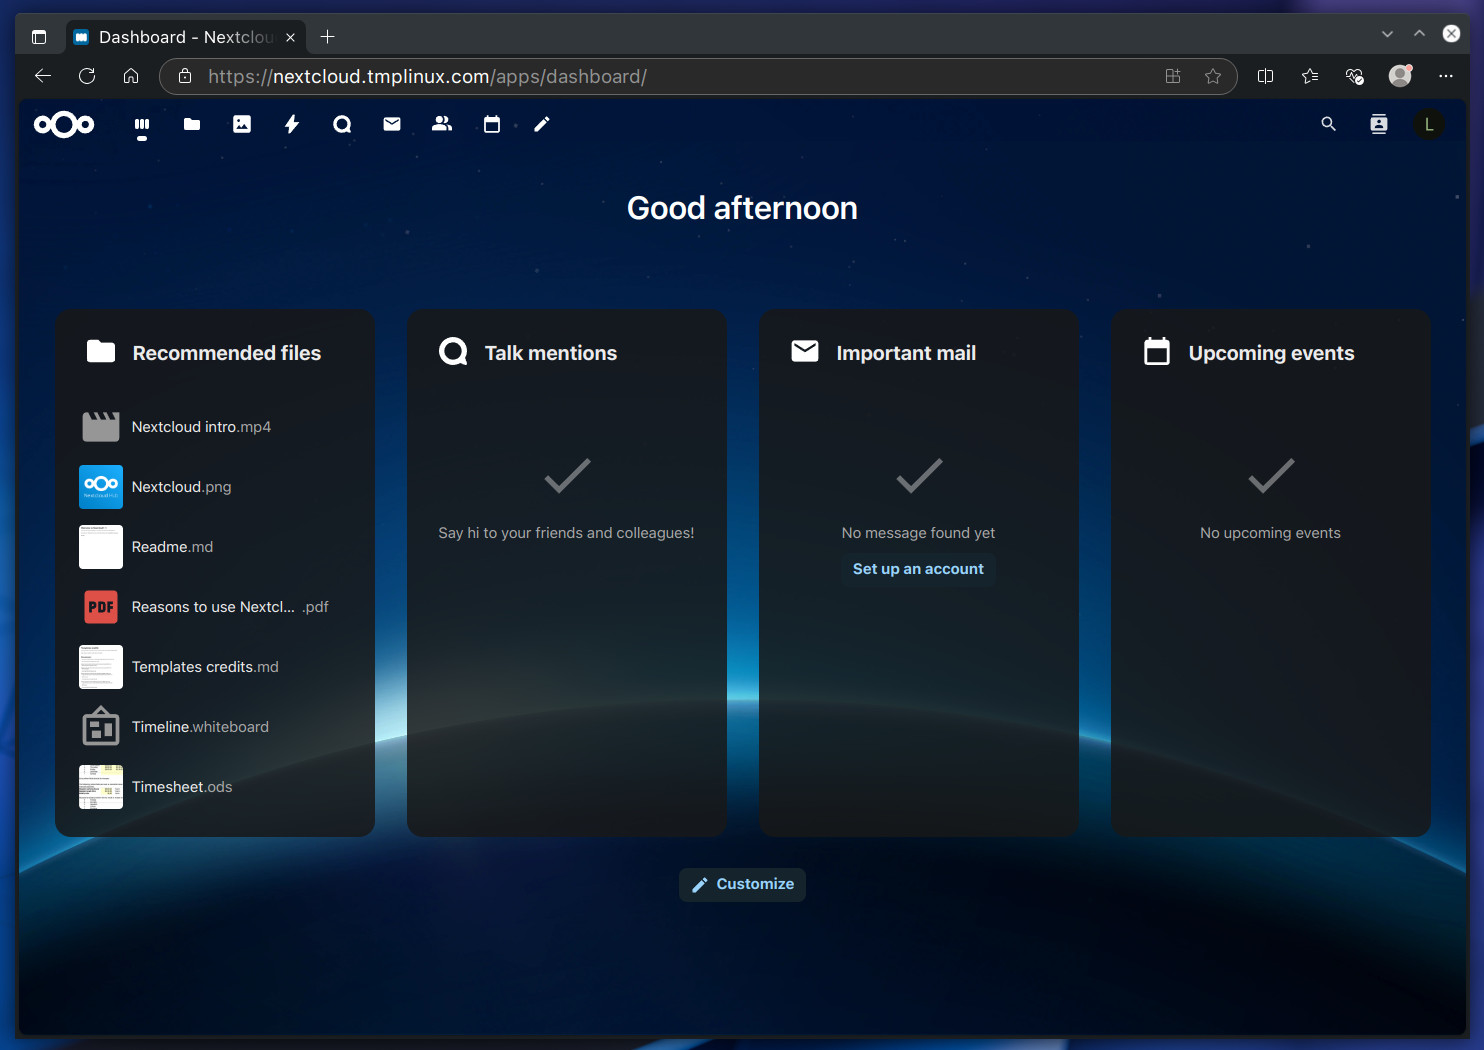
Open a web browser and point it to your Nextcloud address to complete the final installation steps. In our case, it’s a “https://nextcloud.tmplinux.com.”
You will be greeted by a screen asking you to create an administrative Nextcloud account. As you’ll notice, the Caddy reverse proxy service has automatically issued a Let’s Encrypt SSL certificate for the domain.
Enter the username and password you want created and get administrative privileges for the Nextload instance, then click the “Install” button.
Once the installation is complete, which can take up to 1-2 minutes, you’ll be taken to a screen offering the installation of recommended apps like Calendar, Contacts, Mail, Notes, etc. I strongly encourage installing these, as they significantly enhance your Nextcloud experience, transforming it into a robust collaboration platform.
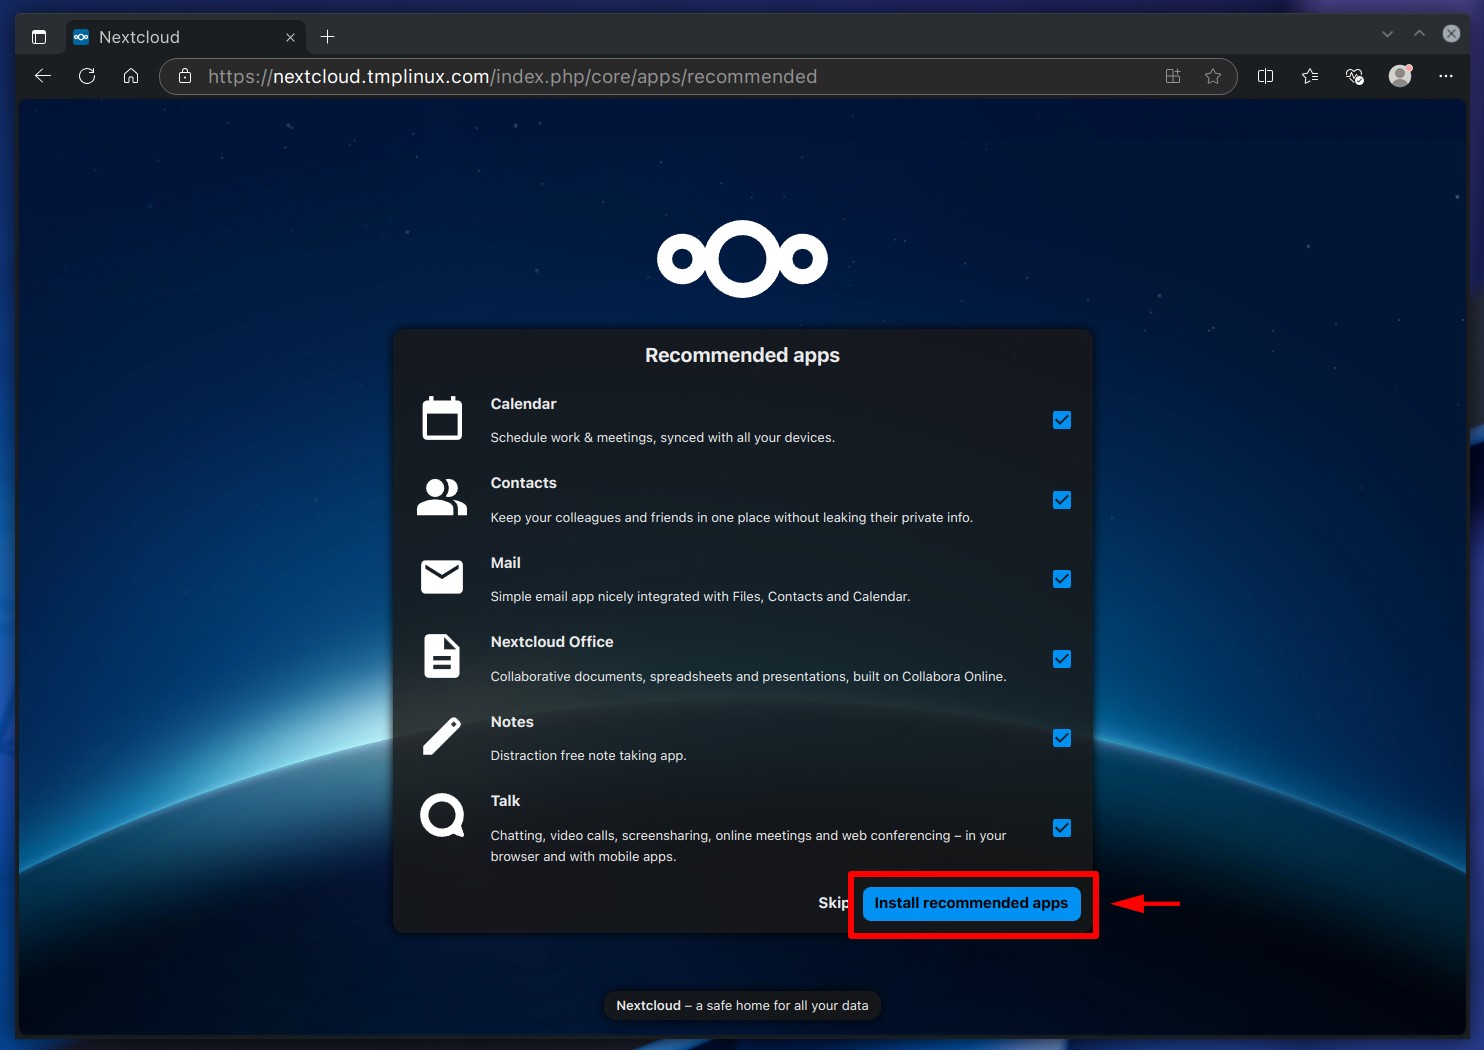
Wait for them to install, as the process takes about a minute. Immediately after that is the right moment to congratulate yourself on a job well done! Your personal Nextcloud instance has been successfully installed, ready to serve your cloud needs.
Worried about how to manage your brand-new containerized Nextcloud instance with Docker Compose? Don’t – we’ve got you covered. In our comprehensive and easy-to-understand guide, you’ll find everything you need to tackle this task easily.
Conclusion
Above all, thank you for trusting our step-by-step instructions and relying on our expertise.
Setting up your own private cloud server using Nextcloud and Docker Compose has never been easier. With the step-by-step instructions in this guide, you can quickly and effortlessly create your own secure and customizable cloud environment.
By utilizing Docker Compose, you can easily manage and deploy the necessary containers and services required for Nextcloud. This allows you complete control over your data, ensuring its privacy and security while enjoying the convenience of cloud storage and collaboration.
So why wait? Start today and set up your Nextcloud server effortlessly using Docker Compose. Take charge of your data, enhance your productivity, and enjoy the peace of mind of having your private cloud server.


Excellent guide. Worked as is out-of-the-box perfectly. After I tried it for the first time, I redid my server storage, repartitioned the drives and created an LVM. I tried to follow the bouncing ball of this guide to change the default nextcloud_data volume from /var/www/http to /data/nextcloud/data. /data is a logical volume. I made, what I thought, were appropriate changes in nginx.conf under http/server/root setting as well as in docker-compose.yaml in web section under nextcloud_data volume, in nextcloud section under volumes nextcloud_data and under cron section.
Docker-compose runs fine, containers show as running, but when I browse to my instance I get Nginx 404 error. Can someone point out what I am doing wrong?
How do I create the nginx.conf file in the nextcloud-web container?
Nice guide and followed as it is. No way I can access the nextcloud login. docker ps lists all images as active, but caddy has ip 0.0.0.0….How can I fix this?
I am using traefik and it works great but i do want to give caddy a try but no to familar with caddy…after creating this stack how easy is it to add other containers that will work with caddy, is it just by adding the proxy network?
How can I check if caddy is working?After the installation I cannot se the nextcloud page because the website ist not secured but I have entered the same domain as in the config file above.
I'm getting an ssl error (ERRSSL_PROTOCOL_ERR) having set this up on proxmox with an ubuntu vm. My guess is there is an issue with the caddy setup, but beyond that I don't know where to look. Any thoughts?
Thanks a lot for the detailed tutorial. Is there a way to update NC to the latest version via docker compose?
Thx for this nice blogpost. But what is the benefit of this approach (using fpm version) over the use of the All-in-one (aio) version? I would love the know your take on that? It might be a interesting to add an introduction paragragh on this topic?
Ha, that's a good question. Thanks for asking! It comes down to performance. I agree that the all-in-one approach is definitely the easiest option. You get a prepackaged solution with everything bundled together in the image—the application itself, web server, PHP, and so on—and it just works right out of the box.
However, performance-wise, things were pretty bad in our tests. On the other hand, the method outlined above is much more production-ready and delivers significantly better performance. And yes, you're absolutely right—I should update the guide with this information.
How to upgrade that instance to newer version?
I highly recommend using Watchtower for this purpose. Our guide on the topic is here.
[+] Running 4/5 ✔ Container redis-dbcache Running 0.0s ✔ Container nextcloud-app Started 5.2s ✔ Container nextcloud-cron Running 0.0s ✔ Container reverse-proxy Started 3.4s ⠦ Container nextcloud-web Starting 1.5sError response from daemon: failed to create shim task: OCI runtime create failed: runc create failed: unable to start container process: error during container init: error mounting "/nextcloud_linux/nginx.conf" to rootfs at "/etc/nginx/nginx.conf": mount /nextcloud_linux/nginx.conf:/etc/nginx/nginx.conf (via /proc/self/fd/6), flags: 0x5001: not a directory: unknown: Are you trying to mount a directory onto a file (or vice-versa)? Check if the specified host path exists and is the expected type
I followed your instructions and got error as abovePlease guide how to fixthanks
I had the same problem, then I figured out that the commands had to be run using sudo, ie.
“sudo docker network create nextcloud_network”
and
“sudo docker compose up”
then everything worked.
Thanks, easy and working guide OVH VPS Ubuntu 22.04
Grazie, guida facile e funzionante OVH VPS Ubuntu 22.04
did not work for me, even using the ip address of the reverse-proxy container timed out
Thank you very much for your great guide! It is awesome! I would like to add Collabora Online. However, I do not have the option to use subdomains, so I need to setup reverse proxy for Collabora based on a different port. How would I do that? If I see it correctly, the Caddy container is configured by nextcloud-web. Would I need another nginx container that also modifies caddy?
great guild for high performance nextcloud. I was hoping to get advice on backing up and recovery of nextcloud when using docker-compose…
After I run command “docker-compose up -d” it throws the following errors“WARN[0000] The "Ktxn8" variable is not set. Defaulting to a blank string.WARN[0000] The "MZy3L" variable is not set. Defaulting to a blank string.WARN[0000] The "Ktxn8" variable is not set. Defaulting to a blank string.WARN[0000] The "MZy3L" variable is not set. Defaulting to a blank string.WARN[0000] /home/tom/nextcloud/docker-compose.yaml: `version` is obsolete[+] Running 3/4 ✔ Container redis-dbcache Running 0.0s ✔ Container mariadb-database Running 0.0s ✔ Container nextcloud-cron Running 0.0s ⠹ Container reverse-proxy Starting 0.2sError response from daemon: driver failed programming external connectivity on endpoint reverse-proxy (58a7e8d41bc645324538579c3902c9b744dfcb50c502aacf8fd9384f1cd6dc15): Error starting userland proxy: listen tcp4 0.0.0.0:443: bind: address already in use“
It looks like port 443 is already being used by another service on your system, possibly by a web server or an existing reverse proxy setup. I've added guidance in the "Caddy Web Server" section on approaching such a case.
I try this all step by step locally. all docker containers start, but I can't access the main nextcloud install page. any solution?
i had this problem for days before i figured it out – you have to go to your router settings and port forward port 80 to your server's public ip address. this is how i got everything to work.
Hey Bobby your readers have a lot of questions and it’d nice if ya answered some of ’em.
They were all polite and stuff 🙂
Jus’ sayin’
Great guide – needs a couple updates:
in nginx.conf after this line below
fastcgi_hide_header X-Powered-By;
add this
# Set .mjs and .wasm MIME types
# Either include it in the default mime.types list
# and include that list explicitly or add the file extension
# only for Nextcloud like below:
include mime.types;
types {
text/javascript js mjs;
application/wasm wasm;
}
In the docker-compose.yml use this mariadb image tag instead:
db:
image: mariadb:lts
container_name: mariadb-database
You should be all set!
Having some issues with MariaDb – this 1GB linode I don’t think it has enuff powa. I might have to consider going to a sqlite verison sans redis. Kinda tricky to get all this config right with that magnitude of changes…could be a while.
Greate guide!
One question: Which folder and path was the nginx.conf saved?
TIA
I made a directory called docker – in there are all the files: docker-compose.yml, nginx.conf, php-fpm-www.conf
Then I ran docker network create and the docker compose up command with sudo from that directory on a 1GB linode and everything is up and running nice (see my comment below for a couple fixes)
Hi,
Great document. Some questions:
1. How can I run NC just locally w/o the reverse proxy? This relies to geteah’s question.
2. I have managed to attach external storage and the directory is visible in Files, but I do not see the files themself in this NC directory
Thanks
Hi,
thanks for the guide. I got one question: What do I have to do to being able to access the Nextcloud from inside my local network?
Have a nice day.
Thanks for making this. I’m having problems getting the CODE server to work, or to get Nextcloud office documents to work with this image. Did anyone else try this or have a fix?
Great document, thanks. Locally everthing is running. But the reverse proxy doesn’t show the nextcloud login. From my provider I get for my domain cloud.mfgsteffen.de a “not save message” and the alfahosting logo in return. What did I wrong?
A wild guess: in the docker-compose.yml file, you need to change the domain:
labels:
caddy: your.domain.goeshere
caddy.reverse_proxy: “{{upstreams}}”
Thanks for this great doc. One issue i am facing is nextcloud.log file always showing remote address as the addess of reverse-proxy. How can i make NC log actual client IP?
A great guide.
Can you please explain how add and install Nextcloud on external SDD/HDD.
Thank you in advance.
update: got this working using bind mounts even though file sharing says that the home folder is shared. So it could be something to do with absolute and relative paths.
A great guide as usual which explains every step well. I have followed a few other guides without any real hitches but I have come up against a couple of problems which may be of my own making as I am trying to install a stack via the portainer extension on docker desktop. The two errors I am getting are:
1 – level=warning msg=”mount of type `volume` should not define `bind` option” . This is repeated for all the named volumes but I am not sure why there is a bind issue as being named means it is under docker control.
2 – Error response from daemon: Mounts denied: The path /data/compose/8/php-fpm-www.conf is not shared from the host. Again I am not sure why there should be an error as the home folder is shared in file resources in docker desktop. perhaps its a permission issue as the file has myself as owner but maybe it should be something else.
Any thoughts would be helpful
Great document. !