Docker is a tool that revolutionizes the way we build and deploy applications. Docker Compose is an essential addition to it that expands its capabilities and makes it easier to work with.
However, getting started can be overwhelming if you’re new to Docker Compose. To facilitate this, in this article, we’ll cover the basics of Docker Compose and show you how to create a simple multi-container application.
By the end of this guide, you’ll understand how to install and use Docker Compose to build and deploy your own applications. But first, let’s answer an important question.
What’s Docker Compose?
Docker Compose is a platform-neutral tool for defining and running multi-container Docker applications. It allows you to define a group of services, their dependencies, and the configuration to run them declaratively using a YAML file.
Then, Docker Compose uses this file to create and start all the necessary containers with a single command. It is a powerful tool widely used for development, testing, and production environments for managing containerized applications.
Why Use Docker Compose?
Docker Compose simplifies managing multi-container applications by providing an easy way to orchestrate and manage their dependencies, network, and storage configuration.
Here are some of the main reasons why to use Docker Compose.
- Simplified Configuration: With Docker Compose, you can define all the services and their configuration in a single YAML file, which makes it easier to manage complex setups with multiple containers and dependencies.
- Seamless Communication: Docker Compose automatically creates a network between the containers in your application, allowing them to communicate seamlessly without any extra setup.
- Variables Support: Docker Compose supports variables in Compose’s YAML file. These variables can be used to customize your deployments to different environments and needs.
- Consistent Development and Testing Environments: With Docker Compose, you can define the same environment for your development and testing machines, which helps avoid compatibility issues and ensures that your application behaves consistently across different environments.
Having specified all that, let us show you how to install it.
How to Install Docker Compose
First, ensure you have Docker installed on your system before installing Docker Compose, as it must be present for Docker Compose to work. So, let’s check if Docker is available on our system:
docker -v
As you can see from the command output above, Docker is installed on our machine. However, if you get an error message like “bash: docker: command not found…“, you’ll need to install Docker before proceeding.
We’ve got you covered if you need help with how to do it. Here are our easy-to-follow guides for Ubuntu, Debian, Linux Mint, Fedora, Raspberry Pi, AlmaLinux, and Rocky Linux. Now back on topic.
To start with Docker Compose, you’ll need to install it on your local machine first. Fortunately, the process is relatively straightforward and can be completed with just two commands.
The first one is to download Docker Compose, which is a single binary:
sudo curl -L "https://github.com/docker/compose/releases/latest/download/docker-compose-linux-$(uname -m)" -o /usr/local/bin/docker-composeCode language: JavaScript (javascript)Then, set executable permissions on the file:
sudo chmod +x /usr/local/bin/docker-composeThat’s it. Let’s see whether we already have Docker Compose installed:
docker-compose version
Everything seems fine – time to test our Docker Compose installation.
Creating a Docker-Compose File
To use Docker Compose, you must first create a “docker-compose.yaml” file describing the containers in your application’s stack. It describes the services, environment variables, volumes, and networks our containers will use.
It is important to remember that containers declared in the “docker-compose.yaml” file automatically become members on the same stack.
In other words, they’re linked in their own Docker network, which is automatically created by Docker Compose when they are started, so they can communicate using their service names as hostnames described in the “docker-compose.yaml” file.
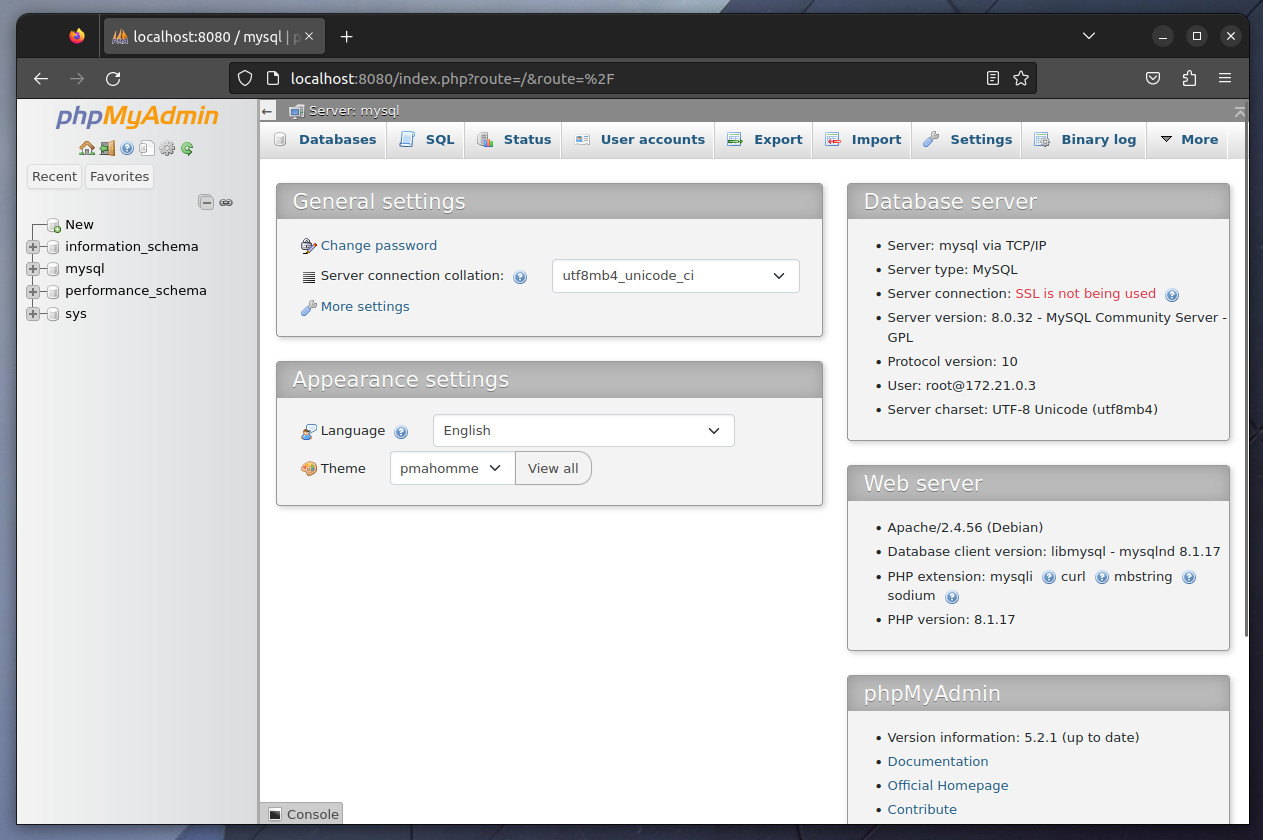
For example, the Docker Compose YAML file below deploys two containers, MySQL and phpMyAdmin. As a result, you’ll have a running database and a convenient web-based UI to administer it in minutes.
version: '3.8'

# Services
services:

    # MySQL Service
    mysql:
        image: mysql:latest
        environment:
            MYSQL_ROOT_PASSWORD: your_password
        volumes:
            - mysqldata:/var/lib/mysql

    # phpMyAdmin Service
    phpmyadmin:
        image: phpmyadmin/phpmyadmin:latest
        ports:
            - 8080:80
        environment:
            PMA_HOST: mysql
        depends_on:
            - mysql

# Volumes
volumes:
  mysqldata:Code language: PHP (php)
Copy and save the above content to a file named “docker-compose.yaml.” Don’t forget to change the password for the “MYSQL_ROOT_PASSWORD” variable to another of your choices.
Then, from the directory where the file is placed, open the terminal and type:
docker-compose up -d
The command will begin to pull (download) the MySQL and phpMyAdmin Docker images from Docker Hub. This will take a while. Once the download is complete and the containers are successfully run, their status will change to “Started.”
Congratulations! Your first Docker Compose deployment was created successfully. Now, open your browser and navigate to “http://localhost:8080.” The phpMyAdmin login page will greet you.

Use the user “root” and the password you specified in the “docker-compose.yaml” file to log into phpMyAdmin and start administrating your dockerized MySQL container.
This simple example should give you an idea of how to use Docker Compose to deploy multi-container applications. Now, let’s review the essential Docker Compose commands for managing them.
Commonly Used Docker Compose Commands
If you’re familiar with Docker, using Docker Compose commands will seem very familiar, as they overlap and have similar functionality. So let’s take a look at the most important ones.
We stress that the docker-compose command must always be run from the directory containing the “docker-compose.yaml” file defining the corresponding containerized service(s).
Build & Run Containers
The docker-compose up command builds and runs the Docker images, starts the containers, and attaches to containers for a service. However, it is often used with an added “-d (--detach)” flag, indicating that a Docker container is running in the background of the terminal.
docker-compose up -dIf you omit to add it, the containers will remain stuck to your terminal session and will be terminated when you press “Ctrl+C,” for example.
Stop & Remove Containers
The command shown below will stop and remove containers and all the networks:
docker-compose downIn addition, if you add the “-v (--volumes)” flag to it, all volumes associated with the services defined in “docker-compose.yaml” will also be deleted. So use it with caution!
docker-compose down -vList Docker Containers
To view the current status of the running containers in a Docker Compose application, execute the following command:
docker-compose psHowever, this will not show you the stopped containers. So, add the “-a (--all)” argument to the command to show the status of all service-defined ones in the “docker-compose.yaml” file.
docker-compose ps -aStop Containers
You can stop all the running containers defined in the “docker-compose.yaml” file without removing them by using the following command:
docker-compose stopTo stop only an individual container, add a reference after the command to the service name defined as such in the “docker-compose.yaml” file. For example:
docker-compose stop mysqlStart Containers
To start all existing containers that were previously created with the docker-compose up command:
docker-compose startAdd the service name after the command to run only a single one. For example:
docker-compose start mysqlView Logs
Sometimes, our Docker Compose deployments fail. One of the main ways to find out what went wrong in such a situation is by examining the containers’ logs.
To do so, enter the docker-compose logs command followed by the service name as you defined it in the “docker-compose.yaml” file. For example:
docker-compose logs mysqlA handy option is to add the “-f (--follow)” argument, allowing you to track what is happening in the corresponding container in real-time.
docker-compose logs -f mysqlRemove Container
To remove stopped service containers, type the following:
docker-compose rmIn addition, to remove any anonymous volumes attached to containers, use the “-v (--volume)” argument:
docker compose rm -vFinally, we highly recommend checking out Compose’s CLI documentation for a detailed reference and in-depth coverage of all Docker Compose commands.
Conclusion
Docker Compose is an essential tool for any developer or system administrator looking to streamline their workflow and manage multiple containers.
With its easy-to-use syntax and powerful features, Docker Compose makes it possible to quickly set up complex multi-container environments and test your applications in various scenarios.
By following the steps outlined in this guide, you should now understand how to install and use Docker Compose to simplify your development process.
In addition, check out the project’s official documentation to learn more about Docker Compose.
We hope that we were helpful to you. Any comments or suggestions are welcome in the comments section below.