
The classic LAMP stack—Linux, Apache, MySQL, and PHP—has long been the backbone of countless dynamic websites and web applications. However, in modern development workflows, manually installing and maintaining each component on your host system is no longer necessary.
With Docker Compose, you can easily containerize every part of your LAMP environment in minutes, keeping your setup clean, reproducible, and portable across systems.
Of course, if you still prefer the traditional approach, you can install this stack from the distro’s native packages. If that’s the case, our tutorials for Ubuntu, Debian, Rocky Linux, and AlmaLinux will help you do it effortlessly.
But in this guide, the focus is different. It’ll walk you through building a production-ready LAMP stack using Docker Compose. So let’s dive in.
Prerequisites
As you can guess, Docker and Docker Compose must be installed to deploy a containerized LAMP stack. If you don’t have it, the following guides will help you quickly install it.
Just pick the distribution you are using—Ubuntu 24.04 LTS, Debian 13, Arch Linux, AlmaLinux 10, Rocky Linux 10, Fedora, Linux Mint 22, Pop!_OS 22.04, or Raspberry Pi OS—and follow the steps to install Docker.
The other essential component is Docker Compose. Recent Docker versions now include Docker Compose via the “docker-compose-plugin” package. So, install it if it’s not already in your setup.
As an alternative, you can get it separately using both commands below. In that case, remember, when running the tool, to type docker-compose instead of docker compose.
sudo curl -L "https://github.com/docker/compose/releases/latest/download/docker-compose-linux-$(uname -m)" -o /usr/local/bin/docker-compose
sudo chmod +x /usr/local/bin/docker-composeCode language: Bash (bash)
Create Project’s Structure
Docker Compose allows you to build and run stacks of multiple containers. In other words, it is a tool for defining and running multi-container Docker applications.
To use it, you must first create a “docker-compose.yaml” file that configures the containers for your application. Then, you can use a single command such as docker-compose up -d to start all the containers and link them together.
First, let’s create the directory structure to house the files required to set up Apache, MariaDB, PHP, and phpMyAdmin with Docker Compose. The final version should look like the one shown below.
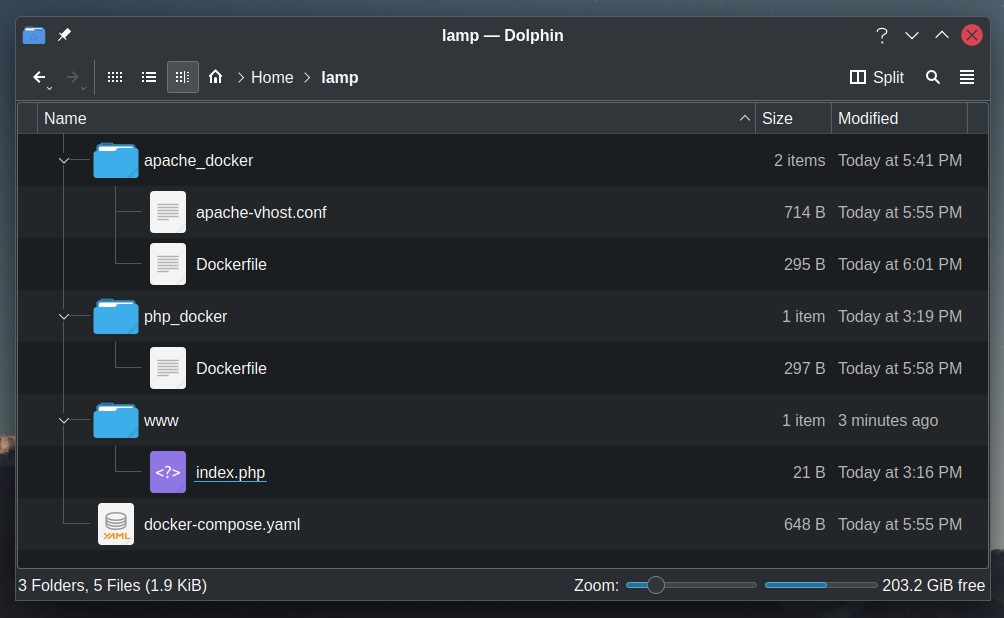
I use an arbitrary name for the main directory, such as “lamp.” It will store all the files required for the setup, so let’s create it.
mkdir lampCode language: Bash (bash)Then we make three subdirectories inside it: “apache_docker,” “php_docker,” and “www.”
mkdir lamp/{apache_docker,php_docker,www}Code language: Bash (bash)- The “apache_docker” directory contains the file (Dockerfile), which builds the Apache container, as well as the additional configuration for the Apache server (“apache-vhost.conf“), providing the integration of the web server with PHP and adding a virtual host.
- The “php_docker” directory contains the “Dockerfile,” which builds a PHP container with additional PHP modules installed.
- The “www” directory is intended to store the executable PHP scripts for our apps.
It is important to note that we chose all these directory names arbitrarily. Of course, you are free to use different ones.
Set Up Apache, MariaDB, PHP, and phpMyAdmin with Docker Compose
It’s time to create our deployment file describing all the services in the containerized LAMP stack. First, create a file named “docker-compose.yaml” inside the “lamp” directory with your preferred text editor:
cd lamp
nano docker-compose.yamlCode language: Bash (bash)
Add the following content to it:
services:

  # PHP Service
  php:
    build: './php_docker/'
    volumes:
      - ./www/:/var/www/html/

  # Apache Service
  apache:
    build: './apache_docker/'
    depends_on:
      - php
    ports:
      - "80:80"
    volumes:
      - ./www/:/var/www/html/

  # MariaDB Service
  mariadb:
    image: mariadb:lts
    environment:
      MYSQL_ROOT_PASSWORD: your_password
    volumes:
      - mysqldata:/var/lib/mysql

  # phpMyAdmin Service
  phpmyadmin:
    image: phpmyadmin/phpmyadmin:latest
    ports:
      - 8080:80
    environment:
      PMA_HOST: mariadb
    depends_on:
      - mariadb

# Volumes
volumes:
  mysqldata:Code language: YAML (yaml)
Save and close the file. Don’t be worried if something in its contents is unclear to you. We’ll go through it in more detail below.
PHP Service
We’ll begin with PHP, the first service in our “docker-compose.yaml” file. The key point here is the “build” directive, which points to the “php_docker” directory, where the default “Dockerfile” is located.
As you can see, there is no path to a Docker image here. This is because we will be building our own, and the instructions are in the “Dockerfile” file.
You may be asking why we need to build our own Docker image for PHP instead of using one already available on Docker Hub. The answer is simple: the official image includes only a limited set of preinstalled PHP extensions. Unfortunately, they are, in most cases, insufficient for the applications we aim to develop.
To fix this, we will create a new custom Docker image based on the official PHP image and compile and include the most commonly used PHP extensions, such as MySQL, PostgreSQL, GD, ZIP, XML, Redis, etc.
So, create a file named “Dockerfile” inside the “php_docker” directory and add the following content to it:
nano php_docker/DockerfileCode language: Bash (bash)FROM php:8.4-fpm
# Installing dependencies for building the PHP modules
RUN apt update && \
apt install -y --no-install-recommends zip libzip-dev libpng-dev libicu-dev libxml2-dev libpq-dev libonig-dev libcurl4-openssl-dev && \
rm -rf /var/lib/apt/lists/*
# Installing additional PHP modules
RUN docker-php-ext-install mysqli pgsql pdo pdo_mysql pdo_pgsql gd zip intl xml mbstring curl opcache fileinfo bcmath soap
# Install Redis support via PECL
RUN pecl install redis \
&& docker-php-ext-enable redis
# Cleaning APT cache
RUN apt cleanCode language: Dockerfile (dockerfile)Save and close the file. Of course, as you guessed, if you need more PHP extensions, you can include them in the file.
The “volumes” directive in the “php” service section of “docker-compose.yaml” specifies the location of the app’s PHP files. As you know, Docker containers are temporary, and any data stored in them is expected to be lost when the container is deleted. Fortunately, Docker volumes provide a mechanism for persisting data created inside a container.
So, our local “www” directory points to “/var/www/html” within the PHP container, where PHP looks for executable PHP scripts. In other words, we map a folder on the host filesystem (outside of the container context) into the running container.
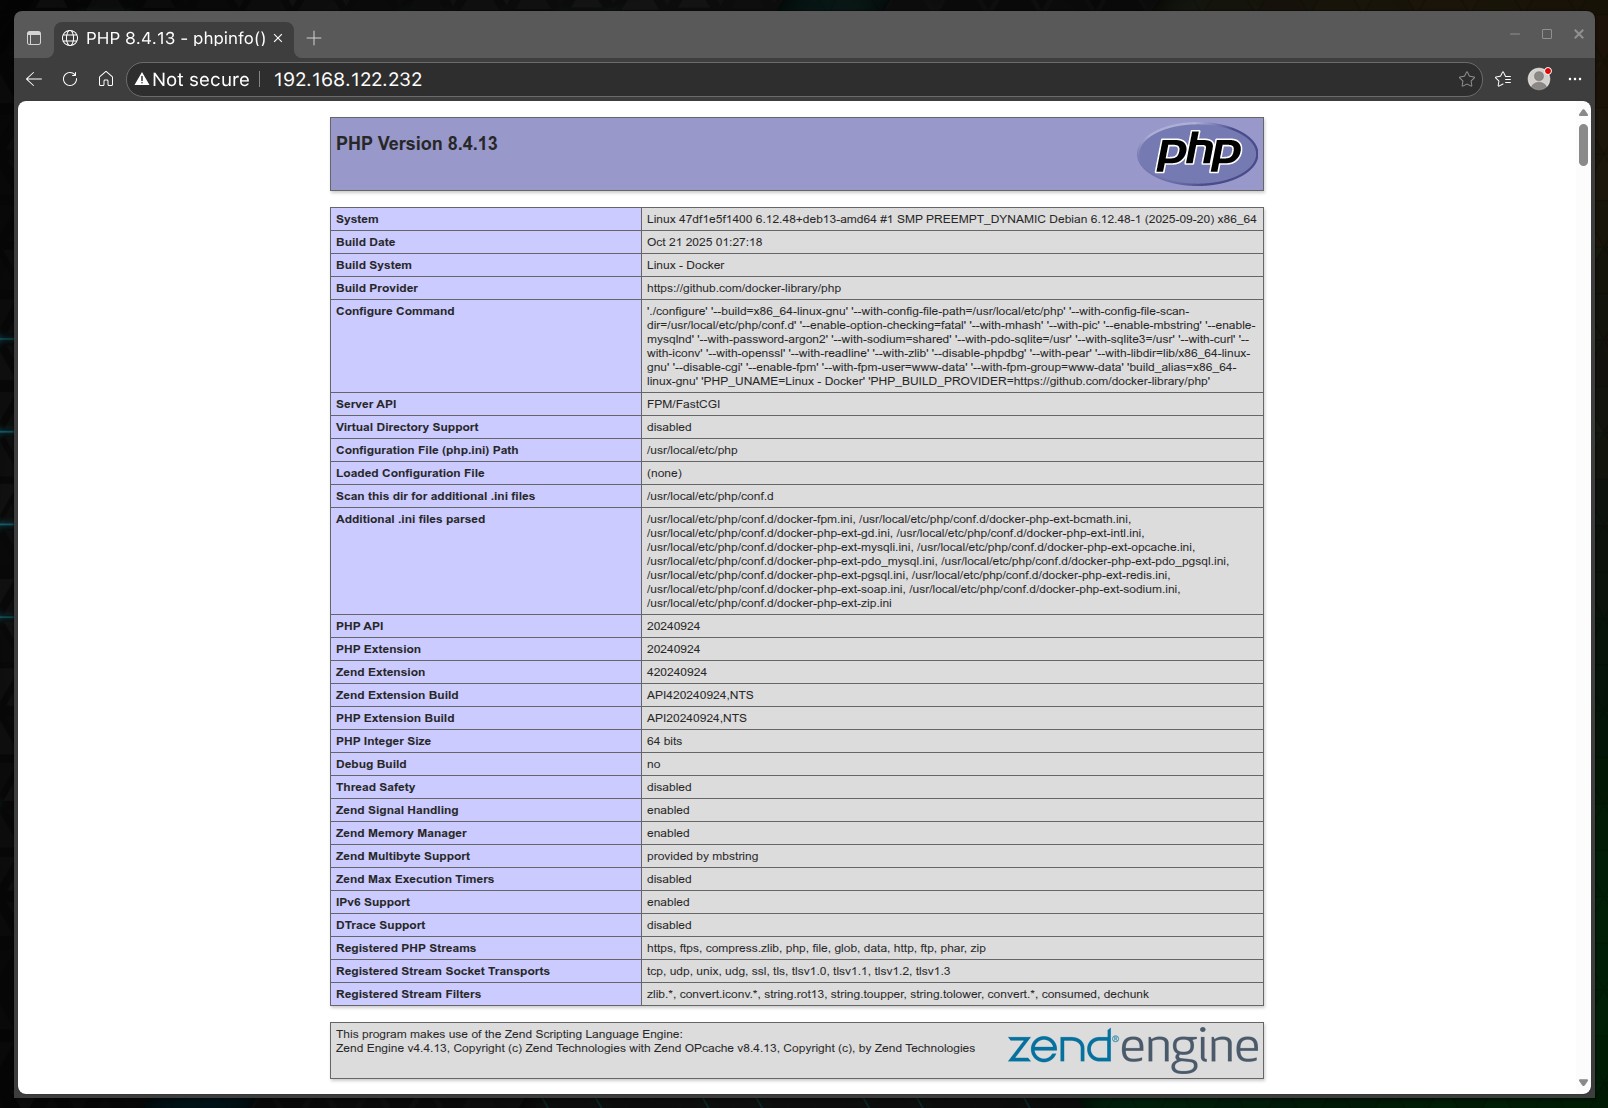
Next, let’s create an “index.php” file for testing.
echo "<?php phpinfo(); ?>" | tee www/index.phpCode language: Bash (bash)Apache Service
Things are similar here. We use the latest Docker image and map the container’s port 80 to port 80 on our local Linux system.
Let’s first create our “apache-vhost.conf” file, which sets the root directory containing the PHP files for our application to be the container “/var/www/html,” which, as we already know, we have mapped to our local one “www.”
In addition, we load the modules we need in Apache so the web server can proxy requests, in this case, to the PHP container.
So, inside the “apache_docker” directory, create a file named “apache-vhost.conf” and paste the following content into it:
nano apache_docker/apache-vhost.confCode language: Bash (bash)ServerName localhost
LoadModule deflate_module /usr/local/apache2/modules/mod_deflate.so
LoadModule proxy_module /usr/local/apache2/modules/mod_proxy.so
LoadModule proxy_fcgi_module /usr/local/apache2/modules/mod_proxy_fcgi.so
<VirtualHost *:80>
# Proxy .php requests to port 9000 of the PHP container
ProxyPassMatch ^/(.*\.php(/.*)?)$ fcgi://php:9000/var/www/html/$1
DocumentRoot /var/www/html/
<Directory /var/www/html/>
DirectoryIndex index.php
Options Indexes FollowSymLinks
AllowOverride All
Require all granted
</Directory>
# Send Apache logs to stdout and stderr
CustomLog /proc/self/fd/1 common
ErrorLog /proc/self/fd/2
</VirtualHost>Code language: Apache (apache)Save and exit the file.
Now, again inside the “apache_docker” directory, create the “Docker” file that will build our Apache image and import into it the “apache-vhost.conf” file we just created.
nano apache_docker/DockerfileCode language: Bash (bash)FROM httpd:2.4-alpine
RUN apk update; apk upgrade;
# Copy Apache virtual host file to proxy .php requests to PHP container
COPY apache-vhost.conf /usr/local/apache2/conf/apache-vhost.conf
RUN echo "Include /usr/local/apache2/conf/apache-vhost.conf" \
>> /usr/local/apache2/conf/httpd.confCode language: Dockerfile (dockerfile)Again, save and exit the file.
MariaDB Service
Our MariaDB server’s Docker Compose configuration is simple. All that needs to be done is replace the “MYSQL_ROOT_PASSWORD” directive with “your_password” or whatever you choose. As the name implies, this is the password for the MariaDB root account.
The “volumes” directive ensures that we will not lose the data in our database during container restarts. That’s all we need for our MariaDB container.
phpMyAdmin Service
The final container in our Docker Compose deployment is phpMyAdmin. Since it is not required for the LAMP stack to function, it simplifies MariaDB administration, which is why we include it in our deployment.
We specify phpMyAdmin to be accessible on port 8080 because 80 is already reserved for the Apache container.
The “PMA_HOST: mariadb” directive tells the phpMyAdmin container which database to connect to, in this case, the service name of the MariaDB container.
Start and Run the LAMP Stack with Docker Compose
Finally, it’s time to build and run our containerized LAMP stack. To do this, execute the following command from the “lamp” directory where our “docker-compose.yaml” file is located.
docker-compose up -dCode language: Bash (bash)The images will start downloading, and custom PHP and Apache Docker images will be built during the process.
The entire procedure will take a few minutes. In the end, you should see a screen similar to the one below, informing you that all containers have been successfully created and started.

The initial delay in container startup will only happen once, because Docker must first download some images and then build others locally. After that, all subsequent runs will take seconds since they will already be available locally on your Linux system.
Finally, you can open your browser and navigate to “http://localhost” or “http://< server-ip-addresses>” if you have deployed the LAMP stack on a remote server. The “index.php” file we prepared early in the “www” directory will greet you.
You can also reach your containerized phpMyAdmin instance at “http://localhost:8080” or “http://< server-ip-addresses>:8080” and use the username “root” and password that you set in the “docker-compose.yaml” file to connect to and manage the MariaDB server.

It’s time to congratulate yourself on a well-done job! Now, let’s quickly walk through the essential Docker Compose commands for managing your containerized LAMP stack.
Basic Docker Compose Commands
The basic Docker Compose commands you can use in practice are shown below with examples. Remember to execute them from the directory containing the “docker-compose.yaml” file.
To view a list of all the containers that are currently running in your LAMP deployment, type:
docker-compose psCode language: Bash (bash)To stop all Docker containers that are running in the background, use the command as shown below:
docker-compose stopCode language: Bash (bash)Of course, you can stop only a single container in your LAMP stack rather than all of them. Run docker-compose stop followed by the service name to do so. Notice not the container name but the service name.
For example, to stop the Apache container, execute the following:
docker-compose stop apacheCode language: Bash (bash)Similarly, you can rerun it later by executing “docker-compose start apache.”
Similarly, from your project directory (“lamp”), type the command below to start up your application:
docker-compose startCode language: Bash (bash)The “docker-compose logs” command displays log output from services. For example, to view the Apache container logs:
docker-compose logs apacheCode language: Bash (bash)Additionally, if you want to aggregate the logs of every container in your LAMP stack and track what’s happening in them in real-time, type:
docker-compose logs -fCode language: Bash (bash)The following command stops and removes containers and networks created by the “docker-compose up -d” command:
docker-compose downCode language: Bash (bash)Additionally, if you want to stop and remove containers as well as their associated Docker images, use the following command:
docker-compose down --rmi allCode language: Bash (bash)In addition, if you want an in-depth introduction to Docker Compose, check out our comprehensive guide.
Conclusion
Congratulations! You have mastered quickly deploying Apache, MariaDB, and PHP using Docker Compose. With the knowledge and skills you have gained from this guide, you are well-equipped to streamline your web development workflow and accelerate your project deployment process.
The benefits of using Docker Compose for your LAMP stack deployment are numerous. First, it provides isolation and portability, ensuring your applications run consistently across different environments.
It also enables easy scaling of individual services within your stack, allowing you to handle increased traffic and demand seamlessly. Furthermore, the modular nature of Docker Compose makes it effortless to add or remove services from your stack as your application evolves.
However, if you decide to go with Nginx instead of Apache and choose the LEMP (Linux, Nginx, MySQL/MariaDB, PHP) stack, we’ve got you covered in our detailed guide.
I hope this guide has helped you demystify deploying a LAMP stack with Docker Compose. Happy coding and deploying!

Hello,
Can this be up to date please? 2025
Thank you in advance.
It’s done. Enjoy. 🙂
i enjoyed your tutorial and followed it, successfully installing the lamp stack and being able to open the index site at localhost showing the phpinfo.
i didnt install the phpmyadmin though, as i prefer to use mysql in the shell. So from my point of view, your otherwise great tutorial is missing a small section on how to use or open mariadb from this docker environment via shell
Bobby,I would like to thank you once again for this tutorial. Once again because I have already worked through the LEMP and it worked.But I had to give up the LEMP because the PHP version connected to it caused an error, which does not happen with this LAMP.I am also writing here for a tip, advice, help or whatever you can call it. I understand that my question here is a bit more than this tutorial and maybe you could put a post in the Tips & Tricks section. Or maybe it would work here because you write: “You may be asking why we need to build our own Docker image for PHP instead of using one already available on Docker Hub.”It's about the php.ini or rather about additional/changed specifications for upload_max_filesize, post_max_size, max_execution_time etc.The PHP version included here (as well as the one in LEMP) only uses 2 MB for max_execution_time, which is very small if you have to upload some larger files (images, GEDCOM files etc.).If you mean “we will create a new Docker image based on…” and “we will compile and include some of the most often-used PHP extensions”, can't you add an additional php.ini file with some specifications like upload_max_filesize = 64M and post_max_size = 64M?Thank you very much for this!
I am running this on a Raspberry Pi, I had to change a line in the .yaml to get it to work:
from: image: phpmyadmin/phpmyadmin:latest
to:image: arm64v8/phpmyadmin:latest
Hi Team,
Love the work that has gone into this site, it’s truly fantastic.
Now i am running into an issue that i am hoping someone could kindly assist with.
I have done a Google but i haven’t found any solutions.
So i have successfully deployed my LAMP Stack as per https://linuxiac.com/how-to-set-up-lamp-stack-with-docker-compose/
I have come across this and attempted the steps and it isn’t working.
I believe this is as the LAMP Stack is containerised and this isn’t a follow up guide for the Lamp Stack with Docker Compose.
Could someone reach out to me when they have the time and advise how i install the ZeroSSL certificate into a container.
Kind Regards,
Ove
Apache rewrites fail miserably with your ProxyPassMatch directive.
Hello, its very clean and good tutorial. how can add all of them same network in docker-compose.yaml and Can we add php libs or extension later (after docker build) ?