
Gone are the days of relying solely on third-party cloud services for data storage and synchronization. Self-hosting has gained immense popularity due to its unprecedented control, privacy, and customization benefits.
In this light, Seafile stands out as a versatile, open-source file synchronization and sharing solution that empowers users to manage their data effortlessly.
By self-hosting your Seafile server, you regain ownership of your data, ensuring that sensitive information remains within your control.
Moreover, it is an excellent alternative to the popular Nextcloud. Suppose all you need is to sync and share files between your devices. In that case, we recommend it over it because Nextcloud is a much more comprehensive solution with slightly different goals focused on users’ collaboration.
However, if you want to try it out, our detailed guide, “How to Install Nextcloud with Docker,” will walk you through the entire process easily.
Now, back to the topic. Throughout this article, we will guide you through installing the self-hosted Seafile server using Docker Compose. So, let’s get started!
Prerequisites
Of course, having Docker and Docker Compose installed is required to deploy a containerized Seafile. So, if you don’t already have Docker installed, any of the following guides will be helpful:
- How to Install Docker on Ubuntu 22.04
- How to Install Docker on Debian 12 (Bookworm)
- How to Install Docker on AlmaLinux / Rocky Linux
- How to Install Docker on Fedora
- How to Install Docker on Linux Mint 21
- How to Install Docker on Raspberry Pi
The other essential component is Docker Compose. Remember, it is provided separately from Docker. Therefore, you must Install Docker before adding Docker Compose; otherwise, Compose will not function.
Installing it is pretty simple, even if it is not already on your Linux system. To install Docker Compose, type the following two commands:
sudo curl -L "https://github.com/docker/compose/releases/latest/download/docker-compose-linux-$(uname -m)" -o /usr/local/bin/docker-compose
sudo chmod +x /usr/local/bin/docker-composeCode language: JavaScript (javascript)
Armed with all the necessary tools, it is time to get down to the installation.
Install Seafile Server with Docker Compose
The Seafile server deployment shown below does not use HTTPS. This means it applies if you want to use it on your local (home) network, and the service will not be exposed to the internet.
However, if you choose this option, we strongly advise you to put the Seafile server behind a reverse proxy to enable SSL encryption on the connection. The reverse proxy options are many, with the most popular representatives being Nginx, Nginx Proxy Manager, Caddy, Traefik, HAProxy, etc.
On the other hand, if you plan to have the Seafile server visible on the web, we’ll show you the options needed to issue a valid free SSL certificate to ensure a secure connection between client applications and the server a little further down.
Setting up Working Directory
The first step is to create the folder in which our Docker Compose deployment files will be placed. Then switch to it; from here on, you need to execute all commands further down in this guide from that location.
mkdir seafile
cd seafile
Setting up Docker Compose’s Seafile Deployment
Next, create a “docker-compose.yaml” file and paste the following content into it:
nano docker-compose.yamlCode language: CSS (css)version: '3'
services:
db:
image: mariadb:10.11
container_name: seafile-mysql
environment:
- MYSQL_ROOT_PASSWORD=your-mysql-password
- MYSQL_LOG_CONSOLE=true
volumes:
- mysql-data:/var/lib/mysql
restart: unless-stopped
networks:
- seafile-net
memcached:
image: memcached:latest
container_name: seafile-memcached
entrypoint: memcached -m 256
restart: unless-stopped
networks:
- seafile-net
seafile:
image: seafileltd/seafile-mc:latest
container_name: seafile
ports:
- "80:80"
volumes:
- seafile-data:/shared
environment:
- DB_HOST=db
- DB_ROOT_PASSWD=your-mysql-password
- TIME_ZONE=Etc/UTC
- SEAFILE_ADMIN_EMAIL=mail@example.com
- SEAFILE_ADMIN_PASSWORD=your-password
- SEAFILE_SERVER_LETSENCRYPT=false
- SEAFILE_SERVER_HOSTNAME=seafile-server-ip-address
depends_on:
- db
- memcached
restart: unless-stopped
networks:
- seafile-net
networks:
seafile-net:
volumes:
mysql-data: {}
seafile-data: {}Code language: PHP (php)A few parameters must be adjusted before saving the file:
- MYSQL_ROOT_PASSWORD: Set the password that will be set for the MySQL root superuser account.
- DB_ROOT_PASSWD: You must enter the same password you selected for the “MYSQL_ROOT_PASSWORD” option. The Seafile container uses it to establish a connection to the database.
- TIME_ZONE: Set the correct time zone for you, for example, “America/New_York.” Interactions with the Seafile server will thus be reflected within the proper time frame.
- SEAFILE_ADMIN_EMAIL: Besides being the admin account’s email address, this is the username the admin user will use when logging into the Seafile server.
- SEAFILE_ADMIN_PASSWORD: The password for the admin account from the previous option.
- SEAFILE_SERVER_HOSTNAME: Specify the IP address of the machine on which your dockerized Seafile server will run. For example, “SEAFILE_SERVER_HOSTNAME=192.168.0.123.”
Once you change them, you are good to save and close the file.
In case port 80 is already in use by another service on the host you are going to run the service, you can specify a different port for the Seafile server, for example:
ports:
  - "8088:80"Code language: JavaScript (javascript)
Of course, this means that the service will be available on the provided port, for example, 8088, so when configuring the client to connect to the server, as we’ll show below, you’ll need to specify the port following the server name/IP address. For example, “http://192.168.0.123:8088.”
Starting the Seafile Server with Docker Compose
Finally, we can run our dockerized Seafile stack using Docker Compose. To do this, execute the below-given command from the “seafile” directory where our “docker-compose.yaml” file is located.
Start and run the containers in the background:
docker-compose up -dThe Docker images will start downloading. The entire procedure can take seconds to a few minutes, depending on your internet connection speed.
In the end, you should see a screen similar to the one below, informing you that your Seafile server installation has been successfully deployed and is up and running.
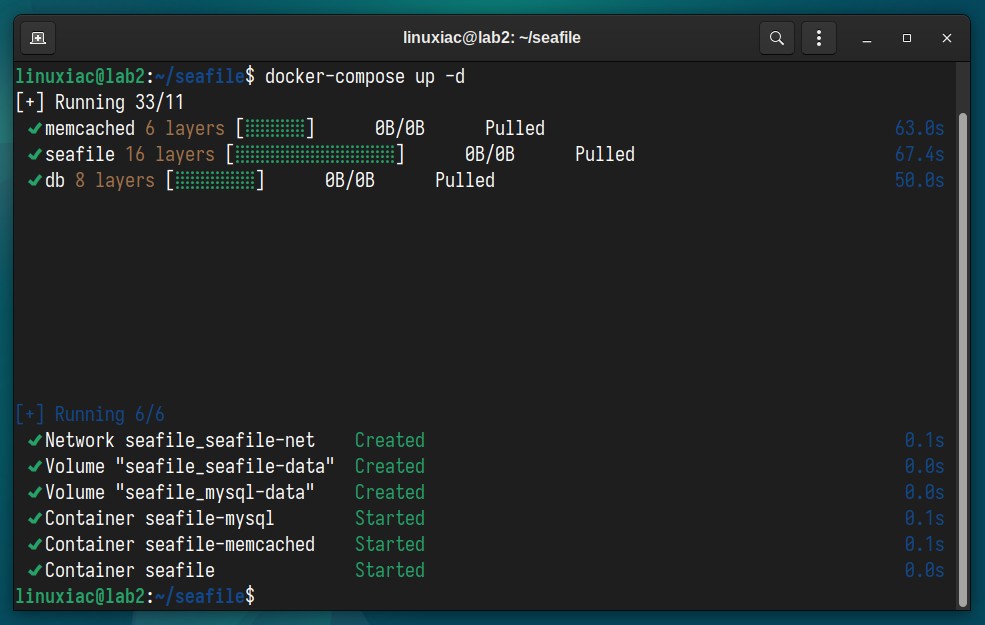
The initial delay of the containers’ start will only be the first time because Docker must download images from the Internet. After that, all subsequent runs will take seconds since they will be already available locally on your Linux system.
Log in to the Seafile Server
Open a web browser and point it to the machine’s IP address where the Seafile server is running. A login screen will greet you.
Enter the email and password you set for the “SEAFILE_ADMIN_EMAIL” and “SEAFILE_ADMIN_PASSWORD” options in the “docker-compose.yaml” file, then hit the “Log in” button.
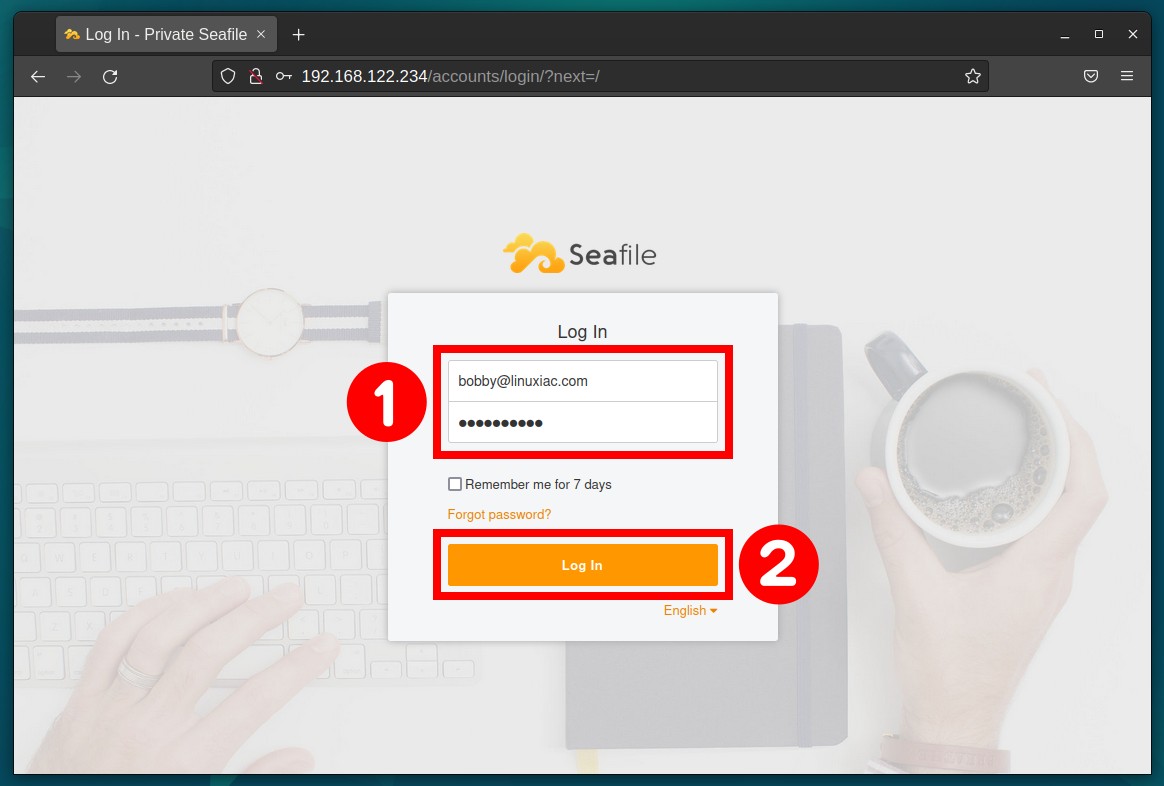
Congratulations! Mission accomplished. Your new Seafile server has been successfully installed, and you can now manage it via its web-based management interface.

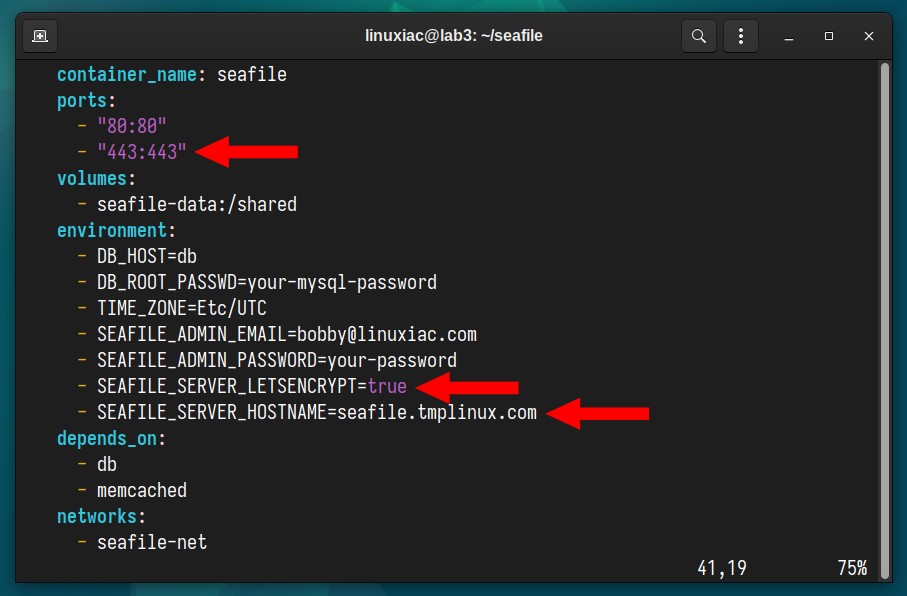
Seafile Server with SSL Certificate
If you plan to access your Seafile server from the internet, you must secure the connection with an SSL certificate (HTTPS).
Fortunately, Seafile offers an option that automatically issues a Let’s Encrypt certificate providing you with this functionality. All you need to take advantage of it is a valid domain name.
For this guide, we will use “seafile.tmplinux.com.” To enable this feature, make the following changes to the “docker-compose.yaml” file.
- Add port 443 to the “ports” section.
- Set the “SEAFILE_SERVER_LETSENCRYPT” option to “true.”
- Specify the domain address where the service will be located by adding it as value to the “SEAFILE_SERVER_HOSTNAME” in the format “sever.example.com.”
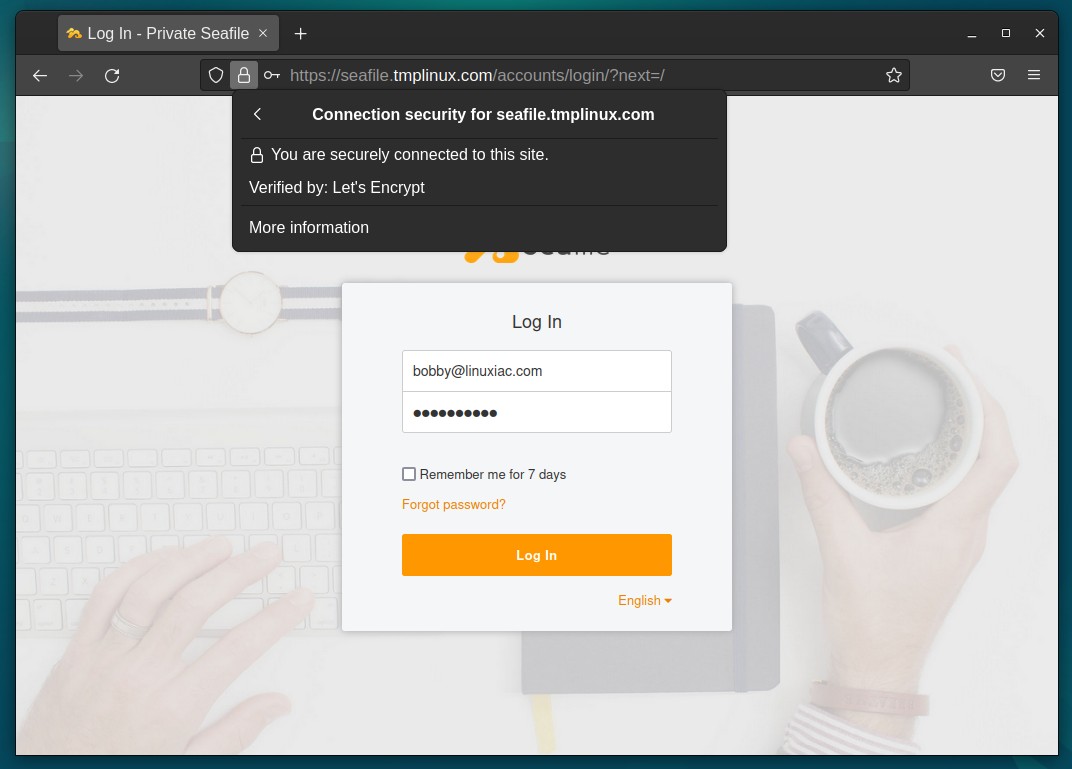
After starting the server, wait a few seconds for Seafile to request and obtain the SSL certificate. Then open the address, and you will see that you have been issued a valid Let’s Encrypt certificate, ensuring secure HTTPS communication with the server.
Connect Seafile Client to the Server
The next important thing to do is, depending on the operating system you are using, to install the desktop client app to interact with the Seafile server to synchronize your local files with the server.
Seafile offers desktop clients for Windows, Linux, and macOS that can be downloaded from the project’s website. In addition, if you use the service from your mobile devices, you can download an Android client from Google Play Store or an iOS client from Apple App Store.
Below we will show you how to install the Seafile client for some of the most widely-used Linux distributions.
Ubuntu, Debian, Linux Mint
To install the Seafile desktop syncing client, type the following APT command:
sudo apt install seafile-guiArch Linux, Manjaro
Arch and users of Arch-based distributions can install the Seafile client from the AUR repository with the help of AUR helper as yay, performing:
yay -S seafile-clientHowever, if you don’t have experience with Arch’s AUR repository, don’t worry – we’ve got you covered. Our detailed guide, “How to Install AUR Packages in Arch Linux,” will help you tackle this task with ease.
Fedora
Fedora users have the Seafile client in the distribution’s repositories, so they are only one DNF command away from installing it.
sudo dnf install seafile-clientAfter installing it, you can start it from the desktop application menu. Search for “seafile,” and when its icon appears, click to run the same.

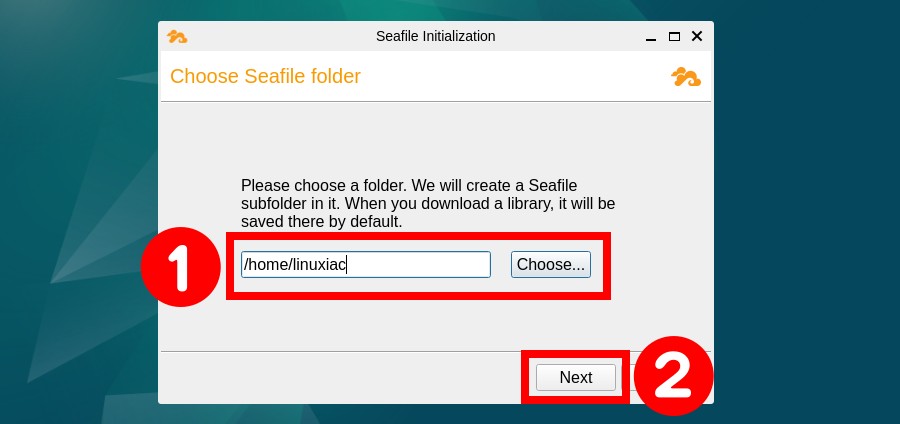
Choose the directory where you want to synchronize your files. It should be noted that a subdirectory called “Seafile” will be created automatically in it. Then, hit “Next.”
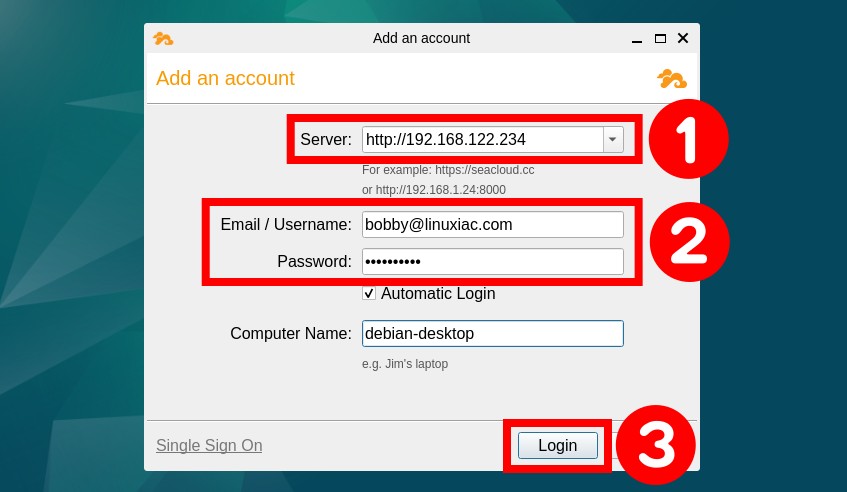
Enter the Seafile server address and user’s credentials in the following window, and finally, click the “Login” button.
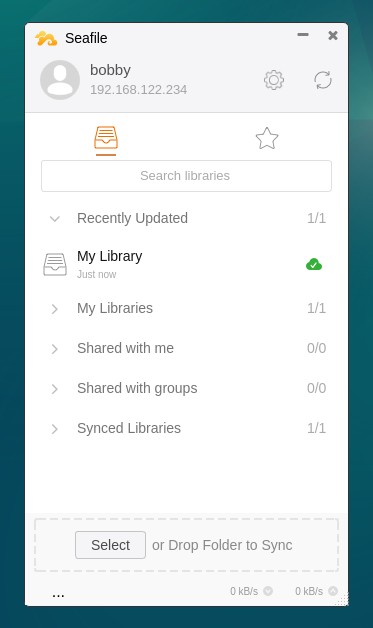
The window will close, and the Seafile client app will launch. You are ready to start synchronizing your files with the Seafile server.
In addition, you can also install the client on your other devices if you need to have your files on them.
Bonus Tips
In addition to the Seafile Sync desktop client, you also have the Seafile Drive client. It enables you to access files on the server without syncing to a local disk. In other words, it works like a network drive.
You can get it by downloading and installing it from the Download section of the Seafile website.
Furthermore, if you’re wondering, “Ok, but how can I update the Seafile container when a new version comes out?” there’s no room for worry, as we’ve got you covered.
With the help of Watchtower and our detailed and easy-to-follow guide, “Watchtower: Automatically Update Docker Container Images,” you’ll always have the most up-to-date Seafile version.
Finally, if working in a terminal isn’t your thing, Portainer is here to help by providing a comfortable web-based interface for interacting with Docker containers.
Have you never heard of it? Simply reading “How to Install and Use Portainer to Manage Docker Containers” will captivate you.
Conclusion
This guide showed you how to install Seafile File Sync Server using Docker Compose. Additionally, we showed you how to install the client application and connect it to the server.
By following the steps outlined, you can harness the potential of Seafile’s data synchronization while benefiting from Docker Compose’s encapsulated and portable application deployment.
This approach streamlines the setup process and ensures consistent and reliable performance regardless of the underlying infrastructure.
Thanks for your time! If you have any questions, please leave them in the comments section below. To learn more about Seafile, visit its website or review the documentation.


This has been the most comprehensive yet easy to follow instruction set I’ve found so far! Thank you so much. I wish it hadn’t taken me weeks to come across this article. I am on Cox internet and port 443 is blocked – should I put “444":443” under ports for remote access? I also want to use no-ip for me domain – any chance you have any familiarity with that service?The only other thing missing from this already amazing guide is a suggestion as to what ports forwarding entries should be saved in your router when trying to set up remote access…
What are the advantages of Seafile over Synchthing? And why would it be a better choice?
Synching