
Docker is a popular containerization platform that allows developers to create, deploy, and run applications in a portable and efficient manner. It simplifies the process of packaging applications and their dependencies into self-contained units called containers, which can run on any Linux-based operating system.
In this article, we will explore how to install Docker on Linux Mint 21, step-by-step. Whether you are a developer, sysadmin, or just getting started with Docker, this guide will help you get up and running with Docker on your Linux Mint 21 system in no time.
However, if you came across this guide looking for one for Linux Mint 22, you can find it here.
Installing Docker on Linux Mint 21
You can install Docker on your Linux Mint 21 system in several ways. For example, it is available in the official Mint repositories, where users can easily install it with a single APT command. However, one disadvantage to this approach is that the version available is not always the most recent.
For this reason, this guide will show you how to install Docker on Linux Mint 21 from the official Docker repository so you always get the latest version, and it will automatically receive all future software updates as they become available. So, let’s get started.
Step 1: Install Prerequisites
First, run the two commands below to update the package index and install the prerequisite necessary to add and use a new HTTPS repository.
sudo apt update
sudo apt install apt-transport-https ca-certificates curl gnupgCode language: Bash (bash)
Once operations are completed, you can move to the next section, where we’ll add the Docker’s repo GPG key and repo itself to our Linux Mint 21 system.
Step 2: Add Docker’s Official GPG Key
Next, import the Docker GPG repository key to your Mint system. This security feature ensures that the software you’re installing is authentic.
curl -fsSL https://download.docker.com/linux/ubuntu/gpg | sudo gpg --dearmor -o /usr/share/keyrings/docker.gpgCode language: Bash (bash)
Notice that the command produces no output.
Step 3: Add Docker Repo to Linux Mint 21
After importing the GPG keys, we’ll add the official Docker repository to our Linux Mint 21 system. This implies that the update package will be made available with the rest of your system’s regular updates if a new version is released.
echo "deb [arch=$(dpkg --print-architecture) signed-by=/usr/share/keyrings/docker.gpg] https://download.docker.com/linux/ubuntu jammy stable" | sudo tee /etc/apt/sources.list.d/docker.list > /dev/nullCode language: Bash (bash)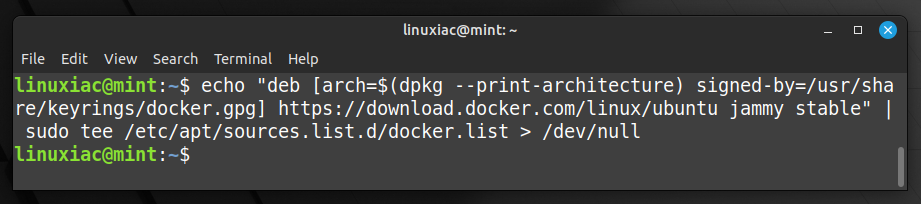
As with the previous command, its execution produces no output.
Next, refresh the package list.
sudo apt updateCode language: Bash (bash)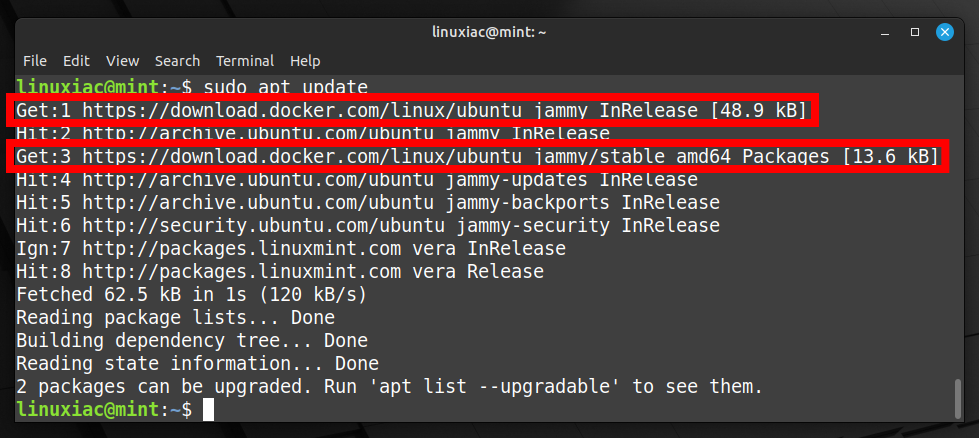
This command updates the package index on our system. As you can see, the newly added Docker repository is now available and ready to be used.
Step 4: Install Docker on Linux Mint 21
Finally, run the below command to install the latest up-to-date Docker release on Linux Mint.
sudo apt install docker-ce docker-ce-cli containerd.io docker-buildx-plugin docker-compose-pluginCode language: CSS (css)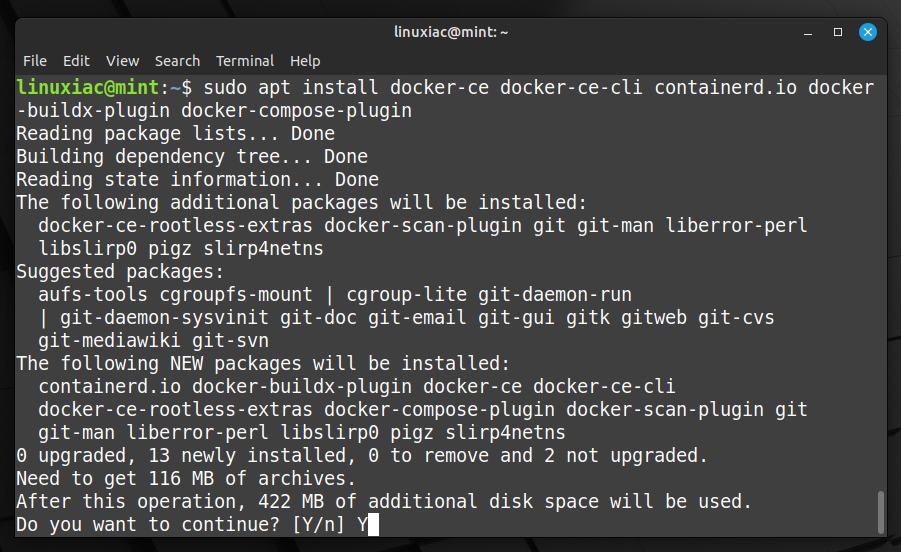
This installs the following Docker components:
- docker-ce: The Docker engine itself.
- docker-ce-cli: A command line tool that lets you talk to the Docker daemon.
- containerd.io: A container runtime that manages the container’s lifecycle.
- docker-buildx-plugin: A CLI plugin that extends the Docker build with many new features.
- docker-compose-plugin: A configuration management plugin to orchestrate creating and managing Docker containers through compose files.
That’s all! Docker should now be installed; the service started and enabled to start automatically on boot.
In addition, you can check the Docker service status using the following:
sudo systemctl is-active dockerCode language: Bash (bash)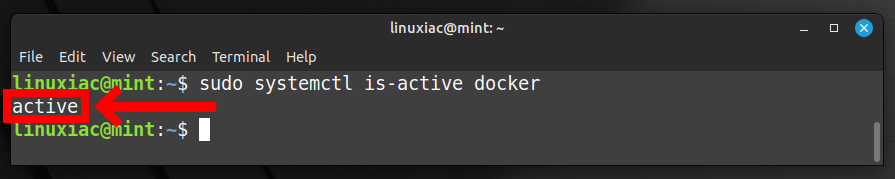
Step 5: Verify the Docker Installation
Now let’s check if everything with our new Docker installation works properly. For this purpose, we will run a simple application called “hello-world.”
sudo docker run hello-worldCode language: Bash (bash)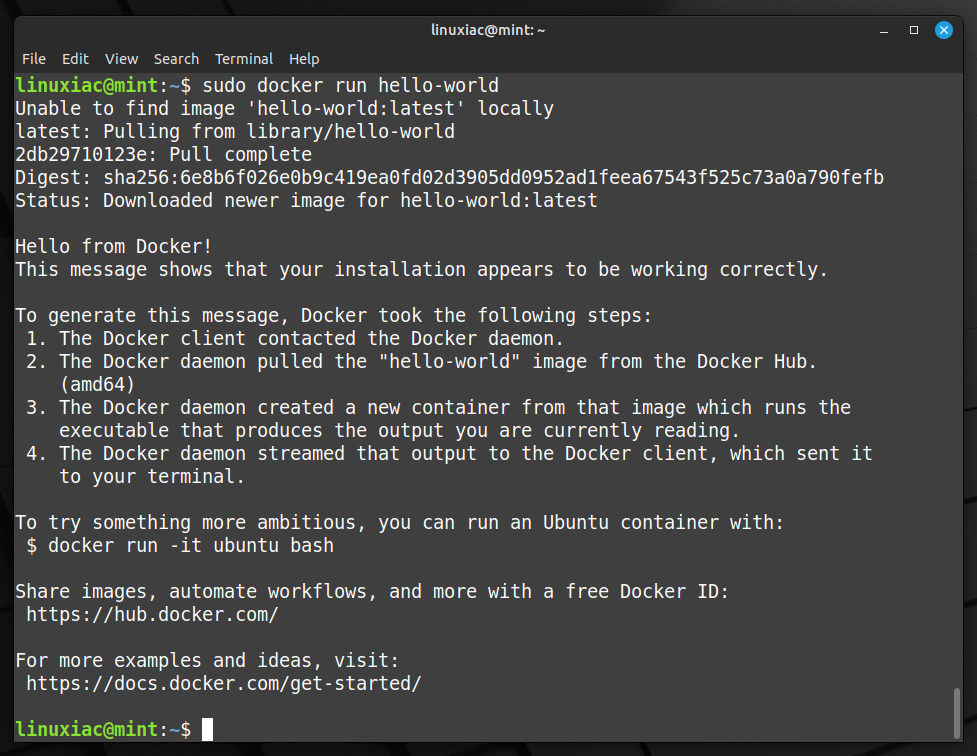
Congratulations! As we can see, everything works as expected!
Enabling Non-root Users to Run Docker Commands
So far, we have successfully installed Docker on your Linux Mint 21 system.
However, only root and users with sudo privileges can execute Docker commands by default, which can be a security concern. In other words, if you attempt to run the docker command as a regular user without prefixing it with sudo, you’ll get an error message like this:
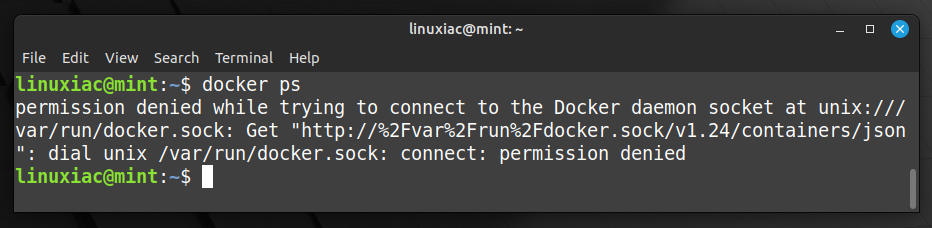
So, to run Docker commands as a non-root user, you must add your user to the docker group. To do that, type in the following:
sudo usermod -aG docker ${USER}Code language: Bash (bash)In the above command, ${USER} is an environment variable that holds your username. To apply for the new group membership, reboot your Mint system. You can then execute docker commands without prefixing them with sudo.
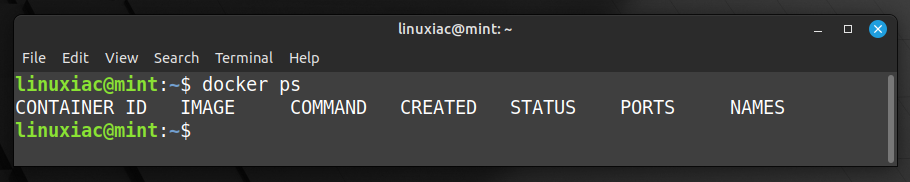
This approach can reduce the security risks associated with Docker while enabling non-root users to take advantage of its powerful capabilities.
Conclusion
Installing Docker on Linux Mint 21 can initially seem daunting, but with the step-by-step guide provided, it is a relatively straightforward process. Following the steps outlined in the guide, you can successfully install Docker on your Linux Mint 21 machine and start reaping the benefits of containerization.
So, what are you waiting for? Start experimenting with Docker today and see how it can revolutionize how you build and deploy applications.
Let me know if you have any questions or suggestions, and I’ll be happy to follow up with you. Happy dockering!
To learn more about Docker, check out the official Docker documentation.


Thank you very much for this simple and usefull guide!!!
thank u very much dude
Thank you! Worked like a charm!
that last step with the usermod did not work for me
oh screw. forgot the reboot
OK, I have to rein in my enthusiasm a little. After doing all this, something is still wrong because any attempt to do “docker pull” results in
Aaand never mind. Even though I had logged out and logged back in, a full reboot was indeed necessary.
Excellent. I’m a Docker / Linux noob and not only got this done with no BS, but learned a bunch in the process.
After this last step:”sudo usermod -aG docker ${USER}”, I needed to reboot my linux and after that it works well.
Where you are adding the docker repo, in your example you are using :
echo “deb [arch=$(dpkg –print-architecture) …
which will fail if you are not using a Bourne shell derivative, such as csh, tcsh, etc.
If you replace $(dpkg –print-architecture) with `dpkg –print-architecture`, then it should work with both flavours of shell.
ps. Thanks for the guide.
The best guide for install docker on linux mint and resolving error from permission denied. Thank you!
Extremely helpful guide, Bobby, thank you. I will refer others to this guide when we set up Docker on multiple Linux Mint systems.
Glad to have been of help. 🙂
Best,
Bobby
Thanks, awesome tutorial, great job !
Thanks very much for this How-To. It’s just what I needed.
Thank you very much, Bobby!
I followed an official guide without luck, and with your guide everything is running smoothly now! May you have many happy days!
Thank you Bobby,
I successfully installed Docker on my Mint thanks to your tutorial
Should we install the Compose plugin? It seems to be no longer supported and is instead included in docker.
https://docs.docker.com/compose/install/linux/
Hey Leon,
No, you don’t need to install Compose if you don’t need it. However, if you plan to deploy containers with Docker Compose, you can quickly install it later by following the steps in this guide: “How to Install and Use Docker Compose: A Beginners Guide.”
Best,
Bobby
This guide is so easy to understand and way more useful as the one on the official docker website. Thanks!
Thanks for tutorial. Help me find out, how can i get Docker UI? When i had Windows, i simply download Docker desktop, but after installing docker on mint, i have only console view. So i tried to install Docker Desktop and it show me conflicts when i try to run application. But console works fine.. so i am confused
Hi Evgeny,
Docker Desktop includes the Docker engine itself, so you should uninstall any existing Docker instances from your system before using it. Another approach to getting a user-friendly GUI for your current Docker installation is to use Portainer. You can see how to set it up quickly and easily in the following article: “How to Install and Use Portainer to Manage Docker Containers.”
Best,
Bobby
a very little step was necessary for me: sudo systemctl start docker
This guide is so good! I followed on Mint 21.1 and it worked perfectly. For the group membership, I tried to just log out of the GUI and back in, but that didn’t work out. I went ahead and rebooted and then I was able to run docker commands without any errors.
Bobby, very much appreciate you putting together this article in great detail. Installation was a breeze following your instructions.
Thank you for the feedback. Glad to have been of help!
Best,
Bobby
Really helpful post. Installed without error.