
In today’s interconnected world, passwords have become the keys to our digital lives. From online banking to social media accounts, we rely on passwords to safeguard our personal information and secure our online presence.
However, managing passwords across multiple platforms can be daunting, and relying on cloud-based password managers may raise concerns about data privacy and security.
So, if you are searching for a robust and self-hosted password management solution, look no further.
This comprehensive guide walks you through setting up Vaultwarden using Docker Compose, ensuring a seamless installation experience. But before we move on to the installation, let’s look at the app itself.
What’s Vaultwarden?
Vaultwarden, formerly known as Bitwarden_RS, is a fork of the renowned Bitwarden project. It is a community-driven project, written in Rust language, of the Bitwarden codebase, which means it shares many similarities and functionalities with it.
In other words, Vaultwarden offers the same user-friendly features, robust security, and great functionalities but with the added benefit of self-hosting.
The best part? The Vaultwarden server is fully compatible with the Bitwarden client, so that you can use the official Bitwarden client on all your devices with your self-hosted Vaultwarden server.
Key Features of Vaultwarden
- Self-Hosted: One of the most significant advantages of Vaultwarden is that you can host it on your server or infrastructure. This gives you complete control over your data, reducing reliance on third-party services and cloud providers.
- End-to-End Encryption: Vaultwarden employs strong end-to-end encryption to secure your passwords and other sensitive information. All data is encrypted on your device before sending it to the server, ensuring that only you can access your decrypted data.
- Open Source and Transparency: Vaultwarden is an open-source project, meaning its source code is publicly available for review and scrutiny. This transparency fosters trust and allows security experts to audit the code, enhancing the platform’s overall security.
- Cross-Platform Compatibility: The Vaultwarden server can be used with the official Bitwarden client, available for various platforms, including Windows, macOS, Linux, iOS, and Android. This ensures that you can access your passwords from any device with ease.
- Browser Integration: Using Bitwarden’s browser extensions, you can seamlessly integrate your self-hosted Vaultwarden server with all major web browsers. This enables you to autofill login credentials and access your passwords directly while browsing the web.
- Active Community Support: Being a community-driven project, Vaultwarden benefits from an active and engaged community of developers and users contributing to its ongoing development and support.
- Cost-Effective Solution: Self-hosting Vaultwarden can be a cost-effective option compared to subscribing to cloud-based password management services, especially for individuals or organizations with specific hosting resources.
We can move on to the installation now that we’ve introduced you to Vaultwarden.
Prerequisites
Of course, having Docker and Docker Compose installed is required to deploy a containerized Vaultwarden. So, if you don’t already have Docker installed, any of the following guides will be helpful:
- How to Install Docker on Ubuntu 22.04
- How to Install Docker on Debian 12 (Bullseye)
- How to Install Docker on AlmaLinux / Rocky Linux
- How to Install Docker on Fedora
- How to Install Docker on Linux Mint 21
- How to Install Docker on Raspberry Pi
The other essential component is Docker Compose. Remember, it is provided separately from Docker. Therefore, you must Install Docker before adding Docker Compose; otherwise, Compose will not function.
Installing it is pretty simple, even if it is not already on your Linux system. To install Docker Compose, type the following two commands:
sudo curl -L "https://github.com/docker/compose/releases/latest/download/docker-compose-linux-$(uname -m)" -o /usr/local/bin/docker-compose
sudo chmod +x /usr/local/bin/docker-composeCode language: Bash (bash)
Now let’s talk about the implementation itself. To complete the guide below, you must have your domain name. For this guide, we will use “vaultwarden.tmplinux.com.” But why is this required?
From the official documentation:
For proper operation of Vaultwarden, enabling HTTPS is pretty much required nowadays, since the Bitwarden web vault uses web crypto APIs that most browsers only make available in HTTPS contexts.
You must have issued a valid SSL certificate for the HTTPS connection to work correctly. Our Docker Compose will use Caddy as a reverse proxy to forward incoming requests to the Vaultwarden container to ensure this.
Caddy is a versatile, simple, lightning-fast web server that functions as a reverse proxy. It is well known for its ability to automatically issue Let’s Encrypt SSL certificates, making it an ideal candidate for our Vaultwarden installation.
Furthermore, putting Vaultwarden behind a reverse proxy server is the officially recommended approach for implementing the service by the Vaultwarden project.
Of course, any other software providing similar functionality can be used as a reverse proxy, such as Nginx, Nginx Proxy Manager, Traefik, HAProxy, etc. However, we choose Caddy as a tried-and-true, reliable, secure, and simple-to-implement alternative.
You’re probably already asking yourself, “Why don’t I issue a self-signed SSL certificate?” I explain immediately.
Why Not Use Vaultwarden with a Self-Signed SSL Certificate
First and foremost, referring to the official recommendations, using Vaultwarden with a self-signed SSL certificate is only acceptable for testing and development purposes.
Moreover, this type of implementation requires additional installation and configuration by you of your own Certificate Authority (CA), which significantly complicates service deployment.
Considering that your passwords are probably the most sensitive information of your entire digital life, true to the tradition of giving our readers only the best and tested by us, we wouldn’t recommend this approach.
Nevertheless, we deployed a solution based on our CA in our test lab and encountered many issues.
First of all, you must import these certificates on all devices that will interface with the Vaultwarden server. This introduces a significant inconvenience and is not what we call user-friendly.
Furthermore, on iOS or macOS devices, these certificates may be rejected, resulting in the inability to use the service.
Last but not least, remember that your own CA must be maintained ahead of time, and any issues with it could result in a denial of service. Are you prepared to deal with this complication?
We could go on and on, but these arguments are enough to convince you that using a validly issued SSL certificate is the only proper and straightforward way to implement the Vaultwarden server.
Install Vaultwarden Password Manager with Docker Compose
As we said above, to install Vaultwarden, we’ll use two separate containers – Caddy and Vaultwarden, which we’ll deploy together using Docker Compose.
Setting Up Working Directory
The first step is to create the folder in which our Docker Compose deployment files will be placed. Then switch to it; from here on, you need to execute all commands further down in this guide from that location.
mkdir vaultwarden
cd vaultwardenCode language: Bash (bash)
Create Docker Network
Let’s now create our Docker network and name it “vaultwarden_network.”
docker network create vaultwarden_networkCode language: Bash (bash)By doing this, we ensure that containers in our Vaultwarden deployment will have network visibility with each other so they can interact.
At the same time, the Vaultwarden installation will be in its isolated network environment from the other Docker containers on our host, which adds a layer of security.
Caddy Web Server
As we already said, Caddy will act as a reverse proxy server, sitting in front of Vaultwarden, forwarding client requests, and delivering the responses to the clients.
The Caddy service section from our “docker-compose.yaml” file is below. Please do not copy it yet; the final and complete version of the file can be seen further down in this guide. We’re just showing it here to explain how it works.
caddy:
    image: lucaslorentz/caddy-docker-proxy:ci-alpine
    container_name: reverse-proxy
    ports:
      - 80:80
      - 443:443
    environment:
      - CADDY_INGRESS_NETWORKS=bitwarden_network
    networks:
      - bitwarden_network
    volumes:
      - /var/run/docker.sock:/var/run/docker.sock
      - caddy_data:/data
    restart: unless-stoppedCode language: YAML (yaml)
Caddy is the only container in our dockerized deployment that exposes ports (80 and 443), allowing the Vaultwarden installation to be accessible from the outside world.
Because Caddy needs to scan Docker metadata, looking for labels indicating that it should serve a specific container, we mount the Docker socket on the host with that of the container.
After finding labels, it generates an in-memory “Caddyfile” (the main Caddy web server configuration file) with site entries and proxies pointing to the Docker service by their DNS name or container IP.
Finally, by creating a named Docker volume (“caddy_data”), we ensured the data (issued SSL certificates, Caddy’s configuration, etc.) would survive between container restarts.
Create Vaultwarden’s Admin Password
For administration, the Vaultwarden server provides a web-based GUI interface. It allows the administrator to view, disable, or delete (but not add a new one) all registered users. It also allows you to invite new users even if registration is disabled (but only if you have the SMTP feature configured correctly).
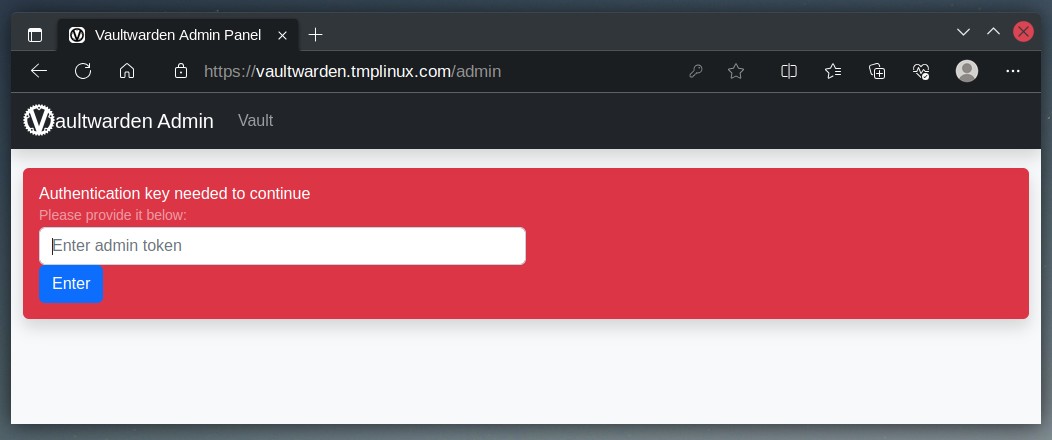
By default, this administrative interface is not enabled. You need to set an authentication token and add it to Vaultwarden’s deployment to enable it. Here’s how to generate a token.
Run the command below, which will spin up a temporary Vaultwarden container. Enter a password of your choice, then repeat. Remember that the password must contain at least eight characters.
docker run --rm -it vaultwarden/server /vaultwarden hashCode language: Bash (bash)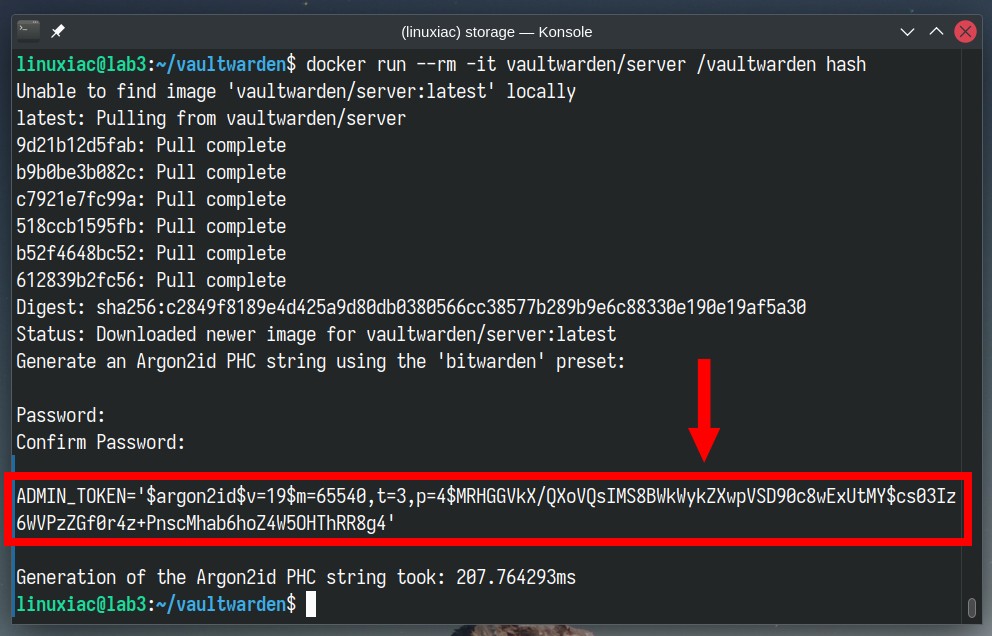
Once the token is generated, take the part with the single quotes, and pass it to echo, and pipe it to the sed command, as shown below.
echo 'your-authentication-token-here' | sed 's#\$#\$\$#g'Code language: Bash (bash)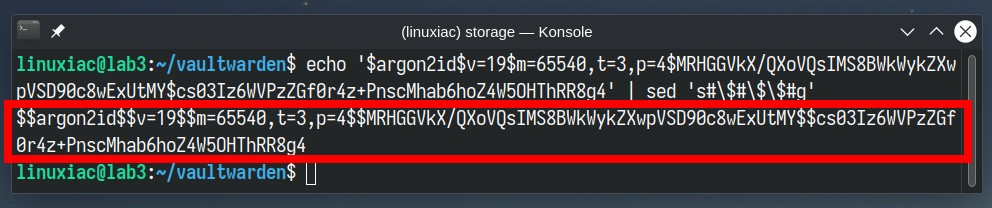
Copy and save the command’s output since this is the hashed version of your Vaultwarden admin password that we’ll use in the final deployment.
Install Vaultwarden with Docker Compose
Let’s now assemble all pieces into a final version of our Vaultwarden dockerized app. First, create a “docker-compose.yaml” file and paste the following content.
nano docker-compose.yamlCode language: Bash (bash)services:
vaultwarden:
image: vaultwarden/server:latest
container_name: vaultwarden
labels:
caddy: your-domain-name-here
caddy.reverse_proxy: "{{upstreams}}"
restart: always
environment:
- WEBSOCKET_ENABLED=true
- SIGNUPS_ALLOWED=true
- INVITATIONS_ALLOWED=false
- ADMIN_TOKEN=your-admin-authentication-token-here
- DOMAIN=https://your-domain-name-here
volumes:
- vaultwarden_data:/data
networks:
- vaultwarden_network
depends_on:
- caddy
caddy:
image: lucaslorentz/caddy-docker-proxy:ci-alpine
container_name: reverse-proxy
ports:
- 80:80
- 443:443
environment:
- CADDY_INGRESS_NETWORKS=vaultwarden_network
networks:
- vaultwarden_network
volumes:
- /var/run/docker.sock:/var/run/docker.sock
- caddy_data:/data
restart: unless-stopped
networks:
vaultwarden_network:
external: true
volumes:
vaultwarden_data: {}
caddy_data: {}Code language: YAML (yaml)In the example above, replace the following parts with the ones that apply to you:
- ADMIN_TOKEN: Replace it with the previously generated admin token so that the final variant looks like “ADMIN_TOKEN=$$argon2id$$v=19$$m=65…“
Important! Notice that the string is not enclosed between any quotes. - In the Vaultwarden’s labels section, specify the domain name to serve the service. For example, “caddy: vaultwarden.tmplinux.com“
- In the Vaultwarden’s environment section, specify the domain name prefixed with “https://” that will serve the service. For example, “DOMAIN=https://vaultwarden.tmplinux.com “
We want to pay attention to the “SIGNUPS_ALLOWED=true” environment variable. We set it to “true” because after starting Vaultwarden, we can register the user who will use the service.
Immediately after that, as shown below, we will change its value to “false” and restart the containers, making user self-registration impossible. This is done from a security point of view.
Run Vaultwarden with Docker Compose
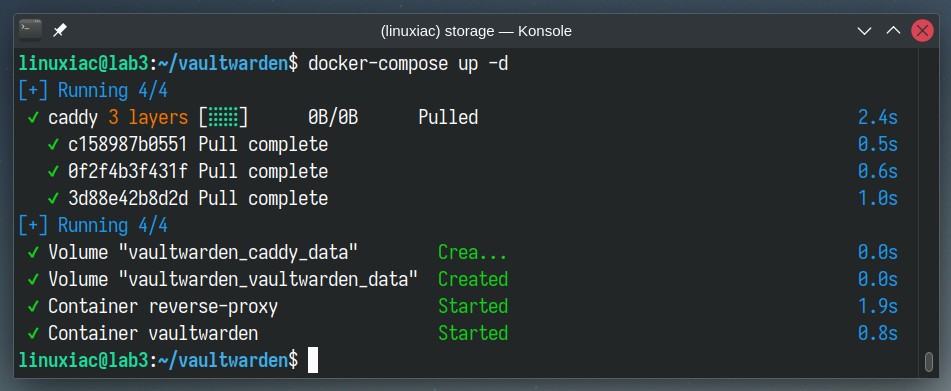
Finally, we can run our dockerized Vaultwarden stack using Docker Compose. To do this, execute the below-given command from the “vaultwarden” directory where our “docker-compose.yaml” file is located.
Start and run the containers in the background:
docker-compose up -dCode language: Bash (bash)The Docker images will start downloading. The entire procedure can take seconds to a minute, depending on your internet connection speed.
In the end, you should see a screen similar to the one below, informing you that your dockerized Vaultwarden installation has been successfully deployed and is up and running.
The initial delay in starting the containers will only be the first time because Docker must download images from the Internet. After that, all subsequent runs will take seconds since they will already be available locally on your Linux system.
Create a Regular User Account
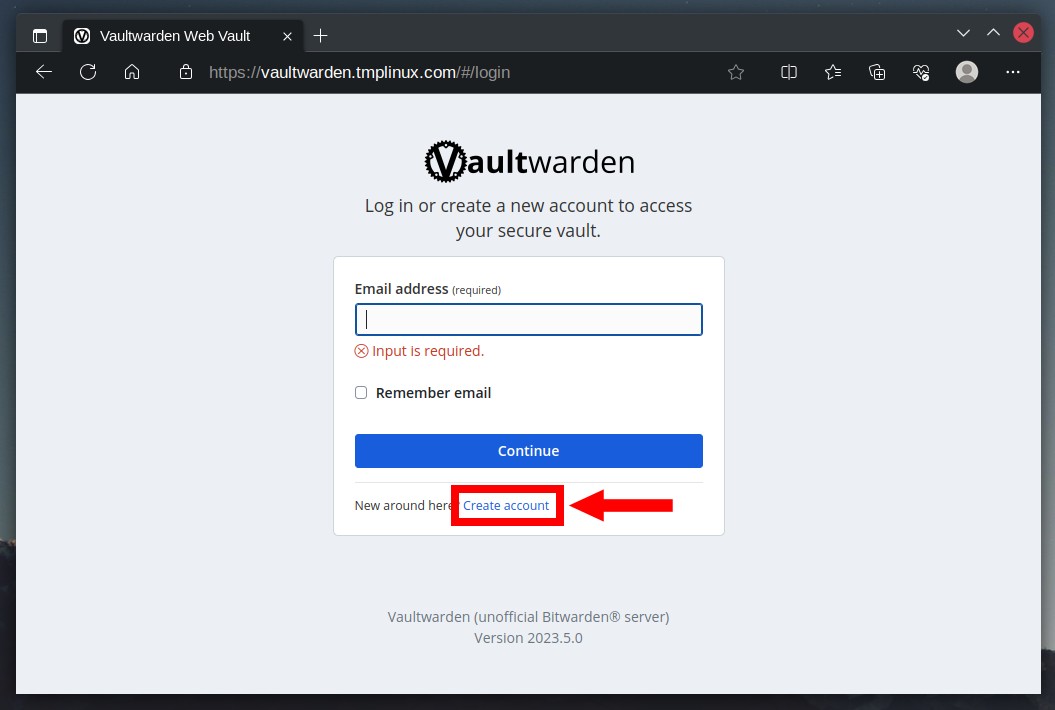
Open a web browser and point it to your Vaultwarden address to complete the post-installation steps. In our case, it’s a “https://vaultwarden.tmplinux.com.”
A Vaultwarden login screen will greet you. As you’ll notice, the Caddy reverse proxy service has automatically issued a valid Let’s Encrypt SSL certificate for the domain.
Since we don’t have an account yet, we must create one. To do this, click the “Create account” link to start.
Enter the required information and hit the “Create account” button.
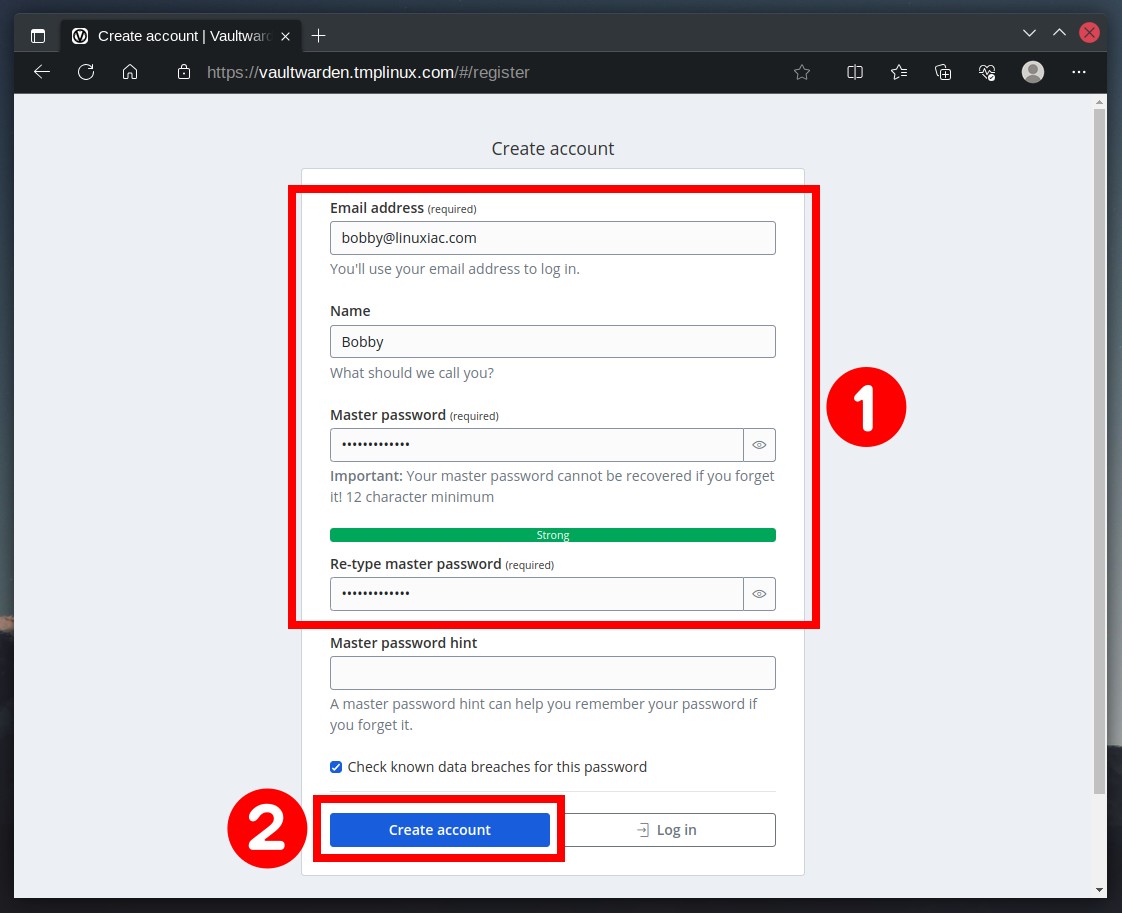
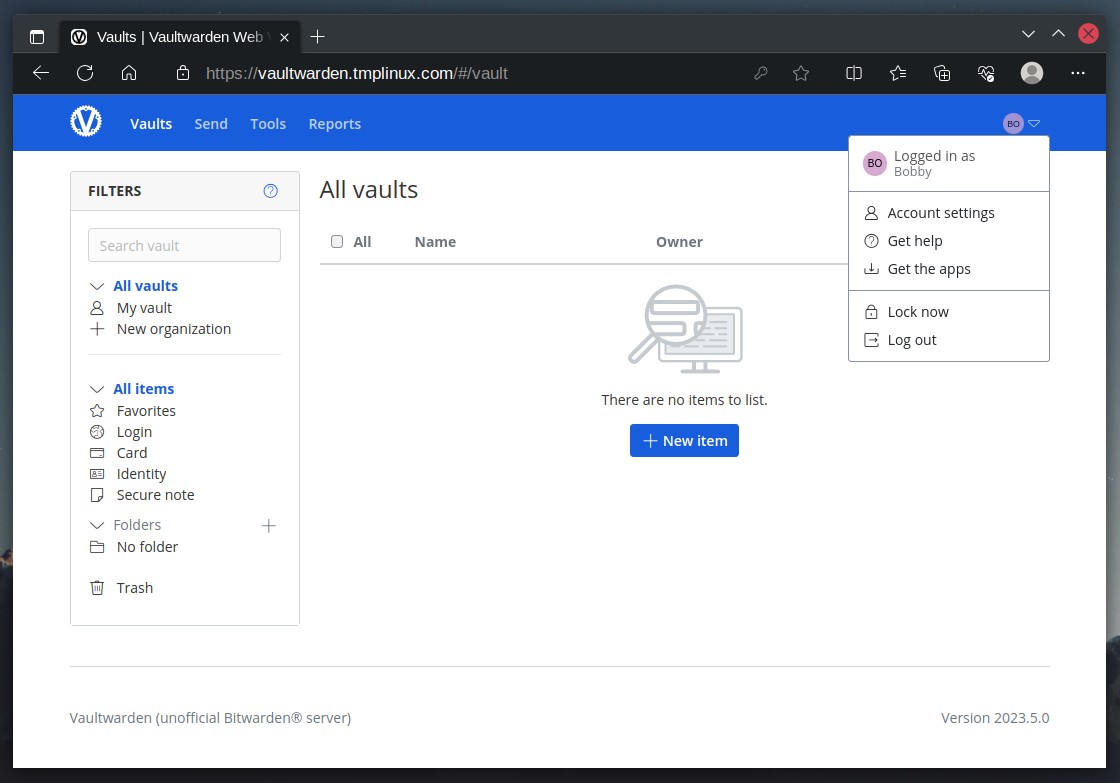
After successfully creating the account, you may log in and start managing your Vaultwarden profile.
Disable User Registration
Once a user account has been created, disabling further free user registration is a good security practice. Here’s how to do it.
Stop and remove currently running containers by executing the following Docker Compose command:
docker-compose downCode language: Bash (bash)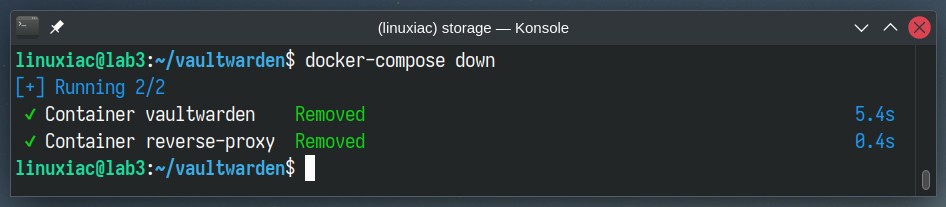
Replace the “SIGNUPS_ALLOWED=true” part with “SIGNUPS_ALLOWED=false” in the “docker-compose.yaml” file. Then rerun the containers.
docker-compose up -dCode language: Bash (bash)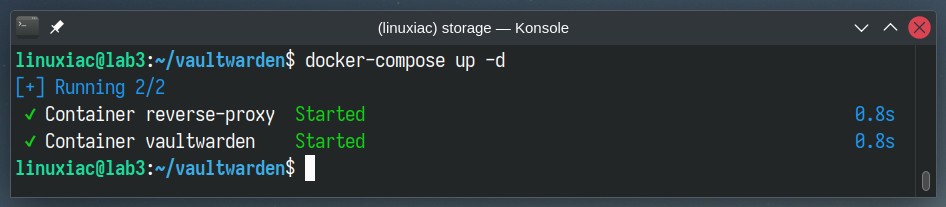
Vaultwarden Administration Interface
Vaultwarden’s administrative interface is a web-based GUI that allows you to manage the Vaultwarden server fully. To access it, enter “https://your-domain-name/admin” and replace the “your-domain-name” part with the one you use.
Enter the password you used to generate the hash in this guide’s “Create Vaultwarden’s Admin Password” section. To be clear, you must enter the password, not the hash itself.
After successfully authenticating, you will be granted access to the Vaultwarden admin interface to perform complete server administration.
Vaultwarden Administration GUI.
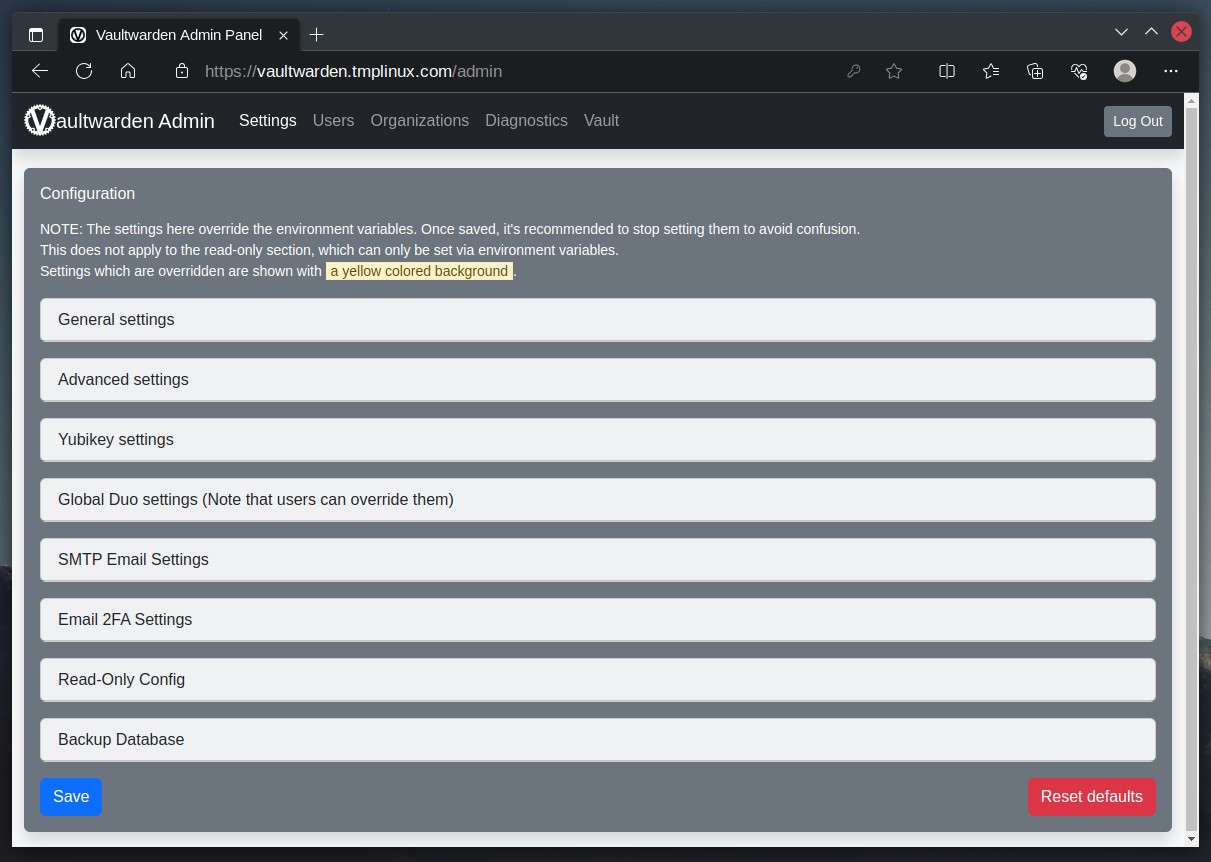
Something significant to remember. Any changes made here take precedence over directives in the “docker-compose.yaml” file. In other words, no matter what is specified there, if you change something through the admin interface, it will always take precedence.
User Management
You can skip this part if you are the only user on your Vaultwarden server. However, if you plan to add more users or want to experiment with user accounts, the main question you ask yourself is, “How do I add a new user?” This is where things become more interesting. This is why.
As you notice, you can remove users from the administration section, but not add a new one. In other words, you don’t have a button like “Add user.” To do so, you have two paths.
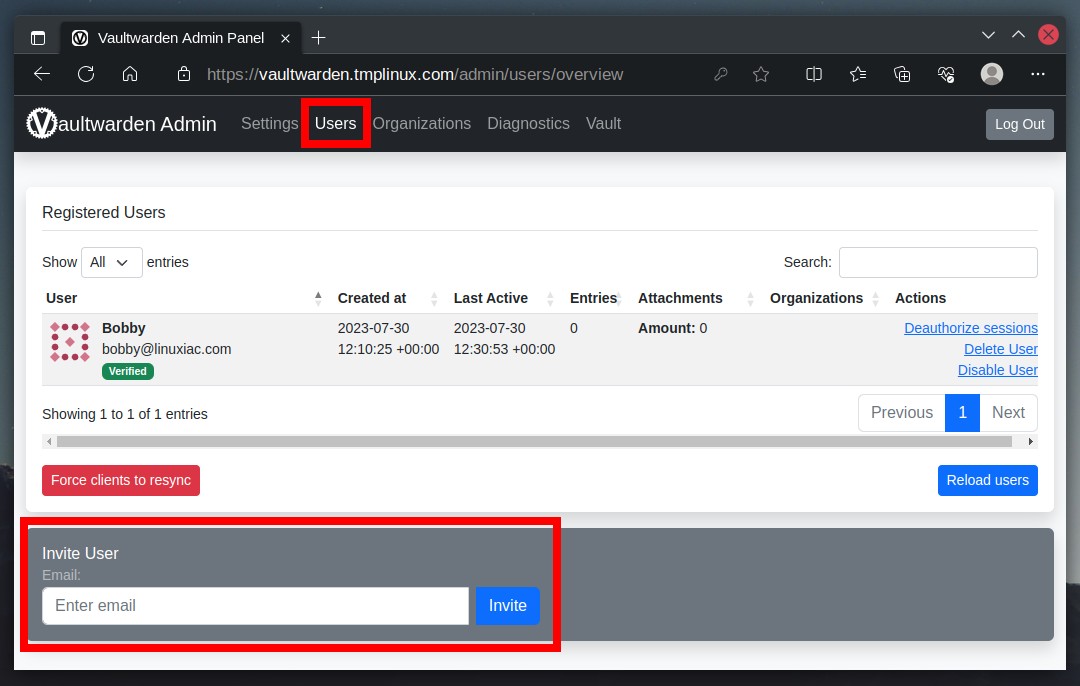
The first is to stop and remove the containers by running “docker-compose down.” Then, enable user registration (“SIGNUPS_ALLOWED=true“) and restart the containers. However, this can become a tedious chore if you run it repeatedly.
The second and preferred approach is to send an email invitation. However, you must have valid SMTP server credentials to use this functionality. If you have them, enter them in the admin interface’s “SMTP Email Settings” section.
Then, in the “Invite User” field, type the user’s email address and send them an invitation. The user will receive an email similar to the one below.
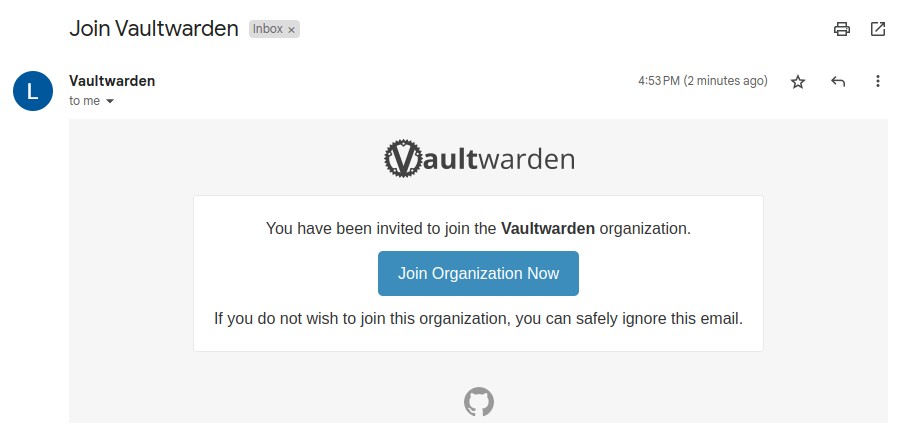
After clicking the “Join Organization Now” button, the user can create and activate the account themselves.
Install Browser’s Bitwarden Extension and Connect to the Vaultwarden Server
Vaultwarden/Bitwarden is most commonly used as a browser extension to generate and remember passwords for the numerous services we use on the Internet. So let’s install the official Bitwarden extension and connect it to our Vaultwarden server.
For your convenience, here are direct links to the extension for major browsers.
After installing the extension, it is time to set it up to work with our self-hosted Vaultwarden server. Click on the extension icon, expand the “Region” drop-down menu, and select the “Self-hosted” option.
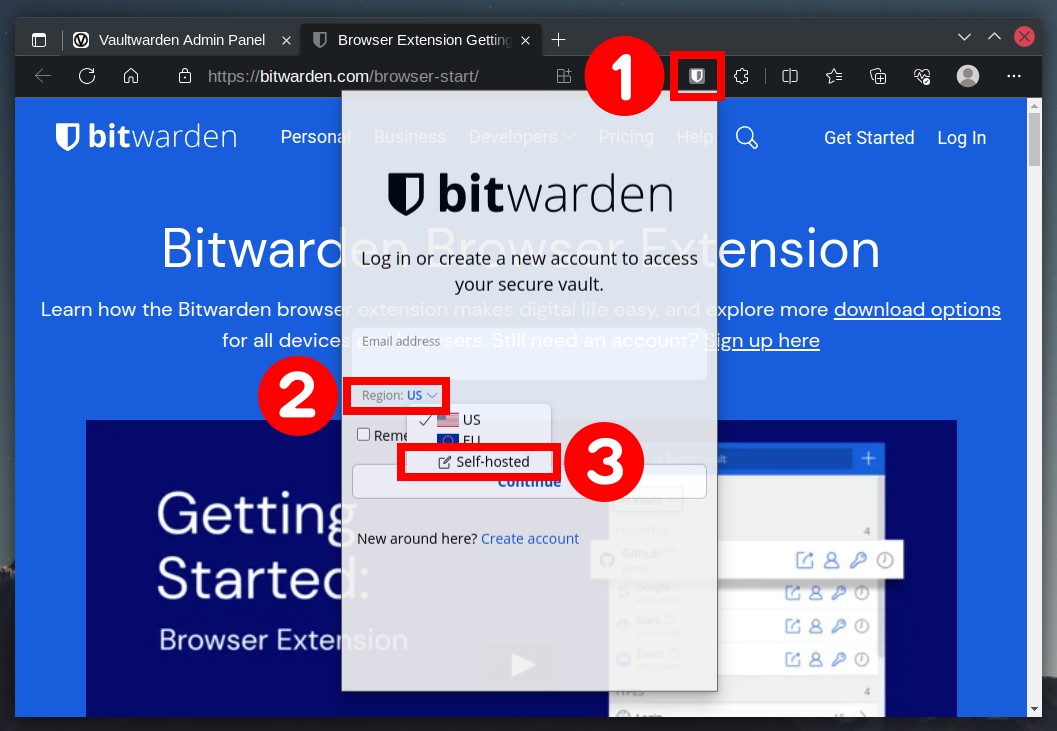
In the “Server URL” field, enter the address of your server and confirm with the “Save” button.

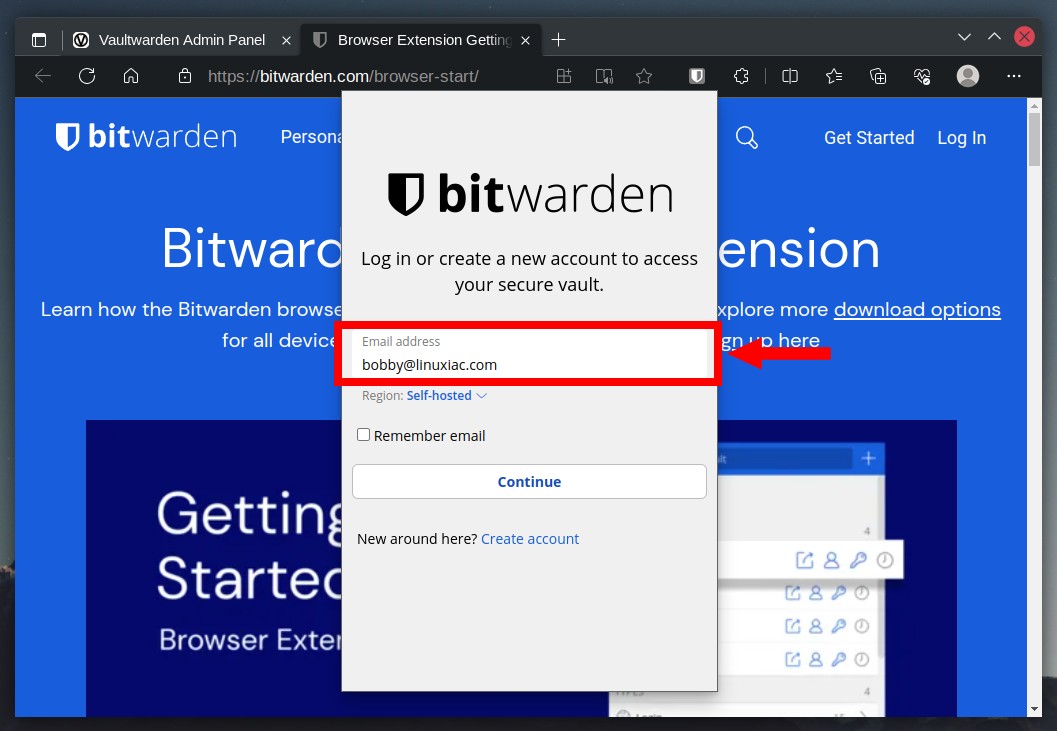
Enter your email address.
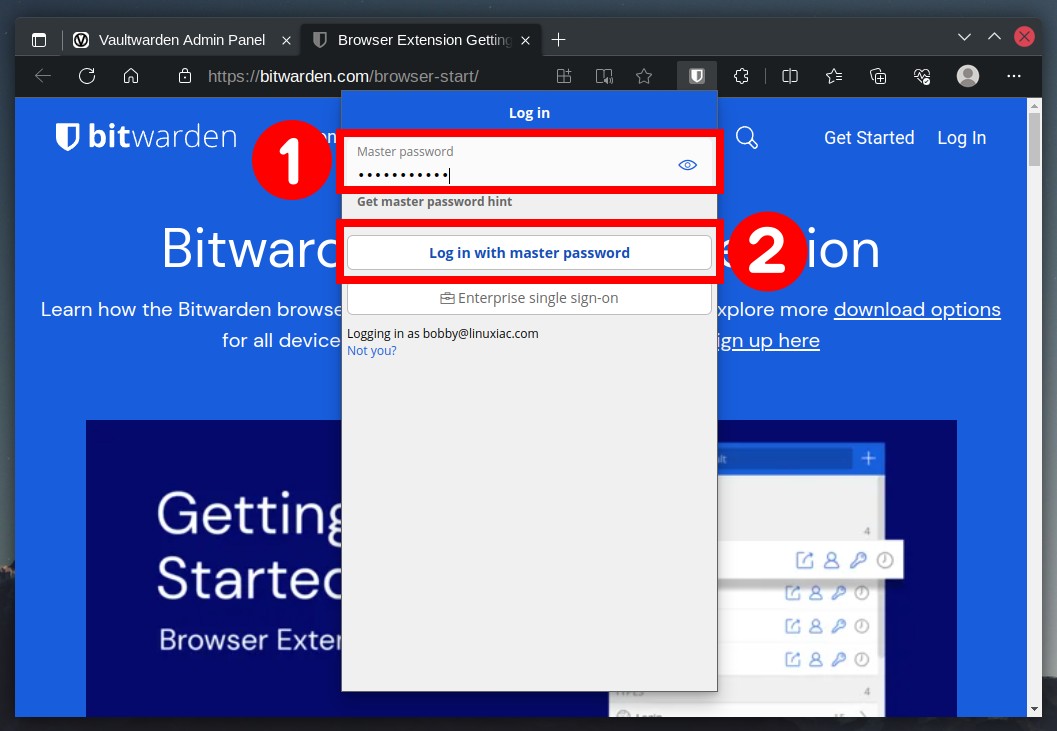
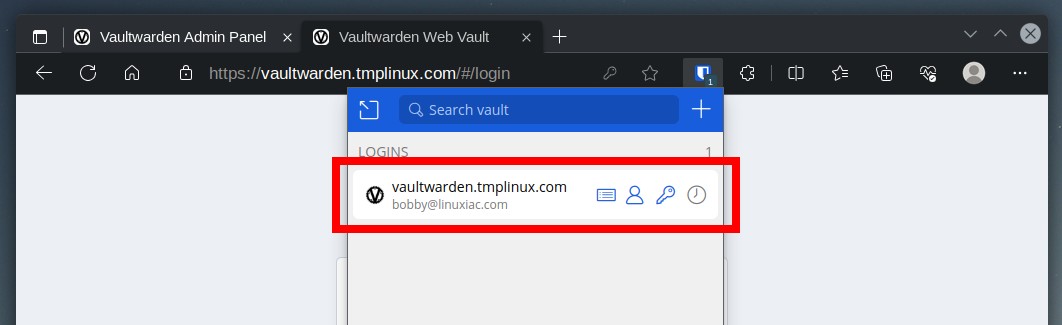
Then enter your password and confirm with the “Log in with master password” button.
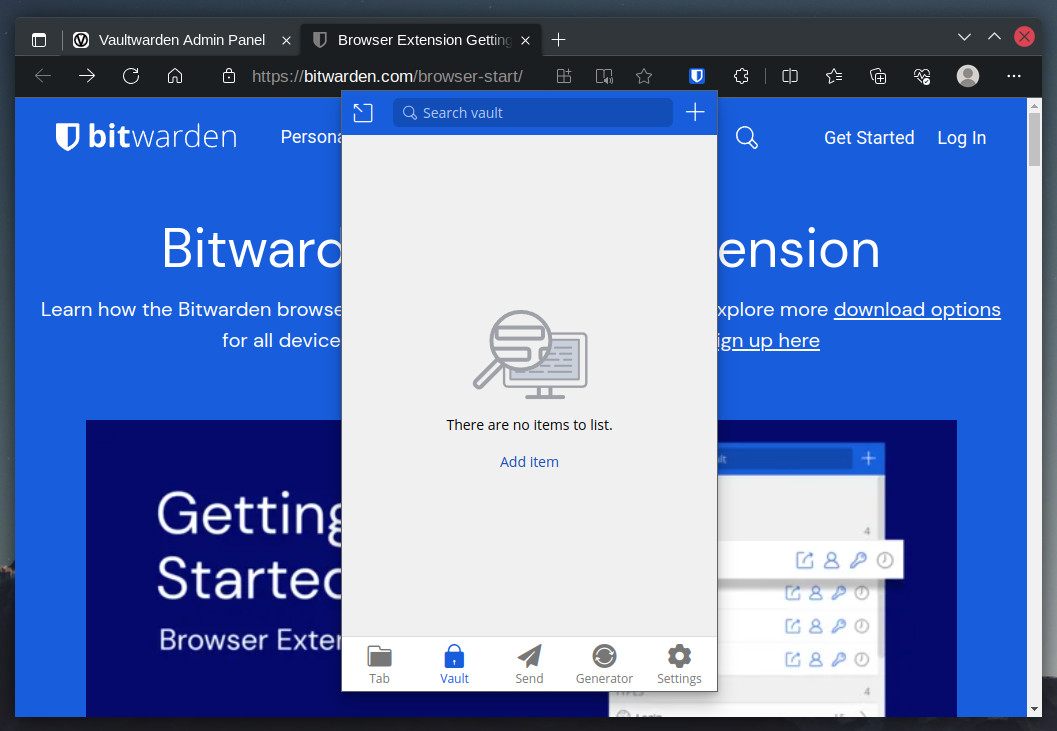
That’s all! After successfully logging in, you will be directed to the app page, where you can start using Vaultwarden.
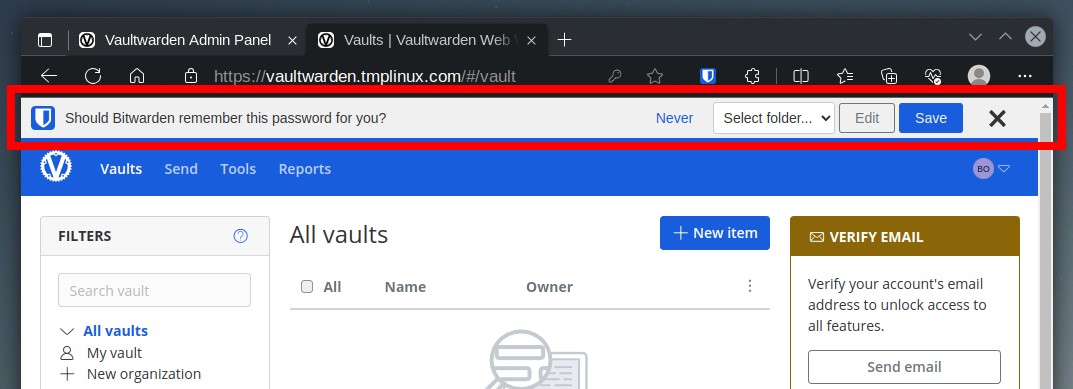
When you submit forms containing usernames and passwords, the Bitwarden client will prompt you with an informative message below the address bar if you want to save the information.
Apart from the browser extension, Bitwarden also provides a desktop client version, which you can download for free, depending on whether you use Windows, macOS, or Linux.
Bonus Tips
Congratulations if you made it this far and installed the Vaultwarden password manager. But you’re probably wondering, “How can I update the Docker container when a new version comes out?” There’s no room for worry, as we’ve got you covered.
With the help of WUD and our detailed and easy-to-follow guide, “How to Keep Containers Up-to-Date with What’s Up Docker (WUD),” you’ll always have the most up-to-date Vaultwarden version on your server.
Furthermore, if working in a terminal isn’t your thing, Portainer is here to help by providing a comfortable web-based UI for interacting with Docker containers. Simply read our guide “How to Install and Use Portainer to Manage Docker Containers” to get started.
Conclusion
In the digital age, where cybersecurity threats loom large, relying on a self-hosted password manager like Vaultwarden is a proactive step towards fortifying your online presence. Secure password management is the first line of defense against data breaches, identity theft, and other cyber attacks.
With its open-source nature and secure server implementation, Vaultwarden provides a robust solution for managing passwords and other critical information.
Our guide on installing Vaultwarden with Docker Compose offers a comprehensive and user-friendly approach to getting started.
By following the step-by-step instructions, you can easily deploy Vaultwarden on your server infrastructure, ensuring that your data stays within your control and away from the prying eyes of third-party cloud providers.
Thanks for your time! If you have any questions, please leave them in the comments section below. To learn more about Vaultwarden, visit the project’s GitHub page.


Dear Bobby
This is the best link in the Internet that we were able to find regarding Vaultwarden. You and your organization did an outstanding job.
I installed it exactly as you described. Additionally I had to reroute the domain through our OPNsense Firewall. Everything just worked the way you explained. Also the Certificate portion was great.
Thank you very much for this remarkable effort.
I do have 2 questions:
– Where exactly is the data located in case we want to do low level Backup of these critical files? It is super difficult for me to understand the logic of the /data folder mentioned in the docker-compose.yaml file (I am not a Docker expert).
– you are using SQLlite I assume. Would there be an option to replace it by PostgreSQL (we are using it all over)
Best Regards
Frank
Hey Frank,
I’m really appreciate you took the time to share such kind words—thank you! Now, about your questions.
In Docker, this setup is known as a named volume mount. Basically, you’re creating a volume called
vaultwarden_data(though you can name it whatever you like) that maps to a physical directory on your host machine. Inside the container, this volume gets mounted at/data.If you’re wondering where this data actually lives on your system, you’ll find it at
/var/lib/docker/volumes/vaultwarden_data/_data.As for your second question—yes, the out-of-the-box DB engine is SQLite. And yes, Vaultwarden does support PostgreSQL as a backend. You can find the official setup instructions on the following link: https://github.com/dani-garcia/vaultwarden/wiki/Using-the-PostgreSQL-Backend
Hope this helps you out. 🙂
I am also slightly confused regarding the created password hash: Where is it used during installation?
Cool. Now I've vaultwarden running my home network/vaultwarden is getting attacked thousands of times per day, resulting that I have to turn it off 😒
I've been looking at CrowdSec as a possible IDS/IPS solution, but suspect my architecture (Ubuntu server running on a new Raspberry Pi 5, 16GB) isn't suitable, dunno?
I've managed to get a basic nginx-proxy-manager with connected mariadb running okay, create an SSL certificate pointing to my vaultwarden container & that works all fine.
Any suggestions on alternative methods to secure vaultwarden from massive network attacks?
For caddy to renew certificates, ports need to be open so LetsEncrypt can do its HTTP-01 challenge. Could you show how to use DNS-01 challenge with caddy and a free dns provider that supports DNS challenge so no ports need to be opened? Many prefer not to expose their password manager to the wild.
Work Perfect and faster.
Thank you!
Very nice tutorial. Two thumbs up! I’m running into the following error on my backup vaultwarden server setup with your tutorial.
“This security key doesn’t look familiar. Please try a different one.”
Explained here: https://www.systemsengineer.cloud/this-security-key-doesnt-look-familiar/
The main server is mydomain.example.com (yubikeys registered here for FIDO2 WebAuthn 2fa) and the backup is mydomain.example.info linked together freedns.afraid.org and internally DNS resolves to different local IP’s. It seems the backup server would need to use the same domain as the main server for yubikeys to work but I can’t have caddy letsencrypt requests mess up the main server’s certificate.
Could the main server export the certificate and caddy import it instead of generating one? Backup not always ready to go then. I’ve got a bootable linux portable external USB drive with a backup vaultwarden using localhost and http but 2fa has to be stripped for this to work on a single local host.
Only internal LAN use and eventually external use would be over tailscale so virtually on the LAN anyways.
So how do you backup vaultwarden? This is a big question. Perhaps a followup blog post about how to survive a catastrophic failure of your self-hosted vaultwarden server. Passwords are important!
Hello,
i have got same problem John :
The installation steps was completed without any problem, but when I try to access the site, I got SSL_ERROR_INTERNAL_ERROR_ALERT on the browser… Solution ?
hi, great tutorial, however, i have a question:
Why enter the admin web interface using a password instead of the token, i think is not secure this way… In my case i use a very basic password, so id like to change it without redoing the installation, or even better use the token instead..
please clarify this.
thanks
Hello,
The installation steps was completed without any problem, but when I try to access the site, I got SSL_ERROR_INTERNAL_ERROR_ALERT on the browser. I just couldn’t fix it, do you have any idea what could be the problem?
Thanks in advance.
It works perfect, thank you very much, you’re my hero!!! 🙂
just a question, how can I renew the let’s encrypt certificate? As far I know it will expire every 90 days
Hey Lucas,
Wow. Strong words – I am touched! Thank you for trusting our tutorials – we strive to give our best and tested solution.
Regarding your question – yes, Let’s Encrypt certificates are valid for 90 days, but in this case, we chose Caddy as part of the implementation for a reason – it takes care of renewing them automatically. In other words, you don’t have to worry about it – Caddy will take care of it.
Best,
Bobby
Thank you for reply Bobby, it’s clear, caddy will auto-renew the certificate, good. I should implement it in my other servers like nextcloud or homeassistant where I have to manually renew them.
so cool. This howto worked and I could set up my vaultwarden on a new debian within 15min. Thank you so much!
Great! Glad to have been of help.
Best,
Bobby