
Ads on websites and applications are a common way of generating revenue. However, the truth is that many websites, including this one, would not exist without the income earned.
But the big truth is that ads have always been an unwanted “addition” for end users and their user experience.
Unfortunately, advertising is a necessary evil for the internet to exist in its current form. First, to be able to use all the resources it offers for free. To even be able to read this article.
In other words, maintaining such a site providing content solely on a volunteer basis would be impossible without ad revenue.
However, in response to advertising and tracking, various software solutions have been developed, some with varying degrees of success, the most popular and easily implemented are ad-blockers in the form of browser add-ons.
Although they may accomplish some of the tasks intended for them, they have some drawbacks. The main one is their very targeted applicability solely within your web browser.
And this is where Pi-hole, the best software solution for fighting annoying ads to date, comes into the picture. And, most importantly, did we mention it’s entirely free?
But, before we go any further, let’s take a quick look at what Pi-hole is, how it works, and what its main benefits are when used.
What’s Pi-hole and How It Works
Pi-hole is a free Linux-based network-wide ad-blocker that protects your entire network from ads and trackers without requiring configuration on individual devices.
It was initially developed for low-power embedded devices with network capabilities, like the Raspberry Pi, although it can be installed on any Linux distro.
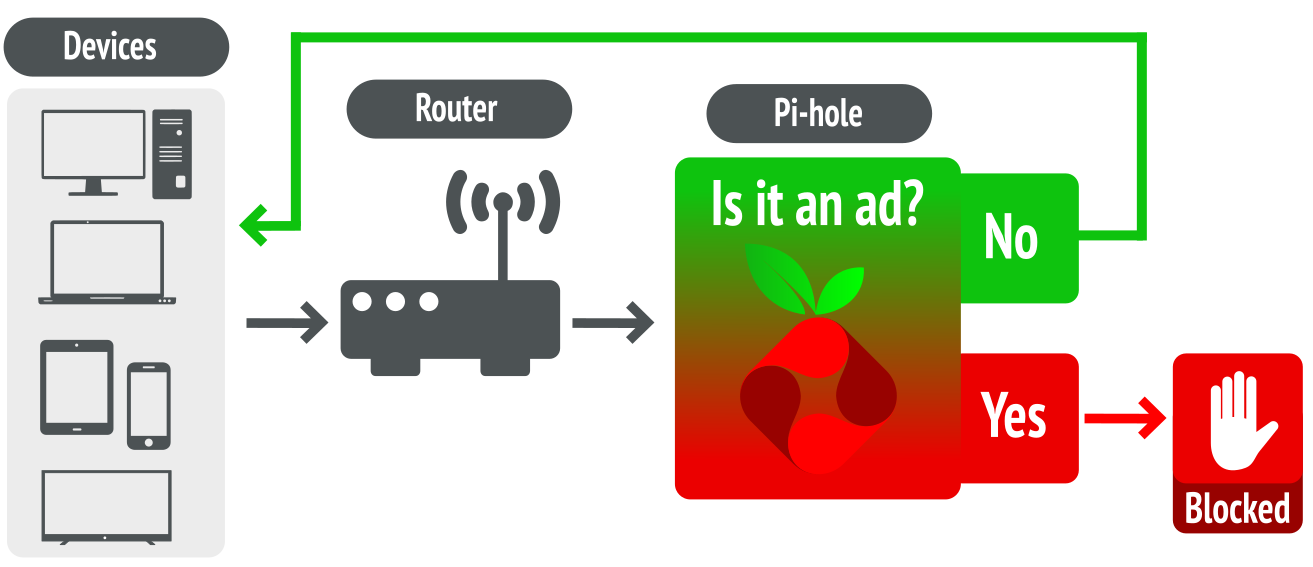
Pi-hole acts as your DNS server, blocking domain names commonly associated with advertising and tracking. In addition, any DNS requests that match a known ad host will be blocked, implying that the connection will never be established. As a result, the ad will never reach and appear on your devices.
The diagram below will help you understand how Pi-hole works.
Now that we’ve clarified let’s look at the main benefits of using Pi-hole.
Benefits of Using a Pi-hole Ad-Blocker
Using Pi-Hole for blocking ads and tracking has several benefits, but three set it apart from similar software in the market. Here’s a summary of them.
Completely Free
Pi-hole is open-source software that is free to download, install, and use. In other words, for the cost of nothing, you can make the user experience across your home or office network faster, ad-free, and, most importantly, more secure by blocking unwanted tracking.
Covers Your Entire Network
As previously said, Pi-hole is a network-wide ad blocker. In other words, it covers your entire network. And this is its most significant part.
Are you using an ad-blocker extension in your browser? Or perhaps you use browsers that include this functionality by default. So far, so good. But what about the other browsers you use?
Let’s also not forget that the browser is far from the only app displaying ads and tracking users. Sure enough, at least a dozen additional apps on your computer are doing it right now without your knowledge.
In addition, it’s also likely that you and other family members have other Internet-connected devices on your home network, such as laptops, phones, tablets, smart TVs, and so on. The list is lengthy.
Each of them contains a variety of software (other than a web browser) capable of displaying ads and tracking. However, they do not have ad blocking software.
This is where Pi-hole reveals its real power. Once installed and connected to the router in your home or office network, all devices are protected. The best part is that no further configuration is necessary.
In other words, once Pi-Hole is integrated into your network, every single device starts to use it and hence gets all the benefits that Pi-Hole brings with it.
Faster Internet Experience
We’re all used to being bombarded with ads while surfing the web. But unfortunately, we’ve come to accept it as a regular part of our internet experience.
We don’t realize that all of those ads significantly slow down the speed with which we load web pages.
That is why the initial impression following Pi-hole integration into your network is earth-shattering. Suddenly, everything loads noticeably faster, as if by a magic wand. And once you’ve gotten used to it, you won’t look back.
In addition, the ad serving and tracking scripts, for the most part, make a lot of additional DNS queries and load the third-party resources. All of this significantly slows down your requested resource load time. So once eliminated, your Internet experience will be faster and smoother.
Prerequisites
Pi-hole is a lightweight application that uses very few system resources. It requires 512MB RAM, a microSD card with at least 2GB of free space, and Raspberry Pi OS to make installation on a Raspberry Pi device possible.
Since all available Raspberry Pi devices meet these requirements (Raspberry Pi Zero, 2, 3, and 4), Pi-hole can be installed on any of them.
Of course, Pi-hole is not limited to Raspberry Pi only. You can install it on nearly any Linux distro. However, this guide will take the traditional approach and install Pi-hole on a Raspberry Pi 3. Here’s all we need.
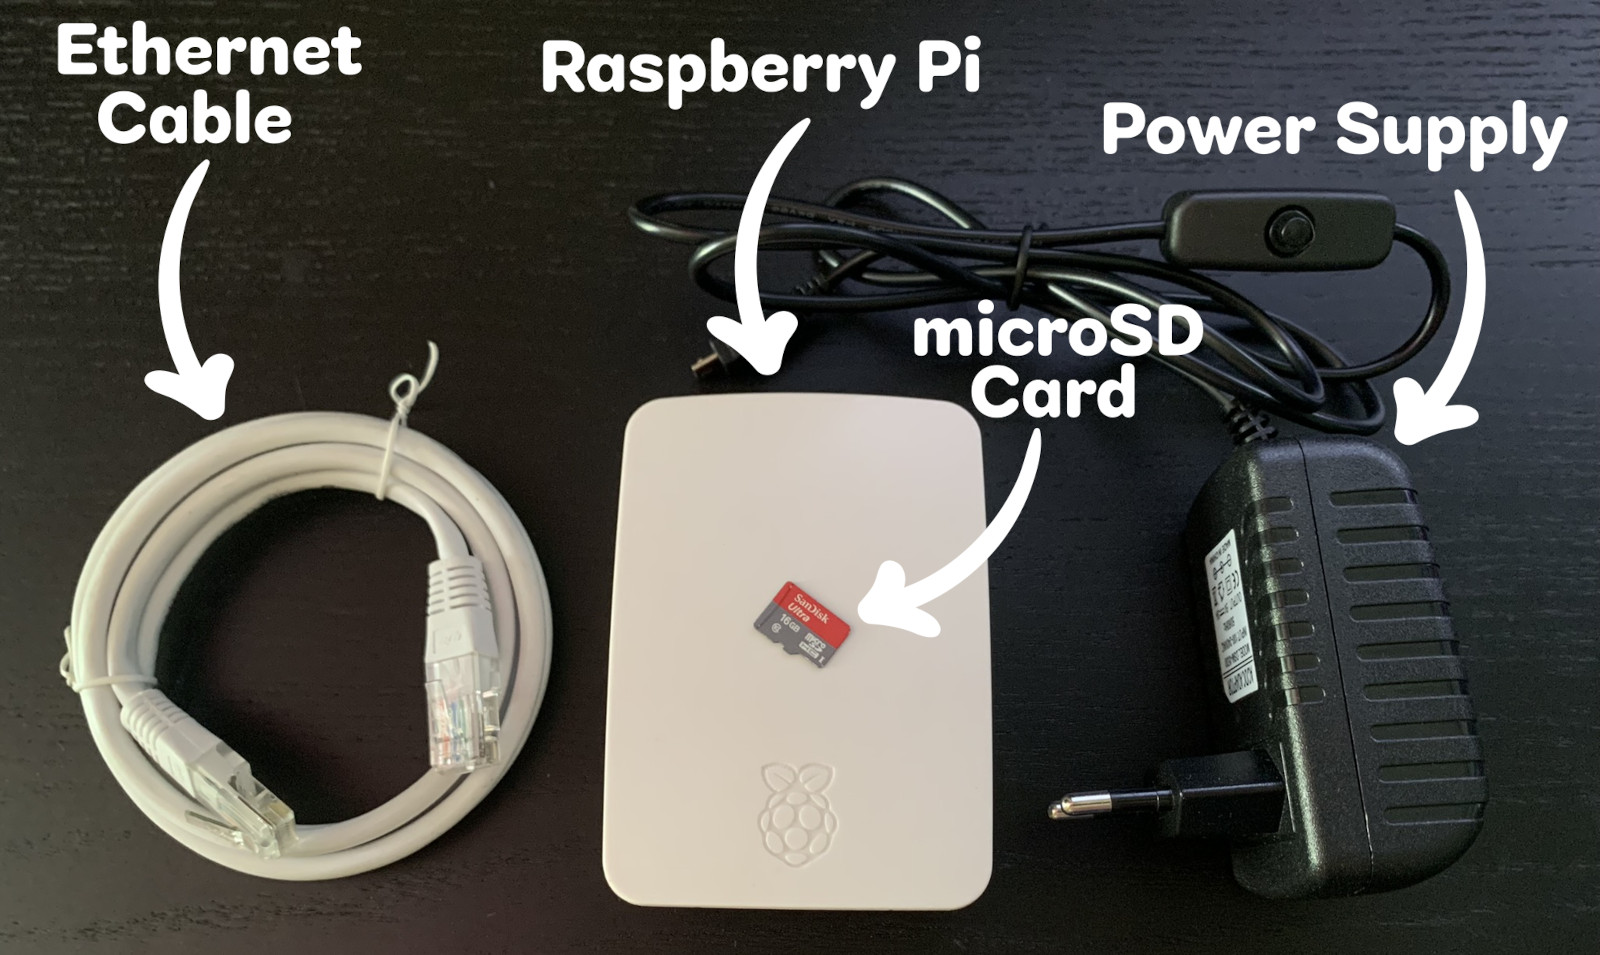
So, with everything out of the way, it’s time to get down to work and install and configure the Pi-hole ad and tracker blocker on our network.
Following the steps below, completing the entire process will take less than two hours. It took us that long, at least.
Install Raspberry Pi Imager
The first step is to install the Raspberry Pi Imager. This software simplifies the Raspberry Pi OS installation onto our microSD card and makes the entire process straightforward and much easier.
Raspberry Pi Imager is available for Windows, Linux, and macOS. In this guide, we will install it on the latest Ubuntu 22.04.
Use the commands below to add the required software repository to your Ubuntu 22.04 system:
echo 'deb http://download.opensuse.org/repositories/home:/pragmalin/xUbuntu_22.04/ /' | sudo tee /etc/apt/sources.list.d/home:pragmalin.list
curl -fsSL https://download.opensuse.org/repositories/home:pragmalin/xUbuntu_22.04/Release.key | gpg --dearmor | sudo tee /etc/apt/trusted.gpg.d/home_pragmalin.gpg > /dev/nullCode language: PHP (php)
Similarly, if you are still running Ubuntu 20.04 and have not yet upgraded to the most recent Ubuntu’s LTS release, you should run:
echo 'deb http://download.opensuse.org/repositories/home:/pragmalin/xUbuntu_20.04/ /' | sudo tee /etc/apt/sources.list.d/home:pragmalin.list
curl -fsSL https://download.opensuse.org/repositories/home:pragmalin/xUbuntu_20.04/Release.key | gpg --dearmor | sudo tee /etc/apt/trusted.gpg.d/home_pragmalin.gpg > /dev/nullCode language: PHP (php)
If you’re a Debian 11 user, execute:
echo 'deb http://download.opensuse.org/repositories/home:/pragmalin/Debian_11/ /' | sudo tee /etc/apt/sources.list.d/home:pragmalin.list
curl -fsSL https://download.opensuse.org/repositories/home:pragmalin/Debian_11/Release.key | gpg --dearmor | sudo tee /etc/apt/trusted.gpg.d/home_pragmalin.gpg > /dev/nullCode language: PHP (php)
However, if you are still on Debian 10 (Buster) and have not upgraded to Debian 11 (Buulseye), perform the following command:
echo 'deb http://download.opensuse.org/repositories/home:/pragmalin/Debian_10/ /' | sudo tee /etc/apt/sources.list.d/home:pragmalin.list
curl -fsSL https://download.opensuse.org/repositories/home:pragmalin/Debian_10/Release.key | gpg --dearmor | sudo tee /etc/apt/trusted.gpg.d/home_pragmalin.gpg > /dev/nullCode language: PHP (php)
Fedora 36 users need to execute:
dnf config-manager --add-repo https://download.opensuse.org/repositories/home:pragmalin/Fedora_36/home:pragmalin.repoCode language: JavaScript (javascript)However, if you are running an older version of Fedora, we recommend that you first upgrade to the most recent Fedora version.
Once you’ve added the appropriate repository to your Linux system, it’s time to move on to the actual installation.
First, ensure that system information of all available software packages is up to date, and then install Raspberry Pi Imager by using the APT command:
sudo apt update
sudo apt install rpi-imager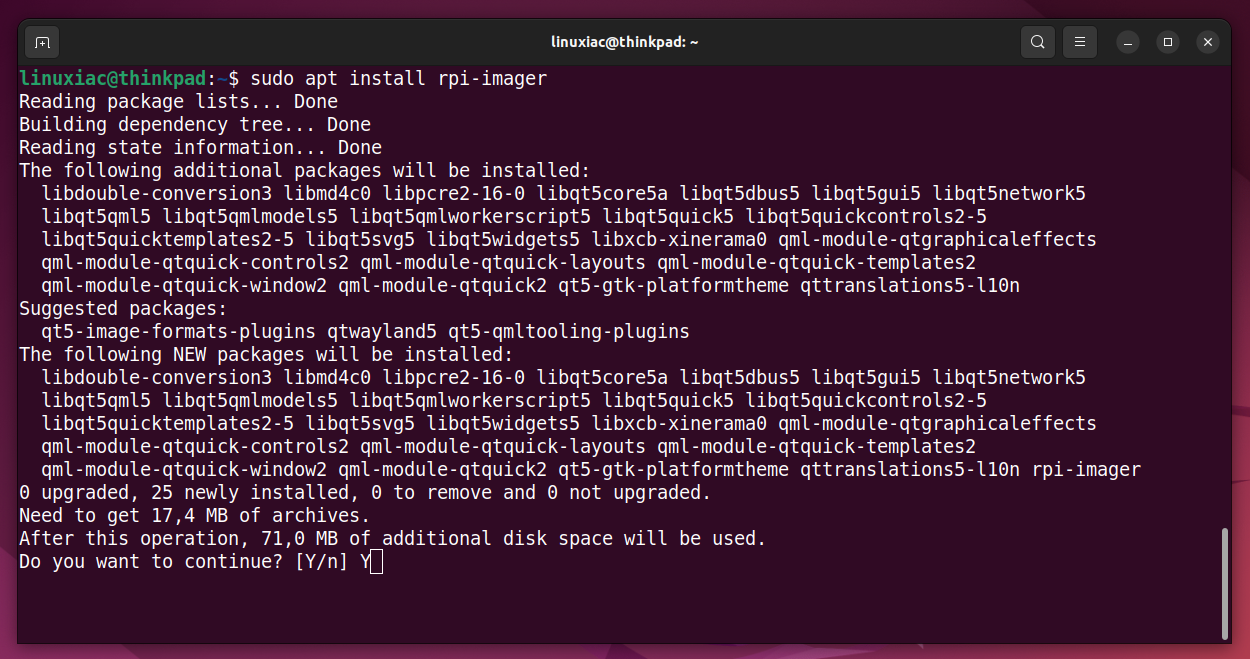
Fedora users must use the DNF packet manager, executing:
sudo dnf install rpi-imagerInstall Raspberry Pi OS on a microSD Card
The next step is to install the Raspberry Pi OS on our microSD card. To start, insert the microSD card into the slot provided on your laptop or desktop computer, or use a card reader.
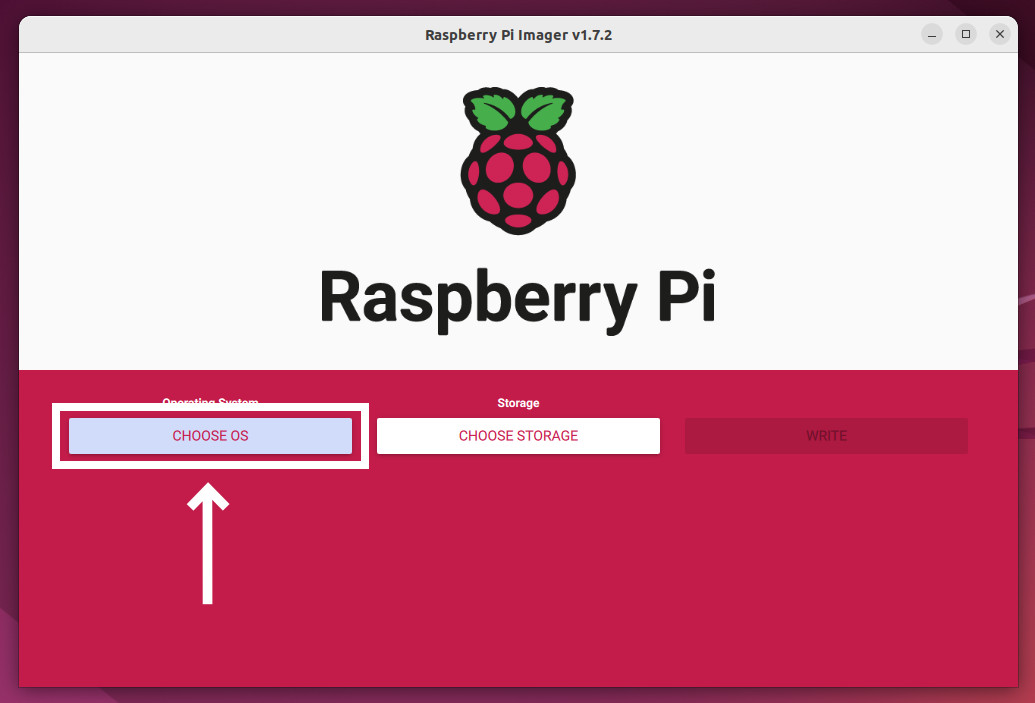
Then, launch Raspberry Pi Imager from your desktop environment’s application menu.

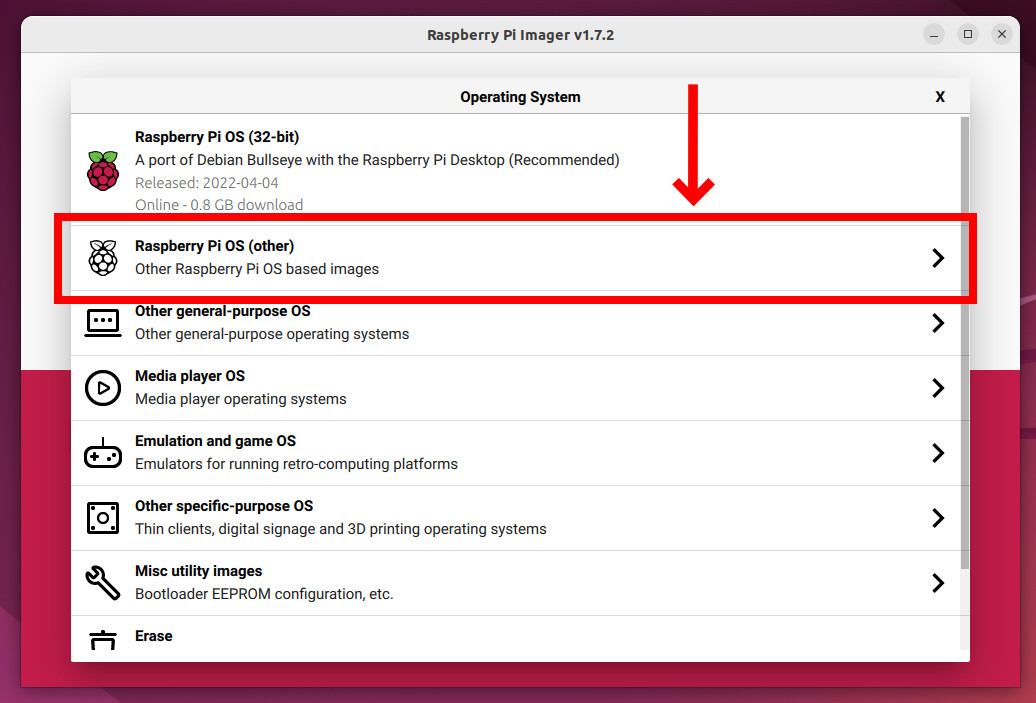
Once the application opens, select “CHOOSE OS.”
Choose “Raspberry Pi OS (other)” from the open window.
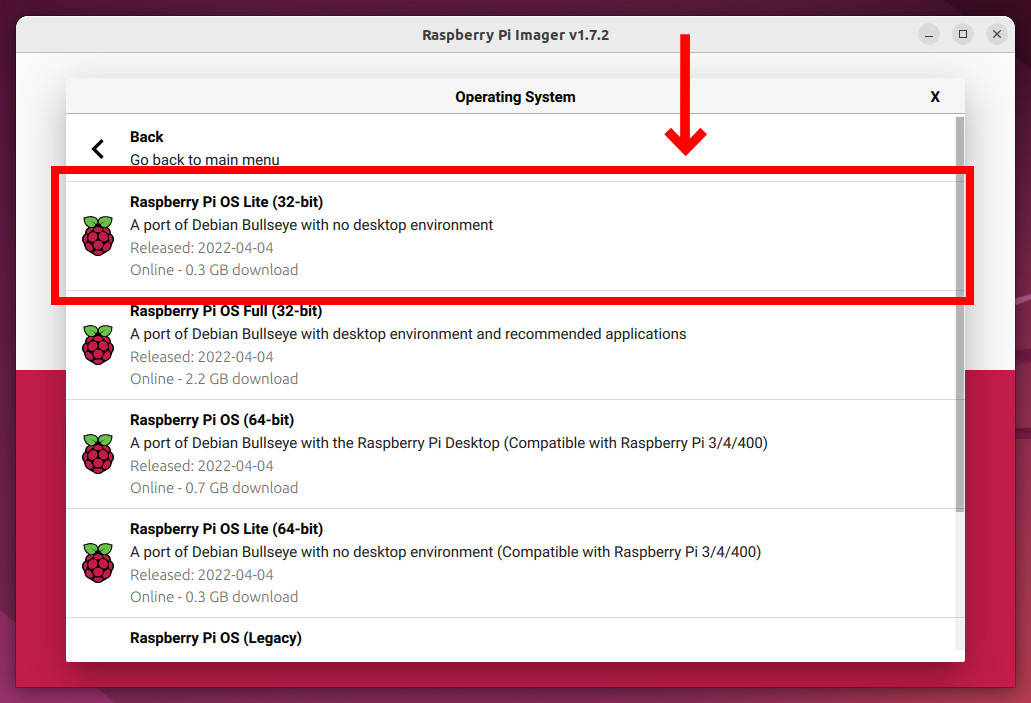
You will be presented with a list of Raspberry Pi OS versions. Pick “Raspberry Pi OS Lite (32-bit)”. This is the place to describe why you should choose this option.
We don’t need a full-featured operating system with a graphical desktop environment and everything else because we’ll be using our Raspberry Pi as a server running a Pi-hole ad blocker.
At the same time, Raspberry Pi OS Lite, as the names suggest, is a lightweight version of Raspberry Pi OS that includes only the components required to run a fully functional OS in command-line mode. So this is precisely what we need in this case.
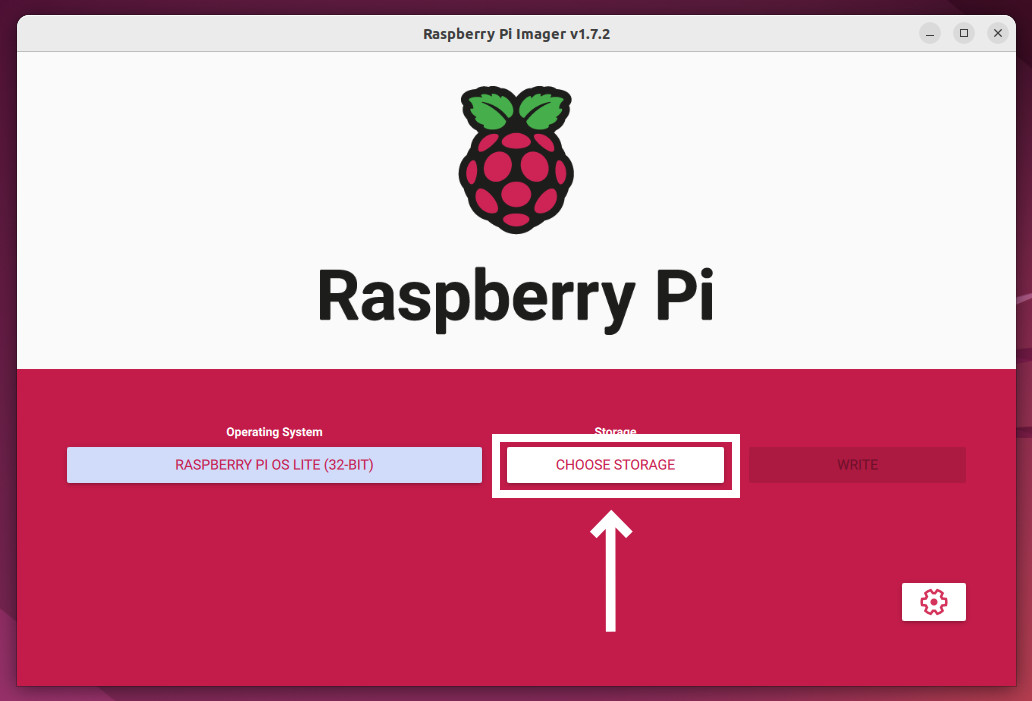
The window will close, and the “Operating System” section will display the Raspberry Pi OS type you selected.
The next step is to specify the storage device on which Raspberry Pi OS will be installed, our microSD card. Then, finally, hit the “CHOOSE STORAGE” button.
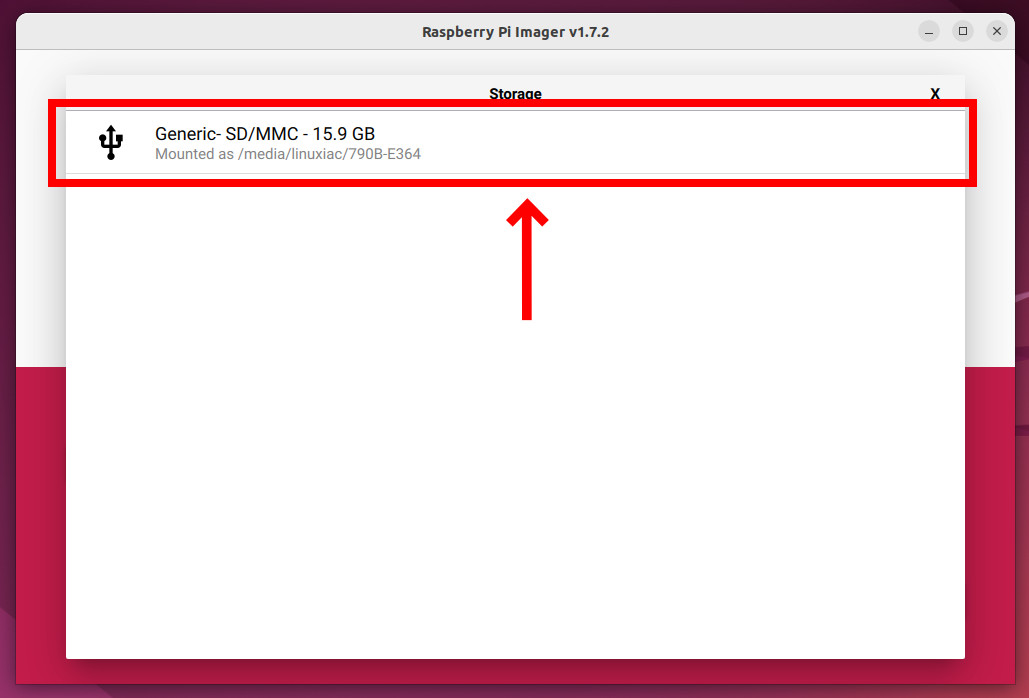
A sub-window will appear in which your extra storage devices should be listed. If you have more than one, pick the ones from the list on which the Raspberry Pi OS will be installed. In our case, it is a 16GB microSD card, so we click on it.
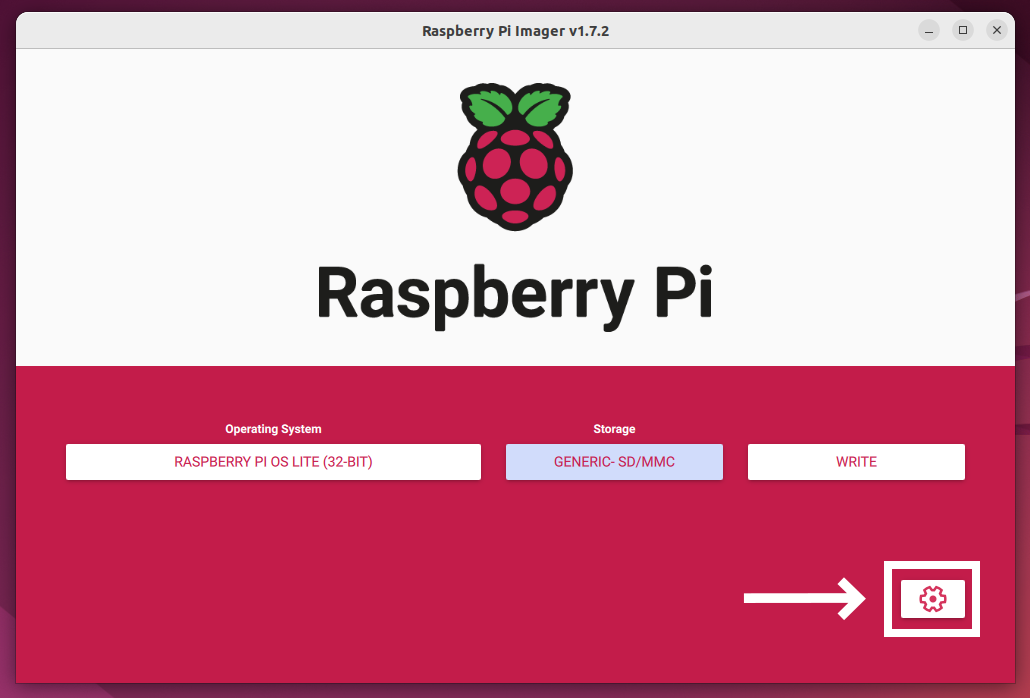
The sub-window will close, and you will be back on the home screen of the Raspberry Pi Imager. To open and configure additional options, click the gear icon in the bottom right corner of the app.
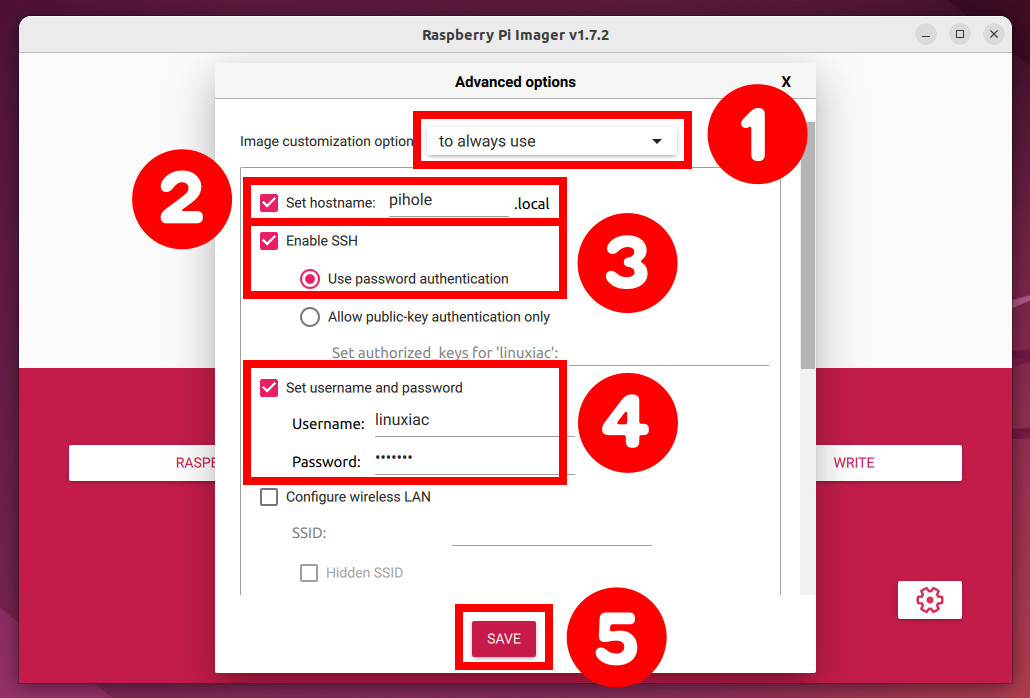
Select “to always use” from the “Image customization option” list. This ensures that the settings made below will remain permanent on your Raspberry Pi OS.
Then, give your Raspberry Pi OS installation a name so that the device can be identified on your local network. For our example, we used “pihole,” but you can choose another based on your personal preferences.
Tick the “Enable SSH” checkbox and ensure the “Use password authentication” option is selected.
Tick the “Set username and password” checkbox and enter the username and password you’ll use to access your Raspberry Pi device via SSH remotely.
We must make a necessary clarification here. Because our Raspberry Pi device will be connected directly to the router via Ethernet cable, no wireless connection setting is required. However, if you intend to use one, you must enable it (by ticking the checkbox) and enter the relevant information in the “Configure wireless LAN” section.
When you’re done, click the “SAVE” button.
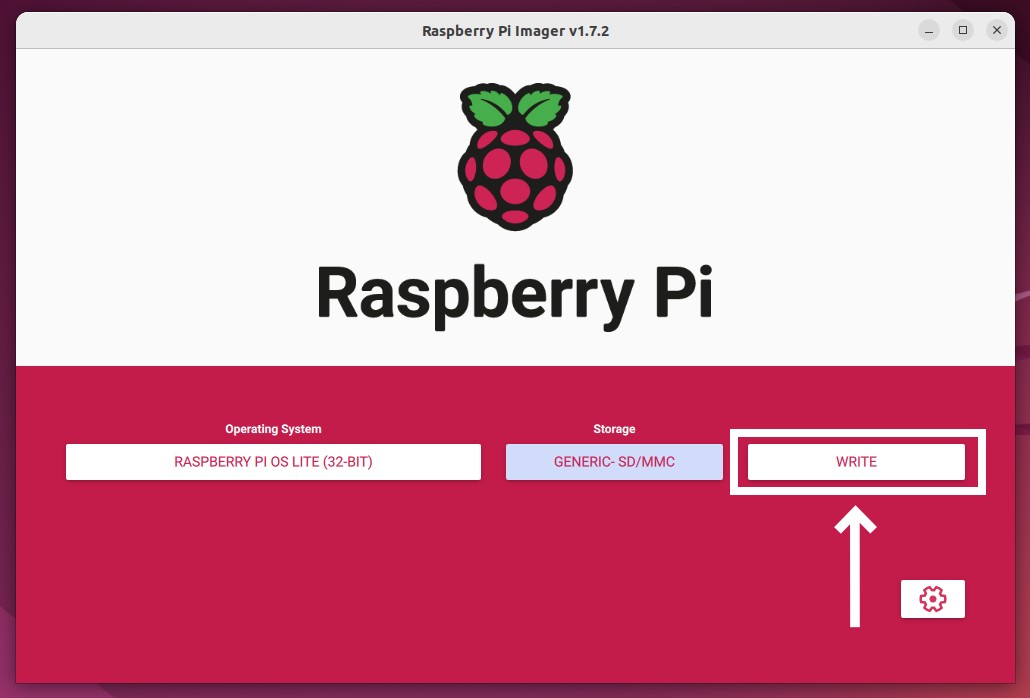
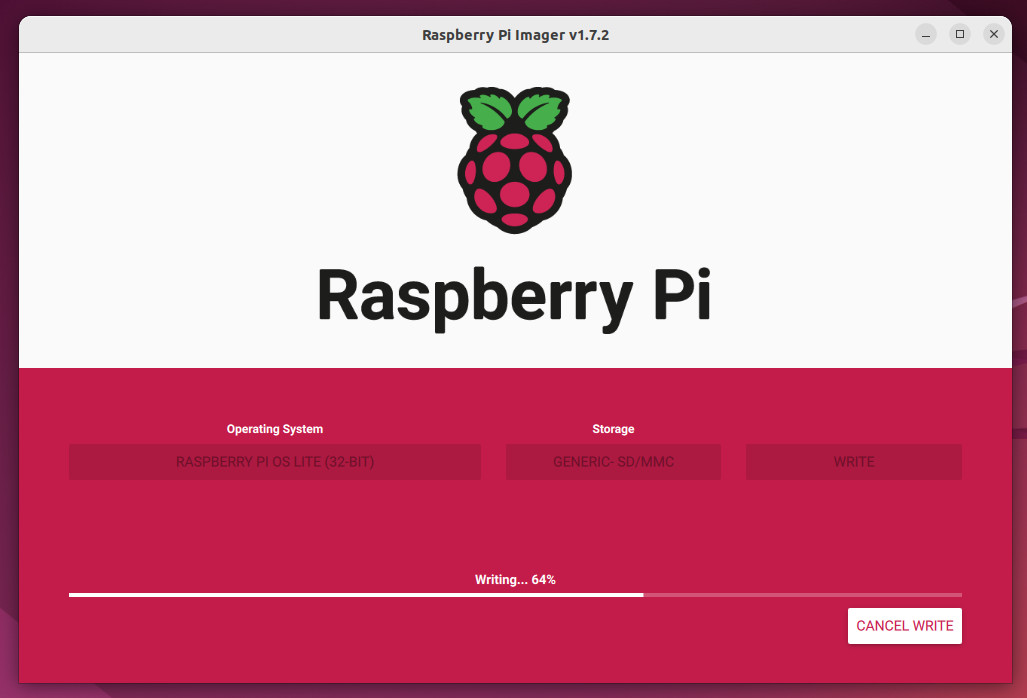
Everything is now in place to start the actual installation of Raspberry Pi OS on our microSD card. To begin the installation process, press the “WRITE” button.
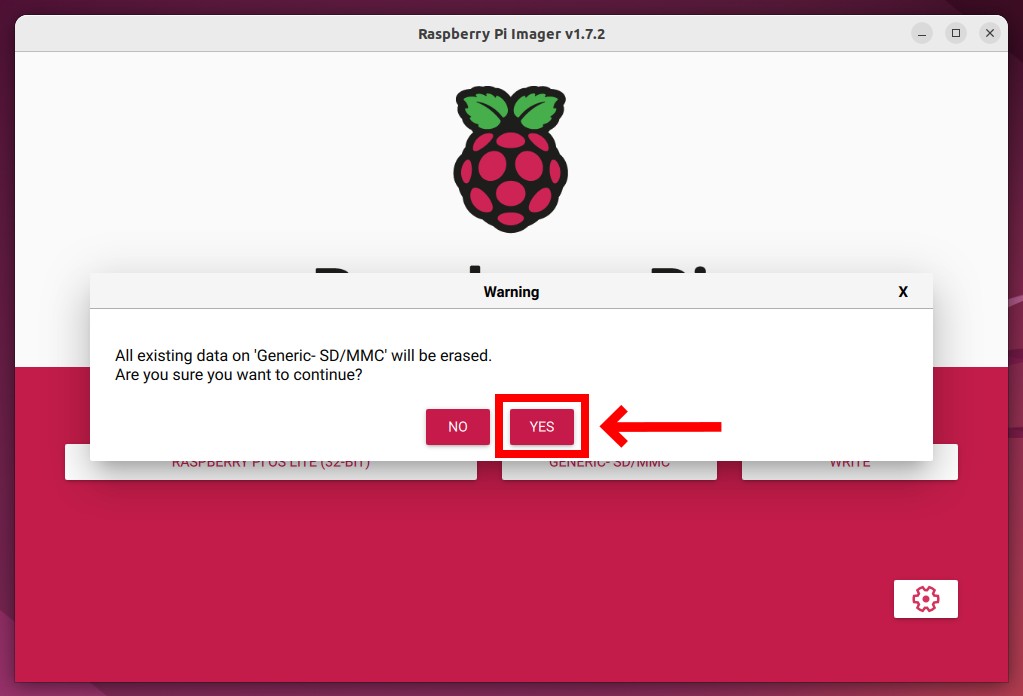
Raspberry Pi Imager will warn you that all available data on your microSD card will be wiped. Confirm your approval to proceed by clicking the “YES” button.
The installation process will start. Depending on your Internet connection’s speed, installing Raspberry Pi OS on your microSD card will take between 5 and 15 minutes.
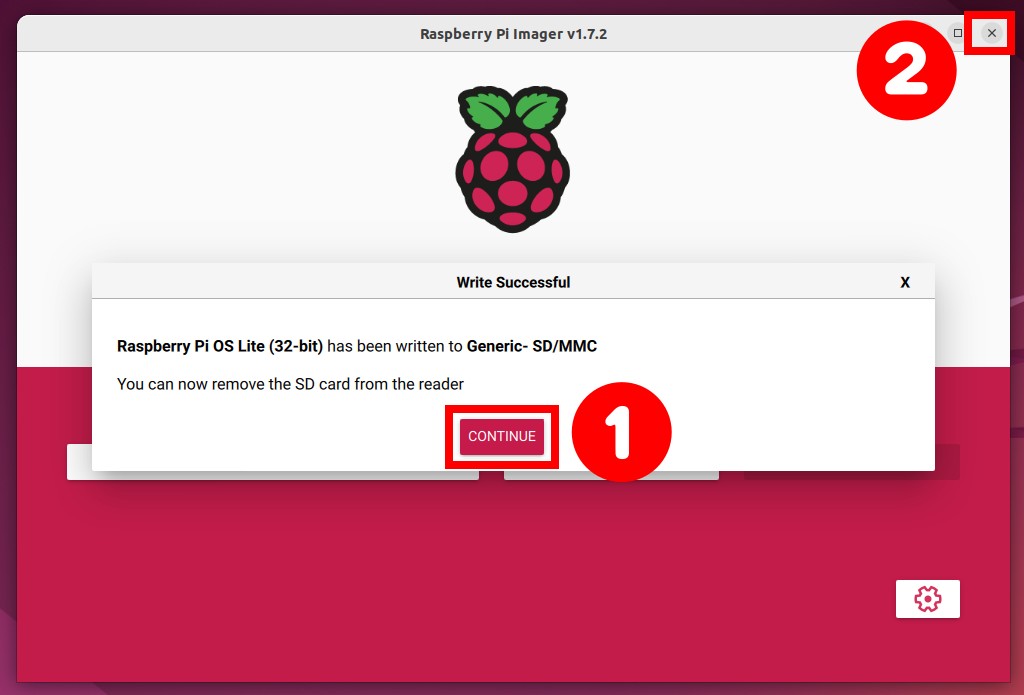
When the installation is complete, you will be notified that your microSD card can now be safely removed. Confirm with the “CONTINUE” button and close the Raspberry Pi Imager app.
Connect Raspberry Pi to the Router
The Raspberry Pi OS is now installed. Next, insert the microSD card into your Raspberry Pi device and connect it to the router using the Ethernet cable. Of course, you can skip this step if you configured it to use a wireless connection.
Start the device. Here comes the trickier portion, which depends entirely on your router.
To find out what IP address your Raspberry Pi device has, log into the administrative web interface of the router you’re using and look for the IP address assigned to your Raspberry Pi device in the list of connected devices.
Because Pi-hole is acting as a server, we must ensure that our Raspberry Pi device receives the same IP address each time. In other words, your Raspberry Pi should have a static IP address in your private network.
To do so, navigate to the DHCP settings area of your router’s web-based administrative interface and look for an option like “Static Leases.”
You must provide the current MAC address of your Raspberry Pi device to receive the same IP address (you need to specify one) each time by applying the necessary configuration. In our case, we picked 192.168.1.100, but you should set one that corresponds to the network infrastructure of your private network.
After that, reboot the Raspberry Pi device to get its new IP address. To reboot it, unplug it and plug it back into power.
Install Pi-hole Ad Blocker on Raspberry Pi OS
Once we’ve ensured our Raspberry Pi device with a static IP address, we can log in to it through SSH to begin the Pi-Hole installation.
We use the well-known SSH command for this, which in our case looks like this:
ssh linuxiac@192.168.1.100Code language: CSS (css)Of course, replace the username with the one you picked during the Raspberry Pi OS installation and the IP address with the current one in your case.
Run the following command to start the Pi-hole installation:
curl -sSL https://install.pi-hole.net | bashCode language: JavaScript (javascript)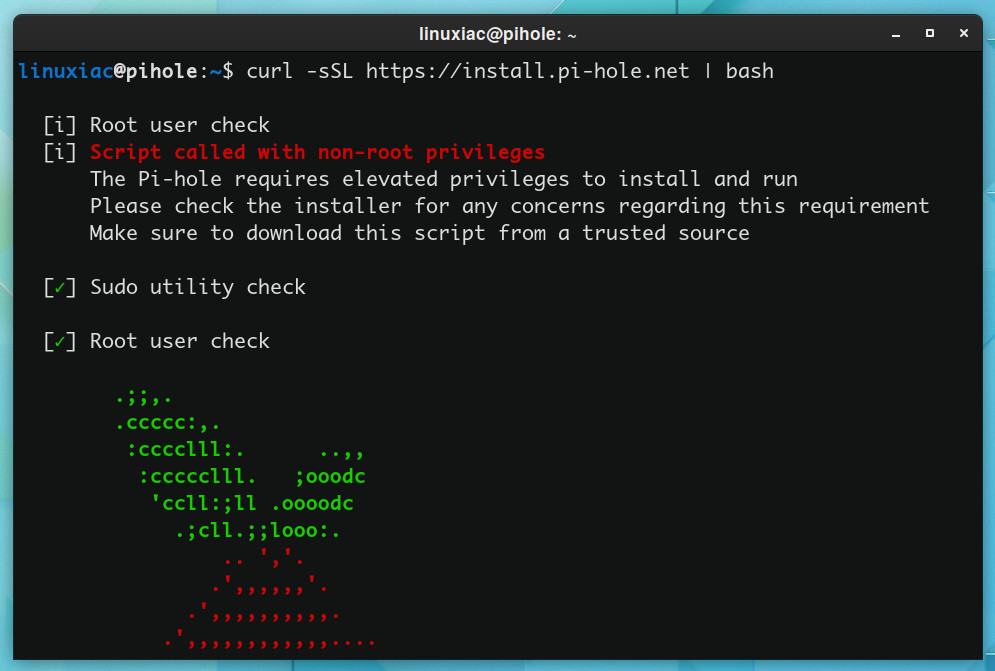
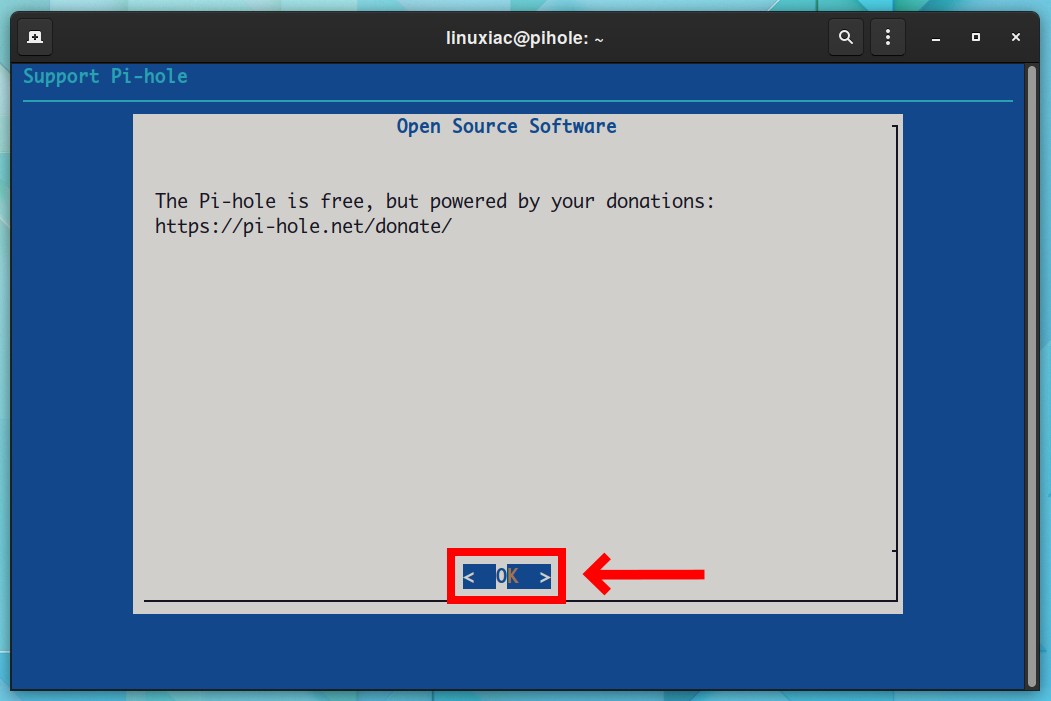
A series of checks will be performed, after which you will be met with the text-based Pi-Hole installer. To proceed, press “OK.”
Pi-hole will notify you that it needs a static IP address to work. Because we’ve already provided one, click “Continue” to proceed to the next step.

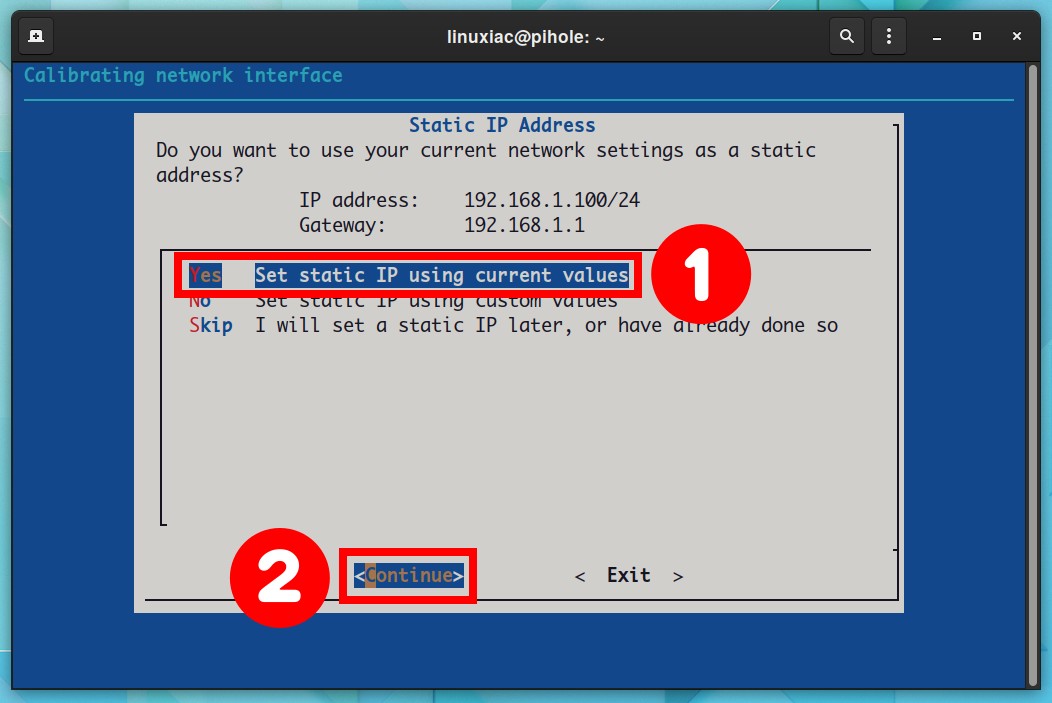
Pi-Hole notifies us about the current IP address (192.168.1.100) and provides us with several options for changing it. We choose “Set static IP using current values” and confirm with “Continue” because, as previously stated, this is the correct static IP address we have chosen to be assigned to our Raspberry Pi device each time.
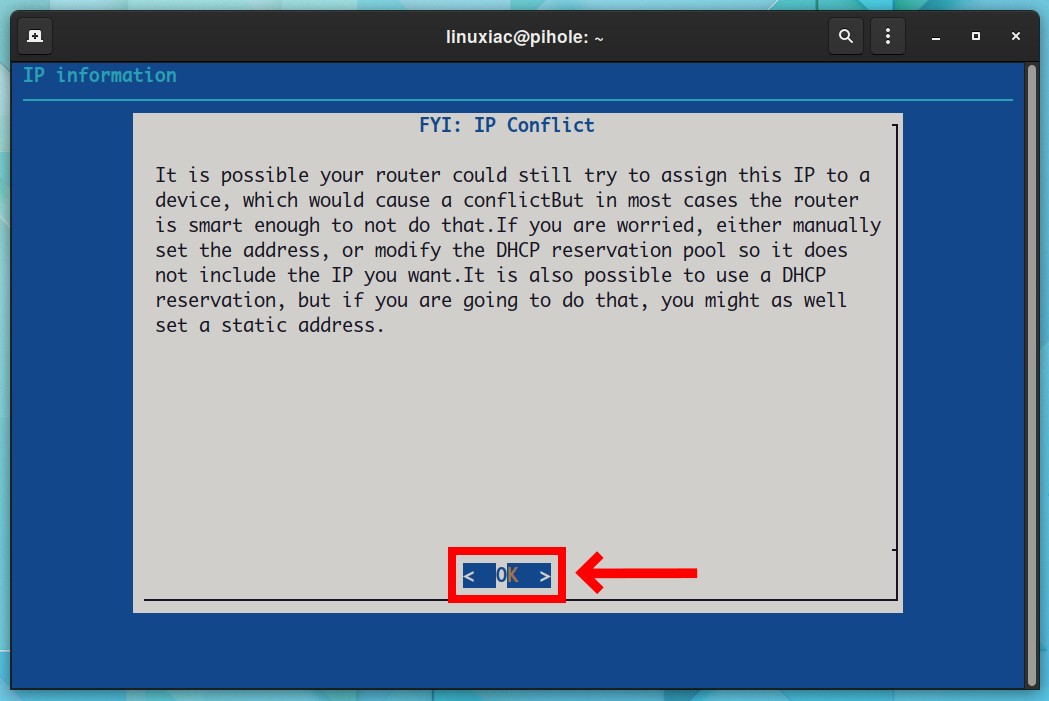
The message that follows is purely informative. To proceed, click “OK.”
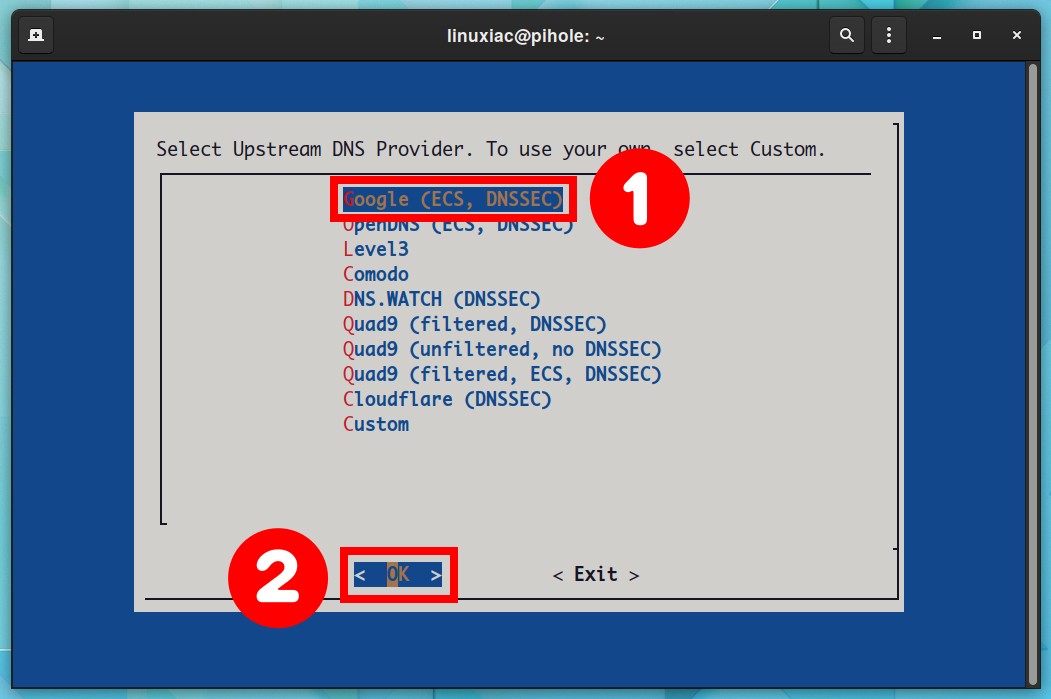
The next screen asks us to select our upstream DNS provider. Again, you have several options, but we recommend sticking with Google for one. So choose it and confirm with “OK.”
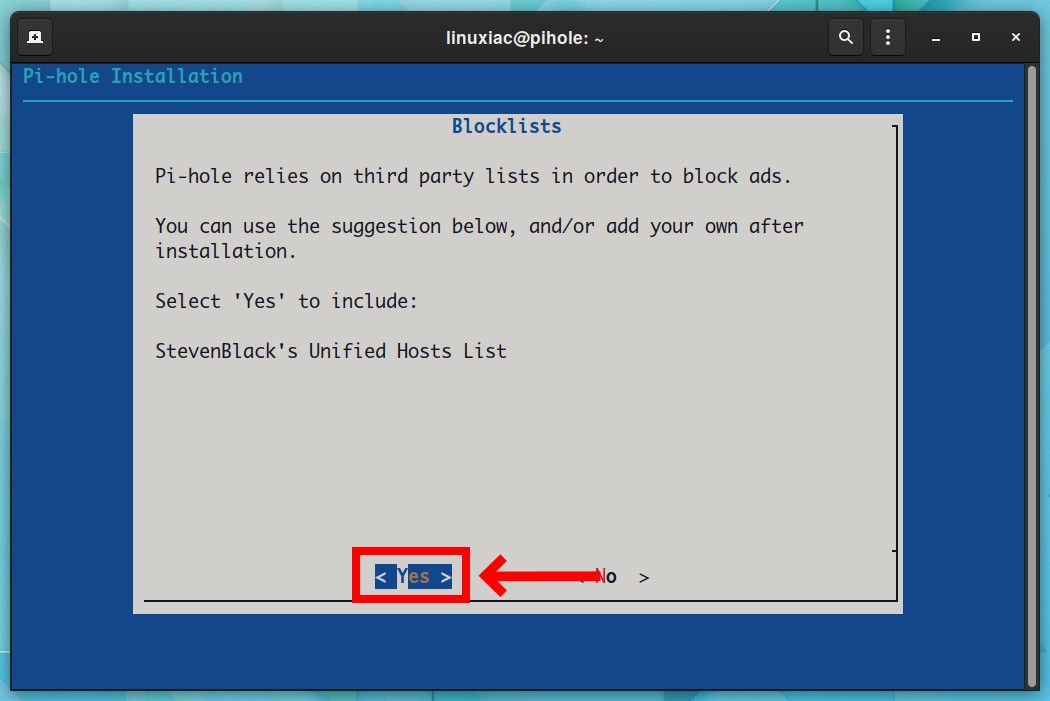
The next step is essential. Pi-hole uses third-party lists containing addresses to ensure that unwanted ads and tracking are blocked out. In other words, without them, Pi-hole would block virtually nothing.
The suggested default list (“StevenBlack’s Unified Hosts Lists”) is a good starting point. Therefore, press “Yes” to confirm that you want it to be imported.
Of course, you’ll be able to add more lists, including custom ones, later if you want.
Pi-hole may be completely managed via the command line. This approach, however, requires extra effort and learning of Pi-hole service-specific commands.
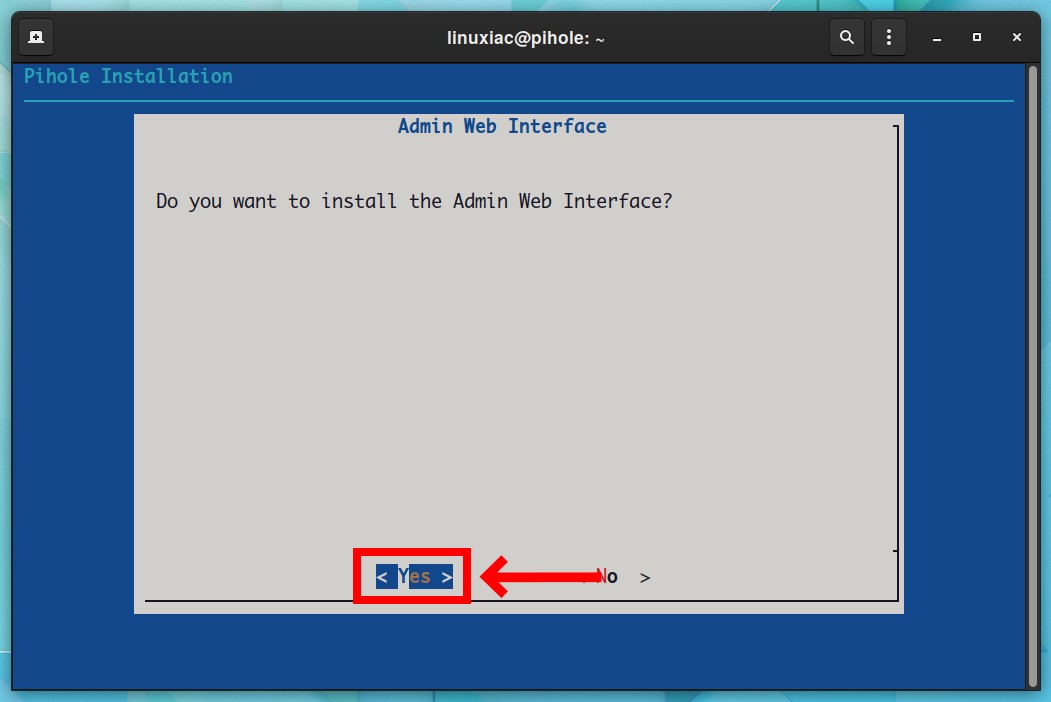
Fortunately, Pi-hole offers a superb web interface that makes the entire administration process simple and quick. So, yes, we want to install the admin web interface. Hit “Yes” to confirm.
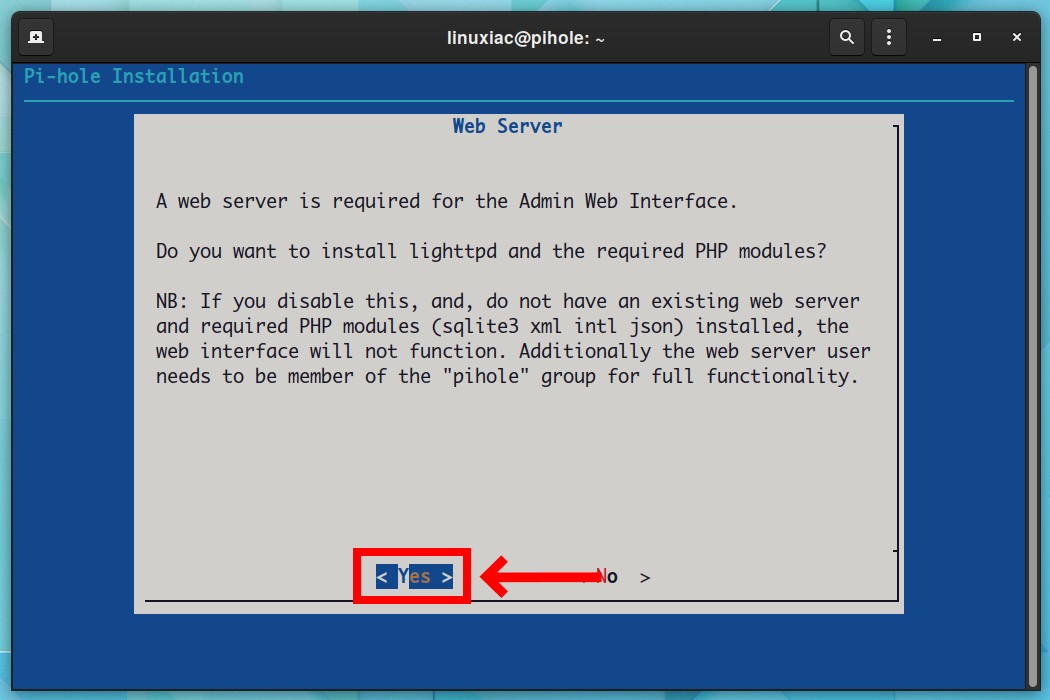
For Pi-hole’s administrative web interface to function correctly requires PHP support. So we confirm again with “Yes” that we want PHP to be installed on our Raspberry Pi device.
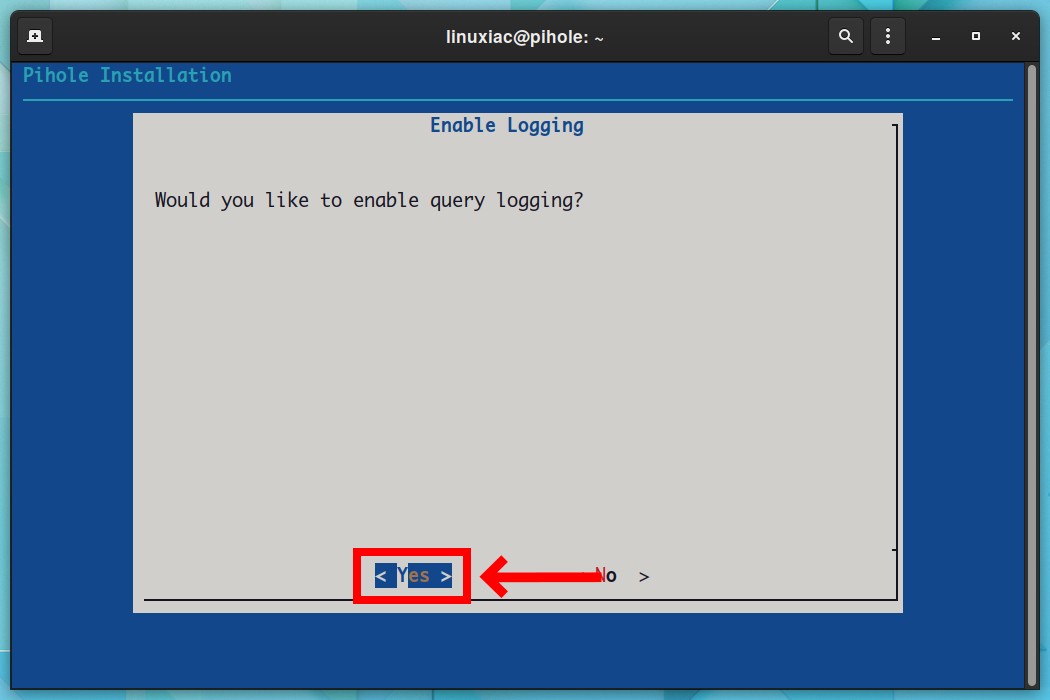
To have a complete picture of what’s going on with Pi-hole, we need to be able to see all requests. Therefore, we chose “Yes” here.
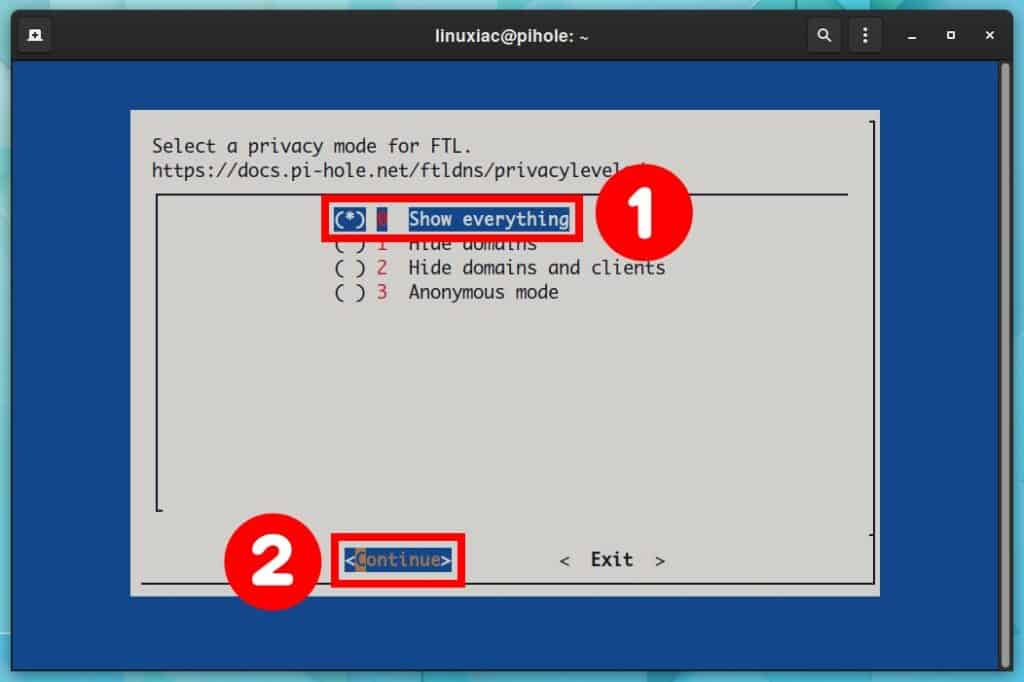
We choose to see all available information about the executed requests and confirm with the “Continue” button.
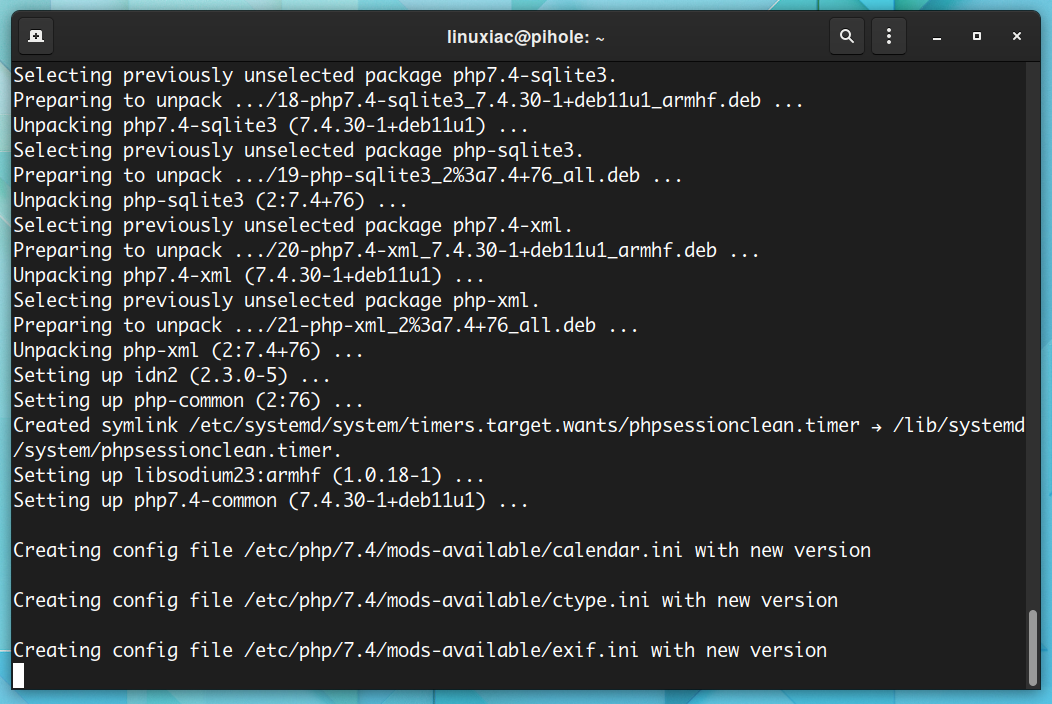
The actual process of downloading and installing the Pi-hole packages will begin. This should only take a few minutes, so be patient and wait for the installation to complete.
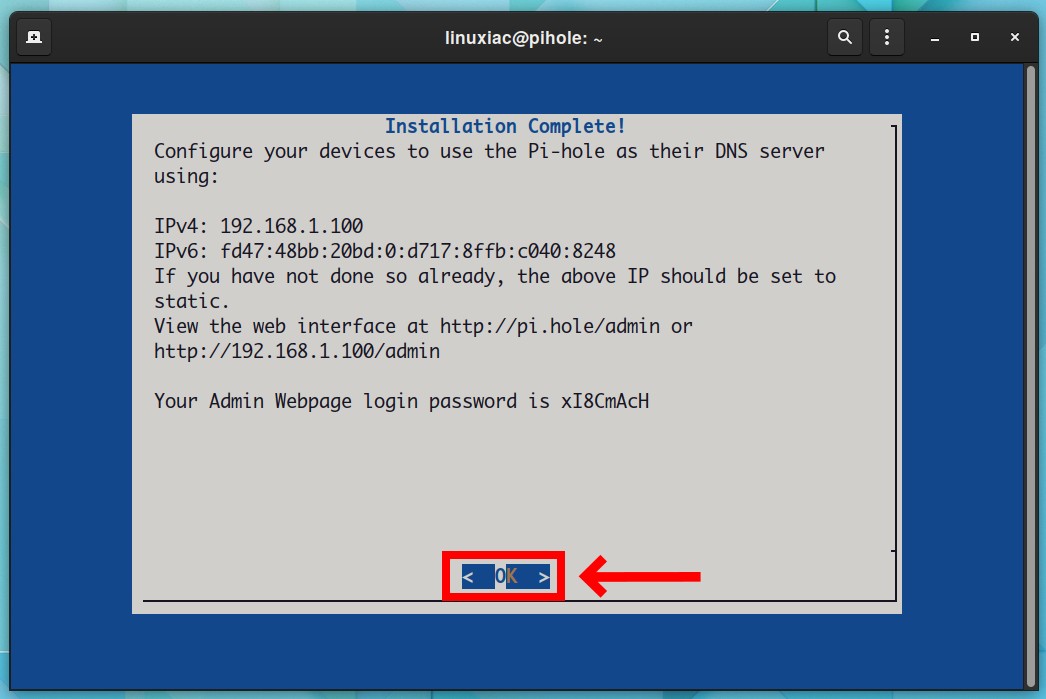
After completing the installation, you will be greeted by a screen informing you of the service’s IP address, the URL address for administration, and the automatically generated password for service administration via the web interface.
You do not need to remember this password because it will be changed with our preferred password in the next step. Just click “OK” to return to the terminal.
Change the Pi-hole Admin Password
Let’s now change the administrative password for our new Pi-Hole installation to our preferred one. This is quite simple. Just run the command below, but of course, replace “mypass” with a more strong password.
pihole -a -p mypass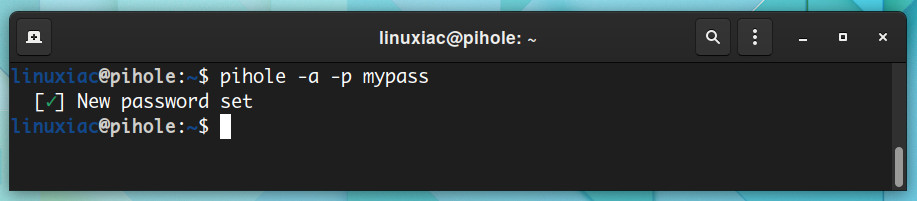
Access Your Pi-hole Admin Page
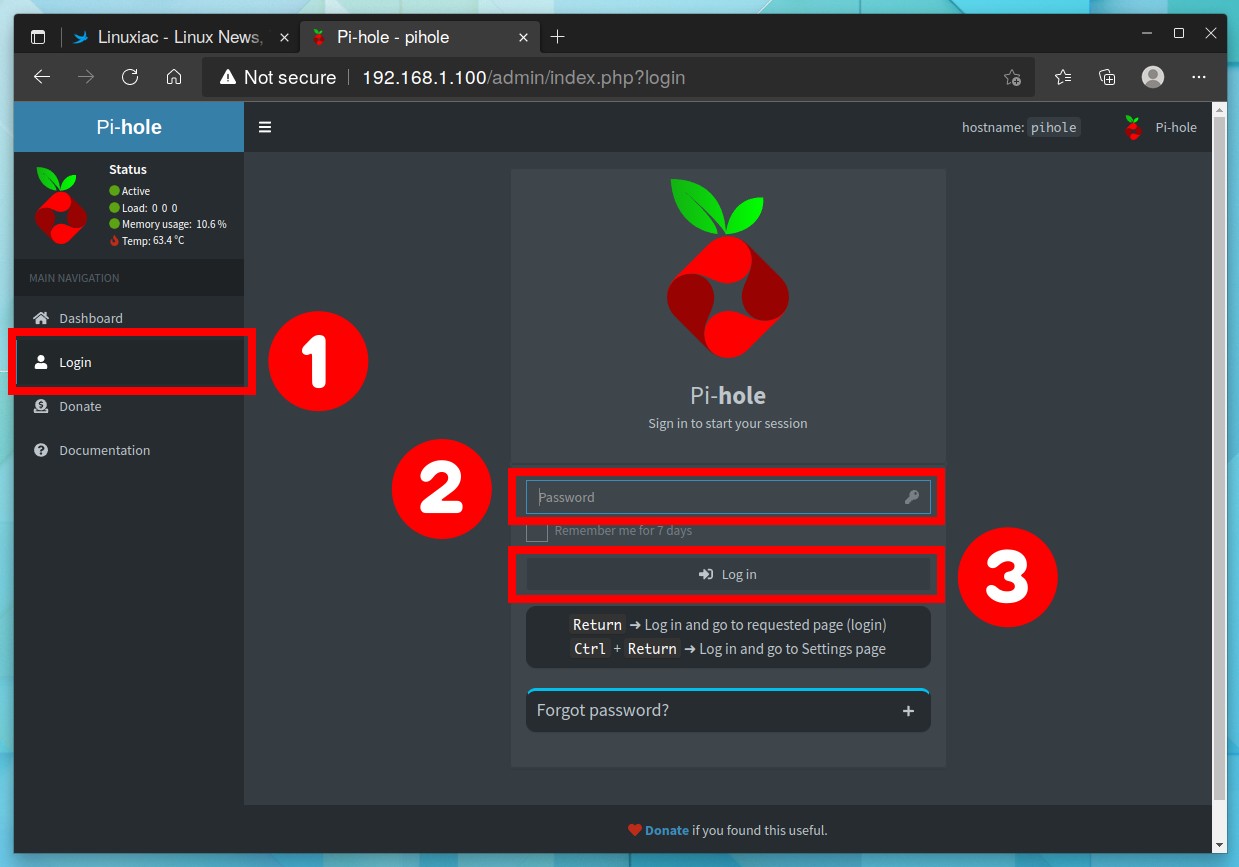
You can now access the admin page of your newly installed Pi-Hole. To start, open your browser and navigate to the IP address you assigned to your Raspberry Pi device, followed by /admin/.
In our case, the address is as follows: http://192.168.1.100/admin/
Select “Login” from the menu on the left, type the password you set earlier, then click the “Login” button.
You will be met by a beautiful web-based admin console from which you can manage the Pi-hole ad blocker service effortlessly, fast, and conveniently.
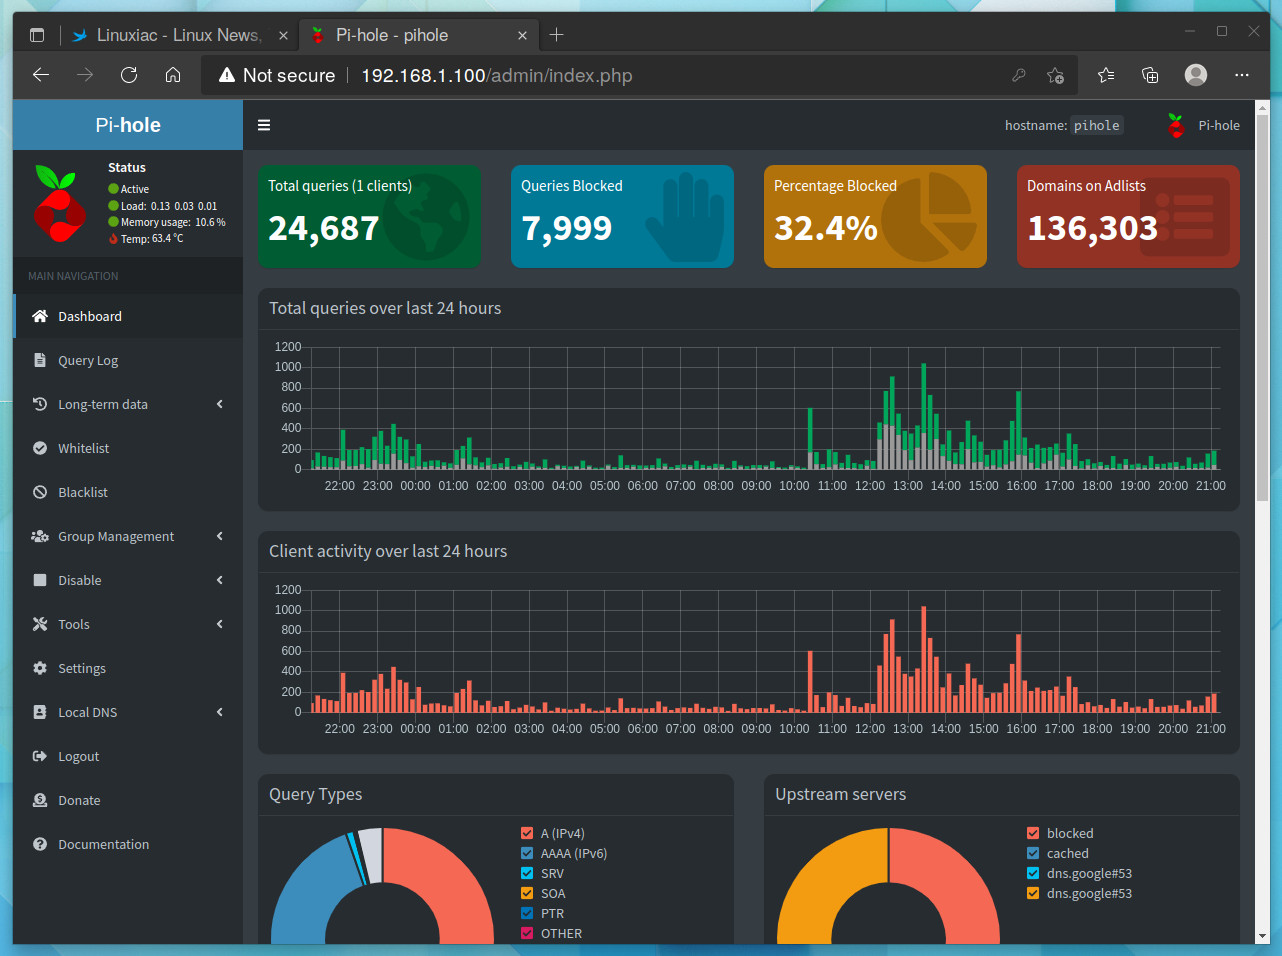
Setup Your Router to Use Pi-hole
After successfully installing Pi-hole, the final step is configuring your network to use Pi-hole as its DNS server.
To achieve this, you must change your router’s DNS server and point it to the Pi-hole IP address. This way, you ensure any client that connects to your network receives the Pi-hole as its DNS server.
So open your router’s web-based administrative interface page and look for the DNS settings section. There should be a place where you can set the primary and secondary DNS servers.
For example, in our case, they are in the WAN interface’s “Edit” section. Set the primary address to the IP address of the Pi-hole. In our case, we have specified this to be 192.168.1.100.
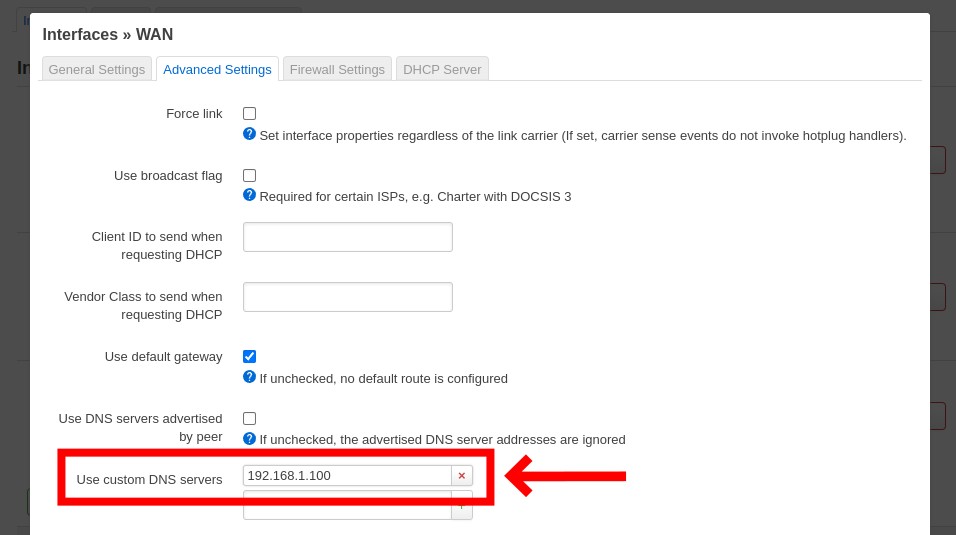
That’s all. Save your changes; all you have to do from here is enjoy a faster and more secure Internet experience.
Unfortunately, some routers do not allow you to change the DNS settings. You have two options in this case. The first is configuring Pi-hole to function as a DHCP server, which it does very well. Please follow the steps in this guide to learn how to do so.
The second method is to manually configure each device on your private network to use Pi-hole for DNS by setting its IP address in the network settings (192.168.1.100).
The first option is preferred since it gives you a globally automatic configuration for every single device on your network, both current and future.
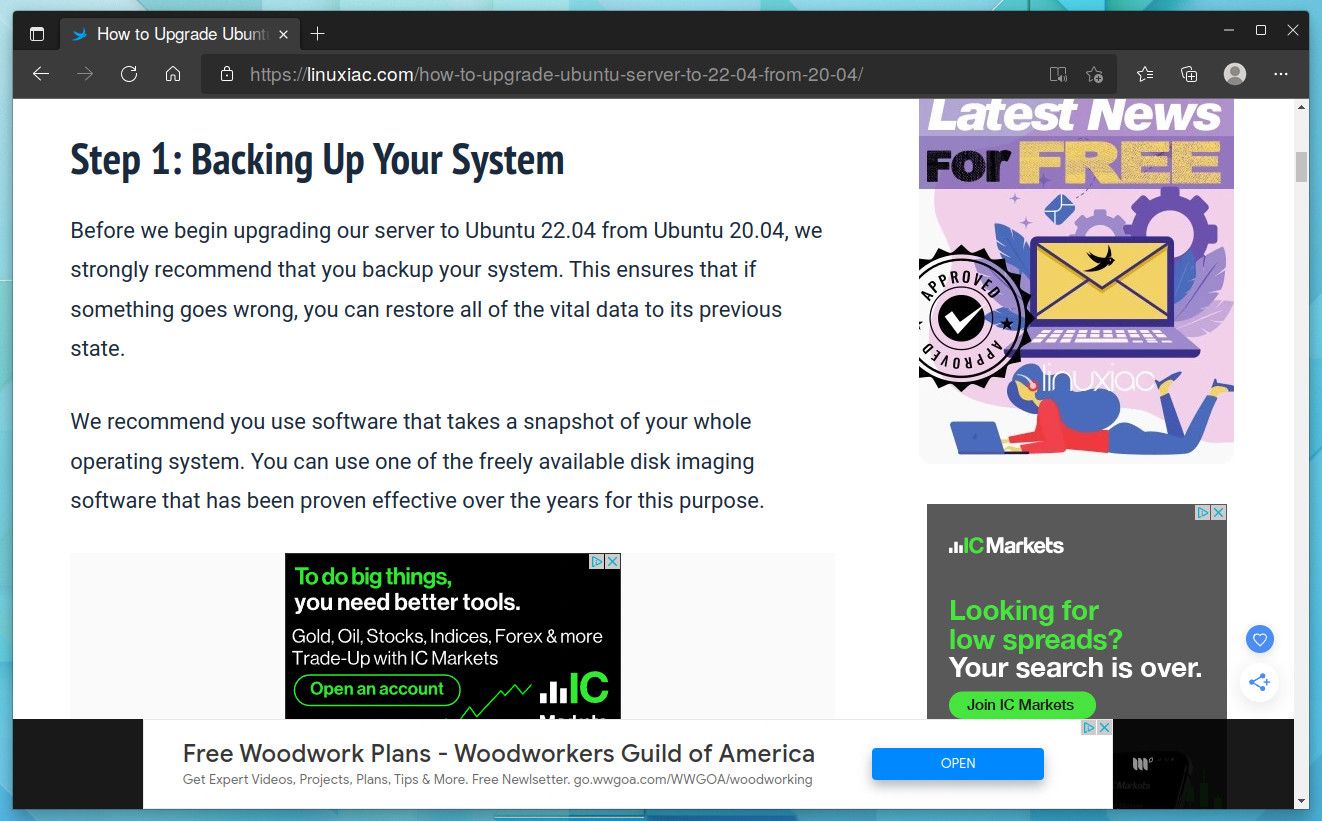
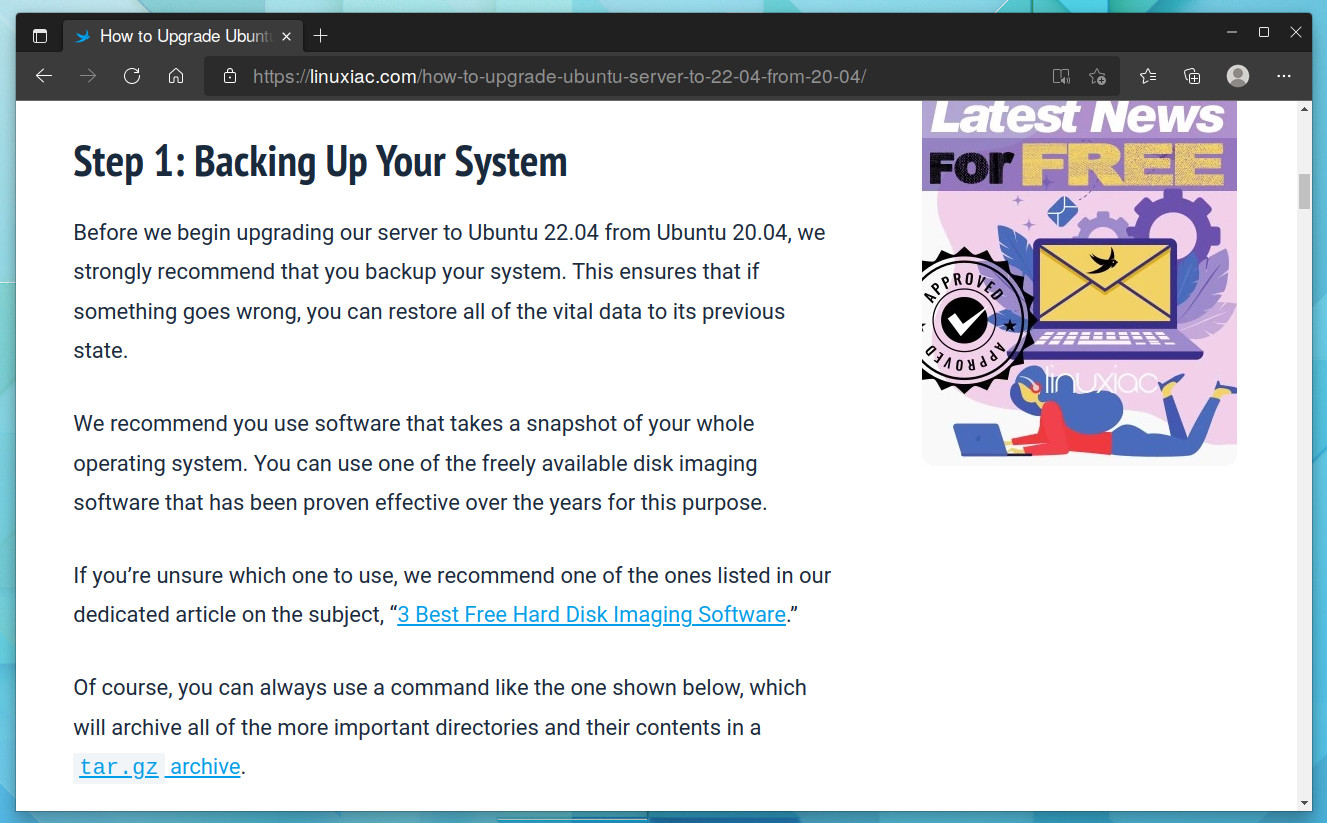
And at the very end, true to the maxim “A picture speaks more than a thousand words,” we leave it up to you to decide how effective the use of Pi-hole is.
Conclusion
This guide showed you how to install Pi-hole on a Raspberry Pi; a DNS sinkhole that blocks ads and tracking while you use the internet. It guarantees a more pleasant, fast, and secure Internet experience.
If you would like to gain more in-depth knowledge about Pi-hole, you can visit the project documentation page.
Thank you for taking the time to read our guide. We hope you found it helpful. If you have any questions, please leave them in the comments section below.


This is sad. Like many user, I just want to support the web when browsing. But, we just can’t. Without adblock it’s a nightmarish experience. There is pop-up, blinking ads, anti-adblocks, video ads, fake news ads, ads in an ads, ads covering the whole screen covered by cookie acceptance covered by notification acceptance (ads in disguise), ads for the more profitable app with more ads…
If, you look at youtube content there is more ads than content. Plus there is few ads in the content too because youtube gives pennys to his content farmer. Without saying anything about the anti-backbutton, the bias in research on search. Content bubble.
At this rate people will quit internet, and go on it when forced to.