
Nowadays, securing your website is not just a recommendation but a necessity. This is where SSL certificates come into play. They encrypt the data transferred between a user’s browser and the website, ensuring privacy and security.
Among the various options available for obtaining an SSL certificate, ZeroSSL is one of the preferred choices, ranking in popularity after Let’s Encrypt, especially for those looking for a free and reliable solution.
This article delves into how to secure your website with a free SSL certificate from ZeroSSL.
ZeroSSL: A Quick Overview
ZeroSSL is a free, automated, open certificate authority that provides SSL certificates. It’s known for its user-friendly approach to SSL certification, making it accessible even for those with limited technical knowledge.
Important clarification: ZeroSSL’s free subscription is limited to a maximum of 3 certificates with 90-day validity each. This means the free-of-charge plan ends after 3 x 90-day issuings/renewals. Then, to continue obtaining certificates, you must switch to one of the paid plans, with the Basic one costing $12,50 monthly.
Similarly to Let’s Encrypt, ZeroSSL provides free 90-day certificates that require renewal before expiration. However, there are some differences between the two platforms, so let’s mention them quickly.
Comparing ZeroSSL with Let’s Encrypt
Let’s Encrypt is a popular choice for free SSL certificates. Like ZeroSSL, it’s automated and open. The key differences lie in their approach and additional features.
Let’s Encrypt is more geared towards automation and is widely supported by various hosting providers, making it a go-to choice for many users who prefer a set-it-and-forget-it solution.
On the other hand, ZeroSSL appeals to users who desire a more user-friendly approach and additional support. Compared to Let’s Encrypt, ZeroSSL additionally gives you:
- Manage certificates via convenient UI
- Offer domain verification via email
- No rate limit
- SSL Monitoring
- RESP API
On top of that, while both offer free SSL certificates, ZeroSSL provides paid options for extended validity periods and additional features, which might benefit some businesses.
With that explained, let’s move on to the steps involved in obtaining a free ZeroSSL certificate.
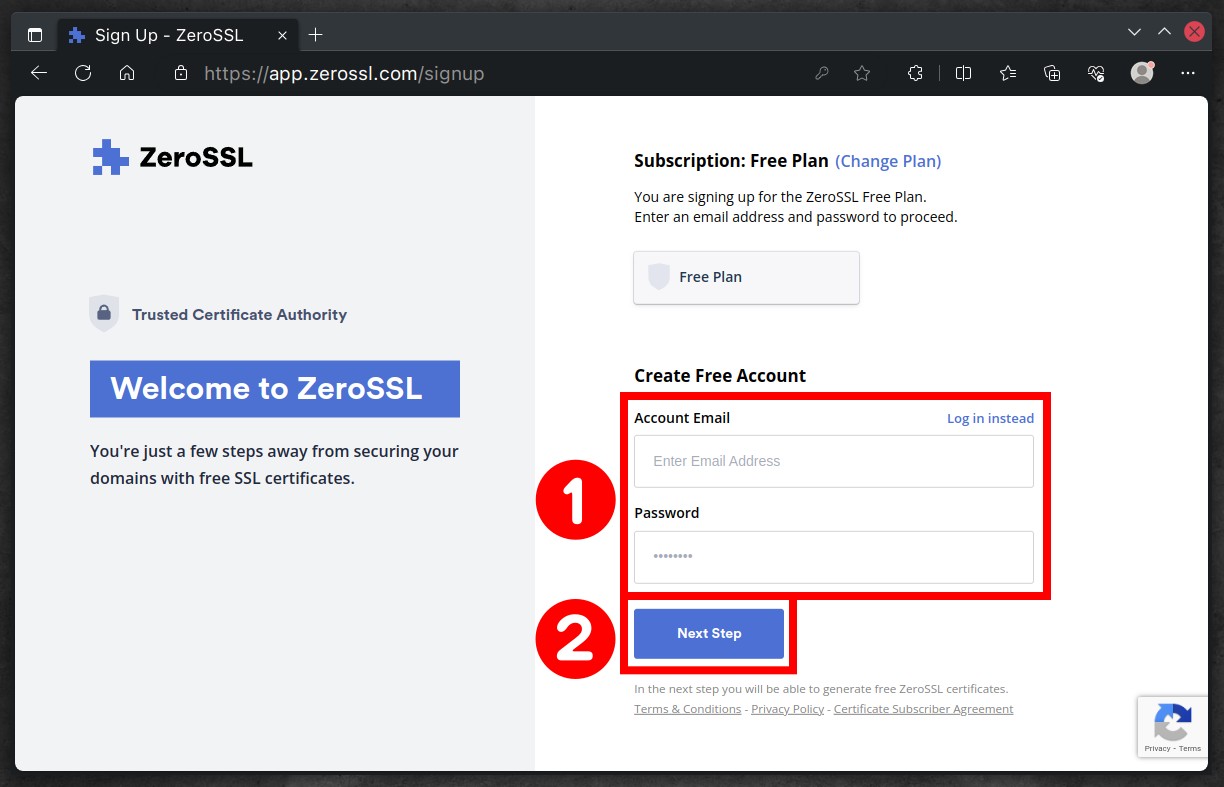
Step 1: Sign Up for ZeroSSL
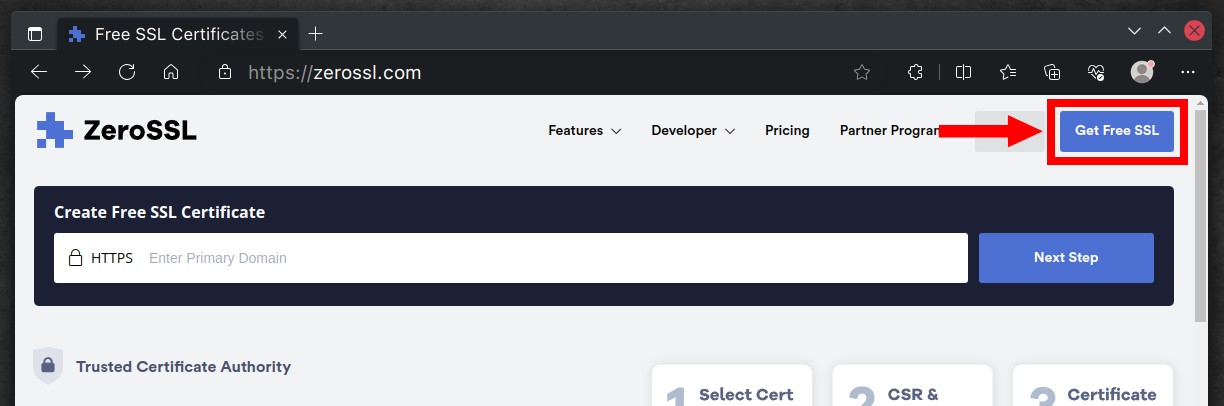
You must have a registered account to get a free SSL certificate from ZeroSSL. So, as a first step, navigate to the ZeroSSL website using your preferred web browser and click on the “Get Free SSL” button.
Sign up for the free plan from the next page by entering a valid email address, choosing the password, and hitting “Next Step.”
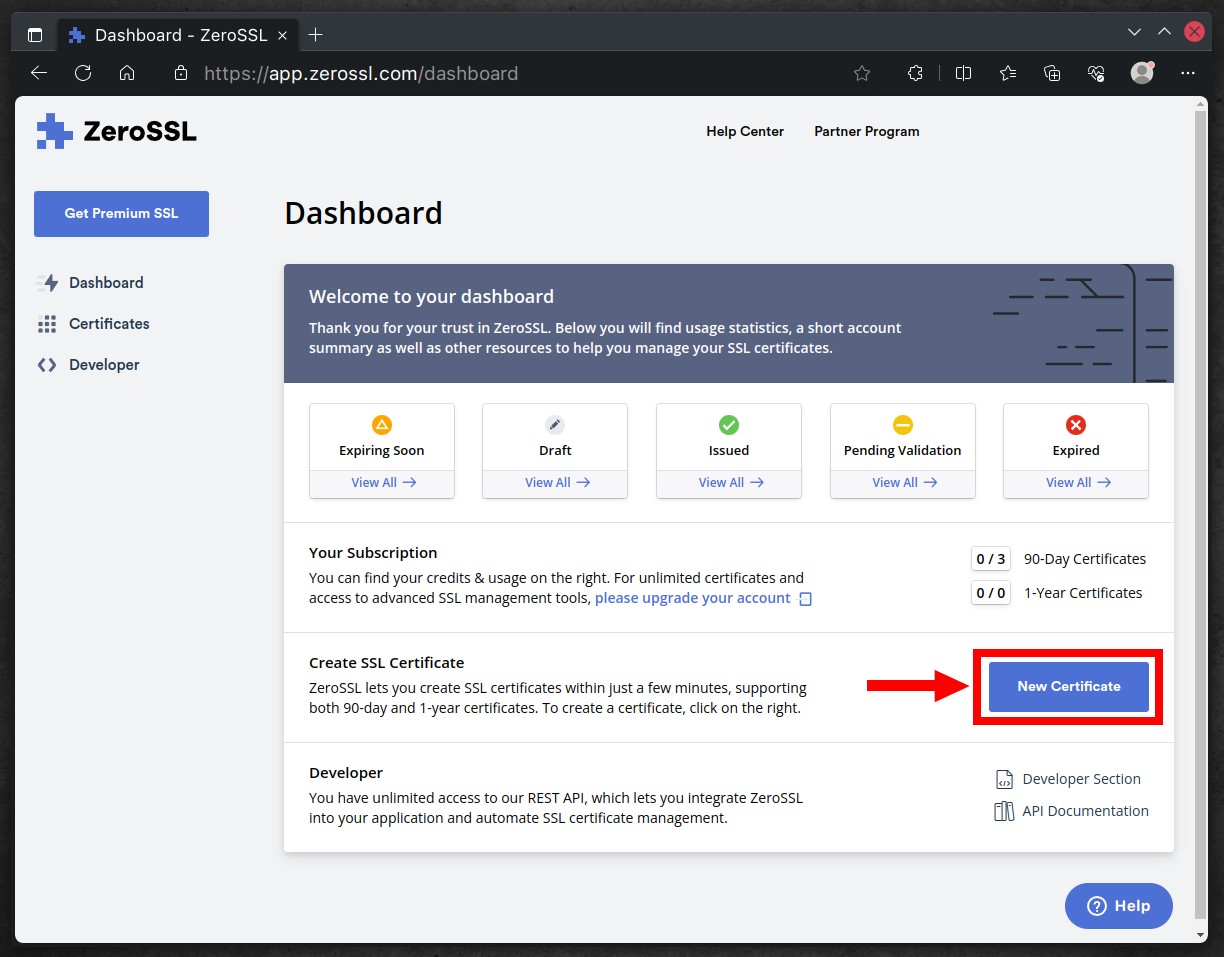
Step 2: Create a New SSL Certificate
You will be automatically logged into the dashboard. To start issuing a new SSL certificate, click the “New Certificate” button.
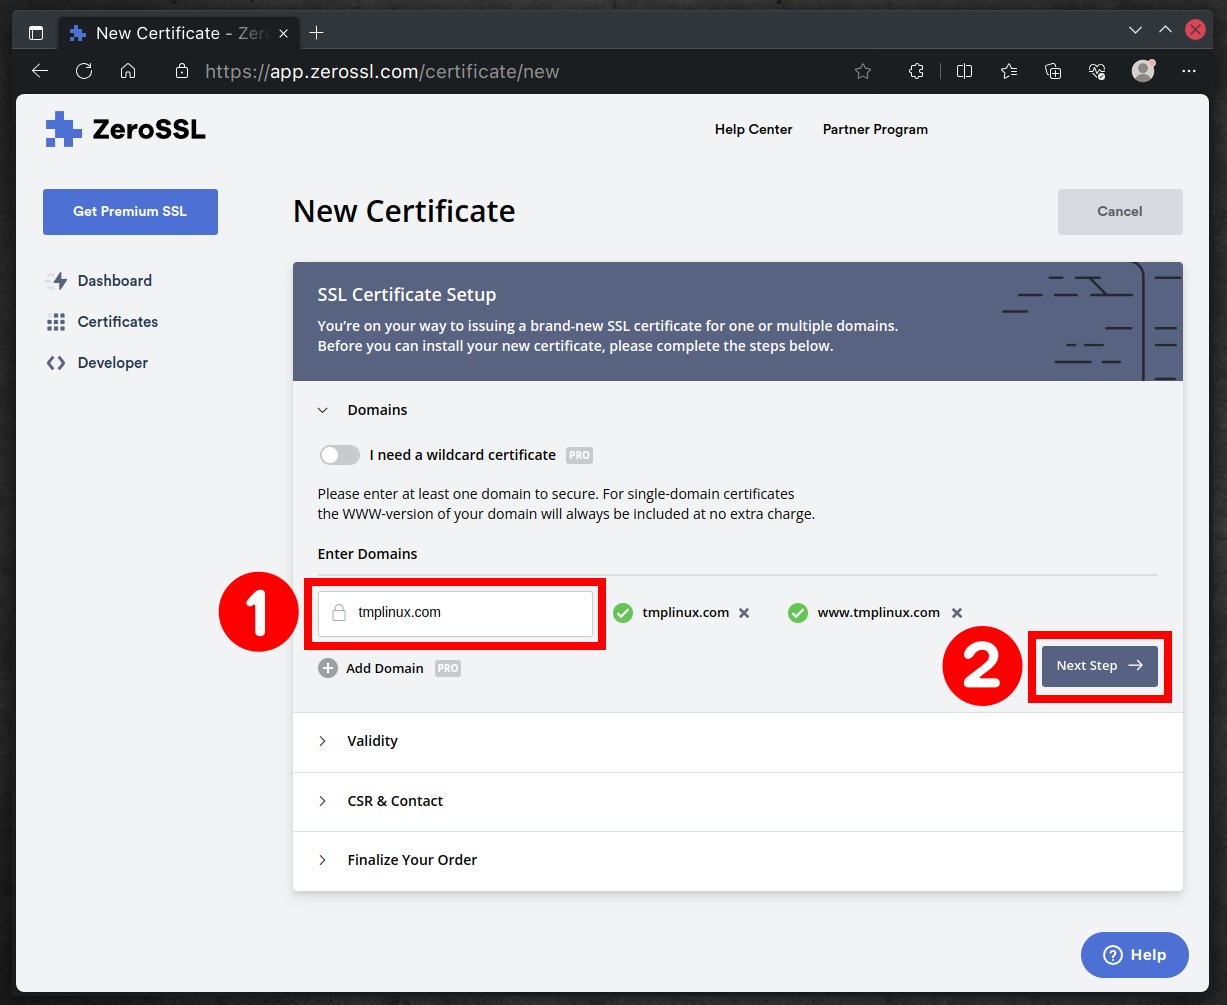
Provide the domain name for which you need a free SSL certificate. In case it’s a primary domain (such as “example.com “) rather than a subdomain (like “dev.example.com “), ZeroSSl will, by default, add the “www” prefix to the certificate, meaning it will also cover “www.example.com.” Click the “Next Step” button.
Set the “90-Day Certificate” validity, a free option from ZeroSSL, and proceed by clicking “Next Step.“
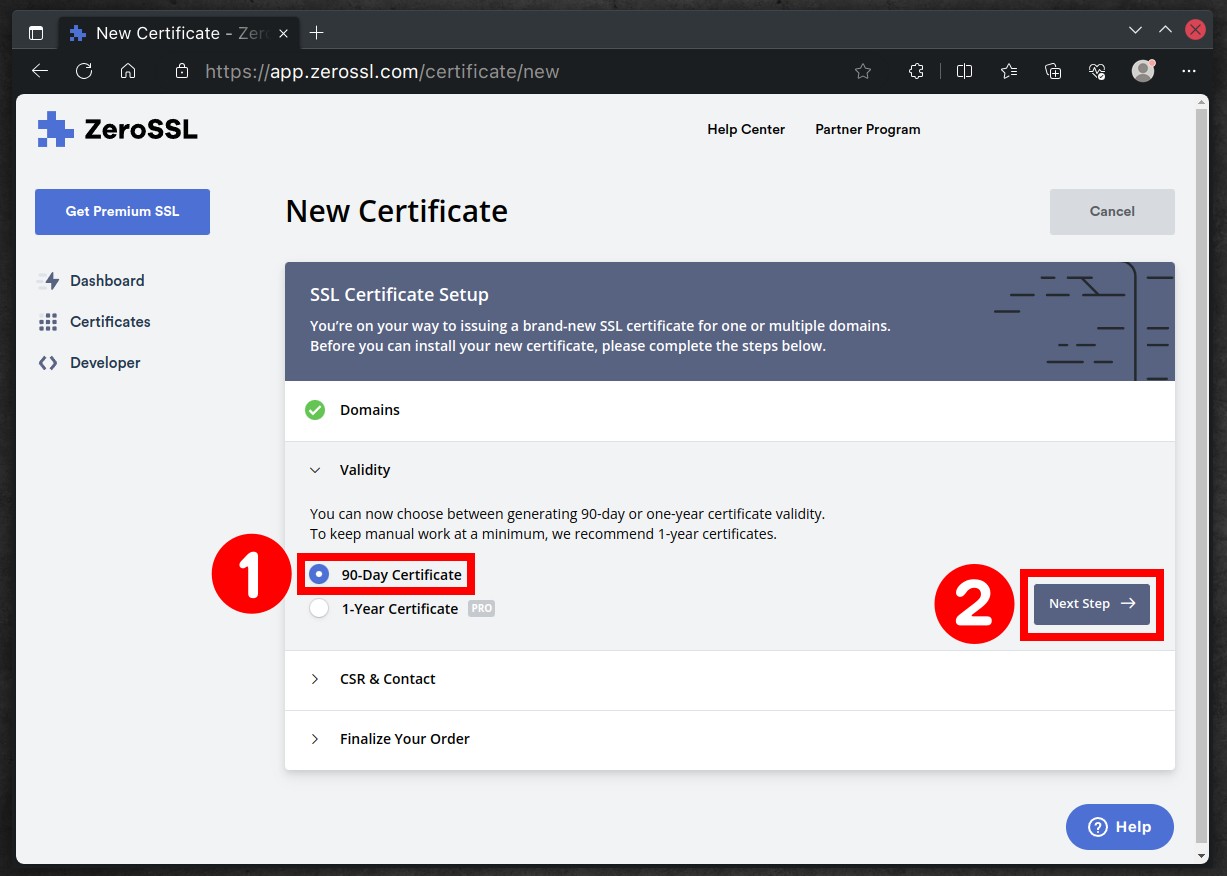
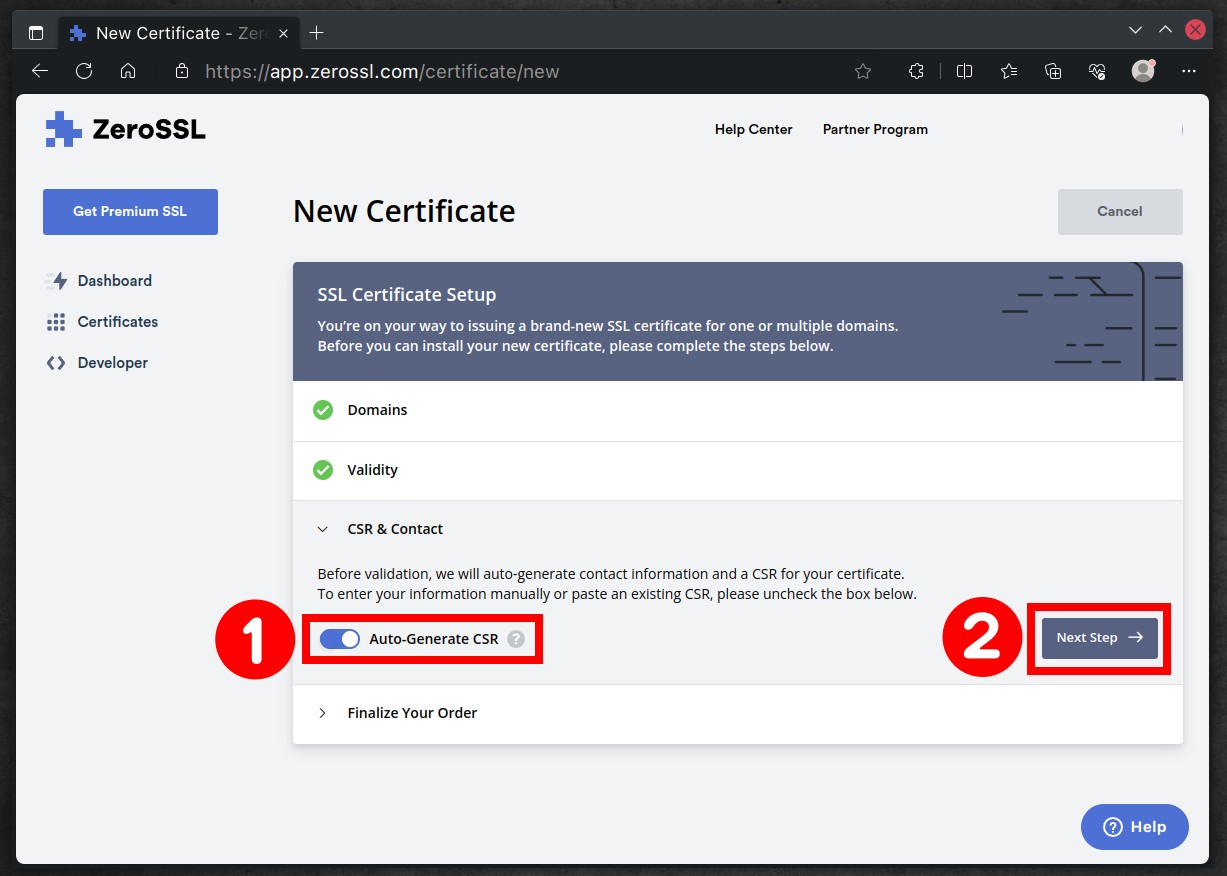
Make sure the “Auto-Generate CSR” option is enabled. A CSR, or Certificate Signing Request, is a block of encoded text given to a Certificate Authority (CA) when applying for an SSL/TLS certificate.
It contains information that will be included in the certificate, such as the organization’s name, domain name, locality, and country. The CSR also contains the public key that will be included in the certificate, and it’s generated alongside a private key, which must be kept secure and not shared.
Click the “Next Step” button to proceed to the final step of issuing your free SSL certificate.
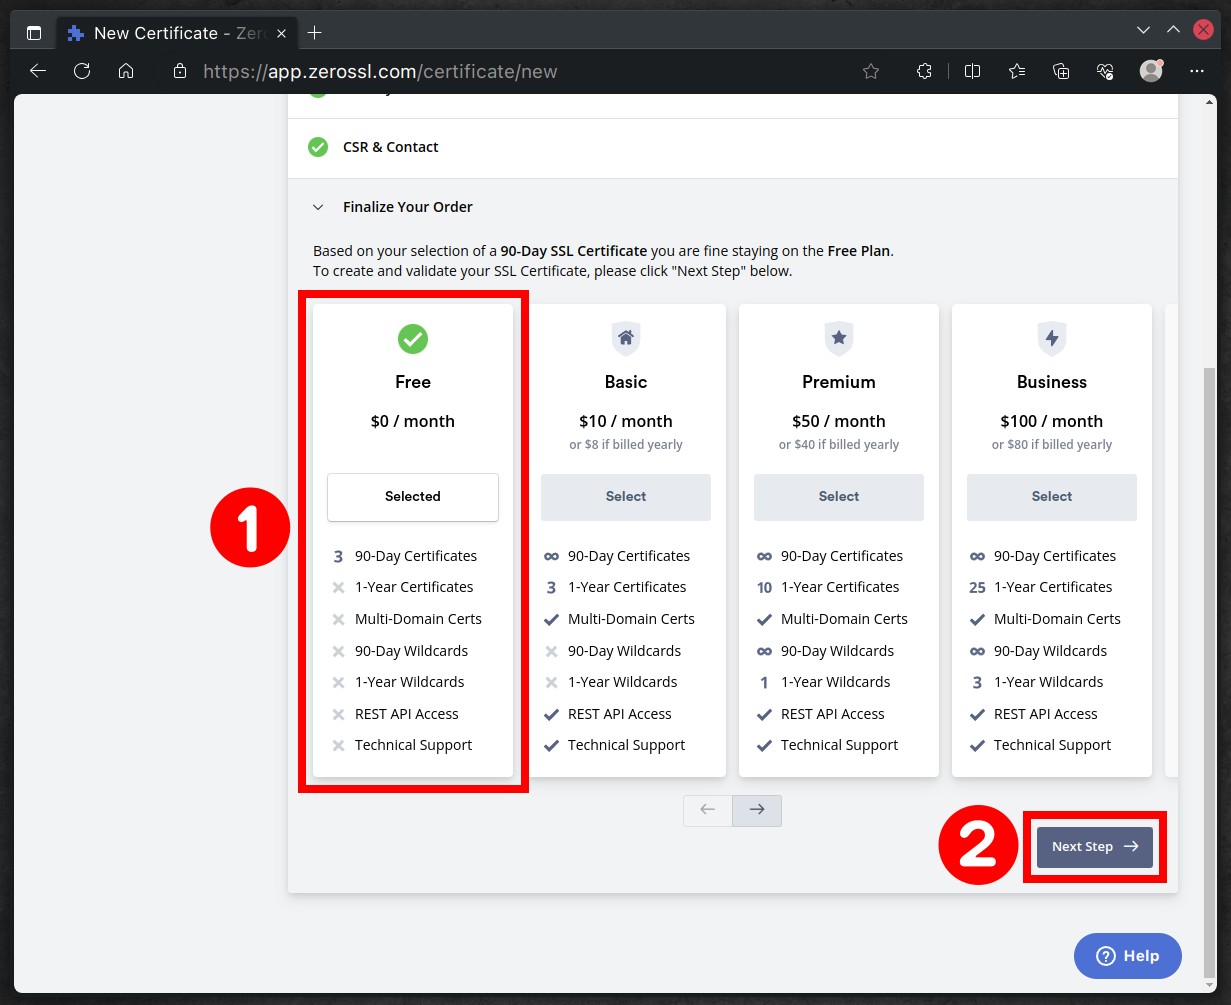
Make sure the “Free” option is selected on the next screen. Press the “Next Step” button.
Step 3: Verify Domain Ownership
The certificate is ready, but the domain ownership must be verified before you get it. In simple terms, domain ownership verification is like proving that you are the owner of a house. When you want to show that a website’s domain (like a house address on the internet) belongs to you, you must go through a process to prove it.
ZeroSSL provides three methods for verification: Email, DNS, and HTTP File Upload. Although DNS and HTTP File Upload necessitate server-side configurations, thus demanding more technical expertise and complicating the verification process, Email verification is the quickest and simplest method.
That’s why we will focus on it as an option to prove your domain ownership, so go for it.
You will be presented with a list of five commonly used standard usernames, typically associated with the email address for domain administration. These include:
- admin@your-domain.name
- administrator@your-domain.name
- hostmaster@your-domain.name
- postmaster@your-domain.name
- webmaster@your-domain.name
To successfully pass the verification, ensure you have the needed credentials (username & password) to access the email account associated with your chosen name. Select it and then click the “Next Step” button to proceed.

Clicking on the “Verify Domain” button initiates sending an email to the specified email address, which includes a link and code for domain verification.

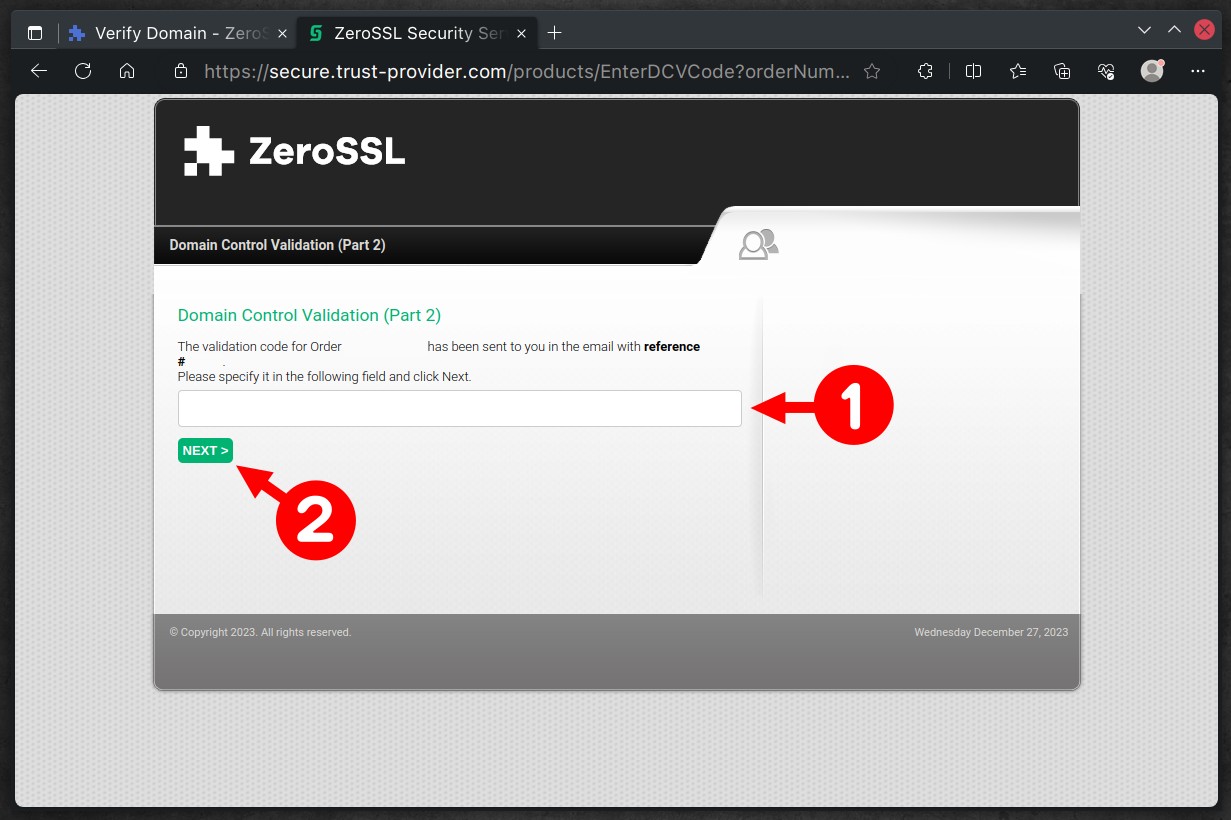
The mail itself is shown below. Copy the verification key to the clipboard, then click on the “Go To Verification Page” link.
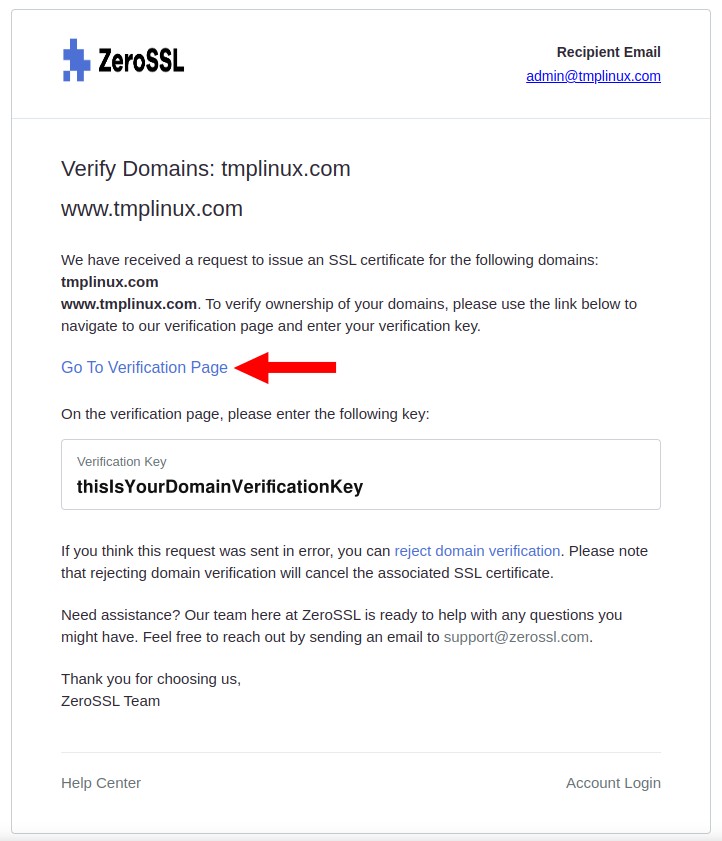
You will be redirected to a page where the verification itself takes place. Enter the verification code you copied from the email into the provided field and click “Next.”
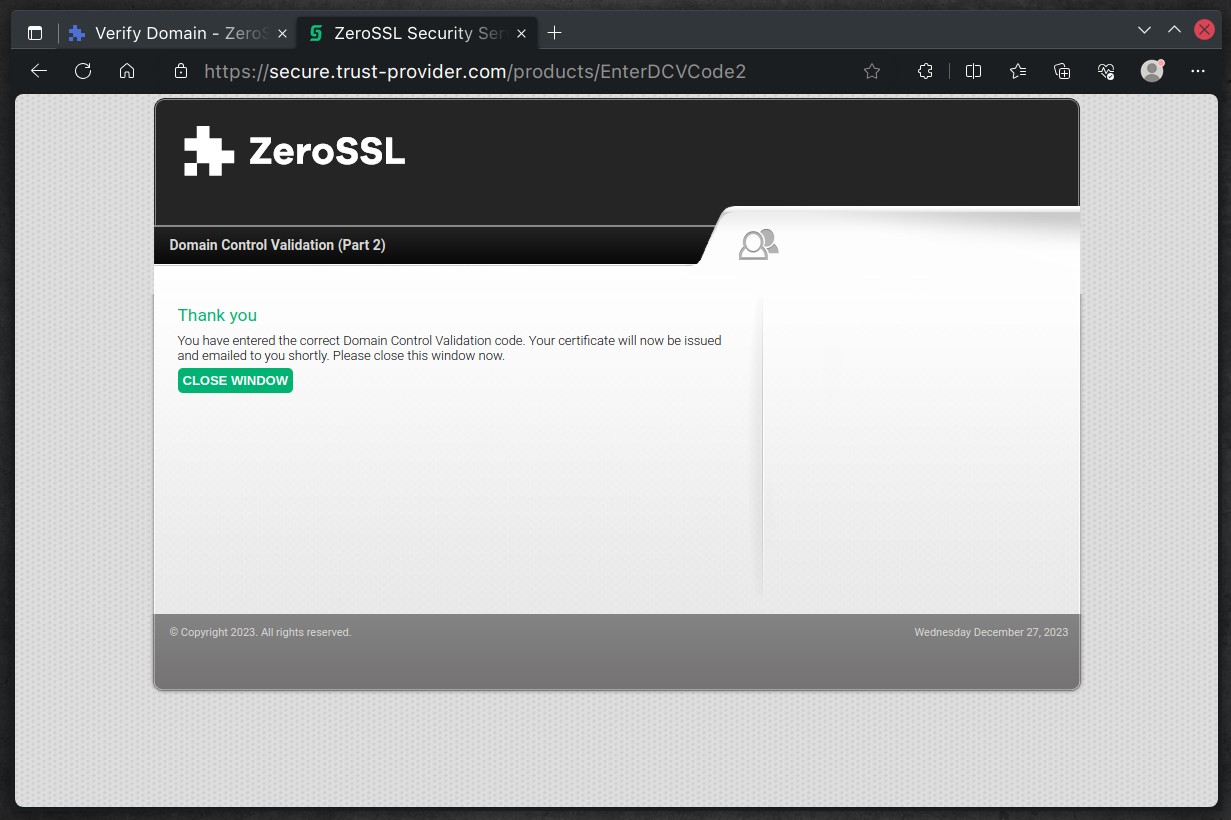
You should receive a message confirming the successful verification of your domain ownership. You can now safely close this window.
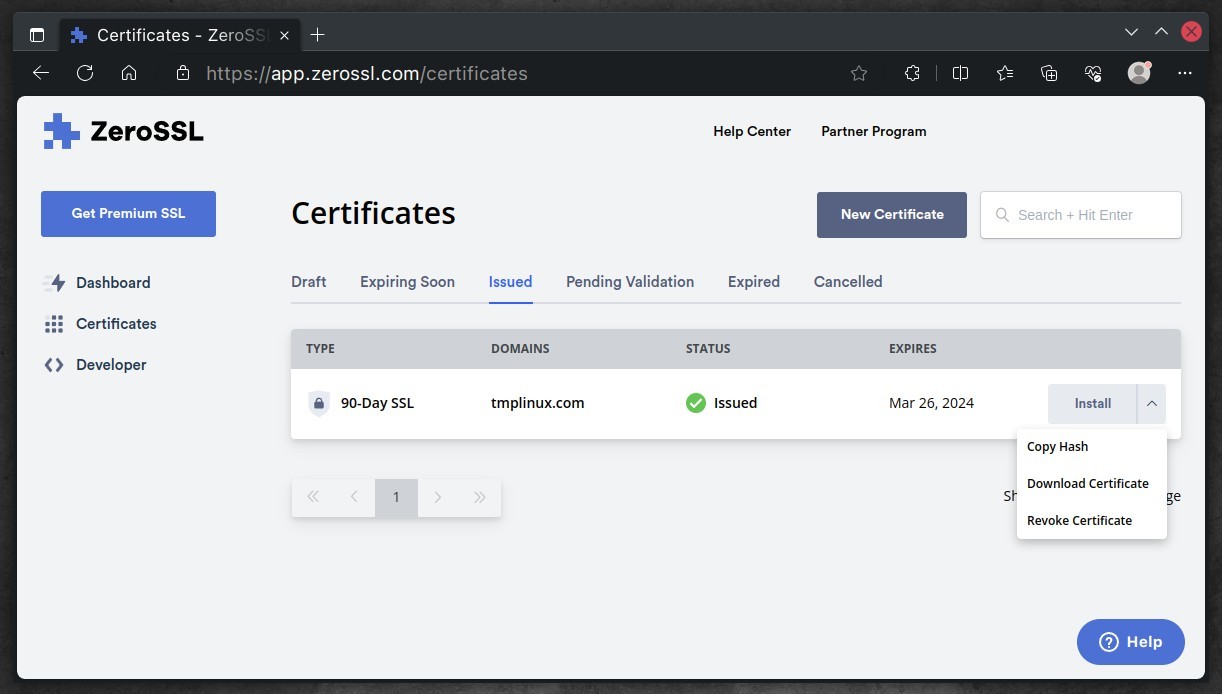
Step 4: Install the SSL Certificate on Your Web Server
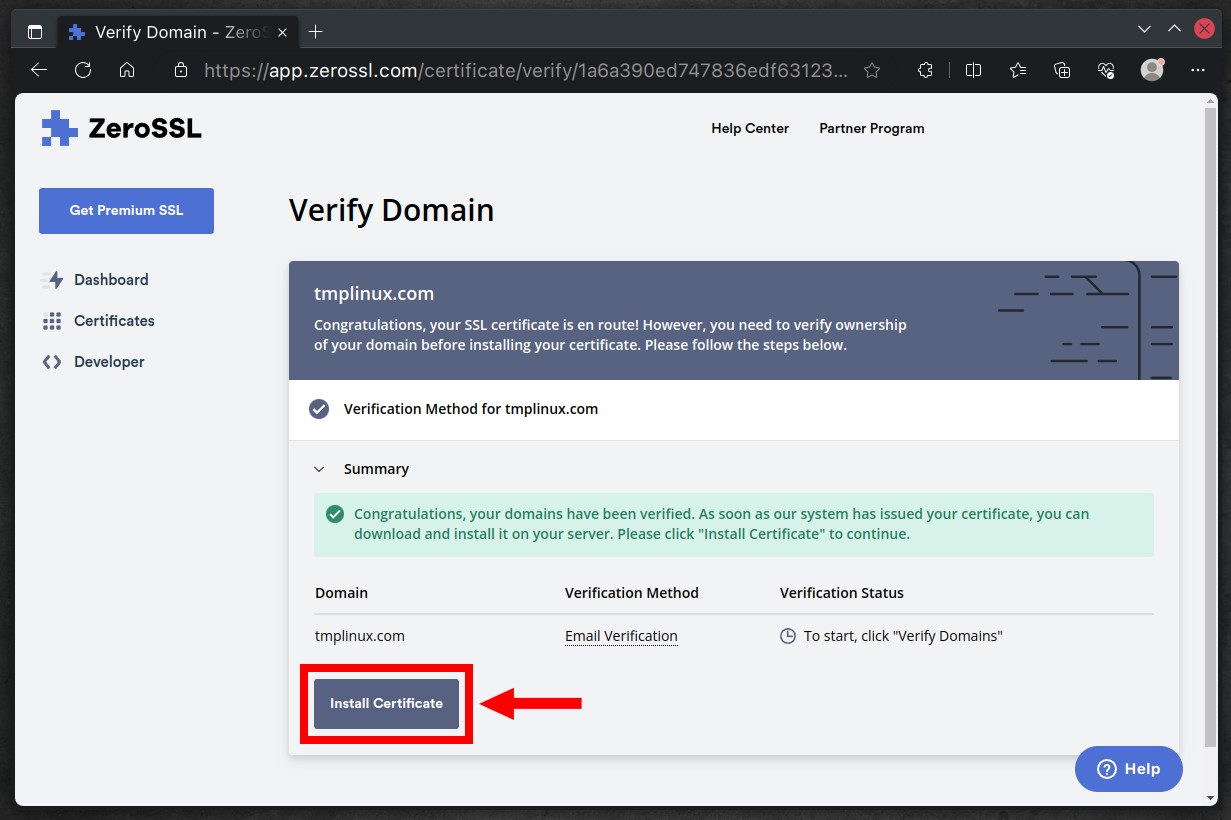
Return to the ZeroSSL page and hit the “Refresh Status” button. You’ll receive a notification confirming the successful verification of the domain. Following this, the “Install Certificate” button will appear. Click on it.
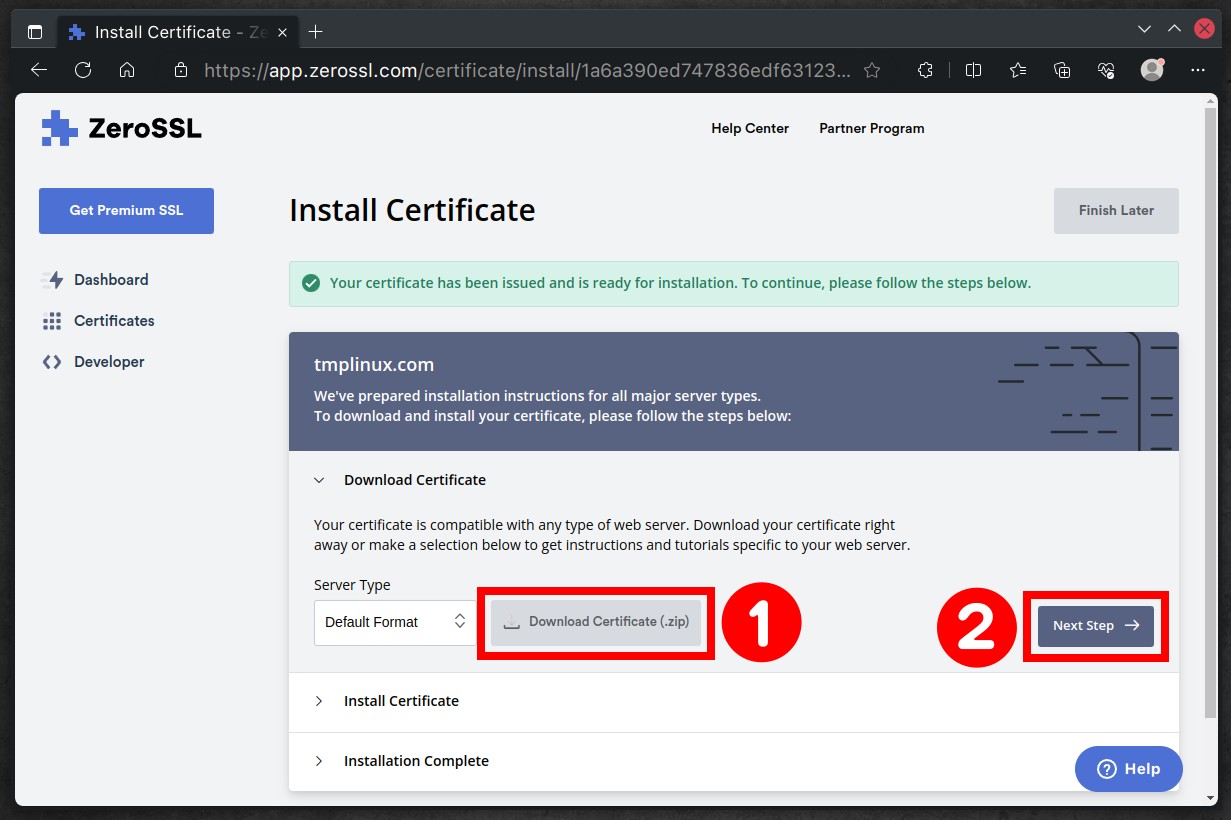
To download the SSL certificate as a ZIP file to your computer, click “Download Certificate (.zip).” Then, press the “Next Step” button and keep the page open for now.
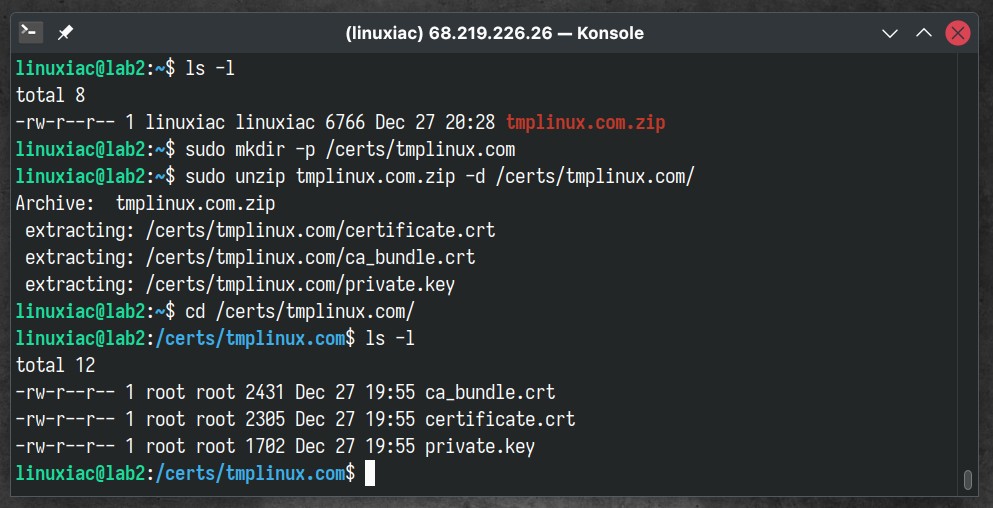
Copy the ZeroSSL certificate to the server hosting the website for the domain using tools like the SCP command, for example.
Create a folder at a location you prefer for storing the certificates. Remember to change “your-domain.name” to the actual name of your domain.
sudo mkdir -p /certs/your-domain.nameThen extract the ZIP file to this directory:
sudo unzip your-domain.name.zip -d /certs/your-domain.name/Next, navigate to the folder and list its content. It should contain the following three files:
- ca_bundle.crt
- certificate.crt
- private.key
You should combine the “ca_bundle.crt” and “certificate.crt” into a single file, which will be named “zerossl_combined.crt “. Fortunately, this can be easily accomplished using the cat command, as shown below:
sudo bash -c 'cat certificate.crt ca_bundle.crt >> zerossl_combined.crt'Code language: JavaScript (javascript)So far, so good! You must configure the webserver now to work with the newly created SSL certificate. Here’s how you can do it for the two most popular web servers, Nginx and Apache.
Configuring an SSL Certificate in Nginx
You need to configure a virtual host (server block) for your domain in Nginx. Since this is outside the scope of this guide, if you need to learn how, you can refer to our comprehensive guide on this topic if you need assistance.
Below, we have shown the main part that must be present in your Nginx virtual host’s configuration for the webserver to work with our new SSL certificate, as the first server block is used to redirect all HTTP requests to HTTPS.
Of course, don’t forget to replace the “your-domain.name” part with your specific domain.
server {
    listen 80;
    server_name your-domain.name www.your-domain.name;
    return 301 https:$server_name$request_uri;
}
server {
    listen 443 ssl;
    server_name your-domain.name www.your-domain.name;
    root /var/www/html;
    ssl_certificate /certs/your-domain.name/zerossl_combined.crt;
    ssl_certificate_key /certs/your-domain.name/private.key;
}Code language: PHP (php)
Finally, restart the Nginx server.
sudo systemctl restart nginxConfiguring an SSL Certificate in Apache
To enable Apache to work with SSL certificates, it’s essential first to activate its SSL module. You can easily accomplish this by executing the following command:
sudo a2enmod sslThen, create a virtual host for your domain:
sudo nano /etc/apache2/sites-available/your-domain.name.confAnd put in it the following configuration, again remembering to replace the “your-domain.name” part with your current one:
<VirtualHost *:80>
    ServerName your-domain.name
    ServerAlias www.your-domain.name
    Redirect permanent / https://www.your-domain.name/
</VirtualHost>
<VirtualHost *:443>
    ServerName your-domain.name
    DocumentRoot /var/www/html/
    ErrorLog ${APACHE_LOG_DIR}/error.log
    CustomLog ${APACHE_LOG_DIR}/access.log combined
    SSLEngine on
    SSLCertificateFile /certs/your-domain.name/zerossl_combined.crt.crt
    SSLCertificateKeyFile /certs/your-domain.name/private.key
</VirtualHost>Code language: HTML, XML (xml)
Save the file. Finally, enable your new virtual domain and restart the Apache web server:
sudo a2ensite your-domain.name.conf
sudo systemctl restart apache2Code language: CSS (css)
Step 5: Test Your ZeroSSL Certificate
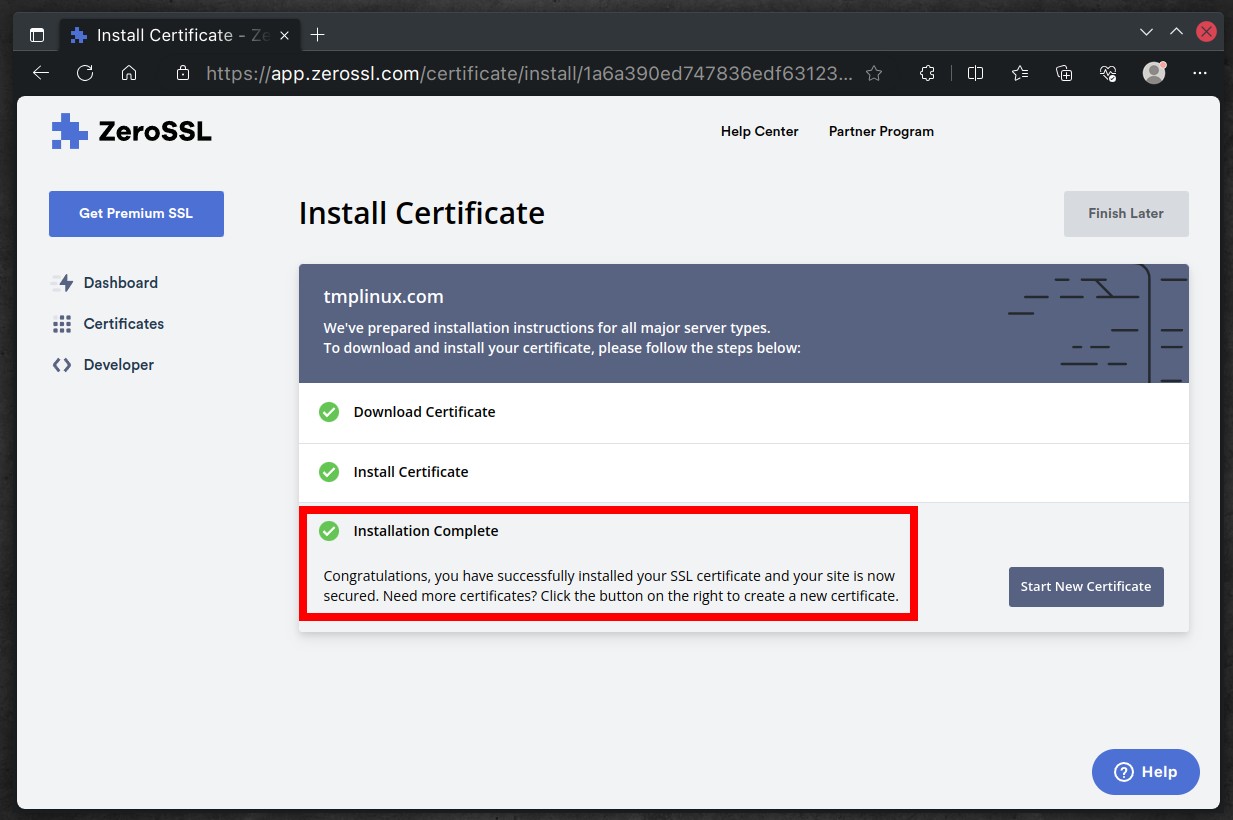
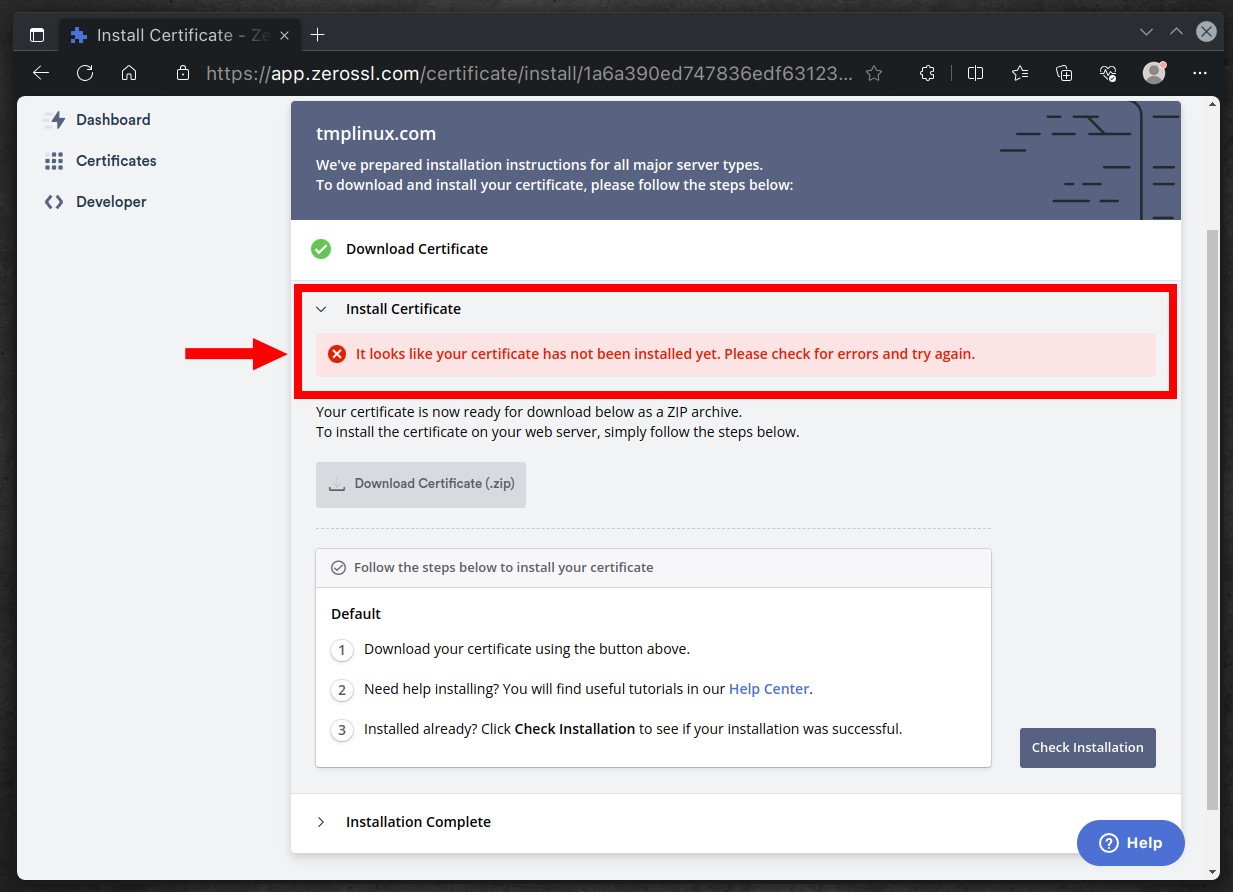
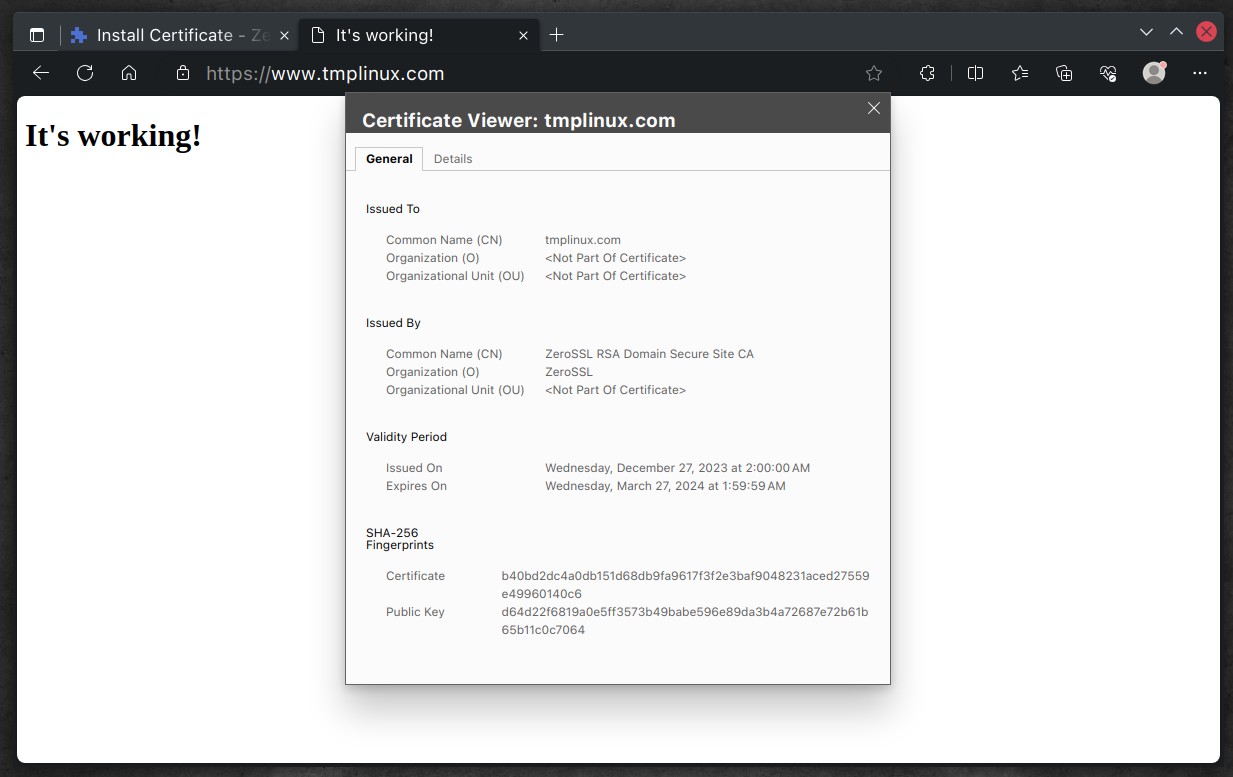
Return to the ZeroSSL website and click the “Check Installation” button.
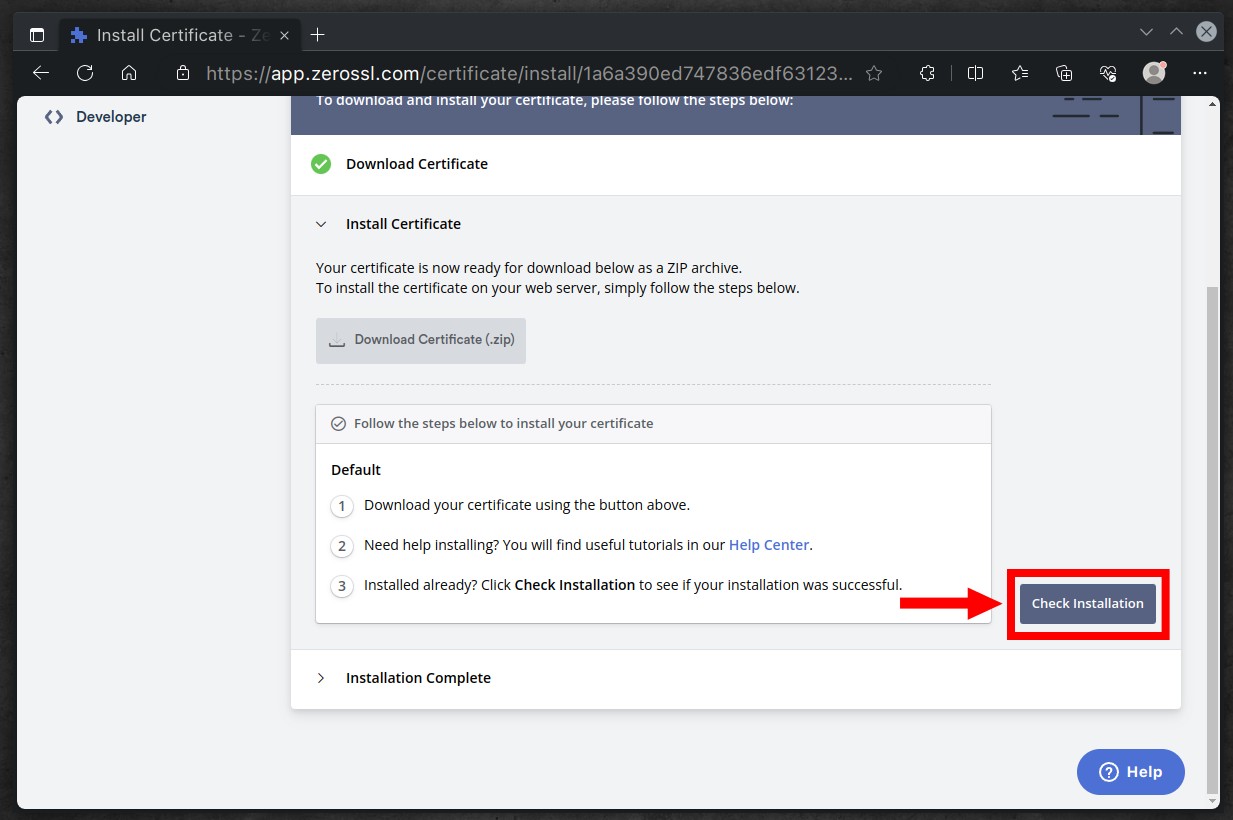
If the SSL certificate setup on your web server is correctly configured, you will see a green check mark indicating “Installation Complete.”
However, if something is wrong with your configuration, you will receive a notification informing you about it.
Of course, the most effective way to verify is to direct your browser to your domain. By adhering closely to the instructions in this manual, you should receive the coveted padlock symbol, indicating that your website possesses a valid SSL certificate that has been properly set up. Congratulations!
Your ZeroSSL website account also enables you to manage your SSL certificates effortlessly and efficiently.
Conclusion
ZeroSSL presents a user-friendly and accessible way for website owners to secure their online presence with a free SSL certificate. This comprehensive guide has detailed the steps in obtaining, verifying, and installing a free SSL certificate from ZeroSSL on your web server.
Thanks for your time! Feel free to share your experiences or ask questions in the comments below.


Hi Team,
Love the work that has gone into this site, it’s truly fantastic.
Now i am running into an issue that i am hoping someone could kindly assist with.
I have done a Google but i haven’t found any solutions.
So i have successfully deployed my LAMP Stack as per https://linuxiac.com/how-to-set-up-lamp-stack-with-docker-compose/
I have come across this and attempted the steps and it isn’t working.
I believe this is as the LAMP Stack is containerised and this isn’t a follow up guide for the Lamp Stack with Docker Compose.
Could someone reach out to me when they have the time and advise how i install the ZeroSSL certificate into a container.
Kind Regards,
Ove
I read this hopping ZeroSSL has a solution for intranet (not public) domain names and I understand this is no case, I have to continue with self-signed certificates.
Honestly, I prefer Let’s Encrypt: even if you work a bit more on the initial setup, then everything is automated and you don’t risk your certificates to expire. By contrast, ZeroSSL seems designed to push you towards a paid subscription.
Is it possible to use ssl if i just have a static ipv4 address, rather than a domain name?
Hi,
In simple terms, the answer is no; you can’t get an officially valid SSL certificate from a public certificate authority (CA) for just an IP address; you need a domain name. While there are rare situations where it can still be done for a public IP address (check this), it’s complicated and not commonly done. Of course, you can always approach this situation by issuing your own self-signed SSL.
Best,
Bobby