
Nginx is designed to handle multiple domains on a single server and IP address. In other words, if you have a server that is used as a web server and allocated one IP address only, then you need to use Nginx virtual hosts to have more than one website or domain running on the server.
Before you begin this tutorial, you’ll need to install Nginx. To learn how to install it, read our excellent guide on Installing Nginx Web Server on Linux.
What is a Virtual Host?
Let me explain if you’re not sure what a virtual host is. It is an Apache HTTP Server term; however, it is also commonly used by Nginx users. The proper term for Nginx is server block.
Related: Apache vs. Nginx: Which Web Server You Should Choose
In short, a virtual host is a method for hosting multiple domain names on a single server.
How Does Virtual Host Work?
When you start web server software like Nginx on a server, that web server will bind itself to one or more network ports. Usually, for a web server, that will be ports 80 and 443.
When a computer goes to visit a website, it will send a request over the internet to the server, and the server will receive that request. But, first, the server will look at the destination port to which the request was sent.
Next, it will use that destination port to determine the application to which to forward that information. That means your web server can only have one application receiving the requests.
But what if you want to run two websites on the same server? When a packet requesting a website is received, the server must determine which website is being requested before deciding what information to return.
It is essential to understand that no matter what website is requested, the server cannot identify which website a client is trying to access based on the port number and destination port.
So all the server will do is say, “I’m sending this request to Nginx.” From there, Nginx has to decide what to send back.
This is when the server blocks come into play. They can be used to serve other websites based on the IP address requested or to serve different websites based on the domain name used.
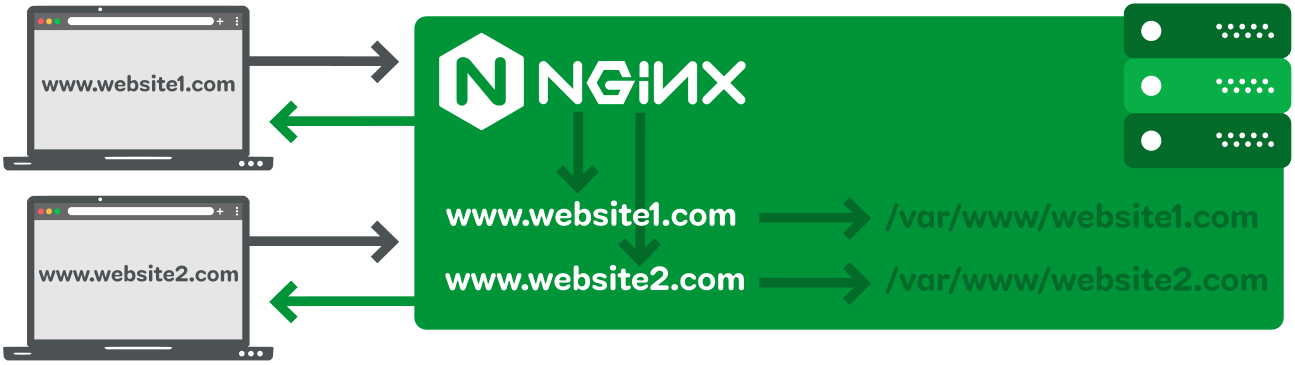
So, when you type in a website’s name, such as www.example.com, and the server receives it, Nginx will look into the HTTP headers to see what server name was requested.
Then, based on the virtual hosts configured, the server determines which directory stores the website files and delivers the correct response to the client based on the server name.
How to Create Nginx Virtual Hosts (Server Blocks)
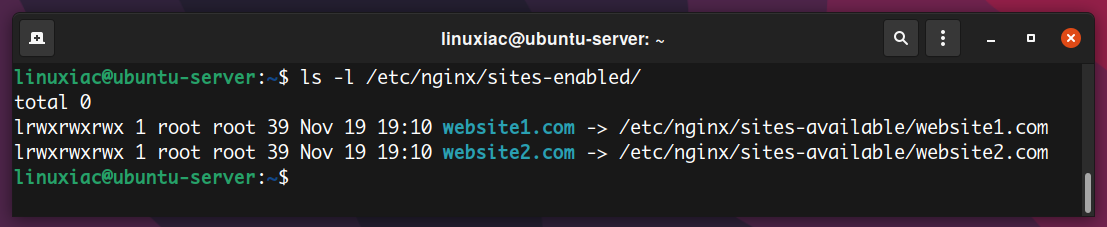
We can create and store our virtual host configuration files in two directories. Both of them are located inside the /etc/nginx directory. The names of those two directories are sites-available and sites-enabled.
/etc/nginx/sites-available: The directory where individual virtual hosts (websites) are defined. Remember that Nginx will not use the configuration files in this directory unless they are linked to the/etc/nginx/sites-enableddirectory./etc/nginx/sites-enabled: List of the virtual hosts (websites) actively served by Nginx.
Do you wonder why we need two directories to store our virtual host files? The answer is that in this way, we can create many virtual host files on our Nginx server, but we can enable them per our requirements.
For this guide, we will create virtual host files in our Nginx server to host multiple sites with multiple domains. The domain names are website1.com and website2.com.
1. Creating the Directory Structure
First, we must create a directory for each virtual host to store the different website content. We will place these directories in /var/www and name them after each domain name.
Run the following commands to create the directories:
sudo mkdir -p /var/www/website1.com
sudo mkdir -p /var/www/website2.comCode language: JavaScript (javascript)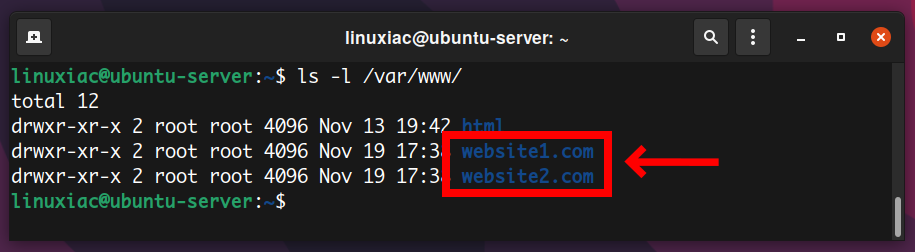
The -p flag in the command above tells mkdir to create any necessary parent directories.
2. Creating Test Pages for Each Website
Next, for demonstration purposes, let’s create an index.html file inside the domain’s document root directory so that we will have something to display.
sudo vim /var/www/website1.com/index.htmlCode language: JavaScript (javascript)Paste the following lines:
<!DOCTYPE html>
<html lang="en">
    <head>
        <meta charset="utf-8">
        <title>Welcome to Website 1!</title>
    </head>
    <body>
        <h1>Welcome to Website 1!</h1>
    </body>
</html>Code language: HTML, XML (xml)
Now repeat the above step for website2.com.
sudo vim /var/www/website2.com/index.htmlCode language: JavaScript (javascript)Paste the following lines:
<!DOCTYPE html>
<html lang="en">
    <head>
        <meta charset="utf-8">
        <title>Welcome to Website 2!</title>
    </head>
    <body>
        <h1>Welcome to Website 2!</h1>
    </body>
</html>Code language: HTML, XML (xml)
3. Create Nginx Virtual Host (Server Blocks)
To create an Nginx virtual host file inside the sites-available directory, execute the following command:
sudo vim /etc/nginx/sites-available/website1.comIt is worth noting that the Nginx virtual host configuration file can be named whatever you like, but it is generally a good idea to use the domain name.
Now, paste the following content into your virtual host file:
server {
    listen 80;
    server_name website1.com www.website1.com;
    root /var/www/website1.com;

    access_log /var/log/nginx/website1-access.log;
    error_log /var/log/nginx/website1-error.log;
}Code language: JavaScript (javascript)
To make things more transparent, let’s break down this syntax. First, here is what each parameter means:
listen: Specify on which port the Nginx server to listen for connections.server_name: Here, we match requests for our domain. The directive holds a list of domain names we want to use to access our site.root: The location of the directory in which we have stored our website files.error_log: Full path to the log file in which we store this virtual host’s error logs.access_log: Full path to the log file in which we store this virtual host’s access logs.
Now we can use our initial virtual host configuration as a basis for our second file. Just copy it over to create a new file:
sudo cp /etc/nginx/sites-available/website1.com /etc/nginx/sites-available/website2.comOpen the new file and adjust it to match our second (website2.com) domain name:
sudo vim /etc/nginx/sites-available/website2.comserver {
listen 80;
server_name website2.com www.website2.com;
root /var/www/website2.com;
access_log /var/log/nginx/website2-access.log;
error_log /var/log/nginx/website2-error.log;
}Code language: JavaScript (javascript)4. Enable Nginx Virtual Hosts (Server Blocks)
The last thing we need to do before testing enables the virtual hosts. We can do this by creating a symbolic link from the file to the sites-enabled directory:
sudo ln -s /etc/nginx/sites-available/website1.com /etc/nginx/sites-enabled/
sudo ln -s /etc/nginx/sites-available/website2.com /etc/nginx/sites-enabled/
As you can see from the image below, these files are now linked to the sites-enabled directory.
Before we go forward, let’s double-check that there aren’t any typos. Test the Nginx configuration for correct syntax:
sudo nginx -tFinally, if no issues were found, restart the Nginx service to apply the changes:
sudo systemctl restart nginx5. Testing the Virtual Hosts (Optional)
To test the Nginx virtual hosts, we first need to point our domain name records at the server’s IP address. In our case, the server IP address is 192.168.122.101.
If you are on Linux, open the /etc/hosts file on your desktop PC (the one from which you will perform the test) using the below command:
sudo vim /etc/hostsAnd add the virtual domain names one by one, as shown below.

Save and close the file when you are finished. This way will allow us to test domains that we don’t own.
Now open your browser and enter www.website1.com and www.website2.com one by one. You will see the index pages of both domains, respectively.

You have successfully configured two independent domains with Nginx.
6. Disable Nginx Virtual Hosts (Server Blocks)
To disable a virtual host in Nginx, we must remove the symlink we had created while enabling the virtual host file. For example, to disable website2.com, we have to execute the following command:
sudo rm -rf /etc/nginx/sites-enabled/website2.comTo apply the changes, we have to restart the Nginx server:
sudo systemctl restart nginxConclusion
This article shows you how to create Nginx virtual hosts (server blocks) and host multiple domains on a single Linux server. To create a virtual host for another domain, repeat the same steps. But, of course, Nginx can do a lot more.
Related: How to Configure Nginx to Work with PHP via PHP-FPM
In addition, if you want to know how to secure your website with a free SSL certificate, I recommend going through our guide, “How to Use Certbot to Get a Free Let’s Encrypt SSL Certificate.”
You can refer to the official Nginx documentation for more information on setting up an Nginx server.
Thanks for reading! I hope you found the article helpful and that you were able to set up the virtual hosts. Feel free to leave a comment if you have any questions.


Hi, the post is very good, but at the end where website1 and 2 virtual hosts were created, they didn’t work, is there any other change? something is missing because I followed the great tutorial to the letter.