
Void Linux is independent Linux distribution following a rolling release model entirely developed by volunteers. It appeals to users who prefer a lightweight, minimalistic, highly customizable Linux experience.
However, what sets it apart from most other Linux distributions is that Void is not a derivative of any other. Instead, it is a genuinely original build from scratch.
Moreover, it is a notable exception to most Linux distributions because it is systemd-free; Void uses runit as its init system instead of the more common systemd.
For those not familiar with runit, it is a very minimalist and extremely fast init system that is easy to configure and more in line with the old daemon tools that Linux distros used to use by default.
Armed with this knowledge, we can now move to the meat of this guide – the installation of Void Linux.
UEFI Preparation
You can install Void Linux directly to your computer by following this guide, but you can also install it on a virtual machine using VirtualBox or KVM.
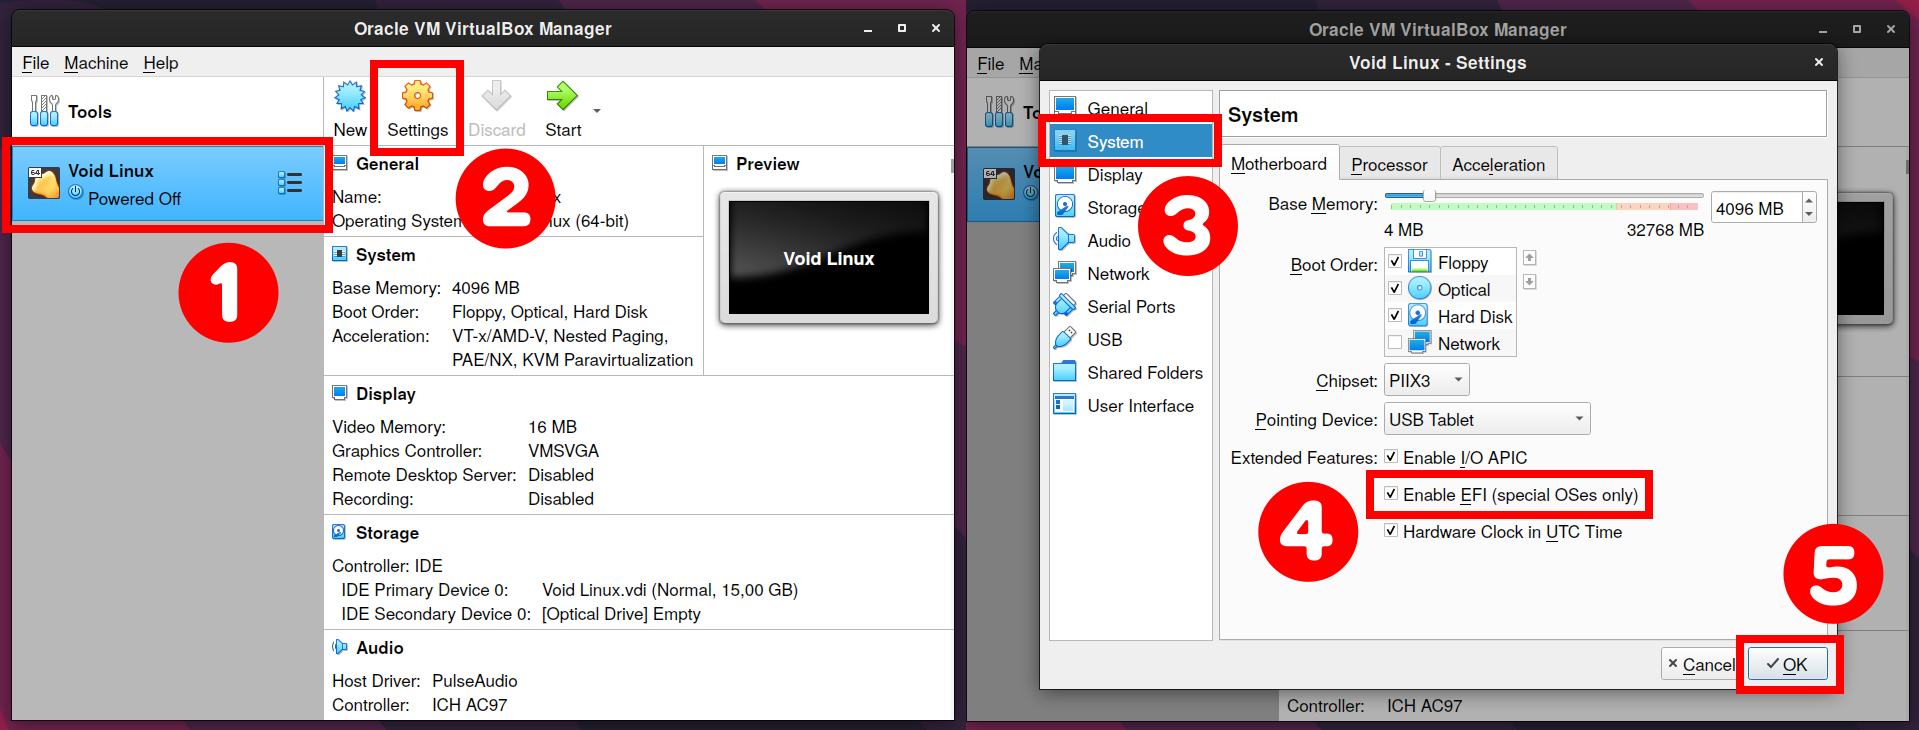
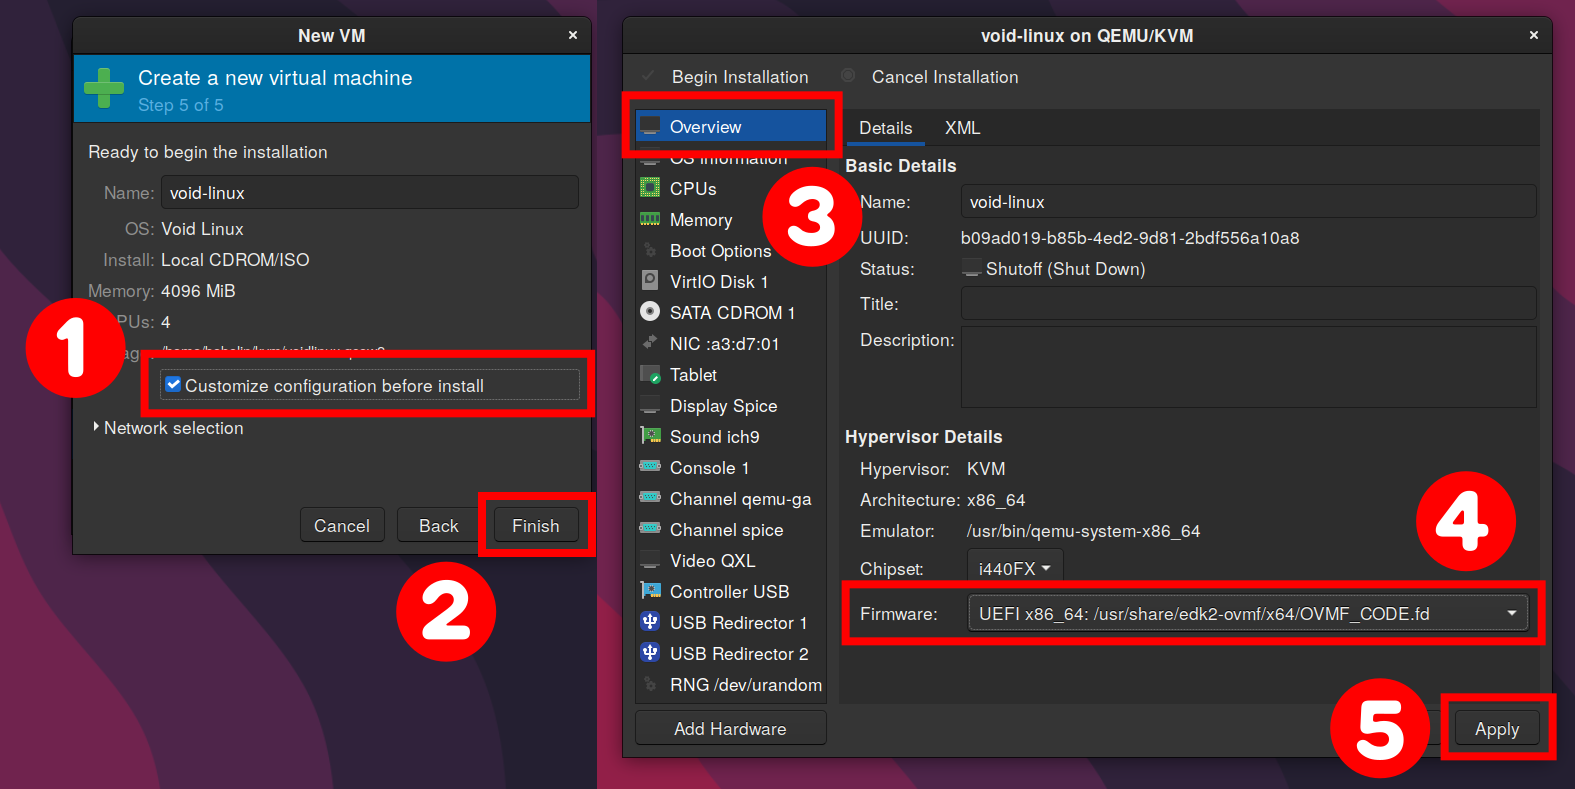
Before starting the installation, VirtualBox’s and KVM’s virt-manager users must enable EFI in the virtual machine settings. Otherwise, an error will occur when attempting to install the GRUB bootloader.
VirtualBox
Virt-Manager
1. Download the Void Linux Installation Image
The first thing that we need to do is obtain an installation image of Void Linux. Void comes with two C standard libraries: glibc and musl. Glibc is widely used among Linux distributions.
On the other hand, musl is a more straightforward implementation of the same C library, but its recency means that not all programs will work properly.
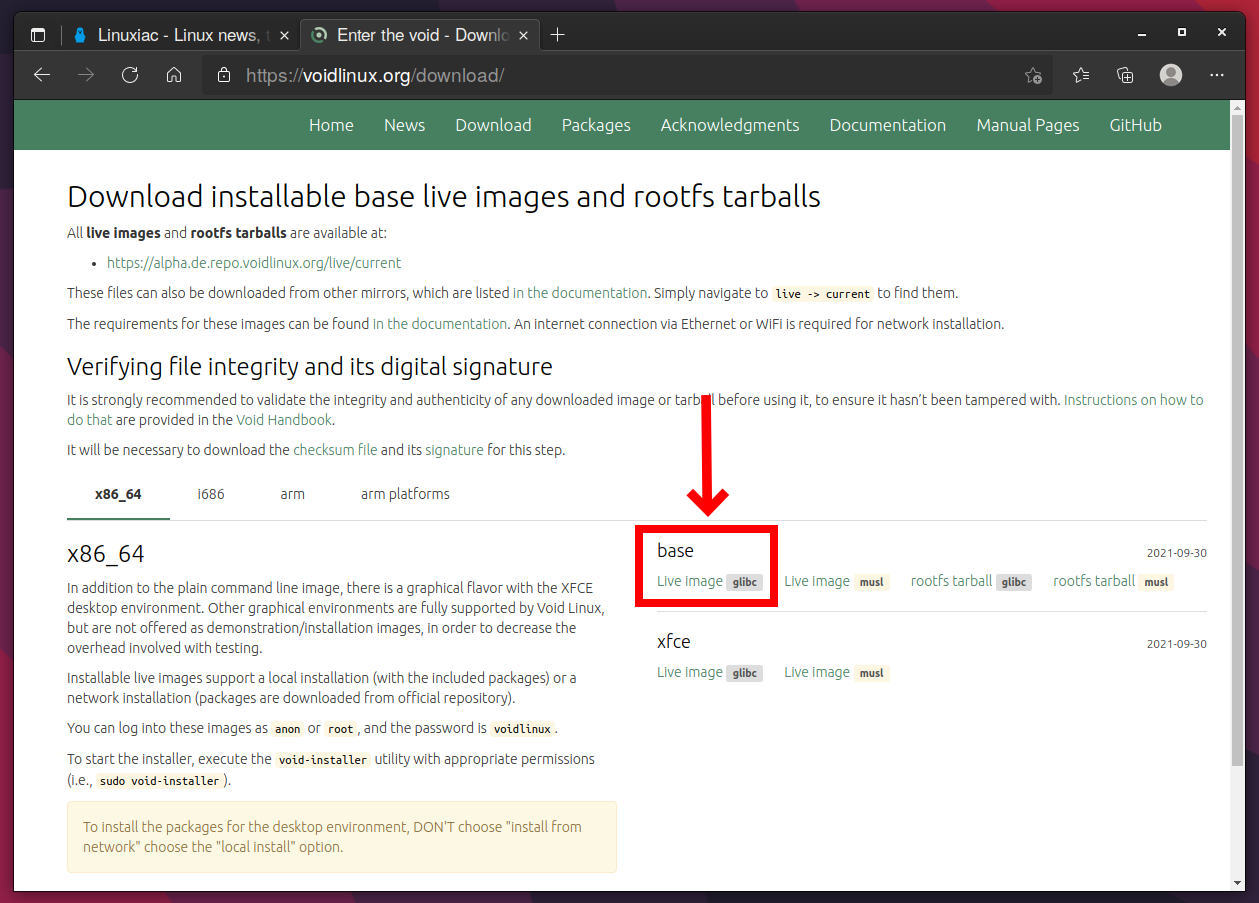
For this guide, we will use the glibc version. First, visit the Void Linux download page and grab the base Live image with glibc.
2. Prepare Live Bootable USB
Once your Void Linux ISO file finishes downloading, you must create a live Void installation USB from the ISO you just downloaded. There are many ways to prepare it, and one of them is by using the dd command.
Alternatively, you can use applications such as Etcher or Ventoy, which are good options for creating a bootable USB drive.
3. Boot Void Linux from the Live USB
Once you have created a live USB for Void Linux, shut down your computer, plug the USB into it, and boot your system.
Please remember that you can sometimes not boot from a Live USB with secure boot enabled. If that’s the case with you, access the BIOS and disable the secure boot first.
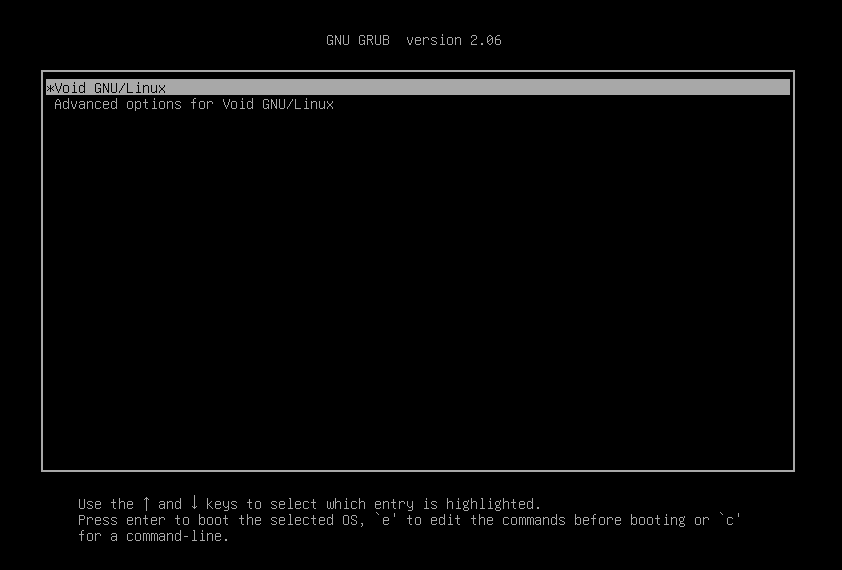
Once you have appropriately booted into the Void ISO, you should see something similar to the below image.
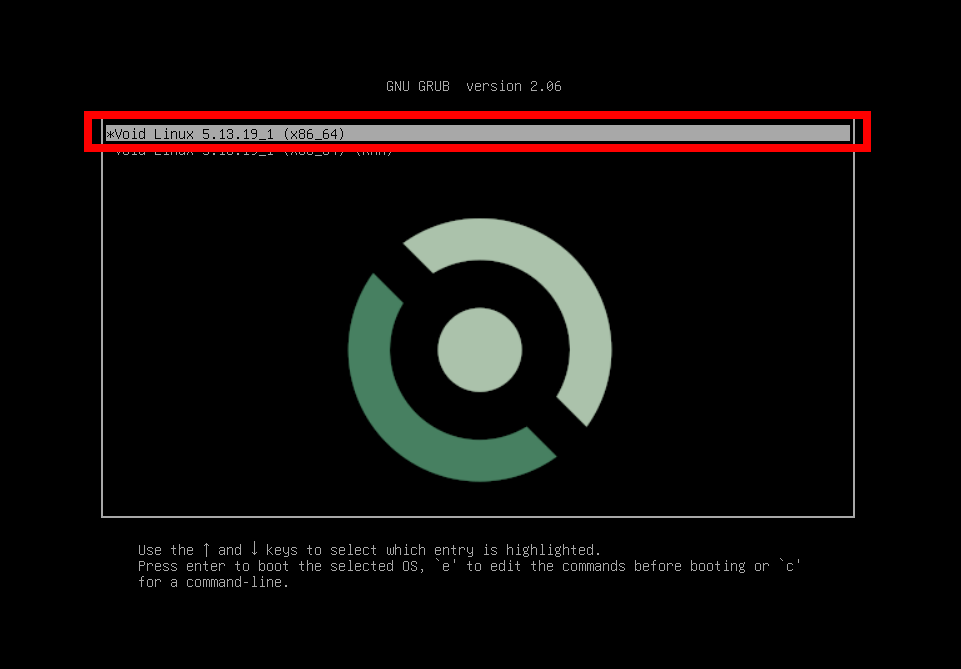
Choose the first row and hit “Enter.”
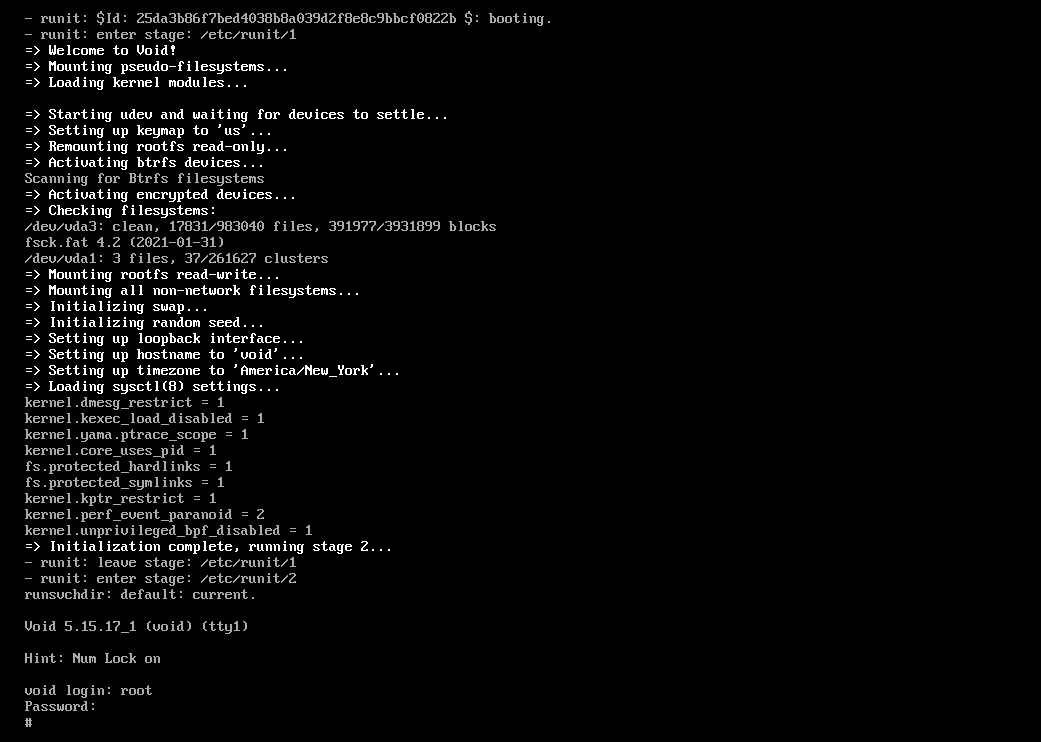
After the installer decompresses and loads the Linux kernel, you will be automatically thrown to a terminal with root privileges.
At this point, we only have the Void Linux live system. We need to proceed to install Void Linux. Log in with the username “root” and password “voidlinux.”
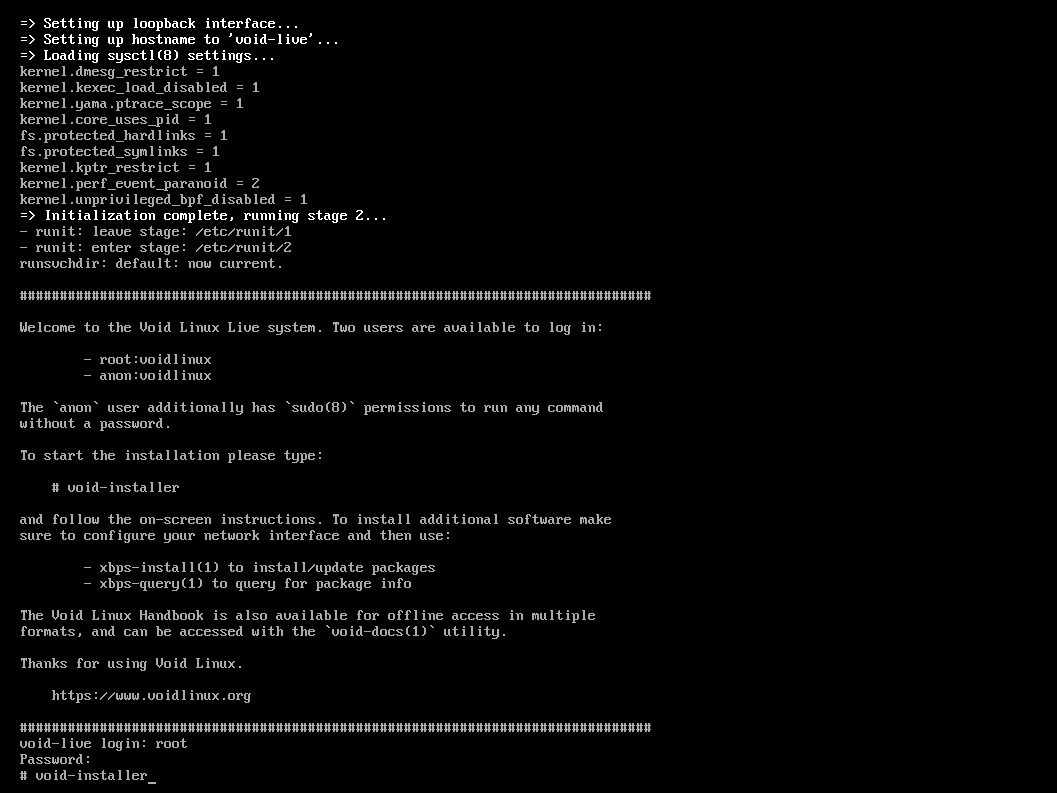
Then start the installation process. To do this, type void-installer in the command line.
void-installerCode language: JavaScript (javascript)4. Installing Void Linux
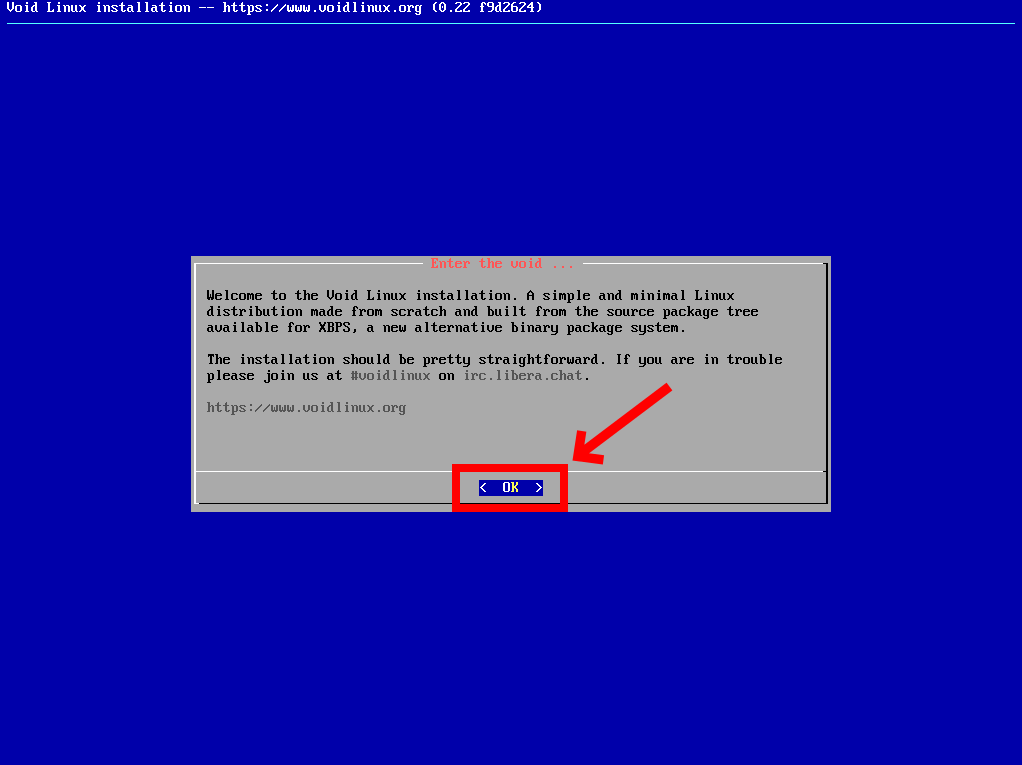
Void uses a simple text-based installer to guide you through the traditional installation steps. In addition, the Void’s installation program will welcome you.
We’re going to go ahead and press “Enter.”
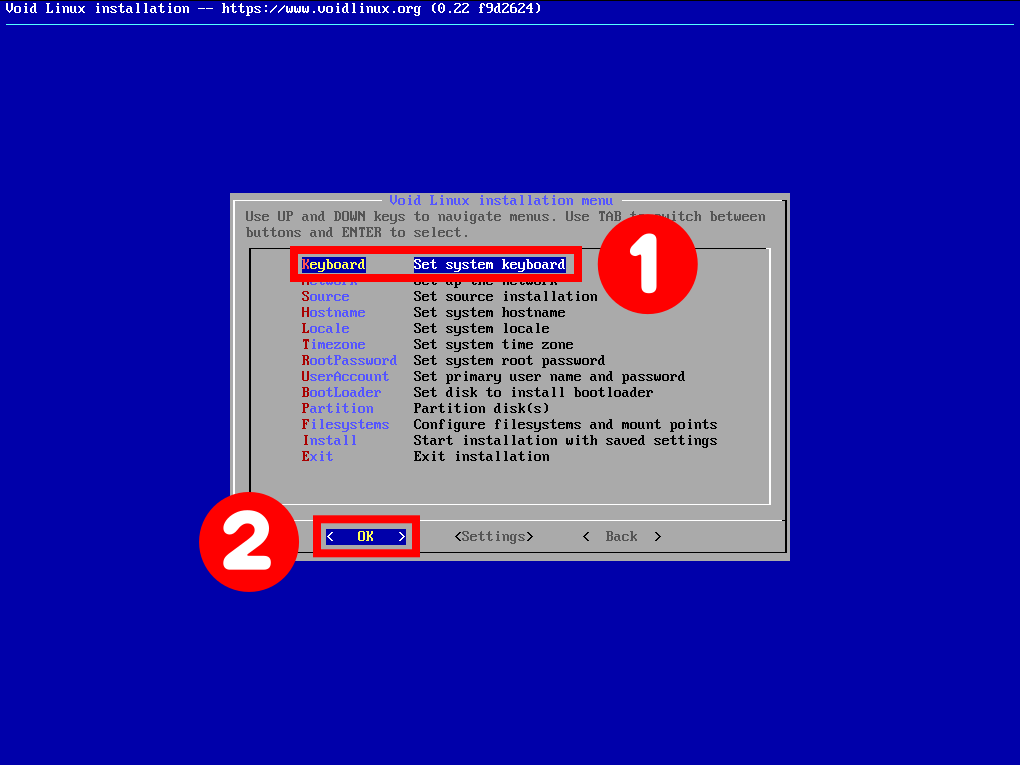
4.1 Set System Keyboard
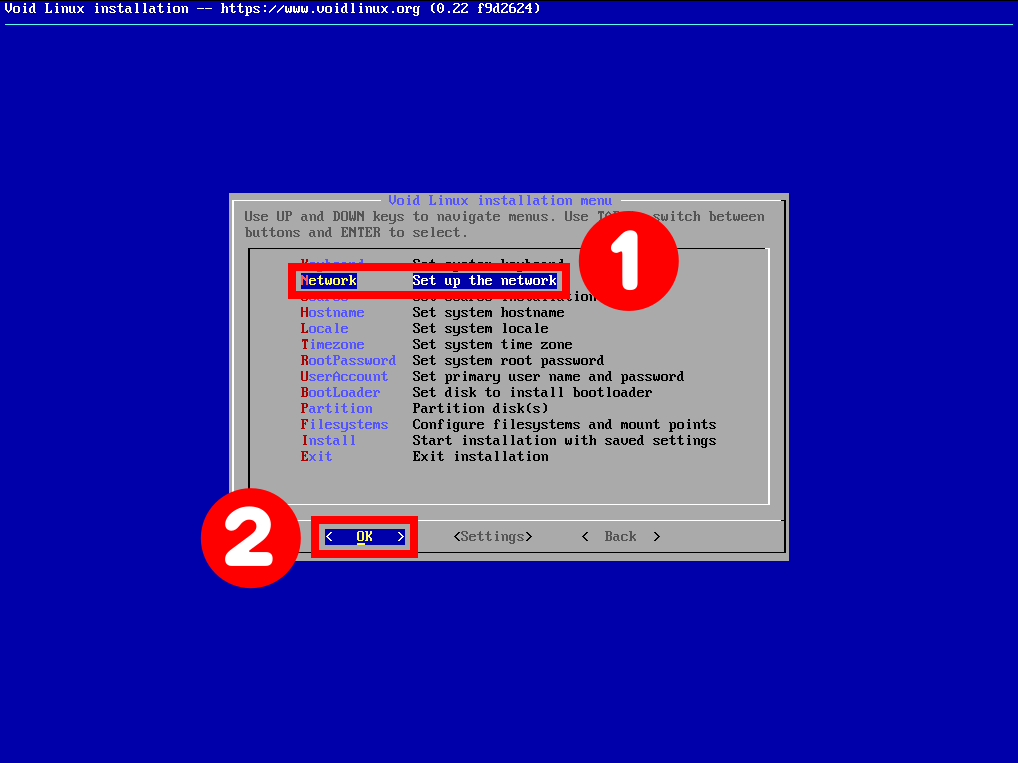
The installation wizard’s main menu highlights all the steps you need to do. We are starting with the “Keyboard” and making our way down.
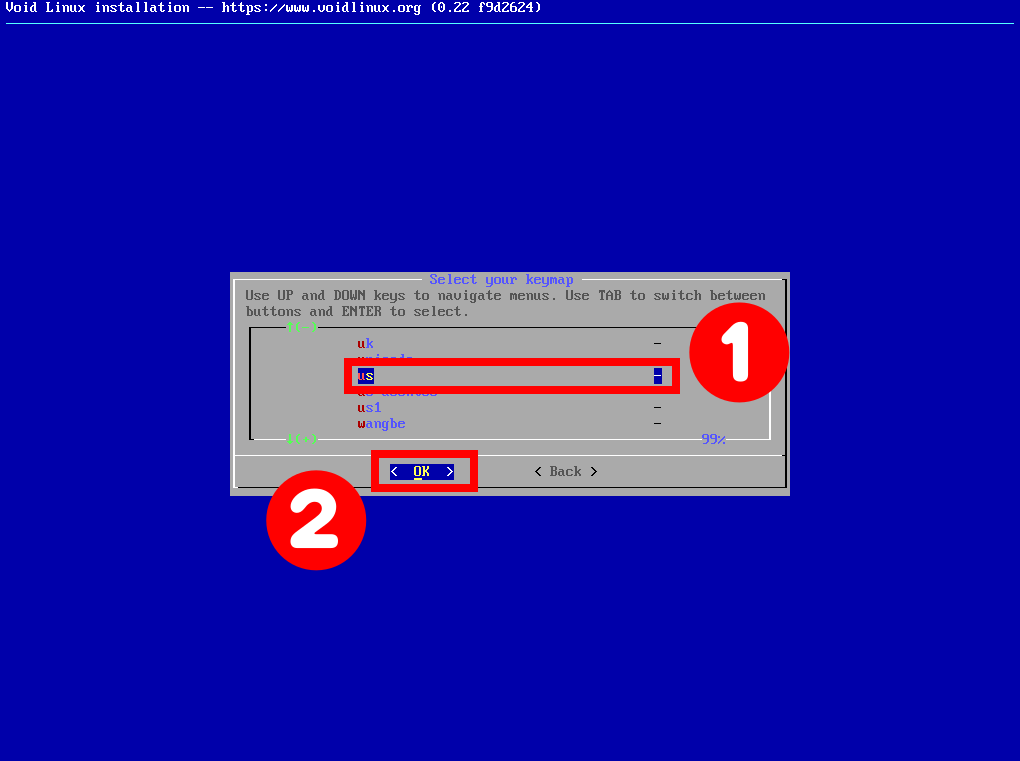
Select whatever works for you, but mine is the “us” standard keyboard. So go down to “us,” select it, and hit “Enter.”
4.2 Set up the Network
Next is the network setup.
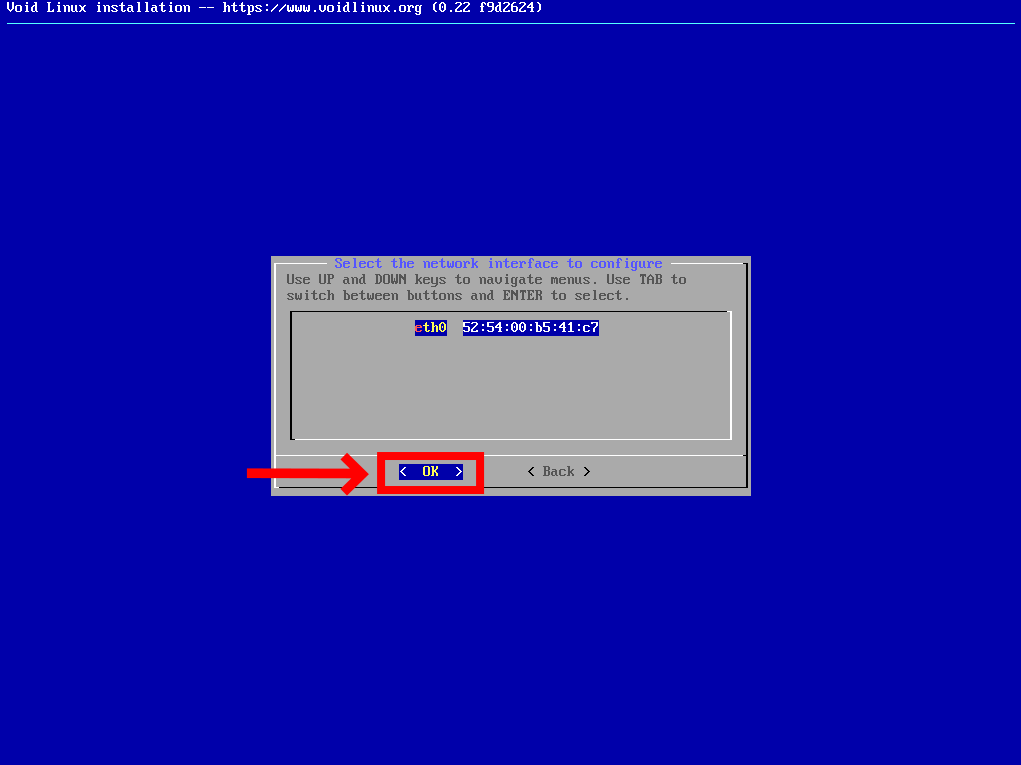
The network says it did detect an Ethernet adapter here.
Next, the installer will ask if you want to set up DHCP for this Ethernet adapter. If you choose “Yes,” your network adapter will automatically grab an IP address from your router. Otherwise, you will have to set up a static IP address.
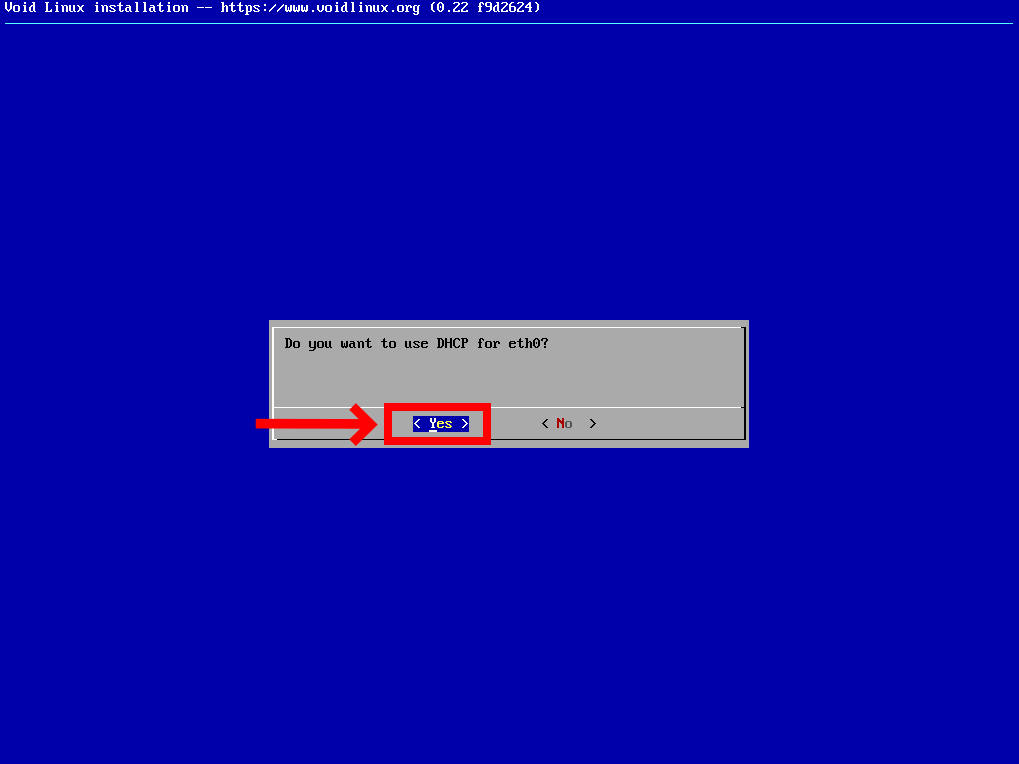
As you can see, it says that our network works correctly, so hit the “Enter” key.

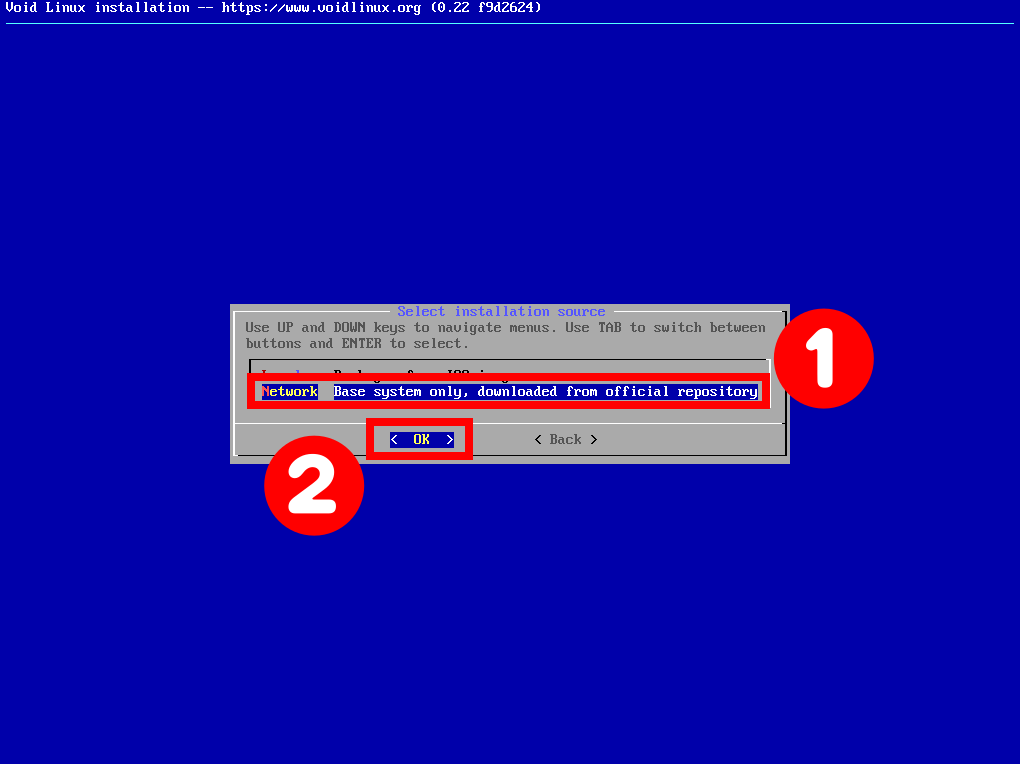
4.3 Installation Source
The next step is to select where the installer will get its installation packages.
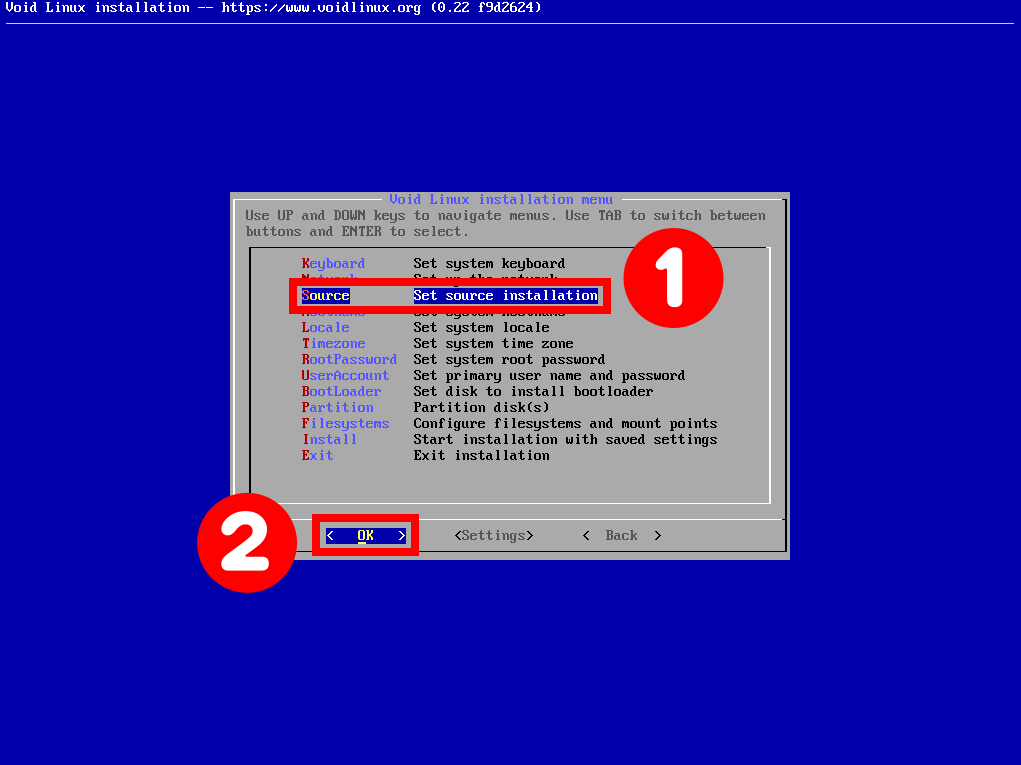
To get the latest packages, select “Network.” Of course, this option requires a workable network connection.
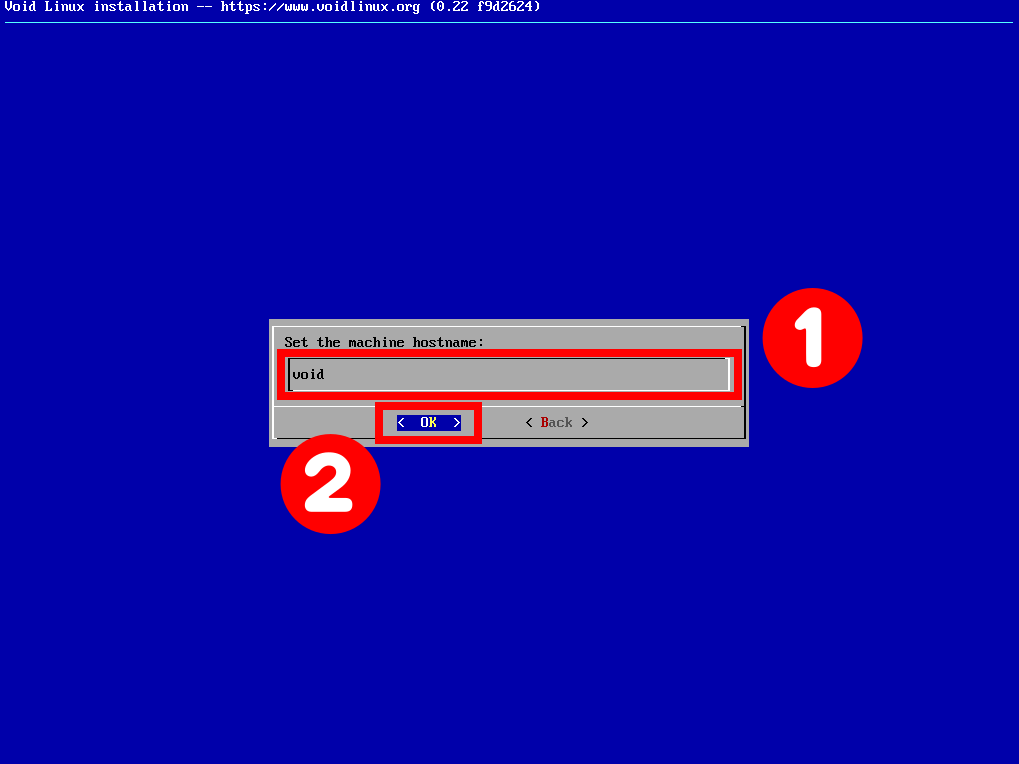
4.4 Set System Hostname
In the next step, you must provide a hostname for your Void system. Again, it can be anything that you want.
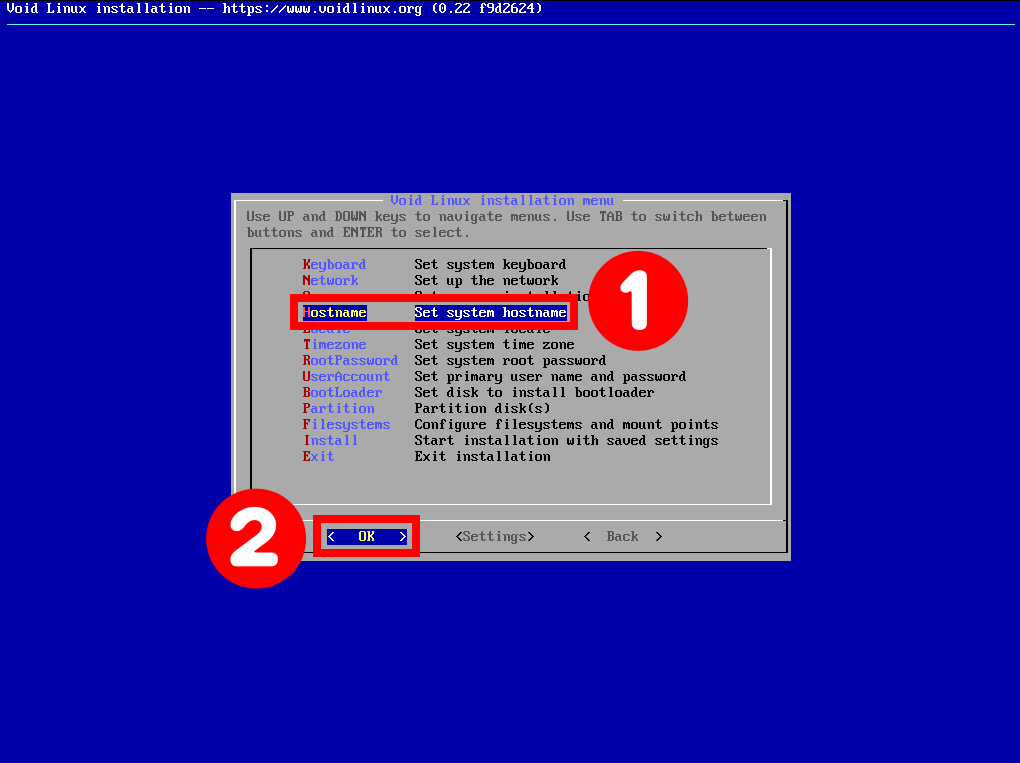
In our case, I will name the machine “void.”
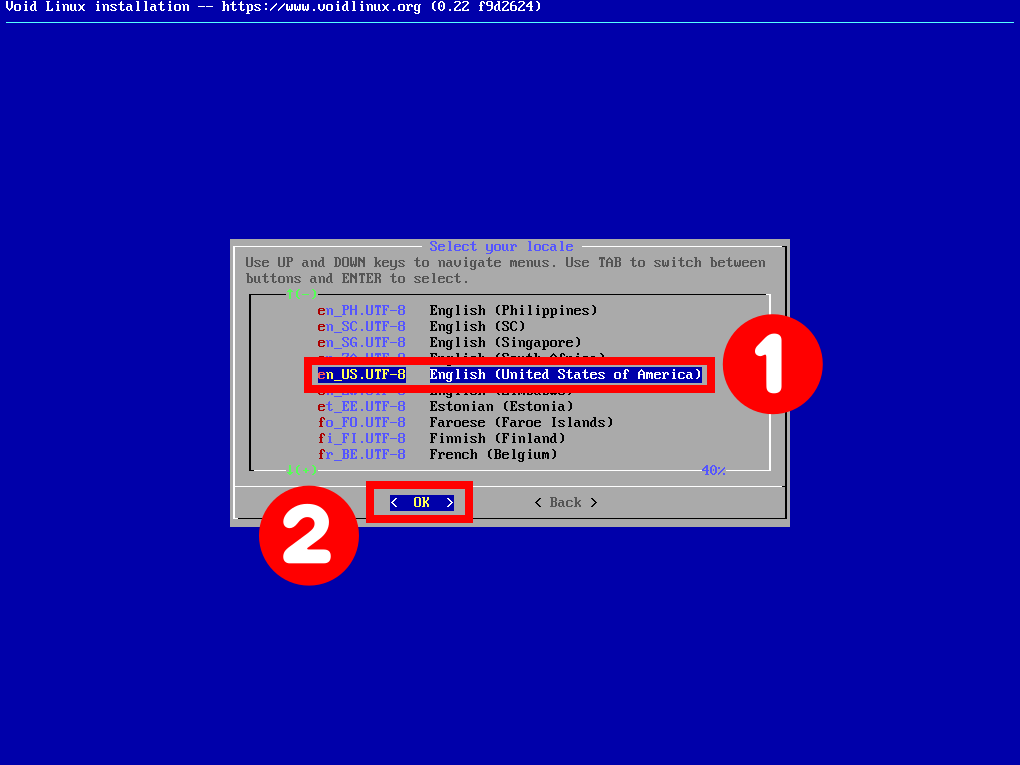
4.5 Set System Locale
Now we need to set up a locale.
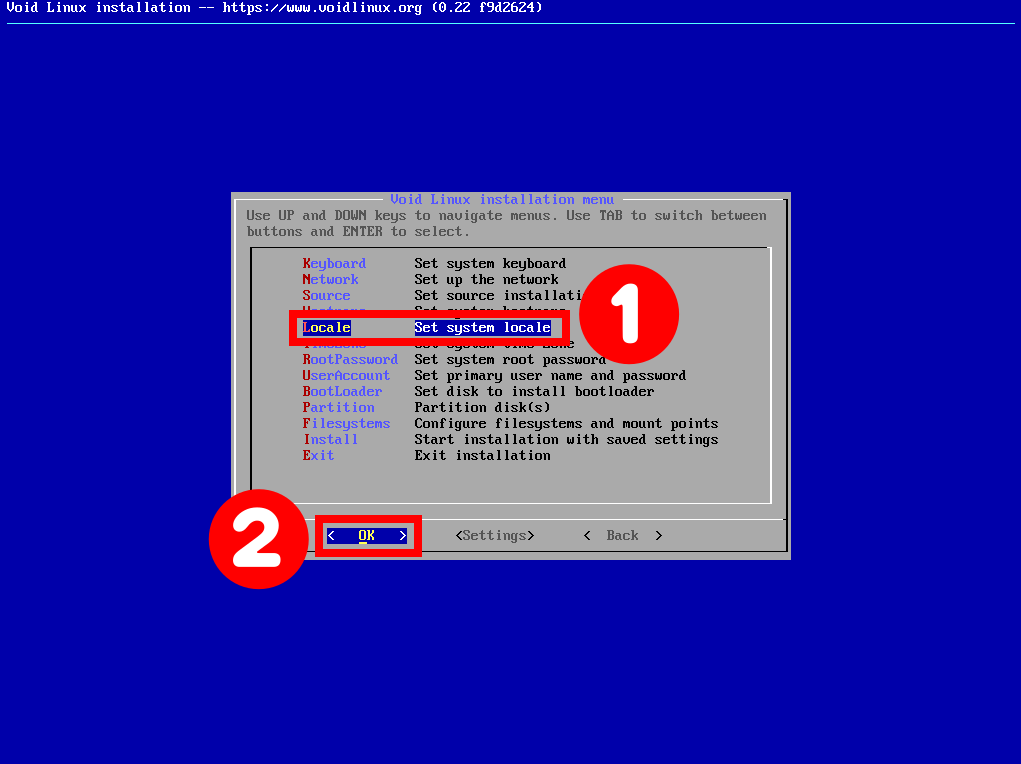
Select “en_US.UTF-8.”
4.6 Set System Timezone
Next, let’s configure the timezone.
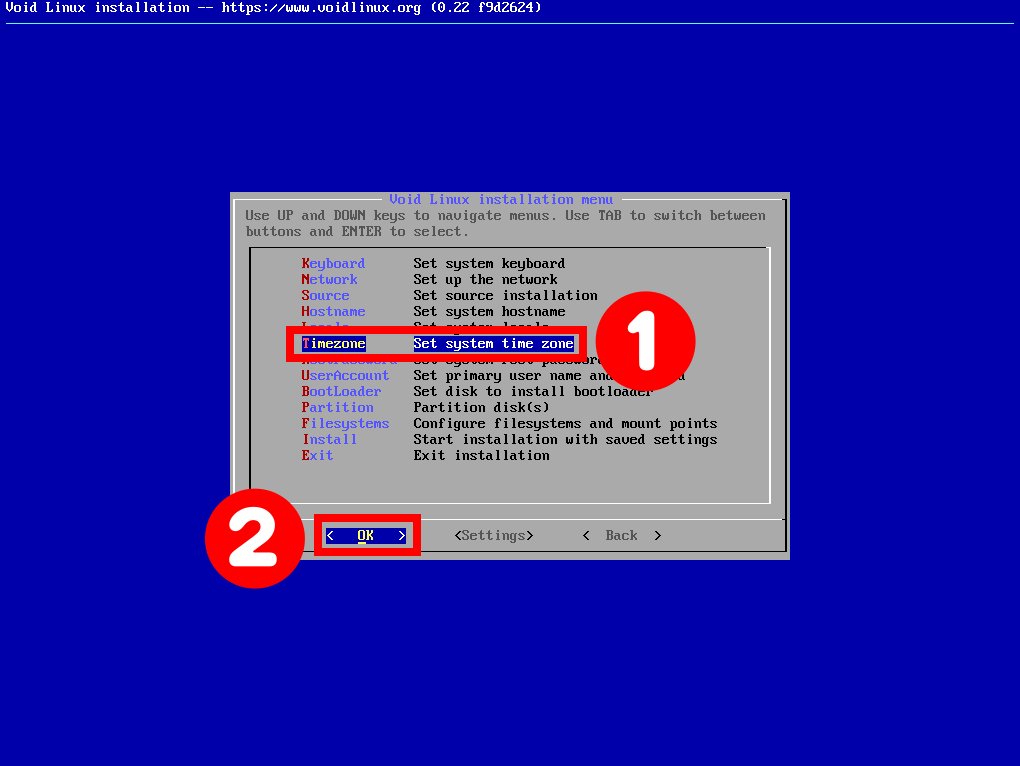
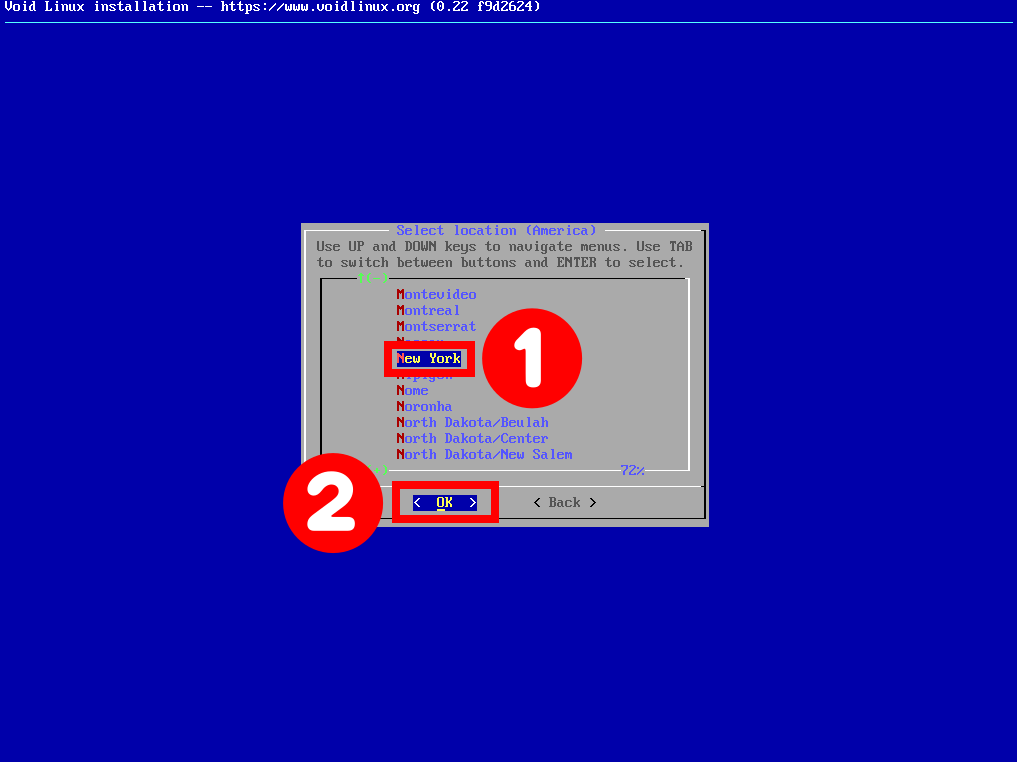
For the timezone step, pick the closest location to you to determine your system clock.
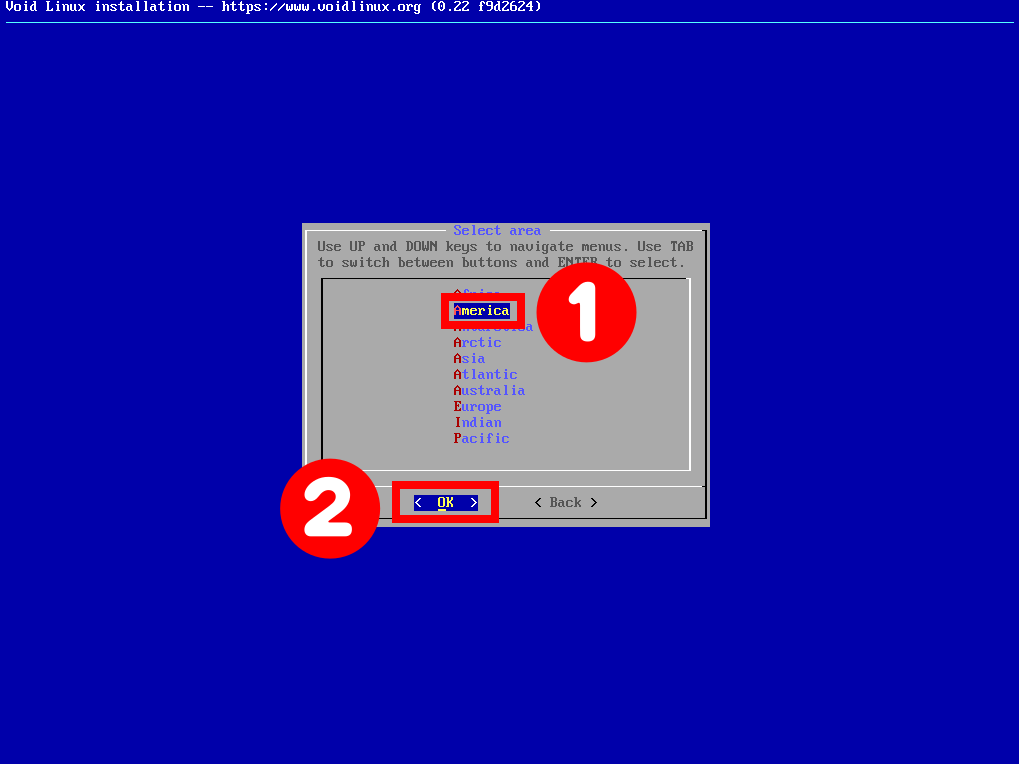
For this Void Linux installation, I choose “America“> “New York.” Of course, you select the time zone corresponding to your location.
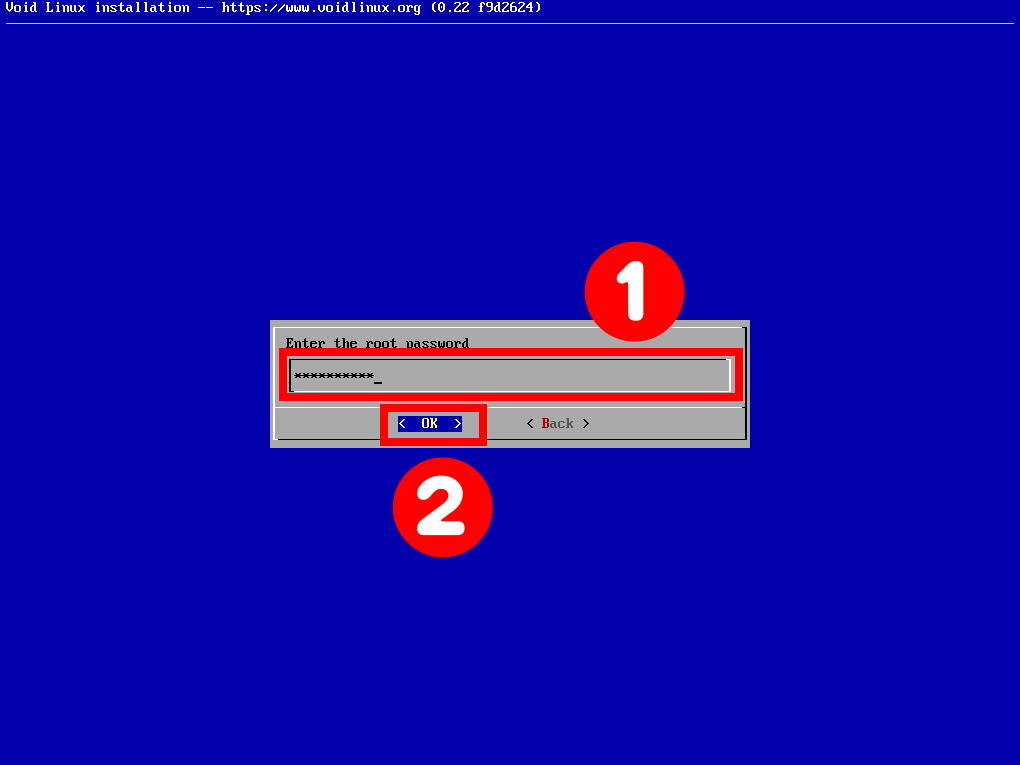
4.7 Set Root Password
Following that, we’ll be setting up a root password. So let’s go ahead and press “Enter.”

Then type in a password you want to use for a root user. Make sure this is a secure password. After that, you’re going to be asked to confirm the password.
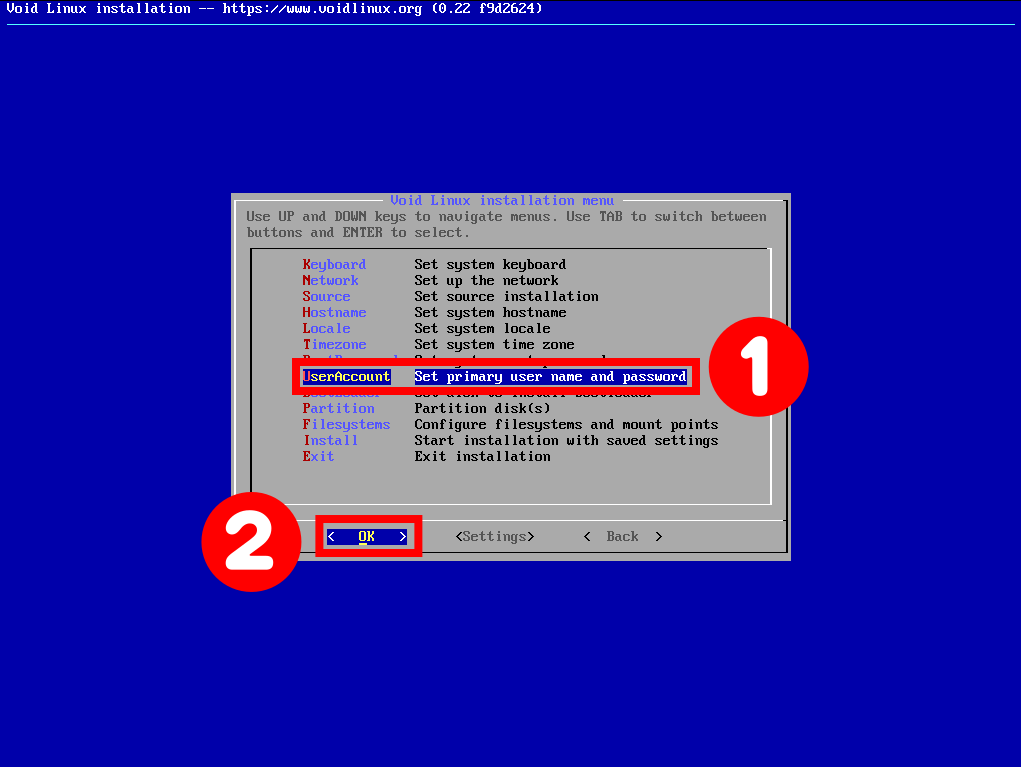
4.8 Setting Up the User
Next, we have the user account to set up, which is the system’s primary user. So this is what you’ll be logging in with access to the desktop.
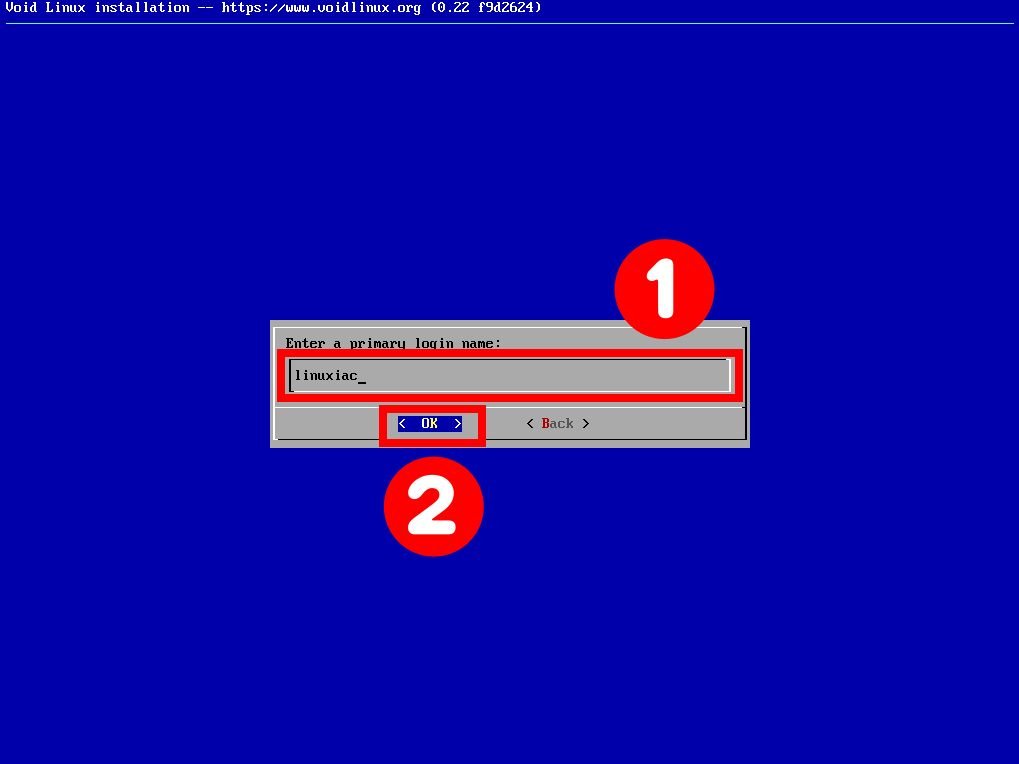
The first prompt will ask for your username.
The next is for the full name of our new user. For example, you can enter your name here. I chose to stay with the default value “Void User.”
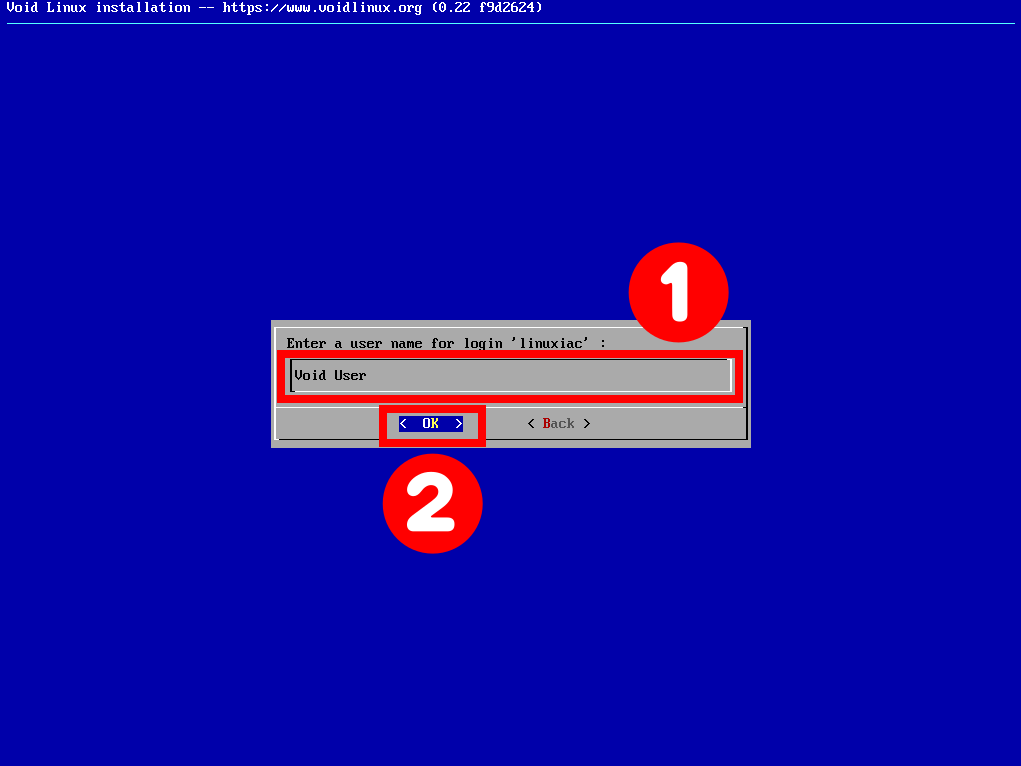
After that, you’ll be asked for a password and a password confirmation.

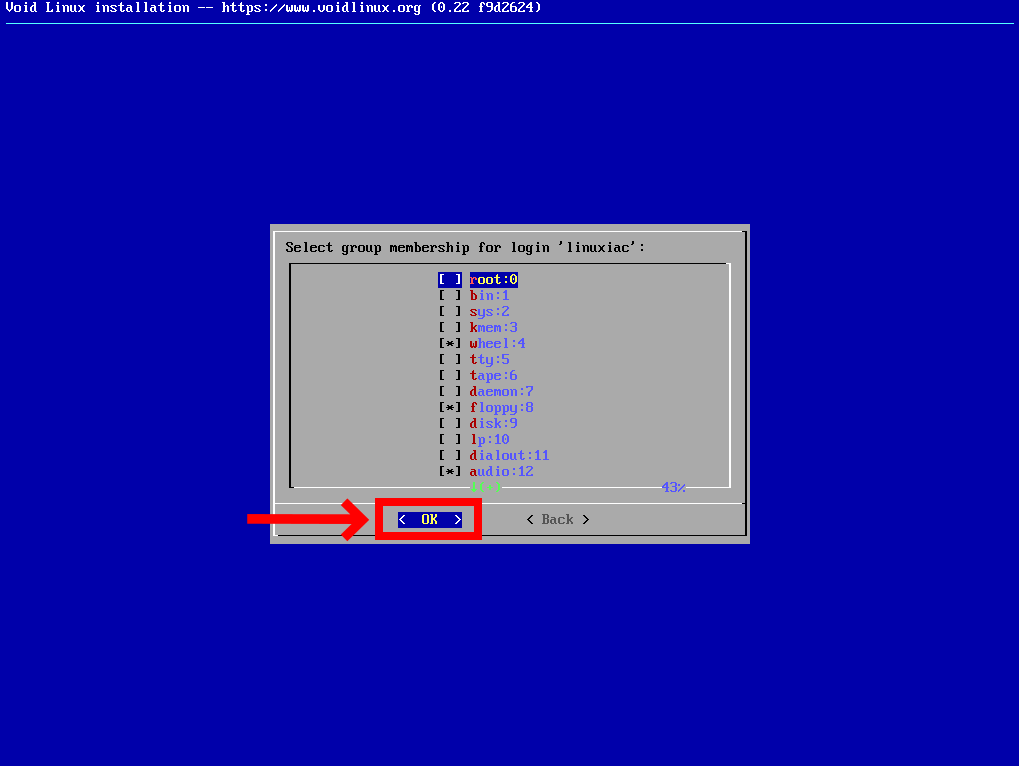
Select which system groups you want your user account in the next step. The installer has already provided reasonable defaults, which should be enough for daily use, so press “Enter” to continue to the next step.
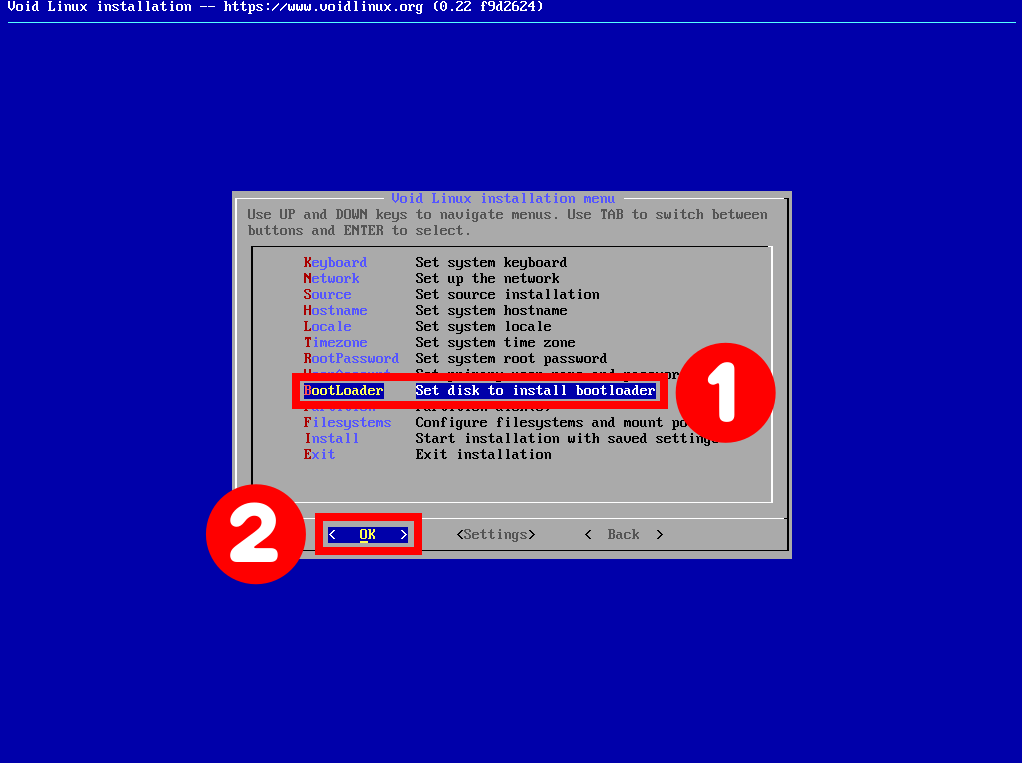
4.9 Setting Up the Bootloader
Next, we’ll be asked about the bootloader.
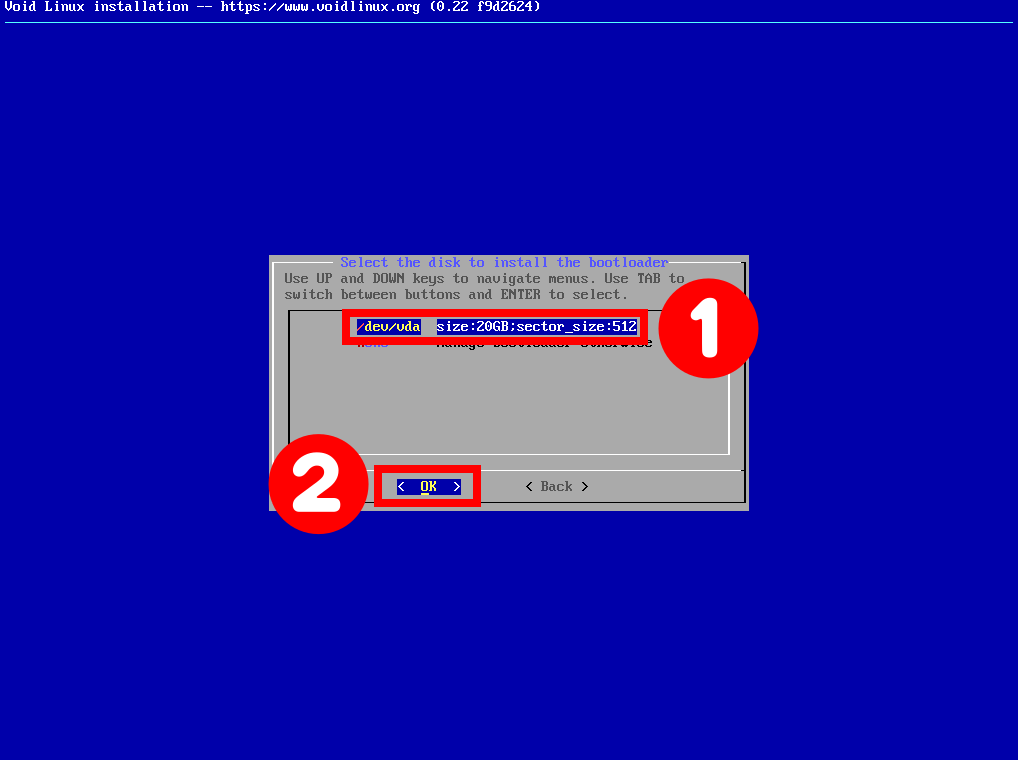
Go ahead and set where to install it. As you can see here, I only have one disk, “/dev/vda,” and that’s the one I will select.
Make sure you choose the proper disk; mount it to your computer if you have more than one.
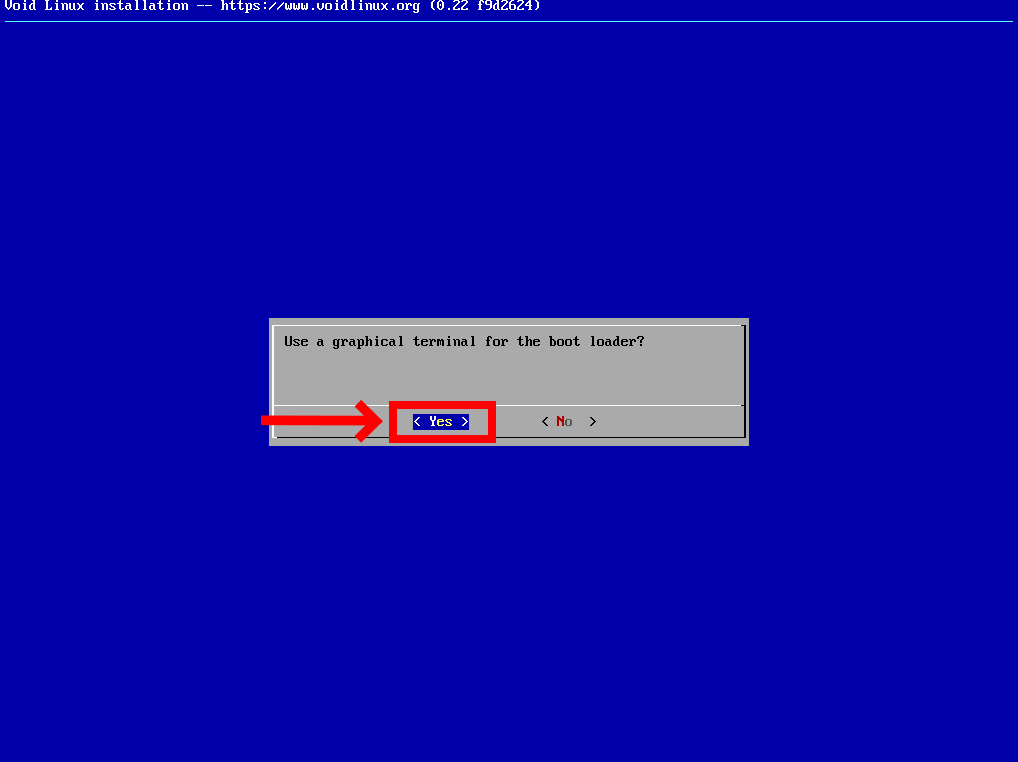
The installer asks if you want to use the graphical terminal for the bootloader. Choose “Yes.”
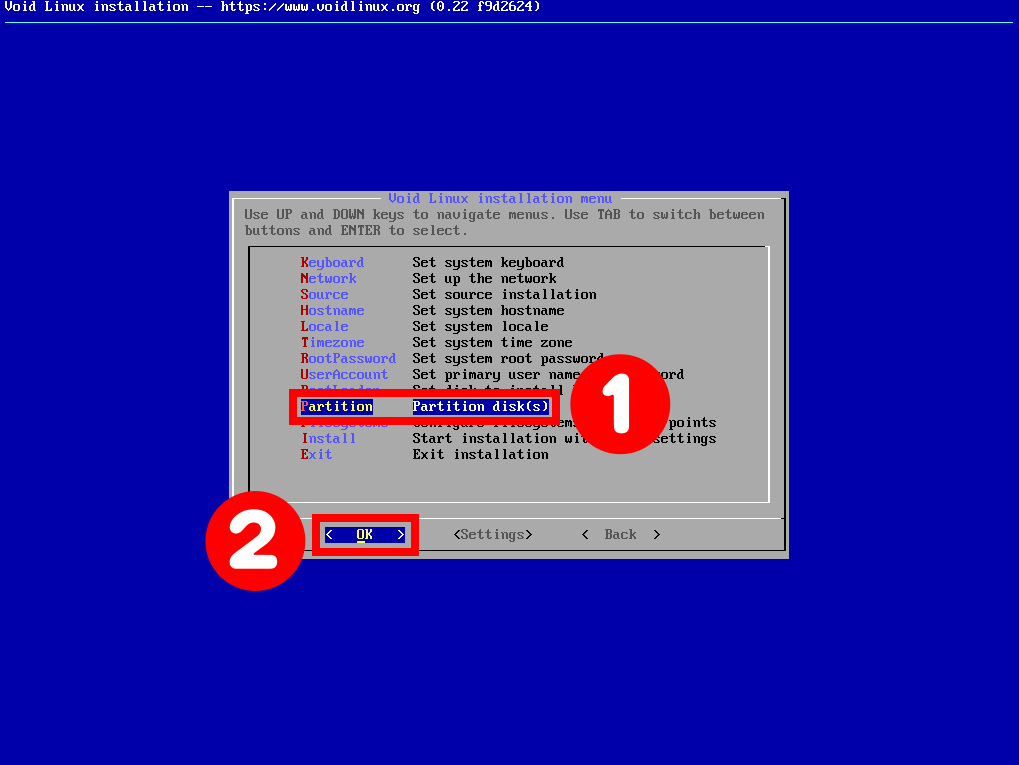
4.10 Partition of the Disk
The next step in our Void Linux installation guide is partitioning the hard drive. Here you will find the most trouble if you are unfamiliar with partitioning tools such as cfdisk or fdisk.
But don’t worry, it’s easy, as you’ll see.
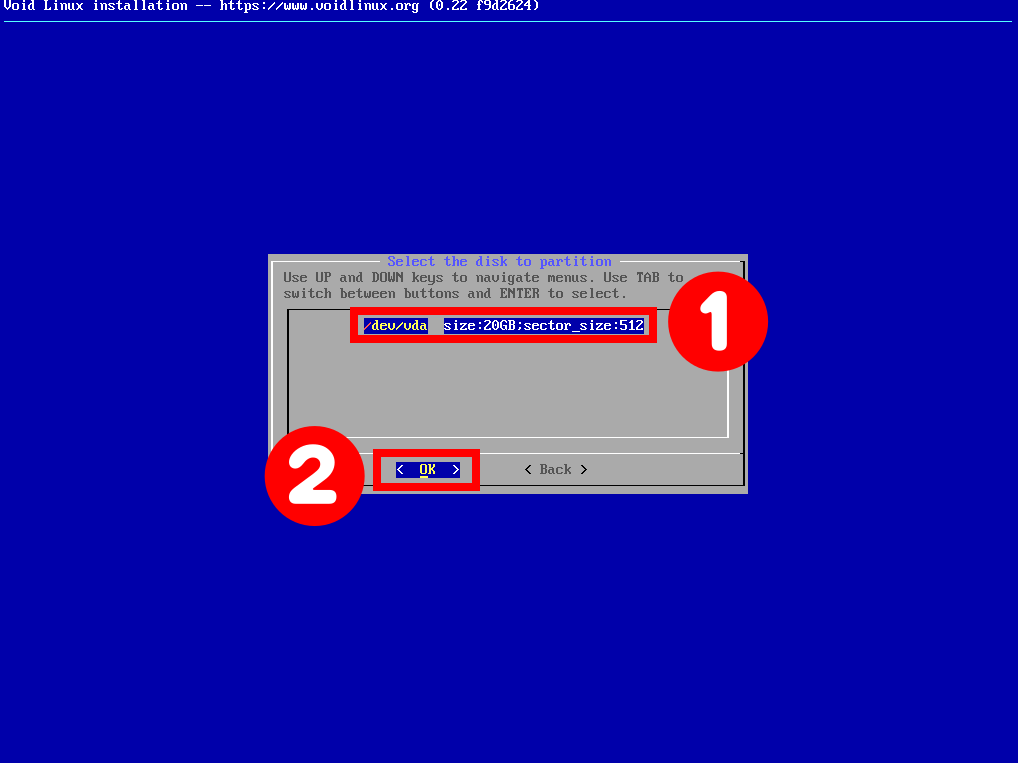
Here you can see the disk selected is “/dev/vda.” That’s the only one for me. Of course, you might have more than this if you have multiple disks mounted to your system. So make sure again to select the proper one.
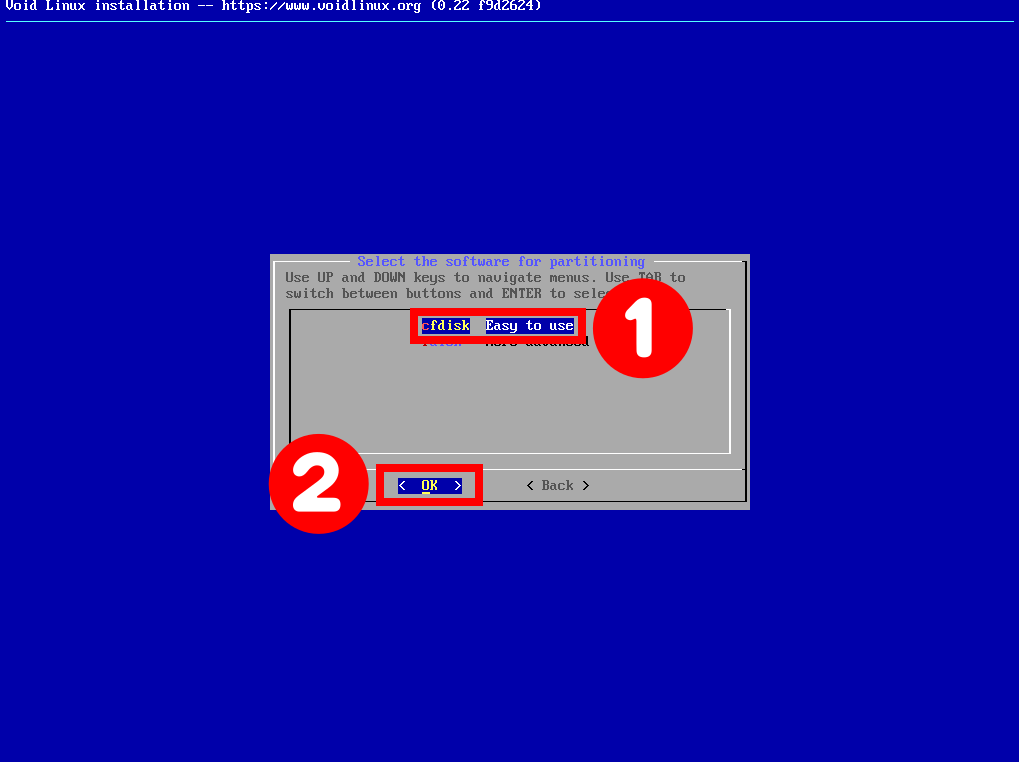
The wizard will then ask which tool you want to use to partition the disk. Select “cfdisk,” as it is simpler and easier to use.
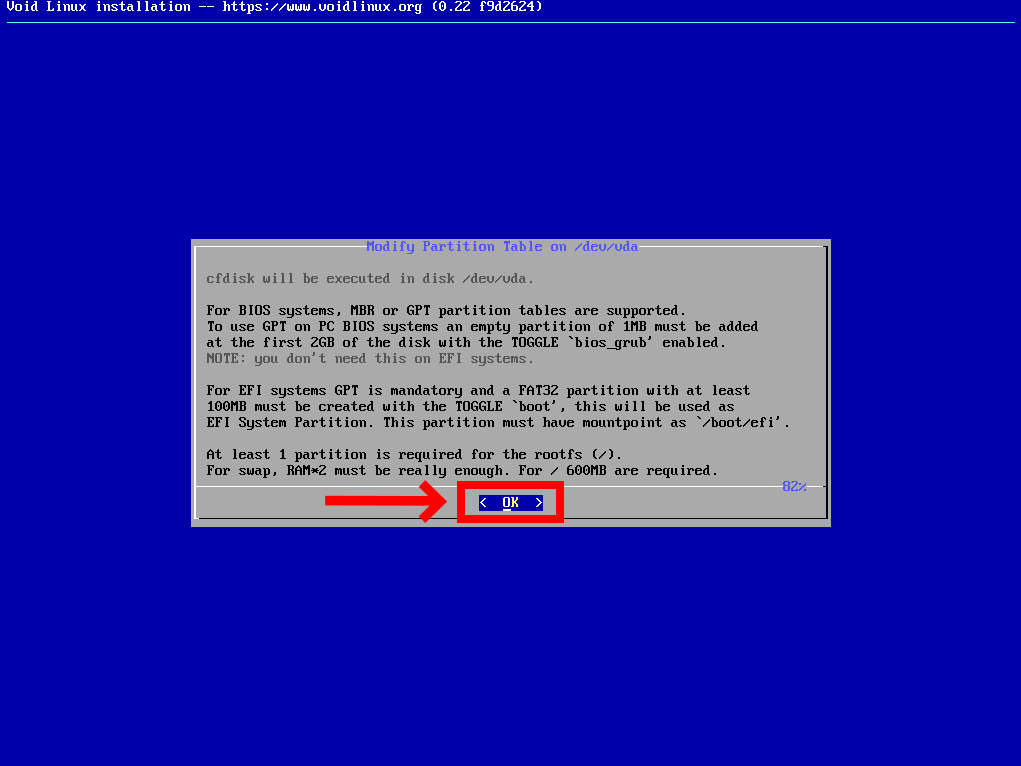
Here you can go ahead and read through the differences. Then, you can either set up an MBR or GPT partition table. In this guide, we will use GPT.
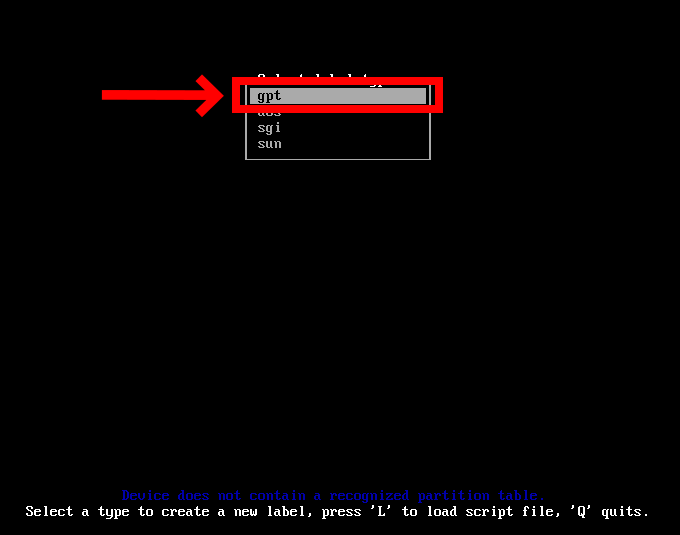
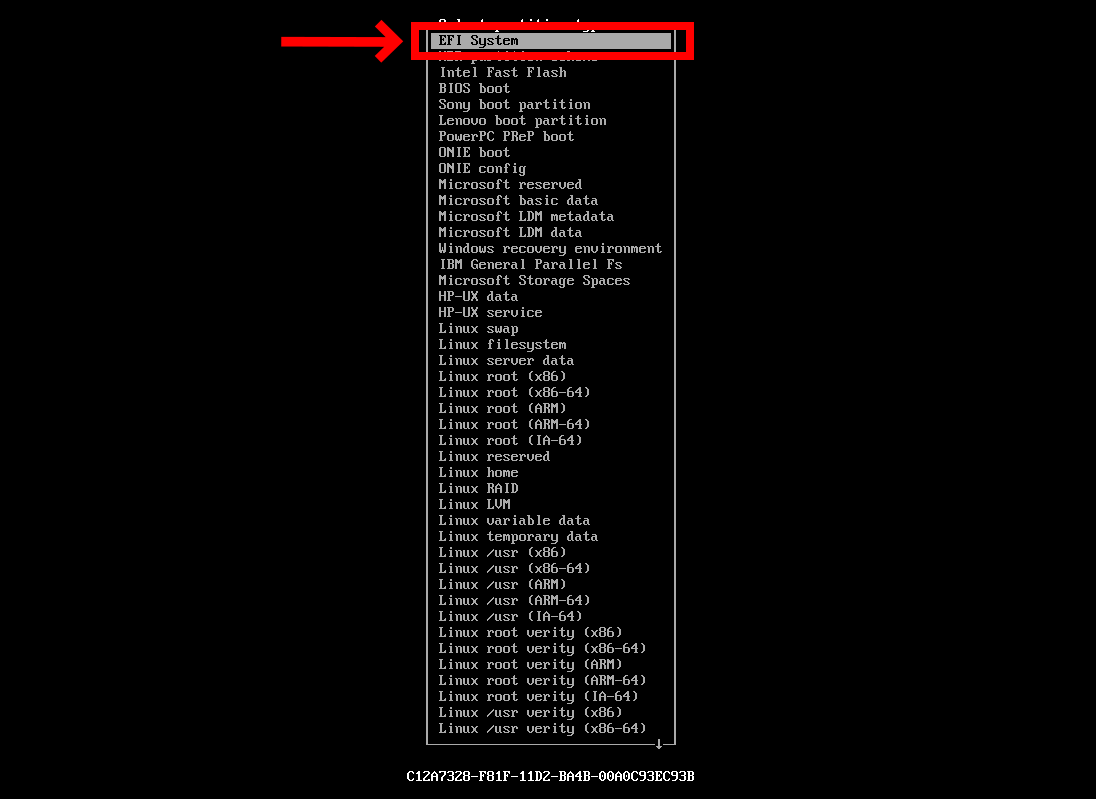
Now let’s start creating the disk layout partition table. If you use a blank disk, cfdisk will ask you for a Label Type. Select “gpt” and hit “Enter.”
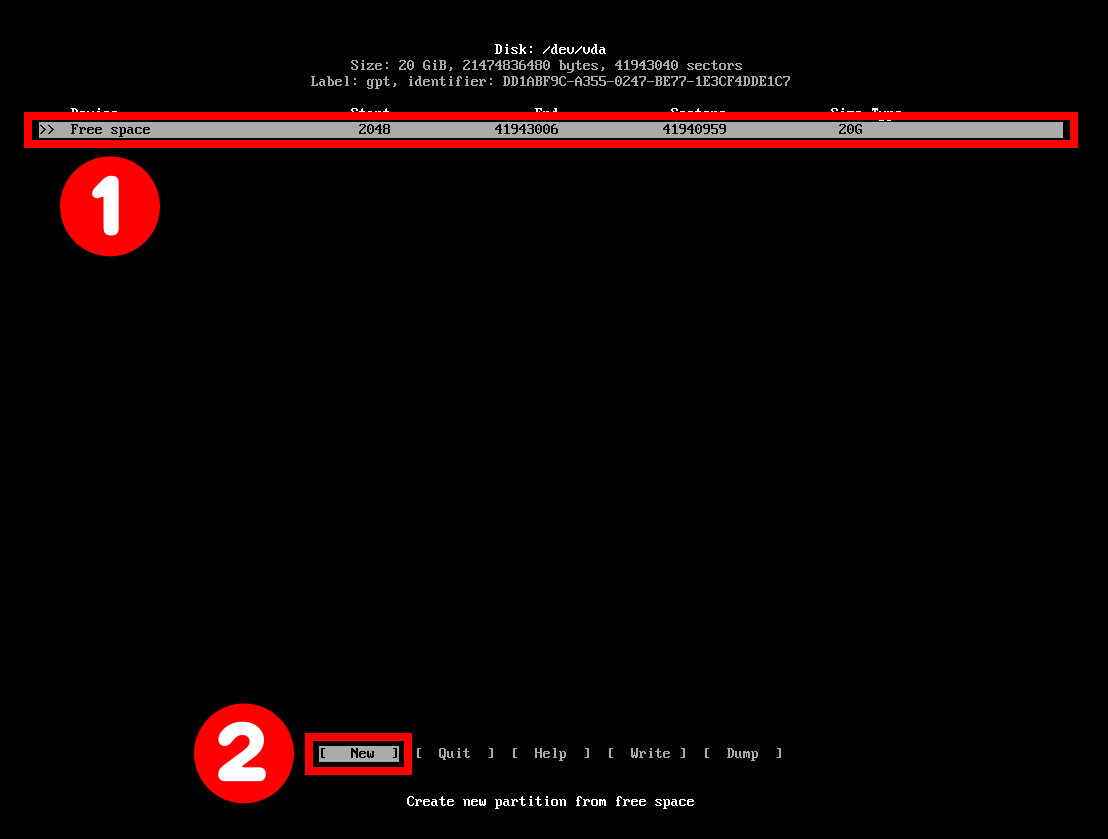
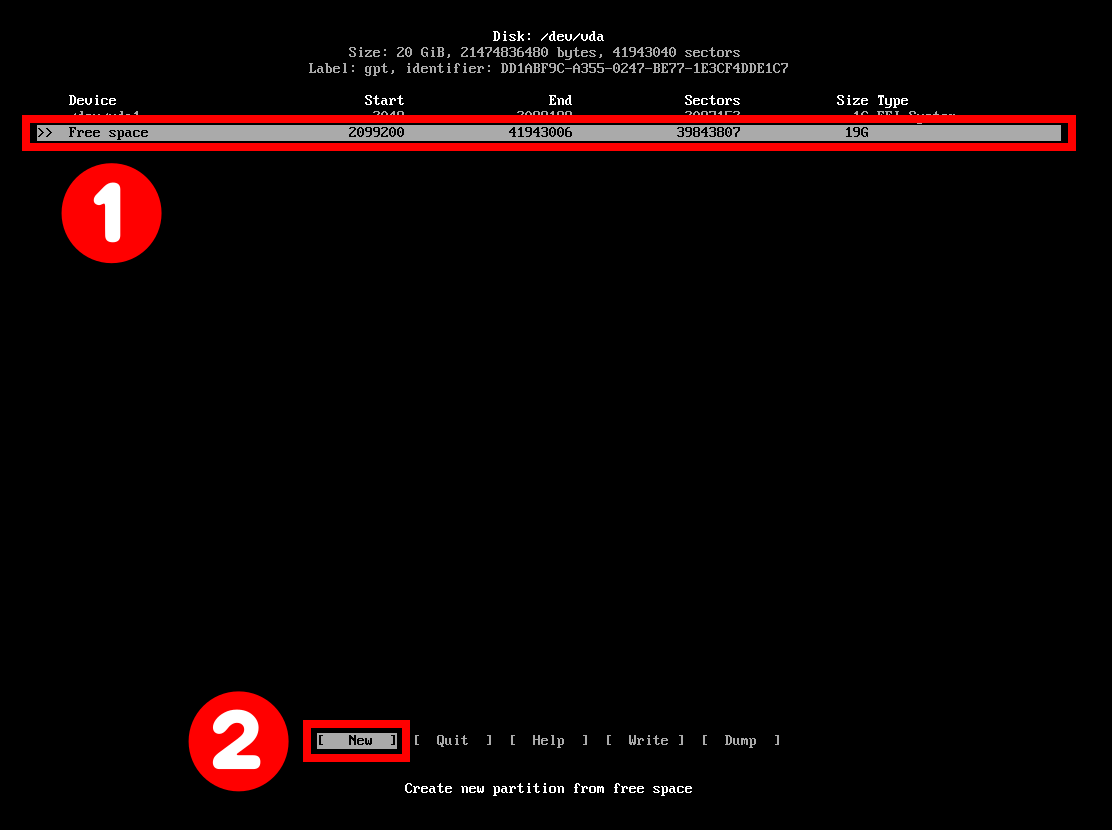
Then select “Free Space” and hit “New” from the bottom menu. You can navigate through the menu options using the Tab or arrow keys.
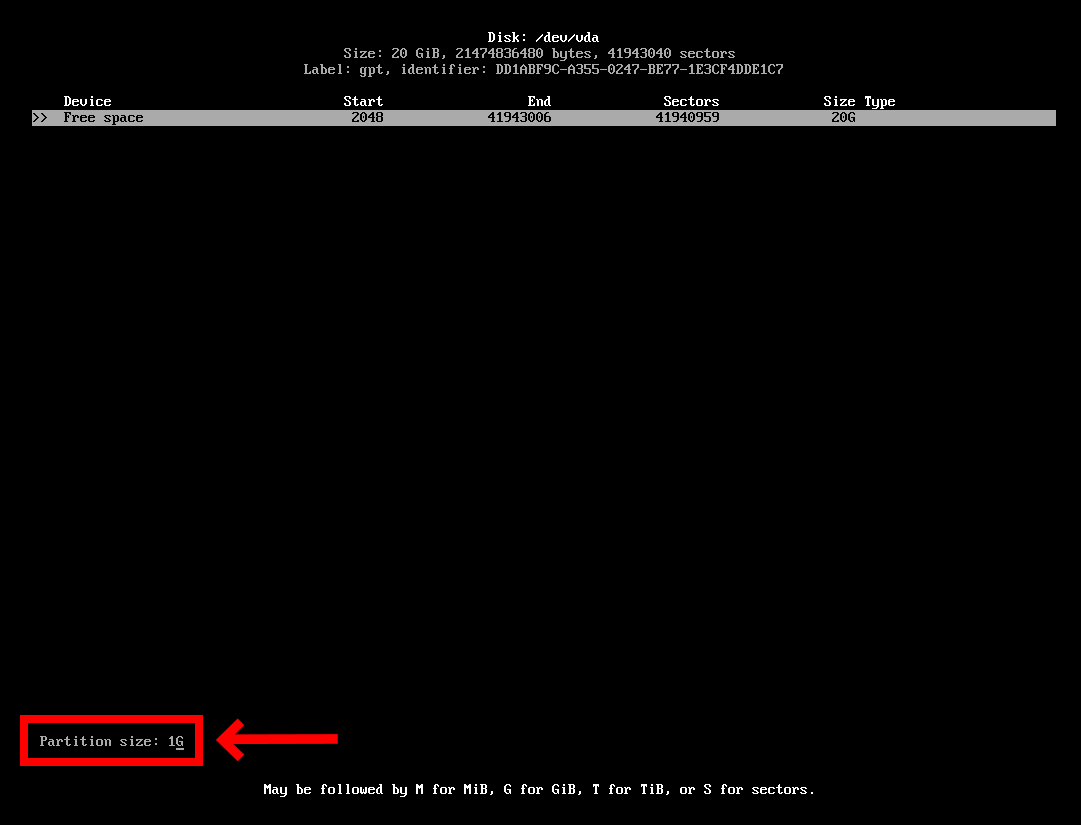
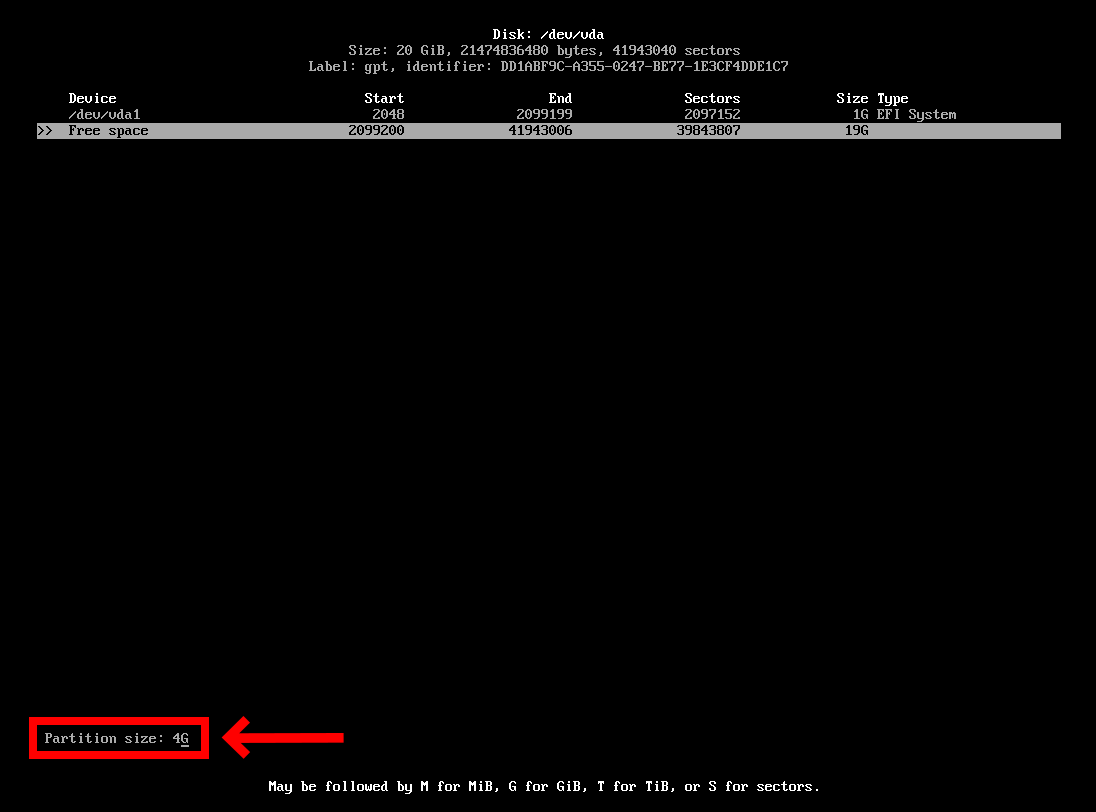
Type the partition size in GB (1G) and press the “Enter” key.
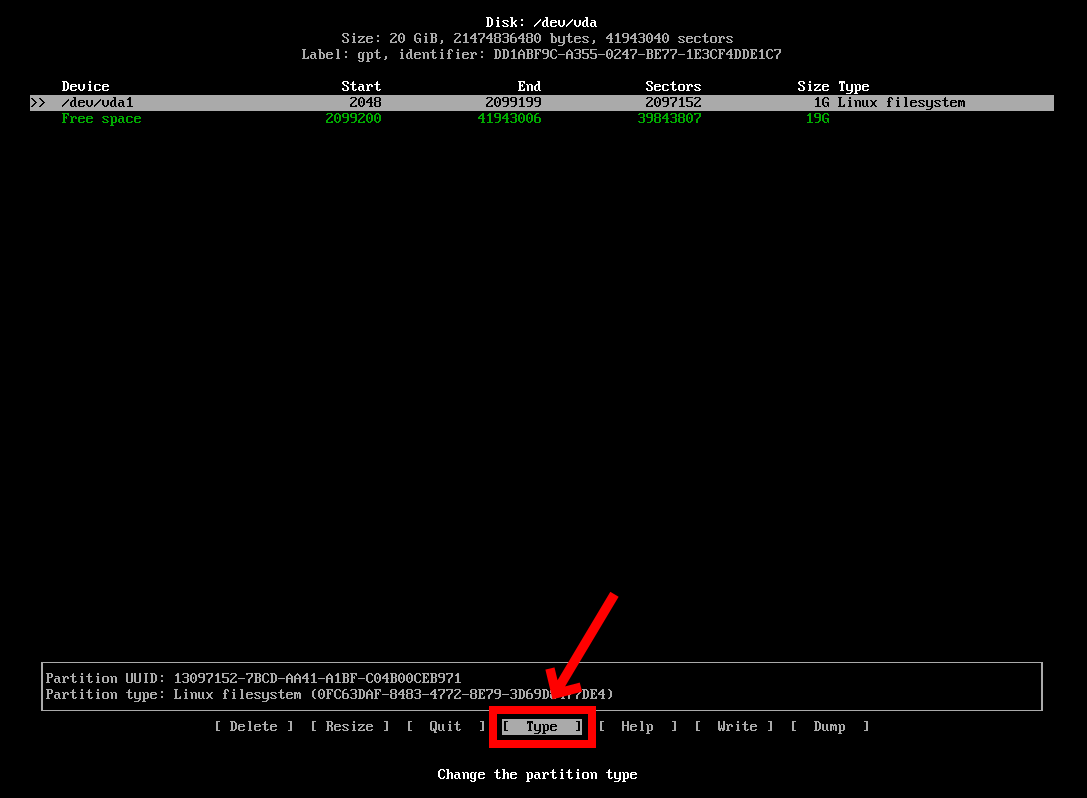
With the “/dev/vda1” partition still selected, select “Type” from the bottom menu and choose “EFI System” partition type.
You’ve finished configuring the EFI System partition. Now let’s create the Swap partition using the same procedure.
Select “Free space” again and hit “New.”
Type the partition size in GB (4G) and press the “Enter” key.
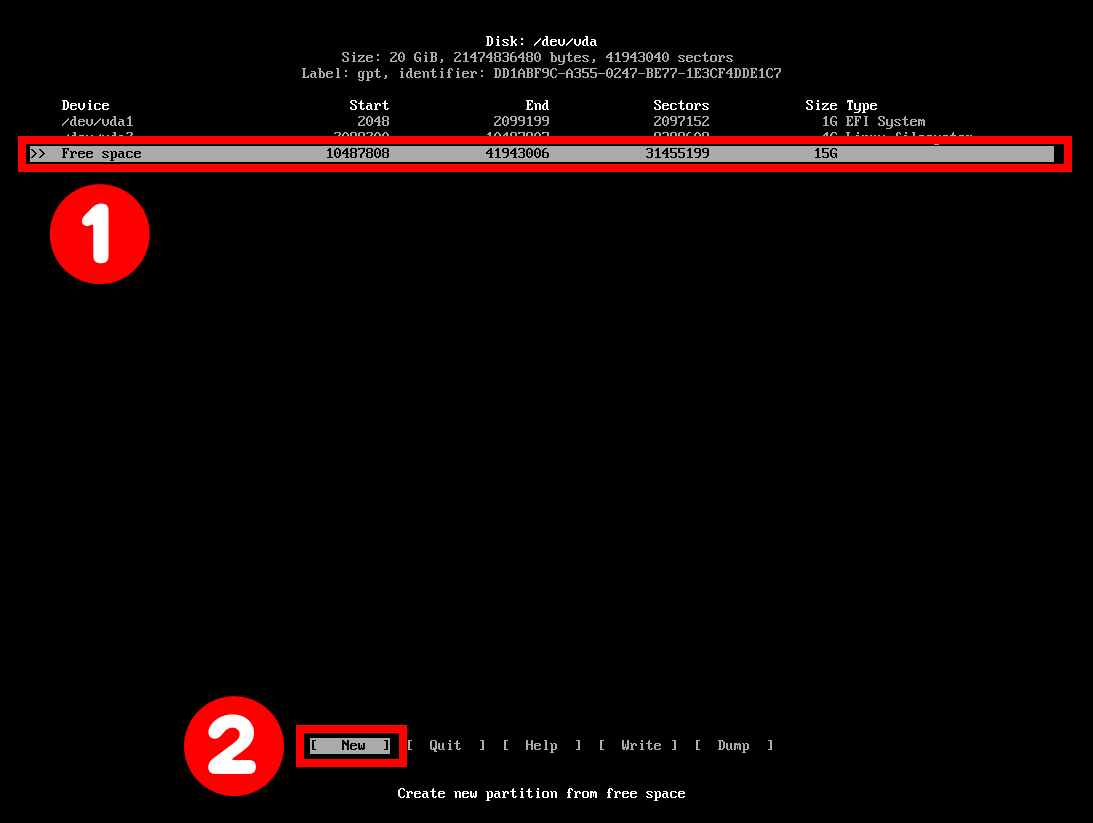
Finally, you need to create the root (/) partition. Once again, select the remaining “Free space” and hit on “New.”
Leave the default size value: all the remaining free space. Then, press the “Enter” key.
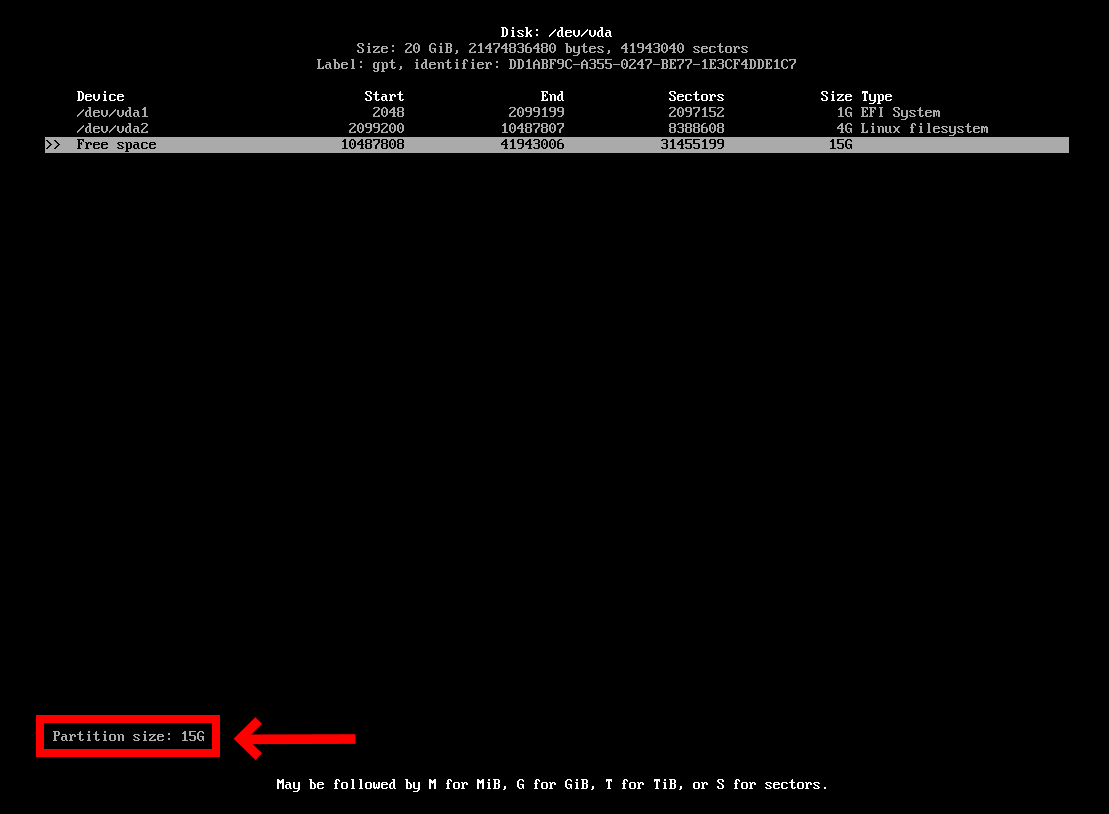
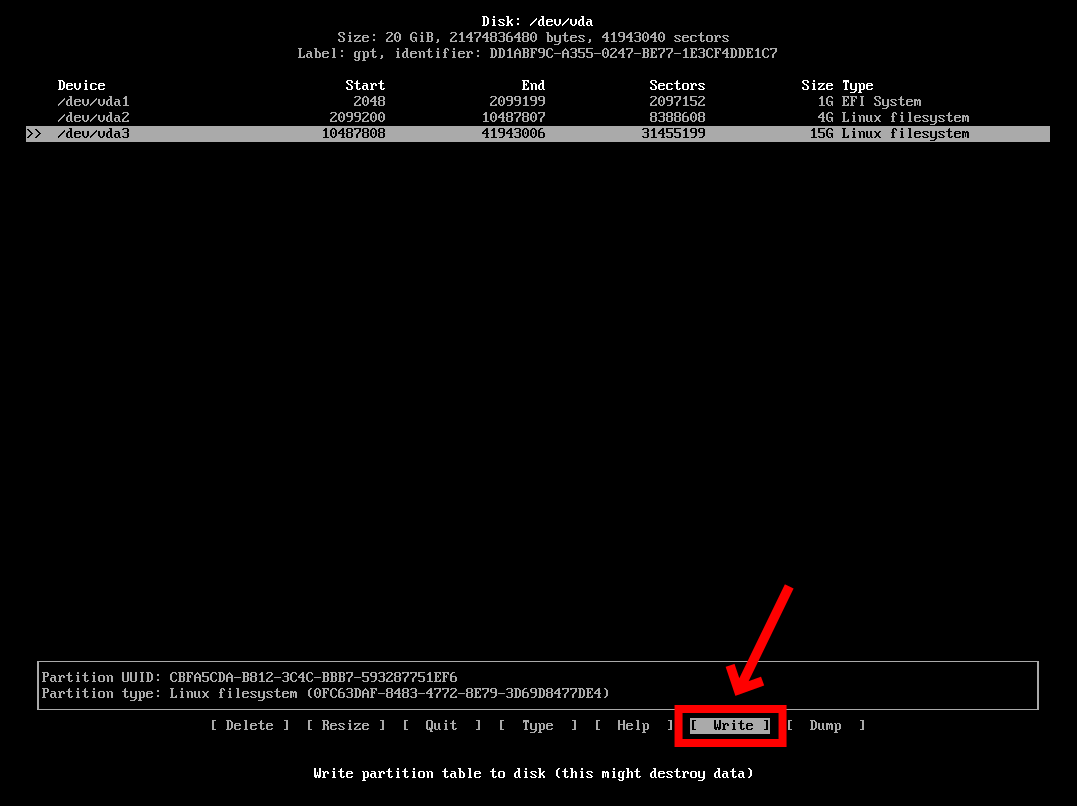
You’ve finished configuring the root partition. Finally, you need to save the changes made. Choose “Write” from the bottom menu and hit “Enter.”
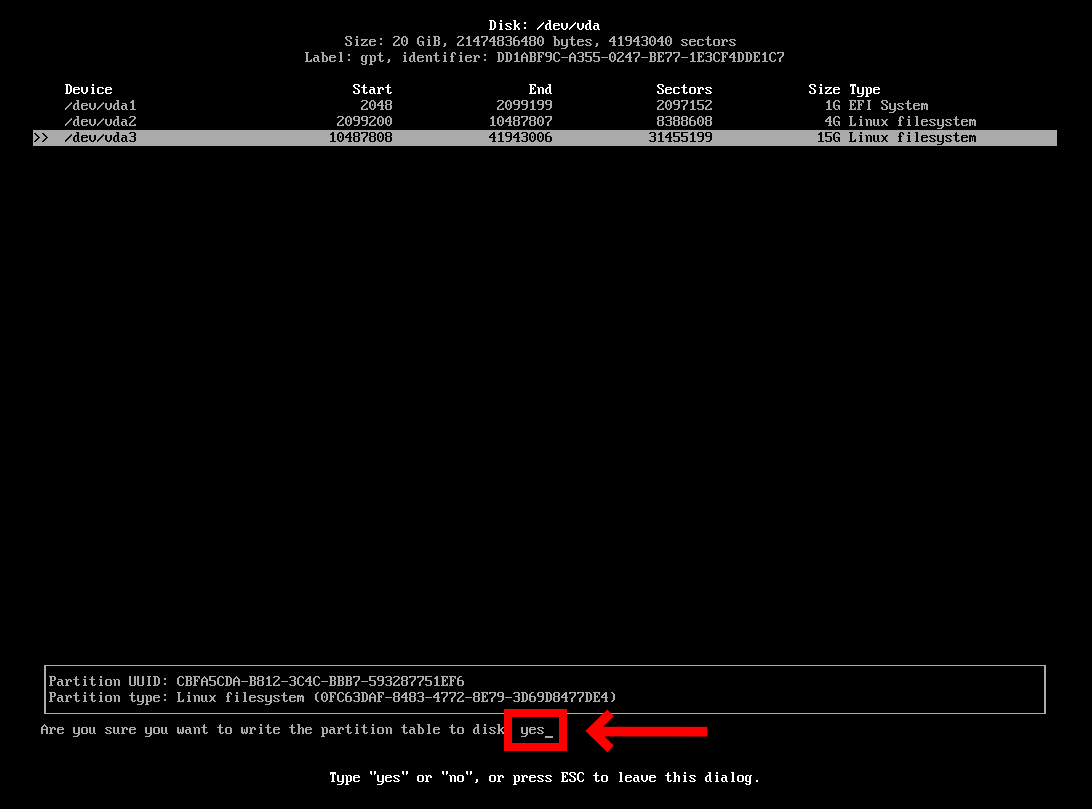
Type “yes” and press the “Enter” key.
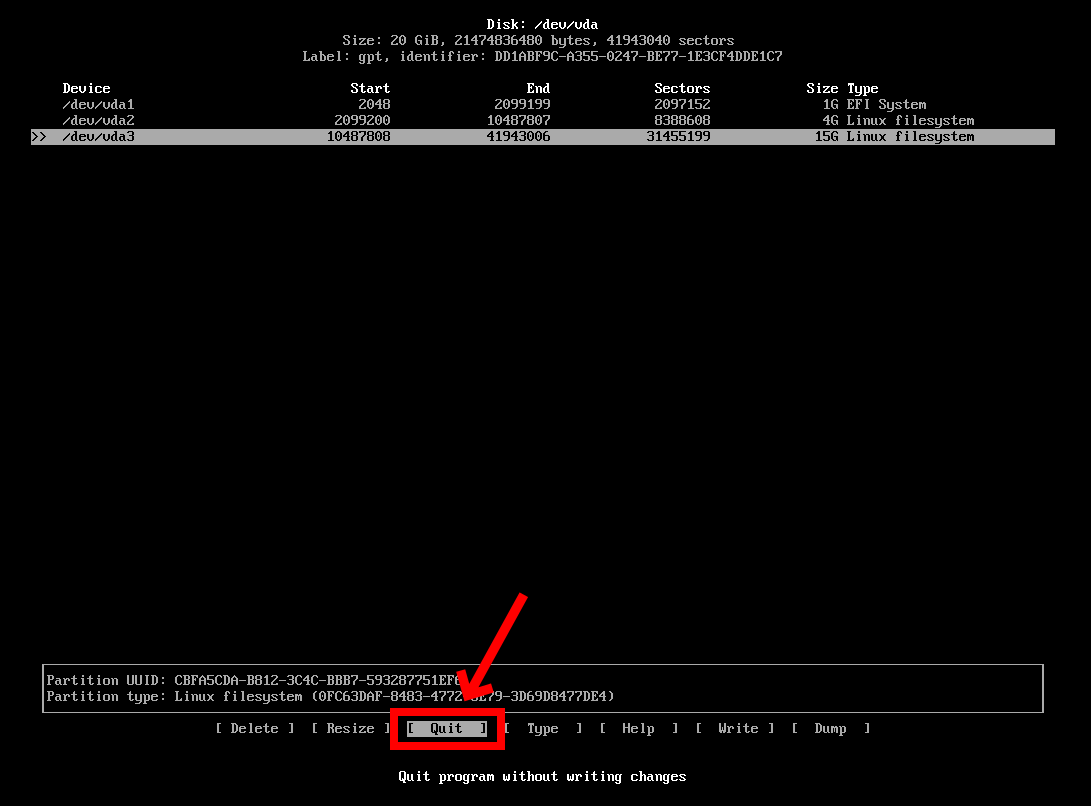
We’re done here. Select “Quit” and press “Enter” to do so.
4.11 Creating the Filesystems and Mount Points
For the filesystems step, you will create the filesystems for the partitions you made.
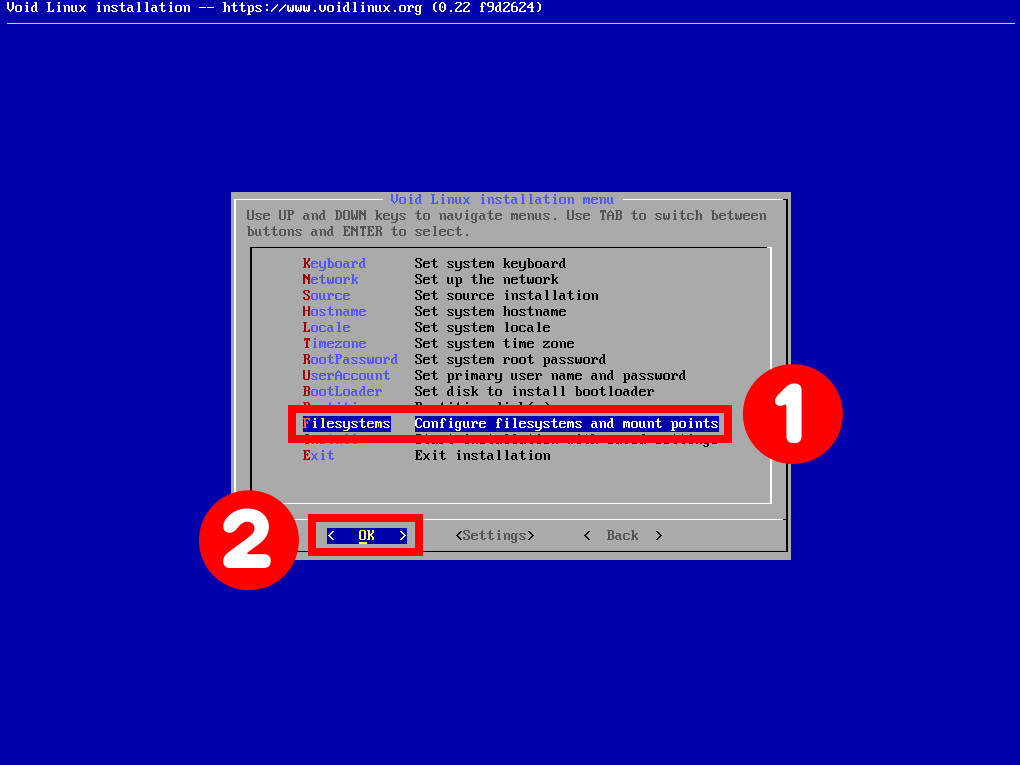
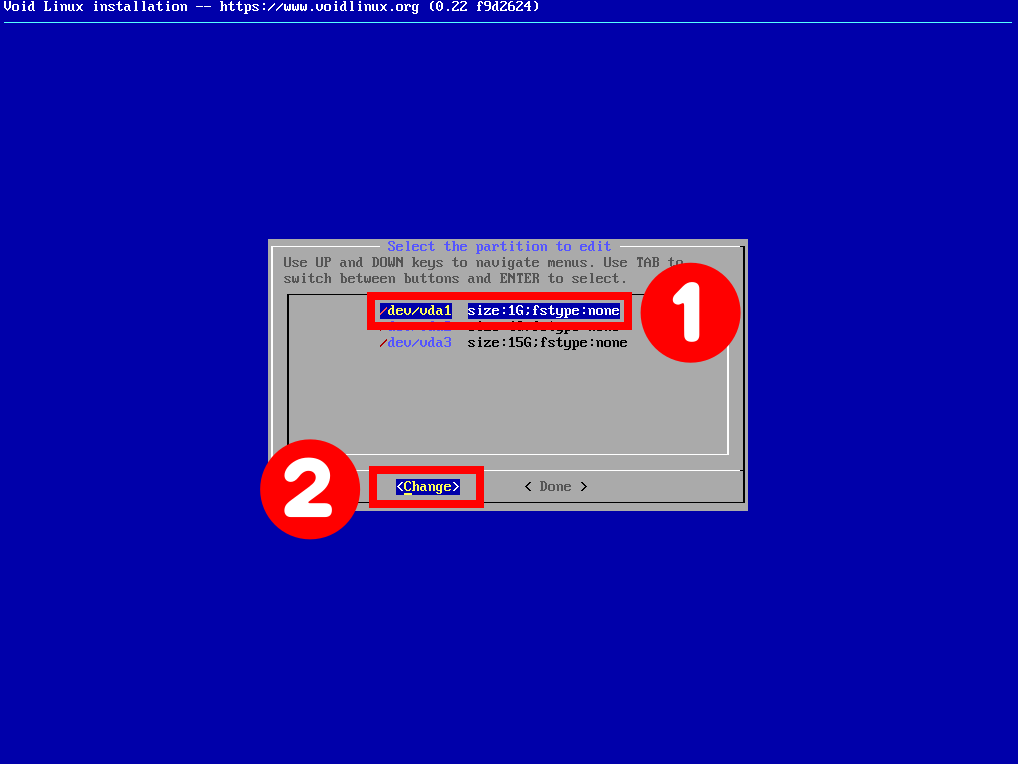
The first filesystem we have is “/dev/vda1,” which was the partition of the EFI system. So go ahead and press “Enter.”
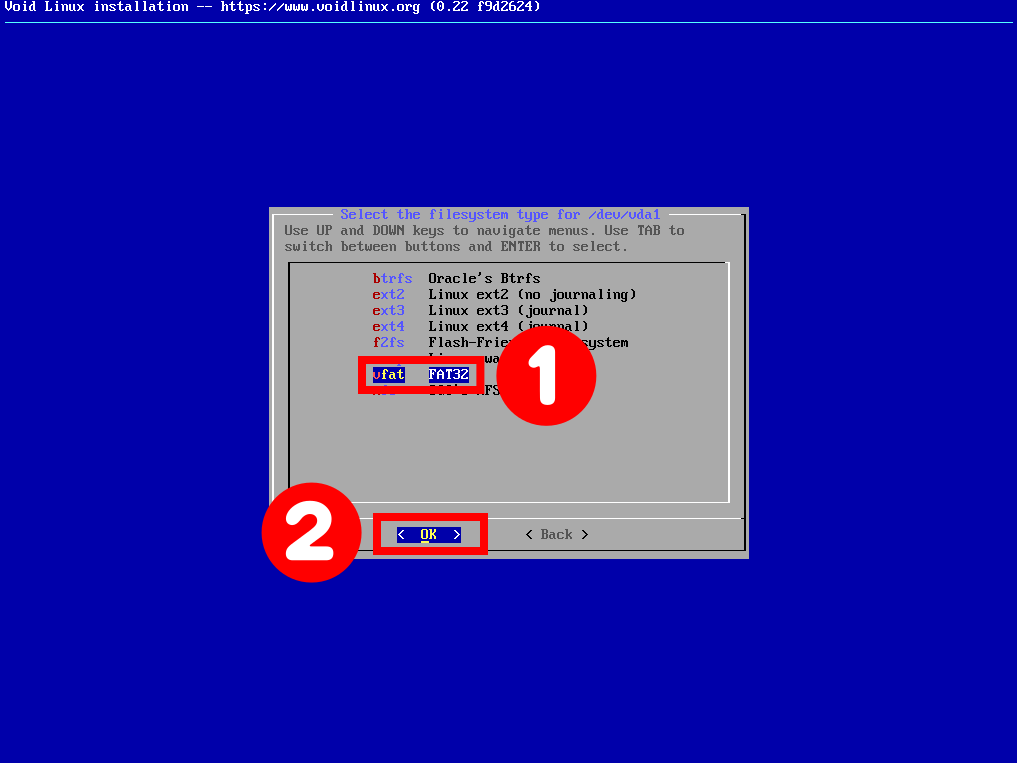
We’ll use the “vfat” for this one.
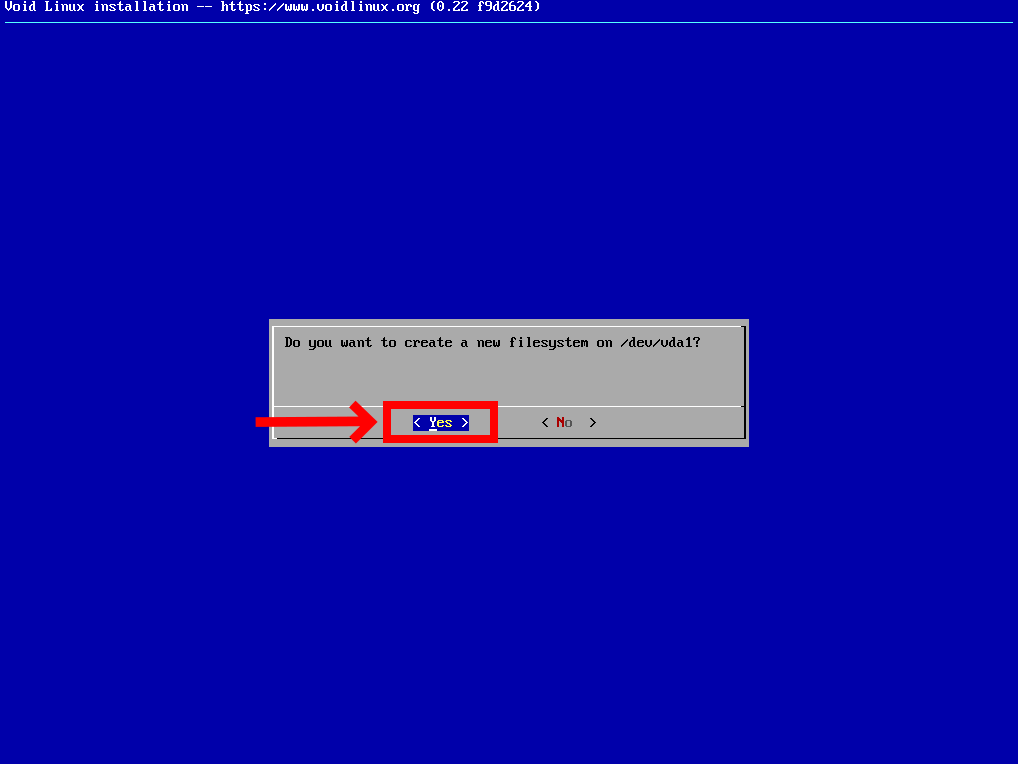
Then the installer asked us where do we want to mount this partition. It will be in “/boot/efi,” so type it and press “Enter.”

Confirm your choice by pressing “Enter.”
Next is “/dev/vda2.” We’re going to go ahead and press “Enter.”
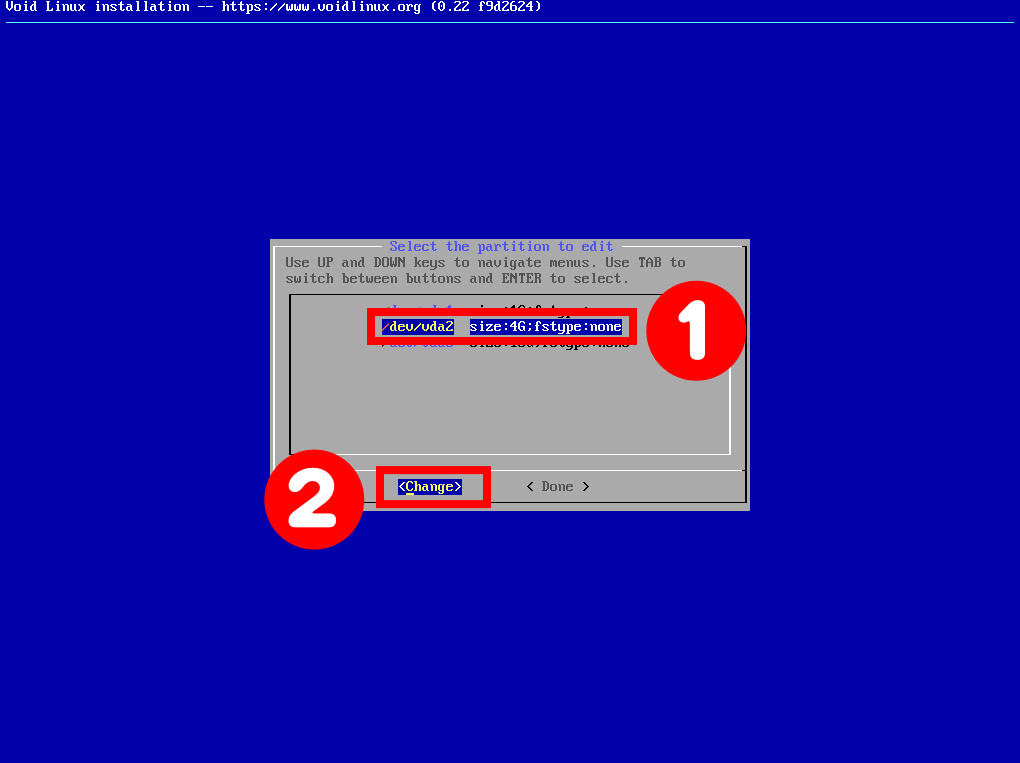
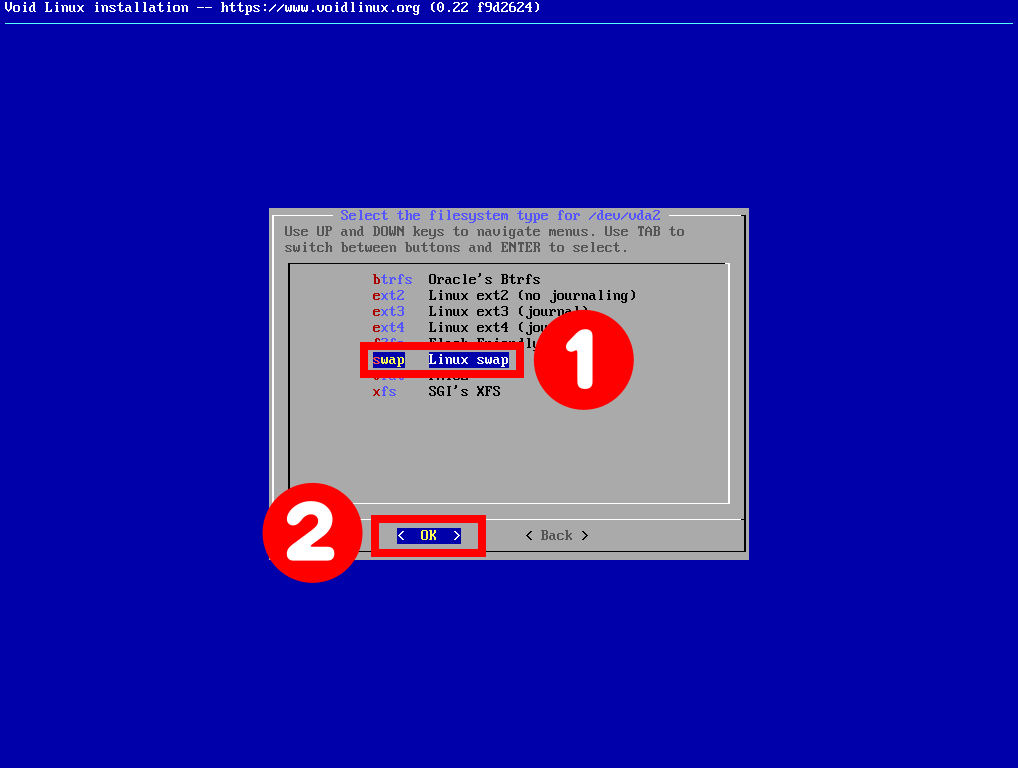
Here we wanted to create a “swap.” So choose it and press “Enter.”
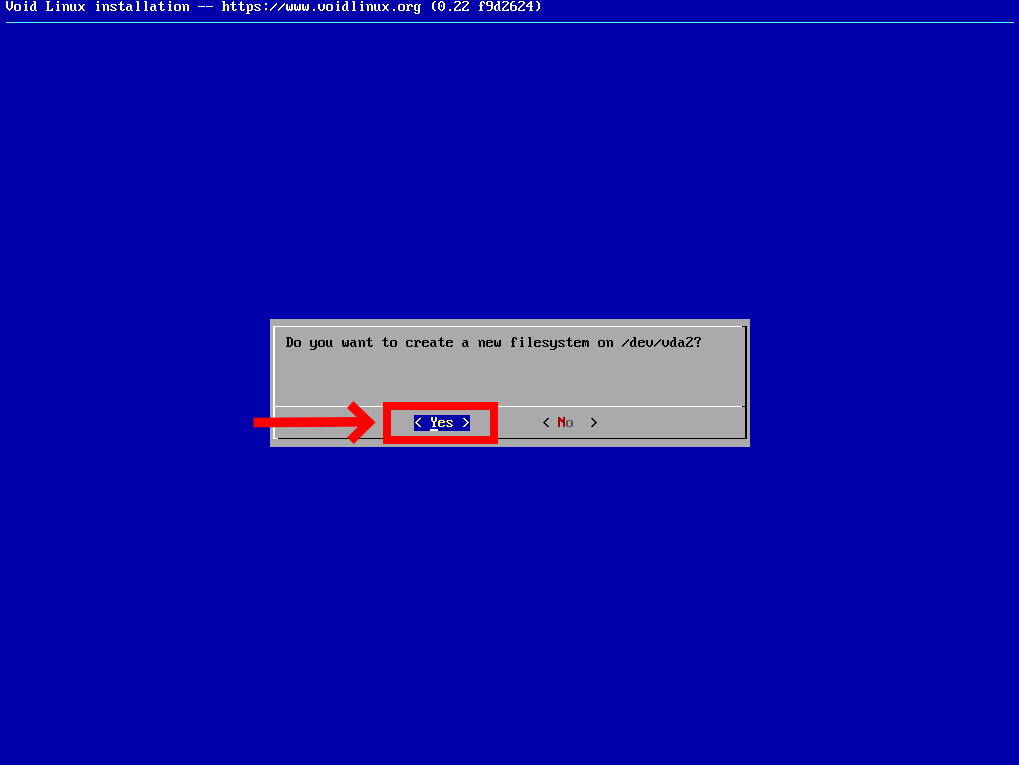
Confirm your choice by pressing “Enter.”
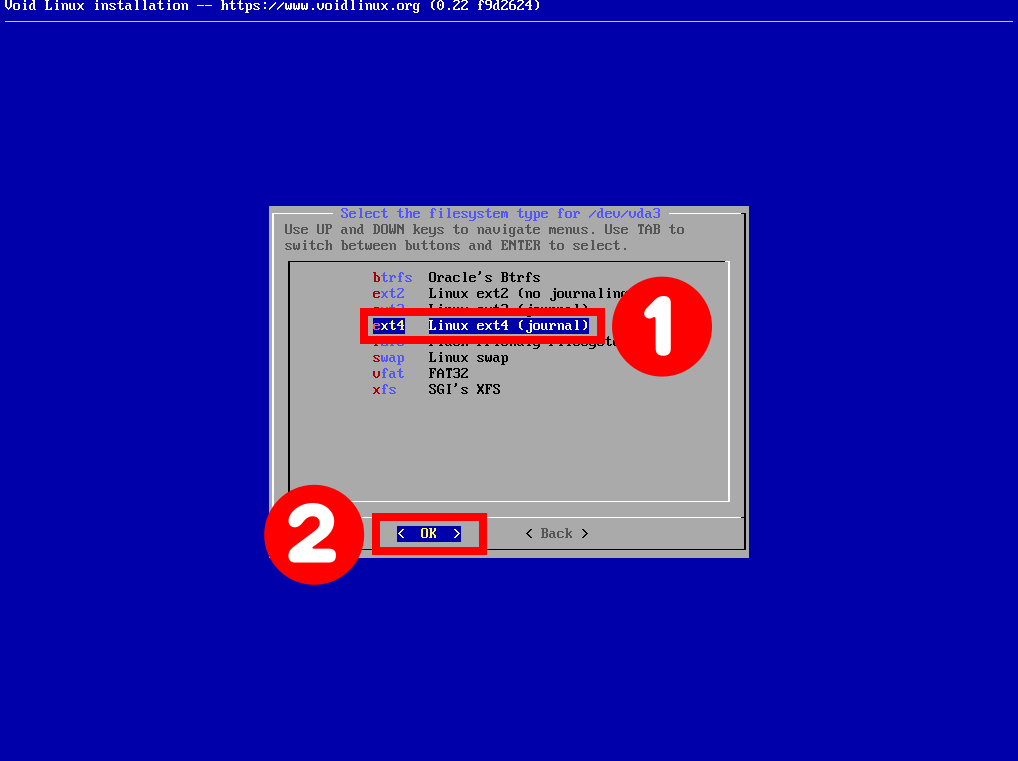
And finally, go down to the bottom and pick “/dev/vda3.”
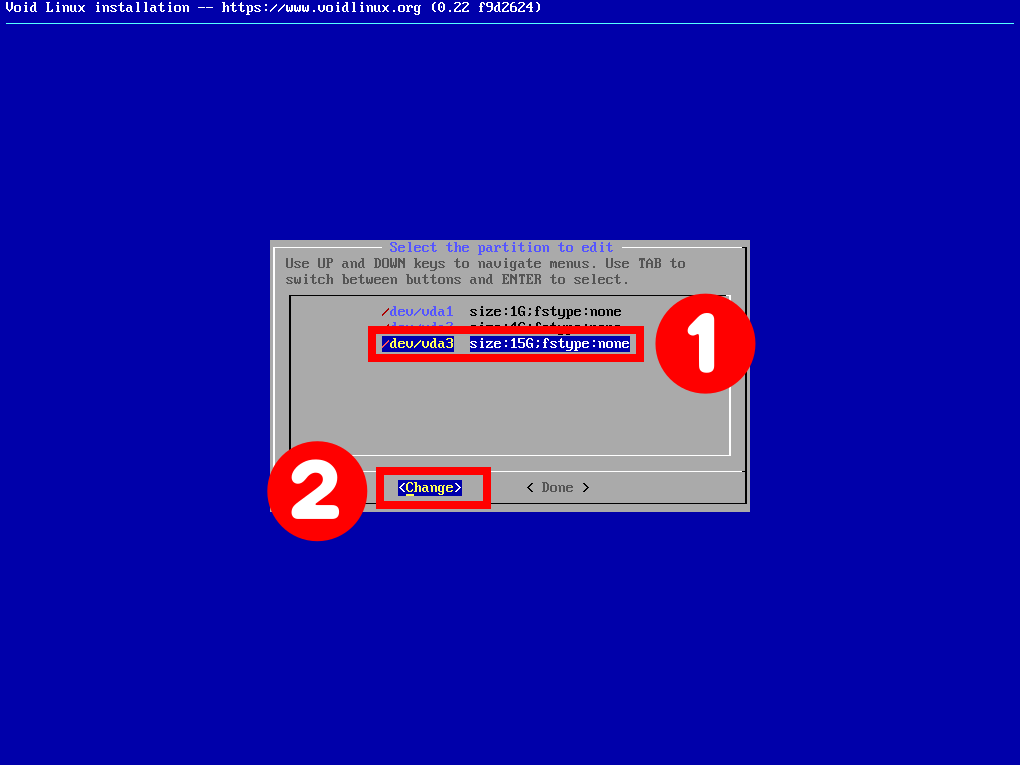
Choose “ext4” for the filesystem.
Then the installer says to specify a mount point. We put one forward slash (/) indicating the root file system and hit “Enter.”
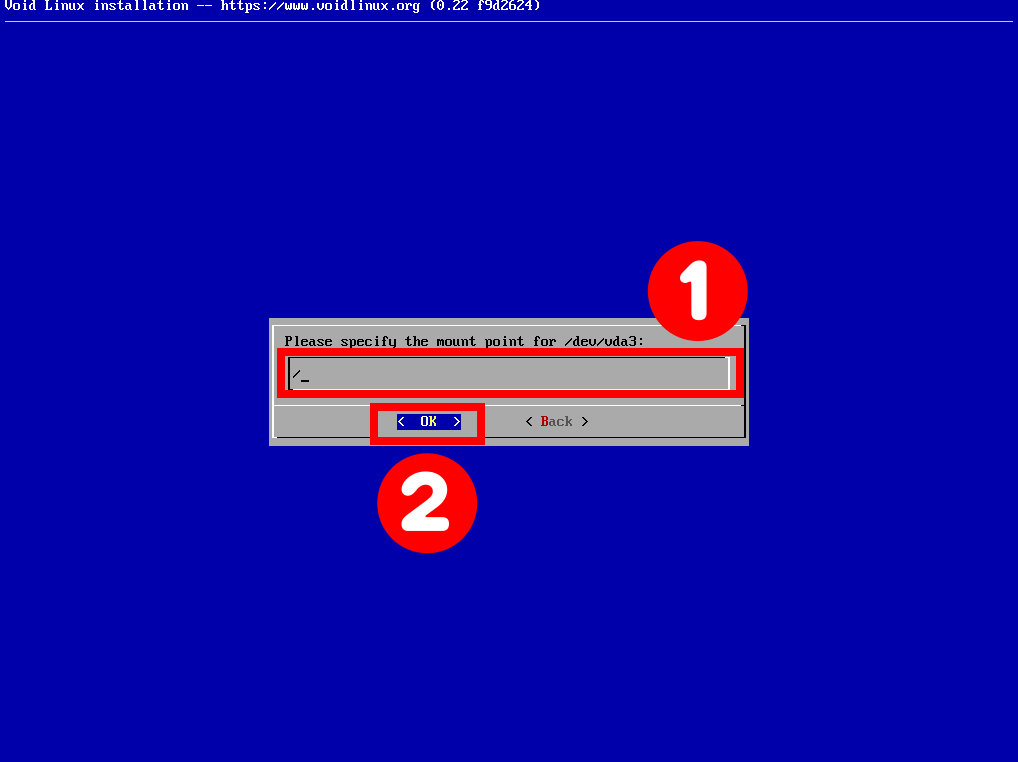
Confirm your choice by pressing “Enter.”

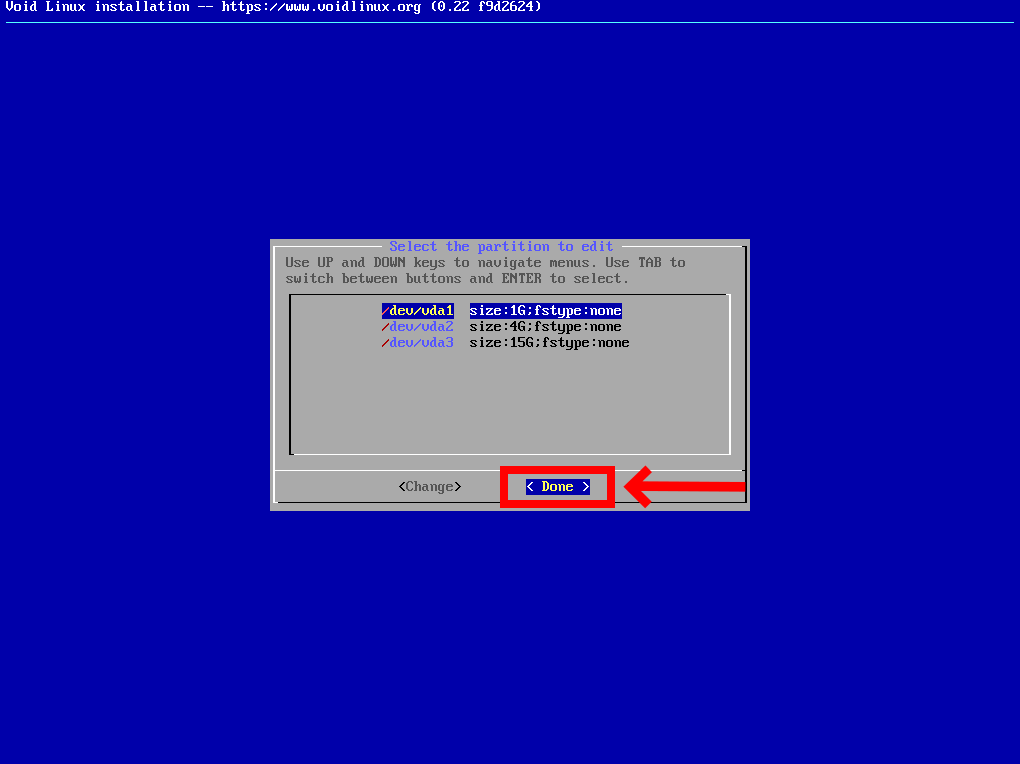
After we’re done with all three partitions, we’ll scroll over to the “Done” button and press “Enter.”
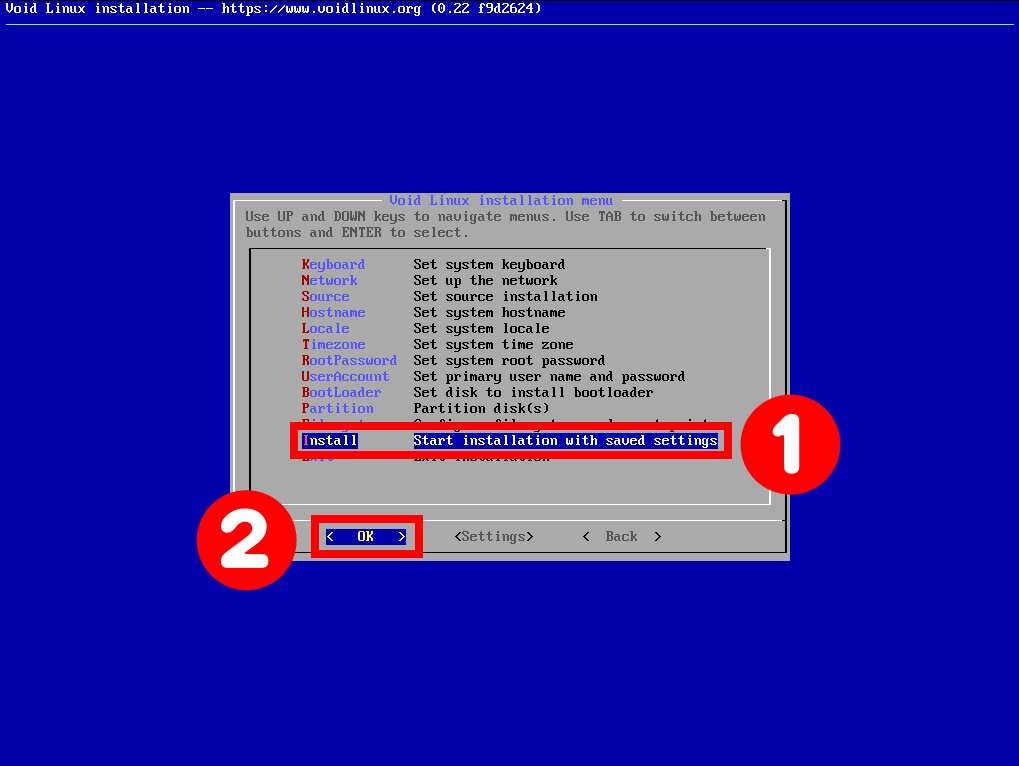
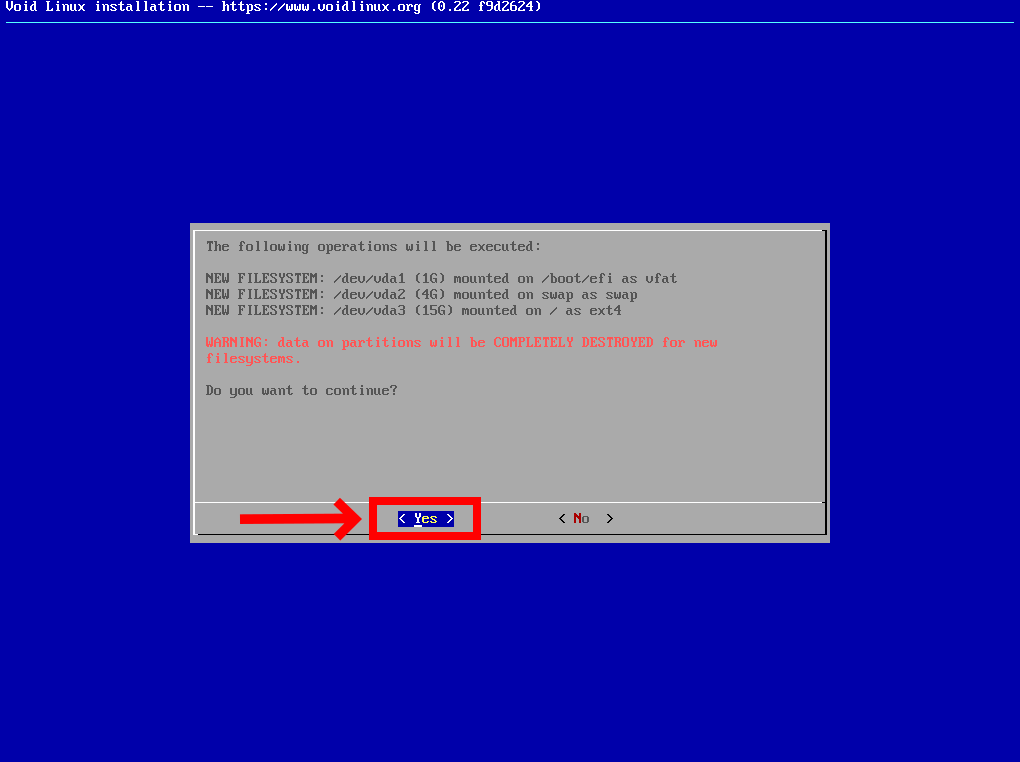
Now that we have selected our filesystems and the disk partitions, we proceed by running the installation process. So select “Install” and press “Enter.”
Here we are getting one last confirmation. Just press “Yes.”
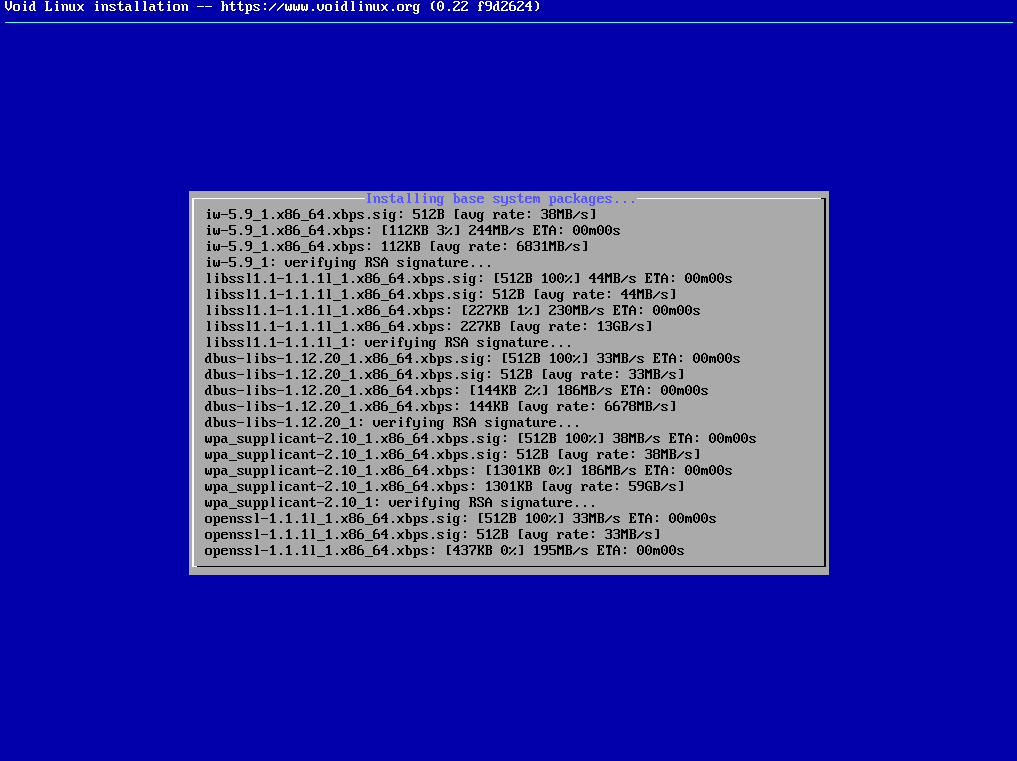
The packet download will start, so be patient and wait for it to finish. It usually takes a few minutes.
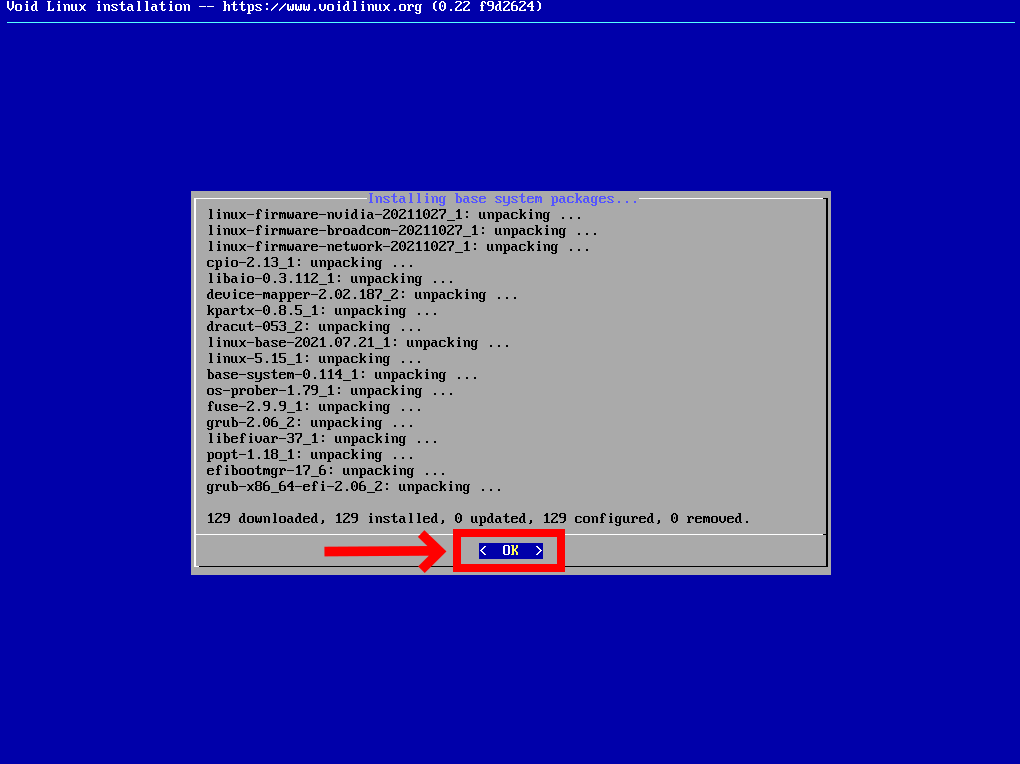
Once the download is done, it will show an “OK” prompt. Press “Enter,” and the wizard will continue the installation process.
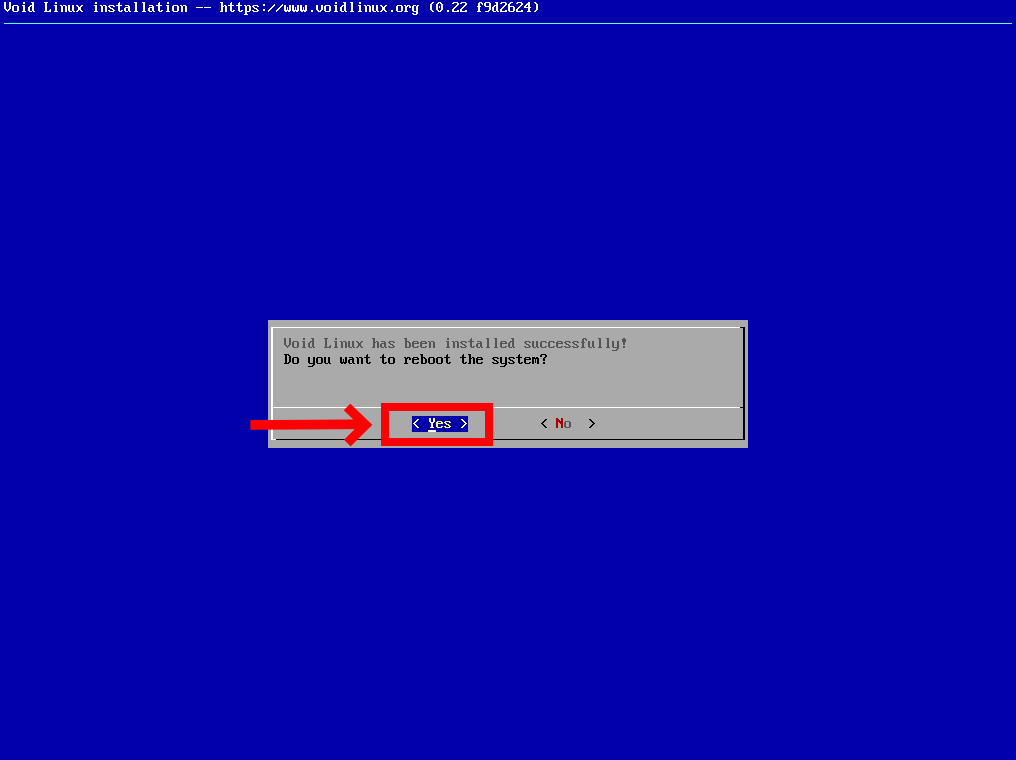
The installation should not take long. Once finished, the installer will display an installation success screen. Select “Yes” to reboot the machine to the newly installed Void Linux.
After the reboot, you will be greeted by the GRUB bootloader.
After booting your new Void Linux system, you can log in with the root account you created earlier.
Suppose you got this far – congratulations! You successfully installed Void Linux on your computer!
5. Installing Desktop Environment on Void Linux
At this point, your Void Linux system contains only the essential software packages needed to manage the system from the command line, with no desktop environment installed. So, let’s add it.
Firstly, change the default root shell to Bash.
chsh -s /usr/bin/bash
Then, log out (“Ctrl+D“) and log in so that the change can be applied.
We can choose between many desktop environments that can be used with Void Linux. For this guide, I will install GNOME.
xbps-install -S gnome gnome-apps xorgHowever, if you are unfamiliar with installing packages on Void, do not worry – we’ve got you covered. Here is our excellent guide to get you started: How to Use XBPS Package Manager on Void Linux
Once the package installation is complete, it is time to set up the services that will automatically start when you reboot your Void Linux system.
Managing services on Void is relatively easy. It uses the runit supervision suite to run system services and daemons.
All service scripts currently running are just files that can be seen in the “/var/service/” directory, and those can easily be added, modified, or removed from “/etc/sv/.”
To enable a service on a booted system, you need to create a symlink to the service directory in “/var/service.”
With that said, let’s enable the GDM display manager, Network Manager, and DBUS services to autostart:
ln -s /etc/sv/gdm /var/service
ln -s /etc/sv/NetworkManager /var/service
ln -s /etc/sv/dbus /var/serviceCode language: JavaScript (javascript)
6. Enable Audio
To set up the audio on Void, you must first decide whether to utilize PipeWire, PulseAudio, or ALSA. Since PipeWire is increasingly becoming the default media server for Linux, we will use it in this guide.
Run the two commands below to enable the automatic startup of the PipeWire media server and WirePlumber, a powerful session and policy manager for PipeWire, when logging into the desktop environment.
ln -s /usr/share/applications/wireplumber.desktop /etc/xdg/autostart/
ln -s /usr/share/applications/pipewire.desktop /etc/xdg/autostart/
More on the topic – here.
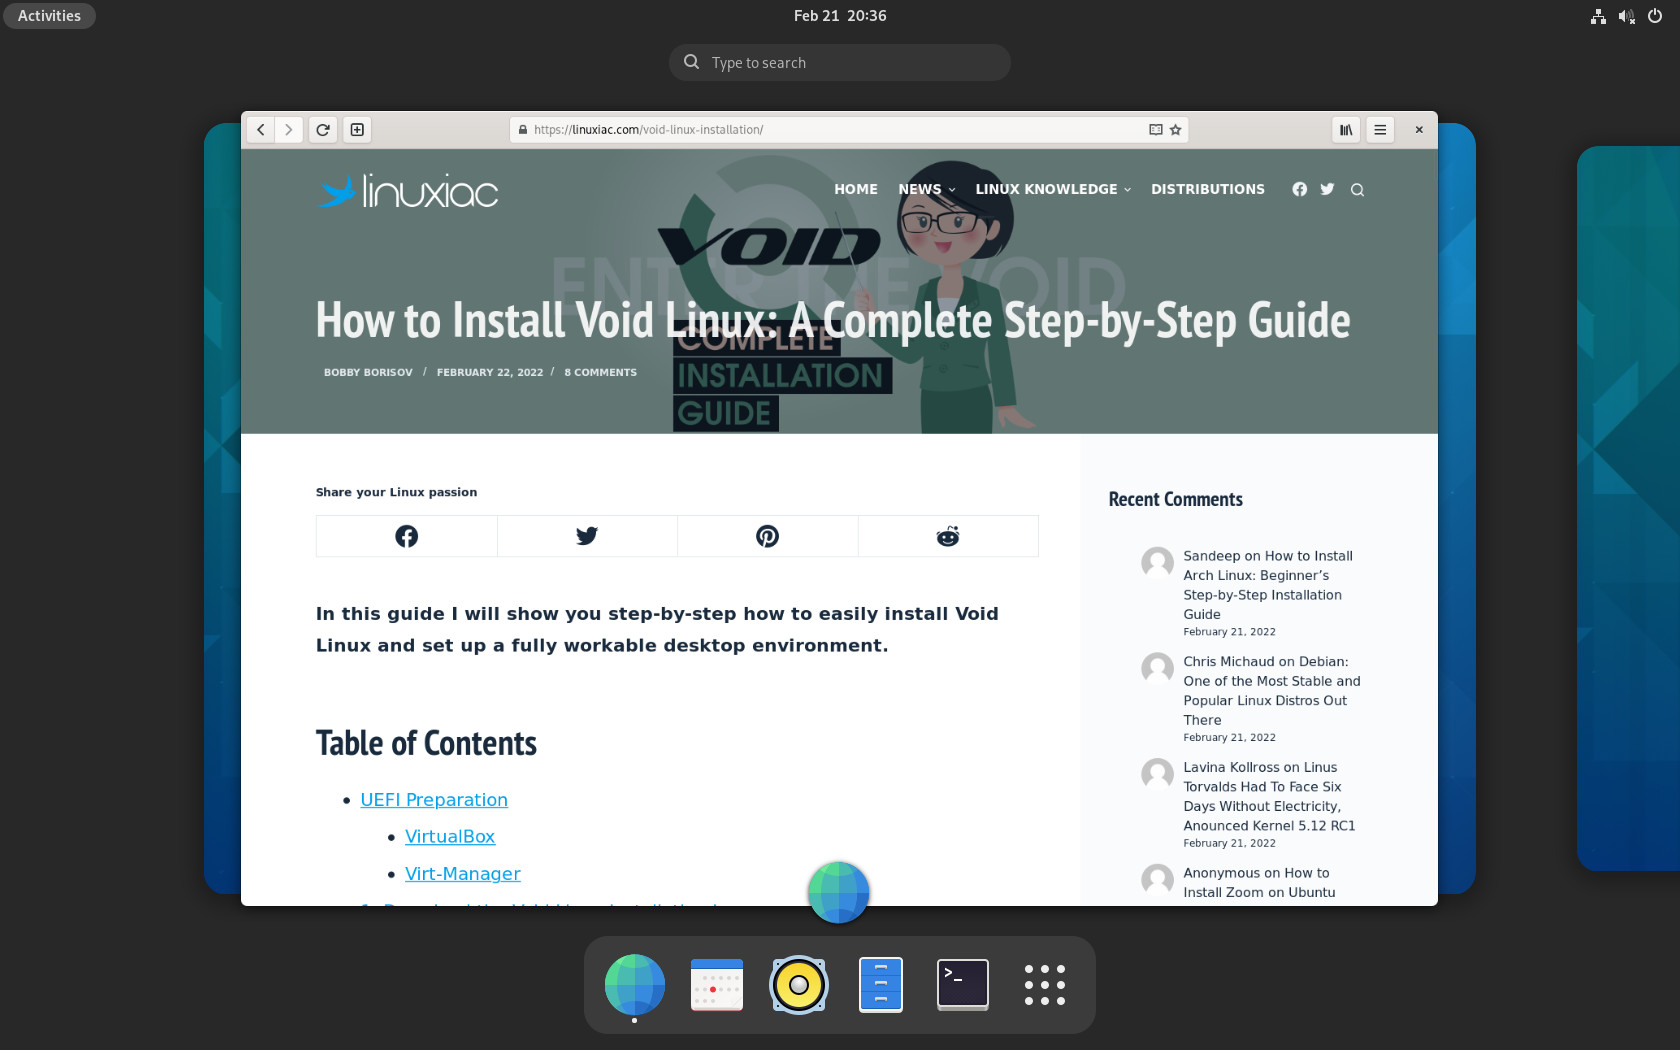
7. Reboot and Enter the Void
Finally, reboot and log in to the newly installed GNOME desktop environment.
reboot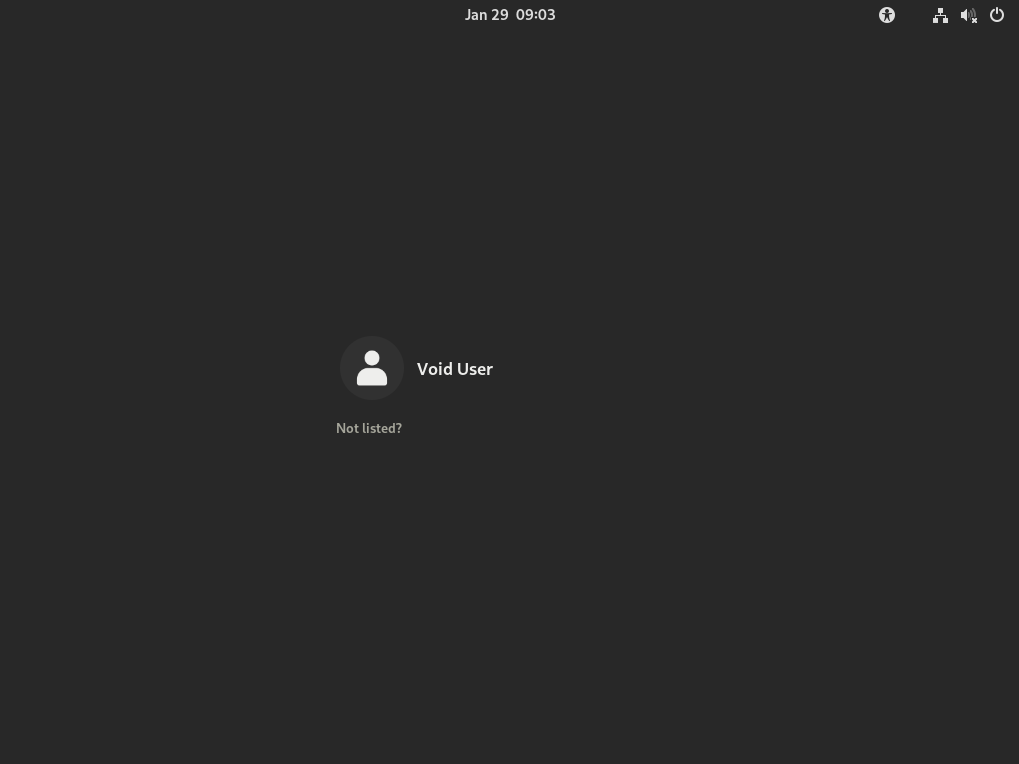
From this point, you can install what you want and configure your Void Linux system to suit your tastes and preferences best.
Conclusion
Up to this point, you have gotten some good information about Void Linux and have successfully installed it. I know it was long, but I have tried to cover all steps in brief and other additional things from scratch.
By completing this guide, you have gained the skills to install Void Linux easily and acquired a solid foundation to explore further customization options, experiment with additional software, and delve into the vibrant Void Linux community.
In addition, as a Void user, the Void Linux Handbook might be a precious resource to you.
I hope the guide has helped get you started with Void Linux. Thanks for using it!
If you have any questions, comments, or suggestions, please post them in the comments section below.


Thanks for the guide. You helped me a lot
The installation process is horrible. This is the way I would install Linux 25 years ago. Now in 2025, every installer I have tried ask me the same question with the same 3 alternatives:
How do you want to install?
1. Delete and use the whole disk
2. Install alongside existing OS installations
3. Advanced
Advanced will take me to a graphical partition editor where I can do what I do in Void, but quite a bit more friendly. I’m afraid even in 2025, almost 2 years after this article was updated, Void Linux installation is still quite intimidating to non computer savvy people.
Also, when I change the keyboard layout on the live disk, it’s never applied. Whatever I do I’m stuck with the US layout.
Sp, basically a Slackware lookalike?
Except, no.
wireless not working need to install
broadcom drivers
how do i go about that
boot partition 1M not 1G !!!! and leave empty
Note that you need to have mesa-dri package installed, in order for GNOME to work after starting up.
https://www.reddit.com/r/voidlinux/comments/qcwc3d/my_regular_user_was_not_created_during/
I too encountered the problem with default user not being preserved after rebooting. Someone suggested using chroot before rebooting, but I haven’t figured out that part yet.
Hi Bobby. My good old MXLinux21 is getting bloated and slower. Tried Void and it is eye-blinking fast, virtually instant. Awesome. But, things like ‘USB with persistance’, and also Void Installing are nightmares for newbies. I’m running Void KDE live (USB 1) and want to actually install it on a second 64Gb (USB 2) stick. Not sure how to manage this correctly? Tips please? Hope Void learns from MXLinux etc and gets a good Installer GUI very soon, so more people will use Void…the future of great Linux distros! – – – – – before the big boys catch up! Send me an email with details if you wish, in case it is a big explanation. Thanks.
Thx 4 this great guide 🙂 to connect to wifi after installation can be helpful too 😉
Bonjour et merci beaucoup pour ce tuto détaillé et très clair. Je l’ai suivi pour une installation rapide, sans cafouillage, et avec succès.
J’ai cependant une question technique concernant l’environnement de bureau (DE):
Vous avez opté pour gnome, je n’ai pas d’avis objectif sur la question, c’est très bien mais j’aimerais installer xfce ou mate afin de gagner encore en fluidité.
Void est une distribution très légère qui convient parfaitement aux machines peu musclées et gnome plombe un peu les performances.
Comment installer d’autres DE plus légers et comment les faire cohabiter en switchant de l’un à l’autre en fonction des besoins et des humeurs ?
D’avance merci beaucoup pour votre réponse.
Bonjour Sony,
Le site est anglophone, une question en Français appelera moins de réponses…
Pour installer d’autres DE, il faut utiliser le gestionnaire de paquets : xbps. J’ai noté que Xfce est présent, Mate aussi. Il y a également lxqt (minimaliste, léger). Soit tu as déjà un système sous Void, et dans ce cas:
xbps-install -Su xfce
(ou “mate”, ou “lxqt”).
Soit tu n’as pas encore de système sous Void, ou peux en réinstaller un, et alors en partant de l’image live avec Xfce, et en installant “local” plutôt que “network” au moment du choix des paquets, ça installe un bureau Xfce fonctionnel (à part le son, chez moi).
Le manuel Void détaille l’installation d’autres DE plus lourds (KDE, Gnome) mais il suffit de remplacer par le paquet de ton choix : soit avec le méta-paquet, soit en choisissant les paquets plus finement.
Pour ce qui est de changer de DE, évidemment c’est possible : ça se fera dans le gestionnaire de session, au début, dans l’écran de login.
J’ai installé sddm avec KDE, ça fonctionne, mais c’était déjà le cas avec le gestionnaire par défaut (lxdm il me semble).
Bon courage !
Thanks for the tutorial. It was very helpful in setting up my first instance of Void Linux. I appreciate their documentation and will refer to it but this style of quick start is much easier as a new user to Void.
Hi Eric,
I’m glad you found it useful!
I noticed the iso dated from 2021-09 and it used kernel 5.13.
That seems oldish to me. They haven’t produce anything since last september ??? Is Void really still alive or slowing dying ???
Void certainly is not dying. 🙂 Just the installation ISO image comes with this version of the Linux kernel. If you perform a network installation, you will see that the installed kernel is the latest possible:
[linuxiac@void ~]$ uname -a
Linux void 5.15.17_1 #1 SMP Thu Jan 27 12:55:26 UTC 2022 x86_64 GNU/Linux
Linux 5.15.17, Thu, 27 Jan 2022
https://lwn.net/Articles/882911/
Could you please be a bit more clear about the way it should be installed on virtual box? Because starting the iso within a VB instance is completely different. And if I understand the article correctly it will just be installed on a bare metal system. Am I missing something?
Hi HJ,
As a matter of fact, the installation shown above was made using a KVM. The procedure, whether using a KVM, VirtualBox or doing a bare metal installation is absolutely identical.
Just run the installation ISO file (void-live-x86_64-20210930.iso) in VirtualBox the way you run all the others. There is nothing special here, except the EFI part which is shown at the beginning of the guide.
Best,
Bobby
You should specify that after installation you need to finish the installation of the user account. You need to go like root and add to the user groups and confirm the password to log in already as a user. Without this, the system does not recognize the user account and his password.
Thanks for the note but if you follow the steps described above no further actions are needed to finalize the user account settings. Once the installation is complete, the user account is available and ready for use.
I had another experience in this matter. But maybe this is just my experience.