![How to Add a User in Linux [With Examples]](https://cdn.shortpixel.ai/spai/q_lossy+ret_img+to_auto/linuxiac.com/wp-content/uploads/2022/12/add-user-1024x768.jpg)
Linux is a multi-user system, which means that multiple people can interact with it at the same time. Therefore, adding a new user to Linux is a routine task that every Linux system administrator encounters at some point.
There are two main approaches for creating a new user in a Linux system: using the command line or, if the system has a graphical interface, using the GUI tools it provides. We will look at each of them in this guide, and you will choose the most practical and convenient for your needs and situation.
We’ll start by creating a new user through the command line. This is the method to use if you’re working with a remote server that doesn’t have a graphical user interface. The Linux command line provides two commands for adding a new user to the system: useradd and adduser.
Although they do the same thing, they have functional differences in how they are used. So, before we go any further, let’s examine their differences.
What Is the Difference between useradd and adduser?
The useradd command is a low-level native command available with every Linux installation. It assumes a certain knowledge about the options and which ones need to be used to add a new user.
At the same time, adduser is a script that runs the useradd command in the background and wraps it in a user-friendly interactive mode. However, unlike useradd, the adduser command is not available by default in many Linux distributions and needs to be installed explicitly.
In other words, more experienced Linux users prefer to use useradd because it provides more precise control over the properties of a Linux user account when adding it – for example, creating a service account or specifying parameters related to the home directory.
At the same time, if the goal is to create a regular user account, the adduser command provides a simple and intuitive way that does not necessitate a high level of expertise.
Create a New User in Linux Using the useradd Command
The useradd command can only be used by root or users with sudo privileges to create new user accounts. It creates a new user account based on the command-line options and the default values set in the “/etc/default/useradd” file.
Furthermore, the useradd command also reads the content of the “/etc/login.defs” file. It provides default configuration information for several user account settings such as password expiration policy, user ID ranges, user mailbox location, default umask, and so on.
The above information is provided solely for informational purposes. This means that while using useradd, you do not need to modify the contents of these files in any way beforehand.
However, if you have any special requirements and want to change the default settings for creating a Linux account system-wide, ensure you are confident and understand what you are doing.
How to Add a New Regular User Account
To create a new regular user account, run the useradd command, followed by the options listed below and the user’s name. For example, to create a new user named “john,” you would run the following:
sudo useradd -m -c "John Doe" johnCode language: JavaScript (javascript)When creating the account, we used two options, “-m” and “-c.” So let’s explain their meaning.
- -m (–create-home): By default, the
useraddcommand does not create a home directory for the newly created user. Using the “-m” option, we specify that we explicitly want one to be created. - -c (–comment): Typically used to specify the user’s full name, admins can also use it to set some identifying information about the account to remind you later what its purpose is.
However, the new user is locked and requires a password set for the account to be used. So the next thing to do is to use the passwd command followed by the username to set a password:
sudo passwd john
You’ll be asked to enter and confirm the password. Make use of a strong password. Note that while entering the password, it will not be displayed in the terminal.
Creating a User with a Specific Home Directory
However, you may specify a directory other than “/home” for various reasons and circumstances. This is possible using the “-d (--home)” option followed by the directory path.
For example, let’s create user “john” but set his home directory “/srv/john.”
sudo useradd -m -d /srv/john -c "John Doe" johnCode language: JavaScript (javascript)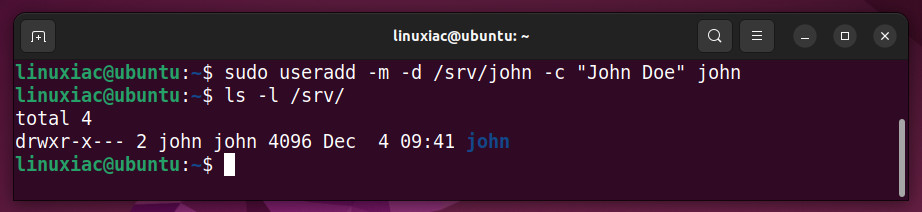
As you can see, we use the “-m” option again to explicitly say to the useradd command that we want a home directory to be created for the new user, but this time it is followed by the “-d” option specifying the full path where this new directory should be created.
Creating a User with Specific User and Group IDs
Each Linux user account has a numerical user ID (UID) and group ID (GID). IDs and GIDs between 1 and 999 are used for various system accounts and services. Those over 1000 are provided for regular user accounts. 0 is reserved for root.
To create a user with the specified ID, use the “-u (--uid)” option followed by the ID number. It must not already be presented in our system, or we will receive an error message.
For example, to create a user “john” with ID 1069, we need to perform the following:
sudo useradd -u 1069 -m -c "John Doe" johnCode language: JavaScript (javascript)Then, by using the id command followed by the username, we can quickly check the ID and GID of a particular user.
id john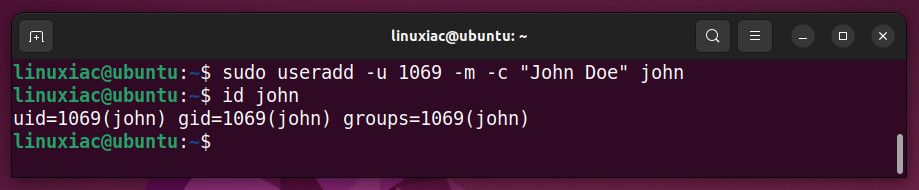
As we can see, the useradd command assigned user ID 1069 to the user “john” and created a group with the same name and ID. This is the command’s default behavior.
But what if we want to create a user and explicitly specify that the group ID differs from the user ID? To achieve this, first, we need to use the groupadd command with the “-g (--gid)” option and the GID number to create a group. Then, we can use this group and set it as the user’s default.
So let’s create an “extusers” group and associate it with GID 1169.
sudo groupadd -g 1169 extusersNext, assign this group as the default when creating the user “john“:
sudo useradd -u 1069 -g 1169 -m -c "John Doe" johnCode language: JavaScript (javascript)Finally, let’s check the ID and GID of the newly created user:
id john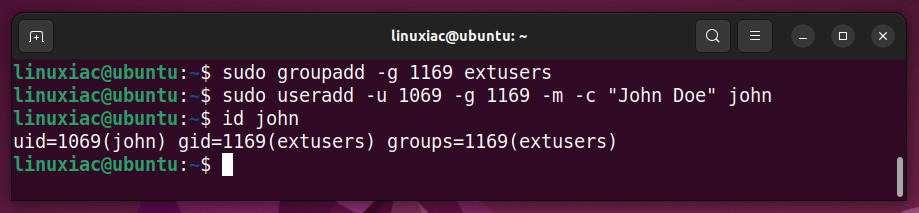
We’ll add that instead of the numeric identifier (1169) of the group after the “-g” option in the useradd command above, you can also use the name of the group (“extusers“).
Creating a User and Assign Multiple Groups
There are two types of groups in Linux operating systems: primary and secondary. Users can be members of only one primary group and zero or more secondary groups.
You can use our guide to add an existing user account to multiple secondary groups. Now let’s look at how we can achieve this when we create a user account with the useradd command.
For example, let’s create a user account, “john,” and add it to the secondary groups 135 (sambashare), 137 (vboxusers), and 1169 (extusers). We’ll use the “-G (--groups)” option to specify which extra groups the account should be associated with when it’s created.
sudo useradd -G 135,137,1169 -m -c "John Doe" johnCode language: JavaScript (javascript)Check the user’s groups:
id john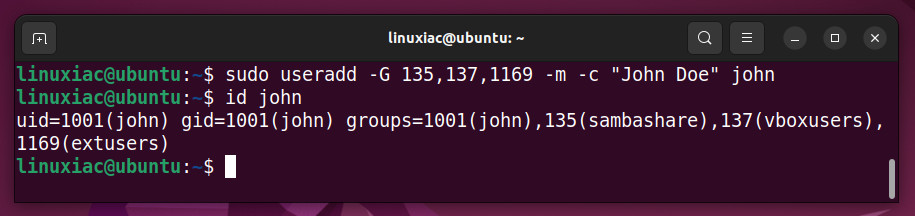
The groups must exist on your Linux system, and there must be no spaces when listing them. Otherwise, an error message will occur.
Creating a User with a Specific Login Shell
Every new user is assigned a default login shell, which is often a Bash shell, which is the most widely used and is the default on many Linux distributions.
However, if your system has more than one shell installed, you might want to give the new user a different default shell than Bash, such as the Z shell.
To achieve this, use the “-s (--shell)” option followed by the full path to the shell:
sudo useradd -s /usr/bin/zsh -m -c "John Doe" johnCode language: JavaScript (javascript)Now you can check the user entry in the “/etc/passwd” file to verify the user’s login shell:
cat /etc/passwd | grep john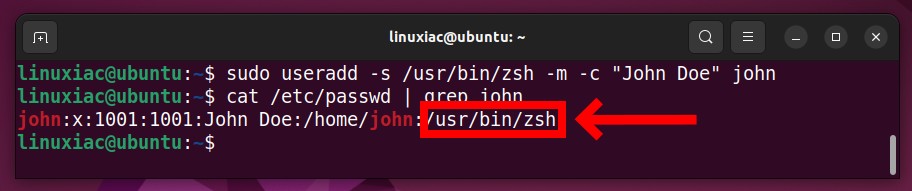
Creating a System User Account on Linux
There is little difference in Linux between a regular account and a system account. The main one is that a system account has a UID and GID below 1000 and usually does not have a shell and password set, which ensures that no one can use this account for local login or remote access to the system.
System accounts are typically associated with a specific service, for example, a web server, database, etc. The useradd command includes the “-r (--system)” option, which creates such an account.
In the following example, we create a “filesync” service account with the shell set to “/usr/sbin/nologin” because the default “-r” option associates it with “/bin/sh.”
sudo useradd -r -s /usr/sbin/nologin filesync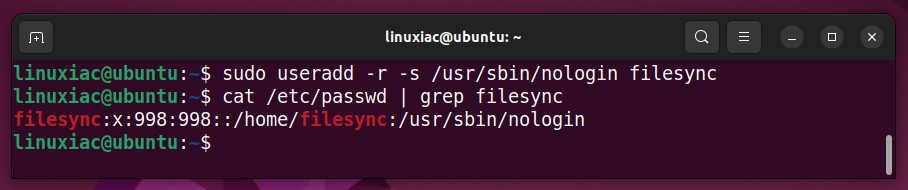
As can be seen, the “-r” option assigned a UID and GID below 1000, in this case, 998, to the newly created “filesync” service account.
However, of course, we can achieve the above without using the “-r” option by running the following commands with the knowledge we already have:
sudo groupadd -g 998 filesync
sudo useradd -u 998 -g 998 -s /usr/sbin/nologin filesync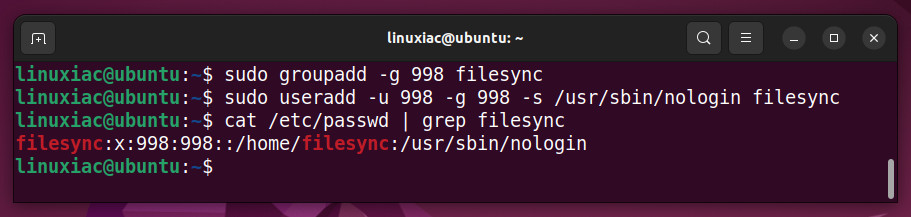
As we can see, the result is entirely identical.
Creating a User with Account Expiry Date
The useradd command’s ability to create expired accounts allows you to create accounts in cases where they will be used temporarily, for example. To do so, use “-e (--expiredate)” followed by the account’s expiration date. It must be in the YYYY-MM-DD format.
For example, let’s create an account named “john” and set its expiration date to January 24, 2023.
sudo useradd -e 2023-01-24 -m -c "John Doe" johnCode language: JavaScript (javascript)Then, with the help of the chage command, you can verify the account expiry date:
sudo chage -l john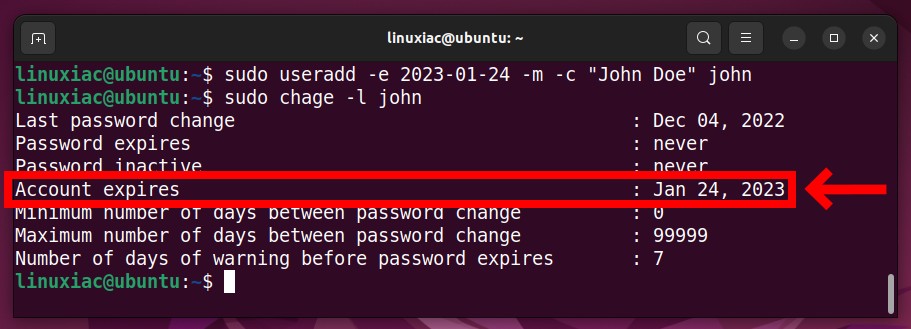
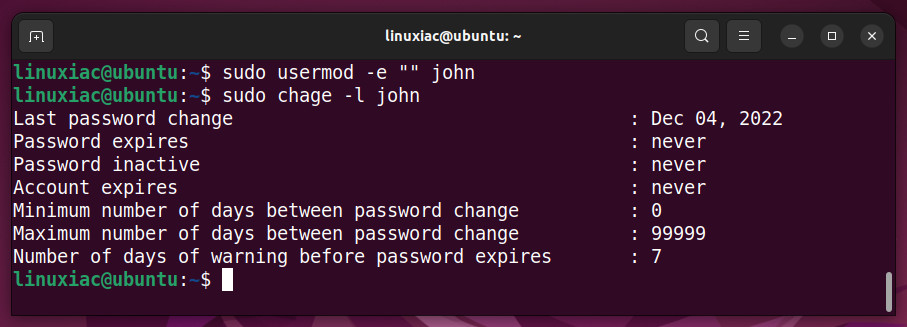
Now, John’s account will only work until January 24, 2023, and no more unless an administrator re-enables the account, either by setting a new account expiration date or by using the following command:
sudo usermod -e "" johnCode language: JavaScript (javascript)This removes the account’s expiration date and makes it permanent.
Create a New User in Linux Using the adduser Command
As stated earlier, adduser is a script that, in the background, uses the useradd command to add a user to the system. In its most basic form, you only need to provide the username. Then in interactive mode, you will be asked for a few additional options.
Finally, after your confirmation, the command will add the user to your system. In addition, if you make a mistake, press “N” and enter the correct information again.
For example, to create user “john” using the adduser command, run:
sudo adduser john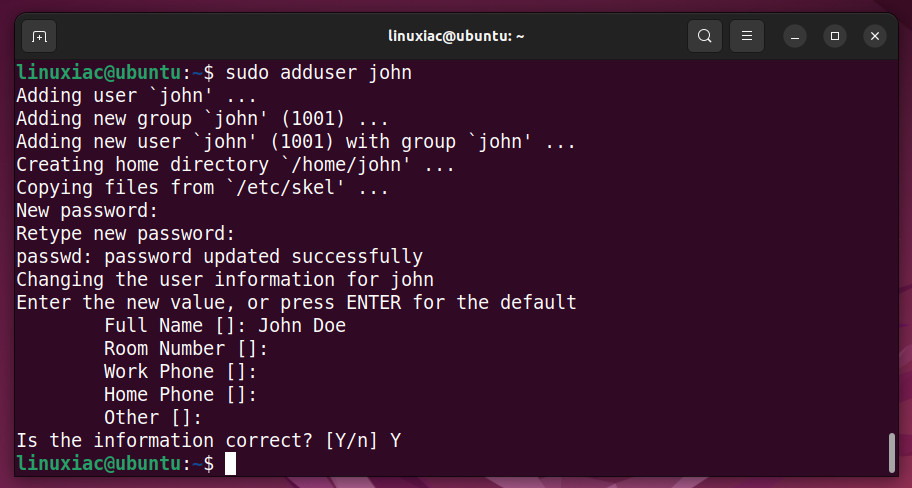
Because the adduser script’s options sometimes differ from one Linux distribution to another, we won’t discuss how to use it with specific options. For example, in Ubuntu, you can provide a user directory using the “--home,” whereas the Arch version of adduser uses the “-d” and “--home-dir” options.
So, run the command below to review the adduser command options available for the distribution you’re using:
adduser --helpCreate a New User in GNOME
GNOME and KDE are the most popular graphical desktop environments among Linux users. So let’s see how to add a new user to your system with GNOME.
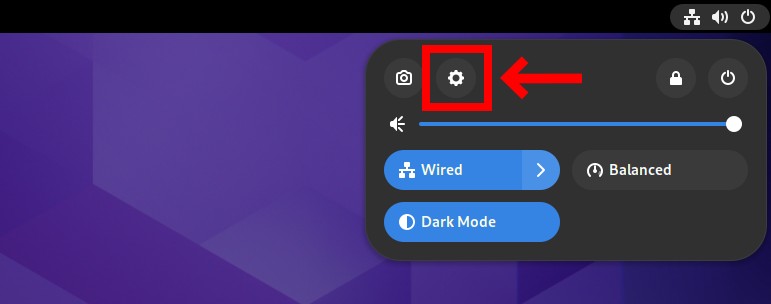
Open the “Quick Settings” by clicking in the top right corner of the GNOME desktop environment, then select the “Settings” button.
Then, select “Users” on the left and click the “Unlock” button.
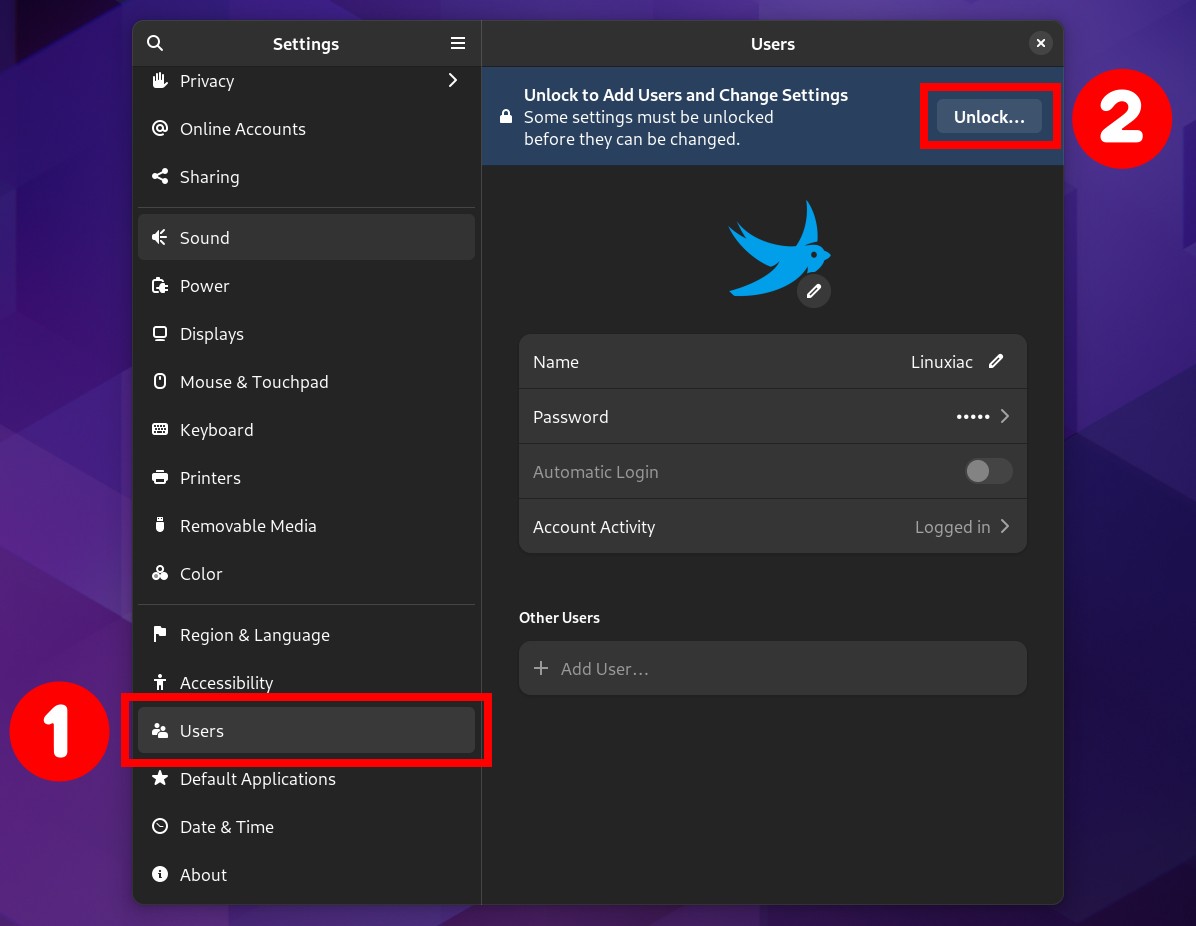
You will be prompted for your user password, which you use when using the sudo command, for example. Enter it and click the “Authenticate” button to confirm.

Once you’ve unlocked the option to add a user, click the “Add user” button to bring up the GNOME add user GUI.
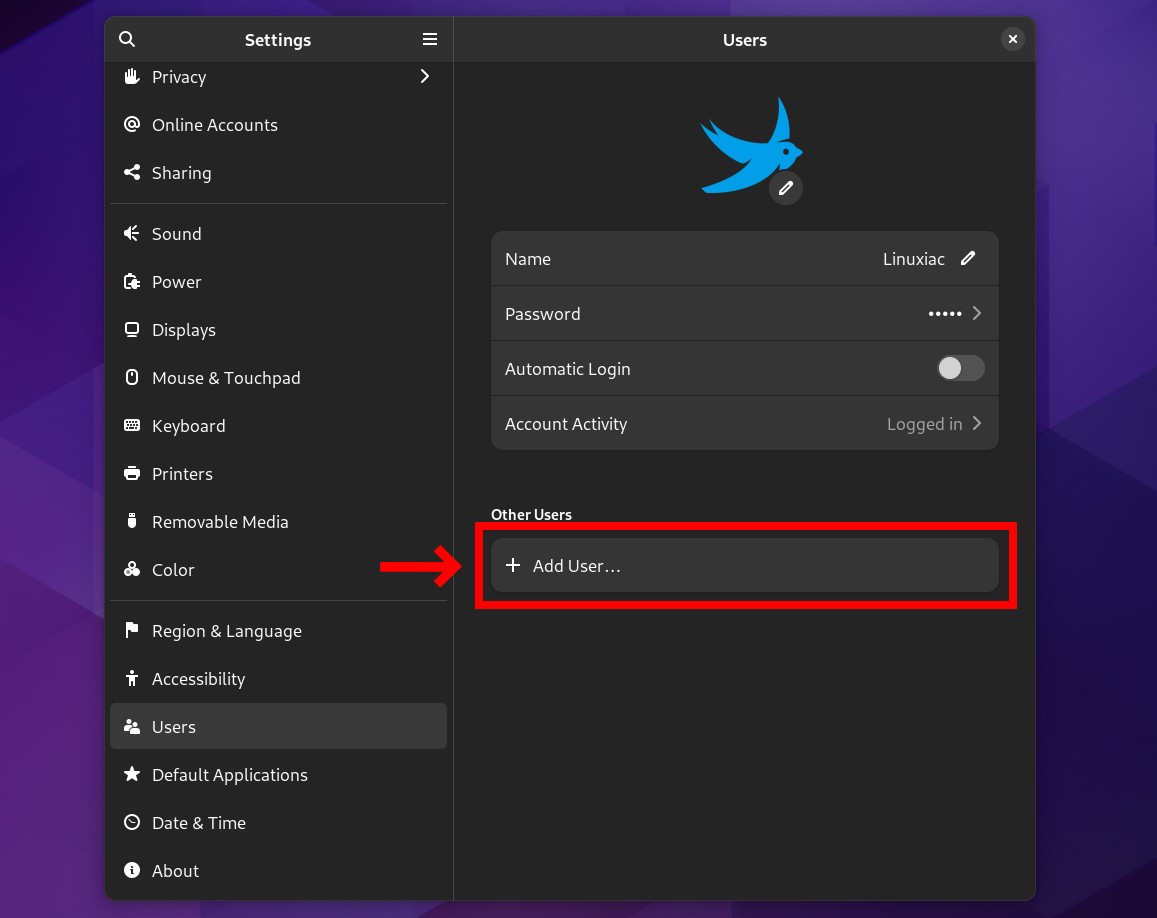
The screen will present you with the administrative GUI of the GNOME desktop environment for adding a new user. It is intuitive and user-friendly, so even novice Linux users will have no difficulty using it.
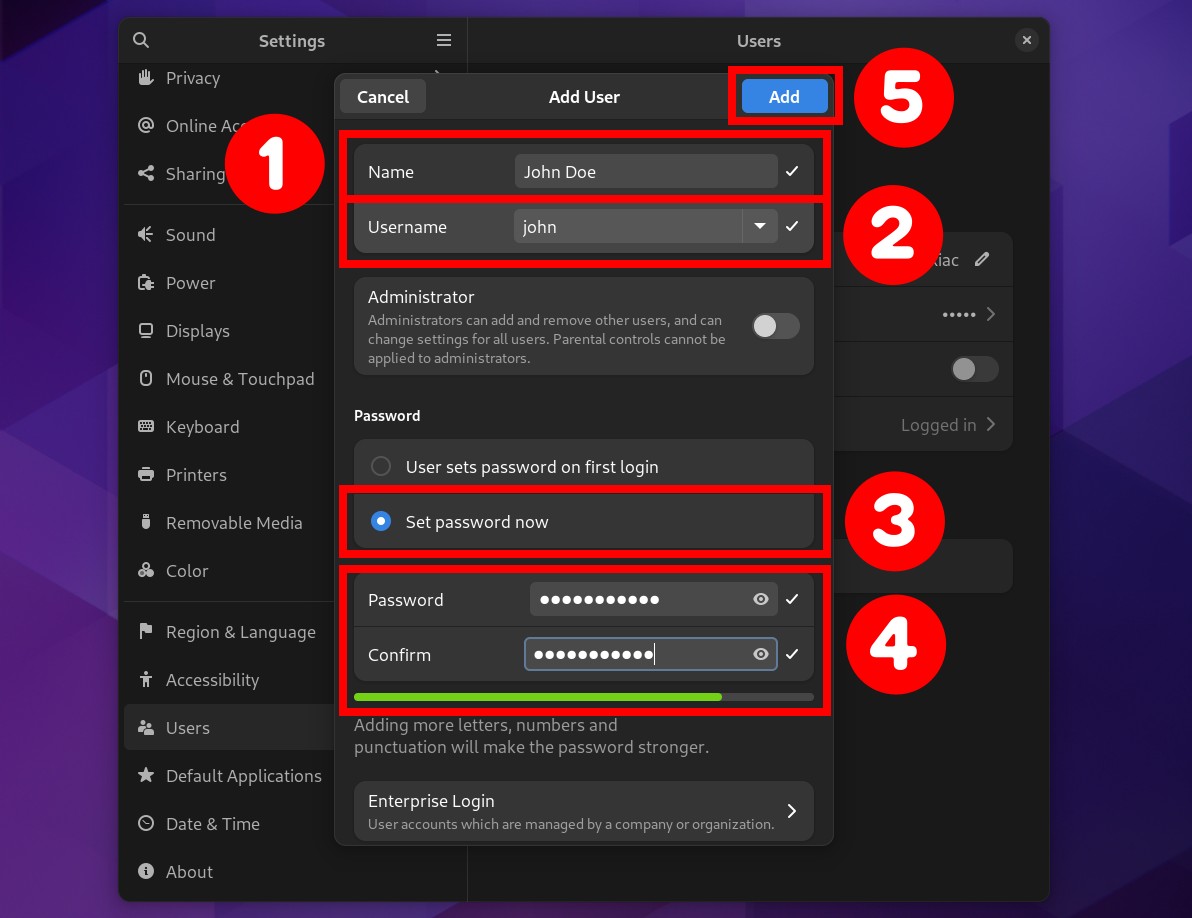
- Enter the user’s full name.
- Select the username for the new user account. It is not required to be tied to the user’s full name.
- To unlock the password input boxes, tick the “Set password now” checkbox. You can also choose the “User sets password on first login” option, which will prompt the user to set a password on their first login attempt to the GNOME desktop environment.
- Set the user’s password. Make sure you choose a strong one. The graphical indicator below the fields will tell you if your chosen password is strong enough.
- Click the “Add” button to create the user account.
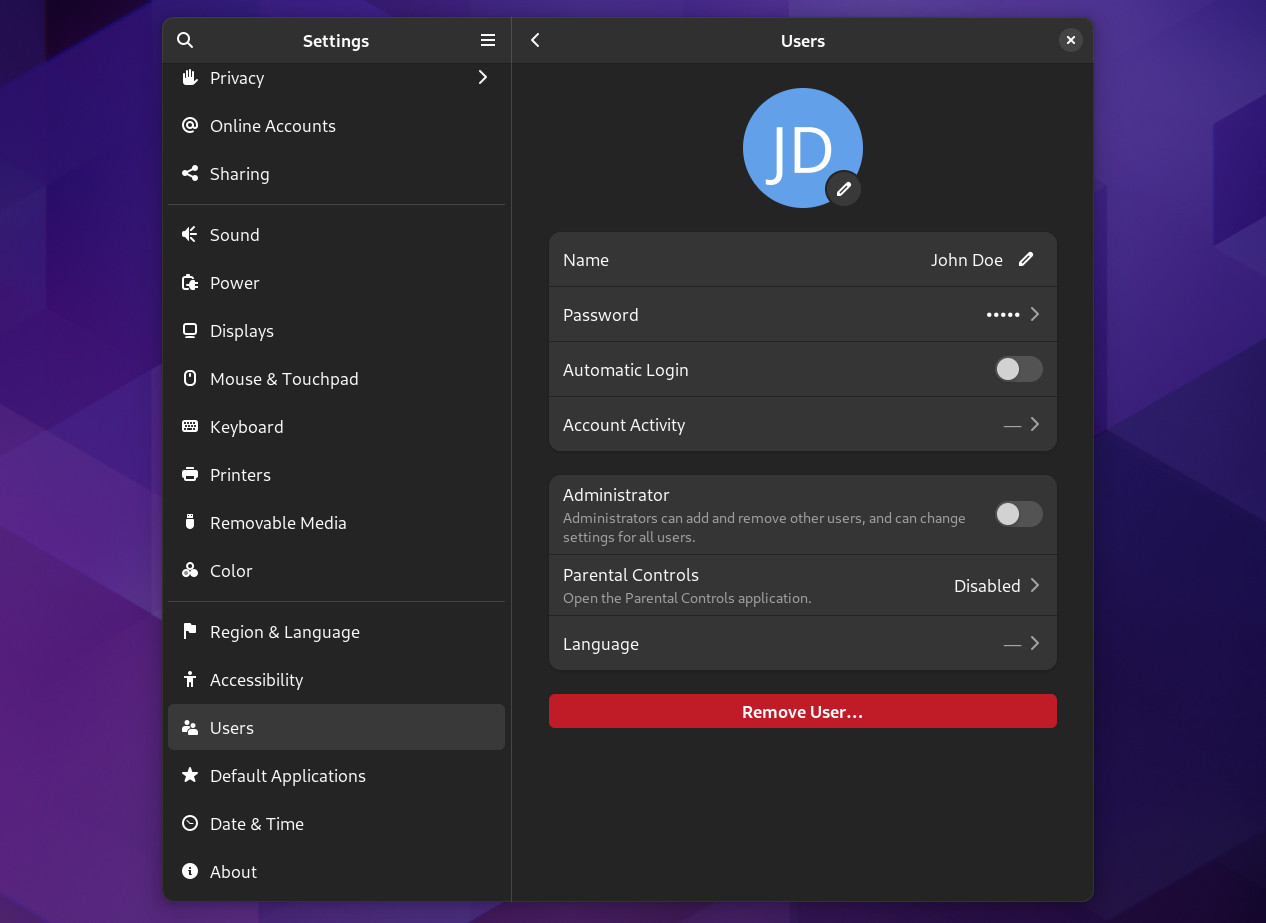
You will be taken back to a screen that displays the user’s information. This confirms that the user has been added successfully to the system.
If you log out now, you will be greeted by the GNOME Display Manager (GDM), which will show the newly added user. Please select it and enter the assigned password to log into your Linux system.

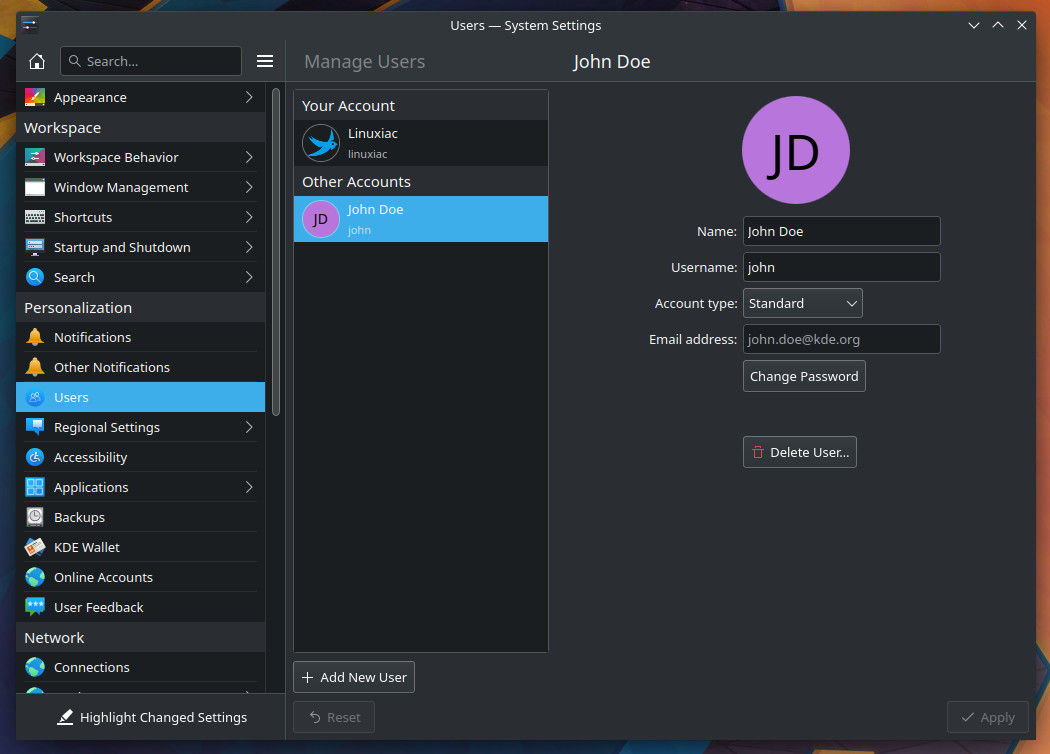
Create a New User in KDE Plasma
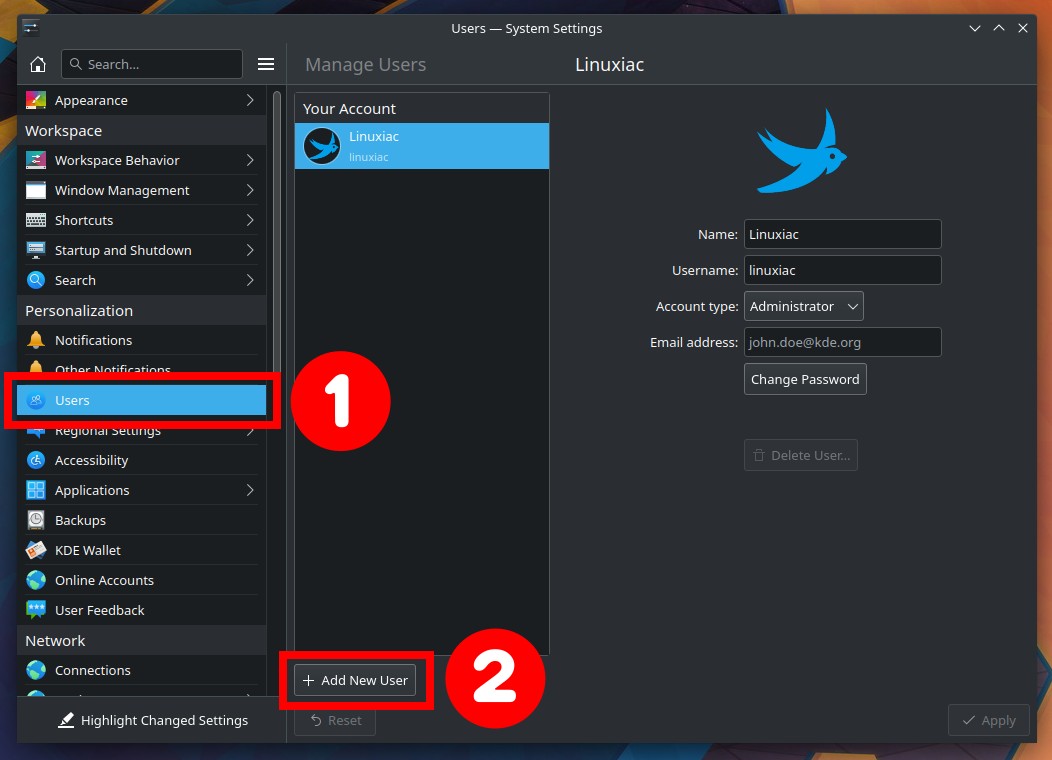
Click the Application Launcher button, then choose “Settings” on the left and “System Settings” on the right.
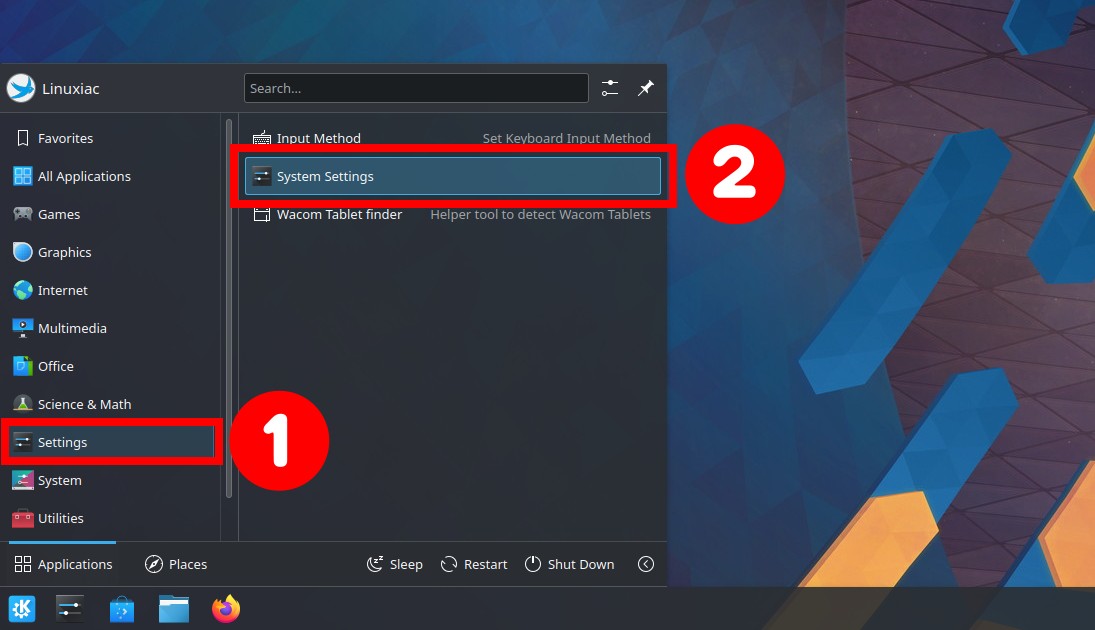
Select “Users” from the list on the left, then click the “Add New User” button.
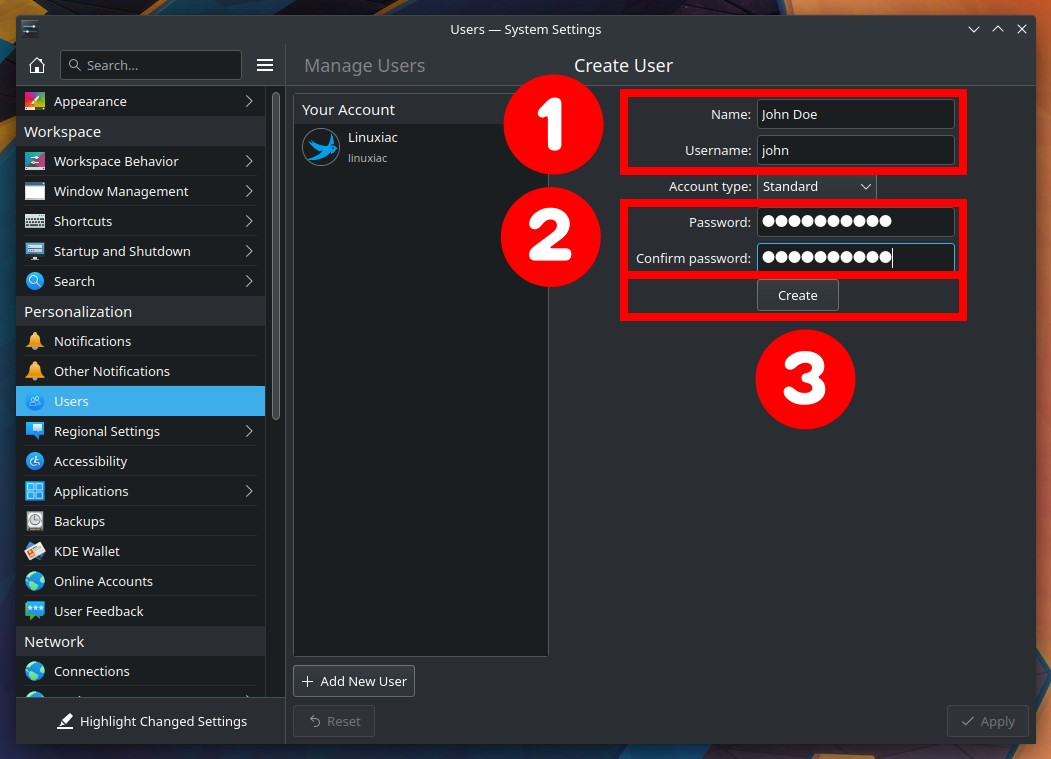
A simple and easy-to-use graphical interface will greet you to add a new user to the system.
- Enter the new account’s full name and a preferred username.
- Set a password for the account, choosing it as strong as possible.
- Hit the “Create” button.
You will be prompted for your user password, which you use when using the sudo command, for example. Enter it and click the “OK” button.
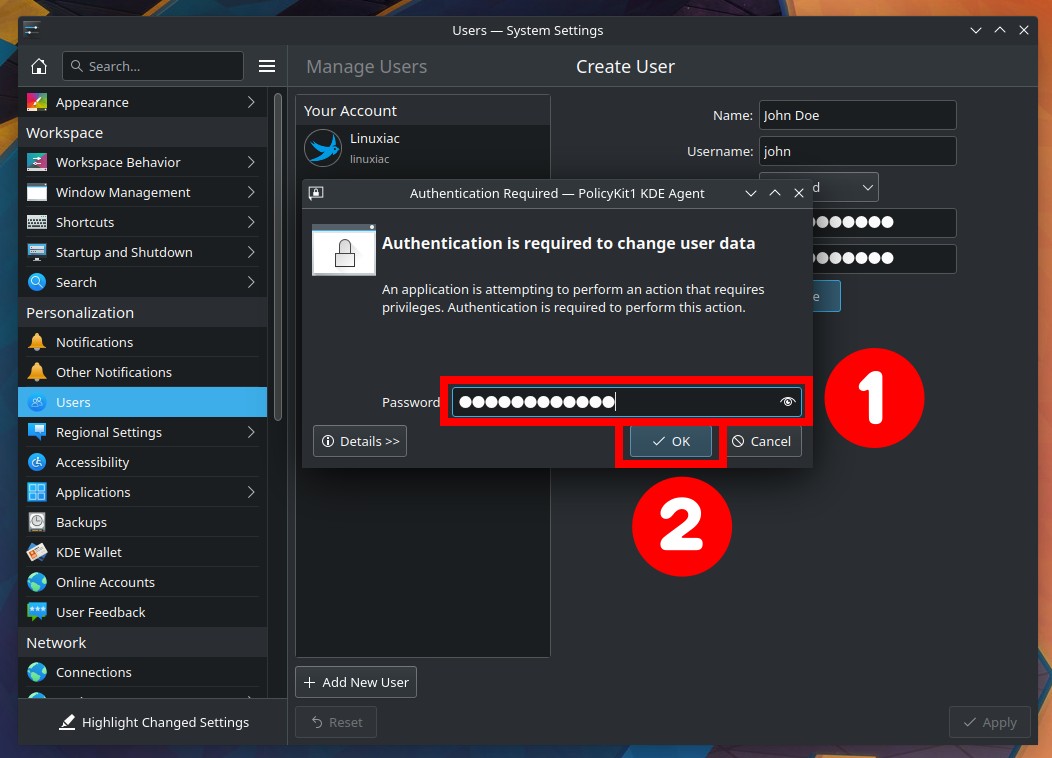
That’s all. You will be taken back to a screen that displays the user’s information. This confirms that the user has been added successfully to the system.
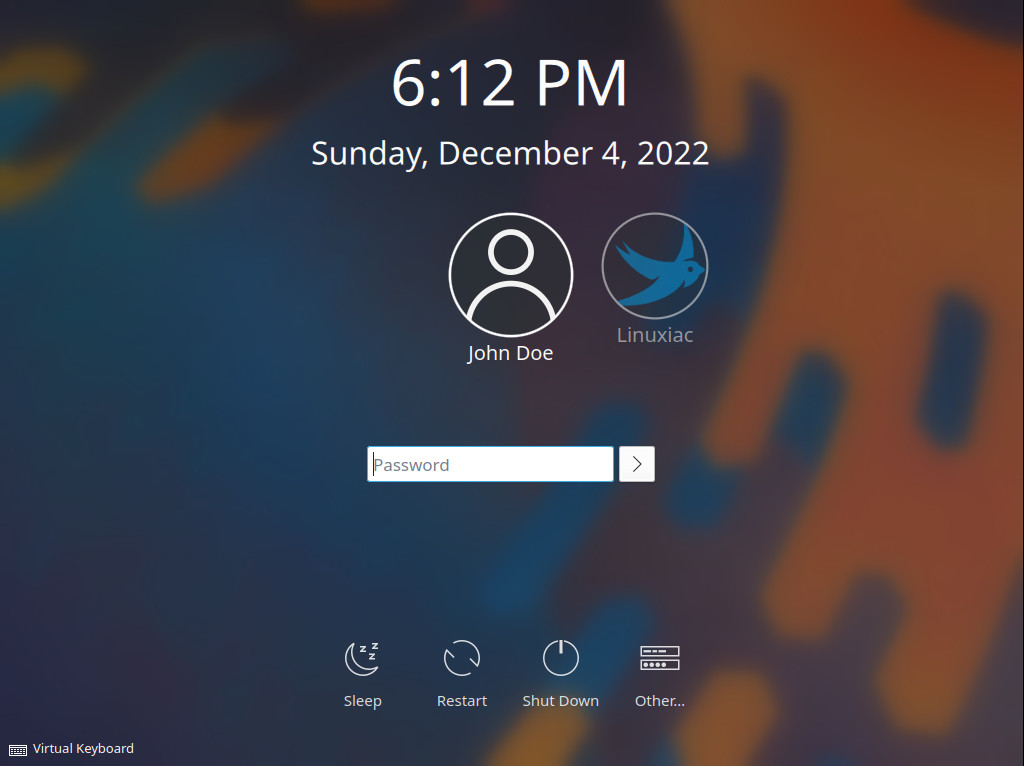
Now, log out, and you will be greeted by Pslama’s Simple Desktop Display Manager (SDDM), which will show the newly added user. Please select it and enter the assigned password to log in.
Conclusion
In this guide, we have shown in detail how to add a new user to your Linux system using both the command line via the useradd and adduser commands and the graphical desktop environments GNOME and KDE Plasma.
We hope we were of help to you. Any feedback and suggestions are very welcome in the comments section below.