
Nowadays, configuring and implementing a reliable firewall for your servers and network is a must. Without it, the question is no longer if but when malicious attacks will harm you, unfortunately, are common on the Internet these days.
This is where Firewalld comes into play. Firewalld, the default firewall in Linux distros such as Red Hat Enterprise Linux, Fedora, Oracle Linux, openSUSE, AlmaLinux, Rocky Linux, and others, provides all the protection you need to secure your servers and network. But before we get into how to use it, let’s first explain what it is.
What is Firewalld?
Firewalld is a zone-based firewall management tool that provides a dynamically managed firewall with support for network zones that define the trust level for network connections or interfaces.
In addition, it acts as a front-end for the Linux kernel’s Netfilter framework, providing firewall functionality.
Unlike iptables chains, it manages firewall rules using zones and services. These rules are used to sort incoming traffic and determine whether it should be blocked or allowed.
How to Manage Firewall Rules with Firewalld
The main tool for managing the Firewalld rules is firewall-cmd. It is a command-line tool that provides an interface for managing Firewalld’s runtime and permanent configuration. When you use it, the changes take effect immediately, and there is no need to restart the service.
Checking the Firewalld Status
Run the following command to see if your Firewalld is active:
sudo firewall-cmd --state
The output should say either “running” or “not running.”
In addition, to view the status of the Firewalld service, run the following:
sudo systemctl status firewalld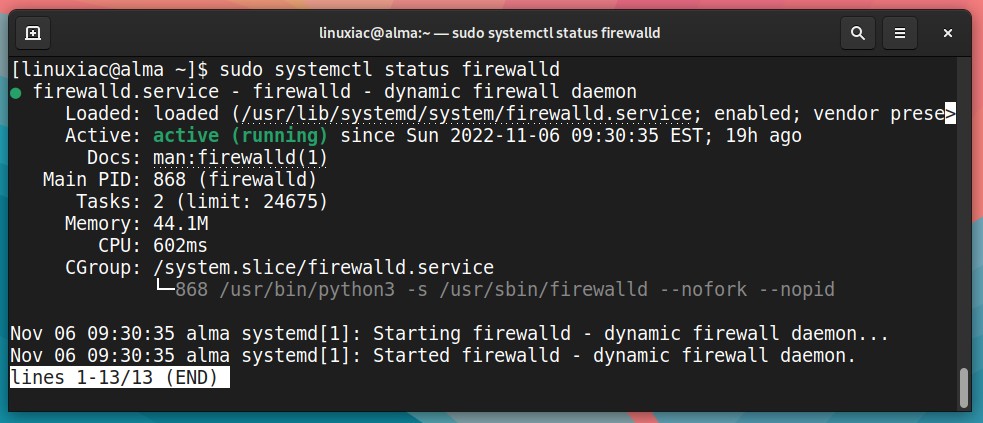
If the service is not started for some reason, you can start it and set it to start automatically when the system boots as run:
sudo systemctl start firewalld
sudo systemctl enable firewalld
Similarly, you can stop and disable the Firewalld service’s automatic startup by doing the following:
sudo systemctl stop firewalld
sudo systemctl disable firewalld
Zones and Interfaces
Firewalld, as previously stated, is a zone-based firewall. But what exactly does that mean, and what are zones?
In short, they are a top-level component of the Firewalld organization. So, zones can provide different levels of security for different connection zones. The idea is to have separate security measures for different network zones.
Each zone is connected to at least one network interface – hardware or a virtual network adapter. Getting a list of the preconfigured Firewalld zones is simple. Type the command:
sudo firewall-cmd --get-zonesCode language: JavaScript (javascript)
As you can see, the zones that are listed by default are:
- block: Incoming network connections are rejected with an icmp-host-prohibited message. Only network connections initiated by this system are allowed.
- dmz: For publicly accessible computers in your demilitarized zone with limited access to your internal network. Only certain inbound connections are accepted.
- drop: Any incoming network connections are dropped, and no response is sent. Only outgoing network connections are allowed.
- external: For usage on external networks with masquerading enabled, mainly routers. You don’t trust other computers on networks not to harm yours. Only certain types of inbound connections are accepted.
- home: For usage in a home. You generally trust other computers on networks not to harm yours. Only certain types of incoming connections are accepted.
- internal: For usage on internal networks. You generally trust that the other computers on the network will not harm your computer. Only certain inbound connections are accepted.
- public: For usage on external networks. You don’t trust other computers on networks not to hurt yours. Only certain types of inbound connections are accepted.
- trusted: Any network connection is allowed.
- work: For usage in workplaces. You generally trust that other computers on networks will not harm your computer. Only certain inbound connections are accepted.
If you haven’t made any additional changes, Firewalld’s default zone is set to “public.” To check the default zone:
sudo firewall-cmd --get-default-zoneCode language: JavaScript (javascript)
To change the default zone, for example, “home,” type:
sudo firewall-cmd --set-default-zone=homeCode language: JavaScript (javascript)
To list the active zones and the network interfaces assigned to them, run the following:
sudo firewall-cmd --get-active-zonesCode language: JavaScript (javascript)
To assign a network interface (enp1s0 in our case) to another zone, such as “home,” type:
sudo firewall-cmd --zone=home --change-interface=enp1s0Code language: PHP (php)
Remember that if you have only one network interface on your system and assign it to another zone, that zone will become active by default.
To get all configurations for a specific zone, for example, “public,” run:
sudo firewall-cmd --zone=public --list-allCode language: PHP (php)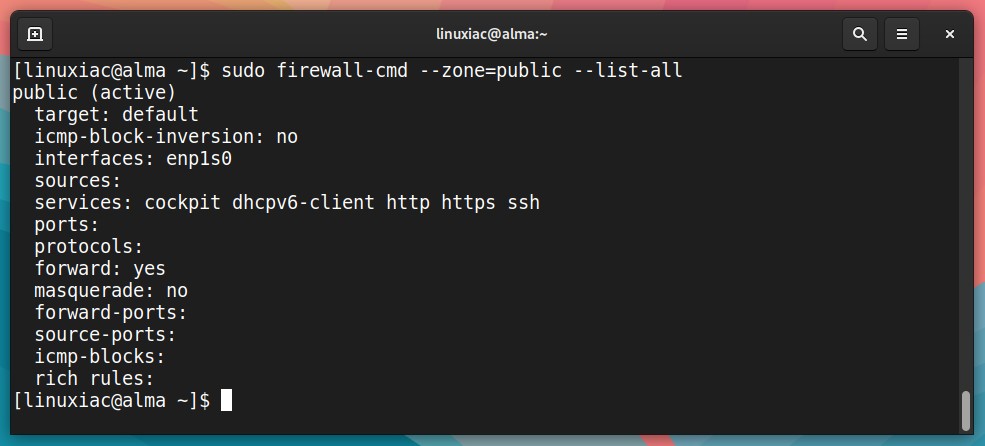
Similarly, to get configurations for all zones at once:
sudo firewall-cmd --list-all-zonesCode language: PHP (php)Allow and Deny by Service Name
Firewalld can allow traffic for specific network services based on predefined rules. The simplest method is to add the services you need to allow to the zones you are using.
Of course, you should first know the name of the service. But it is hard to remember the names of all the services, even though they are as expected. So, using the following command, we can view the names of all available predefined ones.
sudo firewall-cmd --get-servicesCode language: JavaScript (javascript)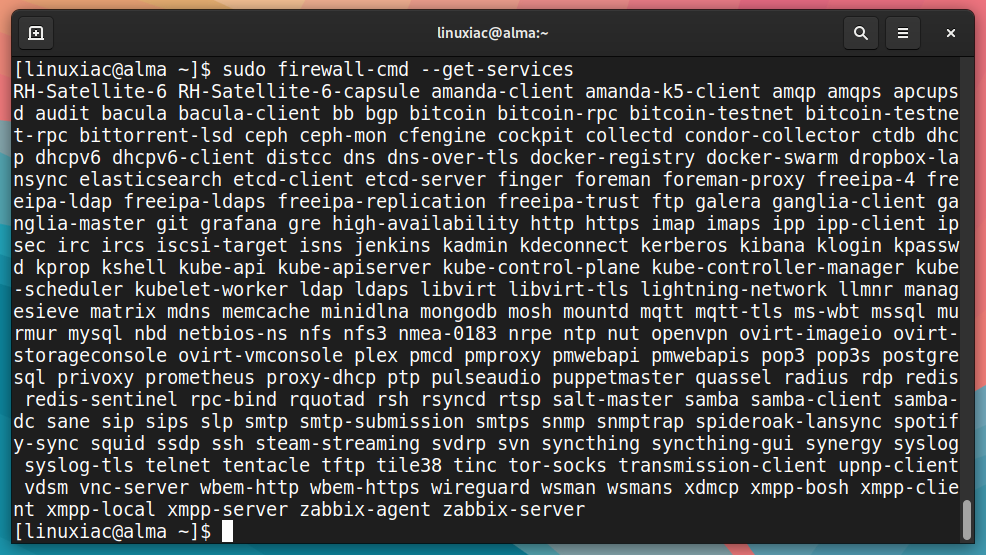
You can find more details on these services in their associated .xml file in the /usr/lib/firewalld/services directory. For example, the MySQL service is defined as follows:
cat /usr/lib/firewalld/services/mysql.xml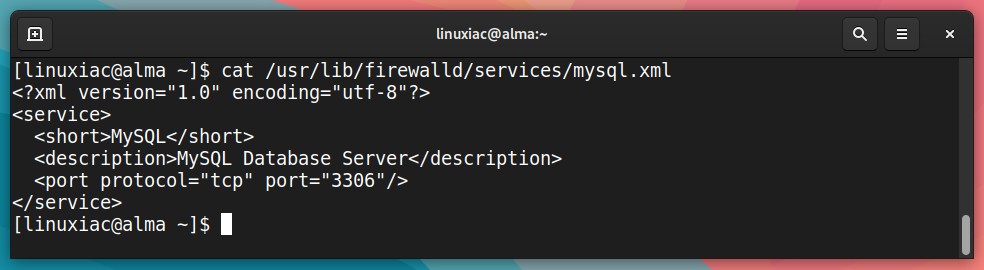
Assume we want to enable the MySQL service. To accomplish this, we add the service name after --add-service= to the firewalld-cmd command and use the --zone= option to specify which zone to assign the service.
sudo firewall-cmd --zone=public --add-service=mysqlCode language: PHP (php)
Let’s now recheck the “public” zone details.
sudo firewall-cmd --zone=public --list-allCode language: PHP (php)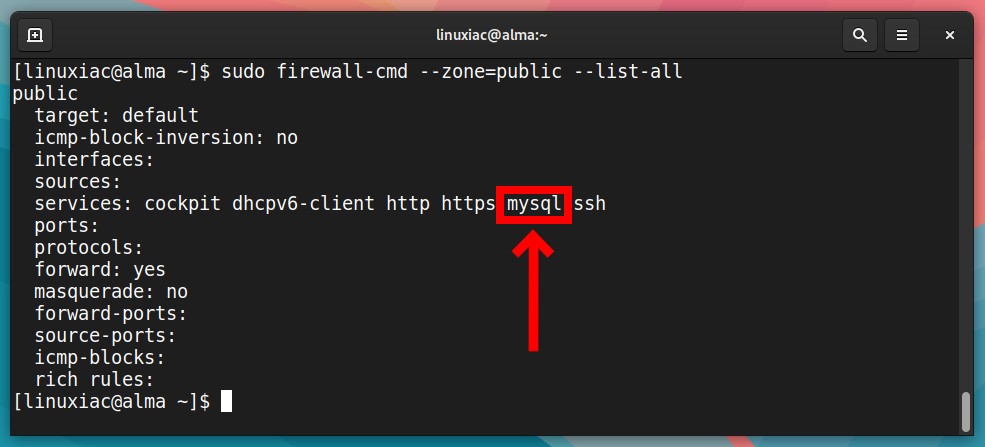
Great. We’ve added a firewall rule that allows incoming connections to the MySQL server. However, this rule is temporary. This means that the rule will not survive during a system reboot.
To ensure the rule’s persistence, we must add the --permanent option to the command. This way, even after a reboot, Firewalld will automatically load it.
sudo firewall-cmd --zone=public --add-service=mysql --permanentCode language: PHP (php)We must note one important detail: adding a rule without the --permanent option makes it available and effective immediately. However, using --permanent will have no effect until the system is rebooted.
So, to make our new permanent rule active immediately, we need to reload the Firewalld, executing:
sudo firewall-cmd --reloadThis way, we reload firewall rules while preserving state information. In other words, the current permanent configuration will become a new runtime configuration.
Let’s look at how we can remove rules from our firewall now. The procedure is nearly identical to adding, but the option --remove-service is used this time.
For example, to remove the MySQL service, we have to issue the following command:
sudo firewall-cmd --zone=public --remove-service=mysqlCode language: PHP (php)
Again, to remove the access permanently, we need to add the --permanent option and then reload the rules for the change to take effect immediately.
sudo firewall-cmd --zone=public --remove-service=mysql --permanent
sudo firewall-cmd --reloadCode language: PHP (php)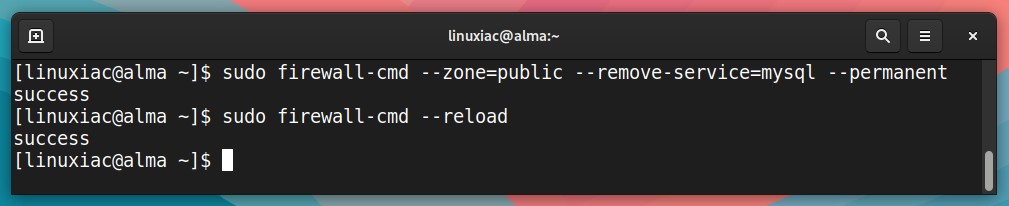
Allow and Deny by Port Number
However, sometimes we have to allow access by specifying a port number. For example, suppose you have a service listening on the non-standard TCP port 10069. So, we will need something other than predefining services by name.
Fortunately, Firewalld offers a way of allowing access by port and protocol that is entirely identical to that of service names. For example, to allow traffic to port 10069 on TCP, run:
sudo firewall-cmd --zone=public --add-port=10069/tcpCode language: PHP (php)We check the allowed ports, executing:
sudo firewall-cmd --zone=public --list-portsCode language: PHP (php)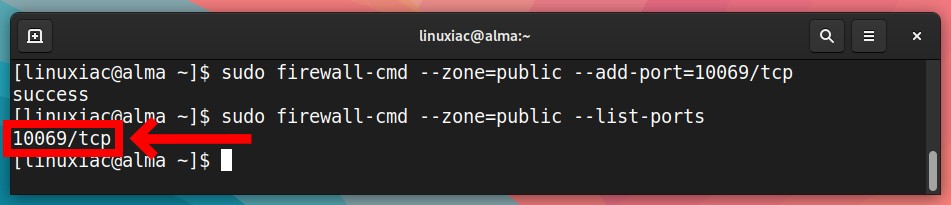
Of course, we can also get an overview of the big picture for the entire zone in a familiar way:
sudo firewall-cmd --zone=public --list-allCode language: PHP (php)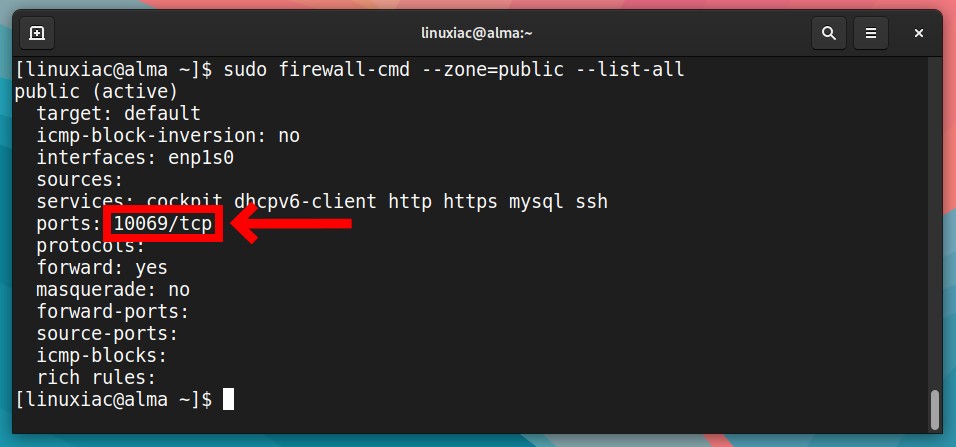
The same persistence rules apply here as they do when using service names. As a result, to ensure that our firewall rule survives between reboots, we need to execute the following:
sudo firewall-cmd --zone=public --add-port=10069/tcp --permanent
sudo firewall-cmd --reloadCode language: PHP (php)
In addition, if the port you want to enable uses the UDP protocol instead of TCP, you must replace tcp with udp in the firewall-cmd line.
The approach for removing a port from the list of rules is identical, with the only difference being the replacement of --add-port= with the --remove-port= option.
sudo firewall-cmd --zone=public --remove-port=10069/tcp --permanent
sudo firewall-cmd --reloadCode language: PHP (php)
Firewalld Rich Rules
Those familiar with iptables will be at ease using firewalld rich rules. As the name implies, they enable you to construct complex rules with multiple criteria that cannot be achieved using a name or port-based rules.
In other words, the Firewall rich rules provide a much greater level of control through more custom granular options. Furthermore, they can also configure logging, masquerading, port forwarding, and rate limitation.
Their use can have countless variations, so if you want to learn more about them, you should consult the official documentation. Here, we’ll provide some simplified examples to give you a sense of what you can do with the Firewalld rich rules.
For example, assume we want to allow access to the MySQL server, which, as we know, listens on port 3306 from IP address 192.168.1.69. The rule would look like this:
sudo firewall-cmd --zone=public --add-rich-rule 'rule family="ipv4" source address="192.168.1.69" port port=3306 protocol=tcp accept'Code language: PHP (php)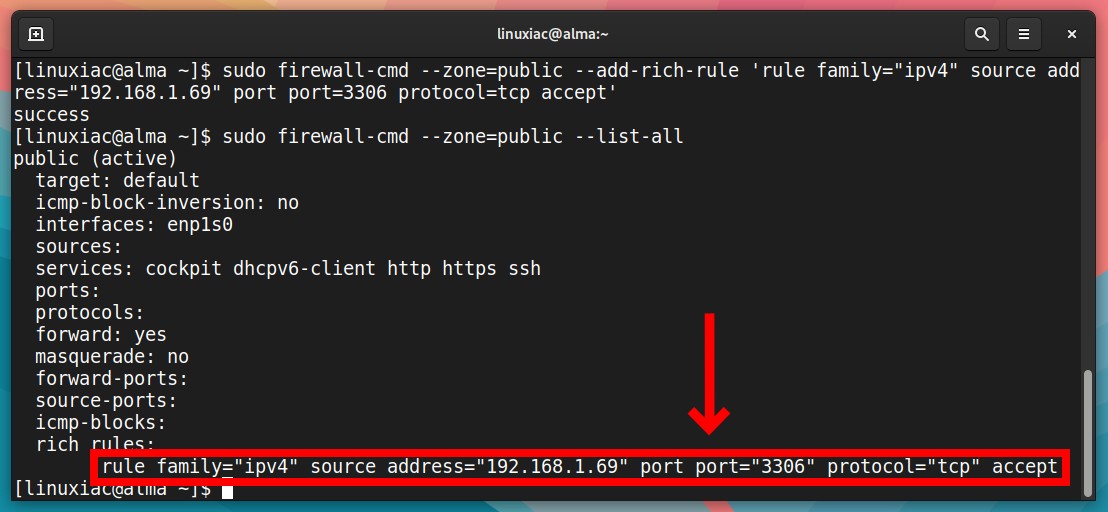
As with name and port-based rules, Firewalld’s rich rules are not persistent unless the --permanent flag is specified.
The command to remove this rule is identical to the one above, except that the --add-rich-rule option should be replaced with --remove-rich-rule.
sudo firewall-cmd --zone=public --remove-rich-rule 'rule family="ipv4" source address="192.168.1.69" port port="3306" protocol="tcp" accept'Code language: PHP (php)If we want to do the opposite and block access to the MySQL server from IP address 192.168.1.69, our rule would be:
sudo firewall-cmd --zone=public --add-rich-rule 'rule family="ipv4" source address="192.168.1.69" port port="3306" protocol="tcp" reject'Code language: PHP (php)As a final example, we want to redirect all inbound traffic from port 80 to port 8080 on host 192.168.1.200, where we have installed a Tomcat server. To achieve this, our Firewalld rich rule should be:
sudo firewall-cmd --zone=public --add-rich-rule 'rule family=ipv4 forward-port port=80 protocol=tcp to-port=8080 to-addr=192.168.1.200'Code language: PHP (php)You can review the rich rules by running the following:
sudo firewall-cmd --zone=public --list-rich-rulesCode language: PHP (php)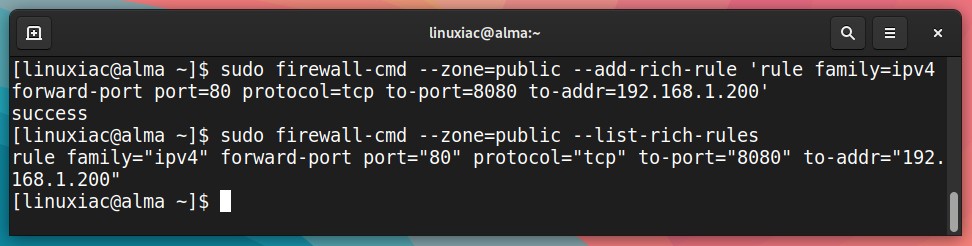
Conclusion
This concludes our guide. I hope you found it helpful. You should now have a good understanding of what Firewalld is and how to use it to secure your computers and network. Knowledge of it will allow you to use the tool’s flexibility and power.
For a more in-depth overview of Firewalld, visit the official documentation or look at this article on the Red Hat website, who are authors of Firewalld.


Thank you so much! Wonderful presentation.
You’ve put a lot of work into this. And it was really helpful. Thanks
Not a bad tutorial. I’m not sure I would do permanent and reload for a beginner. It might make more sense to do the move first and then if it works nicely make it permanent. Thus if a mistake happens a reboot will fix it.