
CentOS has long been popular for its stability, reliability, and long-term support. However, with the unexpected shift in CentOS’s strategy to focus on CentOS Stream, many users have found themselves seeking an alternative solution.
So, have you ever asked yourself, “How do I migrate from CentOS 7 to AlmaLinux?” You don’t need to worry about this anymore because this step-by-step guide will walk you through migrating your CentOS 7 installation to AlmaLinux 8, ensuring a smooth and hassle-free transition.
So far, so good, but how do we do it? For those unaware, the AlmaLinux ELevate project allows users to upgrade or migrate between any RHEL-based distro. So, let’s dive in and do it.
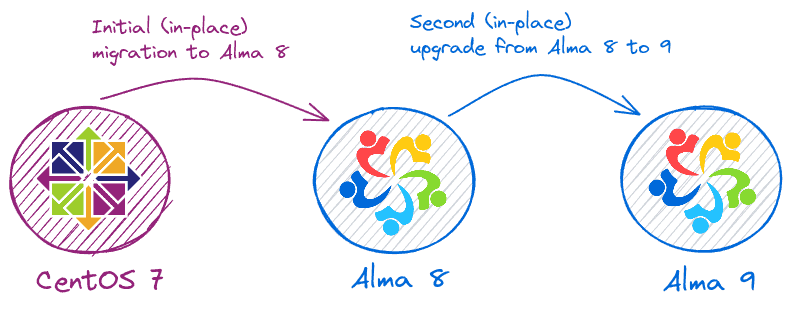
CentOS 7 to AlmaLinux Upgrade Path
However, before we get to the action, there are a few key points we need to clear up, with the most important one being that it’s not possible to migrate from CentOS 7 to Alma 9 directly.
In other words, if you aim to transition to Alma 9, the path involves initially migrating your current CentOS 7 system to Alma 8. Once that’s done, you can then move on to upgrade from Alma 8 to 9. This two-step process ensures a smooth transition and compatibility across versions.
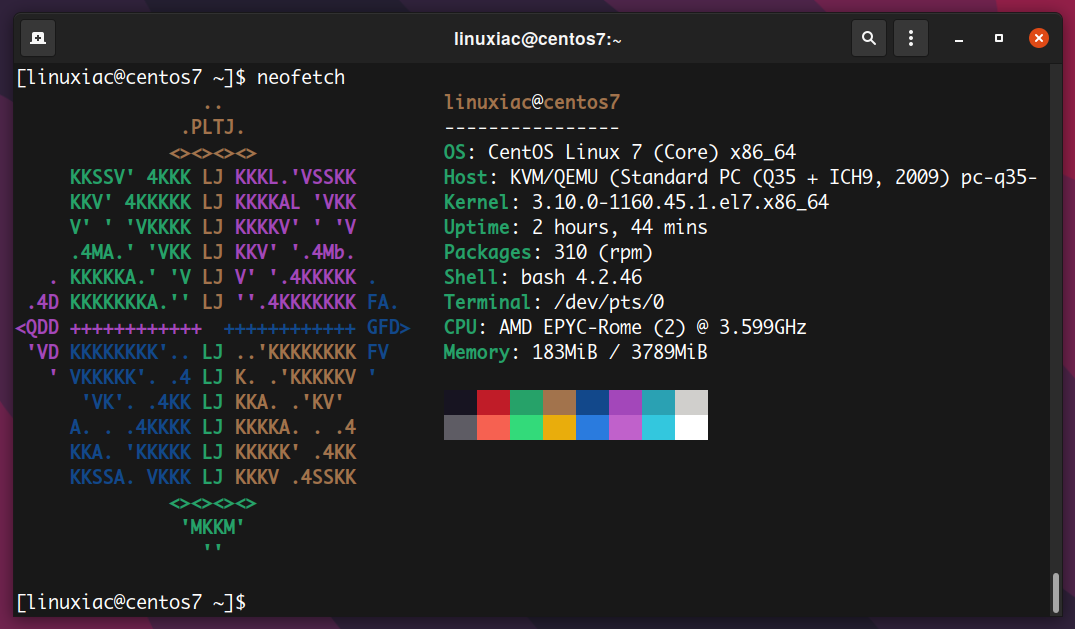
Here is our CentOS 7 system before starting the migration process to AlmaLinux 8.
Step 1: Take System Backup
Before upgrading, please back up all your essential data and take a snapshot of the complete CentOS 7 system. This way, you will be on the right side if anything goes wrong.
Alternatively, you can always use a command like the one below to archive all the more important directories and their contents in a single tar.gz archive file.
sudo tar czf /centos7.tar.gz \
     --exclude=/centos7.tar.gz \
     --exclude=/dev \
     --exclude=/mnt \
     --exclude=/proc \
     --exclude=/sys \
     --exclude=/run \
     --exclude=/tmp \
     --exclude=/media \
     --exclude=/lost+found \
     /Code language: Bash (bash)
Of course, you can add more “–exclude=” parameters if necessary. Finally, the command creates a backup of all the files and directories by placing them in the “centos7.tar.gz” archive in the root (/) partition.
Then, this file must be transferred to another computer or drive, for example, using the SCP command.
Step 2: Upgrade the Current CentOS 7 System
The next step in the upgrade process is to ensure we have a wholly upgraded system. Update existing software with the following command:
sudo yum updateCode language: Bash (bash)Once all the packages are updated, reboot your system to apply the changes.
Now, let’s verify the version of our current operating system.
cat /etc/centos-releaseCode language: Bash (bash)CentOS Linux release 7.9.2009 (Core)Code language: Bash (bash)The system runs CentOS 7.9, the latest version in the 7.x branch.
Step 3: Migrate CentOS 7 to AlmaLinux 8
3.1 Install ELevate
The first step in the upgrade process is installing the “elevate-release” package on your current CentOS 7 system.
sudo yum install -y http://repo.almalinux.org/elevate/elevate-release-latest-el7.noarch.rpmCode language: Bash (bash)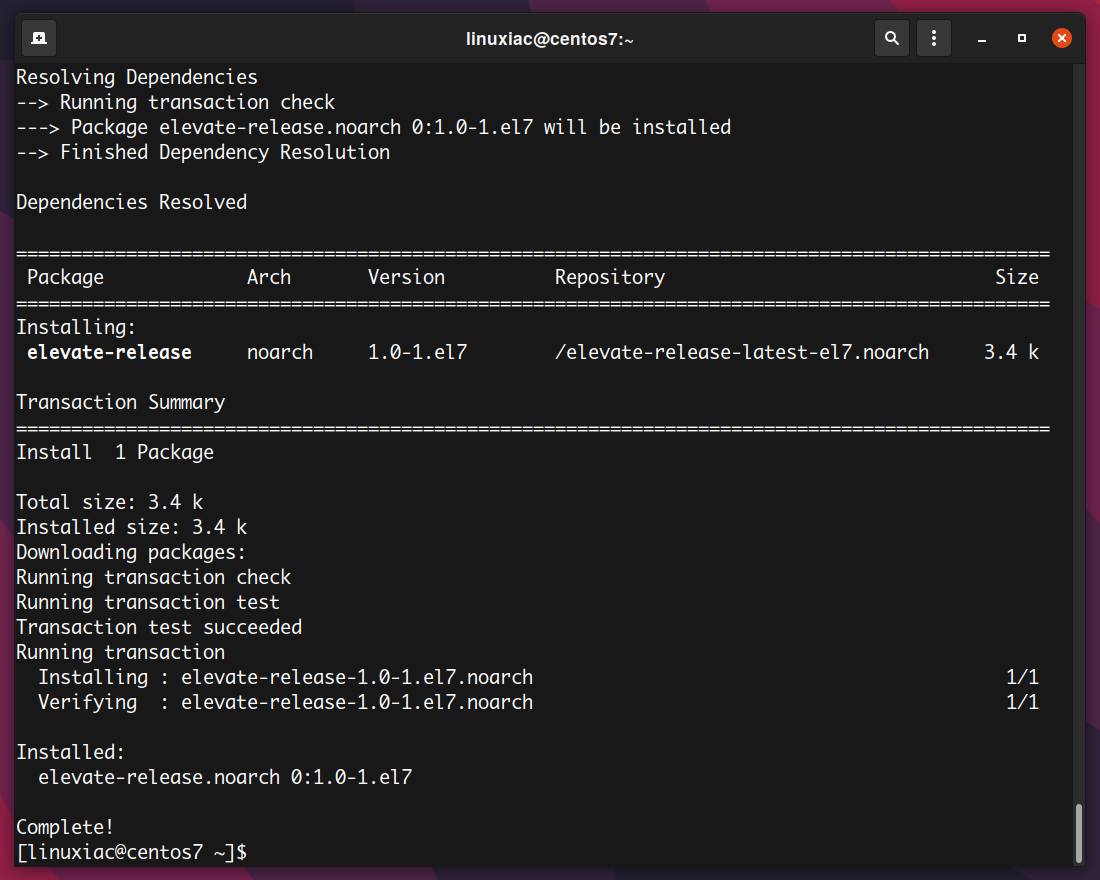
3.2 Install Leapp and Migration Data
The migration process is based on using Red Hat’s Leapp utility. It combines Red Hat’s Leapp framework with a community-created library and service for its required migration metadata set.
So, the next step is to install the required packages for the upgrade from CentOS 7 to AlmaLinux 8.
sudo yum install -y leapp-upgrade leapp-data-almalinuxCode language: Bash (bash)3.3 Start a Pre-upgrade Check
The next step is to start a pre-upgrade check. The below command verifies server compatibility without any actual changes:
sudo leapp preupgradeCode language: Bash (bash)The check will probably fail, but don’t panic! That’s normal because some tweaks are required in advance.

According to the official documentation, those three commands are shown below to solve the problem. Just run them one after the other:
sudo rmmod pata_acpi
echo PermitRootLogin yes | sudo tee -a /etc/ssh/sshd_config
sudo leapp answer --section remove_pam_pkcs11_module_check.confirm=TrueCode language: Bash (bash)
(Optional) If you rerun the check, the pre-upgrade check will succeed.
sudo leapp preupgradeCode language: Bash (bash)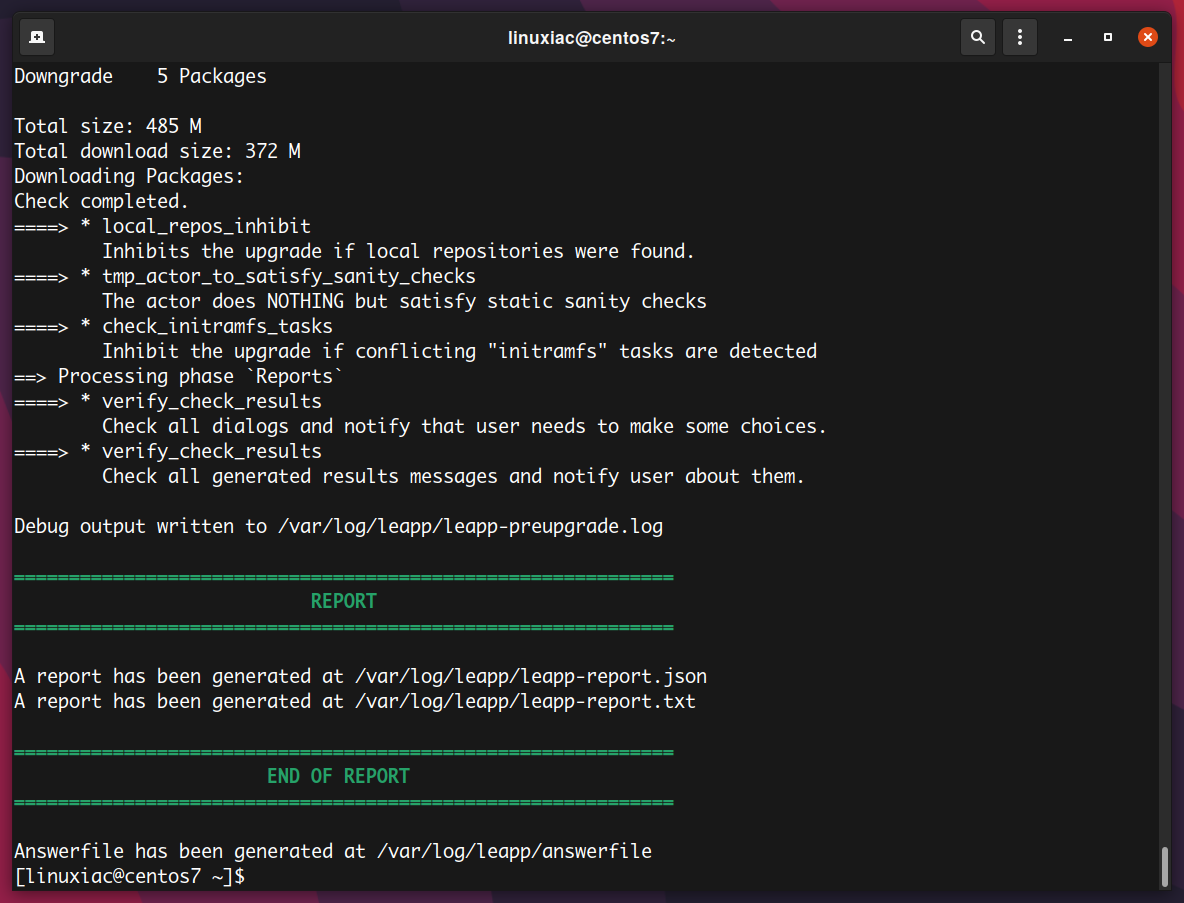
3.4 Start the Upgrade Process from CentOS 7 to AlmaLinux 8
Now you can run the following command to migrate CentOS 7 to AlmaLinux 8.
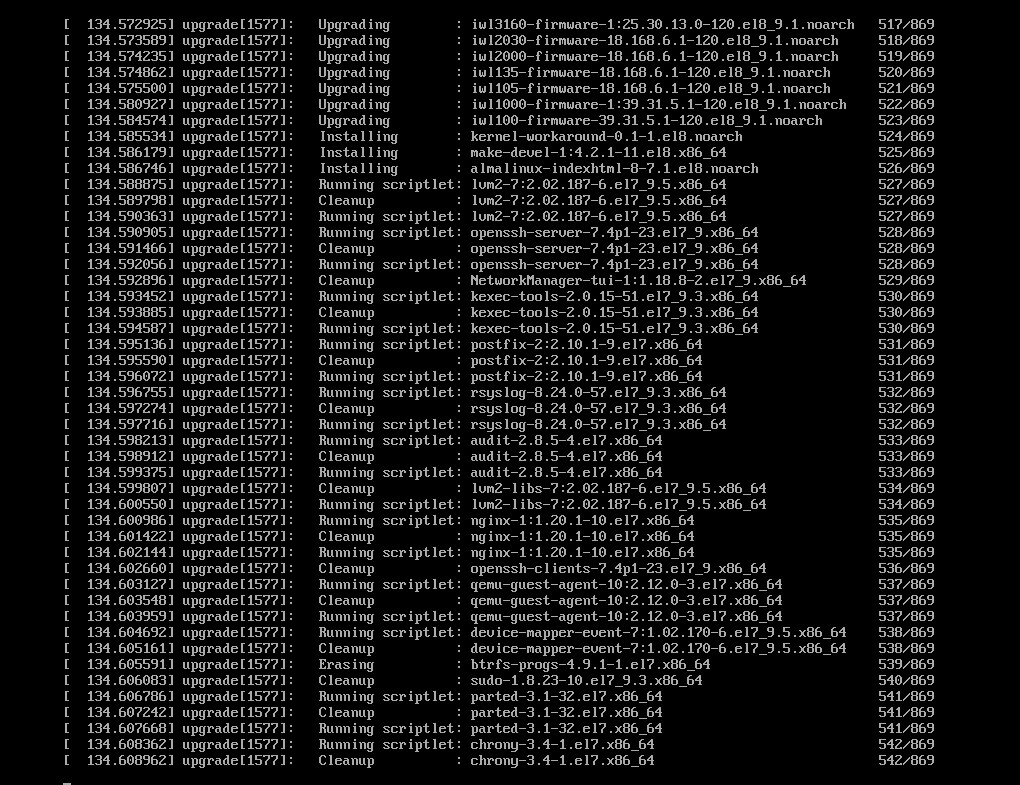
sudo leapp upgradeCode language: Bash (bash)Be patient since the upgrade process could take some time. Once the migration is completed, you’ll be offered to reboot the system:
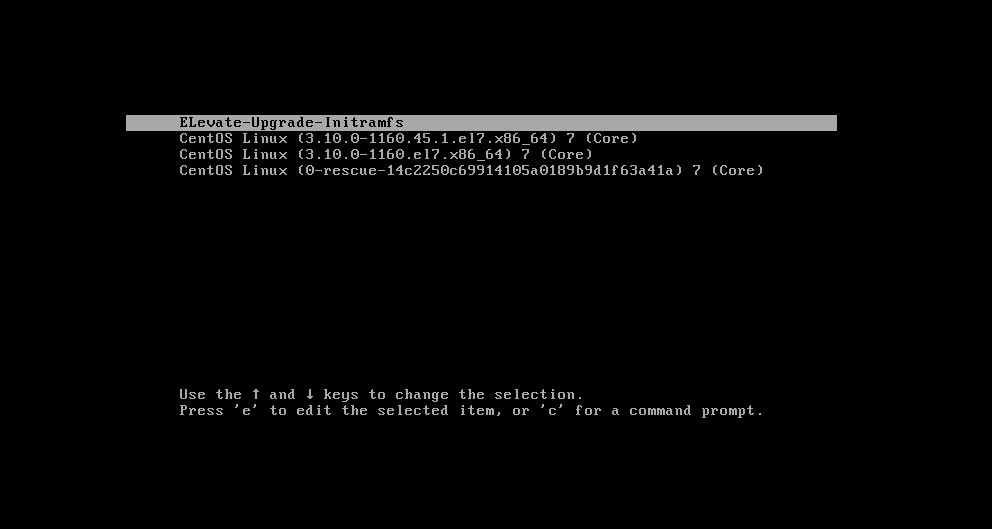
sudo rebootCode language: Bash (bash)A new entry in GRUB called ELevate-Upgrade-Initramfs will appear. Hit “Enter” and wait for the upgrade process to finish. The system will be automatically booted into it.
Since the package upgrades involve a lot of background activity, the process might take a while. Please be patient if you cannot access the terminal to track these changes. Depending on your hardware’s capabilities and the number of packages being updated, it could take anywhere from a few minutes to half an hour.
In the final loop, the system will automatically reboot again, but this time, GRUB will display the entries for your AlmaLinux 8 system.
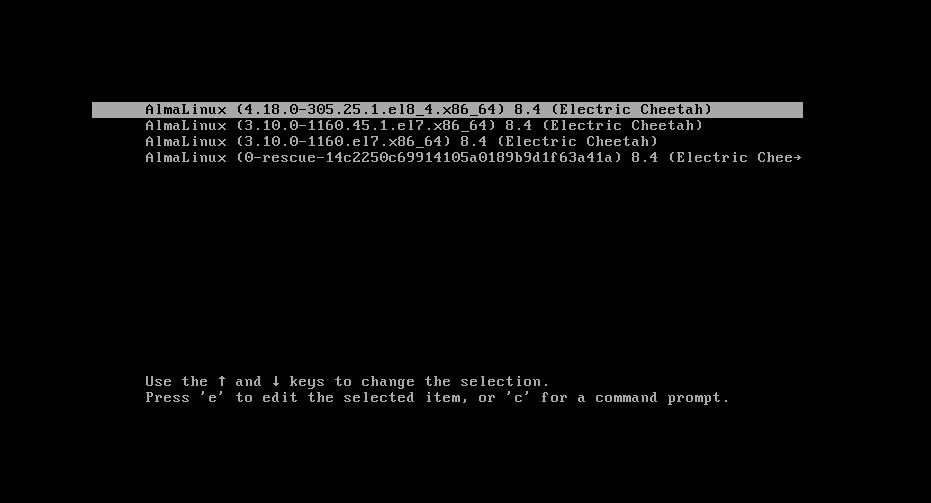
Congratulation! You’ve successfully transitioned your system from CentOS 7 to AlmaLinux 8.
Step 4: Check the OS Version
To confirm that you have successfully migrated from CentOS 7 to AlmaLinux 8, check the OS version. In addition, you can update the server hostname to match with AlmaLinux.
sudo hostnamectl set-hostname alma8
sudo rebootCode language: Bash (bash)
cat /etc/redhat-releaseCode language: Bash (bash)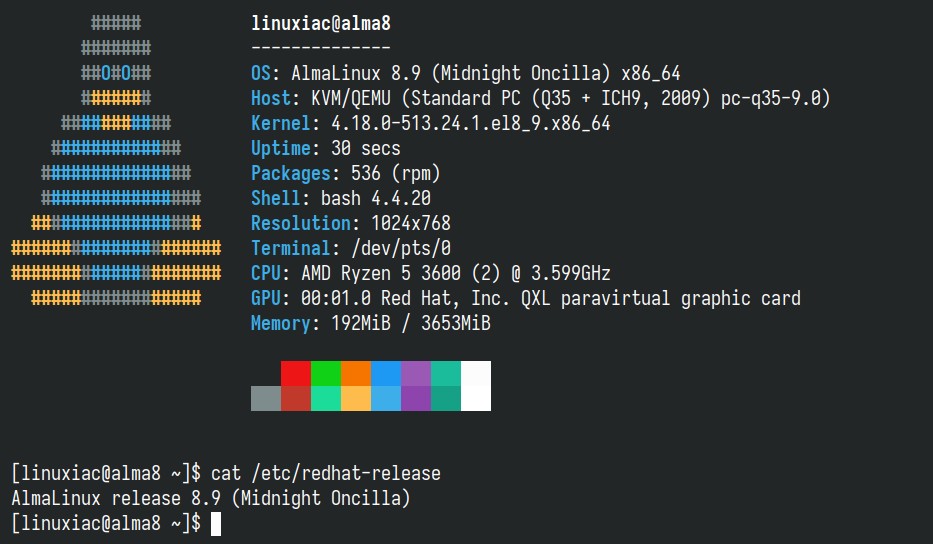
Post-Installation Steps
Refresh the package base.
sudo dnf updateCode language: Bash (bash)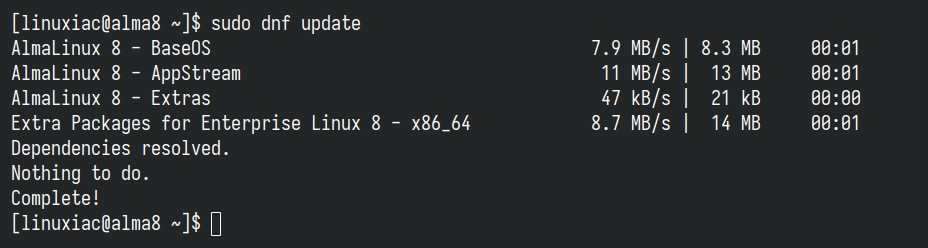
Next, remove all CentOS 7-related packages. To find them, run the command below:
sudo rpm -aq | grep el7Code language: Bash (bash)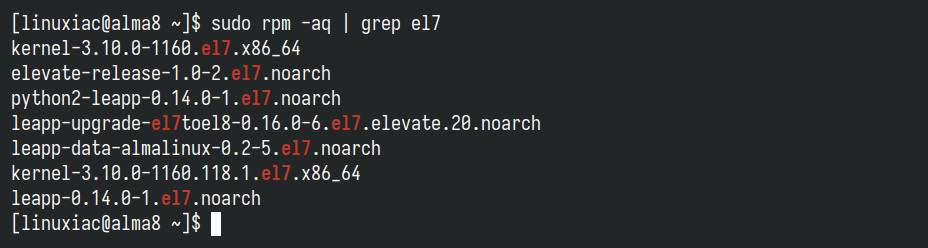
Open the “/etc/yum.conf” file and comment out the “exclude” line shown below.
sudo nano /etc/yum.confCode language: Bash (bash)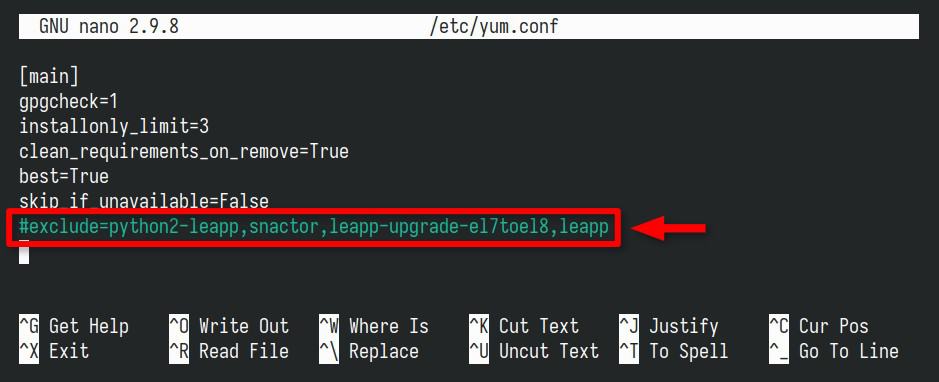
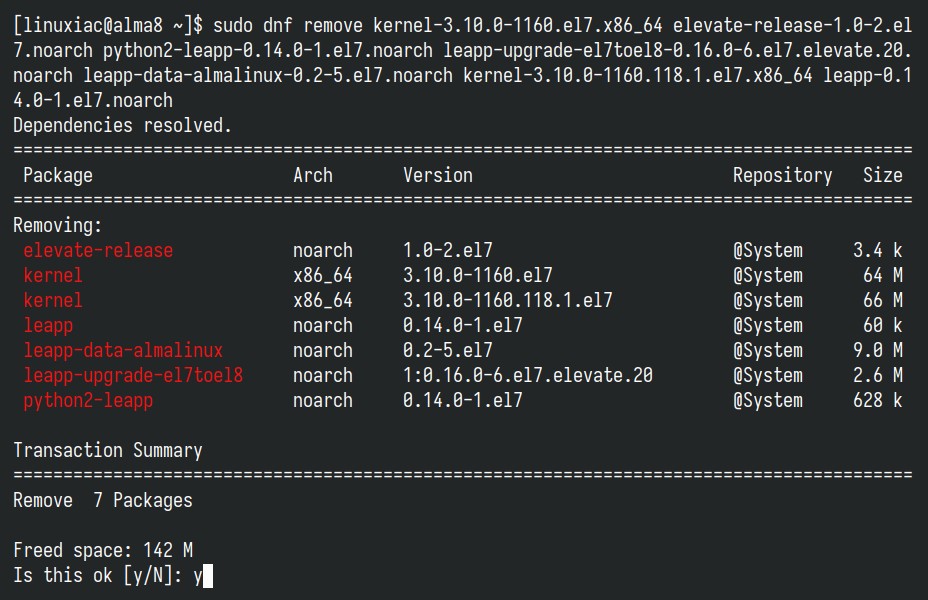
Finally, to remove them, list them individually as arguments to the dnf remove command. In our case, it looks like this:
For a more in-depth introduction to the DNF command, we highly recommend consulting our article on the subject, “DNF Command-Line Package Manager in Linux: A Complete Guide.”
Conclusion
AlmaLinux’s ELevate tool is a great one! It may be a fantastic option if you want to migrate from CentOS 7 to AlmaLinux 8.
Moreover, if you’re looking for a different upgrade path to another enterprise Linux distro, we’re here to help. Check out our detailed guide on migrating from CentOS 7 to Rocky Linux 8 or Oracle Linux 8.
In addition, if you are running CentOS 8.x, all you have to do to switch to AlmaLinux 8 is follow our CentOS 8 to AlmaLinux 8: A Step-by-Step Migration Guide.
I have made this guide as simple as possible. Thanks for using it! Please share your thoughts in the comments box below.


Hi Bobby, is there a workaround for having a LUKS encryption on the server? I can’t seem to get past the ‘UPGRADE INHIBITED’ steps because of this.
Hi Sonia,
I'm afraid that might not be possible. The upgrade relies on the Leapp tool, and according to the details provided:
Good to know, thank you so much for the fast response!
Thanks for this guide! It is a precious help and very well explained!
The only little thing to mention is the server must contact alma repositories directly on the net, or replace URLs in this file /etc/leapp/files/leapp_upgrade_repositories.repo with your own repository servers before launching pre-upgrade and upgrade !
Thanks for the procedure. The guide was perfect.
Hi Luma,
I’m happy to be of help.
Best,
Bobby
I was already running the upgrade, i mistakenly pressed the keypad and the installation stopped and since then i cant upgrade anymore, started giving errors, what can i do to start over
This is exceptionally well documented. But I can see by various comments that the upgrade is fraught with danger. Any upgrade is very dicey. So I am not sure whether to continue using Centos 7 until it just dies. I am getting more and more RACE warnings.
When I did the yum update, Kernel 3.10.0-1160.80.1.el7.x86_64 was installed. Rebooting on that only goes to line-driven terminal with all kinds of problems (too numerous to convey, but includes things like failure to mount drives, etc). I can successfully reboot into the previous Kernel (3.10.0-1160.76.1.el7.x86_64). I removed the patch 80 copy of the Kernel and rebooted again. Then when I run leapp preupgrade, the report says that I have to be running the latest installed Kernel. I’m stuck in a catch 22. I am not a Linux expert by any means and there are none here. Are there any suggestions?
The downloaded packages were saved in cache until the next successful transaction.
You can remove cached packages by executing ‘dnf clean packages’.
Process Process-476:
Traceback (most recent call last):
File “/usr/lib64/python2.7/multiprocessing/process.py”, line 258, in _bootstrap
self.run()
File “/usr/lib64/python2.7/multiprocessing/process.py”, line 114, in run
self._target(*self._args, **self._kwargs)
File “/usr/lib/python2.7/site-packages/leapp/repository/actor_definition.py”, line 72, in _do_run
actor_instance.run(*args, **kwargs)
File “/usr/lib/python2.7/site-packages/leapp/actors/__init__.py”, line 290, in run
self.process(*args)
File “/usr/share/leapp-repository/repositories/system_upgrade/common/actors/dnfpackagedownload/actor.py”, line 51, in process
xfs_info=xfs_info, storage_info=storage_info, plugin_info=plugin_info, on_aws=on_aws
File “/usr/share/leapp-repository/repositories/system_upgrade/common/libraries/dnfplugin.py”, line 385, in perform_rpm_download
test=True, on_aws=on_aws
File “/usr/share/leapp-repository/repositories/system_upgrade/common/libraries/dnfplugin.py”, line 219, in _transaction
e.stdout = e.stdout.encode(‘utf-8’, ‘xmlcharrefreplace’)
AttributeError: can’t set attribute
I got the same error. Any idea how to fix it?
turns out it had nothing to do with python but the container overlay image at /var/lib/leapp
is set to default 2048MB. There wasn’t enough space so i increased it by running
export LEAPP_OVL_SIZE=4000
and that fixed it
After solving the “inhibitors”, I always get the following error…
============================================================
ERRORS
============================================================
2022-05-14 15:14:39.704179 [ERROR] Actor: target_userspace_creator
Message: Unable to install RHEL 8 userspace packages.
Summary:
Details: Command [‘systemd-nspawn’, ‘–register=no’, ‘–quiet’, ‘-D’, ‘/var/lib/leapp/scratch/mounts/root_/system_overlay’, ‘–setenv=LEAPP_NO_RHSM=0’, ‘–setenv=LEAPP_EXPERIMENTAL=0’, ‘–setenv=LEAPP_COMMON_TOOLS=:/etc/leapp/repos.d/system_upgrade/el7toel8/tools’, ‘–setenv=LEAPP_COMMON_FILES=:/etc/leapp/repos.d/system_upgrade/common/files:/etc/leapp/repos.d/system_upgrade/el7toel8/files’, ‘–setenv=LEAPP_UNSUPPORTED=0’, ‘–setenv=LEAPP_EXECUTION_ID=d5278bb5-e873-438d-b094-c7e1ebfcc069’, ‘–setenv=LEAPP_HOSTNAME=srv-net-072.alpaca.int’, ‘dnf’, ‘install’, ‘-y’, ‘–nogpgcheck’, ‘–setopt=module_platform_id=platform:el8’, ‘–setopt=keepcache=1’, ‘–releasever’, u’8.4′, ‘–installroot’, ‘/el8target’, ‘–disablerepo’, ‘*’, ‘–enablerepo’, u’almalinux8-baseos’, ‘–enablerepo’, u’almalinux8-powertools’, ‘–enablerepo’, u’almalinux8-resilientstorage’, ‘–enablerepo’, u’almalinux8-extras’, ‘–enablerepo’, u’almalinux8-highavailability’, ‘–enablerepo’, u’almalinux8-appstream’, ‘dnf’, ‘dnf-command(config-manager)’, ‘–disableplugin’, ‘subscription-manager’] failed with exit code 1.
Stderr: Failed to create directory /var/lib/leapp/scratch/mounts/root_/system_overlay//sys/fs/selinux: Read-only file system
Failed to create directory /var/lib/leapp/scratch/mounts/root_/system_overlay//sys/fs/selinux: Read-only file system
Host and machine ids are equal (4e3bf1688a5744d698d980f621bf9021): refusing to link journals
Failed to synchronize cache for repo ‘almalinux8-highavailability’, ignoring this repo.
Failed to synchronize cache for repo ‘almalinux8-extras’, ignoring this repo.
Failed to synchronize cache for repo ‘almalinux8-baseos’, ignoring this repo.
Failed to synchronize cache for repo ‘almalinux8-appstream’, ignoring this repo.
Failed to synchronize cache for repo ‘almalinux8-powertools’, ignoring this repo.
Failed to synchronize cache for repo ‘almalinux8-resilientstorage’, ignoring this repo.
Error: Unable to find a match: dnf dnf-command(config-manager)
============================================================
END OF ERRORS
============================================================
Hello ArVie,
Does your server have a direct access on the net ?
If not, you may try to replace the file /etc/leapp/files/leapp_upgrade_repositories.repo with URL for your own repo cache.
It’s my case, and with our own reposerver, this migration is quite easy !
Hello ArVie,
I’m having the same problem here. I’ve tried several ways to overpass it but nothing seems to work.
Have you found any fix to it?
tx in advance.
Hello,
I tried the upgrade on CentOS 7.9, it froze on libvirtio (I’m writing from memory, it resembled something like that), then forced a reboot and now grub shows the old menu, Alma Linux tries to start, shows a lot of errors, then the cursor flashes and nothing else happens.
I have no clue what to do from here! That server is now down, the upgrade failed.