Okay, you’ve installed Arch—congratulations on that! I know it has a reputation as one of the more challenging Linux distributions to set up, but if you followed our “How to Install Arch Linux” guide, you probably found the process easier than expected.
Now, here you are—logged into your fresh Arch system, greeted by the iconic command prompt… and nothing but a bare Bash shell staring back at you.

Wait, seriously? After all that manual work, setting up partitions, tweaking system settings, installing boot loaders, and everything else… I’m greeted with a plain black screen?
Take your time and don’t rush to disappointment—because that’s actually where Arch’s true beauty and charm lie. Unlike many other distributions that essentially say, “Here’s what we’ve decided for you—take it or leave it,” Arch takes a different approach.
It states clearly and simply, “You’re my master—I’m here to give you all the power to shape me exactly how you want.” Needless to say, this approach has inspired a passionate, almost fanatical following of countless devoted users around the globe. Yes, they use Arch, BTW.
So, do you want to be the creator of your own desktop system? This guide will walk you through everything you need to transform a bare-bones Arch installation into a sleek, fully functional setup built to last.
Think of that black screen in front of you as a blank canvas—minimal, sleek, and waiting for your masterpiece to be painted. There’s no need to stress about the next steps or how to do it—I’ve got you covered. Let me show you.
- Add User and Grant sudo Permissions
- Perform a Full System Update
- Install Basic Utilities
- Enable the Multilib Repository
- Install Microcode Updates on Arch Linux
- Enable Bash Completion
- Install GPU Drivers (NVIDIA/AMD) on Arch
- Install Some Fonts
- Installing a Desktop Environment in Arch Linux
- Install Essential Software
- Install AUR Helper
- Adding Flatpak support in Arch
- Enable TRIM for Your SSD (and Why You Should)
- Install GUI Pacman Frontend on Arch Linux
- Pick the Fastest Arch’s Mirrors
- Conclusion
Add User and Grant sudo Permissions
When you complete an Arch installation, you have just one user: the root superuser account. However, relying on it for day-to-day tasks is a big no-no regarding security. That’s why your first step should be creating a new regular user account.
useradd -m bobbyCould it be simpler? Of course, replace “bobby” in the example above with your desired username. The “-m” flag creates a home directory for the user at “/home/username,” in this case, “/home/bobby.”
Next, set a password for the new user:
passwd bobbyCode language: Bash (bash)Enter and confirm the new password when prompted. The password will not be displayed in the terminal while you are entering it.

Lastly, to allow your new user to run commands with elevated privileges, they need to be added to the “wheel” group, which Arch uses by default to manage sudo access.
usermod -aG wheel bobbyCode language: Bash (bash)Next, ensure the “sudo” and “vi” packages are installed on your system. If missing, you can easily add them by running:
pacman -S sudo viType the command below to open the sudoers file:
visudoCode language: Bash (bash)Go to the end of the file and look for the line that says “%wheel ALL=(ALL:ALL) ALL.” Remove (uncomment) the “#” at the beginning of the line. Once you’re done, it should look like this:
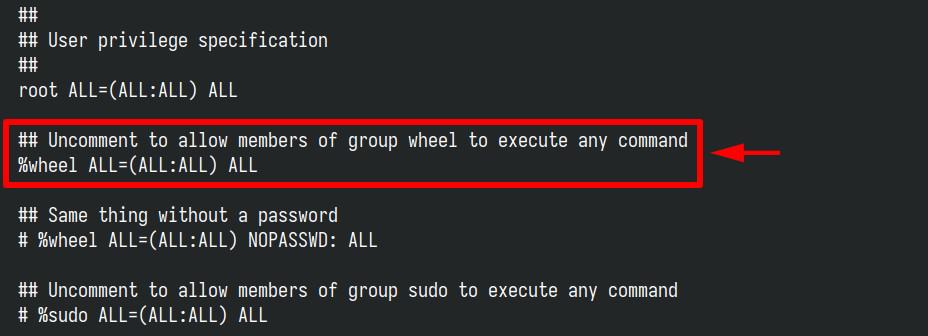
This grants all members of the “wheel” group full sudo privileges. Save the file and exit.
Go ahead and exit the terminal by pressing “Ctrl+D.” Then, log in using the regular Linux user account you added to the “sudo” group. You can now run commands that require administrative privileges by prefixing them with sudo.
For the rest of this guide, we’ll stick to using this account instead of working directly as the root user.
Lastly, if you’d like to increase the time your system skips asking for a password when using sudo commands, check out our guide on adjusting this setting. Just a heads-up, though—setting the timeout too high might not be the safest option, so make sure to strike a good balance.
Perform a Full System Update
Arch is a rolling release distribution, meaning updates are frequent and often include new features, security patches, and bug fixes. Regular updates help ensure your system stays stable and secure.
So, now that we’ve set up a regular user with sudo privileges, the next essential step is to upgrade the packages on our new Arch system, and we’ll take care of that right away.
sudo pacman -SyuCode language: Bash (bash)
This command refreshes your system’s package database to check for updates (if any) and then updates any installed packages to the latest versions available.
Just to add, if you’re looking to master Pacman, Arch Linux’s package manager, we’ve got you covered with a dedicated guide. Trust me, it’s worth checking out.
Install Basic Utilities
It’s a good idea to have certain system tools pre-installed since you will likely need them at some point. Arch doesn’t come with many of them out of the box, so let’s add some essentials:
sudo pacman -S base-devel git curl rsync wget zip unzip nano vim man net-tools dnsutils Enable the Multilib Repository
Arch Linux supports both 64-bit and 32-bit software. By default, Arch installs a pure 64-bit system, which is great for most modern applications. However, some software (like older games or proprietary applications) still needs 32-bit libraries to function.
This is where the Multilib repository comes in—it provides access to precompiled 32-bit packages that work seamlessly on your 64-bit Arch system.
Enabling multilib is straightforward. You’ll need to edit Pacman’s configuration file:
sudo nano /etc/pacman.confCode language: Bash (bash)Scroll down to the bottom of the file until you find this section (it will be commented out by default), and uncomment these two lines to enable the repository:
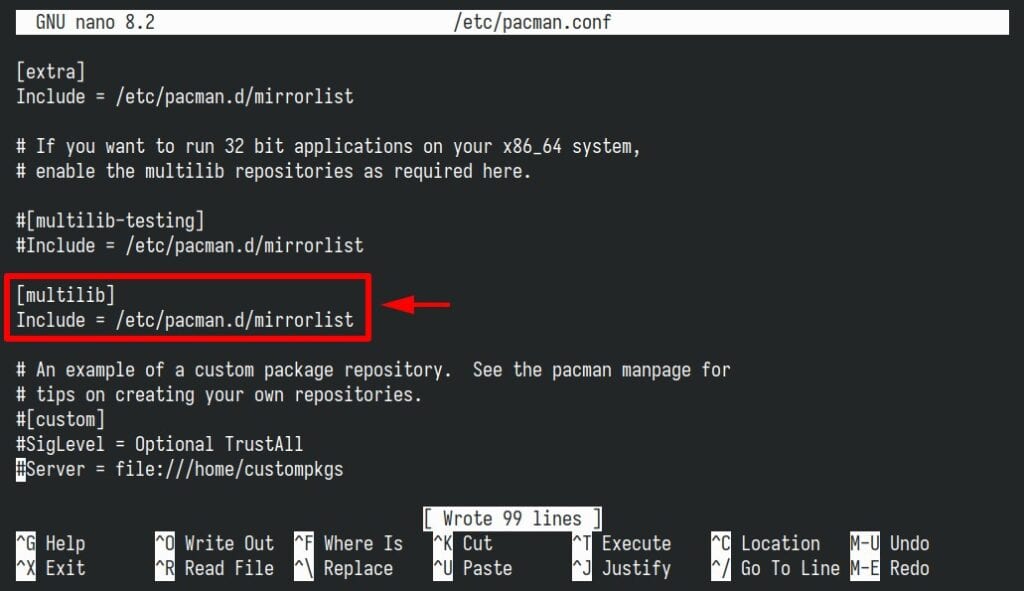
But don’t rush to save the file yet. Let me show you a little trick that will make your work with Pacman easier. What do I mean?
Plain text output can be functional, but a little color improves readability, especially when you’re managing packages frequently. To enable color in Pacman’s output, find the “#Color” line in the “Misc options” section. It will be commented out by default. Simply remove the “#” to enable it:
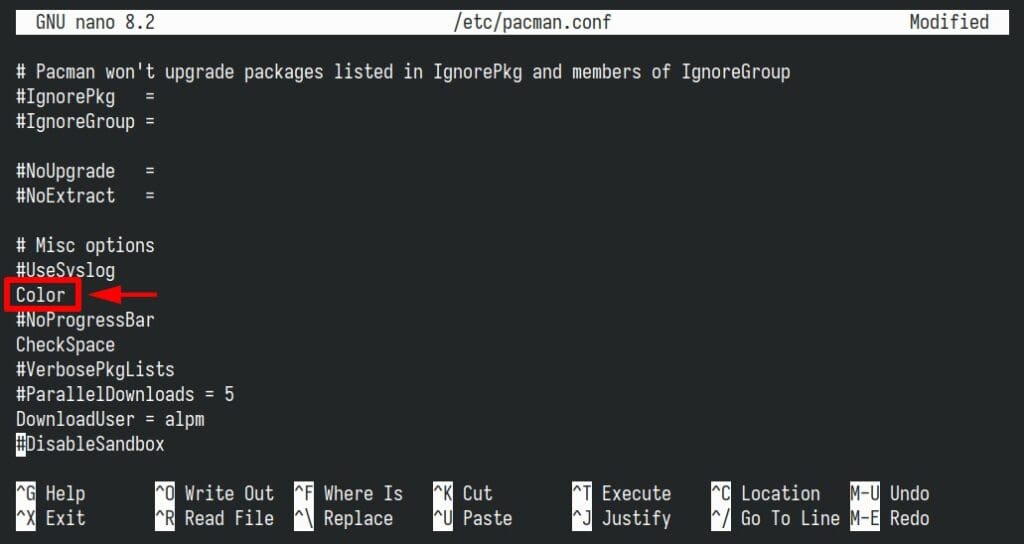
Now you can save the file by pressing “Ctrl+O” and exit with “Ctrl+X.” After that, give your system’s base a quick refresh using the command you’re already familiar with:
sudo pacman -SyuCode language: Bash (bash)
As we can see, the multilib repository is available, and our Pacman commands now have colorful output—how nice is that?
Install Microcode Updates on Arch Linux
One step you might not want to skip after a fresh Arch install is enabling microcode updates. Okay, but what is microcode, and why should you care?
Here’s the deal. Think of it as your CPU’s “firmware.” It’s like a tiny instruction set that tells your processor how to behave in different scenarios. Why does this matter? Because even CPUs have bugs (yep, they’re not perfect). Microcode updates often fix those bugs.
Furthermore, microcode can patch vulnerabilities, like those fancy-named exploits you hear about. Last but definitely not least, it brings performance improvements – sometimes, updates optimize how your CPU handles specific workloads.
In other words, without an updated microcode, your system will still behave well, but it might miss out on these fixes and improvements. Arch provides microcode packages for the two major processor types, Intel and AMD. Not sure about your CPU’s vendor? Run this command to identify your processor type:
lscpu | grep "Vendor ID"Code language: Bash (bash)Now, armed with this information, install the appropriate package. For Intel CPUs:
sudo pacman -S intel-ucodeCode language: Bash (bash)For AMD CPUs:
sudo pacman -S amd-ucodeCode language: Bash (bash)Enable Microcode on Systems Using GRUB
Many Arch Linux installations use GRUB as the bootloader. After installing the microcode package, you need to update GRUB so it knows to load the microcode.
sudo grub-mkconfig -o /boot/grub/grub.cfgCode language: Bash (bash)Check if the microcode file was included. Run:
sudo cat /boot/grub/grub.cfg | grep ucodeCode language: Bash (bash)
You should see a reference to “intel-ucode.img” or “amd-ucode.img.”
Enable Microcode on Systems Using systemd-boot
The microcode file for systemd-boot is placed in “/boot“. These files are named respectively “intel-ucode.img” for Intel CPUs and “amd-ucode.img” for AMD ones. Verify their existence:
ls -l /boot/Code language: Bash (bash)Next, edit the entry file for your system in “/boot/loader/entries/.” Each entry (a file ending with “.conf” extension) corresponds to a boot option. For example:
sudo nano /boot/loader/entries/arch.confCode language: Bash (bash)Add the microcode image before the row containing the initramfs image. Here’s how it looks mine:
title Arch Linux
linux /vmlinuz-linux
initrd /amd-ucode.img
initrd /initramfs-linux.img
options root=UUID=n673ebfa-0298-7817-9615-2c041731d6c2 rw
Code language: Bash (bash)
Save the file and exit. That’s all.
Enable Bash Completion
Arch keeps things minimal, so Bash completion isn’t included by default. At the same time, it’s an extremely handy shell feature that lets you auto-complete commands, file names, and even arguments by pressing the “Tab” key. In short, it’s a huge time-saver and avoids typos in file paths or commands.
To add it to your fresh Arch box, you’ll need to install the necessary package:
sudo pacman -S bash-completionCode language: Bash (bash)Okay, that’s it. But there’s a small detail to address—Bash completion works just fine for commands run with your regular user account but not when you use sudo. Let’s fix that.
Open your “.bashrc” file and add the “complete -cf sudo” line to the end:
nano ~/.bashrc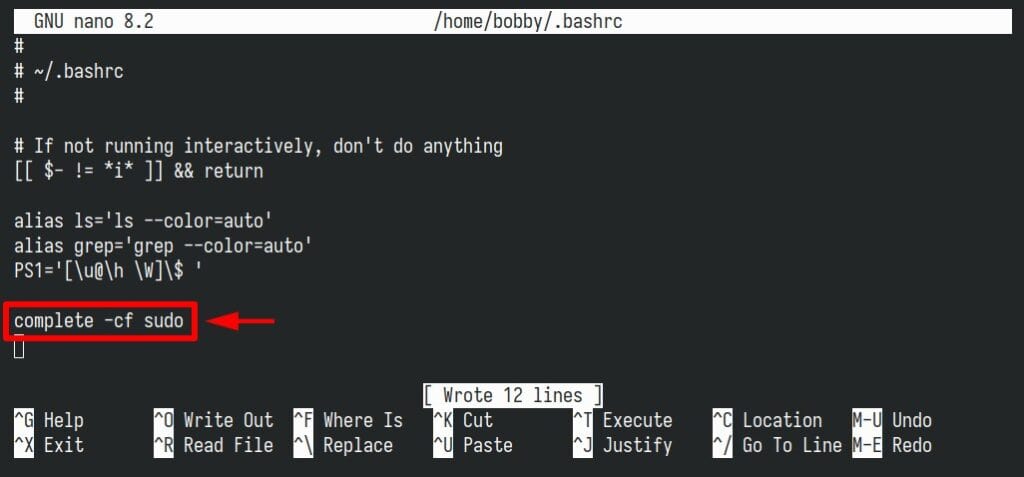
Save the changes, exit the file, and source it:
source ~/.bashrcCode language: Bash (bash)Now start typing a command, then hit “Tab” twice. And just like that, magic happens!

Install GPU Drivers (NVIDIA/AMD) on Arch
One of the most critical aspects of any desktop system is ensuring your graphics card (GPU) runs smoothly. Whether you’re using your system just for everyday office tasks or pushing it to its limits in a high-performance gaming setup, this is essential. And here’s the good news: Arch Linux is hands-down one of the best choices for both scenarios.
Why? It’s simple. Thanks to its rolling nature, Arch consistently provides the latest video drivers, ensuring a top-notch multimedia and gaming experience. Plus, the desktop environments available on Arch are always cutting-edge, packed with the newest features, and fully compatible with modern display protocols like Wayland.
And the best part? It’s all backed by the reliability, consistency, and robust support of the Arch development team. Honestly, what more could you ask for? Now, back to the topic.
Installing NVIDIA Drivers
NVIDIA GPUs rely heavily on proprietary drivers to achieve optimal Linux performance. While open-source alternatives like Nouveau exist, they often lag behind in features and performance compared to NVIDIA’s proprietary offerings.
This is due to limited documentation and closed-source firmware, making proprietary drivers essential for features like gaming, CUDA support, and a smooth desktop experience. That’s why we install the proprietary driver—to ensure you have the best possible experience and can make the most of your NVIDIA GPU. For gamers, it’s a must.
sudo pacman -S nvidia nvidia-utils nvidia-settings lib32-nvidia-utilsCode language: Bash (bash)For additional features like hardware-accelerated rendering, also install the Vulkan drivers and tools:
sudo pacman -S vulkan-icd-loader lib32-vulkan-icd-loaderThe Vulkan-ICD-Loader is essential for using the Vulkan graphics API on Linux and other platforms. It serves as a layer between Vulkan applications and the Vulkan drivers and locates and loads the appropriate Vulkan ICD (Installable Client Drivers) for your GPU at runtime.
Installing AMD Drivers
Unlike NVIDIA, AMD GPUs are open-source friendly for Linux. This means the AMDGPU driver is baked directly into the Linux kernel and supports modern AMD GPUs just out of the box.
So, if you’re rocking an AMD card, you’re (almost) ready to go. Just install additional user-space components:
sudo pacman -S mesa lib32-mesaCode language: Bash (bash)Also, for Vulkan support (important for gaming and other GPU-intensive applications), install the following packages:
sudo pacman -S vulkan-radeon lib32-vulkan-radeonInstall Some Fonts
Before installing the desktop environment, let’s take a moment to address something that really adds a touch of style—fonts. A fresh Arch installation only includes the bare essentials, so let’s spruce things up and get everything looking sharp before we move on.
The distro makes it super easy to install fonts through the official repositories—here are some I recommend installing.
sudo pacman -S noto-fonts noto-fonts-extra ttf-bitstream-vera ttf-dejavu ttf-droid ttf-fira-mono ttf-liberation ttf-opensans ttf-robotoCode language: Bash (bash)Feel free to customize the above list further to match your preferences. If you’d like to dive deeper into installing fonts, I highly recommend checking out our guide, “How to Install Fonts on Linux.” It covers everything you need to know—whether you prefer using the terminal or the tools available in your desktop environment.
Installing a Desktop Environment in Arch Linux
Now comes the part most users find the most exciting—the moment you transform that plain black terminal into a sleek, user-friendly desktop environment complete with a graphical interface and the ease of using a mouse.
Arch Linux offers a wide variety of desktop environments, but here, we’ll focus on installing the two most popular ones: KDE and GNOME.
Installing KDE Plasma
KDE Plasma is known for its modern, highly customizable interface. To install it, run the following:
sudo pacman -S plasma-meta kde-applications-metaCode language: Bash (bash)Let the packages download (around 1,8 GB), and the installation finishes up. After that, there’s just one last step: setting up SDDM, KDE’s display manager (the login screen), and Network Manager (the service that handles your network connections in the background) to start automatically when your system boots.
Simply run the following two commands to make it happen:
sudo systemctl enable sddm
sudo systemctl enable NetworkManagerCode language: Bash (bash)
The moment of truth. Reboot the system:
sudo rebootCode language: Bash (bash)The SDDM display manager will greet you. Just log in, and—boom—you have a brand-new Plasma desktop environment. Congratulations!
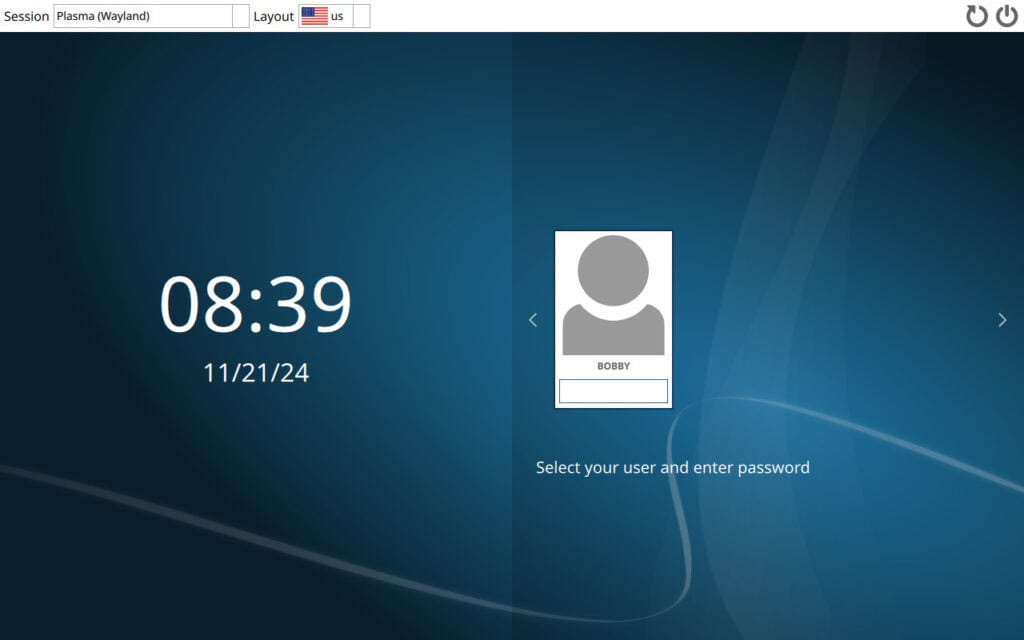
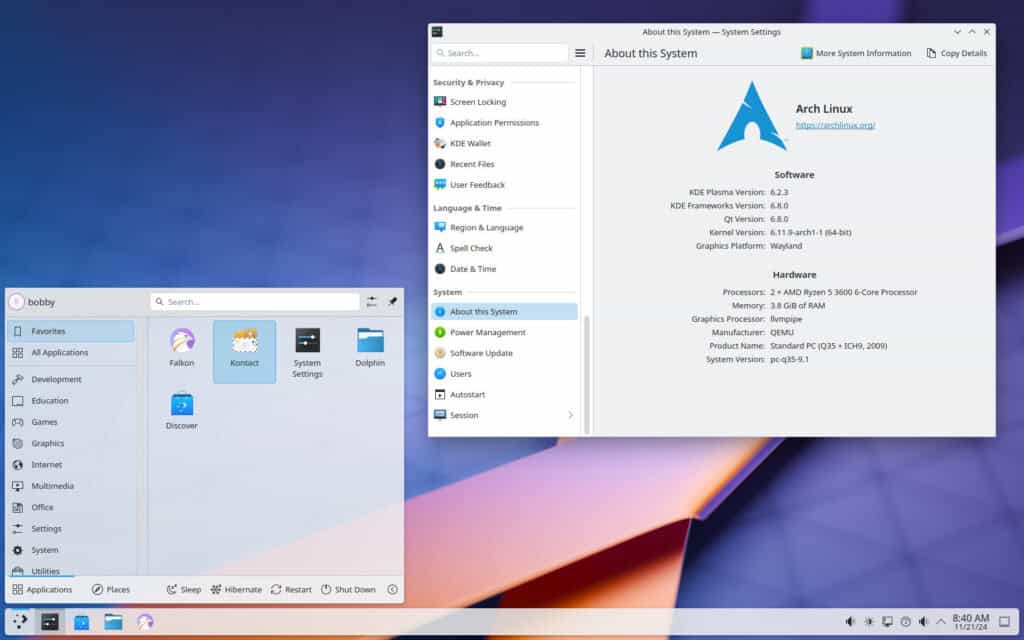
From here, the customization options are virtually endless. Since this is all about your personal taste and style, I’ll leave the fun of tweaking it just how you like it to you. Enjoy!
Installing GNOME
GNOME offers a clean, minimalist design focused on usability and productivity. Install GNOME by typing:
sudo pacman -S gnome gnome-extra networkmanagerCode language: Bash (bash)Next, enable GDM (Gnome Display Manager) and Network Manager services to start on boot:
sudo systemctl enable gdm
sudo systemctl enable NetworkManagerCode language: Bash (bash)
Finally, reboot the system:
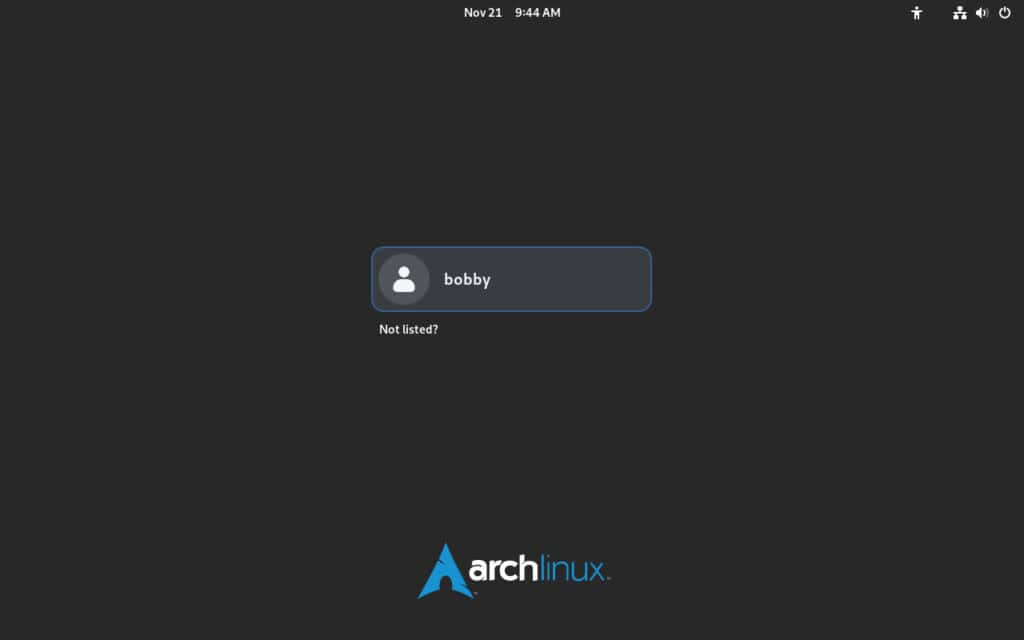
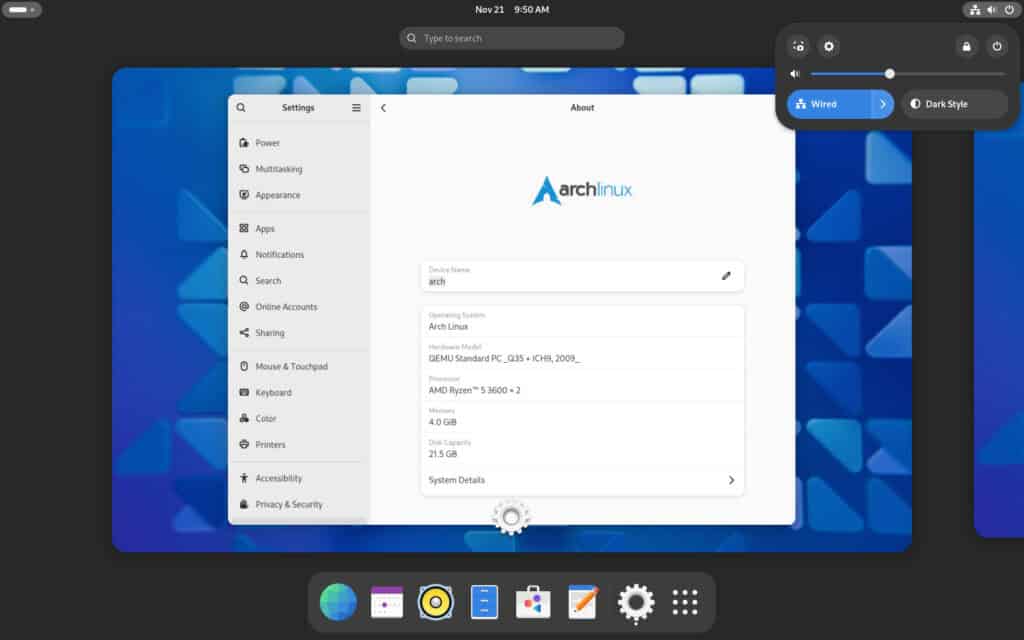
sudo rebootCode language: Bash (bash)GNOME’s GDM will welcome you, and you’ll step right into the vanilla GNOME experience. Enjoy!
Install Essential Software
Once the basics are covered, it’s time to install some software to boost productivity. Personal preferences differ, but as a starting point, I recommend adding a few essentials to your system: Firefox for browsing, LibreOffice for your office tasks, and VLC for multimedia.
sudo pacman -S firefox libreoffice-fresh vlcCode language: Bash (bash)However, if Google Chrome is your browser of choice, check out our guide, “How to Install Google Chrome on Arch Linux,” for step-by-step instructions.
From there, you can easily customize and add your favorite apps to make your new Arch Linux setup truly yours.
Install AUR Helper
One of Arch Linux’s standout features is the Arch User Repository (AUR), a massive collection of user-contributed software packages that expands your options far beyond the official repositories.
But here’s the catch: Pacman can’t work with AUR, and managing AUR packages can be tricky if you do it manually. That’s where an AUR helper like yay comes in handy. With it, you can manage both AUR and official repository packages with a single command.
Run the following four commands to install yay on your fresh Arch system.
sudo pacman -S git base-devel
git clone https://aur.archlinux.org/yay.git
cd yay
makepkg -siCode language: Bash (bash)
It’ll all be done in under a minute. Now you’re all set to dive into the AUR’s treasure trove of software—the secret sauce that truly sets Arch apart from the rest. Need Google Chrome? Just install it:
yay -S google-chromeCode language: Bash (bash)You get the idea. Feeling unsure about how to use AUR? No problem at all—we’ve got your back. Check out our handy guide, “How to Install AUR Packages in Arch Linux,” and you’ll master the basics of AUR and yay in no time.
Adding Flatpak support in Arch
Flatpak has quickly gone from a nice-to-have to an absolute essential. In just a few years, it’s become the go-to standard for distro-agnostic software distribution format. Fortunately, adding Flatpak support to Arch is easy. First, install the Flatpak itself:
sudo pacman -S flatpakThen, add Flathub as its main repository for Flatpak applications:
flatpak remote-add --if-not-exists flathub https://flathub.org/repo/flathub.flatpakrepoCode language: Bash (bash)And that’s all. Now, explore and install any of the thousands of apps available on Flathub. If you’re unsure how to do it, here’s our guide on the subject.
Enable TRIM for Your SSD (and Why You Should)
If you’re running Arch on an SSD/NVMe, you might have encountered something called TRIM. Surprisingly, many users haven’t even heard of it, but it’s one of those features that isn’t just nice to have—it’s vital for keeping your SSD healthy and performing well over the long term. Let me explain.
TRIM is a command that helps your SSD manage its data more efficiently. Unlike traditional hard drives, SSDs don’t overwrite data similarly. Instead, when you delete a file, the SSD marks the space as “unused,” but the data itself isn’t immediately erased.
This can slow down your SSD over time, as it has to do extra work to clear out “unused” blocks before writing new data. TRIM solves this problem by informing the SSD which blocks of data are no longer in use, allowing it to erase them proactively.
In short, enabling TRIM is like giving your SSD regular tune-ups—it stays faster and healthier for longer. The good news is that you’re only two commands away from that. So go ahead, enable TRIM, and enjoy a zippy Arch Linux experience for years to come.
sudo systemctl enable fstrim.timer
sudo systemctl start fstrim.timerCode language: Bash (bash)
To verify it’s working, check the status of the timer to ensure it’s active:
systemctl status fstrim.timerCode language: Bash (bash)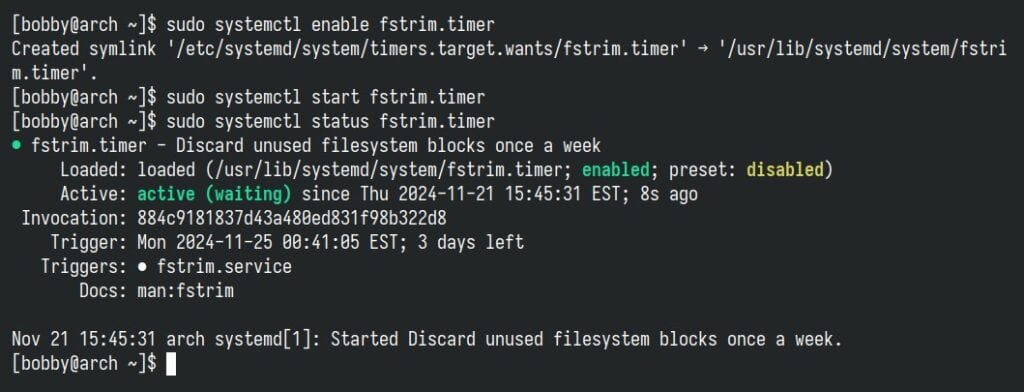
By default, the “fstrim.timer” service is triggered once per week. This interval strikes a balance between maintaining SSD performance and avoiding excessive use of the TRIM operation, which can slightly impact the drive’s longevity if overused.
However, if you prefer to control when TRIM runs, you can execute it manually by passing the path to the mounted partition as the last parameter. For example:
sudo fstrim -v /
sudo fstrim -v /data/Code language: Bash (bash)
After a few weeks of TRIM running and gathering some execution history, you can spot exactly when it started just by checking the journal logs.
journalctl -u fstrim.serviceCode language: Bash (bash)Yes, here we are looking for “fstrim.service” because actually the “fstrim.timer” triggers the “fstrim.service.” This service, in turn, runs on the mounted partitions listed in the “/etc/fstab” file.
Install GUI Pacman Frontend on Arch Linux
You already know about how powerful and flexible Pacman is. But let’s be honest: managing packages from the command line can sometimes feel a bit daunting, especially if you’re new to Arch. That’s where Pacman’s GUI frontends come to the rescue.
One is Octopi, a graphical user interface for Pacman and AUR helpers like Yay. It makes searching, installing, updating, and removing packages a breeze, all with a user-friendly visual interface. So, if you’ve been yearning for a more visual way to manage your packages without giving up Arch’s freedom, Octopi is a great addition to your toolkit.
It’s available in AUR. To install it, run the following:
yay -S octopiCode language: Bash (bash)After installation, you can launch Octopi (and Octopi Notifier) from your application menu. When it opens, you’ll be presented with a clean interface with tabs for installed packages, available updates, and more.
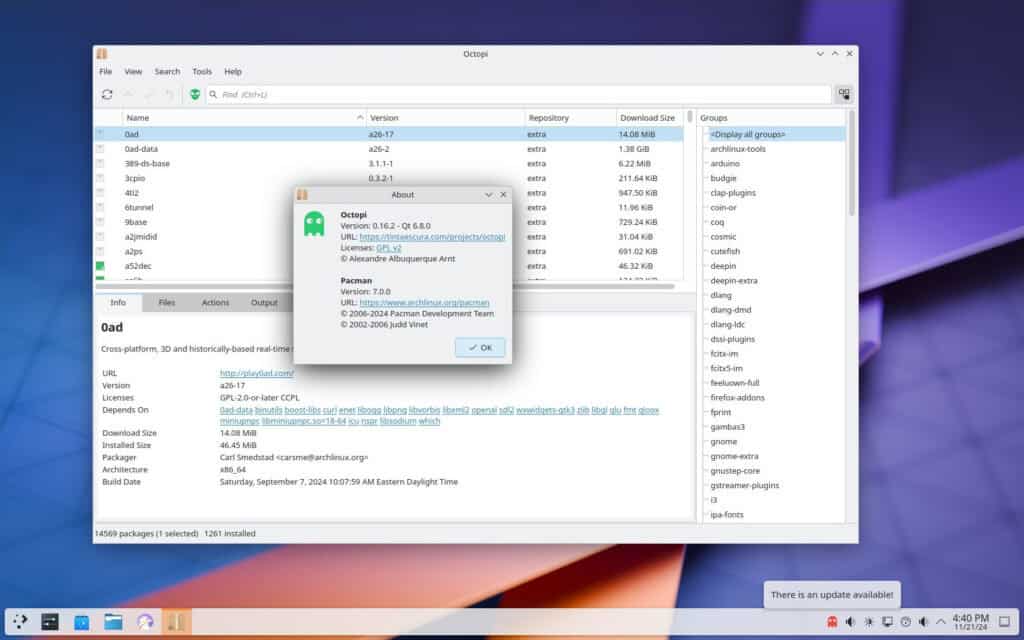
Remember to enable AUR support in the Octopi settings by going to “Tools” > “Options” > “AUR.” Then, to include the AUR repository in your operations, click the green alien icon next to the search button.
Pick the Fastest Arch’s Mirrors
Arch Linux’s package base receives many updates thanks to its rolling-release nature. It’s common to find over 100 packages ready to be updated after just a few days. Having fast and up-to-date mirrors is essential to enjoying these perks without frustrations.
While Arch’s default mirror list does the job, it may not always provide the fastest or most reliable options. I mean, over time, slow or outdated mirrors can turn a routine pacman update into a tedious ordeal.
Fortunately, the distro provides an automatic tool, Reflector, which helps you find and rank Arch mirrors by speed, location, and freshness. It’s included in Arch’s official repositories, so installing it is straightforward:
sudo pacman -S reflector rsyncCode language: Bash (bash)Then, to fetch a list of the five fastest among the ten most recently synced Arch’s mirrors, run this command:
sudo reflector --latest 10 --sort rate --fastest 5 --save /etc/pacman.d/mirrorlistCode language: Bash (bash)After running this command, your system will prioritize the fastest mirrors and automatically generate and save the corresponding “/etc/pacman.d/mirrorlist” file for you. From now on, no more slow system updates.
To learn more about Reflector and make the most out of it, refer to our comprehensive “Finding the Most Up-to-Date and Fastest Arch Linux Mirrors” guide.
Conclusion
Arch Linux’s flexibility is one of its greatest strengths, but that freedom also comes with the responsibility to build a setup that works best for you. Taking the time to complete essential post-installation steps is an investment in a smooth and personalized experience.
By following the steps outlined above, you’ll have a solid foundation for everyday use, whether you’re a developer, gamer, or just someone who appreciates the beauty of a minimalist and powerful system.
Absolutely, there’s plenty more that could be added to the list. Personally, I tackle a bunch of other tweaks and setups, but those are more tailored to my own specific needs. For this guide, I aimed to keep the suggestions relevant to a broader audience.
Finally, I’d love to hear your thoughts—what do you consider essential after installing Arch? Drop your ideas in the comments to help make this guide even better. In the meantime, don’t forget to check out Arch’s official post-installation recommendations. And… Happy Arching!

Nice guide! I'm a long time Arch user and even I picked up a few things I hadn't yet thought to enable (the fstrim stuff mainly), so thanks!
The only thing I'd add is that some might prefer pamac-aur to octopi. I find it a bit more full featured and flexible than octopi despite it not being qt based. Also, there's a nice gui for reflector in the aur called reflector-simple. It comes with EndeavourOS and works well in my experience so I add it to Arch too.
As for my own apps that get installed first, it's always mc, htop and gparted. Midnight Commander (mc) may be my favorite Linux program ever. It's a Swiss Army knife of cli goodness, making even complex console tasks point and click easy.
I still wonder why people find Slackware Linux difficult to learn ? I would never been able to guess all what I need to do just to have a simple desktop computer usable 🙂 No offence, Arch is a super updated and fine distro, nothing against, but to me personally it seems very complicated to do all that basic tools installing by hand at bare install. Anyway, I would never guess all that even after more than 25 yewars on Slackware 😀 .
NIce guide to post-installing Arch, although there might be more than a few who would rather prefer installing lighter desktops and display manager than the "popular" KDE Plasma, GNOME and SDDM. Am thinking of XFCE (and/or LXQt) for the former and LightDM for the latter 🙂
Best and very useful article. Thank you very much