Some tasks are still best accomplished via the command line, even with sophisticated modern desktop environments jam-packed with administrative tools, utilities, and productivity software, all with appealing graphical user interfaces.
A terminal emulator allows you to use the power of the command line on your desktop. In addition, the terminal window provides access to a console and its applications, such as command-line interfaces (CLI) and text user interface software.
What’s Kitty GPU-Accelerated Terminal Emulator
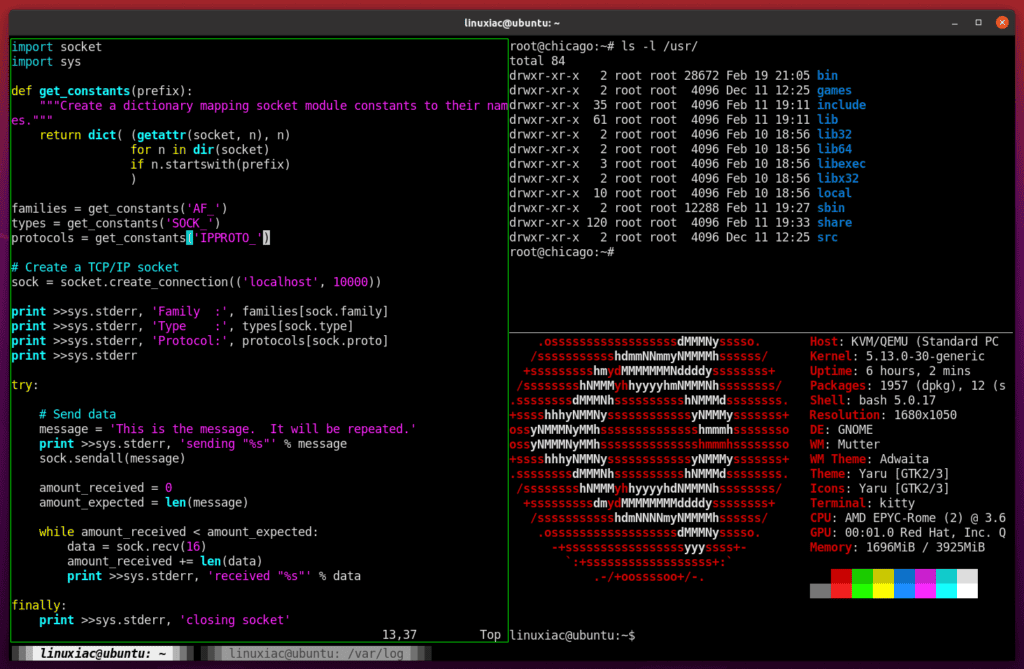
Kitty is a GPU-powered terminal emulator which uses OpenGL for processing and runs on multiple platforms. This means it uses a GPU for rendering instead of a CPU. As a result, it is extremely fast and efficient by nature.
But why would you need a GPU accelerated terminal? In short, it’s all about speed! Offloading rendering to the GPU helps in a couple of ways. First, it helps to reduce system load and provide smoother scrolling.
Kitty’s biggest claim is that it’s one of the fastest terminal emulators available. It is designed for power keyboard users.
Kitty is packed with features, supports tabs, splits, and true colors. Most of Kitty is written almost entirely in Python. The Objective C code is very thin on the ground indeed, and most of it is macro-based or just calling functions in other libraries.
In addition, Kitty is exceptionally configurable. There is mouse support available, which allows you to open URLs, double-click, triple-click, right-click, and do other things. On top of that, it is simple to control from the shell prompt, SSH, and scripts.
It’s essential to understand that terminals don’t just render what you see but also everything that programs output, which can be massive amounts of text, causing non-accelerated terminals to crash.
Some terminals will begin to update infrequently to save themselves, while others will hang completely while burning the CPU.
Installing Kitty Terminal Emulator in Linux
Kitty’s installation can be done using package managers, as shown below.
Ubuntu and other Debian-based distros can install the Kitty terminal emulator using the apt command below:
sudo apt install kittyOn Arch Linux, the Kitty emulator is available for installation via Pacman:
sudo pacman -S kittyOn Fedora, the Kitty terminal emulator is available for installation via the Fedora default software repositories:
sudo dnf install kittyOn RHEL-based distros like AlmaLinux or Rocky Linux, you first need to install the EPEL repo:
sudo dnf install epel-releaseThen install the Kitty terminal emulator:
sudo dnf install kittyIf you’re using openSUSE and want to use the Kitty terminal emulator, you’ll be able to install the app with the following Zypper command:
sudo zypper install kittyOnce installed, Kitty can be launched from the Activities menu. First, go to the application launcher and search for ‘kitty.’ When its icon appears, click to run the same.

Customize Kitty Terminal Emulator
The Kitty terminal emulator is customized using a configuration file. In this section, we’ll go over some basic customization options.
First, copy the sample configuration file kitty.conf to the Kitty configuration directory.
cp /usr/share/doc/kitty/examples/kitty.conf ~/.config/kitty/Code language: JavaScript (javascript)To start the customization, open the kitty.conf file for editing using your preferred text editor.
vim ~/.config/kitty/kitty.confCode language: JavaScript (javascript)Font size is the most obvious customization because Kitty’s font is small by default. So let’s increase it to 13.

Now let’s try to make Kitty’s window a little more transparent. To do this, we need to change the background_opacity option from 1 to about 0.8.
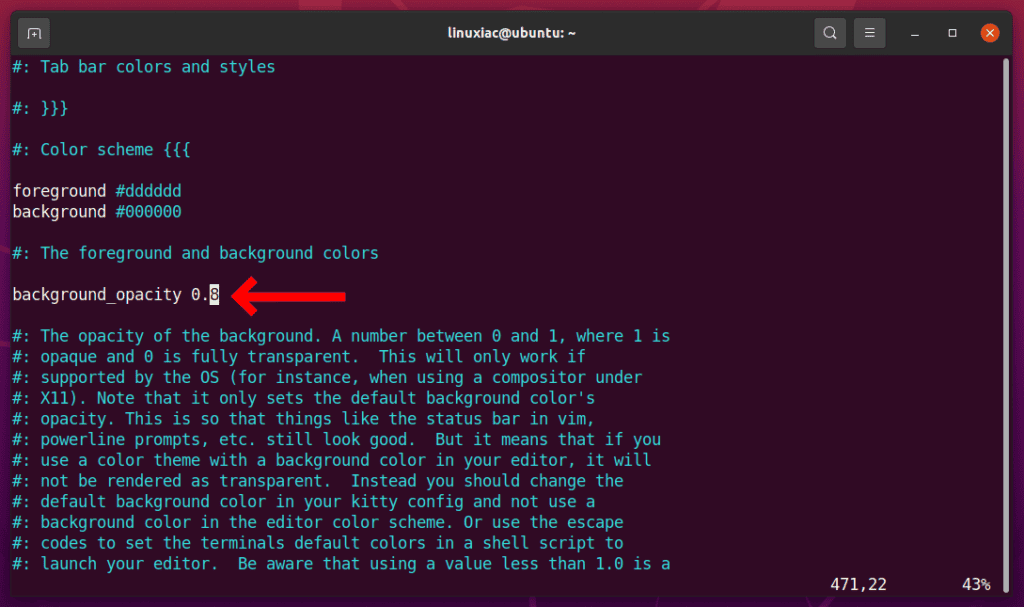
Remember that if you have opened Kitty, you must close it and reopen it for the changes to take effect. Now, let’s check the result of the changes made.
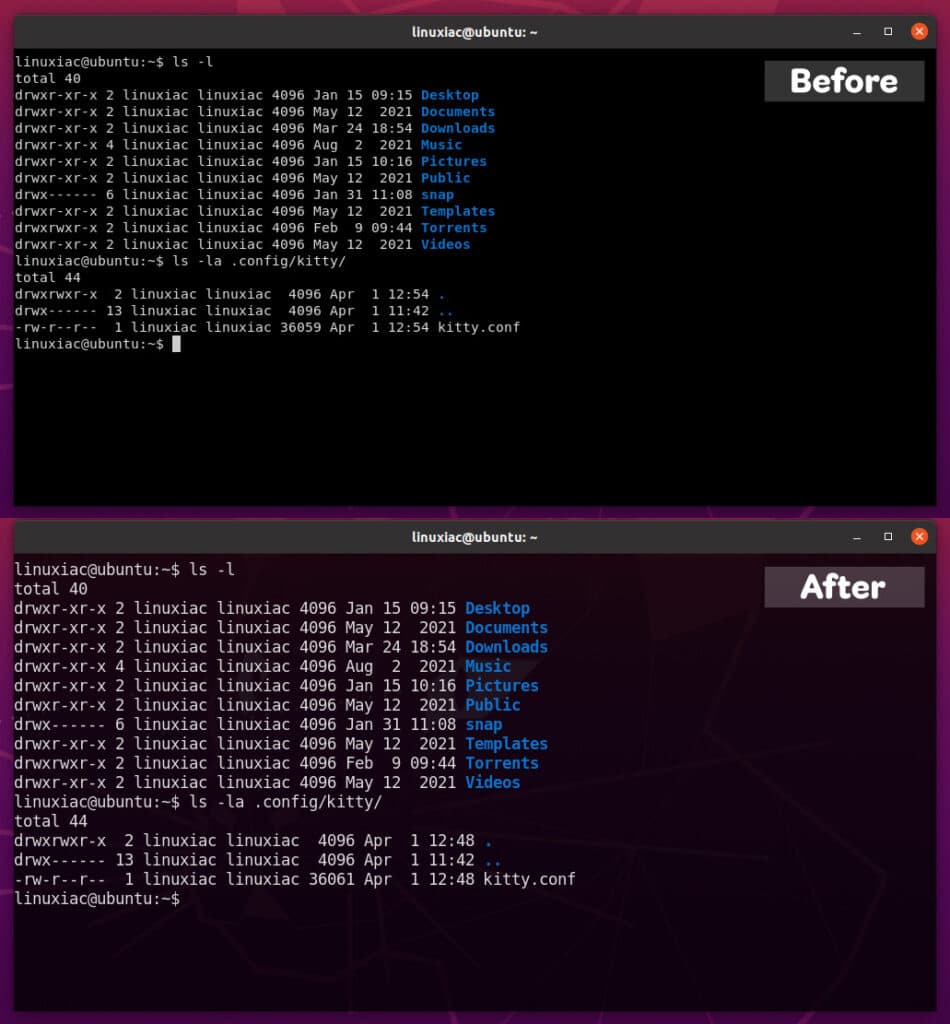
At this point, I think the basic idea is clear. As you’ll see, kitty.conf contains a myriad of configuration options that allow you to change this terminal emulator’s view or behavior completely. You can see their complete list on Kitty’s website.
Kittens
Kitty comes pre-packed with some cool features called Kittens, which can come in handy many times. They are used to add features to Kitty itself and create useful standalone programs.
For example, The icat kitten can display images in the terminal. Using it is as simple as:
kitty +kitten icat [IMAGE_FILE]Code language: CSS (css)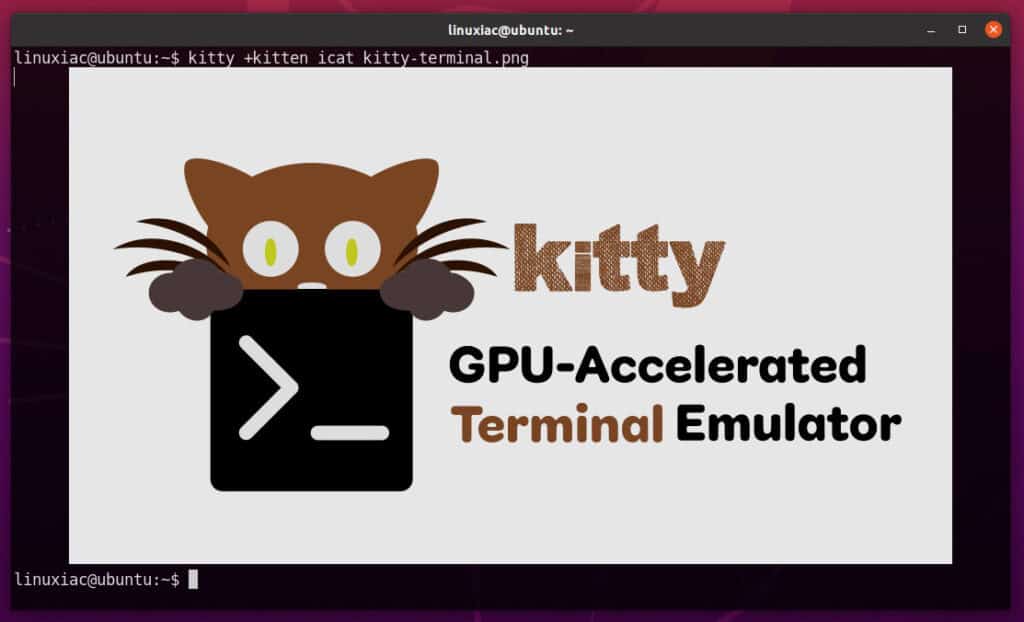
You need to have ImageMagic installed on your Linux system for this kitten to work.
SSH Kitten: Solve Terminal Issues with SSH
Sometimes you can get errors about the terminal being unknown or opening the terminal failing when SSH using Kitty into a remote computer. This happens because the Kitty terminfo files, a group of routines within the curses library that handles specific terminal capabilities, are unavailable on the remote server.
Fortunately, the solution is simple – copy over the terminfo. Kitty has an SSH Kitten to automate precisely this.
kitty +kitten ssh user@hostCode language: CSS (css)Furthermore, you may also alias it to something short in your ~/.bashrc files to prevent having to type it every time:
alias s="kitty +kitten ssh"Code language: JavaScript (javascript)Window Splits
Kitty can define its windows, tiled next to each other in arbitrary layouts. A layout is an arrangement of multiple Kitty windows inside a top-level tab.
To split the window, use the keyboard shortcut Ctrl+Shift+Enter.
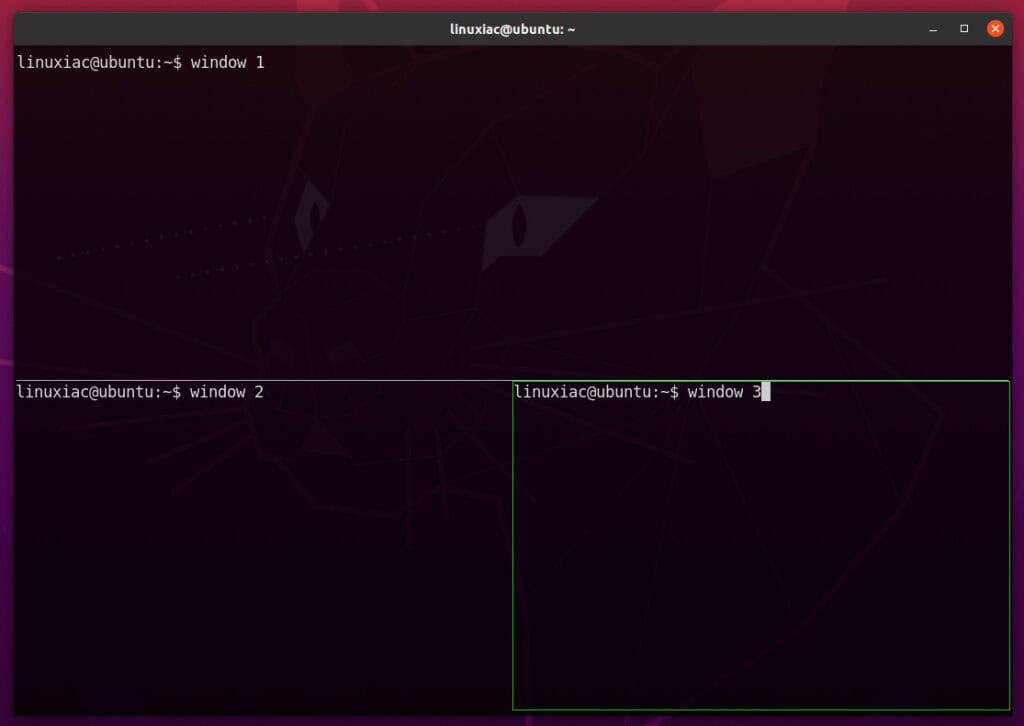
Using the keyboard shortcut Ctrl+Shift+[ or Ctrl+Shift+], you can switch between the different windows.
The windows can be arranged in multiple layouts using the Ctrl+Shift+L keyboard shortcut.
Tabs
Kitty can run multiple programs organized into tabs as each tab consists of one or more windows. To open a new tab, use Ctrl+Shift+T.
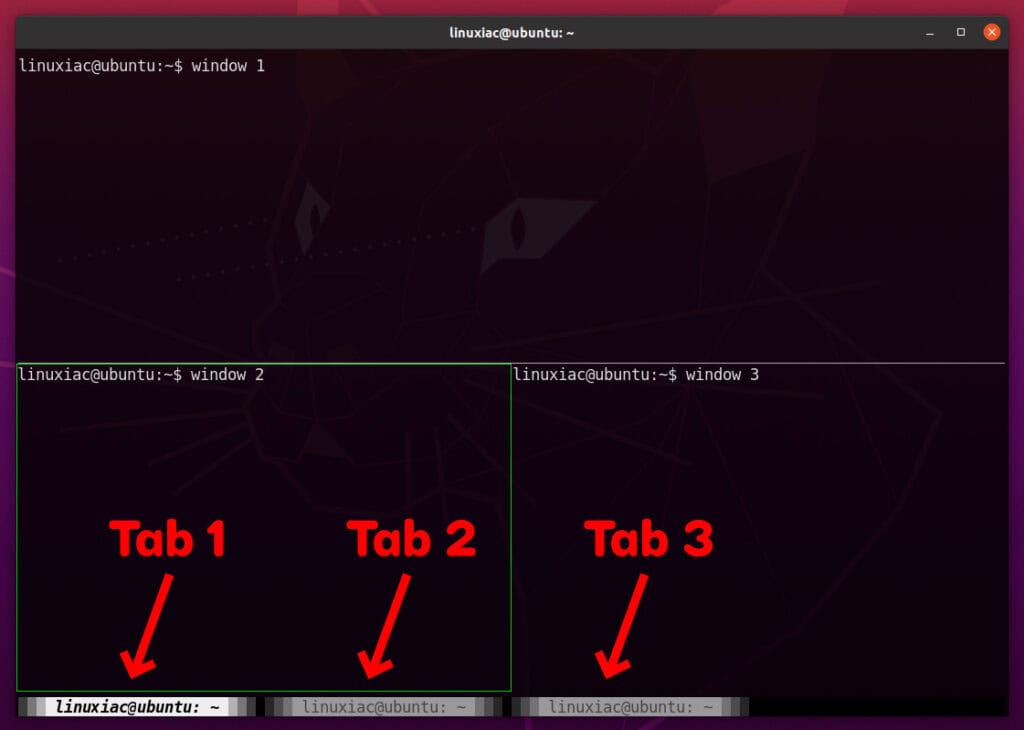
Switching between tabs is possible using Ctrl+Shift+Left or Ctrl+Shift+Right.
Essential Kitty Terminal Emulator Shortcuts
The following are some useful shortcuts to use with Kitty.
Windows
| New Window | Ctrl+Shift+Enter |
| Close Window | Ctrl+Shift+W |
| Next Window | Ctrl+Shift+] |
| Previous Window | Ctrl+Shift+[ |
Tabs
| New Tab | Ctrl+Shift+T |
| Close Tab | Ctrl+Shift+Q |
| Next Tab | Ctrl+Shift+Right |
| Previous Tab | Ctrl+Shift+Left |
| Resize Tabs | Ctrl+Shift+R |
Scrolling
| Line Up | Ctrl+Shift+Up |
| Line Down | Ctrl+Shift+Down |
| Page Up | Ctrl+Shift+Page_Up |
| Page Down | Ctrl+Shift+Page_Down |
| Top | Ctrl+Shift+Home |
| Bottom | Ctrl+Shift+End |
Other
| Copy to Clipboard | Ctrl+Shift+C |
| Paste from Clipboard | Ctrl+Shift+V |
| Paste from Selection | Ctrl+Shift+S |
| Increase Font Size | Ctrl+Shift+Equal |
| Decrease Font Size | Ctrl+Shift+Minus |
| Toggle Fullscreen | Ctrl+Shift+F11 |
Conclusion
This article taught you how to install Kitty on Linux and its primary usage as a terminal emulator.
Kitty is a fantastic terminal emulator with so much customization that it facilitates a “mouse-free” workflow. In addition, it is s super-fast, very stable, and well maintained.
Of course, Kitty has many other cool features and customization, so check it out.

A couple of things to add
Kitty has a default keyboard shortcut to reload the config file CTRL-CMD-comma on MacOS and CTRL-SHIFT-F5 (I think) on Linux.
If you use console vim with kitty you need to add
let &t_ut=”
to your vimrc to get the background colors to render correctly.