
Have you ever found yourself in the dilemma of running out of space on your KVM virtual machine’s disk? Well, you’re not alone! Whether it’s for installing new software, accommodating more data, or just giving your VM a little room to breathe, extending your KVM virtual disk size is a task we all face at some point. But fret not!
In this article, we’ll guide you through resizing (extending) a KVM virtual disk size efficiently and safely, ensuring you have all the space you need in a hassle-free manner.
But before we roll up our sleeves and get into the disk resizing, let’s take a quick detour to understand the main characters in our story: the KVM disk types.
KVM Virtual Disk Types
The KVM (Kernel-based Virtual Machine) world primarily uses two types of disk files – qcow2 and raw, with qcow2 being the most common.
- qcow2: Think of qcow2 as the Swiss Army knife of disk files. It’s flexible and supports features like snapshots (capturing the state of a VM at a particular point in time), compression (to save space), and encryption (to keep your data secure). It’s a file format designed to be as convenient as possible, balancing performance and features.
- raw: The raw disk type is the straightforward, no-frills option. It’s like a blank canvas, offering high performance and simplicity. Raw files are essentially unformatted blocks that the virtual machine can directly and efficiently access. They lack the advanced features of qcow2, but their simplicity and speed are unbeatable for specific tasks.
Armed with this knowledge, you’re ready to resize your KVM virtual disks, ensuring your virtual machines have all the space they need to thrive. So, let’s show you how to do it.
Extend KVM Virtual Machine Disk Size
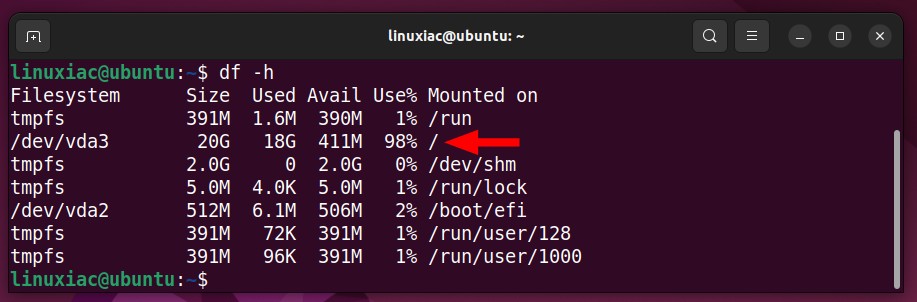
To begin with, here’s what the situation looks like with our KVM virtual machine, whose disk we want to extend.
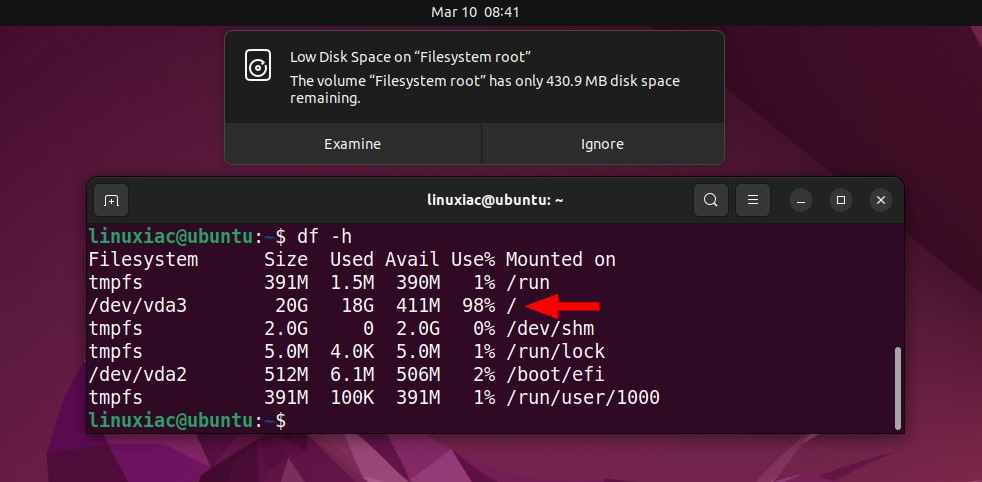
Yes, it seems we’re in a tight spot – our 20 GB disk is nearly maxed out at 98% capacity, as you can tell from the image. But do not worry. As mentioned, we can expand it in just a few minutes. So, let’s dive in and get started
Step 1: Identify the Virtual Disk
First, we need to identify the KVM’s virtual disk file you wish to resize. Let’s first list all virtual machines using the virsh command:
sudo virsh list --allCode language: PHP (php)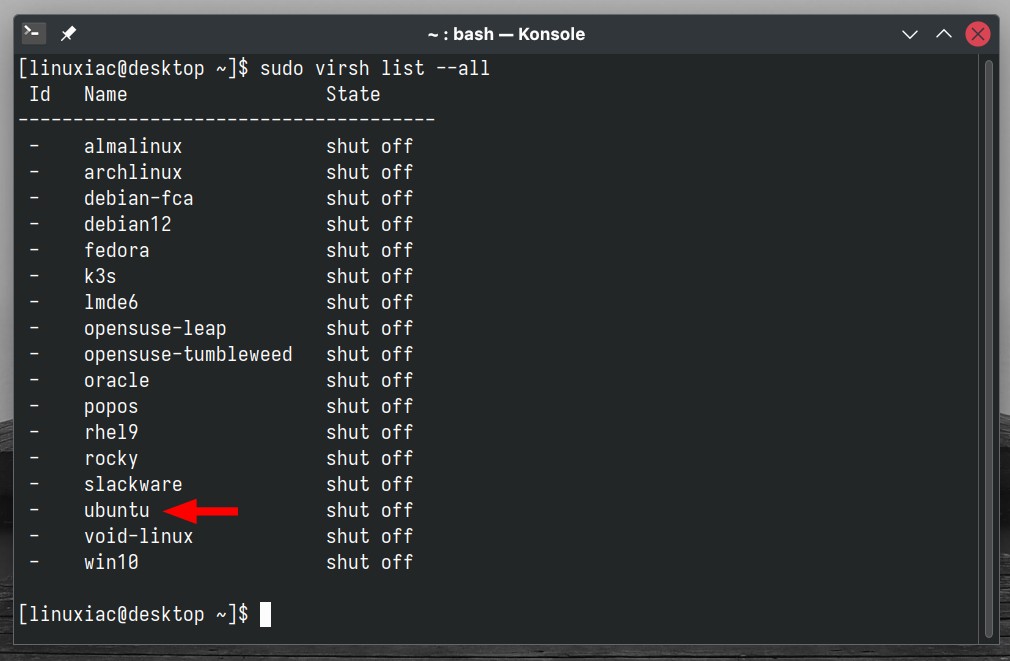
The KVM virtual machine on which we will extend the disk is named “ubuntu” (in KVM terminology, a virtual machine’s name is referred to as the term domain) and is presently shut down. But if it was on, we’d have to turn it off first because we can’t resize the disk while it’s running. To turn it off, just run:
sudo virsh shutdown <vm_name>Code language: HTML, XML (xml)Which, in our case, would be:
sudo virsh shutdown ubuntuAfter identifying the precise name of the virtual machine, our next step is to locate its virtual disk’s absolute path, which corresponds to a singular physical file. To achieve this, we will execute the following command:
sudo virsh domblklist ubuntu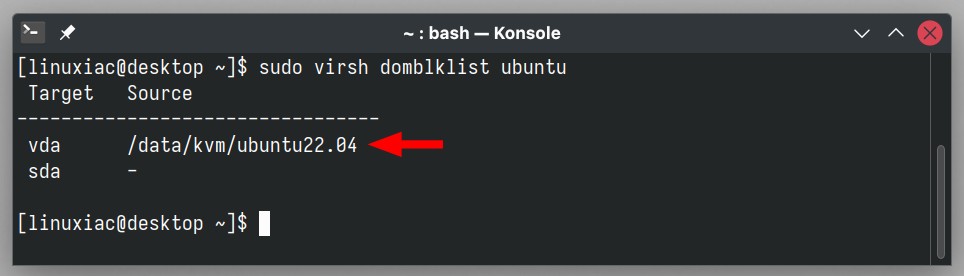
The command output above shows that the complete path to the “ubuntu” virtual machine’s virtual disk is “/data/kvm/ubuntu22.04“.
Additionally, we can retrieve more details about the virtual disk, such as its current size, by executing the qemu-img info command following by the full path to the VM’s disk:
sudo qemu-img info /data/kvm/ubuntu22.04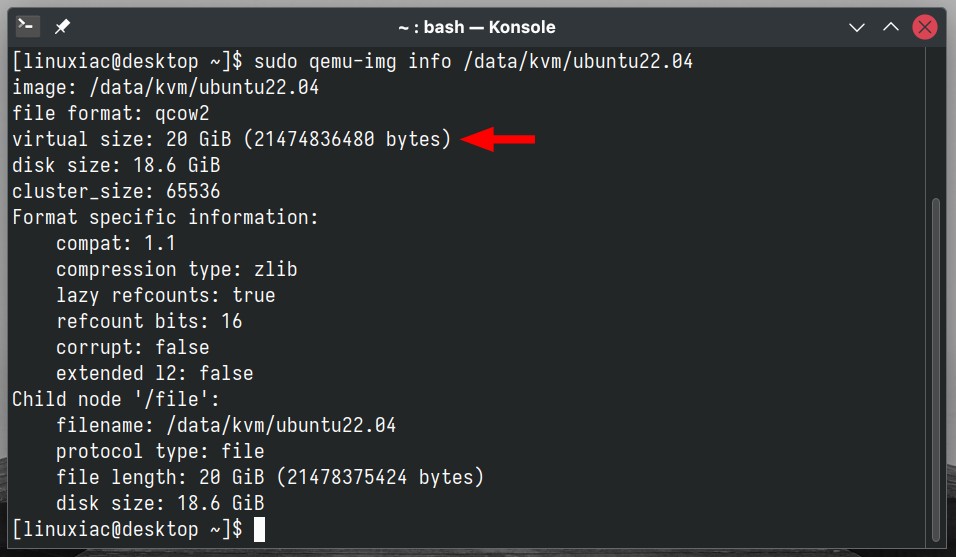
As you can see, the information shown confirms that our current disk size is 20 GB.
Step 2: Check for Snapshots
Before proceeding, it’s important to ensure that our virtual machine has no snapshots. This is because KVM doesn’t permit disk resizing when snapshots exist. To verify if there are snapshots for a specific virtual machine, we execute the following command:
sudo virsh snapshot-list ubuntuCode language: PHP (php)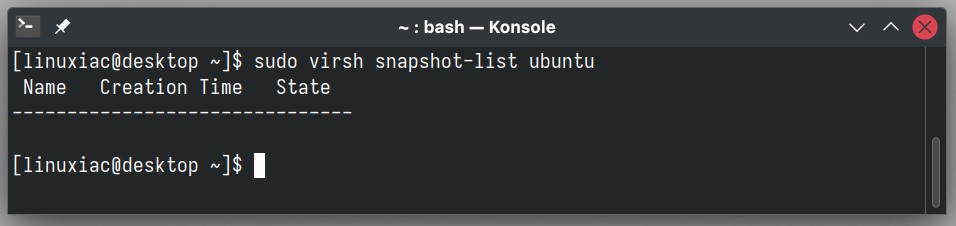
In our case, no snapshots have been created for this virtual machine. However, if there are any, they should be removed using the command below before proceeding.
sudo virsh snapshot-delete <vm_name> <snapshot_name>Code language: HTML, XML (xml)Step 3: Resize the KVM Virtual Disk
Now, we are all set to resize the KVM virtual disk file using the qemu-img command. For example, to increase the size of our “ubuntu” VM disk from 20 to 30 GB, or in other words, adding more 10 GB, we will use:
sudo qemu-img resize /data/kvm/ubuntu22.04 +10GUpon rechecking the file size of our virtual disk, we’ll find that it has been successfully increased by 10 GB, from 20 GB to 30 GB.
sudo qemu-img info /data/kvm/ubuntu22.04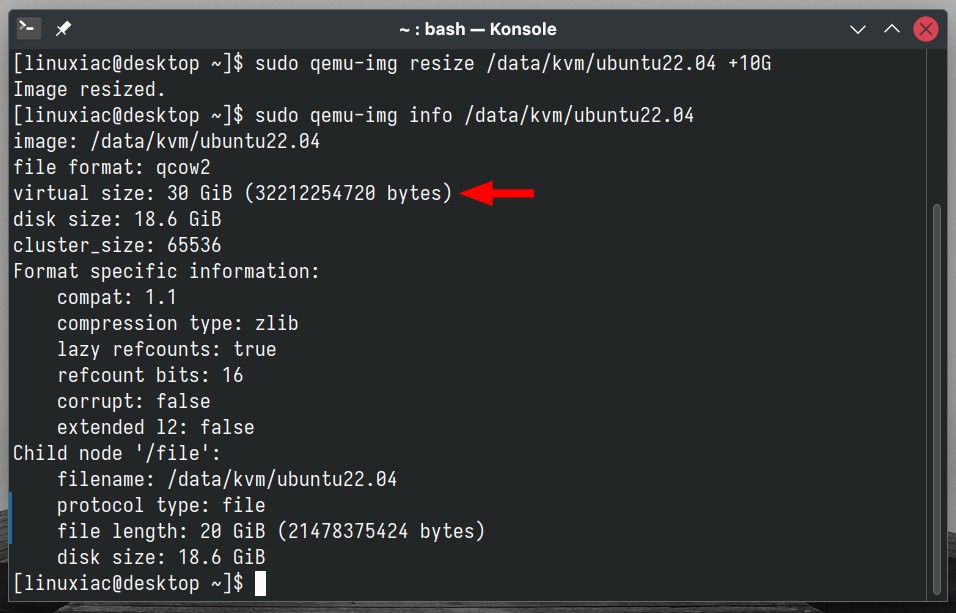
However, have you spotted something very important in the image above? The virtual size has bumped to 30 GB, yet the root disk size field still hovers around 20 GB.
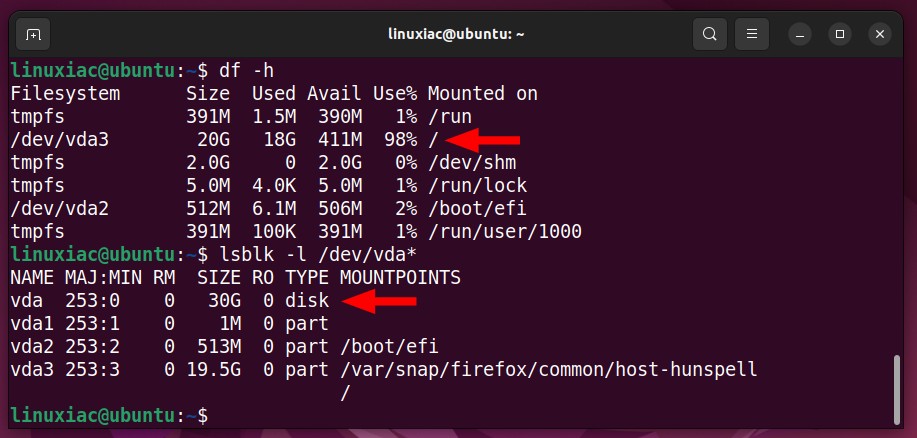
If you dive into your virtual machine, you’ll notice the root file system size appears to still be 20 GB. At the same time, when we use lsblk to list the block devices, it conveniently displays the updated size of 30 GB.
You might be wondering, “What’s happening? I’m confused.” But no worries, all is as it should be. Let me break it down for you.
When you use the qemu-img resize command, you’re expanding the disk file where all the data lives, making it capable of holding more stuff. It’s a bit like getting a bigger backpack for school. However, just because the backpack is bigger doesn’t mean you’ve automatically got more notebooks or textbooks inside it.
Similarly, the file system inside your virtual machine – the organizational structure that decides how data is stored – doesn’t automatically stretch to fill that new space. It’s still using the old setup it had before.
To use that extra space, you need to tell the file system to expand and take up the room in the larger container. Otherwise, the new capacity won’t be accessible to the Linux operating system on your KVM virtual machine.
And that’s exactly what we’ll show you how to do it now.
Resize the Partition and Filesystem
It is essential to understand that resizing a filesystem partition is a two-step process:
- Deleting and recreating the partition table with the new size
- Absorbing the new size from the OS
While step one is generic to all cases, step two is strictly specific to your file system. Below, we’ll look at how to do this with Linux’s three most widely used file system types – ext4, XFS, and Btrfs.
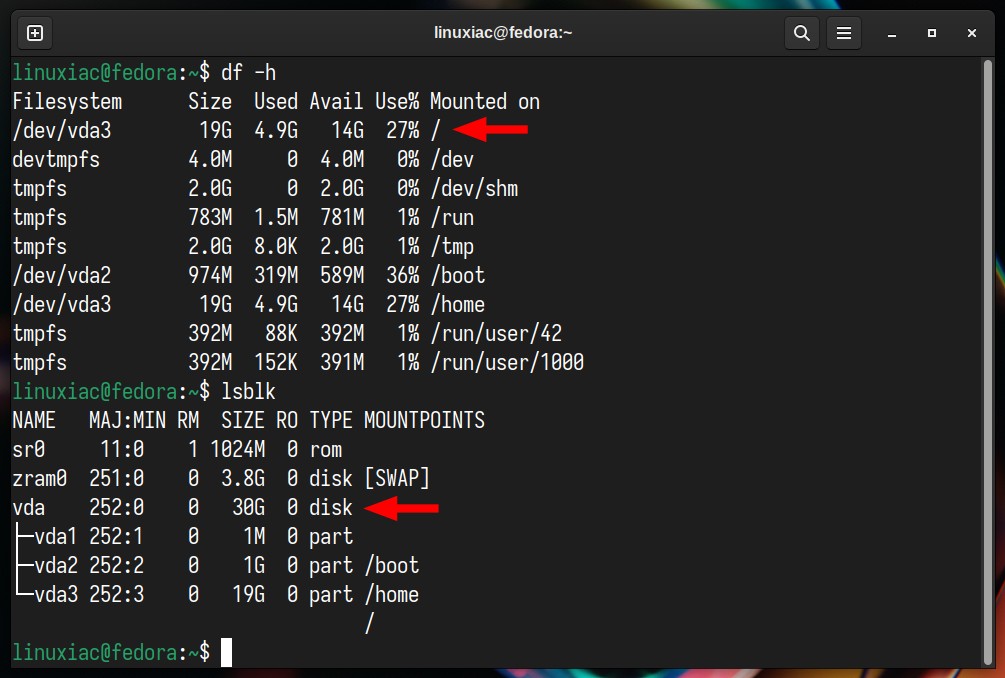
Log on to the KVM virtual machine whose disk you will be resizing. To find out what file system you are using, type the following command:
df -Th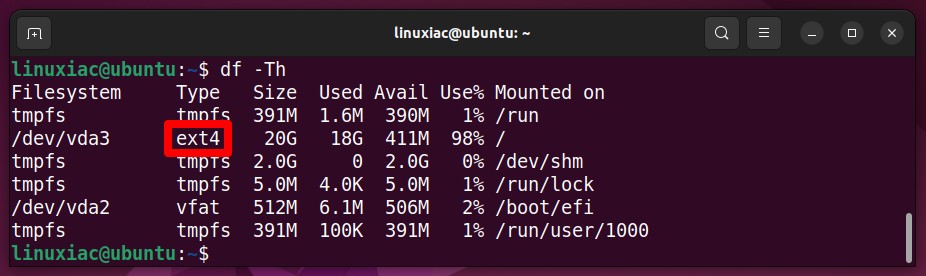
The “Type” column indicates that the filesystem for the “/dev/vda3” partition, which we plan to resize, is ext4. This filesystem is notably the most widely used within the Linux ecosystem.
From here on, the following commands must be executed with caution. We will use the fdisk tool to resize the disk partition.
sudo fdisk /dev/vda
Press “p” and hit “Enter” to view the disk’s partition layout. For us, the partition set to expand by 10 GB due to the qemu-img resize command is the root (“/“) partition, identified as “/dev/vda3“.
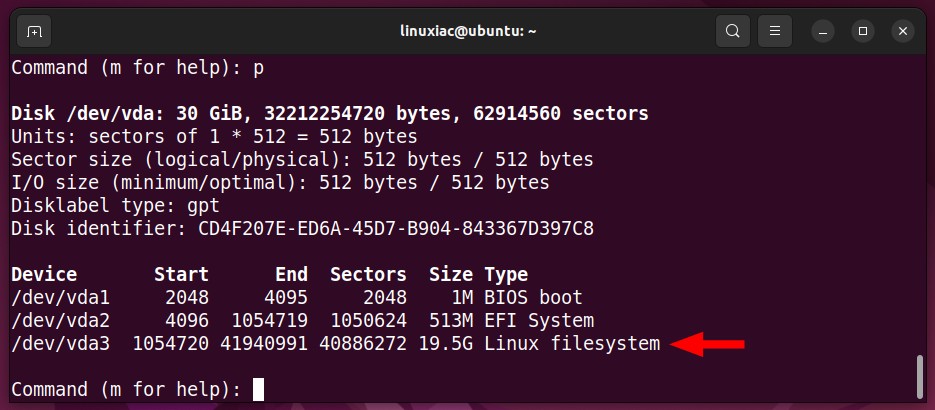
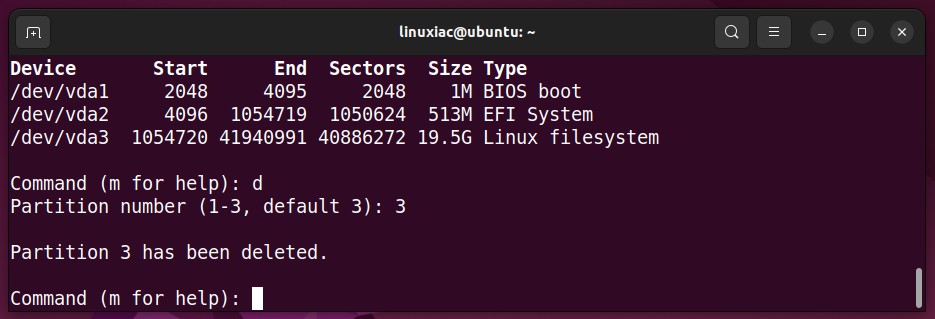
Press “d” and hit “Enter“. You will then be prompted to select a partition for deletion. We opt for 3, as this number corresponds in order to our “/dev/vda3” partition.
It is crucial to understand that you’re not erasing the data stored on this partition by deleting it. Rather, you’re merely removing the partition’s information table, which does not equate to physically removing the files stored on it.
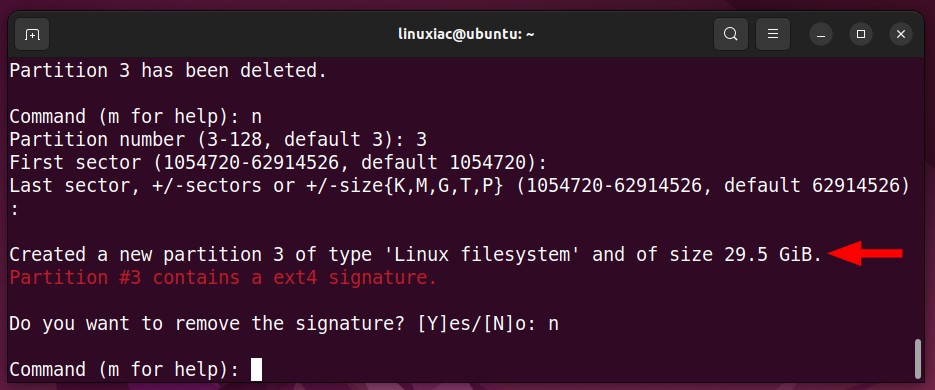
To recreate the disk partition, press “n” and then confirm by hitting “Enter.” When prompted for the partition number, input the one you previously deleted, which is 3. For the following prompts regarding “First sector” and “Last sector “, simply press “Enter” to accept the default values. When asked whether you want to remove the current partition’s signature, answer with “n.”
You’ll be notified that a new partition has been successfully created. It now boasts the desired size of 30 GB, which includes the additional 10 GB added through the qemu-img resize command.
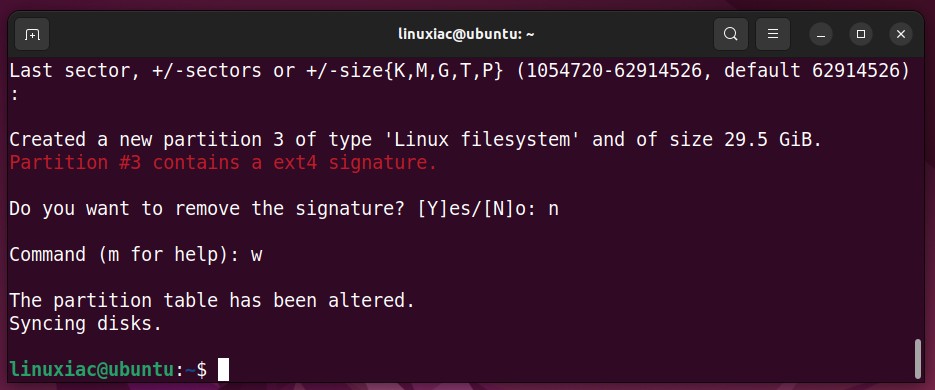
Finally, type “w” and confirm with “Enter” to save your changes and exit the fdisk program.
This completes the first part of our task, which involved updating the partition table to include the additional space. However, our work isn’t over just yet. There’s one more step to complete, which relates specifically to the type of file system used, as previously mentioned.
Here’s the final touch, depending on the file system used.
ext4
To instruct the operating system to adopt the changed partition layout, the resize2fs command, followed by the full path of the relevant partition, must be used. It is a specifically designed tool that works with ext2, ext3, or ext4 file systems.
sudo resize2fs /dev/vda3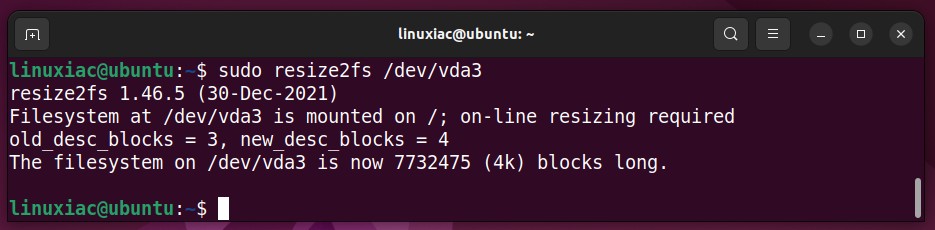
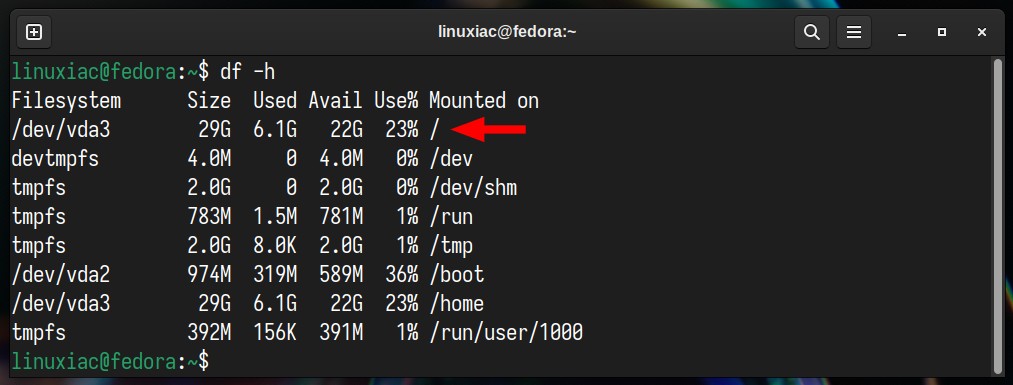
Restart the virtual machine. Then, check the available disk space.
df -hYou’ll be happy to find this:
Has become this:
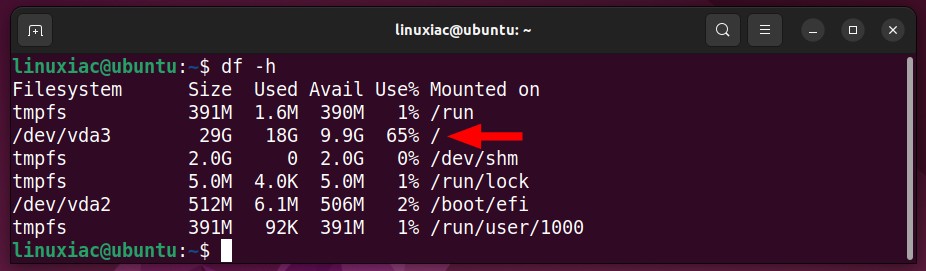
Mission accomplished! You’ve successfully extended your KVM virtual machine’s disk size by an additional 10 GB, so you have every reason to pat yourself on the back for a job well done.
XFS
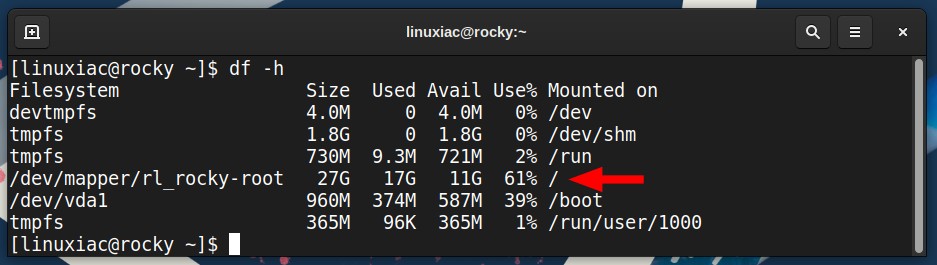
For Linux distributions betting on the XFS file system, such as Red Hat Enterprise Linux, AlmaLinux, Rocky Linux, etc., to leverage the additional disk space, you should execute the following command:
sudo xfs_growfs -d <partition_mount_point>Code language: HTML, XML (xml)However, more than executing the above command is needed because these distros use Logical Volume Management (LVM) behind the scenes. Therefore, it’s necessary to resize the LVM volume first. Here’s how to do it.
Above all, ensure you’ve completed the fdisk portion and added the desired disk space to the disk partition table before proceeding to the next LVM actions.
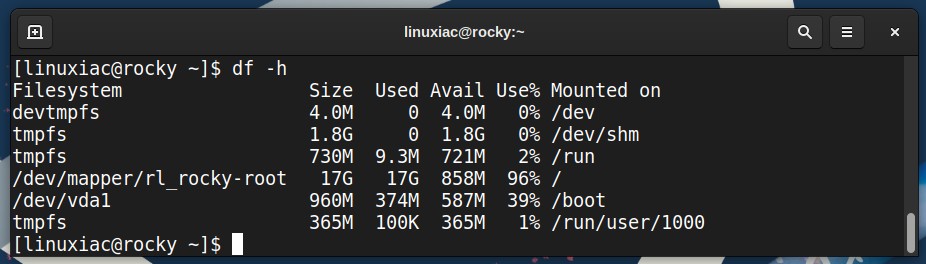
Here is our KVM virtual machine before the LVM manipulations.
Find the name of the LVM physical volume.
sudo pvdisplay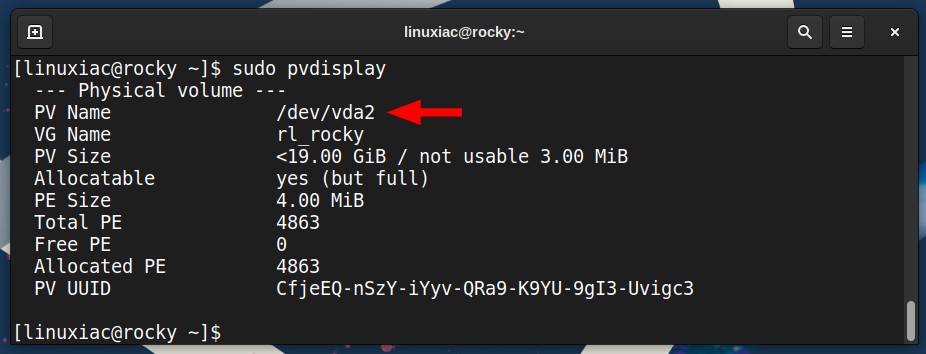
Once you know its name, “/dev/vda2” in our case, adjust its size.
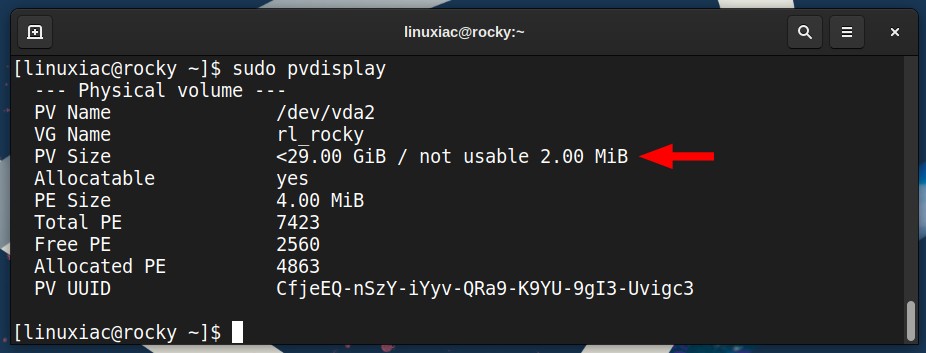
sudo pvresize /dev/vda2
If we check again, we will see that our LVM volume now includes the 10 GB added by the qemu-img resize command.
Identify the LVM volume’s path that you are going to resize. In our case, it is the root partition, mounted at “/dev/rl_rocky/root.” We will use this name as a parameter in the following command.
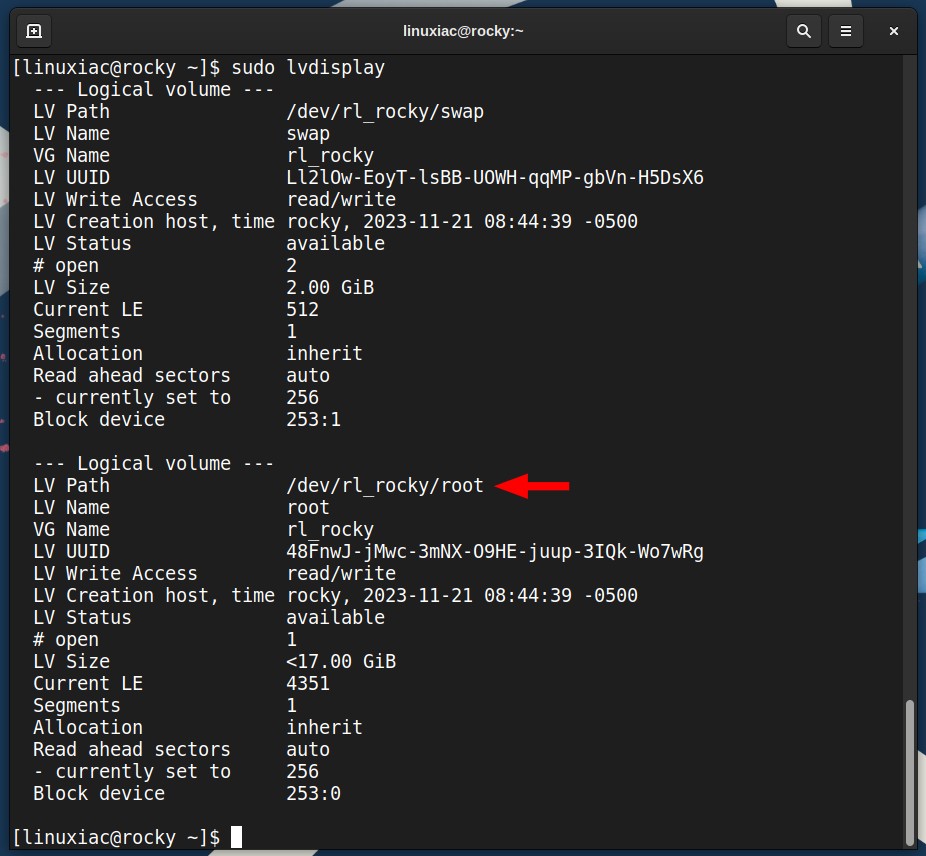
Add the unused space to the Logical Volume, which has now expanded from 17 GB to 27 GB.
sudo lvextend -l +100%FREE /dev/rl_rocky/root
Resize the root (“/“) filesystem:
sudo xfs_growfs -d /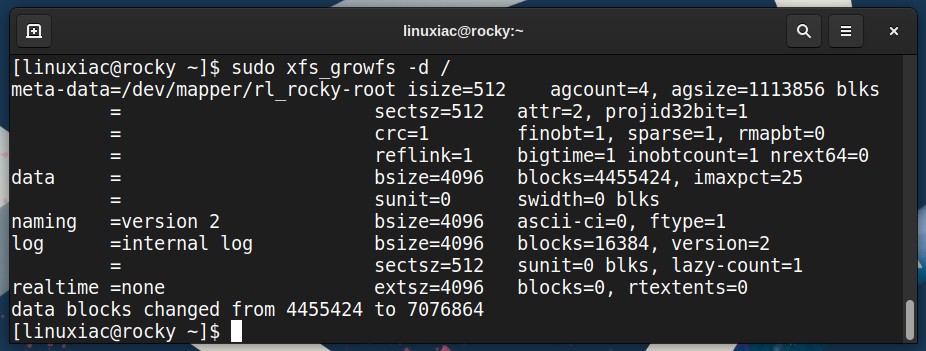
Reboot the KVM virtual machine. Upon checking, you will notice that the disk space has successfully adopted the additional 10 GB.
Btrfs
Btrfs is one of the “big three” most popular file systems in Linux, with distributions like Fedora and openSUSE betting on it.
We’re operating under the assumption that you’ve already completed the qemu-img resize and the fdisk steps. Below is the state of our Fedora system before the intervention.
As you can see from the image above, the operating system currently occupies 20 GB of disk space, while the actual KVM disk has a capacity of 30 GB. To utilize the available 10 GB, we can effortlessly expand the Btrfs filesystem using the following command, specifying the mount path as the last parameter, which, in our case, is the root (“/“) filesystem.
sudo btrfs filesystem resize max /
Restart your system, and upon inspection, you’ll find that the 10 GB has been successfully added to the filesystem, with the operating system now utilizing the newly added space.
Conclusion
Resizing the virtual disk size of a KVM VM is a straightforward process that can significantly enhance the flexibility and scalability of your virtual environments. Following the steps outlined above, you can ensure that your VMs have the space to grow and adapt to your requirements.
Whether you need extra space to install additional software, store more data, or want to give your virtual environment some breathing room, the process we laid out ensures you can achieve your goals without the fear of data loss or unnecessary hassle. So, celebrate your success and enjoy the new possibilities your expanded virtual disk space brings.
Lastly, but definitely not least, thank you for trusting our guidance – it truly means the world! We’d love to hear your feedback or thoughts, so please don’t hesitate to share them with us in the comment box below.


thx