Many users and developers have struggled to work on Windows systems with tools that perform better on Linux or are unavailable on Windows. Solutions often involved:
- Installing Linux distributions on a virtual machine, on a separate hard drive
- Configuring dual boot
- Using tools like Cygwin
However, this will change as Microsoft introduces Windows Subsystem for Linux.
You may not be aware of it, but 93% of servers worldwide run on Linux. This is because Linux systems are known to be very fast, reliable, and secure.
In addition, software developers and system administrators love Linux because of its infinite customization possibilities, performance, and specialized tools not available on other systems.
What is Windows Subsystem for Linux
Windows Subsystem for Linux (WSL) is a compatibility layer for running Linux binaries in Windows environments. Microsoft first introduced it in Windows 1607. However, it is now included by default in Windows installations, and you must turn it on manually.
Above all, the WSL lets users and developers run a Linux environment. It includes most command-line tools, utilities, and applications directly on Windows. They are unmodified, without a traditional virtual machine or dual-boot setup overhead.
WSL or C:\Windows\System32\wsl.exe is a Windows tool that allows you to install a Linux distribution as an app from the Windows store. Since WSL is a simple Windows executable, you can call it from a cmd command prompt or PowerShell terminal.
WSL and WSL2
There are two different versions of Windows Subsystem for Linux, WSL and WSL2.
The original WSL is now known as WSL1. WSL1 provides a Linux-compatible kernel interface developed by Microsoft that allows users to choose a Linux distribution to install from the Microsoft Store.
WSL1 executes unmodified Linux ELF64 binaries by operating a Linux kernel interface on top of the Windows kernel in Windows 10.
WSL2 is the latest version of WSL with new features. It was announced at Microsoft Build 2019. WSL2 features a Linux kernel running inside Windows 10 and Windows 11 and is built on the core technology of Hyper-V to provide better Linux application support and improved file performance.
In addition, WSL2 architecture is entirely different from WSL1. Unlike WSL1, which runs as a translation layer, the Windows subsystem for Linux 2 has a virtual machine with an actual Linux Kernel that can immediately react to system calls.
The main difference between them comes down to system calls. In other words, WSL2 works a lot more like a traditional virtual machine (VM) where Windows would be the host and the WSL distro is the VM guest.
How to Install Windows Subsystem for Linux on Windows 11
To install Windows Subsystem for Linux on Windows 11 with Command Prompt, follow these simple steps:
Open Start on Windows 11 and search for “Command Prompt.” Then, right-click the top result and select the Run as administrator option.
Type the following command to install the WSL on Windows 11 and press “Enter”:
wsl --installAfter installation is completed, you need to restart your computer to finish the WSL installation on Windows 11. Now, you can continue with the Linux distro setup as necessary. This will automatically install the latest version of Ubuntu Linux.
If default Ubuntu is not to your liking, a separate command allows you to specify a preferred Linux distro during WSL installation. Here’s how to do it.
Open Start on Windows 11 and search for “Command Prompt.” Then, right-click the top result and select the Run as administrator option.
Type the following command:
wsl --list --allCode language: PHP (php)That will list all Linux distros available for download.
Find the distro you want to set up alongside WSL and type:
wsl --install -d [DISTRO-NAME]Code language: CSS (css)Of course, you need to replace [DISTRO-NAME] with the name of the distro you want to install, for example, Debian.
Now, just hit the “Enter” key and wait for Windows 11 to install WSL and complete the process.
After installation is completed, restart your computer.
How to Install Windows Subsystem for Linux on Windows 10
To install Windows Subsystem for Linux on Windows 10, the only requirement is that you have a 64-bit Windows 10 device. Different versions of WSL require different builds of Windows, but they can run alongside each other.
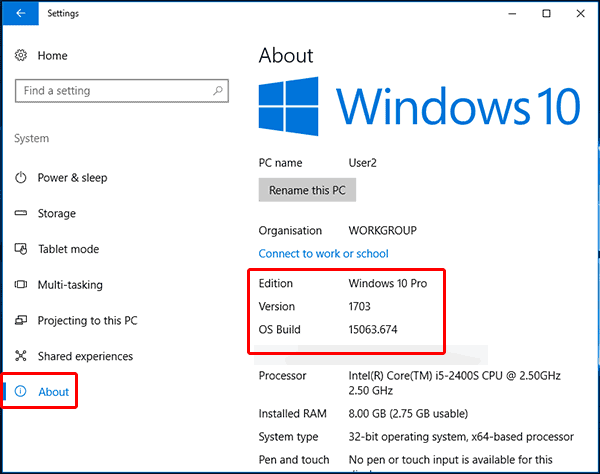
You need to run Windows Build 16215 or later to install WSL1. WSL2 is only available in Windows Builds 18917 or higher.
From the Windows GUI, go to Settings -> System -> About.

How to Install WSL1 from the Command Line on Windows 10
Open PowerShell (as administrator) and type:
Enable-WindowsOptionalFeature -Online -FeatureName Microsoft-Windows-Subsystem-LinuxThen, you need to restart the computer when it is asked.
How to Install WSL2 from the Command Line on Windows 10
Firstly, we need to enable the Windows Virtual Machine Platform optional component. Therefore, we open our PowerShell console as Administrator and type:
dism.exe /online /enable-feature /featurename:VirtualMachinePlatform /all /norestartThen, we enabled the WSL with this command:
dism.exe /online /enable-feature /featurename:Microsoft-Windows-Subsystem-Linux /all /norestartAfter that, we restart our machine.
Next, we need to download and install the WSL2 Linux kernel update package when the machine is ready, available on this link.
In addition, to configure our machine to use WSL2 by default, we open our Command Prompt as Administrator, and we type:
wsl --set-default-version 2Code language: JavaScript (javascript)Conclusion
The WSL will be a crucial component of Microsoft’s new open-source friendly strategy. So now you know how to use the Linux ecosystem on Windows. I hope you found this article useful.
