VirtualBox is a widely used virtualization tool, often chosen to run Linux distributions for testing in an isolated environment or to set up a server for specific tasks.
At some point, though, you may need to SSH into a VirtualBox guest VM and find that it doesn’t work. Don’t worry—it’s not a big deal. The whole thing comes down to how your VirtualBox’s network settings are configured. In this guide, I’ll show you how to adjust them quickly so you can enable SSH access without trouble.
I’ll look at two simple approaches: one using bridged networking, and the other using the default NAT setup with port forwarding added on top. Which one you go with really depends on your preference, but either way, you’ll end up with SSH access to your VM. So, let’s jump in.
Ensure SSH Is Running on the Guest VM
Sometimes when we’re zeroed in on a specific problem, it’s easy to overlook the simplest step—like making sure the SSH server is actually running on your VirtualBox VM. Yes, I know, you’re probably pretty confident it’s already up, but it never hurts to double-check.
The most distro-agnostic way to do that is with the command below. Just log into your VM and confirm that the output includes a line with “/usr/sbin/sshd.”
pgrep -a sshdCode language: Bash (bash)
If you see a result like the one above, great. That means SSH is up and running on your VirtualBox VM. Of course, you can also run systemctl status ssh or systemctl status sshd—the exact service name depends on your distro—to check the same thing.
However, if the commands above don’t show SSH running (return nothing), you’ll need to install and start it first. Covering that setup is outside the scope of this guide, so check your distribution’s documentation for detailed steps.
By default, SSH listens on port 22, and unless you’ve changed that setting, it should still be using it. To make sure, you can run the following command:
sudo netstat -tulnp | grep sshdCode language: Bash (bash)
Now, with everything in place, it’s time to move on to the main part of this guide.
SSH to VirtualBox VM: Bridged Adapter
Before we move into the specific changes, I want to talk a bit about the theory first—just so it’s clear what we’re actually doing and, more importantly, why we’re doing it.
By default, VirtualBox sets up new virtual machines with NAT networking. In this mode, the VM sits behind a kind of internal router that VirtualBox creates. The guest can reach the outside world, but the outside—including your host system—cannot directly initiate connections back into the VM.
That’s why trying to SSH into the guest from the host (or another system) fails: the NAT engine doesn’t automatically forward port 22 (or any port) from the host to the guest. To overcome this, you need to switch your VirtualBox guest VM over to bridged networking mode.
When you do so, the VM no longer hides behind VirtualBox’s NAT. Instead, it connects directly to the same physical or Wi-Fi network as the host, behaving like just another machine on that LAN.
That means it gets its own IP address from the network’s DHCP server (or one you assign manually), and at that point the host—or any other machine on the network—can connect to it over SSH just like they would with any other computer. So, let’s do it. It’s a simple task.
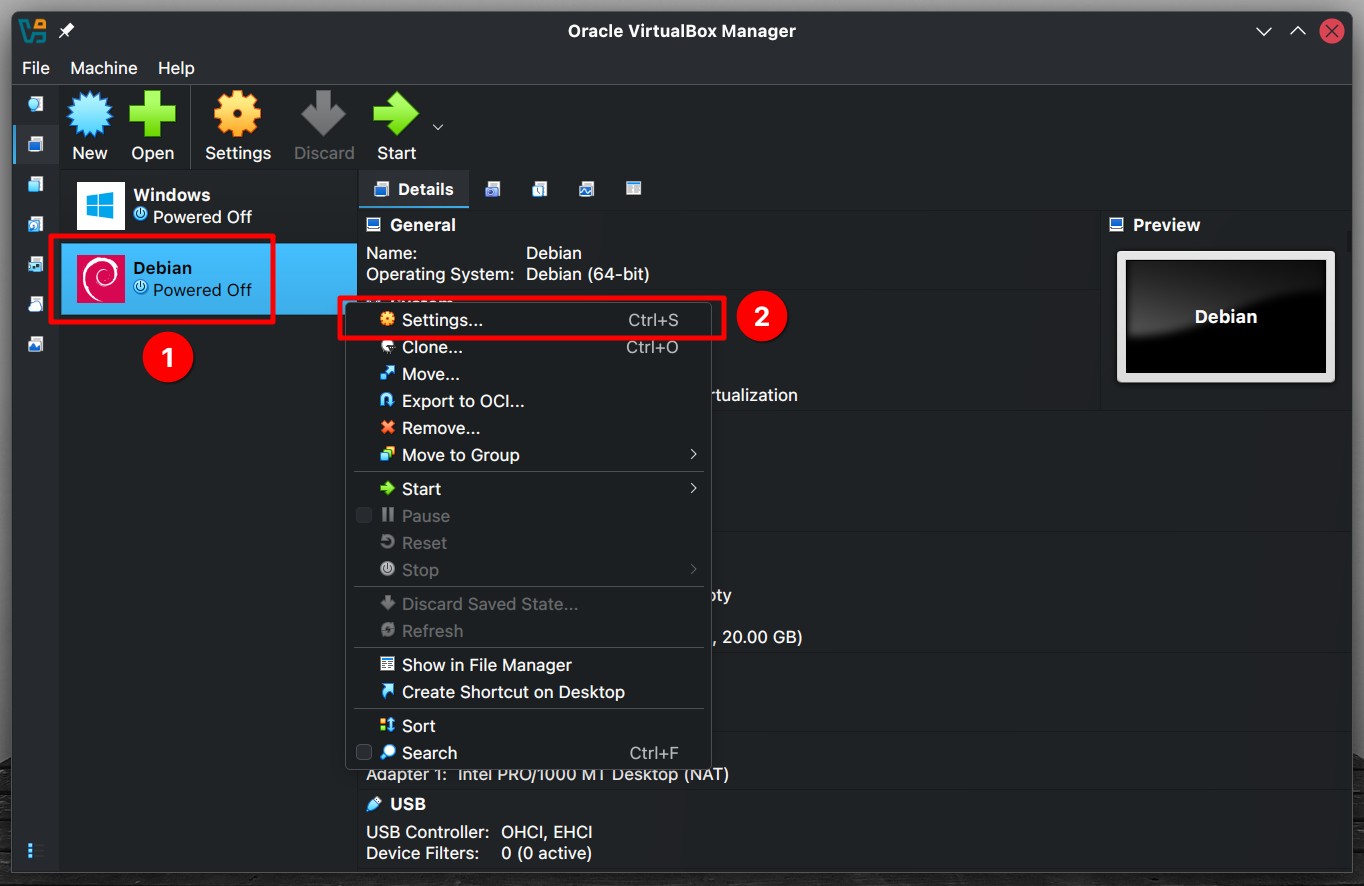
Make sure the virtual machine is powered off first. Then, right-click the VM and choose “Settings” from the context menu. If you prefer, you can also select the VM and click the “Settings” button under the main menu.
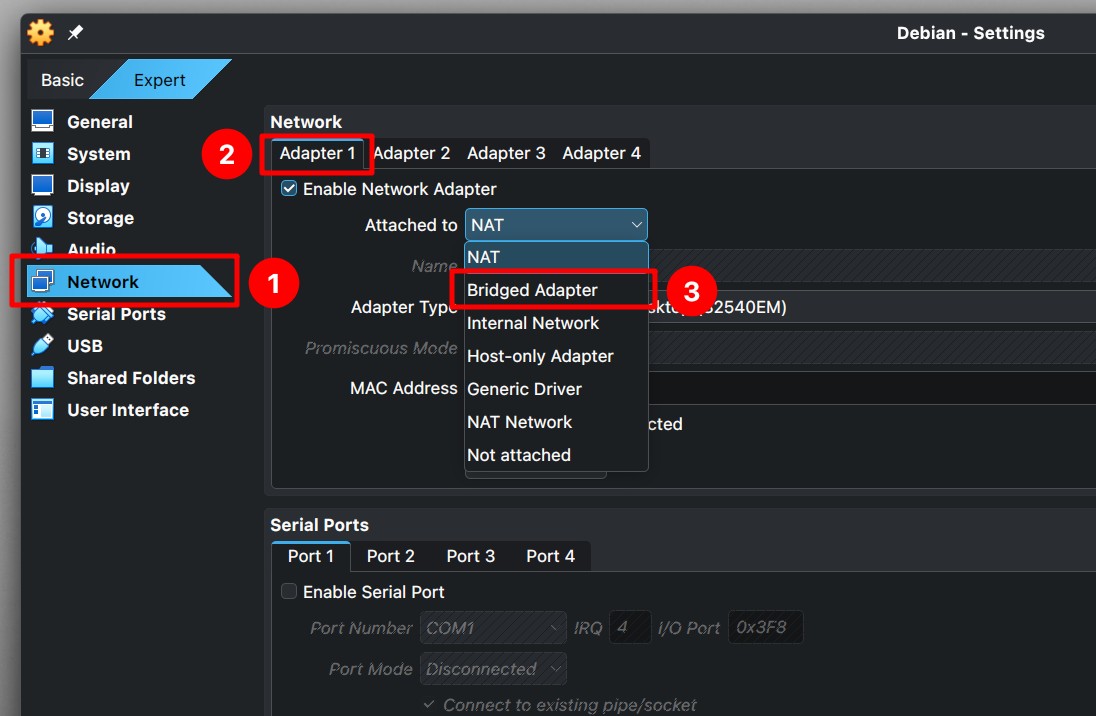
Now, go to the main menu on the left and click “Network.” Choose the active default network adapter for your virtual machine (usually “Adapter 1“). Then, open the “Attached to” drop-down menu and change the setting from “NAT” to “Bridged Adapter.”
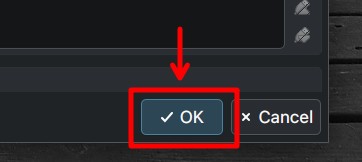
Finally, click the “OK” button in the bottom-right corner to save your changes.
Start the virtual machine. To connect, you’ll need its IP address. The easiest way to find that is by logging in locally and running the command below.
ip aCode language: Bash (bash)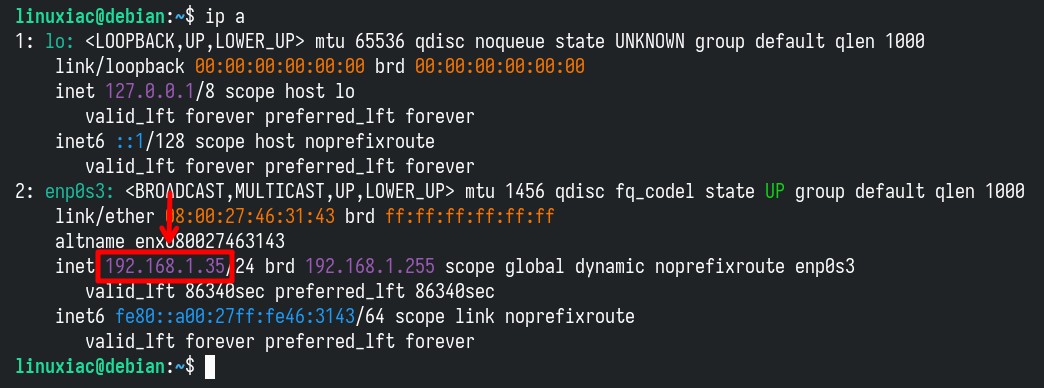
You’re good to go—open a terminal on any host in your local network and run the standard SSH command to reach your VirtualBox Linux VM.
ssh <user>@<host-lan-ip>Code language: Bash (bash)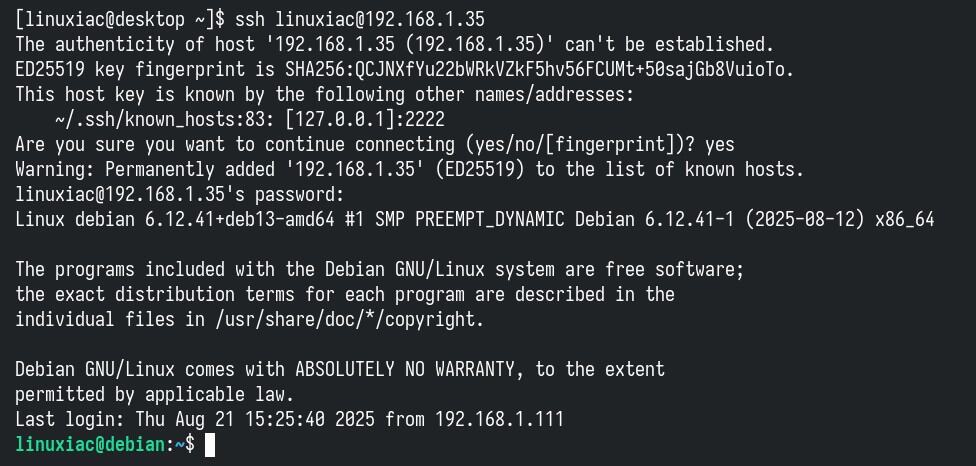
SSH to VirtualBox VM: NAT with Port Forwarding
Now let’s check out another option for connecting to a VirtualBox Linux VM over SSH—this time using the default NAT network mode with port forwarding enabled. What am I talking about?
VirtualBox lets you forward a port on the host machine to a port inside the guest VM. For SSH, the common setup is to forward the host port 2222 (or another unused port) to the guest port 22. With that rule in place, any connection made to port 2222 on the host is automatically passed through VirtualBox’s NAT engine and delivered to the guest VM’s SSH service. Here’s how to do it.
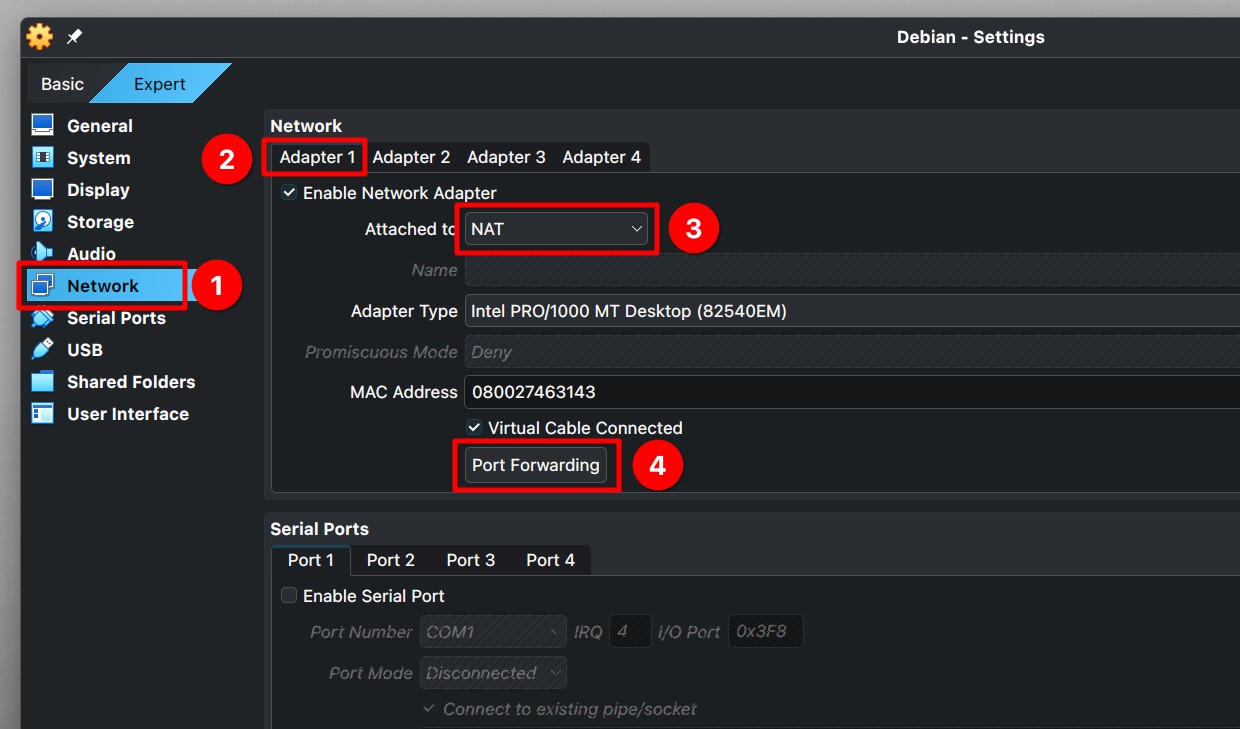
Open the virtual machine settings as described in the previous section. On the left-hand panel, click “Network” and make sure you’re looking at the active network adapter your virtual machine is using (the “Enable Network Adapter” box should be checked). In the “Attached to” drop-down list, select “NAT.” Now for the fun part—click the “Port Forwarding” button.
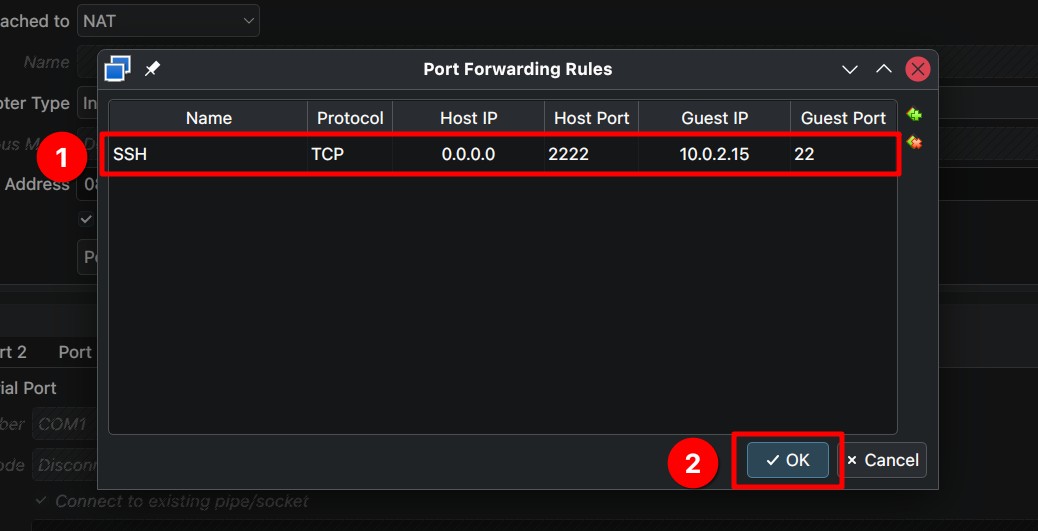
A new window will pop up where you can set up your port forwarding rules. Here’s what each option means:
- Name: This is just a label. You can type in any name you like. The most straightforward choice is, of course, just “SSH.”
- Protocol: Leave this set to the default, “TCP.”
- Host IP: Use 0.0.0.0. This means “listen on all network interfaces of the host.” In other words, connections to the host from anywhere (loopback, LAN, or even WAN if exposed) will be accepted.
- Host Port: This is the port on the host machine that will be opened. If you connect to the host at port 2222, the traffic will be forwarded into the VM.
- Guest IP: This is the internal NAT-assigned IP address of the guest VM. Enter the IP address of your virtual machine, just like we found in the previous section.
- Guest Port: This is the port on which the SSH server listens inside the VM. By default, that’s 22.
When you are ready, confirm with the “OK” button.
Finally, don’t forget again to click the “OK” button in the bottom-right corner to save all changes made so far.
Start the virtual machine. From any other computer on your local network—or even from the VirtualBox host itself—run the command below. Notice that this time we’re adding the -p option, which tells SSH to connect through port 2222 on the host. That’s the port we set up earlier when configuring port forwarding.
ssh -p 2222 <user>@<host-lan-ip>Code language: Bash (bash)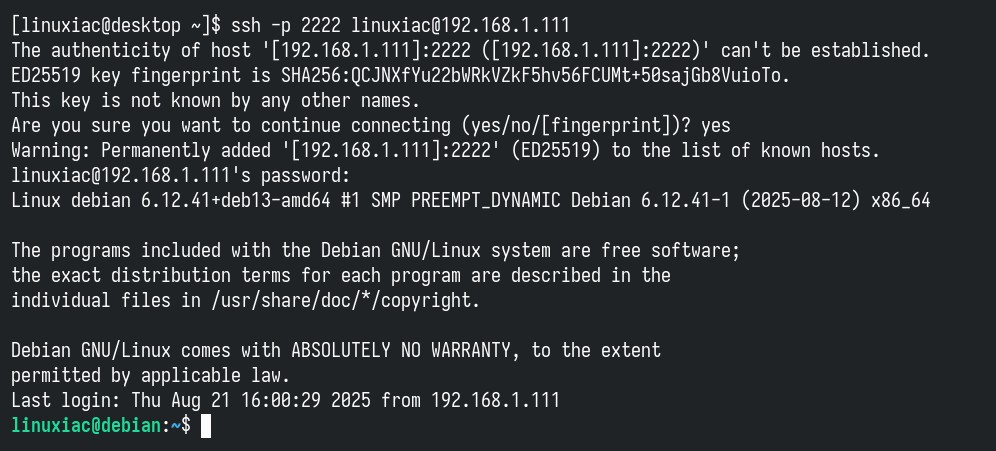
And just like that, we’ve successfully SSHed into our VirtualBox Linux guest. If you’ve got more than one Linux VM and want to do the same with them, just set up another port forwarding rule using a different free port—say 2223. Then, when you connect, make sure to use that port number with the -p option in your SSH command.
Conclusion
As you can see, getting SSH access to your VirtualBox guest isn’t complicated once you understand how the networking works. Whether you go with bridged networking for a more direct connection or stick with NAT and add port forwarding, both methods get the job done. The choice mostly comes down to how you prefer to manage your VMs’ connectivity.
Thank you for your time! I hope you find this guide helpful. As always, any feedback is much appreciated.


Thanks for the great article. I appreciate the articles you write and look forward to more in-depth articles.
Regards,
Carl Andersen