
VirtualBox is powerful yet free virtualization software that allows users to run multiple operating systems on a single machine. It is a versatile tool for testing, developing, or exploring new OS environments.
However, one feature that can significantly enhance the convenience and efficiency of using VirtualBox is the ability to set virtual machines (VMs) to start automatically on a Linux host system.
VM Autostart: Use Cases & Benefits
Imagine having a server running on a VM that needs to be up and running 24/7, or you’re developing an application that requires frequent testing across different operating systems.
In these scenarios and many others, the ability to auto-start VMs upon system boot can save you a tremendous amount of time and hassle.
Furthermore, you no longer need to manually start each VM every time your host system restarts. With a few simple configurations, your VMs can spring to life automatically and be ready for use whenever needed.
VirtualBox: How to Autostart VMs on Linux Boot
This article will guide you through setting up your VMs to start automatically on a Linux host system. So, let’s dive in and unlock the full potential of VirtualBox, making your virtualization experience smoother and more efficient.
Add User to vboxusers Group
Before we move on to our main task, we need to check a few things. The most important one is ensuring that the user with whose permissions the VirtualBox VMs will be automatically started at boot must be a “vboxusers” group member.
We assume that this is your user account that you’re using for all your activities on your Linux desktop. To see which groups it’s a part of, you can run this command:
groups $USERCode language: PHP (php)
You should see “vboxusers” listed in the results, like in the image above. If you don’t see it, don’t worry! You can quickly add your user to this group by using the following command:
sudo usermod -a -G vboxusers $USERCode language: PHP (php)Restart your computer for the changes to take effect. Once you log in again, ensure your user account has been added to the “vboxusers” group. Then, we can proceed.
Create the Needed Systemd Services
To achieve our goal, namely, having our VirtualBox virtual machines start on their own after the system reboots, we will use some functionalities provided by systemd. As I’ll explain, it’s pretty simple to do.
Using your preferred terminal text editor, create a “vboxvmservice@.service” file inside the “/etc/systemd/system/” directory. Then, copy and paste the following content into it.
sudo vim /etc/systemd/system/vboxvmservice@.service[Unit]
Description=VBox Virtual Machine %i Service
Requires=systemd-modules-load.service
After=systemd-modules-load.service
[Service]
User=linuxiac
Group=vboxusers
ExecStart=/usr/bin/VBoxManage startvm %i --type headless
ExecStop=/usr/bin/VBoxManage controlvm %i acpipowerbutton
RemainAfterExit=yes
[Install]
WantedBy=multi-user.targetCode language: JavaScript (javascript)Don’t forget in the “User=…” part to replace the user with the one you use.
But let’s now break down what we just did, especially for those who might not be very familiar with systemd. What’s the meaning of the “@” symbol in the filename?
In systemd, “@” denotes an instance name for a templated unit file. Templated unit files allow you to create services that can be started with different instances, each with a separate configuration or environment.
This is particularly useful when you want to run multiple instances of the same service, each configured slightly differently, without having to create a separate unit file for each instance. That is exactly our case.
Now, let’s list the available VirtualBox virtual machines:
VBoxManage list vmsCode language: PHP (php)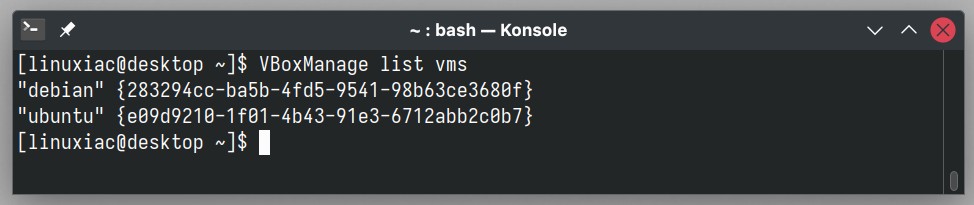
As we can see from the image above, we have two options here: “debian” and “ubuntu.” We mentioned these names because we’ll need to pick one for the next systemd service we’re making. We’ve decided to go with “ubuntu.”
To set it to start automatically, just run the command below. After the “@” symbol, add the name you picked from the list of VirtualBox virtual machines. For us, that name is “ubuntu“.
sudo systemctl enable vboxvmservice@ubuntuCode language: CSS (css)
Аs you can see, our new systemd service, “vboxvmservice@ubuntu“, has been automatically linked to “vboxvmservice@.service“. This means that whatever follows the “@” symbol, in this case “ubuntu“, will be used in the service and replaced in the place of the “%i” variable.
Finally, reload systemd’s configuration files:
sudo systemctl daemon-reloadTesting VirtualBox’s VM Autostart
Okay, it’s the big moment. Go ahead and restart your Linux system. When you log back in, you’ll find your VirtualBox’s VM running. Congratulations on a job well done!
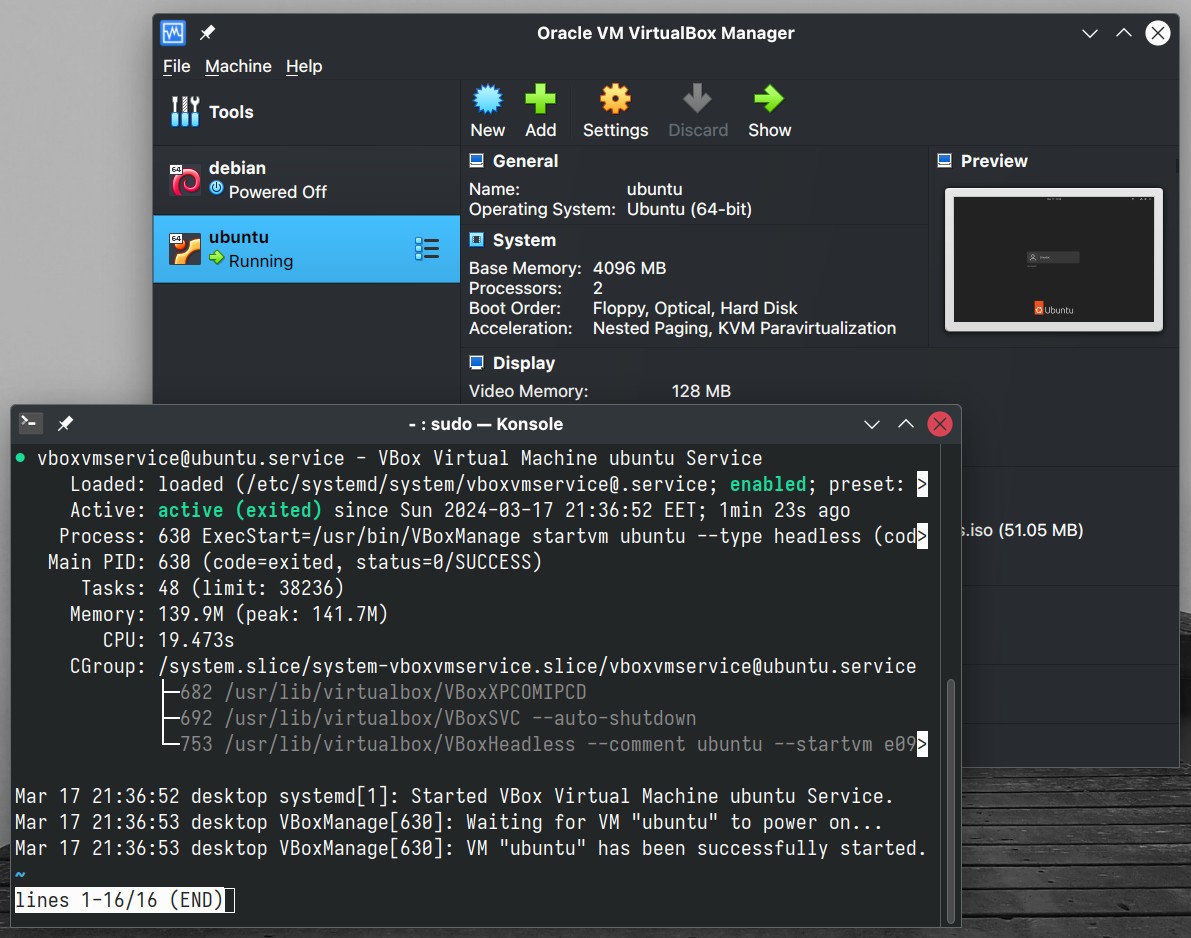
Additionally, you can check the status of the systemd service by running:
sudo systemctl status vboxvmservice@ubuntuCode language: CSS (css)Conclusion
Configuring VirtualBox virtual machines to start automatically on a Linux system offers significant advantages for users looking for an efficient and streamlined virtualization experience.
Successfully implementing this setup means no longer needing to manually start each VM upon the host system’s restart, thus saving time and reducing manual intervention.
Furthermore, this method ensures that essential services running on VMs are consistently available, making it an invaluable addition to any VirtualBox user’s toolkit.
Also, if you’re considering setting up VirtualBox on a remote server to make it the heart of your virtual setup and need help managing it remotely, our guide “How to Setup and Manage VMs on a Headless VirtualBox Server” is all you need.
Lastly, as always, I’d love to hear your feedback or thoughts, so please don’t hesitate to share them in the comment box below.


I first got it working manually with “(sudo) systemctl start vboxvmservice@[virtualmachinename]” but it didn´t start automatically at a reboot. It appeared that dependencies were not exactly correct. I changed a few things and now it works (b.t.w. I use Debian-based MX-Linux, version: Linux hostname 6.6.11-amd64 #1 SMP PREEMPT_DYNAMIC Debian 6.6.11-1~mx23ahs (2024-01-18) x86_64 GNU/Linux). I commented out the original lines:
[Unit]
Description=VBox Virtual Machine %i Service
#Requires=systemd-modules-load.service
Requires=virtualbox.service
#After=systemd-modules-load.service
After=virtualbox.service
[Service]
User=[username]
Group=vboxusers
ExecStart=/usr/bin/VBoxManage startvm %i –type headless
ExecStop=/usr/bin/VBoxManage controlvm %i acpipowerbutton
RemainAfterExit=yes
[Install]
#WantedBy=multi-user.target
WantedBy=default.target
I would expect it to be logical to start this service after virtualbox service itself has started.
The last line (WantedBy=default.target) should ensure that it works for a GUI or non-GUI environment.
sudo vim /etc/systemd/system/vboxvmservice@.service
Edit the After line to add the two dependancies below then it will auto start without the module not loaded error,
After=systemd-modules-load.service vboxdrv.service virtualbox.service
Trying this on Mint Linux 21.3 Cinnamon. It doesn’t work here either. I’ve created the vboxvmservice@.service, but when I try to add the systemctl enable command for a vm called techdocs, it says, Failed to enable unit: Unit file vboxvmservice@techdocs.service does not exist.
Not sure where to go from there.
Hi, thanx for sharing! Unfortunately it doesn't work in Ubuntu 20.04:
$ sudo systemctl status vboxvmservice@win11-topm-A× vboxvmservice@win11-topm-A.service – VBox Virtual Machine win11-topm-A Service Loaded: loaded (/etc/systemd/system/vboxvmservice@.service; enabled; vendor preset: enabled) Active: failed (Result: exit-code) since Fri 2024-09-13 19:27:08 CEST; 4min 54s ago Process: 1278 ExecStart=/usr/bin/VBoxManage startvm win11-topm-A –type headless (code=exited, status=1/FAILURE) Main PID: 1278 (code=exited, status=1/FAILURE) CPU: 74msSep 13 19:27:07 Esprimo-D7010 VBoxManage[1293]: WARNING: The vboxdrv kernel module is not loaded. Either there is no moduleSep 13 19:27:07 Esprimo-D7010 VBoxManage[1293]: available for the current kernel (6.8.0-40-generic) or it failed toSep 13 19:27:07 Esprimo-D7010 VBoxManage[1293]: load. Please recompile the kernel module and install it bySep 13 19:27:07 Esprimo-D7010 VBoxManage[1293]: sudo /sbin/vboxconfigSep 13 19:27:07 Esprimo-D7010 VBoxManage[1293]: You will not be able to start VMs until this problem is fixed.Sep 13 19:27:08 Esprimo-D7010 VBoxManage[1278]: VBoxManage: error: The virtual machine 'win11-topm-A' has terminated unexpectedly during startup with exit code 1 (0x1)Sep 13 19:27:08 Esprimo-D7010 VBoxManage[1278]: VBoxManage: error: Details: code NS_ERROR_FAILURE (0x80004005), component MachineWrap, interface IMachineSep 13 19:27:08 Esprimo-D7010 VBoxManage[1278]: Waiting for VM "win11-topm-A" to power on…Sep 13 19:27:08 Esprimo-D7010 systemd[1]: vboxvmservice@win11-topm-A.service: Main process exited, code=exited, status=1/FAILURESep 13 19:27:08 Esprimo-D7010 systemd[1]: vboxvmservice@win11-topm-A.service: Failed with result 'exit-code'.
I reinstalled the VirtualBox kernel module but it still doesn't work. Do you have any advice?
Sorry, it's Ubuntu 22.04.5
$ VBoxManage startvm win11-topm-A –type headless
is working fine. 🙂
But autostart at boot isn't. 🙁