
Accessing and managing servers remotely is not just a convenience; it’s a necessity. With containerization technologies like Docker, this process has become more streamlined and accessible.
Our comprehensive guide is here to show you how to harness the power of Docker to set up web-based Secure Shell (SSH) access. Following our step-by-step instructions, you’ll learn how to transform your standard web browser into a fully functional terminal console.
By the end of this guide, you’ll have a robust, web-based terminal at your fingertips, allowing you to execute commands, manage files, and easily maintain your servers, all from the comfort of your browser. So, let’s dive in and unlock the potential of web-based SSH!
Prerequisites
Having Docker and Docker Compose installed is required to deploy a containerized web-based SSH. So, if you don’t already have Docker installed, any of the following guides will be helpful:
- How to Install Docker on Ubuntu 22.04
- How to Install Docker on Debian 12 (Bullseye)
- How to Install Docker on AlmaLinux / Rocky Linux
- How to Install Docker on Fedora
- How to Install Docker on Linux Mint 21
- How to Install Docker on Raspberry Pi
The other essential component is Docker Compose. Remember, it is provided separately from Docker. Therefore, you must install Docker to use Docker Compose; otherwise, Compose will not function.
Fortunately, installing it is pretty simple, even if it’s not already on your Linux system. To install Docker Compose, type the following two commands:
sudo curl -L "https://github.com/docker/compose/releases/latest/download/docker-compose-linux-$(uname -m)" -o /usr/local/bin/docker-compose
sudo chmod +x /usr/local/bin/docker-composeCode language: JavaScript (javascript)
What Does Our Dockerized Stack Include?
To install web-based SSH, allowing you to use your browser as an SSH terminal, we’ll use three separate containers – Caddy, Wetty, and OpenSSH, which we’ll deploy together using Docker Compose.
Below is a graphical representation of how the different components in our dockerized web-based SSH stack interact.
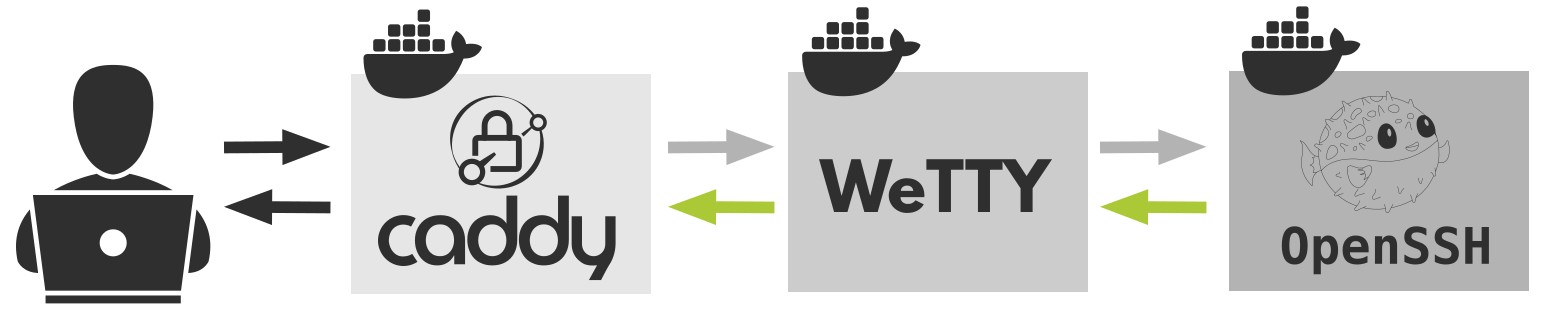
Caddy: Reverse Proxy
Caddy is a versatile, simple, and lightning-fast web server well known for its ability to automatically obtain and renew Let’s Encrypt SSL certificates, making it an ideal candidate for our web-based SSH deployment.
In our case, Caddy will act as a reverse proxy server, sitting in front of the Wetty container, forwarding requests and delivering client responses. Additionally, it will provide us with a secure HTTPS connection and username and password protected access to our web-based SSH implementation.
WeTTY: Terminal Over HTTP and HTTPS
WeTTY (short for Web + TTY) is a terminal emulator software that runs over HTTP and HTTPS. It’s essentially a web-based interface that allows users to access a command-line interface through their web browser.
In other words, it provides a terminal within a web browser, making it easily accessible from any machine with internet access without requiring additional software installations.
OpenSSH: SSH Server
The SSH server we’re discussing is the one that the WeTTY container connects to. But there’s a crucial point to understand here. Neither WeTTY nor the OpenSSH container will link directly to the host server where we set up our web-based SSH.
So, it’s important not to consider this as a solution that grants you access only to the specific server it is installed on.
Instead, think of it like a jump host. This means that the OpenSSH container acts as a middleman. From it, you can establish an SSH connection to the host server and any other remote SSH server.
Web-Based SSH with Docker Compose
The first step is to create the folder in which our Docker Compose deployment files will be placed. Then switch to it; from here on, you need to execute all commands further down in this guide from that location.
mkdir webssh
cd webssh
Additionally, right at the beginning, we clarify that our installation will use “ssh.tmplinux.com” as the domain name on which the service will be accessible and for which Caddy will automatically issue a valid SSL certificate.
Of course, you need to replace this name with the one you own and use in the configurations below.
Create Docker Network
As a first step, let’s create our Docker network and name it “webssh_network.”
docker network create webssh_networkBy doing this, we ensure that all containers in our deployment will have direct visibility with each other so they can interact. At the same time, the web-based SSH stack will be isolated from the other Docker containers on our host in its network, which adds a layer of security.
Caddy
As mentioned above, Caddy will act as a reverse proxy in front of the WeTTY container. Its service section from our “docker-compose.yaml” file is below. Please do not copy it yet; the final and complete version of the file can be seen further down in this guide.
We’re just showing it here to explain how it works, which also applies to all the following snippets (WeTTY and OpenSSH) of our containerized services below.
caddy:
    image: lucaslorentz/caddy-docker-proxy:ci-alpine
    container_name: reverse-proxy
    ports:
      - 80:80
      - 443:443
    environment:
      - CADDY_INGRESS_NETWORKS=webssh_network
    networks:
      - webssh_network
    volumes:
      - /var/run/docker.sock:/var/run/docker.sock
      - caddy_data:/data
    restart: unless-stoppedCode language: PHP (php)
Caddy is the only container in our dockerized deployment that exposes ports (80 and 443), allowing the web-based SSH installation to be accessible from the outside world directly via the browser.
All other containers in our stack do not expose ports; instead, they communicate with one another via their service names within the isolated “webssh_network” Docker network we defined previously.
Because Caddy needs to scan Docker metadata, looking for labels indicating that it should serve a specific container (more information here), we mount the Docker socket on the host with that of the container.
After finding labels, it generates an in-memory “Caddyfile” (a main Caddy web server configuration file) with site entries and proxies pointing to the Docker service by their DNS name or container IP address.
Finally, we also ensure data persistence by creating a named Docker volume, “caddy_data.” This is important to understand: Docker containers don’t keep data permanently – they’re temporary by nature.
So, when you start Caddy, it gets in touch with Let’s Encrypt to get an SSL certificate for your chosen domain. Using a named Docker volume, an approach to ensure data persistence, you ensure this certificate isn’t lost every time you restart the Caddy container.
WeTTY
WeTTY is the heart of our deployment – it’s the puzzle piece that lets you use an SSH terminal directly in your web browser, making it easy to access from any computer with an internet connection.
wetty:
    image: wettyoss/wetty
    container_name: wetty
    labels:
      caddy: ssh.tmplinux.com
      caddy.basicauth: /*
      caddy.basicauth.bobby: JDJhJDE0JDd3S3lscDY2aDFKSzU5clIuNFBiTnVNNHJhR1EvUnhuUkllTU01Nk5OVW94N3VXOHg4RTRH
      caddy.reverse_proxy: "{{upstreams 3000}}"
    environment:
      - SSHHOST=ssh-server
      - SSHPORT=2222
      - SSHUSER=term
    networks:
      - webssh_network
    restart: unless-stopped
    depends_on:
      - ssh-server
Here, we set all the previously discussed labels under the “labels” section. This is necessary for Caddy to perform its reverse proxy role effectively when it interacts with the WeTTY container.
Of course, in the final version of the “docker-compose.yaml” file (shown below), don’t forget to replace the line (“caddy: ssh.tmplinux.com “) with your actual domain name.
We need to do a bit of work now. The line below lets us protect our web-based SSH access with a username and password. We’ve chosen “bobby” as the username, and the password is in a secure, hashed form.
caddy.basicauth.bobby: JDJhJDE0JDd3S3lscDY2aDFKSzU5clIuNFBiTnVNNHJhR1EvUnhuUkllTU01Nk5OVW94N3VXOHg4RTRHCode language: CSS (css) Here’s a simple way to set your password, for example, “mypassword.” Just run the command below. It will download and run a temporary Caddy container. Then, the hash-password command will hash the string you provide after the “–plaintext” option.
docker run --rm caddy caddy hash-password --plaintext mypasswordFinally, take the output and decode it into base64 bit encoding.
echo -n '$2a$14$OkAZQQXYqWyH4QXeyScoi.XVOsyGgNAwlf7rC3OgtxkVvWGzS4rde' | base64Code language: PHP (php)
The final string that contains the hashed version of “mypassword” is now ready to be used. For the user part, you can choose any name you like, for example, “john.” Here’s what the final version would look like:
caddy.basicauth.john: JDJhJDE0JE9rQVpRUVhZcVd5SDRRWGV5U2NvaS5YVk9zeUdnTkF3bGY3ckMzT2d0eGtWdldHelM0cmRlCode language: CSS (css)The rest of the WeTTY snippet specifies the default port 3000 on which WeTTY runs and to which the Caddy should connect. In the “environment” part, using the “SSHHOST” and “SSHPORT” directives, we specify the name of the service, “ssh-server,” and the port “2222” on which the SSH server container is running, which is described below.
Also, “SSHUSER” specifies the default user, “term,” that the WeTTY container will use to connect to the SSH one.
SSH Server
We came to the last container in our web-based SSH deployment, the SSH server.
ssh-server:
    image: lscr.io/linuxserver/openssh-server
    container_name: ssh-server
    hostname: ssh-server
    environment:
      - PUID=1000
      - PGID=1000
      - PASSWORD_ACCESS=true
      - USER_NAME=term
      - USER_PASSWORD=term
    networks:
      - webssh_network
    volumes:
      - ./config:/config
    restart: unless-stoppedCode language: PHP (php)
The things to pay attention to here are the username (“term “) and password (“term “) set via the “USER_NAME” and “USER_PASSWORD” options. In other words, the SSH container will create this user upon initialization by assigning the specified password.
Additionally, we link the container’s “config” directory to the “config” one on our host system, which will be created automatically inside the directory form which we will run the docker-compose command the first time the container runs, ensuring persistence of data such as log files, SSH keys, etc.
Docker Compose File
Let’s now assemble all of the previous pieces into a final version of our web-based SSH dockerized app. First, create a “docker-compose.yaml” file and paste the following content.
nano docker-compose.yamlCode language: CSS (css)version: "3.8"
services:
caddy:
image: lucaslorentz/caddy-docker-proxy:ci-alpine
container_name: reverse-proxy
ports:
- 80:80
- 443:443
environment:
- CADDY_INGRESS_NETWORKS=webssh_network
networks:
- webssh_network
volumes:
- /var/run/docker.sock:/var/run/docker.sock
- caddy_data:/data
restart: unless-stopped
wetty:
image: wettyoss/wetty
container_name: wetty
labels:
caddy: ssh.tmplinux.com
caddy.basicauth: /*
caddy.basicauth.bobby: JDJhJDE0JDd3S3lscDY2aDFKSzU5clIuNFBiTnVNNHJhR1EvUnhuUkllTU01Nk5OVW94N3VXOHg4RTRH
caddy.reverse_proxy: "{{upstreams 3000}}"
environment:
- SSHHOST=ssh-server
- SSHPORT=2222
- SSHUSER=term
networks:
- webssh_network
restart: unless-stopped
depends_on:
- ssh-server
ssh-server:
image: lscr.io/linuxserver/openssh-server
container_name: ssh-server
hostname: ssh-server
environment:
- PUID=1000
- PGID=1000
- PASSWORD_ACCESS=true
- USER_NAME=term
- USER_PASSWORD=term
networks:
- webssh_network
volumes:
- ./config:/config
restart: unless-stopped
volumes:
caddy_data: {}
networks:
webssh_network:
external: trueCode language: PHP (php)Remember to adjust the following in the above deployment:
- wetty > labels > caddy: Replace “ssh.tmplinux.com” with the domain you are using.
- wetty > labels > caddy.basicauth.bobby: Change “bobby” to any username you prefer and use the password you created, as described earlier in the manual.
Additionally, we also recommend in the “ssh-server” part replace the default username and password in the “USER_NAME” and “USER_PASSWORD” settings, which are currently “term” and “term,” with different ones you prefer. Also, remember to use the username you chose for “SSHUSER” in the “wetty” section of the service.
Deploying Web-Based SSH with Docker Compose
Finally, we can run our dockerized web-based SSH stack using Docker Compose. To do this, execute the command below from the “webssh” directory where we created our “docker-compose.yaml” file.
Deploy and run the containers in the background:
docker-compose up -dThe Docker images will start downloading. The entire procedure can take seconds to a few minutes, depending on your internet connection speed.
In the end, you should see a screen similar to the one below, informing you that your dockerized web-based SSH installation has been successfully deployed and is up and running.
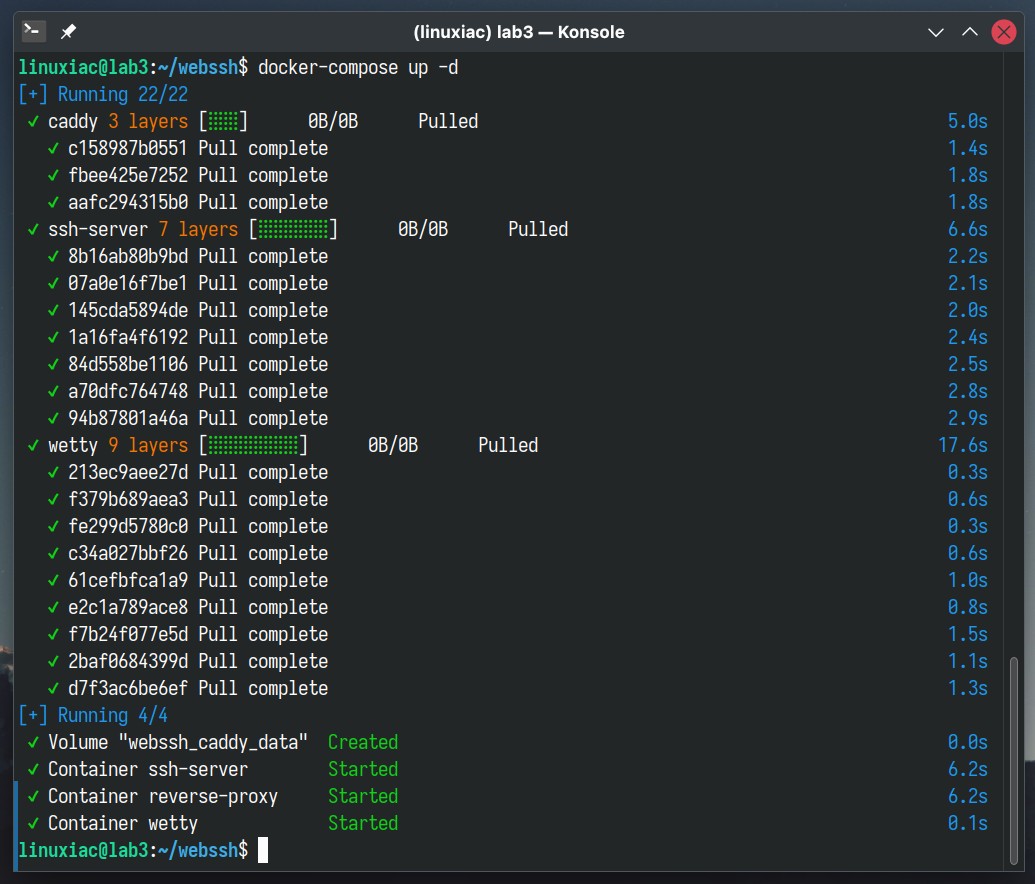
The initial delay of the containers’ start will only be the first time because Docker must download images from the Internet. After that, all subsequent runs will take seconds since they will be already available locally on your Linux system.
Log in to the Web-Based SSH via Web Browser
Open a web browser and point it to the “https://your-domain-name/wetty” address, which, in our case, is a “https://ssh.tmplinux.com/wetty.” A window will pop up asking for your username and password. Please use the ones you set up in the “docker-compose.yaml” file.
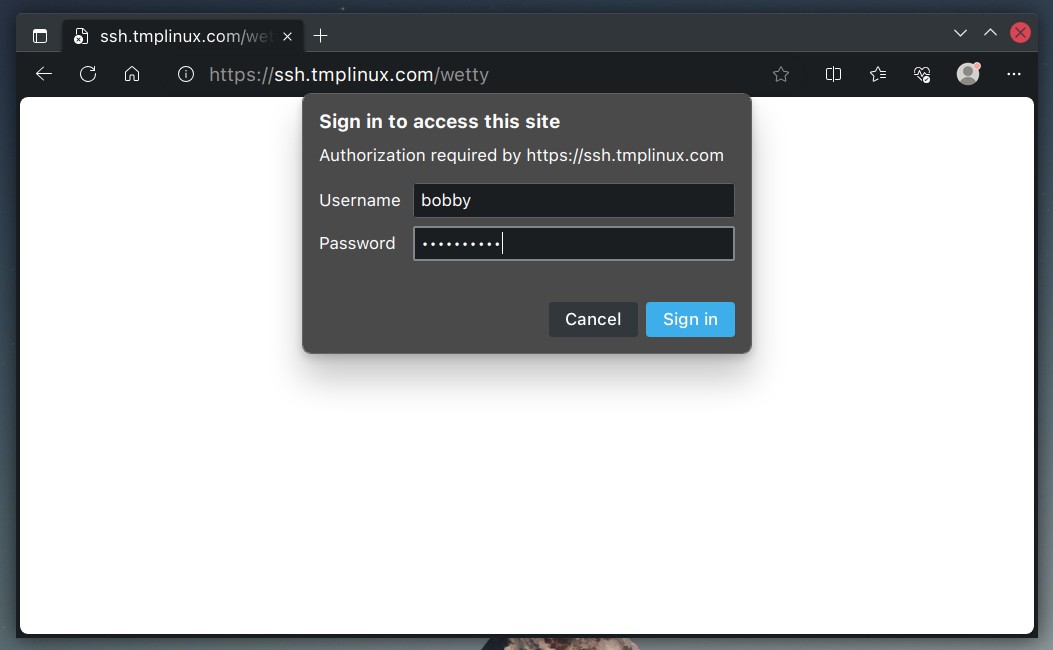
Once you’ve logged in successfully, WeTTY will prompt you to type in the password for the default user set up in the OpenSSH (“ssh-server”) container. Just put in the password, and you’re good to go!
Now, your browser becomes an SSH console, allowing you to connect to other SSH servers remotely. With this setup, you only need an internet connection and a web browser to manage your servers from anywhere.

Conclusion
Setting up web-based SSH with Docker Compose efficiently transforms your browser into a terminal console. Following the steps outlined in our article, you can quickly and securely access remote servers directly from your web browser.
So go ahead, try it, and revel in the convenience and efficiency it brings to your digital life. Thanks for your time! Feel free to share your experiences or ask questions in the comments below.


Anybody know what to add into the docker compose yaml to allow wetty to “allow-iframe” ? I am trying to make this solution wrap into the iframe on the other web page , but got “X-Frame-Options’ to ‘sameorigin” set on wetty . I guess there is a way to instruct wetty to allow iframe when it run in docker , but not sure what format it is.
Thank you!
Ok , I figured that !
Just added line command to yml file :
wetty:
image: wettyoss/wetty
command: ‘–bypass-helmet –allow-iframe’
container_name: wetty
why not use a something like authelia as a front end with authentication?
Gineous , and it just works as described! I was looking over this solution for a few months , and here it is some simply and effectively done! Loving it!
There was somebody asking why it needed? Simple – for your users it gives an option to create a full-scaled classes without giving much access to the infrastructure.
What is the point? I don’t understand why one would install all this stuff when one can simply use an ash client with a key to access their machine remotely. This seems needlessly complicated for the novelty of seeing your terminal screen on a web browser.
Speechless.
All those years spent trying to prevent noob idjuts getting themselves busted using easy to hack passwords instead of ssh keys and other more secure access methods, and you show them how to drive a coach and horses through it with a huge and overly complex bloated piece of insecure junk giving simple access to their entire network.
How to take a left handed screwdriver to open a nut.
Not even a note on how to restrict IP access.
Talk about dumbed down. Almost reads like a Windows howto.
I suggest you ignore this and read up on how to properly use and secure ssh access if you want to stay safe.
Please show a diagram illustrating how the components fit together.
It’s done.
Best,
Bobby