SSH (Secure Shell) serves as a critical entry point to your server, offering a powerful, encrypted method of remote administration. However, its security is only as strong as the measures to protect it.
Enter SSHGuard—a robust tool designed to shield your SSH server from brute-force attacks and other common vulnerabilities. This guide will show you the practical steps to implement it, enhancing your server’s security and giving you peace of mind.
But before we get to the practical part, let’s shed more light on the software itself.
What’s SSHGuard?
SSHGuard is a security tool that protects servers from brute-force attacks, primarily those targeting SSH services. It functions as a log-based intrusion prevention system, monitoring server logs for signs of malicious activity, such as repeated failed login attempts.
When SSHGuard detects such suspicious behavior, it automatically blocks the offending IP addresses using firewall rules.
Moreover, it supports several logging formats and can be integrated with various firewall backends, such as UFW, firewalld, iptables, nftables, IPFW, and pf, to manage the blocking and unblocking of potentially malicious traffic.
Yes, I know. This might remind you of what Fail2Ban does (check out our guide for more details). While the two tools have similarities, they also have key differences. So, let’s explore them briefly to help you decide which tool better fits your needs.
SSHGuard vs Fail2Ban: Key Differences
SSHGuard and Fail2Ban both monitor log files for suspicious activity and then take action to block offending IP addresses. Despite their similar functionalities, however, here are the differences between them:
Monitoring Approach:
- SSHGuard directly monitors log files and can interpret the log entries themselves without requiring regular expressions.
- Fail2Ban, on the other hand, relies heavily on regular expressions to parse log files and identify abusive behavior patterns. This makes it highly flexible and configurable, as it can be adapted to monitor virtually any service that writes to a log file.
Default Services Monitored:
- SSHGuard is primarily designed to protect SSH servers but supports other services like mail servers and FTP.
- Fail2Ban can be configured to protect a wide range of services beyond SSH, including web servers, mail servers, file share servers, FTP, and more.
Implementation and Performance:
- SSHGuard is written in C, which might offer better performance regarding speed and resource usage.
- Fail2Ban is written in Python, which might make it slightly slower but also more adaptable due to Python’s extensive libraries and ease of scripting.
Blocking Mechanisms:
- SSHGuard uses a simpler blocking mechanism that integrates directly with firewall tools like UFW, firewalld, iptables, pf, IPFW, etc.
- Fail2Ban primarily uses iptables but can be configured to work with various other actions, like sending emails, running custom scripts, or integrating with more complex firewall settings.
Ease of Configuration:
- SSHGuard provides a more straightforward setup for users primarily concerned with SSH and a few other services, often requiring less customization.
- Fail2Ban may require more detailed configuration to set up the regular expressions and define the specific rules and actions for different services, but this also allows for greater control and customization.
Installing SSHGuard on Linux
Below is how to install SHHGuard, depending on your Linux distro.
Debian / Ubuntu / Linux Mint
sudo apt install sshguardCode language: Bash (bash)Fedora
sudo dnf install sshguardCode language: Bash (bash)Keep in mind that running the command above will also install the “sshguard-firewalld” package since Firewalld is the default firewall used on Fedora systems. If needed, you can also install the “sshguard-iptables” or “sshguard-nftables” packages as alternative firewall backends for SSHGuard.
Enable and start the service:
sudo systemctl enable --now sshguard.serviceCode language: CSS (css)Alma Linux / Rocky Linux
Since the SSHGuard package is in the EPEL repository, add it to your system first (if you haven’t already) and refresh the package index.
sudo dnf install epel-release
sudo dnf updateCode language: Bash (bash)
You can then install SSHGuard by running the following:
sudo dnf install sshguardCode language: Bash (bash)As with Fedora, an additional “sshguard-firewalld” package will be installed as the default backend for SSHGuard’s use. The other two options, “sshguard-iptables” and “sshguard-nftables” are also available.
Finally, enable and start the service:
sudo systemctl enable --now sshguard.serviceCode language: CSS (css)Configure SSHGuard
The “sshguard.conf” file is where you configure the settings for SSHGuard to protect your server. This file allows you to specify how SSHGuard behaves, what it monitors, and how it responds to potential attacks.
On Debian-based systems (Debian, Ubuntu, etc.), the file is located at:
/etc/sshguard/sshguard.confCode language: Bash (bash)On RHEL-based distros such as Alma Linux, Rocky Linux, Fedora, you can find it on the following path:
/etc/sshguard.confCode language: Bash (bash)This is how it looks by default in Debian:
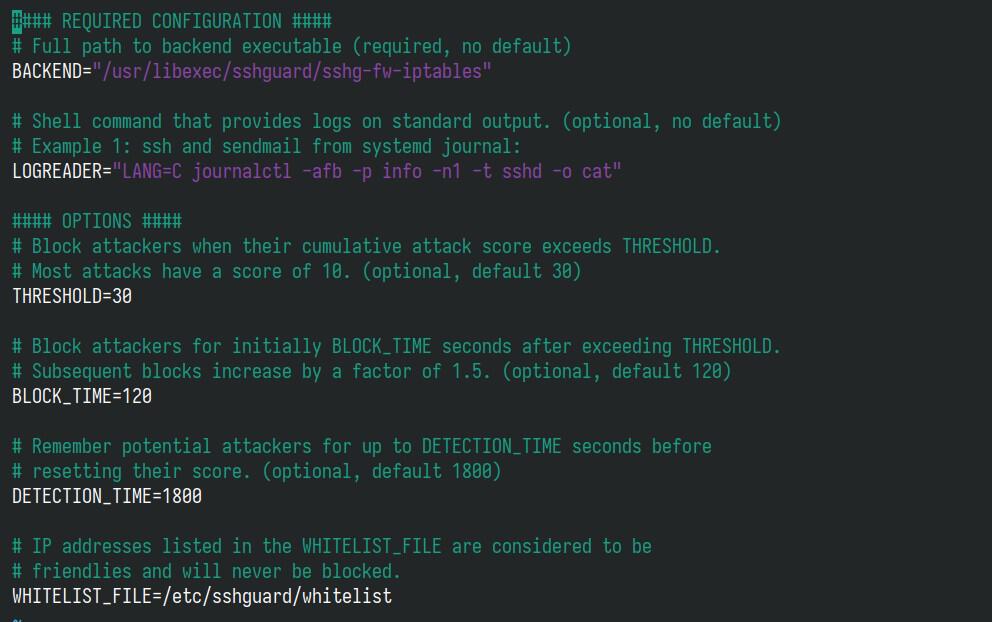
Here’s an explanation of its common options:
- BACKEND: This option specifies the type of firewall backend that SSHGuard should use to block attackers. For example, you might see values like “sshg-fw-nft-sets,” “sshg-fw-firewalld,” “sshg-fw-iptables,” “sshg-fw-pf,” etc., depending on your system’s firewall.
- LOGREADER: Specifies the method SSHGuard uses to read your log files. It determines how SSHGuard processes log entries to detect malicious activity.
- THRESHOLD: This is the number of abusive activities (like failed login attempts) from a single IP address that triggers SSHGuard to block that address. Setting this lower means quicker bans, but be cautious not to set it too low, which might block legitimate users who mistype their passwords.
- BLOCK_TIME: This defines how long (in seconds) an IP address will be blocked after reaching the abuse threshold, with the default setting of two minutes (120 seconds). After this time, the block is lifted unless the IP address triggers another block.
- DETECTION_TIME: This sets the time frame (in seconds) during which repeated offenses by the same IP are counted toward reaching the threshold for blocking. Essentially, it sets the period during which SSHGuard keeps track of suspicious activities from a specific IP address.
- WHITELIST_FILE: The full path to the file in which you can specify IP addresses or ranges that should never be blocked, no matter how they behave. This is useful for ensuring you don’t accidentally block yourself or trusted IP addresses.
Let me now show you how to configure SSHGuard, depending on the firewall you are using.
SSHGuard Configuration When Using UFW/nftables
First, I want to start with an important clarification. Many guides list UFW as a backend for SSHGuard, which is not quite true for one simple reason – SSHGuard does not offer a UFW backend but, in fact, a nftables one.
UFW (Uncomplicated Firewall) is a just user-friendly interface (abstraction layer) for managing the iptables/nftables firewall rules on Linux under the hood. It is the default one used in Ubuntu.
So, to configure SSHGuard to work with it, make sure the “BACKEND” option contains “/usr/libexec/sshguard/sshg-fw-nft-sets” as a value.

However, before SSHGuard can manipulate UFW rules, you need to ensure UFW is set to be managed by external applications like SSHGuard. This involves adding hooks for SSHGuard in UFW’s configuration. To do so, edit the UFW “before.rules” file:
sudo nano /etc/ufw/before.rulesCode language: Bash (bash)Add the following lines after the “allow all on loopback” section to create a new chain for SSHGuard:
# Create a chain for SSHGuard
-A ufw-before-input -j SSHGUARD
-A ufw-before-output -j SSHGUARD
-A ufw-before-forward -j SSHGUARDCode language: PHP (php)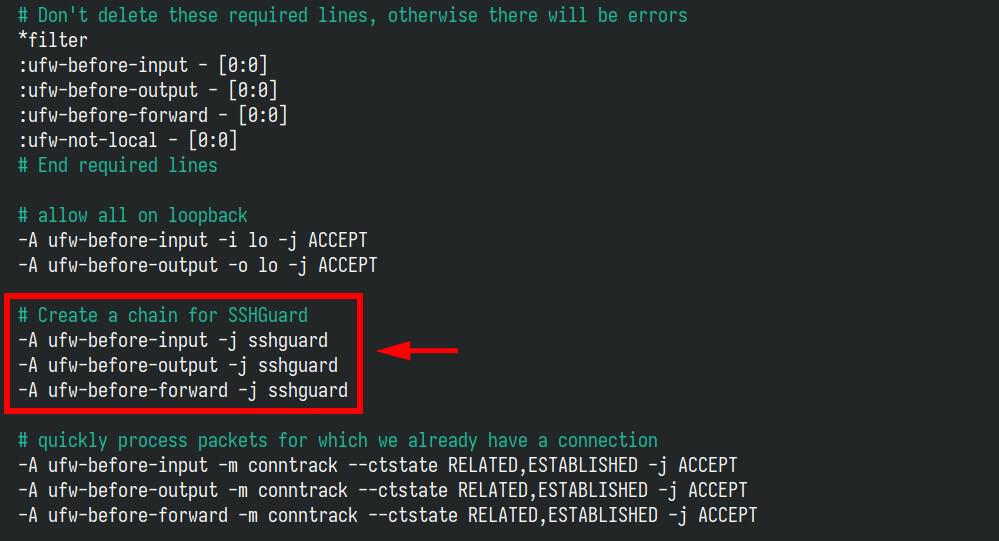
Save and exit the file. Then, restart the UFW service.
sudo systemctl restart ufwCode language: Bash (bash)If you have changed the SSHGuard configuration, restart its service as well.
sudo systemctl restart sshguardCode language: Bash (bash)That’s it. SSHGuard is now all set up to protect your server against brute-force SSH attacks. Try making a few incorrect SSH connections to your server to test it out. After the third failed attempt (“THRESHOLD=30“), SSHGuard will block your connection for two minutes (“BLOCK_TIME=120“).
Want to check which addresses have been blocked? The easiest way is to directly list the SSHGuard nftables table, which contains a list of blocked IP addresses.
sudo nft list table sshguardCode language: Bash (bash)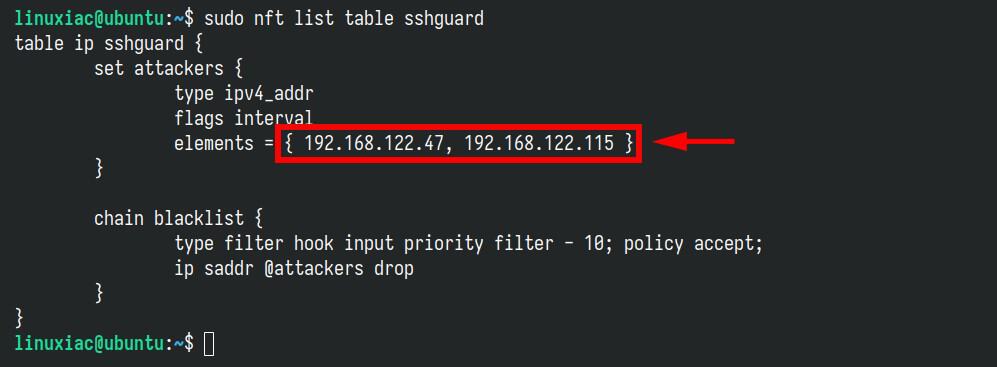
You can also monitor the “/var/log/auth.log” file to view records of SSHGuard’s activities and actions.
sudo tail -f /var/log/auth.logCode language: Bash (bash)
SSHGuard Configuration When Using iptables
Call me old-fashioned (I won’t argue because you’re right), but I prefer using SSHGuard with an iptables firewall for the backend. Here’s how to do it.
First, make sure SSHGuard is configured to use iptables by checking the SSHGuard configuration file, which must contain the “BACKEND” option set to “/usr/libexec/sshguard/sshg-fw-iptables.”
sudo nano /etc/sshguard/sshguard.confCode language: Bash (bash)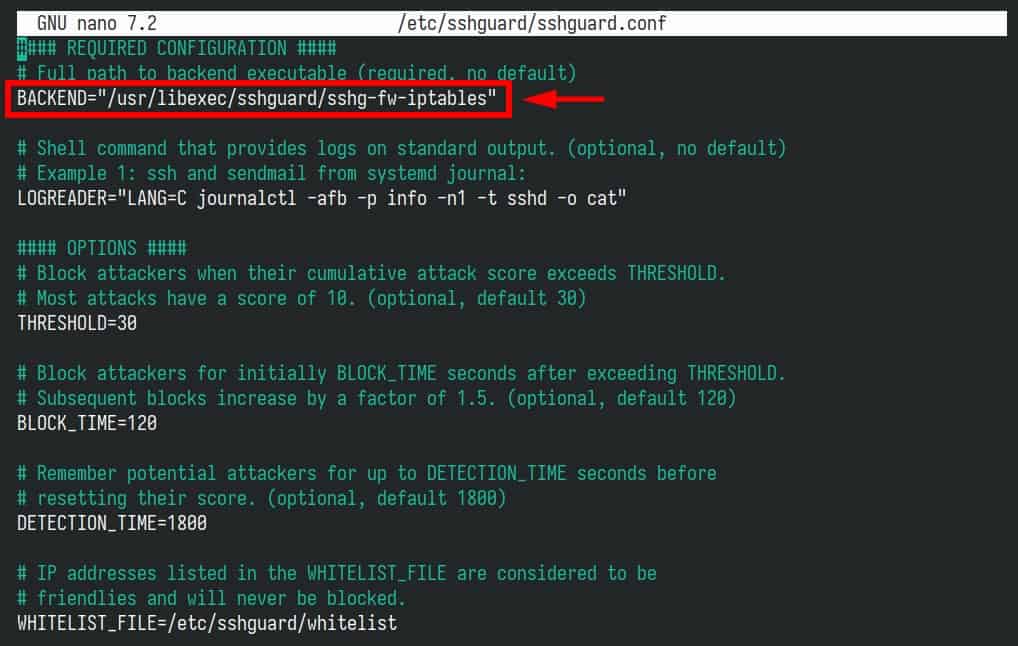
Of course, if you have made any changes to the SSHGuard configuration, be sure to restart it:
sudo systemctl restart sshguardCode language: Bash (bash)Next, create a new iptables chain for SSHGuard:
sudo iptables -N sshguardCode language: Bash (bash)Ensure all SSH traffic passes through the “sshguard” chain:
sudo iptables -A INPUT -p tcp --dport 22 -j sshguardTo make your changes permanent (available after a reboot), look at this guide or follow the commands below:
sudo apt install iptables-persistent
sudo iptables-save -f /etc/iptables/rules.v4
To view the list of IP addresses currently blocked by SSHGuard, run the following:
sudo iptables -L sshguard -n
You can also monitor real-time SSHGuard actions by running:
sudo journalctl -u sshguard -fCode language: Bash (bash)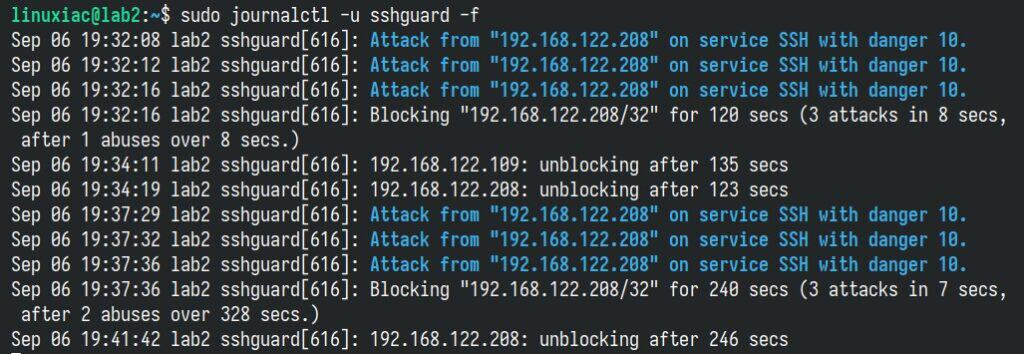
SSHGuard Configuration When Using firewalld
Firewalld is a firewall management tool for Linux. It is primarily used in RHEL-based distros like Alma Linux, Rocky Linux, and Fedora. The tool supports firewall zones, which define the trust level of network connections or interfaces. To learn more about it and how to use it, visit our detailed guide, “Firewalld in Examples.” Now, back to the topic.
To tell SSHGuard to use the firewalld as a backend, make sure that the “BACKEND” option in the “sshguard.conf” file is set to “/usr/libexec/sshguard/sshg-fw-firewalld.”
sudo nano /etc/sshguard.confCode language: Bash (bash)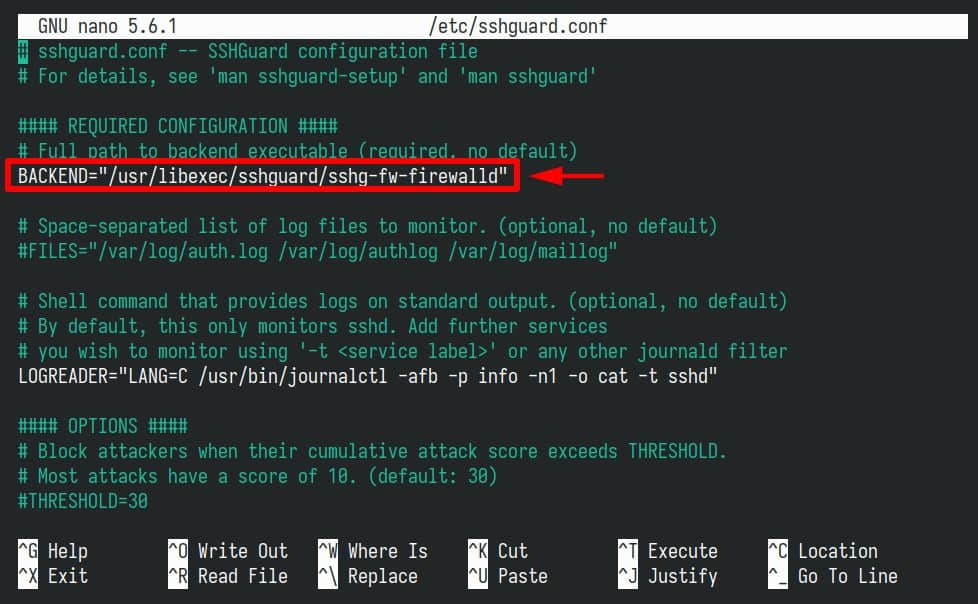
Additionally, don’t forget to restart the SSHGuard service if you have made any changes to the configuration itself:
sudo systemctl restart sshguardCode language: Bash (bash)Blocked attackers are added to two rules, named “sshguard4” (for IPv4 addresses) and “sshguard6” (for IPv6 addresses), respectively, added to the default firewalld zone (“public“).
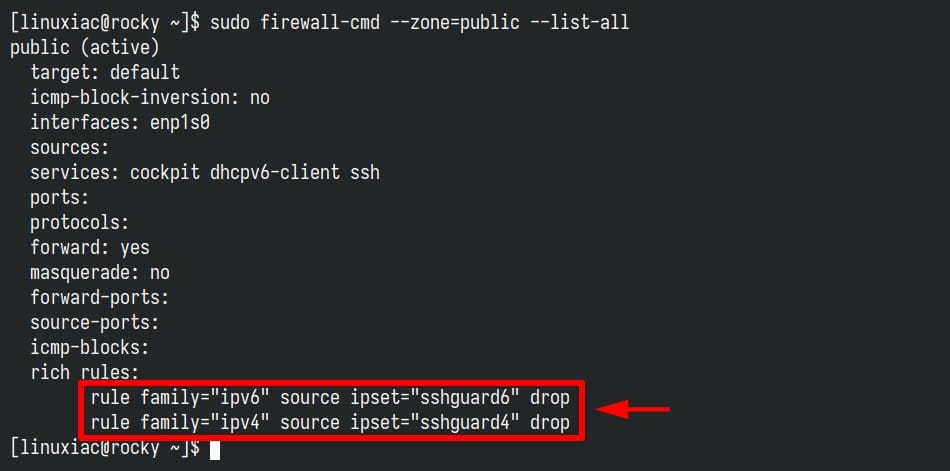
To view the list of IP addresses currently blocked by SSHGuard, run the following:
sudo firewall-cmd --info-ipset=sshguard4Code language: Bash (bash)
Accordingly, for IPv6 addresses, the command is:
sudo firewall-cmd --info-ipset=sshguard6Code language: Bash (bash)Finally, you can monitor real-time SSHGuard actions by running:
sudo journalctl -u sshguard -fCode language: Bash (bash)However, if you’re using a different firewall zone, you can set it up by following the instructions below. Just replace “<zone-name>” with your specific zone name.
sudo firewall-cmd --zone=<zone-name> --permanent --add-rich-rule="rule source ipset=sshguard4 drop"
sudo firewall-cmd --zone=<zone-name> --permanent --add-rich-rule="rule source ipset=sshguard6 drop"Code language: Bash (bash)
Whitelisting IP Addresses
Whitelisting IP addresses in SSHGuard allows you to ensure that certain IP addresses are never blocked, regardless of their activity. This can be important for IPs you trust, such as system administrators or automated processes that may have frequent, legitimate SSH access. Here’s how you can whitelist IP addresses in SSHGuard.
First, ensure that the “WHITELIST_FILE” option in the “sshguard.conf” file is active and not commented out.
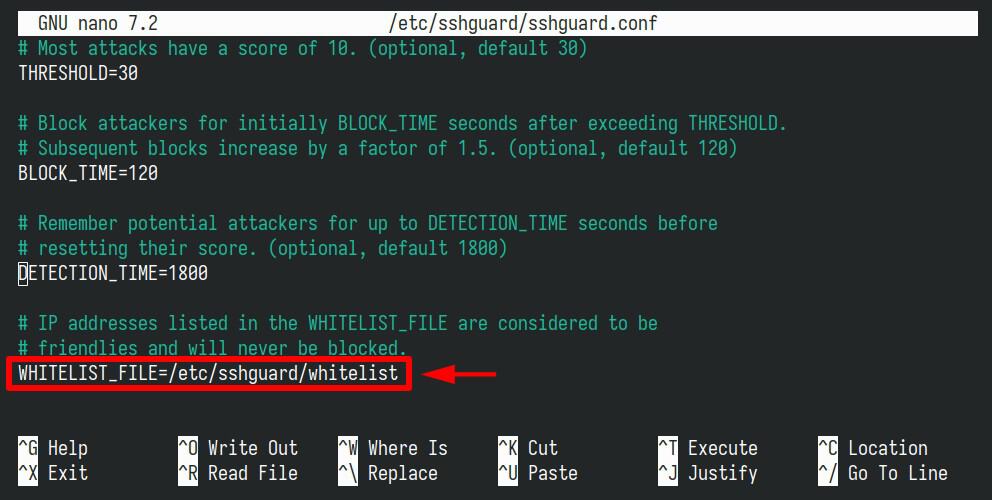
The file’s location with the list of whitelisted addresses may vary depending on your Linux distribution. For those using Debian-based systems like Ubuntu, it’s located at:
/etc/sshguard/whitelistCode language: Bash (bash)For RHEL-based, such as Alma, Rocky, and Fedora:
/etc/sshguard.whitelistCode language: Bash (bash)There, you can enter the hosts you want never to be blocked by SSHGuard in three different ways:
- A single IP address
- A network range
- The full domain name (FQDN) of a host
For example:
192.168.0.34
192.168.0.0/24
myhost.domain.com
So, open the file with your text editor, enter the addresses you need, save the file, and exit. Of course, after that, don’t forget to restart the SSHGuard service.
sudo systemctl restart sshguardCode language: Bash (bash)Conclusion
Securing your SSH server using SSHGuard provides a robust layer of protection against brute force attacks and other unauthorized access attempts. Remember, the key to maintaining security is not just in the initial setup but in continually monitoring and updating your configurations as new threats emerge.
For more information, visit the project’s website or consult SSHGuard’s documentation.
Thanks for your time! If you have any questions, please leave them in the comments section below.

Solid Guide. I found another one that had several errors that lead to a lot of confusion. One tip for people in the Centos/Fedora/Alma/Rocky world:
Part of the battle for guides is to find the locations of packaged files. After installing from EPEL run this:
sudo rpm -qil sshguard
This will list out all the files that came with the package, allowing you to find where the example .conf files are, and the location of the various firewall libraries.
hey anon, try adding this into before.rules instead of what suggested in the article
# sshguard configuration
:sshguard – [0:0]
-A ufw-before-input -p tcp –dport 22 -j sshguard
Hello, thanks for the guide. If I use iptables, there is no issue and I can configure everything accordingly. However, if I use nftables with UFW, sshguard works and keep blocking attackers but I can't even use any basic commands like
The chain added to the /etc/ufw/before.rules is the main source of the situation. Thanks in advance.