Rocky is known as one of the most stable and reliable Linux distributions—a free alternative to Red Hat Enterprise Linux. It’s no surprise, then, that developers and system administrators alike often choose it as their go-to option for building and running Java applications.
In this guide, I’ll walk you through the process of installing Java on Rocky Linux 10. Additionally, we ensure your system is set up properly by covering how to configure the necessary environment variables, so your Java installation is fully ready to go. But before we dive in, a bit of theory.
OpenJDK vs. Oracle JDK
In other guides, you might see instructions for installing the Oracle version of Java. But here, I’ve chosen not to cover that for a reason—and here’s why.
First and foremost, the version of Java available in the Rocky Linux 10 repositories is licensed under GPLv2, which means it’s completely free to use—even for commercial purposes.
Oracle’s version, on the other hand, is distributed under their No-Fee Terms and Conditions (NFTC). While that may seem straightforward at first glance, there are some hidden caveats in the license that developers and organizations should be aware of before using it in production.
First and foremost, no-fee is different from open source. I mean, Oracle JDK under NFTC is not open source, so you’re not allowed to modify or redistribute the source code. With Oracle JDK, while it permits free internal and production use and redistribution of unmodified binaries, you can’t distribute modified builds, and the no-fee period is time-boxed per release line.
So, in practice, Oracle implementation does not give you anything more – both share the same upstream, I mean, both are built from the OpenJDK code.
With that said, the choice is pretty clear: OpenJDK. Now that we’ve cleared that up, back to the main topic of this guide.
Choosing the Right Java Package in Rocky Linux 10
Before we dive into installing Java on Rocky Linux 10, there’s one thing to sort out first—choosing the right OpenJDK package. Rocky gives you three main options, so let’s quickly run through what each one does. That way, you’ll have a clear idea of which one fits your needs best.
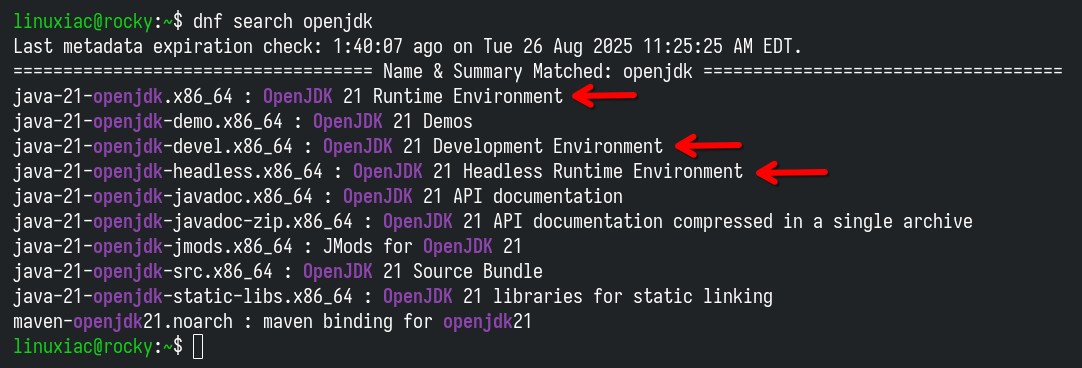
- java-21-openjdk (The Standard Runtime Environment): Provides the full Java runtime needed to run Java applications. So, if you want to run Java programs (including GUI-based apps) without doing any development, this is the way to go.
- java-21-openjdk-headless (Minimal Runtime): A stripped-down runtime optimized for server or CLI environments. No GUI support — excludes AWT, Swing, and other X11 dependencies. It’s Ideal for environments where graphical components are unnecessary.
- java-21-openjdk-devel (Development Tools): Provides the Java Development Kit (JDK) for compiling and building Java applications. If you plan to write, compile, or build Java applications rather than just run them, this is what you need.
Install Java on Rocky Linux 10
I’d recommend installing the “java-21-openjdk-devel” package as your all-in-one option. Even if you don’t plan on compiling Java apps yourself, it’s useful to have that ability available. A lot of services compile Java code on the fly as part of their work, so having this package in place makes most Java setups a whole lot easier.
Installing it is super easy—just run a single DNF command:
sudo dnf install java-21-openjdk-develCode language: Bash (bash)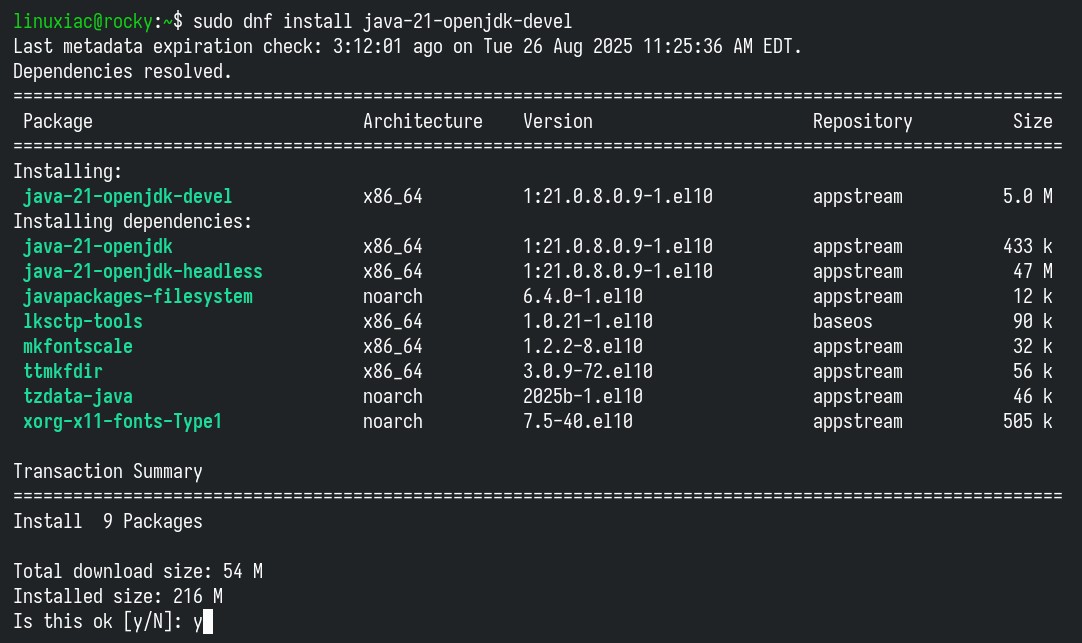
As you can see, installing “java-21-openjdk-devel” also automatically pulls in “java-21-openjdk,” and that in turn pulls in “java-21-openjdk-headless” as a dependency. So you end up with a full Java suite installed.
Once the packages are downloaded and installed, use the command provided below to verify that the installation was successful. It should output similar to the following:
java -versionCode language: Bash (bash)
And that’s all. We have successfully installed OpenJDK 21 on our Rocky Linux 10 system.
Set JAVA_HOME Environment Variable
Think of the “JAVA_HOME” environment variable as a kind of “contract” in the Java world. It simply points to the root directory of your JDK or JRE. But why is it so important?
Well, a lot of tools—like Maven, Gradle, Tomcat, Jenkins, and plenty of others—use “JAVA_HOME” to figure out where your JDK is installed. Additionally, many CI/CD pipelines, Docker images, and development environments require it to be set as well. If it’s missing, some of them might not even start.
Finding the right path for “JAVA_HOME” is easy—just run the command below:
readlink -f /usr/bin/java | sed "s:bin/java::"Code language: Bash (bash)
However, instead of going through the hassle of manually editing your “~/.bashrc” file to add the path—or temporarily exporting variables—here’s a simpler, automated way to make the change permanent. Execute the four lines below in the terminal:
sudo tee /etc/profile.d/java.sh > /dev/null <<'EOF'
export JAVA_HOME=$(dirname $(dirname $(readlink -f $(which java))))
export PATH=$JAVA_HOME/bin:$PATH
EOFCode language: Bash (bash)
Finally, make the “java.sh” file we just created executable.
sudo chmod +x /etc/profile.d/java.shCode language: Bash (bash)
After logging out and back in, the “JAVA_HOME” environment variable will always match the active Java version. A simple check:
echo $JAVA_HOMECode language: PHP (php)
Uninstall Java on Rocky Linux 10
If, for some reason, you want to remove Java from your Rocky 10 system, here’s how to approach it. First, use the command below to find out all locally installed Java packages.
rpm -aq | grep openjdkCode language: Bash (bash)
Then, just pass their names as arguments to the dnf remove command.
sudo dnf remove java-21-openjdk-headless java-21-openjdk java-21-openjdk-develCode language: Bash (bash)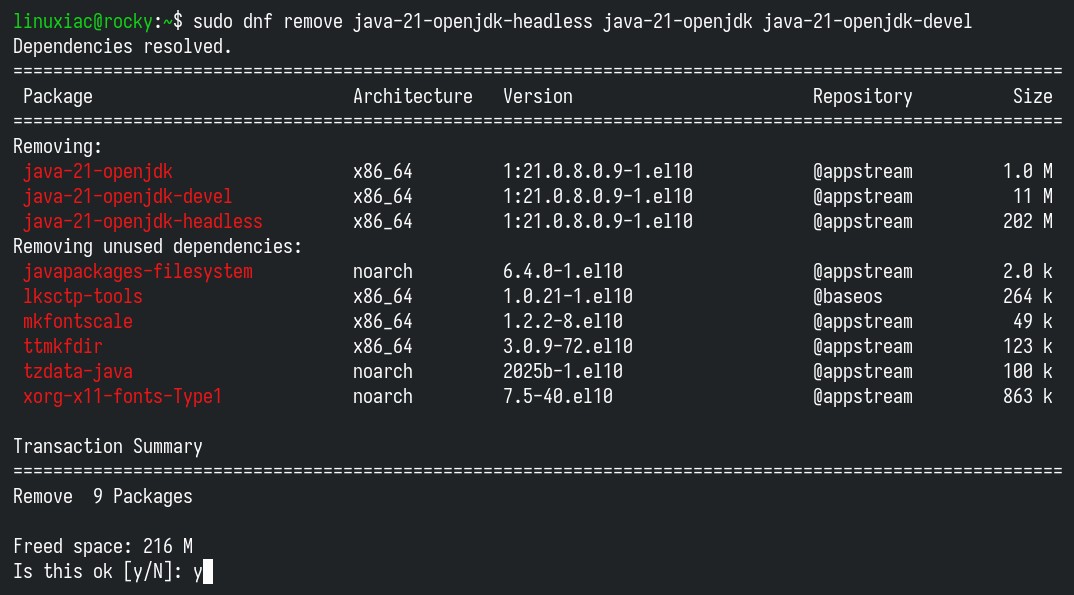
And finally, make sure to delete the “java.sh” file you created earlier.
sudo rm /etc/profile.d/java.shCode language: Bash (bash)Conclusion
As you can see, with the right guidance, installing Java on Rocky Linux 10 is simple and can be completed in minutes. Now, you are all set to run Java applications, develop Java programs, and enjoy all the benefits of this powerful programming language.
Thanks for your time! I hope you find this guide helpful. Your feedback and comments are most welcome.