Knowing who and when logs to your Linux server via SSH is always a good idea. Even if you’re the only one with access, it’s good practice to keep an eye on connections. For teams or production systems, getting notified about SSH logins adds an extra layer of awareness and security.
That’s why, in this guide, I’ll show you an easy way to implement SSH login notifications, which gives you an additional piece of mind by providing real-time insight into who’s accessing your server.
How to Enable SSH Login Alerts Using PAM
PAM (Pluggable Authentication Module) is the most reliable, low-friction way to fire a hook exactly when an SSH session opens (and closes). Here’s how it works.
When someone logs in with SSH, the system requests instructions from PAM. Usually, PAM checks passwords, keys, or 2FA, but we can also tell it: “Every time a new SSH session starts, run this script.” That way, the script gets useful details like the username and IP address, and can immediately send you a notification — without needing to scan logs or run extra daemons. Here’s how to do it.
With your preferred terminal text editor, edit “/etc/pam.d/sshd” and add after the existing “session” lines the following:
session optional pam_exec.so /usr/local/bin/ssh-login-notify.shCode language: Bash (bash)So, the final version looks like this:
sudo nano /etc/pam.d/sshdCode language: Bash (bash)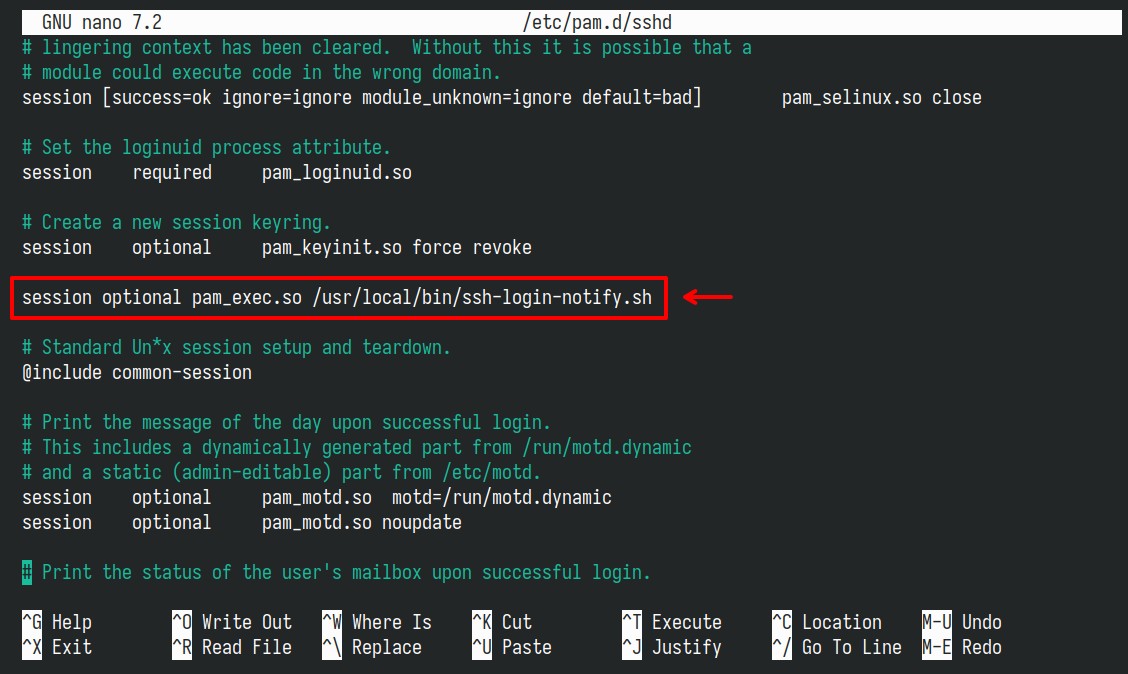
Save the file and exit. Now, let’s create the script itself. It will run every time an SSH login succeeds, thanks to the PAM SSH configuration we just set up. The only thing you really need to figure out here is what kind of notification you’d like to set up.
I mention this because there are numerous ways to do it. For example, if you already use a self-hosted notification system, such as Ntfy or Gotify, or a public-facing one like Pushover, you can hook right into that. Another option is Apprise, which works with nearly every popular notification service available. You could also opt for Telegram, Discord, Slack, or a similar platform.
In short, the possibilities are almost endless—it really comes down to whatever service you prefer. However, to keep things simple for this guide, I’ll show you one of the most straightforward setups: sending a notification via email by using Gmail’s SMTP.
First, let’s install the prerequisites. If you are on a DEB-based distribution (Debian, Ubuntu, etc.), execute:
sudo apt install msmtp msmtp-mta bsd-mailxCode language: Bash (bash)For the RPM-based ones (Fedora, Alma, Rocky, etc.):
sudo dnf install msmtp msmtp-mta mailxCode language: Bash (bash)As you can see, we will use msmtp—a lightweight and simple command-line tool for sending emails by relaying them to a configured mail server. In our case, Google’s SMTP. Create a “/etc/msmtprc” file and paste the following into it:
sudo nano /etc/msmtprcCode language: Bash (bash)# Global defaults
defaults
auth on
tls on
tls_trust_file /etc/ssl/certs/ca-certificates.crt
logfile /var/log/msmtp.log
# Gmail account
account gmail
host smtp.gmail.com
port 587
from YOUR_GMAIL_ADDRESS@gmail.com
user YOUR_GMAIL_ADDRESS@gmail.com
passwordeval "cat /root/.gmail_app_password"
# Set default
account default : gmailCode language: Bash (bash)Of course, replace “YOUR_GMAIL_ADDRESS@gmail.com” with your actual one. Now, let’s focus on a “passwordeval” option. As you can see, it points to a “/root/.gmail_app_password” file. Since Google no longer allows third-party applications or scripts to log in using your regular Gmail password, you must create an App Password in advance — a special 16-character token that grants access to your Gmail account.
To do this, click your profile picture in the top-right corner of your Google account and choose “Manage your Google Account.” In the search bar, type “app password,” then select it when it shows up. Enter a name for your new app — for example, “My SMTP Notifications” — and click “Create.” Google will generate a 16-character password split into four groups of four. Copy that code and keep it handy.
Now run the following commands. Of course, replace “YOUR_16_CHAR_APP_PASSWORD” in the first one with the code Google just generated for you.
sudo bash -c 'echo "YOUR_16_CHAR_APP_PASSWORD" > /root/.gmail_app_password'
sudo chmod 600 /root/.gmail_app_password
sudo chown root:root /root/.gmail_app_passwordCode language: Bash (bash)
Finally, create the script, which PAM will run automatically every time someone successfully logs in to your server over SSH.
sudo nano /usr/local/bin/ssh-login-notify.shCode language: Bash (bash)#!/bin/bash
USER="$PAM_USER"
IP="$PAM_RHOST"
HOST=$(hostname)
DATE=$(date)
RECIPIENT="you@example.com"
SUBJECT="SSH Login on $HOST"
BODY="
A new SSH login was successfully established.
User: ${USER}
User IP Host: ${IP}
Date: ${DATE}
Server: ${HOST}
"
if [ ${PAM_TYPE} = "open_session" ]; then
echo "${BODY}" | mail -s "${SUBJECT}" ${RECIPIENT}
fi
exit 0Code language: Bash (bash)Here, replace “you@example.com” with the email address where you want notifications to be sent. Then, make the script executable:
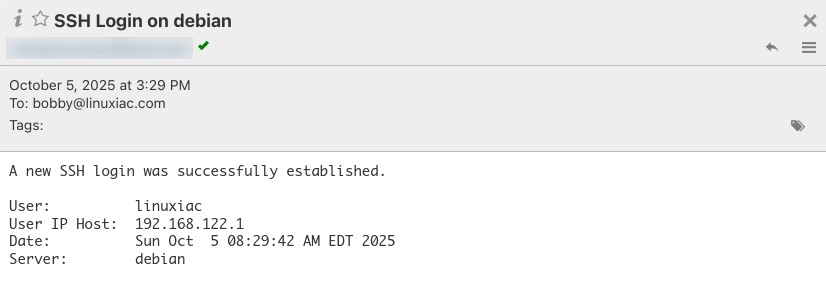
sudo chmod +x /usr/local/bin/ssh-login-notify.shCode language: Bash (bash)To test everything you’ve done so far, log in to the server via SSH from another host. You should get an email at the address you set up, similar to the one shown below:
If, for some reason, you don’t get the result you expected, take a look at the logs in “/var/log/msmtp.log” to see what went wrong.
Conclusion
Using PAM to trigger SSH login notifications is a reliable approach that integrates directly into the authentication process—no log scraping or background daemons required. Once configured, it gives you instant awareness of who’s accessing your server and from where, helping you spot unauthorized activity early.
For an extra layer of protection, consider also a tool like SSHGuard or Fail2Ban. If you’re not sure how to set it up, check out our guides, “How to Secure Your SSH Server with SSHGuard” and “How To Protect SSH with Fail2Ban,” which walk you through the process step by step. To take things a step further, I’d recommend setting up SSH with two-factor authentication.
Finally, avoid using password authentication. Instead, generate an SSH key pair and use it to log in securely.
Thanks for taking the time to follow this guide. As always, your comments are most welcome.


Had it working on a laptop on my network and went to configure the same on my computer, but can’t make it work. There’s no /var/log/msmstp.log file, even though msmtprc is configured. any suggestions?
typo. there’s no /var/log/msmtp.log file
There is a bug in your script. The line: `if [ ${PAM_TYPE} = “open_session” ]; then` should have double-quotes around ${PAM_TYPE.
Nice article. Thank you, Borisov ❤️
For “teams or production systems” you NEVER should use pam based ssh authentications for security reasons. My systems only allow pam based stuff on a physical console.
What specific problem are you referring to in relation to PAM-based authentication?
Finally an atricle i did not know i needed. Thanks also for linking to the other articles, will read them and most likely use aswell