
- Step 1: Install the 2FA Authenticator App on Your Phone
- Step 2: Install Google’s PAM Authenticator Module
- Step 3: Configure Google Authenticator
- Step 4: Configure SSH to Use Two-Factor Authentication
- Step 5: Setting Up PAM for SSH’s Two-Factor Authentication
- Step 6: Testing SSH 2FA
- Optional: Involving Key-Based Authentication in SSH 2FA
- Conclusion
Secure Shell (SSH), a protocol widely used for secure remote login from one computer to another, offers robust encryption to protect against unauthorized access.
However, with the increasing sophistication of cyber threats, relying solely on traditional password-based authentication can leave systems vulnerable to brute-force attacks and password theft. This is where two-factor authentication (2FA) comes into play.
It adds an extra layer of security by requiring not only a password (something you know) but also a second factor, usually something you have (like a mobile device) or something you are (like a fingerprint).
Integrating 2FA with SSH significantly reduces the risk of unauthorized access to your systems, even if a password is compromised. So let’s show you how to do it.
Step 1: Install the 2FA Authenticator App on Your Phone
To start, you must install a 2FA authenticator app on your mobile device to use two-factor authentication with SSH. This app generates time-sensitive, one-time-use codes that serve as the second factor in the authentication process.
Popular choices for such apps include Google Authenticator or Microsoft Authenticator. They are available for Android and iOS devices and can be downloaded from the respective app stores.
- Google Authenticator for Android
- Google Authenticator for iOS
- Microsoft Authenticator for Android
- Microsoft Authenticator for iOS
For this guide, we will use the Google Authenticator app. It’s important to have it preinstalled on your mobile device, as a little further down in step 3, we’ll be using it during the initial setup of 2FA with your SSH server.
Step 2: Install Google’s PAM Authenticator Module
Google Authenticator is a software-based authentication tool that implements two-factor authentication (2FA) services using the Time-Based One-Time Password (TOTP) Algorithm and HMAC-based One-time Password (HOTP) Algorithm for authenticating users of software applications.
To get your Linux system ready for this, you must install the required package called “libpam-google-authenticator” or “google-authenticator,“ depending on your distribution. But what function does this package serve?
In short, it provides a software module for Linux that integrates the Google Authenticator into the Pluggable Authentication Module (PAM) system. PAM is a framework for integrating multiple low-level authentication schemes into a high-level API, allowing for implementing various authentication methods in programs that require user verification.
Ubuntu / Debian
Ubuntu, Debian, and other distributions based on them, such as Linux Mint or Pop!_OS, can install the Google Authenticator using the apt command below:
sudo apt install libpam-google-authenticatorRocky Linux / AlmaLinux
For enterprise Linux distributions like Rocky and Alma, Google Authenticator is available through the EPEL repository. So, you must first add it to your system (if you haven’t already) and then install the Google Authenticator itself.
sudo dnf install epel-release
sudo dnf install google-authenticator
Fedora
Fedora users can find Google Authenticator within the official distribution repositories. To install it, execute the following command:
sudo dnf install google-authenticatorArch Linux
Google Authenticator is available in the distro’s repos for Arch and Arch-based derivatives. To install it, run:
sudo pacman -S libpam-google-authenticatorStep 3: Configure Google Authenticator
Having successfully installed Google Authenticator, we are now ready to configure it. To do so, open the terminal and execute the command shown below.
google-authenticatorFrom here on, you will need to answer a few questions, with the first being, “Do you want authentication tokens to be time-based?” Answer “y” to enable Time-based One-Time Passwords (TOTP).

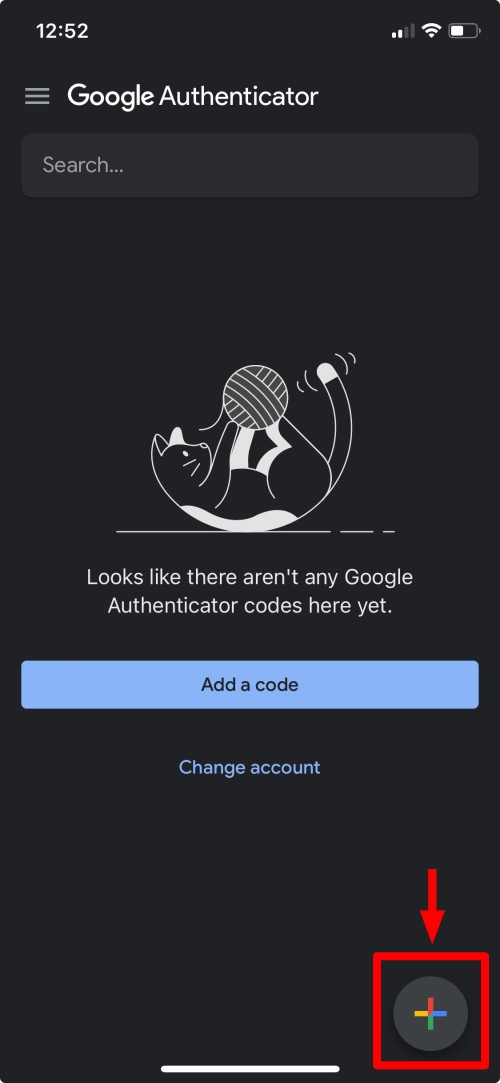
A QR code will be displayed on your terminal screen. This is where the Google Authenticator app on your mobile device comes into play. Open it and click the “+” icon in the bottom right corner.
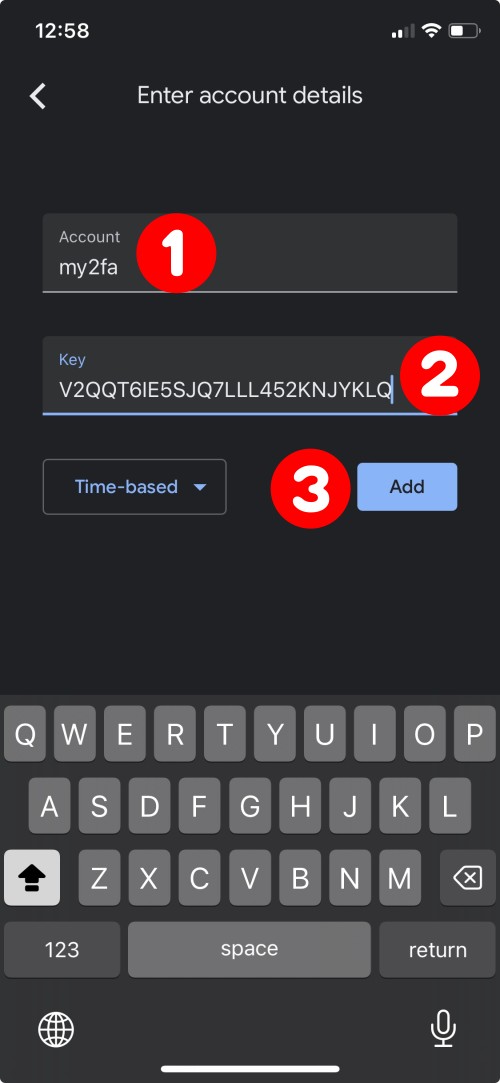
You’ll encounter two options: “Scan a QR code” and “Enter a setup key.” Given that the QR code displayed in the terminal may often be too large and challenging to scan directly from your device, we will opt for the “Enter a setup key” option. Go ahead and click on it.
In the “Account” field, enter a name of your choice, for example, “my2fa.” Then, in the “Key” field on your mobile device’s Google Authenticator app, type the code from the “Your new secret key is” line from the terminal. Finally, click on the “Add” button.
In response, the app will generate a 6-digit code.
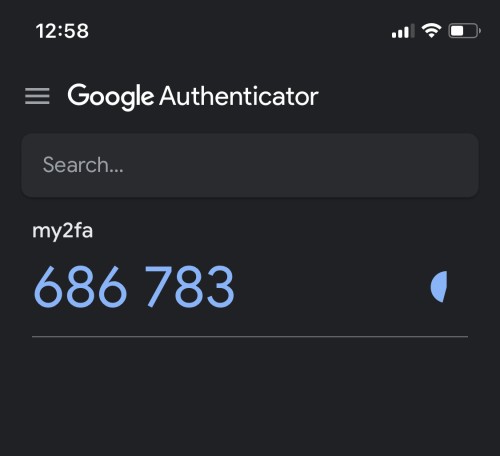
Enter this code in the terminal and hit “Enter.”
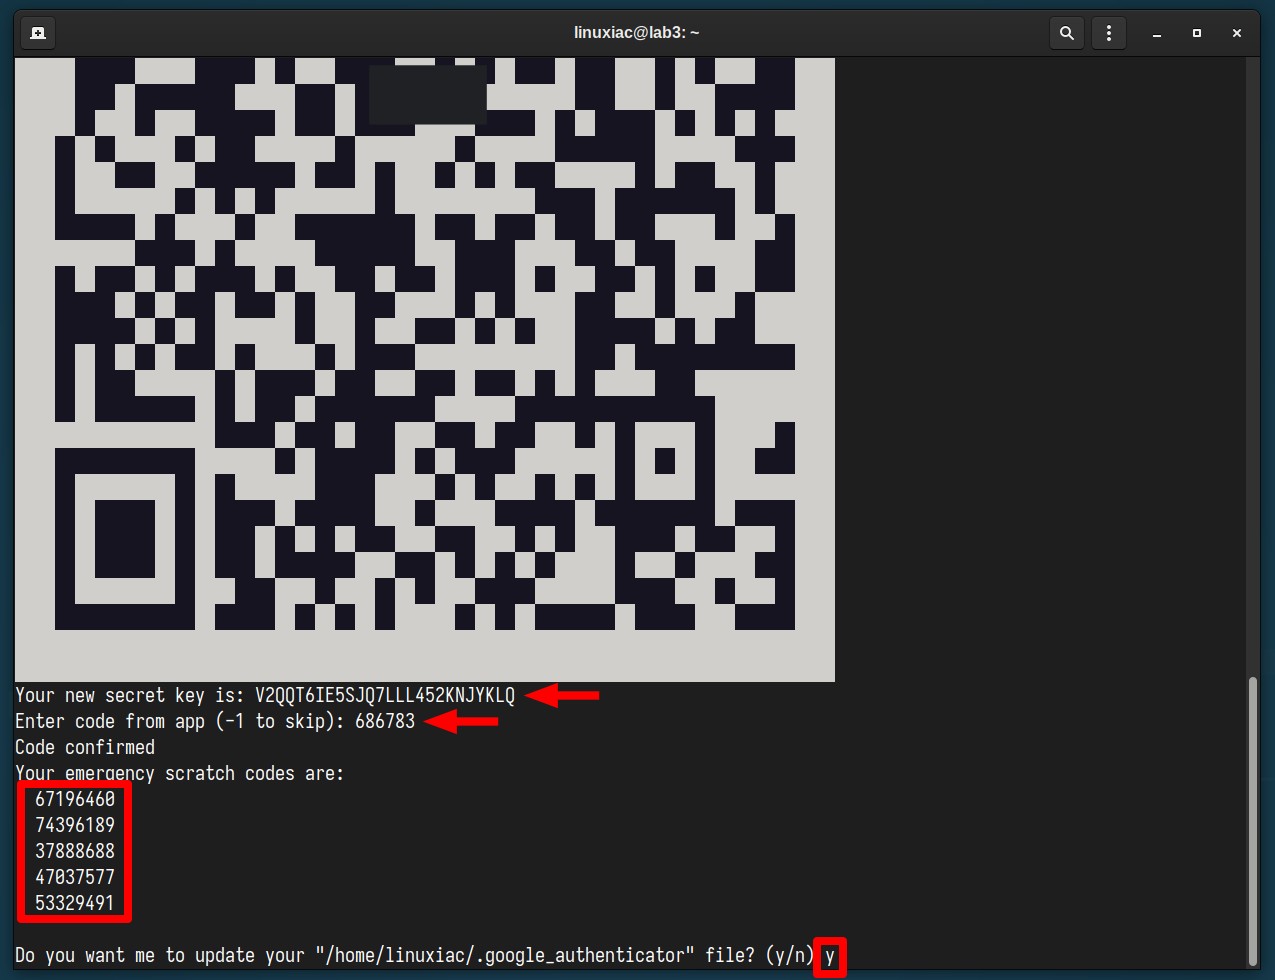
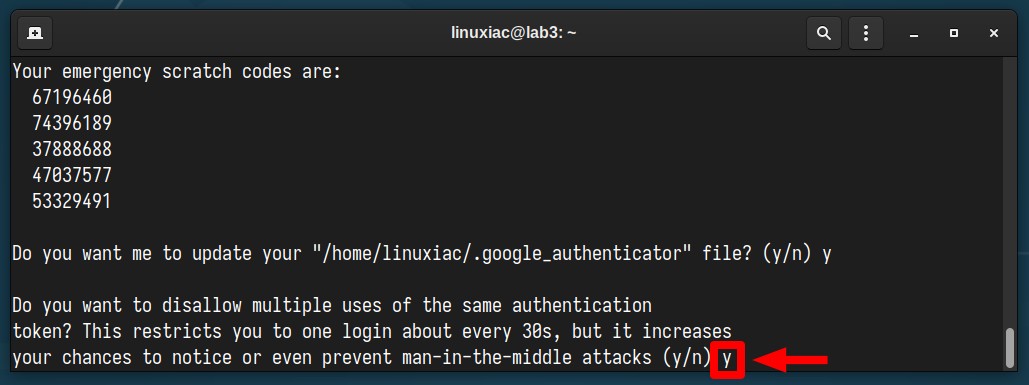
You should receive a “Code confirmed” message. In addition, you’ll get five emergency codes that we recommend you write down and keep somewhere safe.
These codes are one-time and grant you SSH access, for example, when you don’t have your mobile device handy for code generation. Respond with “y” when asked to update the “.google_authenticator” file.
On the next question, to increase security, again, reply with “y,” confirming that you want to disable multiple uses of the same code.
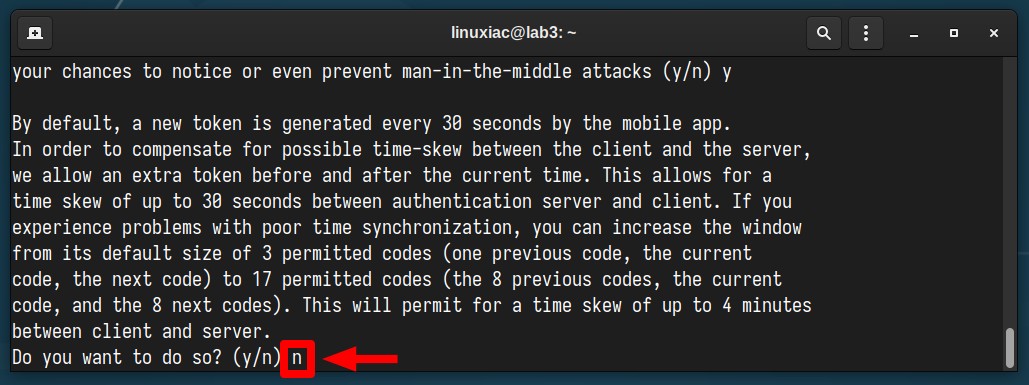
The following configuration option of Google Authenticator concerns the possibility of using previously generated codes if you have not been able to fit into the 30-second time frame, which is the validity of each token from the moment of its generation.
However, since this option reduces security, we strongly recommend you reply with “n.”
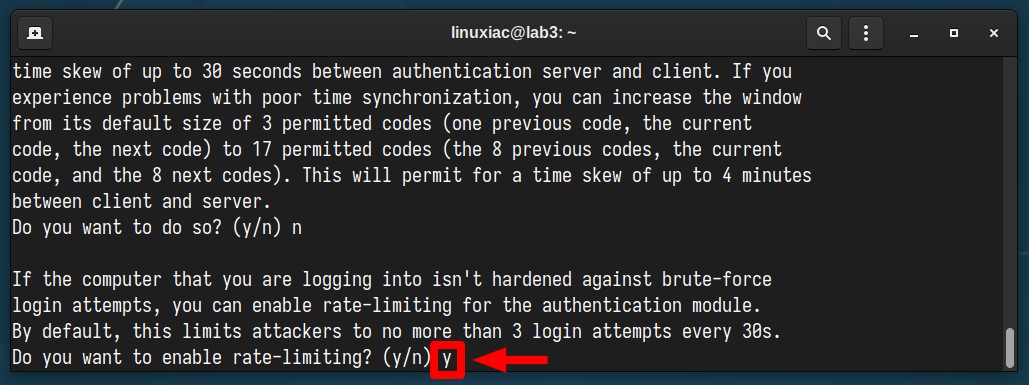
Finally, answer with “y” to activate the rate limit, permitting up to three login attempts within a 30-second window, thus minimizing the chance for a successful brute-force attack on your SSH server.
We’ve completed the Google Authenticator setup, so now it’s time to proceed with configuring the SSH server itself to allow two-factor authentication.
Step 4: Configure SSH to Use Two-Factor Authentication
Open the SSH server configuration file for editing with your preferred terminal text editor:
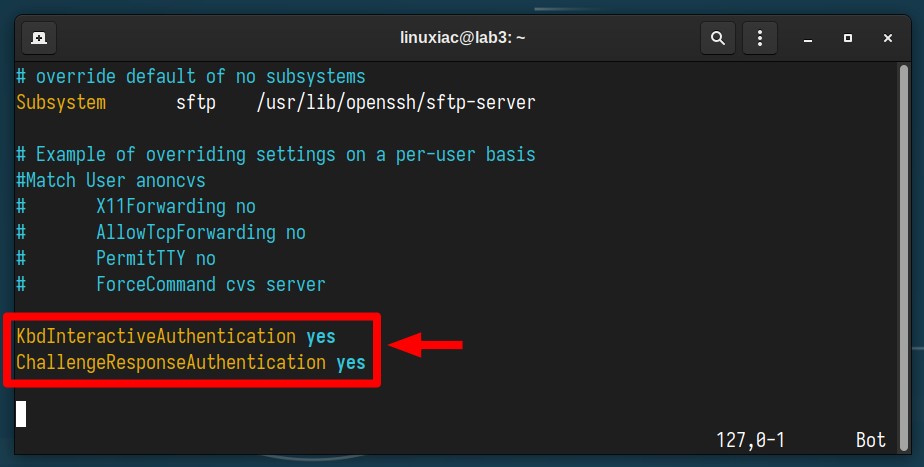
sudo vim /etc/ssh/sshd_configThe thing to do here is to add/change the following two configuration values:
KbdInteractiveAuthentication yes
ChallengeResponseAuthentication yes
If you find either of the two settings in the file, change their values to “yes“. If they’re not there, just add them to the file’s end like the example below, then save and exit the file.
Now, let’s break down what those two options mean:
- KbdInteractiveAuthentication – When enabled in SSH, it allows the server to engage in the 2FA interactive process. For example, after entering your password (the first factor), the server might prompt you for a code from your 2FA app (the second factor).
- ChallengeResponseAuthentication – When enabled, the SSH server can use challenge-response methods for authentication. This includes methods like keyboard-interactive authentication, where the user is prompted to enter information in response to a challenge. In other words, in that case, it allows the SSH server to prompt the user to enter a code generated by a 2FA app.
Lastly, restart the SSH server, and then we can move to the last step of setting up two-factor authentication for our SSH server.
sudo systemctl restart sshStep 5: Setting Up PAM for SSH’s Two-Factor Authentication
PAM (Pluggable Authentication Modules) plays a crucial role in SSH’s authentication process, providing a flexible and modular framework for authentication. This means that instead of SSH having its hard-coded authentication methods, it uses PAM to plug in various authentication mechanisms as needed.
So, the last step is to configure it to allow SSH 2FA. For this, we open its configuration file:
sudo vim /etc/pam.d/sshdThen, we should add the following line at the beginning:
auth required pam_google_authenticator.soCode language: CSS (css)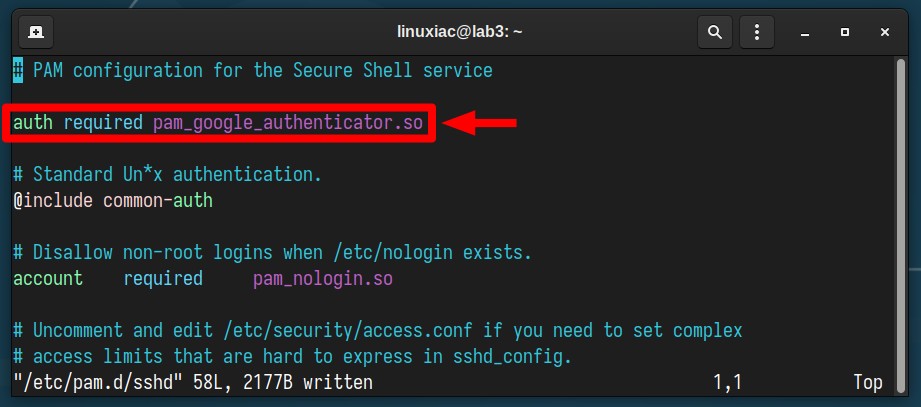
Save the file, exit, and move on to the final, most exciting part.
Step 6: Testing SSH 2FA
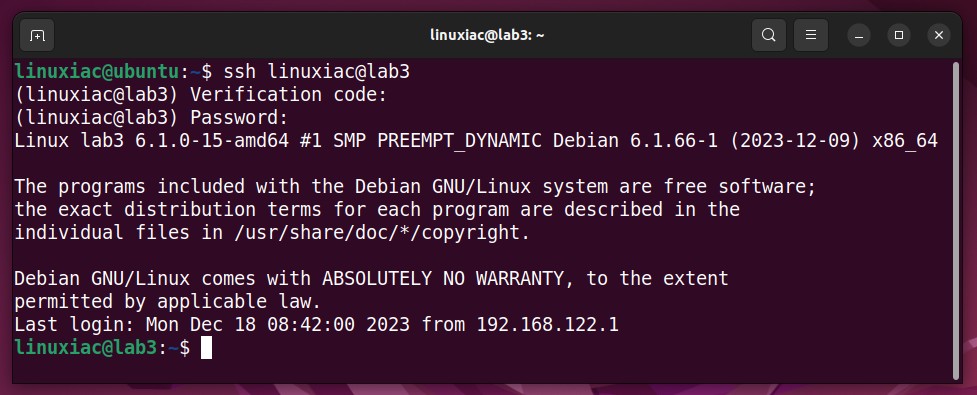
Now, let’s check if everything is working right. To do this from a remote machine, try making an SSH connection to the server configured to use two-factor authentication.
You will be prompted for the verification code. Open the Google Authenticator app on your mobile device and type in the terminal the 6-digit code it shows. When you type, it doesn’t show up on the screen.
Next, you’ll need to enter the user’s password. Once you put in the correct one, you will get SSH access to the server.
If you look at what happens under the hood, in the systemd logs, you’ll find that the login process worked fine. The two-factor authentication code from the Google Authenticator and the user’s password were successfully accepted.
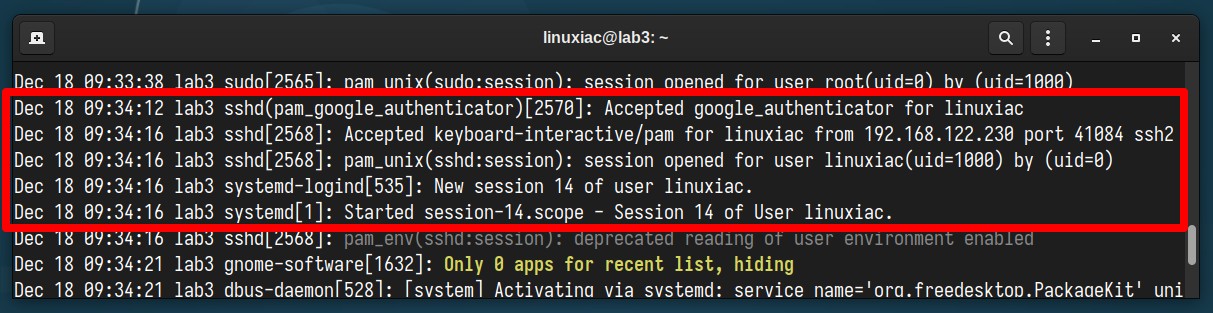
However, even if you type in the correct password but use the wrong code, your SSH connection to the server won’t be allowed, as the systemd logs show.

Great job! You’ve successfully set up two-factor SSH authentication, making your server much safer and well-protected from unauthorized access.
Optional: Involving Key-Based Authentication in SSH 2FA
Okay, we’ve made good progress, but we can make things even better. Let’s add an SSH key to the two-factor authentication process. This adds an extra layer of security and, at the same time, avoids the less secure approach of relying on user passwords.
To achieve this, we assume you already have a generated pair of private and public keys and have passwordless SSH authentication to the server set up and running. However, if you don’t already have one, we’ve provided a guide to help you get it done quickly and simply. Now, back on the topic.
First, open the “/etc/ssh/sshd_config” file and set the “PasswordAuthentication” option to “no,” as shown in the image below.
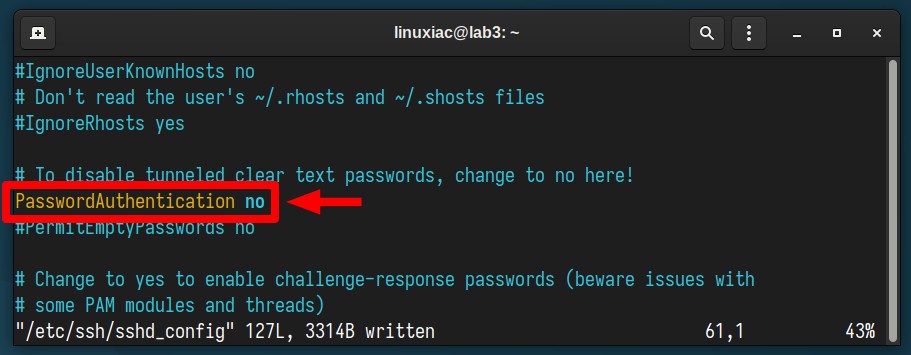
This tells the SSH server to disable password authentication so users cannot log in using their regular username and password. Instead, they must use alternative authentication methods, like SSH key-based authentication.
Then, add the option shown below to your “sshd_config” file.
AuthenticationMethods publickey,keyboard-interactive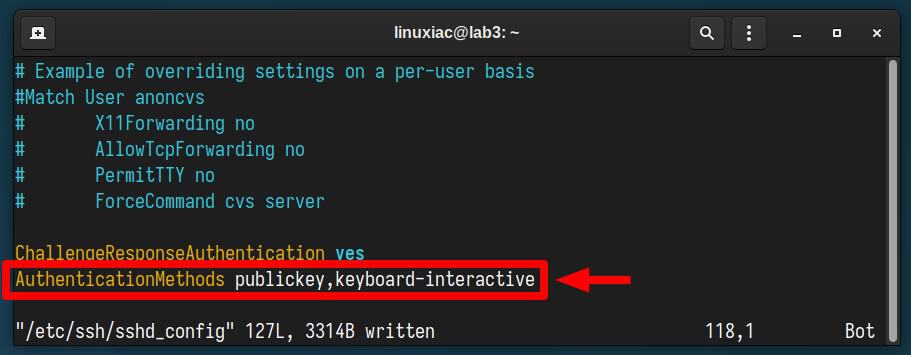
- AuthenticationMethods: Specifies the authentication methods that must be successfully completed for a user to be granted access.
- publickey: This indicates that the first authentication method is based on public key authentication.
- keyboard-interactive: This is the second method of authentication required after the “publickey” method is successfully completed. It typically involves the user entering information in response to a prompt. In our case, this involves introducing a 2FA code generated by the Google Authenticator app.
Save the file, close it, and restart the SSH service.
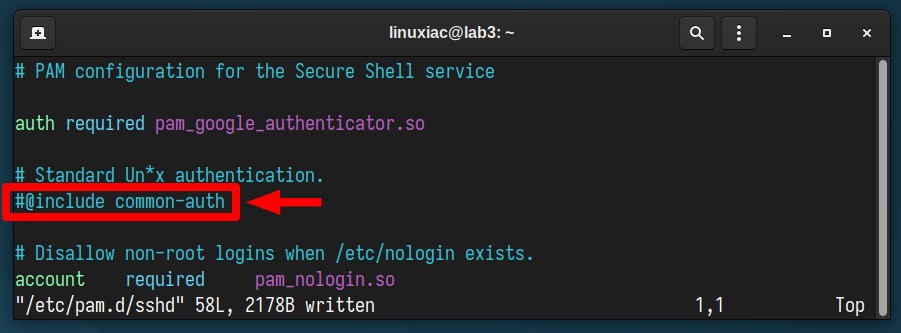
sudo systemctl restart sshNow, open the “/etc/pam.d/sshd” file, find the line “@include common-auth,” and put a comment mark (#) before it. This stops PAM from using the user’s account password to log in.
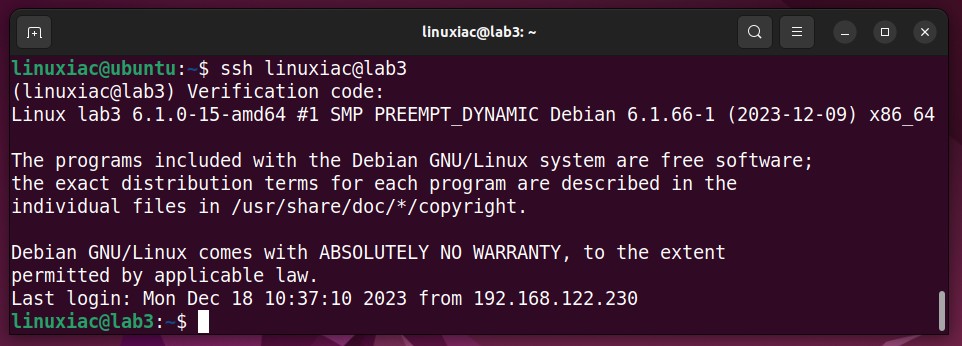
Now try logging in again over SSH – and the magic happens! The prompt requiring you to enter a user password is gone.
Just type in the 6-digit code generated from the Google Authenticator app on your mobile device, and you’ll be logged in. The SSH key will be sent to the server automatically in the background.
Once again, however, we clarify that you need to set up passwordless authentication to the SSH server before implementing this method.
Conclusion
Setting up two-factor authentication (2FA) for SSH access is essential in enhancing the security of your remote connections. This article detailed the steps in configuring Google Authenticator, modifying SSH server settings, and setting up PAM for SSH’s 2FA.
The result is that your SSH server is now well-protected against brute-force attacks and unauthorized access attempts. Furthermore, incorporating key-based authentication into the SSH 2FA process adds a layer of security, moving beyond reliance on passwords alone.
Thanks for your time! As always, your feedback and comments are most welcome.


gee, you could have recommended some FOSS apps for a 2FA authenticator, such as: KeepassXC on Linux, or KeepassDX on Android.
I get your response about recommending some FOSS apps, but you have to use them to recommend them. Maybe the author does not use those in his daily life. I wouldn’t want to recommend something I am not familiar with tbh.
yes, there is also zx2c4’s https://www.passwordstore.org/