
Running out of disk space is one of the most common issues users face. When using containerized Docker services, reaching that point means that your deployments will stop working. This happens for one simple reason—your Linux system becomes unable to execute any further write operations on the disk.
Fortunately, there’s a practical solution. This article will guide you through the steps to relocate Docker’s storage path for images, volumes, containers, etc., ensuring that your projects continue smoothly without the hassle of disk space limitations.
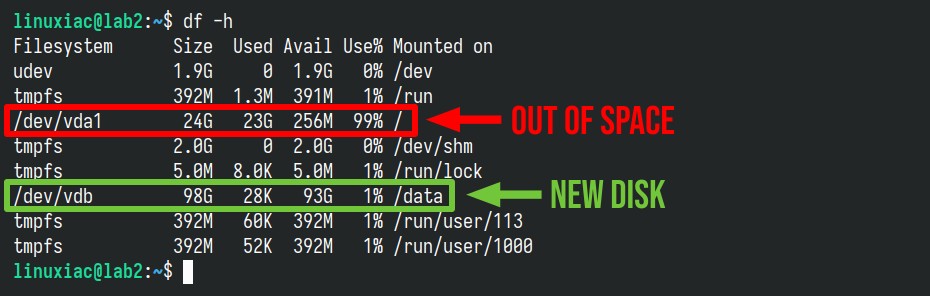
To clarify things, consider this: our disk is 99% full, dangerously close to rendering our entire Linux system inoperable. We’ve added a new 100GB disk to handle this unpleasant situation and mounted it as the “/data” directory in our filesystem.
We plan to move all Docker resources to this location, which frees up significant space on the “/” root partition. This will ensure that not only Docker but also our Linux system as a whole continues to operate without any hiccups.
Step 1: Stop Docker Service
Before making any changes, ensure all your containers are stopped, and Docker is not running. You can do this using the following commands:
sudo systemctl stop docker.service
sudo systemctl stop docker.socketCode language: Bash (bash)
Of course, remember that this will cause all your Docker containers to shut down, so downtime is inevitable.
Step 2: Move the Docker’s Data Directory
Docker stores all its data in a default directory, including images, containers, volumes, and networks. On most Linux systems, this is typically “/var/lib/docker.” While this works well for initial setups, as the number of projects grows, so does the data.
Because of this, the next step is to move the existing Docker directory to a new location with more disk space, which, in our case, is the “/data” directory. Let’s first create a subdirectory for it, for example, “docker,” where we plan to relocate and store our Docker data going forward.
sudo mkdir /data/dockerCode language: Bash (bash)It’s time to get to action. While you could use the recursive cp command or even mv to transfer data, we advise against this. Instead, the safest and most reliable method is the rsync command. If it isn’t already available on your Linux distro, you can easily add it by installing the “rsync” package through your package manager.
To copy all data from the “/var/lib/docker” to the “/data/docker” directory, we execute the command below, as the first argument is the source directory, and the second is the destination.
sudo rsync -aP /var/lib/docker/ /data/docker/Code language: Bash (bash)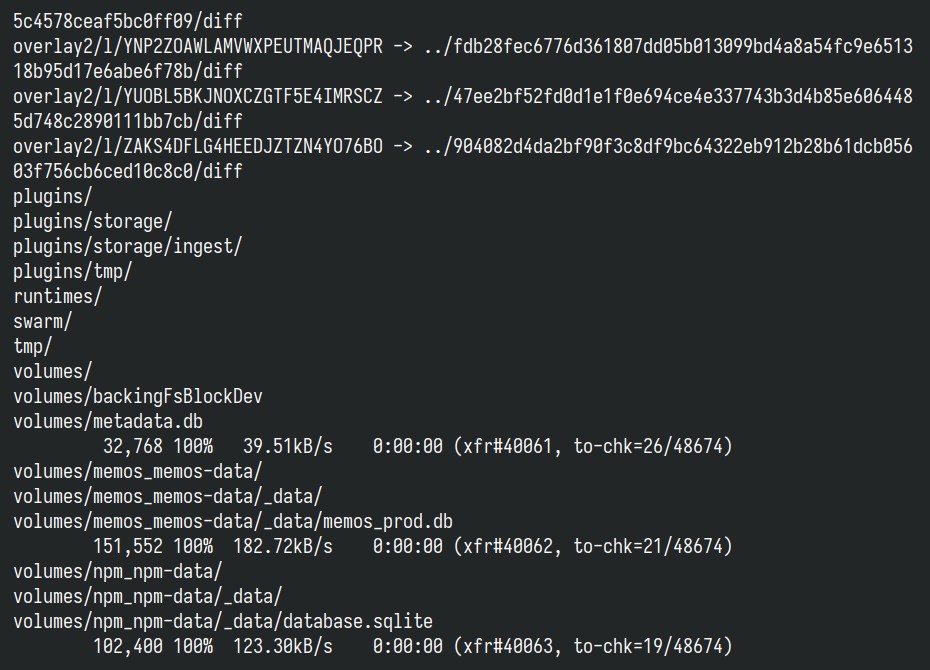
Okay, what does this command do? The “-a” (archive mode) option permits recursive file copying while preserving all symbolic links, file permissions, user and group ownership, and timestamps. The “-P” option keeps partially transferred files if the transfer interrupts. It also shows the transfer progress for each file being copied.
For more in-depth information about the rsync command, visit our comprehensive guide, “Rsync Command in Linux with Practical Examples.”
Step 3: Update the Docker Configuration
After copying the data, you must tell Docker where to find its new home. This can be done by editing the special Docker configuration file, “daemon.json,” in the “/etc/docker” directory.
Note that a Docker installation doesn’t automatically create this file, so if you have not done any manual configurations before, it’s normal for the file to be missing. If that’s the case, create it and put it in the snippet below. Of course, remember to replace “/new/docker/root” with the appropriate filesystem path for your setup.
sudo nano /etc/docker/daemon.jsonCode language: Bash (bash){
"data-root": "/new/docker/root"
}Code language: JSON / JSON with Comments (json)
Finally, save the file and exit.
Step 4: Start Docker & Verify the New Setup
Okay, the moment of truth. Start the Docker service:
sudo systemctl start docker.socket
sudo systemctl start docker.serviceCode language: Bash (bash)
Make sure the Docker service has started up smoothly and is fully operational.
sudo systemctl status dockerCode language: Bash (bash)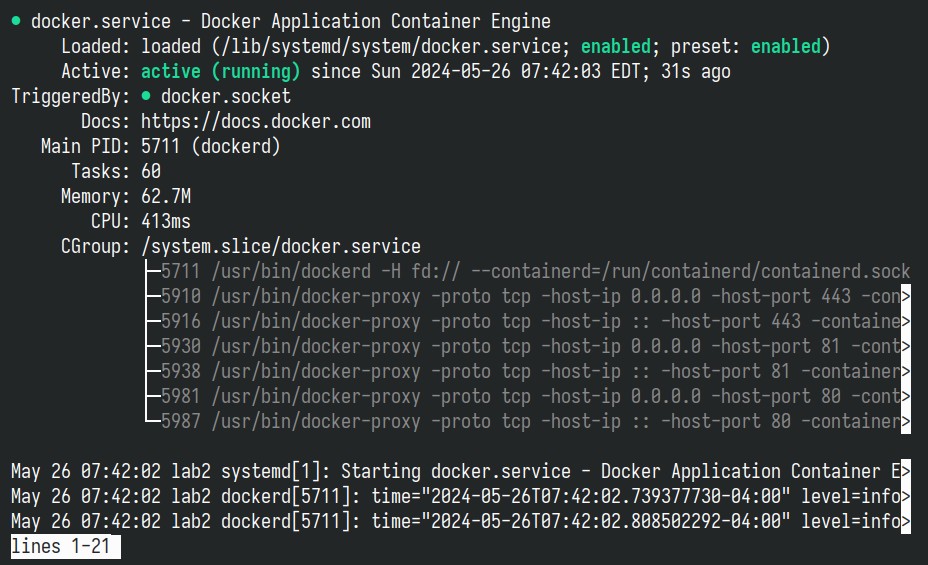
Finally, ensure that Docker is using the directory we specified for data storage as its default:
sudo docker info | grep "Docker Root Dir"Code language: Bash (bash)
This should display the new path, confirming that the relocation was successful.
Post-installation Steps
Ensure that all your Docker containers are functioning as expected. If they are not set to start automatically, run them manually one at a time and check for any irregularities in their operation.
Only after you have verified that everything is running smoothly can you proceed to free up disk space by removing the directory previously used by Docker to store data.
sudo rm -rf /var/lib/docker/Code language: Bash (bash)Bottom Line
Relocating Docker’s storage path is a straightforward process that can significantly alleviate disk space constraints, allowing you to scale your projects. This ensures the continued smooth operation of your Dockerized services and prevents your Linux system from becoming inoperable due to a lack of disk space.
We also want to mention that you can modify systemd’s Docker service to achieve the same result instead of changing the “daemon.json” file. However, we consider this approach a workaround rather than a proper solution, and we don’t recommend it, so we don’t cover it in our guide.
Refer to the official documentation for more detailed information on configuring Docker using the “daemon.json” file.
We’re grateful for your use of this guide and hope it has made the process clear and manageable. We value your feedback and comments, so please feel free to share them in the section below. Happy deploying!


Thanks. This post with clear instructions has helped me a lot.
I have plenty of space but my /config folder has a filesystem of none and a limit of 15Gigs from somewhere. I don’t want to move my data folder. I want more RW space
The only dumb thing I did was not add a comma after the existing line in my daemon.json and that is completely on me. Great guide. Thank you!
the -g option changed into —data-root!
Very clear, straight to the point, perfect guide! Helped a lot
I think you don’t need to change the configuration , for you could just mount the new disk at /var/lib/docker after synced
or a symlink works too
Thank you for your “HowTo” post. This guide was very clear and worked without any problems for me.