Let’s face it: sometimes, we have to erase all the information from our disk in a way that makes it impossible to recover. The most typical reason for completely and irreversibly deleting a device is when, for example, it is to be given away or sold.
Many users believe deleting their data using the file manager or deletion commands ensures security. Well, you need to think again because the truth is slightly different. In fact, without proper precautions, that data might still be recoverable by someone with the right tools and intentions.
Here’s the facts: using the rm command or a file manager in Linux to delete files just removes the pointer to the filesystem, leaving the actual content intact until new data overwrites it. As a result, with a high probability, a considerable portion of this data can be recovered using specific techniques.
That’s where Linux disk-wiping tools come into play. In this guide, we’ll explore effective command-line methods like shred, dd, and wipe to ensure your data is permanently erased and impossible to restore. So, let me show you how to use them to give yourself peace of mind.
Erasing Disk Using shred Command
We start with the shred command because it is one of the best ways to erase private data securely on a Linux system.
Simply put, the command helps overwrite the data several times with random bits (by default, shred uses “/dev/urandom” for random data) to prevent data recovery.
It mitigates this risk, making it much harder—if not practically impossible—to retrieve. That is why it is frequently used to erase data securely.
Because shred is part of the “coreutils” package in Linux, you most likely have the command available by default on your system. It uses three passes by default, writing pseudo-random data to the device during each run.
For example, if you want to erase a device that is present as “/dev/sda” on your Linux system, the command would be as follows:
sudo shred -v /dev/sdaCode language: Bash (bash)
We’ve also included the “-v” (“–verbose“) option to see the disk wipe operation in detail.
Fundamentally, the more times the data is overwritten, the less likely it is that any remnants can be recovered. However, completing these three subsequent cycles can be lengthy, especially if you do them, for example, on large terabyte disk arrays. You may have to wait for days for the process to be completed.
Fortunately, we can specify shred to perform only one loop (which is quite sufficient in most cases) using the “-n” (“–iterations=N“) option:
sudo shred -v -n 1 /dev/sdaCode language: Bash (bash)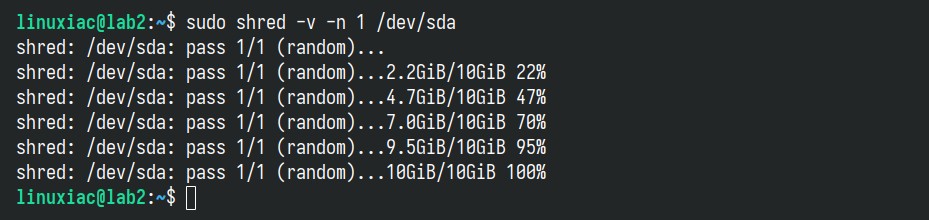
Now, let me share a trick with you. The command provides the clever “-z” option, which adds a final overwrite pass with zeros after completing the random data overwrites. Why do you need it?
It’s simple. Overwriting with zeros can mask the shredding process, making the disk look as if the file was never securely deleted. This can be useful if you don’t want to draw attention to the fact that sensitive data was erased. Let’s give it a try.
sudo shred -v -n 1 -z /dev/sda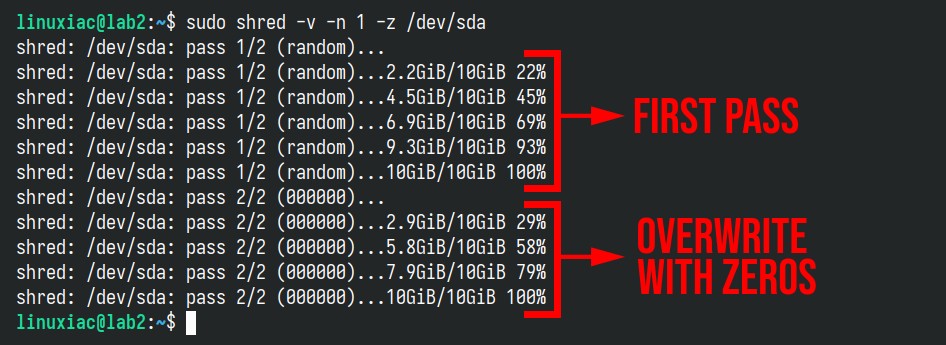
In conclusion, the default shred settings (three passes) balance security and performance well for most users. However, if you’re dealing with extremely sensitive data, you can increase these loops to ten or even more to provide extra peace of mind. But don’t forget – they also make the shredding process slower.
Erasing Disk Using wipe Command
Another approach to completely erasing data from your disk is with the wipe command. As the name suggests, it is used to wipe data from a disk.
Under the hood, the wipe command uses a series of overwrite passes to obliterate the data. So, it doesn’t just write zeros or ones; it uses complex patterns and random data (34 patterns are used, of which eight are random) to overwrite the file’s contents multiple times and flush the cache.
This method adheres to data sanitization standards, making it exceedingly hard (practically almost impossible) for data recovery tools to reconstruct the original information.
On most Linux systems, the wipe command is not installed by default, so you must first install it using your package manager, such as APT, DNF, Pacman, etc. Search for a package named “wipe” and install it.
Next, using the command is relatively straightforward. Just run it, followed by the path to the disk.
sudo wipe /dev/sdaIt’s worth noting that while the wipe command is highly reliable for securely deleting data, it can be very time-consuming because of the large number of loops (34 passes) it performs by default. Simply put, running it on terabyte-sized disks could take several days to finish.
The good news is that, similar to the shred command, you can speed things up by reducing the number of passes.
Using the “-q” option will tell wipe only to make (by default) 4 passes, writing random data. However, combining it with the “-Q <number_of_passes>” lets you set the number of passes for quick wiping.
Here’s what the command looks like if we reduce the passes to just one:
wipe -q -Q 1 /dev/sdaCode language: Bash (bash)
Erasing Disk Using dd Command
The dd command is another frequently used method for erasing a disk in Linux. Although its primary purpose isn’t disk wiping, like shred and wipe are, many professionals leverage its capabilities for this very task.
At its core, dd is a utility used to convert and copy files. The name stands for “data duplicator,” it operates at a low level, allowing direct reading and writing to device files. This means you can use dd to copy entire disk partitions, create disk images, and yes, even wipe disks.
Now, you might be wondering, if dd isn’t specifically designed for disk wiping, why use it? The answer lies in its simplicity and power. It can overwrite a disk with any pattern of data, making it a straightforward option for securely erasing data. Plus, it’s readily available on almost all Linux distros, so there’s no need to install additional software.
For example, run the following command to securely erase all available information from a disk presented as a “/dev/sda” device on your Linux system:
sudo dd if=/dev/urandom of=/dev/sda bs=1M status=progressCode language: Bash (bash)The wiping process is successfully finished when dd reports “No space left on device” and returns control.
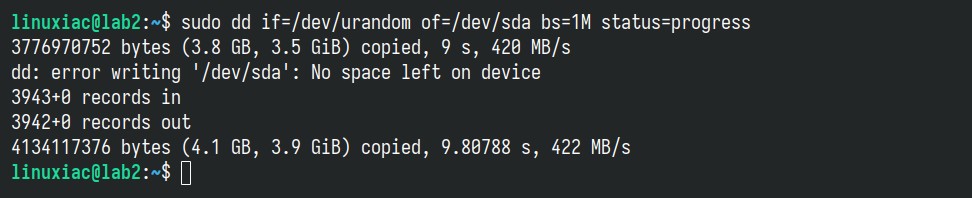
Let’s break down the syntax:
- if – The input file we’ve used, “/dev/urandom,” to produce random data.
- of – The output file, in that case – our “/dev/sda” disk.
- bs – Sets the block size to 1 megabyte for faster processing.
It should be noted that the size of the given block significantly impacts the speed with which the operation will be completed. For example, if you choose the default block size value of 512 bytes and erase a multi-terabyte disk, the process may take days to complete.
In addition, similar to the above approach, the command below will overwrite the entire disk with strings of zeros rather than producing random data.
sudo dd if=/dev/zero of=/dev/sdb bs=1M status=progressCode language: Bash (bash)However, if security is your top priority, using “/dev/urandom” as a more reliable method is the way to go.
Limitations of dd, shred, and wipe on SSDs
However, using the above commands to wipe data from solid-state drives (SSDs) securely isn’t as straightforward and reliable as hard disk drives (HDDs). Why? Because SSDs have a different architecture and behavior, special considerations are needed to ensure data is truly erased. Let me explain.
SSDs use flash memory and incorporate features like wear leveling, garbage collection, and over-provisioning to optimize performance and extend the drive’s lifespan. Here’s why these features matter when wiping data:
- Wear Leveling: SSDs distribute write and erase cycles evenly across memory cells to prevent premature wear. This means that overwriting data at the logical level doesn’t guarantee the underlying physical cells are overwritten.
- Garbage Collection: SSDs periodically clean up unused memory cells in the background, which can relocate or copy data without the operating system’s knowledge.
- Over-Provisioning: Extra memory cells are reserved to replace worn-out ones, making it difficult to access and overwrite all areas of the drive.
Given these challenges, to securely erase NVMe SSDs, I highly recommend using the specialized nvme-cli tool, a command-line utility designed to manage and interact with NVMe devices.
It’s available for the most popular Linux distros in their main repos, and the usual package name is “nvme-cli.” So, look for it and install it. After that, to format an NVMe drive, use the following:
nvme format /dev/nvme0n1Code language: Bash (bash)This will format the specified namespace (in this case, “/dev/nvme0n1“). Adding the “–ses” (Secure Erase Settings) option can perform different levels of secure erase:
- –ses=2: Cryptographic erase (if supported)
- –ses=1: User data erase
Furthermore, passing the “-r” flag will automatically reset the controller after a successful format. For more information on nvme-tool, visit the project’s GitHub page.
Conclusion
This guide shows you how to securely and reliably delete data from your hard disk using three Linux tools: shred, wipe, and dd. Whichever method you choose, you can be sure that the information you remove will be nearly impossible to recover.
However, it’s important to remember that while those tools are powerful, they are not a silver bullet. Use it alongside other security practices like encryption, regular updates, and strong access controls.
Additionally, before you go all-in with those commands, keep these points in mind:
- Data Recovery Limitations: While they make data recovery highly unlikely, extremely advanced forensic techniques might still recover some data. For ultra-sensitive information, consider physical destruction.
- Legal Compliance: Ensure you comply with all legal requirements for data disposal in your jurisdiction.
- Backups: Always maintain proper backups of important data. Once data is wiped, it’s gone for good.
Last but not least, with great power comes great responsibility. Use those commands wisely, and always double-check before you execute. Using it improperly can lead to unintended consequences, like accidentally wiping the wrong disk. After all, it’s better to be safe than sorry when it comes to your data.


While those methods are probably good enough, I opt for using ‘Secure Erase’ (which basically tells the hard drive itself to wipe the drive which temporarily requires unfreezing (‘not frozen’) the HDD with hdparm before you can proceed etc) when I want to properly wipe a hard drive. this is not as beginner friendly though.
but I imagine for general wiping of random data files here and there (on a regular hard drive (not a SSD)), the ‘shred’ command is sufficient, like for example.. “shred -n 0 -uvz NameOfFile.iso”
p.s. as I am sure some around here know, don’t use ‘shred’ etc on SSD as a ‘secure erase’ (which finishes in a few seconds or so on a SSD) is best for that since I think it essentially erases a encryption key internal to the drive at which point the data is basically deleted as while it did not overwrite anything, the data is encrypted on the drive and there is no way to read it without that key I think is the general idea. that’s why ‘Secure Erase’ only takes maybe a few seconds on a SSD where as a regular hard drive it has to overwrite everything on the drive and can take hours on a larger hard drive.
I don’t believe hdparm supports NVME device, so if your SSD is NVME it’s not an option at all.
And sure, wiping the drive’s encryption key makes all the data unintelligible, but not unreadable – and if it’s worth the money to do so, a bad guy could force decrypt the data if they had a copy of it. So for certain pretty to very/extremely security-conscious cases, shred/wipe are well worth the time. And possibly required for compliance as well.
thanks a lot: simple, clear and effective.
The DBAN live ISO has all what’s needed to erase disk or files too.
Interesting project but infortunatly has forked as blanco (non-free) wich is the same but with more functionalities.
Amen, I have seen to many people wipe the wrong disk with the command line, and then go to a forum for help. Even with DBAN, check, then check again, then check again, and then be sure before you hit wipe.