
This Arch Linux Installation Guide was last updated in January 2025 and has been carefully aligned with the latest recommendations from the official Arch documentation. I just simplified the steps to make them easy to understand and follow.
Many Linux users want to try Arch Linux, but the general notion that it is difficult to install (and learn) stops them. This guide shows that this is not the case and that installing Arch is a task that anyone can handle.
As our reader, Paul kindly pointed out in the comments below (and for that, I’m truly grateful):
Your set-by-step guide was flawless. I appreciate the work that went into it. You would not believe how many instruction posts end with disaster after spending 30 minutes following it. Yours work like a charm, and that deserves this comment. Thanks!
So, when people say it is “hard,” they mean it takes effort. Yes, it is true. Getting everything installed and set up takes a bit more effort and dedication here. On the other hand, however, you’ll end up with a system tailored exactly to your needs and tastes—and that’s priceless.
Following this guide, you can install Arch directly on your computer or a virtual machine using VirtualBox or other virtualization software. And I promise you – the outcome will amaze you. So, are you ready to dive into the deep end with me? Let’s do it!
- Preinstallation Notes to Virtualbox and KVM Users
- 1. Download the Arch Linux Installation Image
- 2. Prepare Live Bootable USB
- 3. Boot Arch Linux from the Live USB
- 4. Verify Connectivity to the Internet
- 5. Partition the Disk
- 6. Create File System
- 7. Install Arch Linux
- 8. Configure the Installed Arch System
- 9. Install the Bootloader (systemd-boot)
- 10. Install a Desktop Environment on Arch Linux
- 11. Create a Regular User Account
- 12. Arch Linux Installation is Done
- Conclusion
Preinstallation Notes to Virtualbox and KVM Users
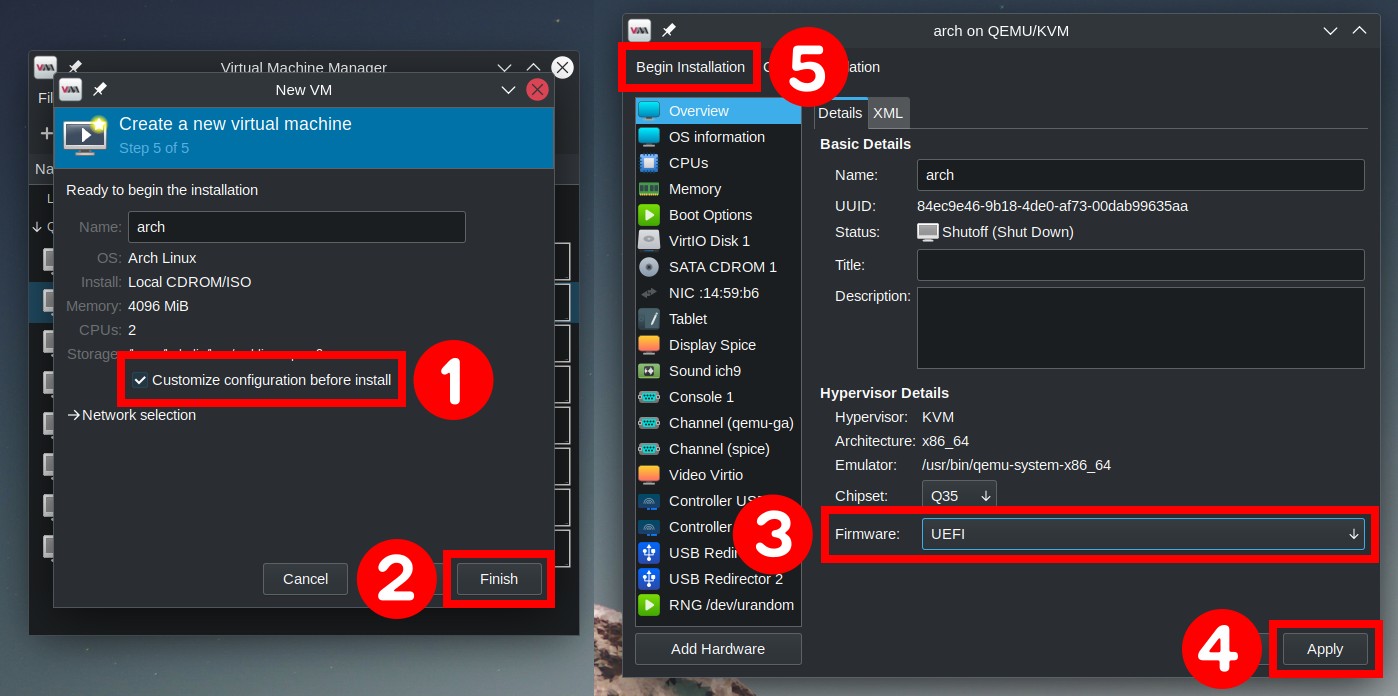
IMPORTANT! Before installing, VirtualBox and KVM users must enable EFI in the virtual machine settings. On VirtualBox, click “Settings,” then switch to the “System” page and mark “Enable EFI (special OSes only).”

If you have decided to install Arch on KVM using Virtual Machine Manager, do not rush to press the “Finish” button when creating the virtual machine. Ensure you have checked the “Customize configuration before install” option, then press “Finish.”
In the newly opened window, select “UEFI” from the “Firmware” drop-down menu, then confirm with “Apply” and finally hit “Begin Installation.”
1. Download the Arch Linux Installation Image
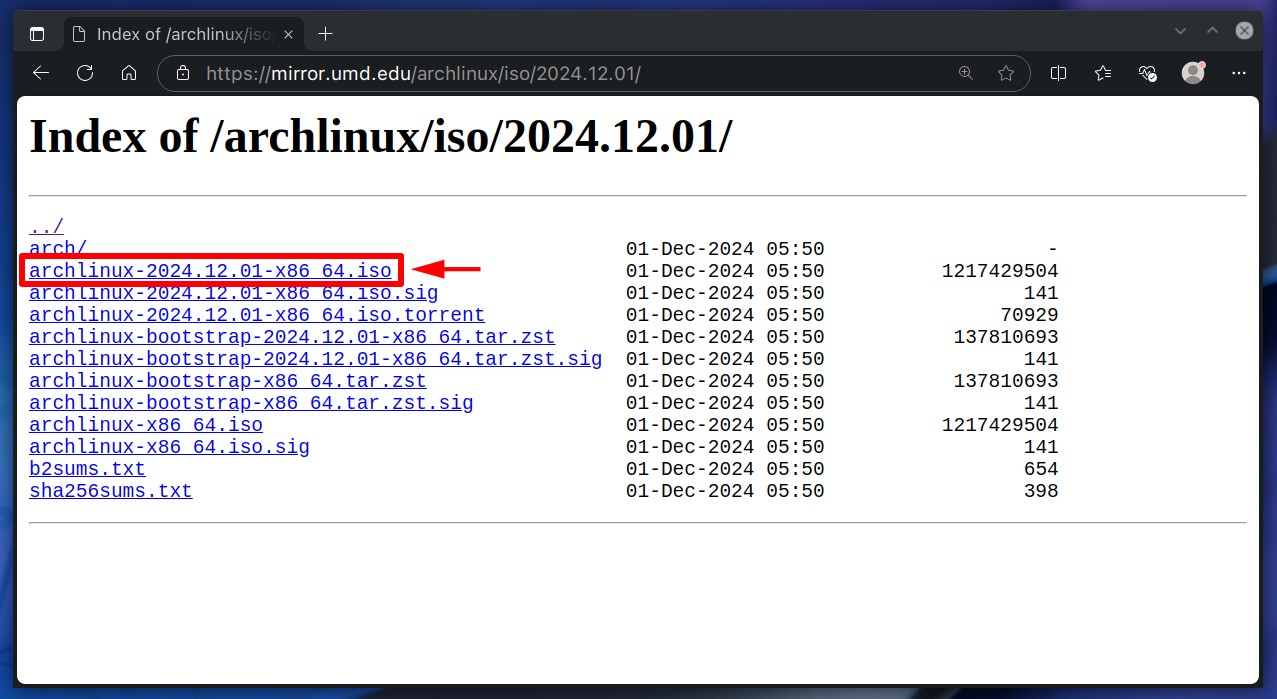
The first thing we need to do is obtain Arch’s ISO installation image. To do so, visit the Arch Linux download page and grab the latest one.
2. Prepare Live Bootable USB
Once your Arch Linux ISO file finishes downloading, you can create a live USB from it. There are many ways to do this, one of the most common being to use the dd command.
Alternatively, you can use applications such as Etcher or Ventoy, which are good options for those who prefer a GUI.
3. Boot Arch Linux from the Live USB
Once you have created a live USB, shut down your computer, plug the USB into it, and boot your system.
Important clarification: With secure boot enabled, you can sometimes not boot from a live USB. If so, access the BIOS and turn off the secure boot first.
Arch provides two installation options: Legacy and UEFI mode. UEFI (Unified Extensible Firmware Interface) is more up-to-date and preferable so that this guide will bet on it.
Once you boot into Arch’s ISO, you should see a screen similar to the image below.
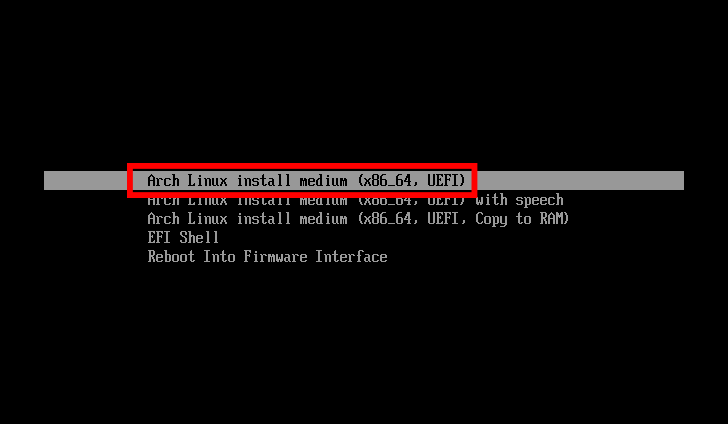
Choose the “Arch Linux install medium (x86_64, UEFI)” option and hit “Enter.”
After the installer decompresses and loads the Linux kernel, you will be automatically thrown to a terminal with root privileges. Here’s where our Arch journey starts!
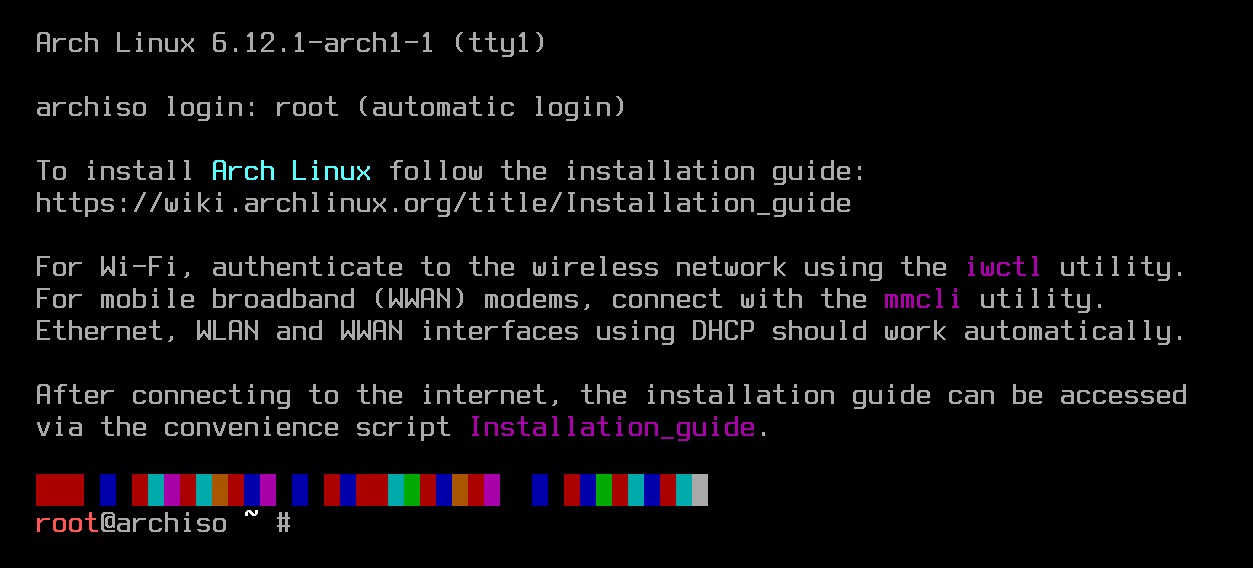
Before we move on, I’d like to share a quick trick to make the installation process more enjoyable. Here’s the deal: the default terminal font is pretty small, making it tough to type all the commands ahead and spot any typos in those tiny letters. So, let’s make things easier on ourselves. Just run this command:
setfont ter-132bCode language: Bash (bash)And just like that—magic! Now, we’ve got a nice, large terminal font that’ll make our Arch installation much more comfortable moving forward.
4. Verify Connectivity to the Internet
First, check the internet connection. To do so, ping a website, as shown in the example below.
ping -c 3 archlinux.orgCode language: Bash (bash)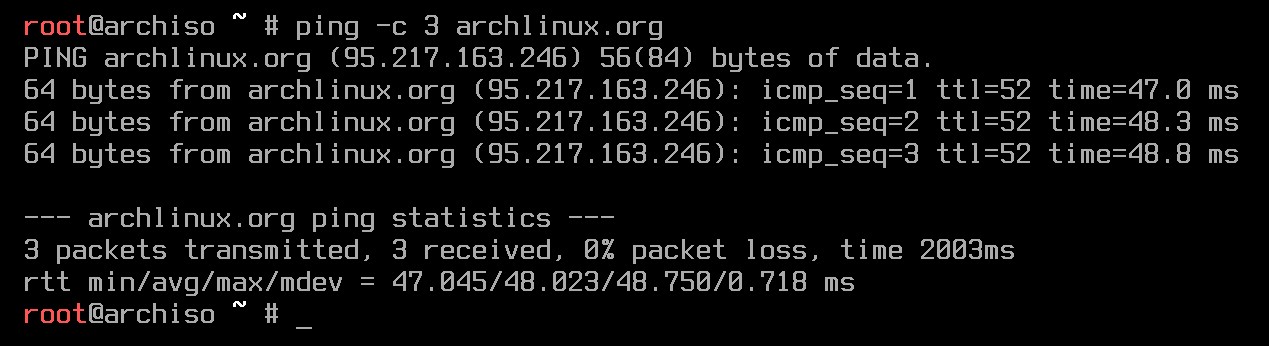
If you use a wired connection, DHCP picks it up automatically. However, if you receive an error message, you must first configure a working one before moving on.
5. Partition the Disk
The next step in our Arch Linux installation guide is partitioning the hard drive. Here is where you will likely find the most trouble if you are unfamiliar with partitioning tools such as fdisk or cfdisk. But don’t worry, it is easy, as you’ll see.
First, list your disks and partitions:
fdisk -lCode language: Bash (bash)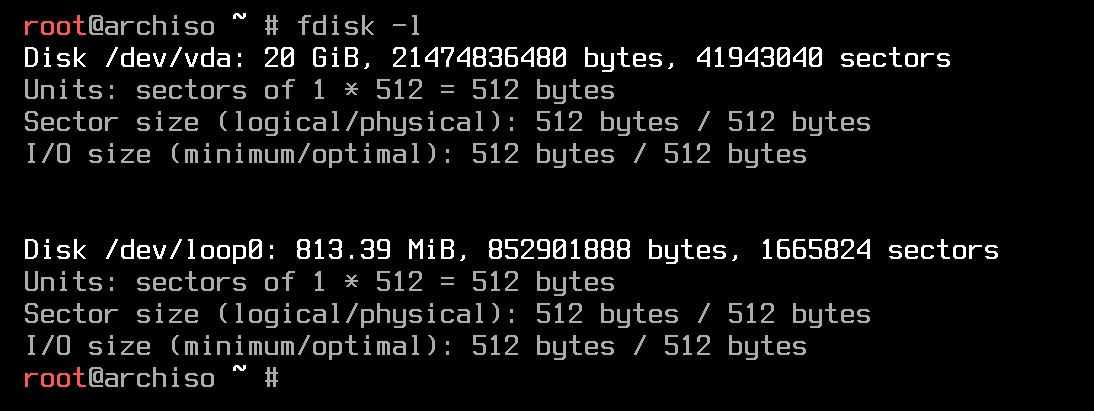
As you can see from the image above, for this guide, I created a virtual machine with a blank 20GB hard disk identified as “/dev/vda.”
For a basic partitioning, we’ll create the following layout:
- /dev/vda1: EFI System partition with 500MB size, FAT32 formatted. This provides space for storing bootloaders and other files required for booting.
- /dev/vda2: Swap partition, 4GB size. Swap space is used to extend the virtual memory beyond the installed physical one (RAM) or for suspend-to-disk support.
- /dev/vda3: Linux partition, with the remaining free disk space size, ext4 formatted. This is the root (“/“) partition on which our Arch Linux operating system, files, and other information will be stored.
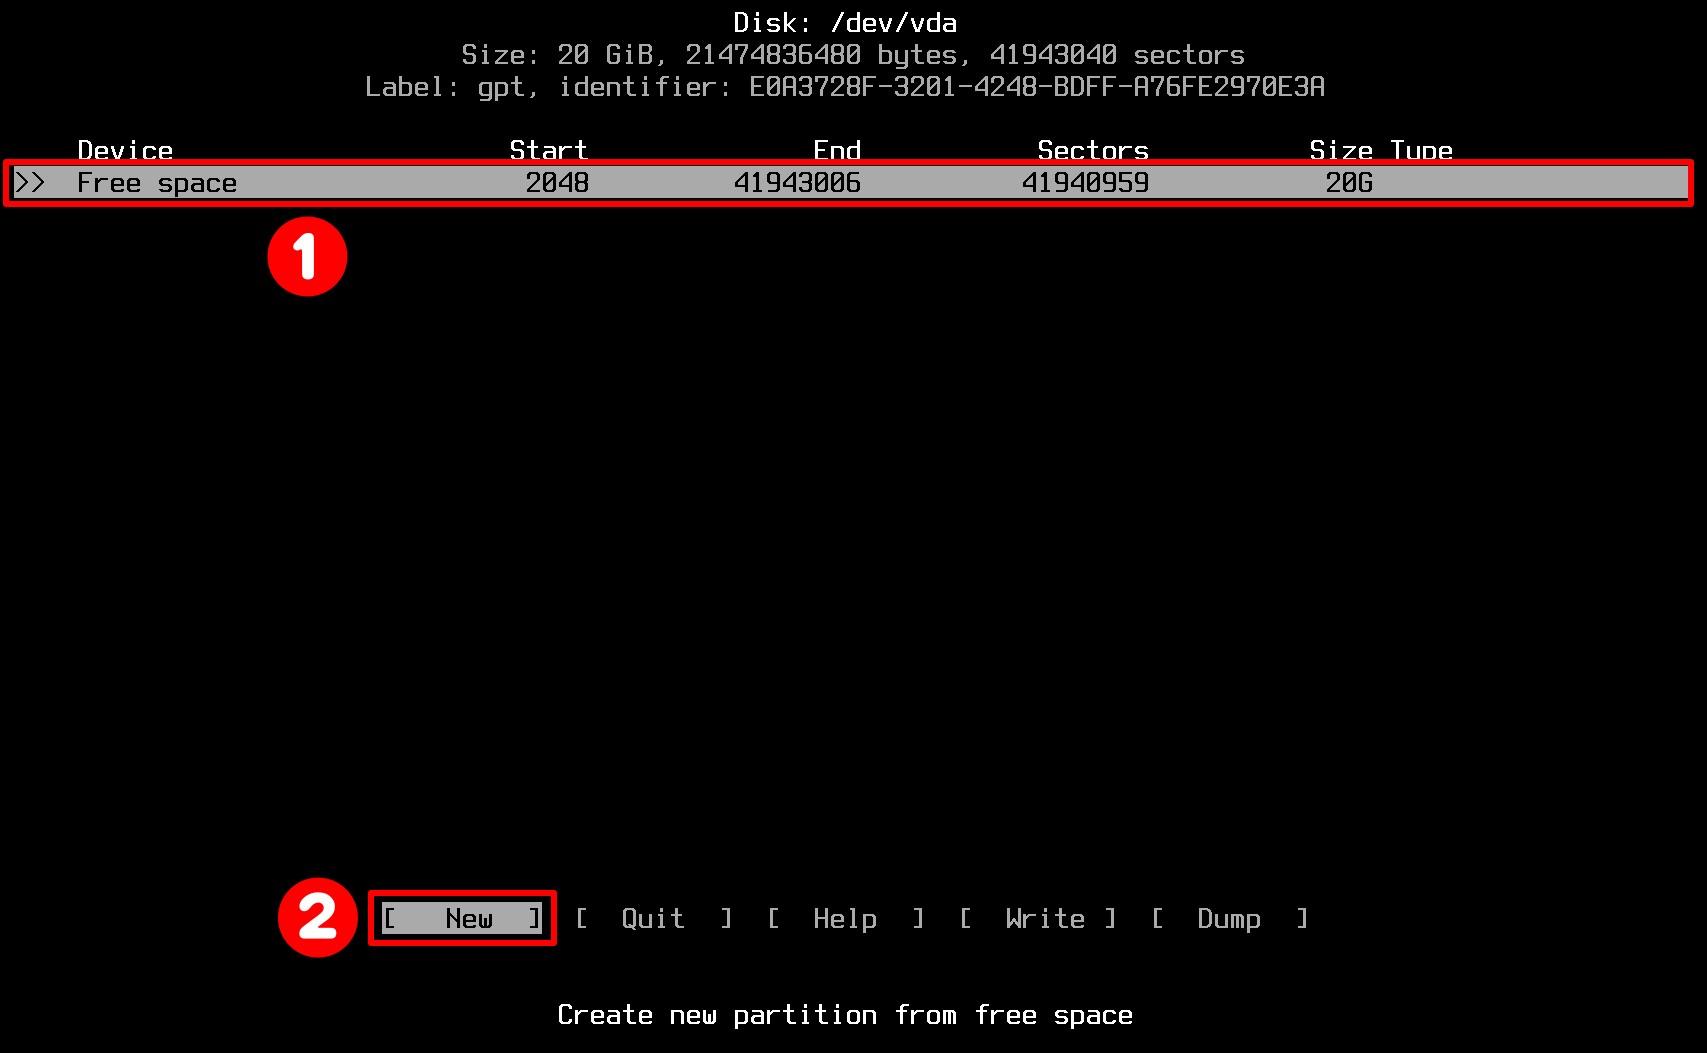
5.1 Create EFI System Partition
Let’s start creating a disk layout partition table by running the cfdisk command against the machine’s hard drive, select the “GPT” label type, and hit “Enter.”
cfdisk /dev/vdaCode language: Bash (bash)
Then, with “Free Space” highlighted, hit “New” from the bottom menu. You can navigate the menu options using the “Tab” or arrow keys.
Type the partition size in MB (“500M“) and press the “Enter” key.
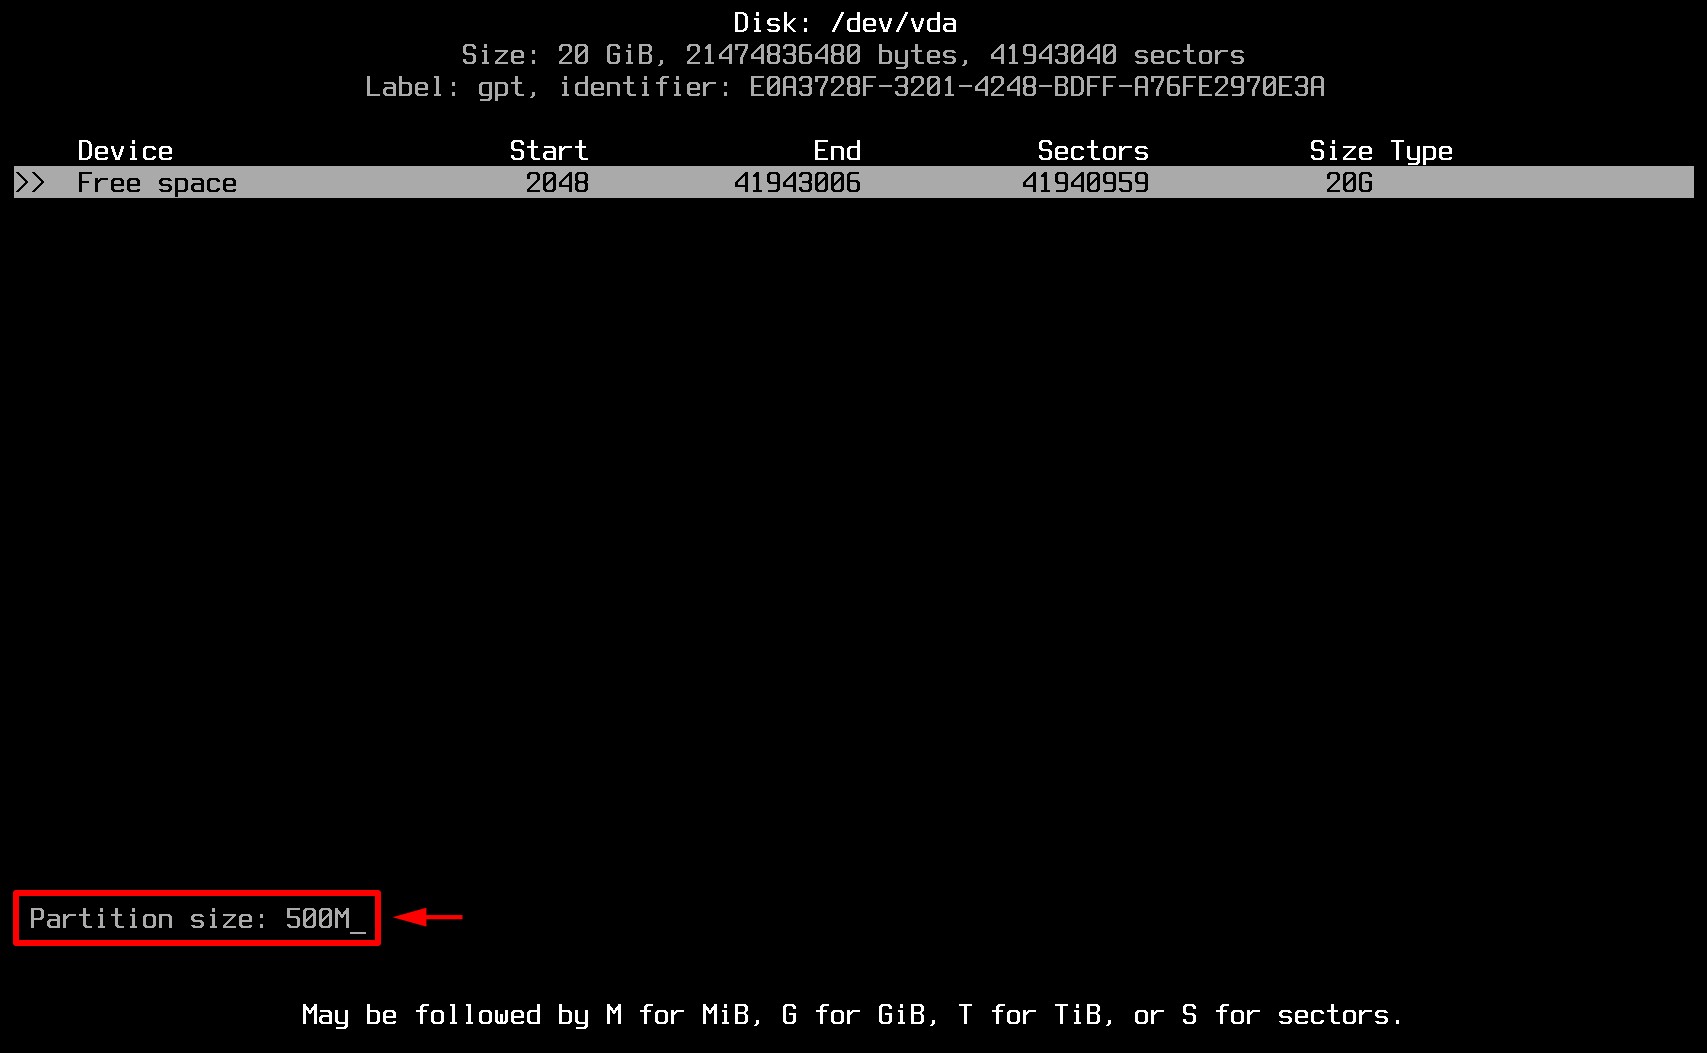
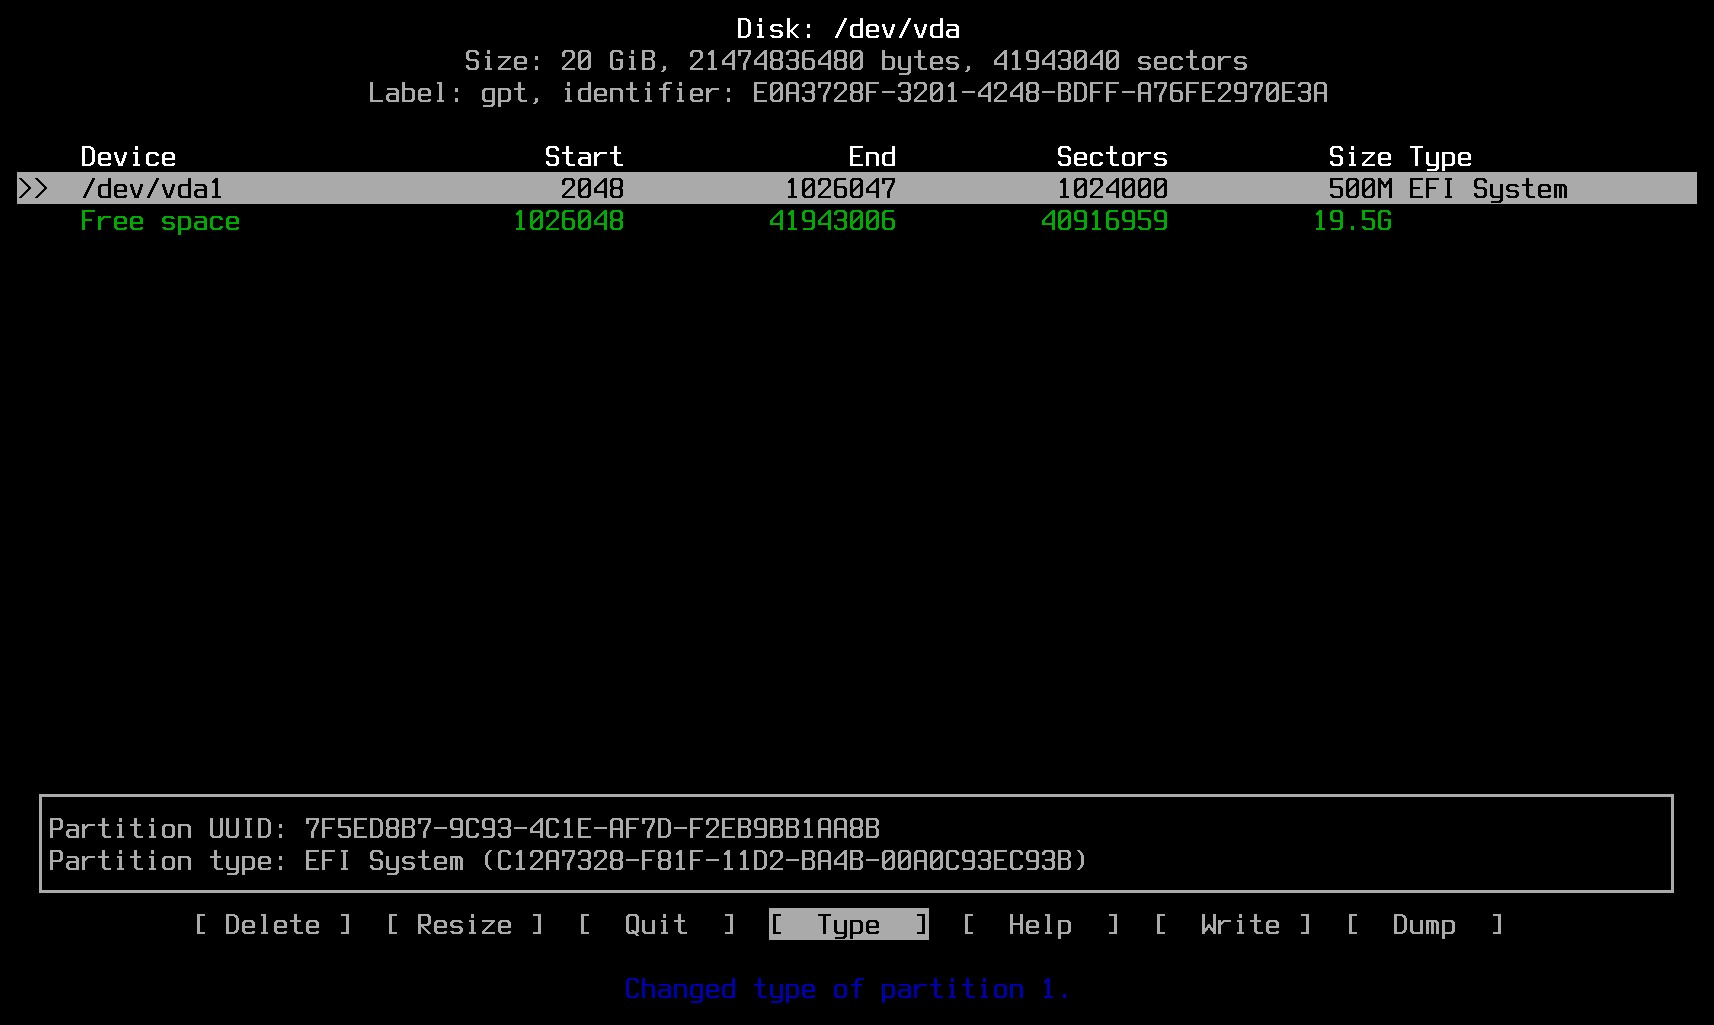
With the “/dev/vda1” still selected, select “Type” from the menu at the bottom and choose the “EFI System” partition type.
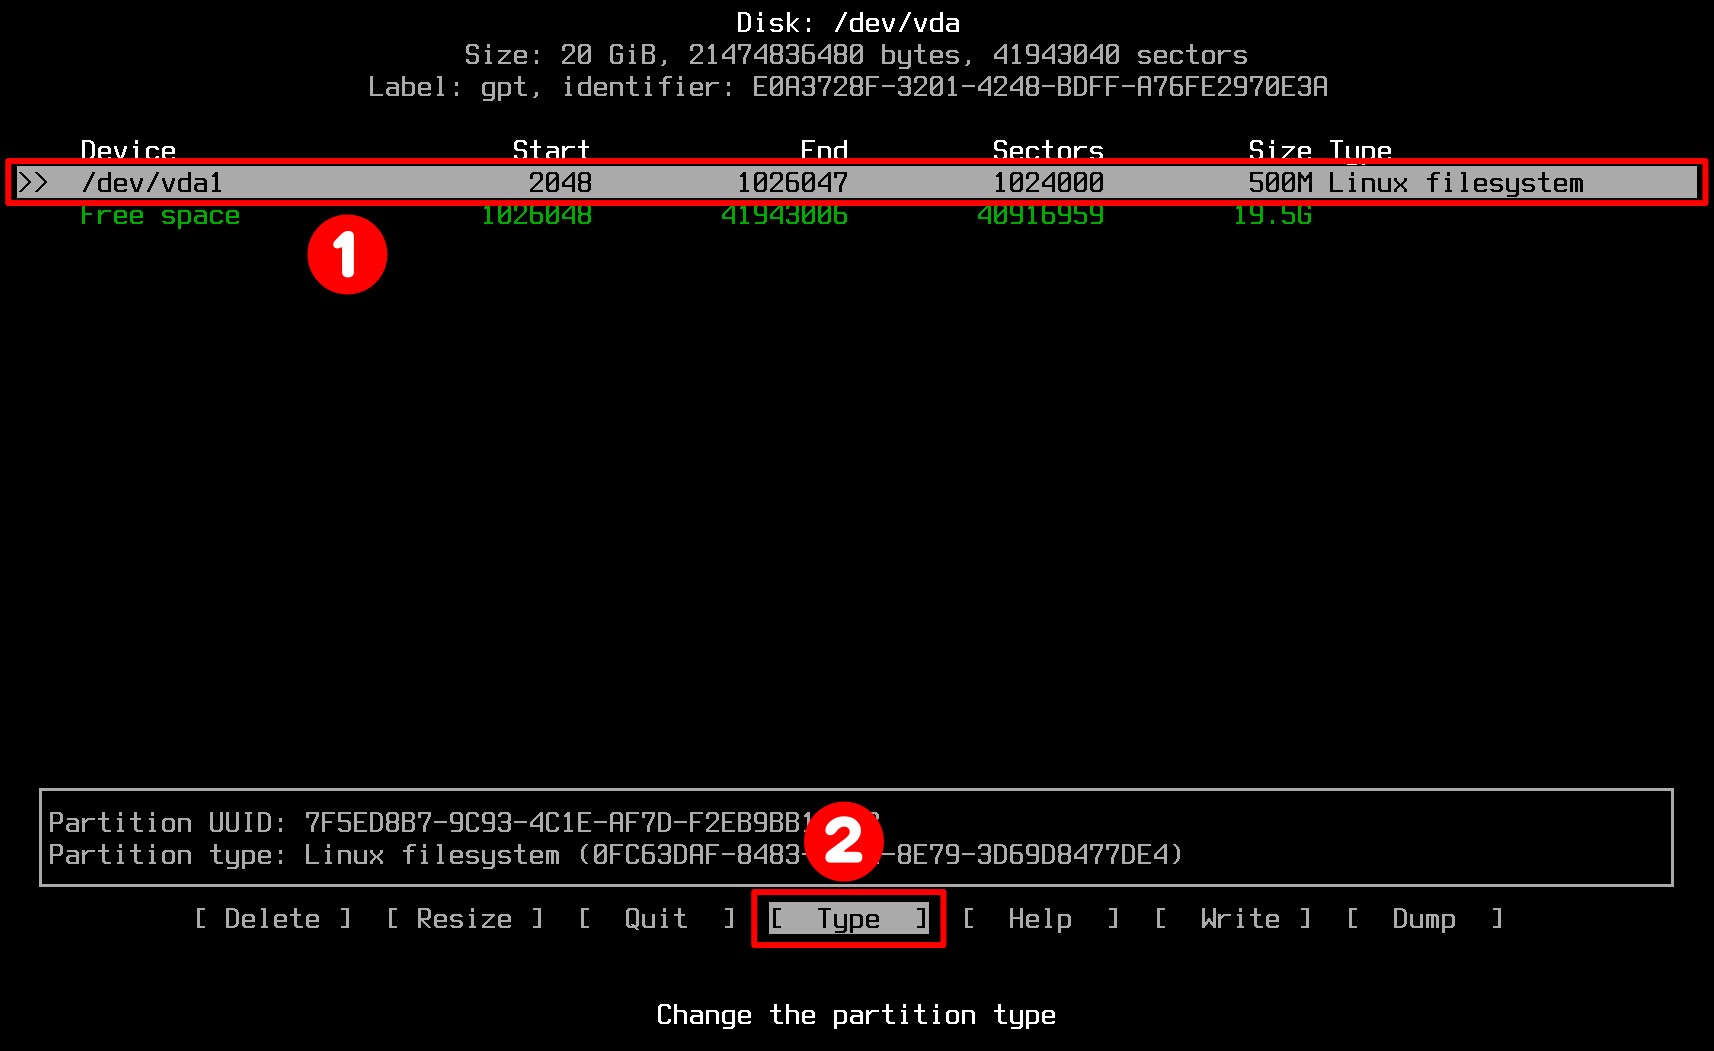

You’ve finished configuring the EFI System partition.
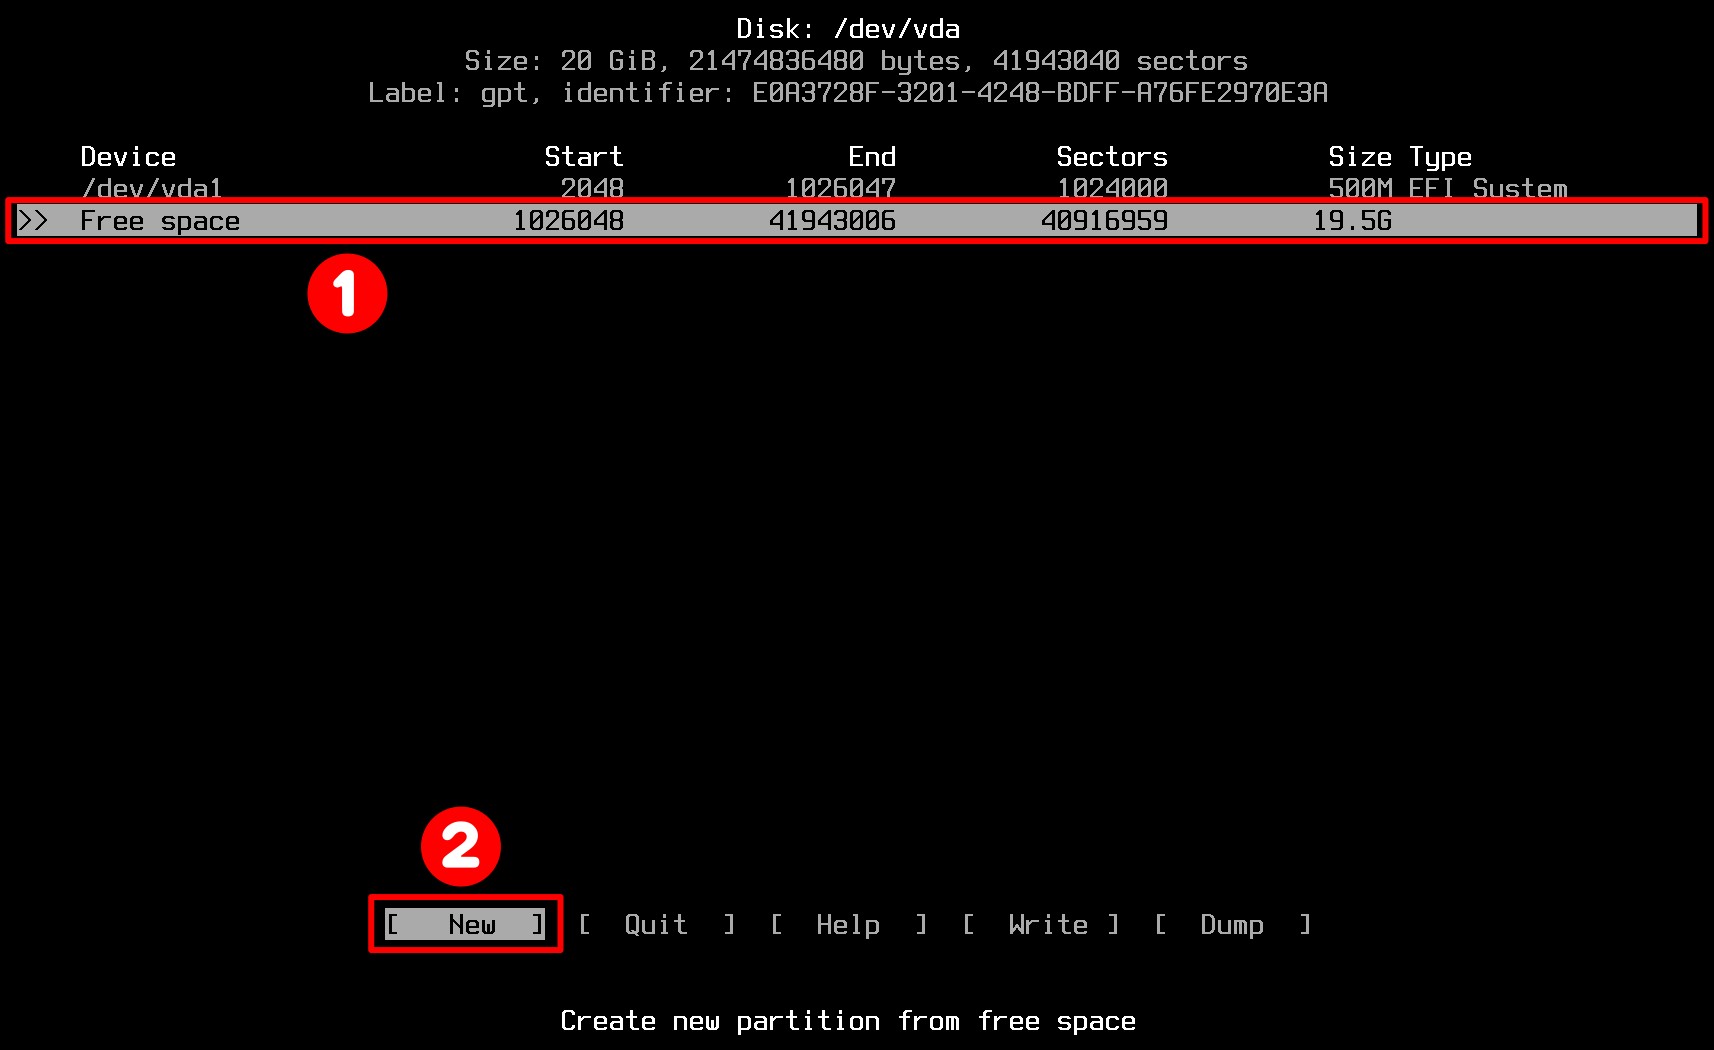
5.2 Create Swap Partition
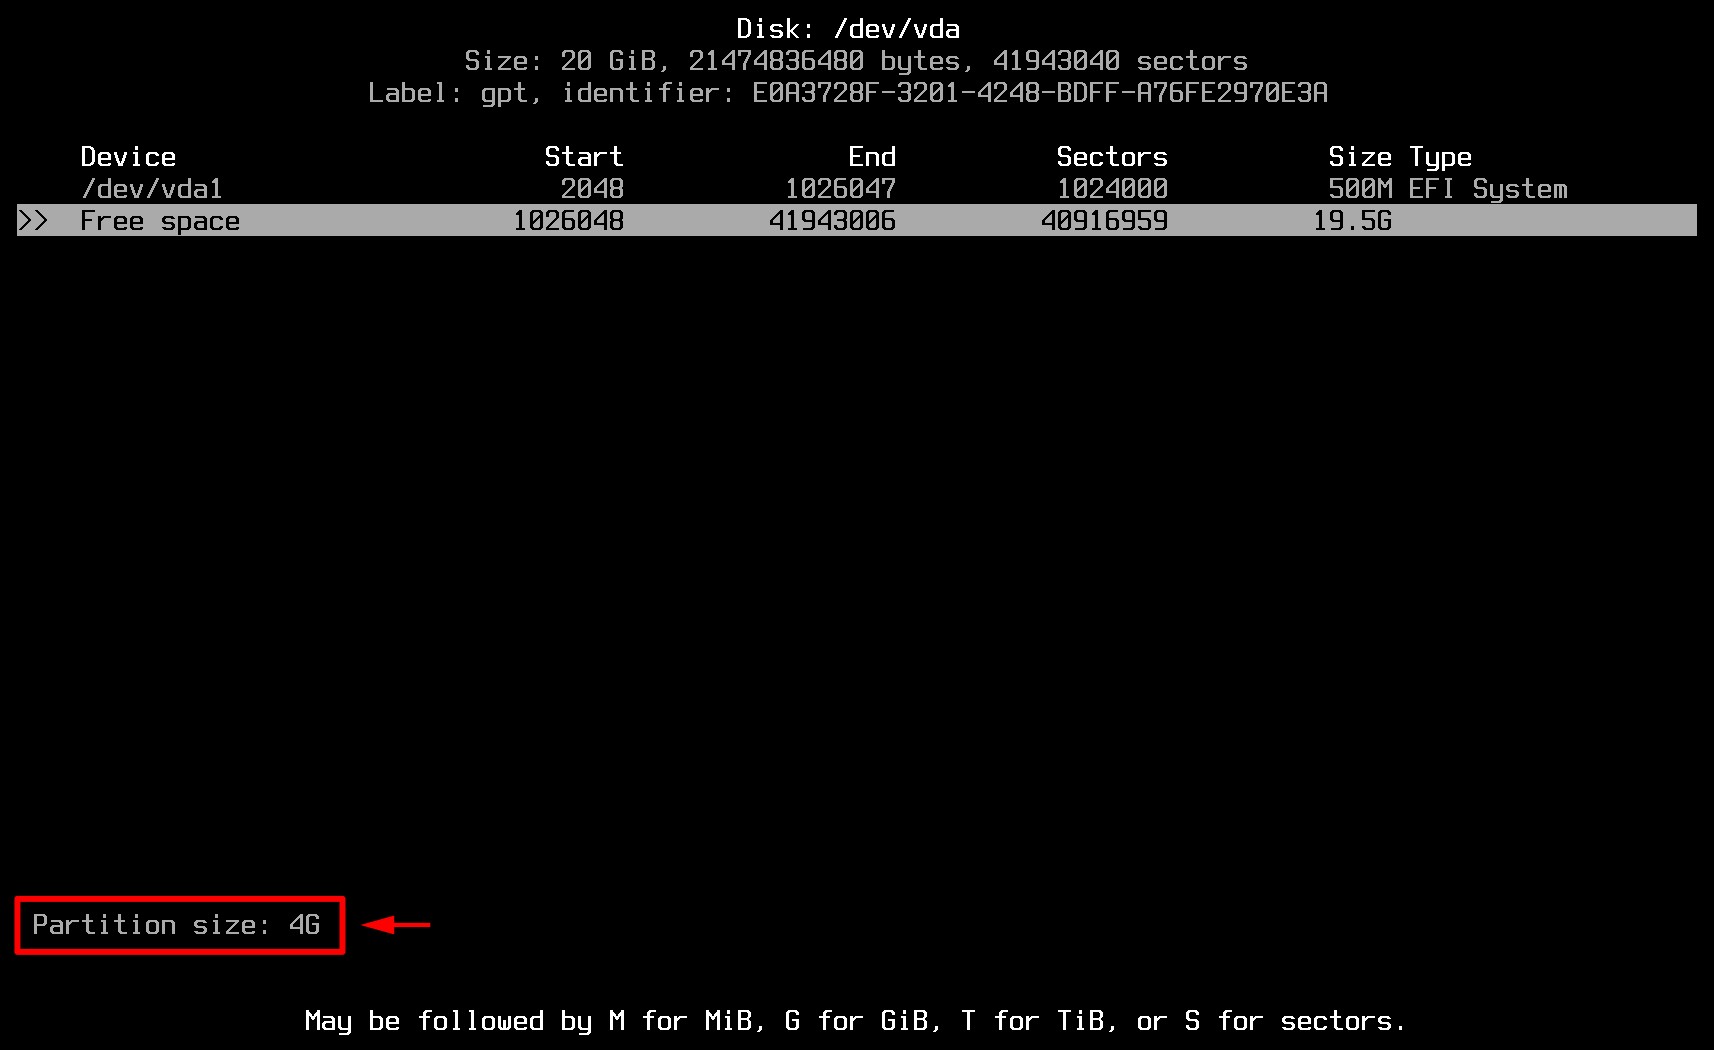
Now, let’s move on and create the swap partition using the same procedure. Highlight “Free space” again and hit “New.”
Type the partition size in GB (“4G“) and press the “Enter” key.
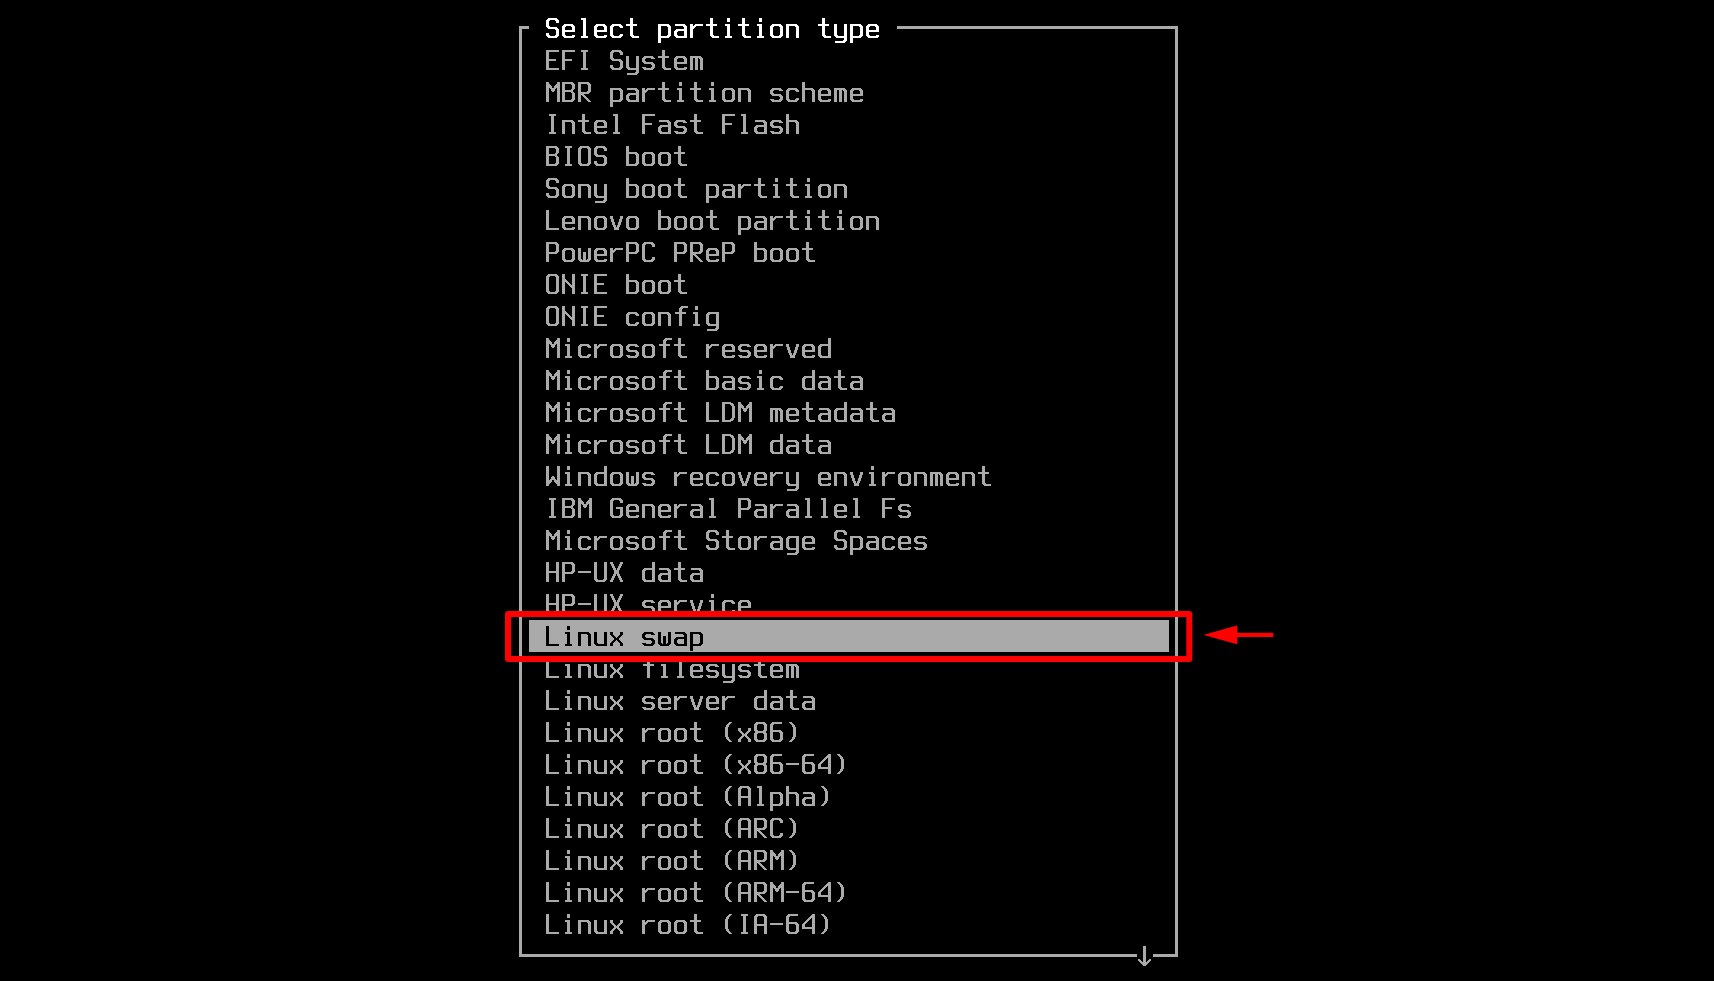
With the “/dev/vda2” still selected, select “Type” from the bottom menu and choose “Linux swap” partition type.
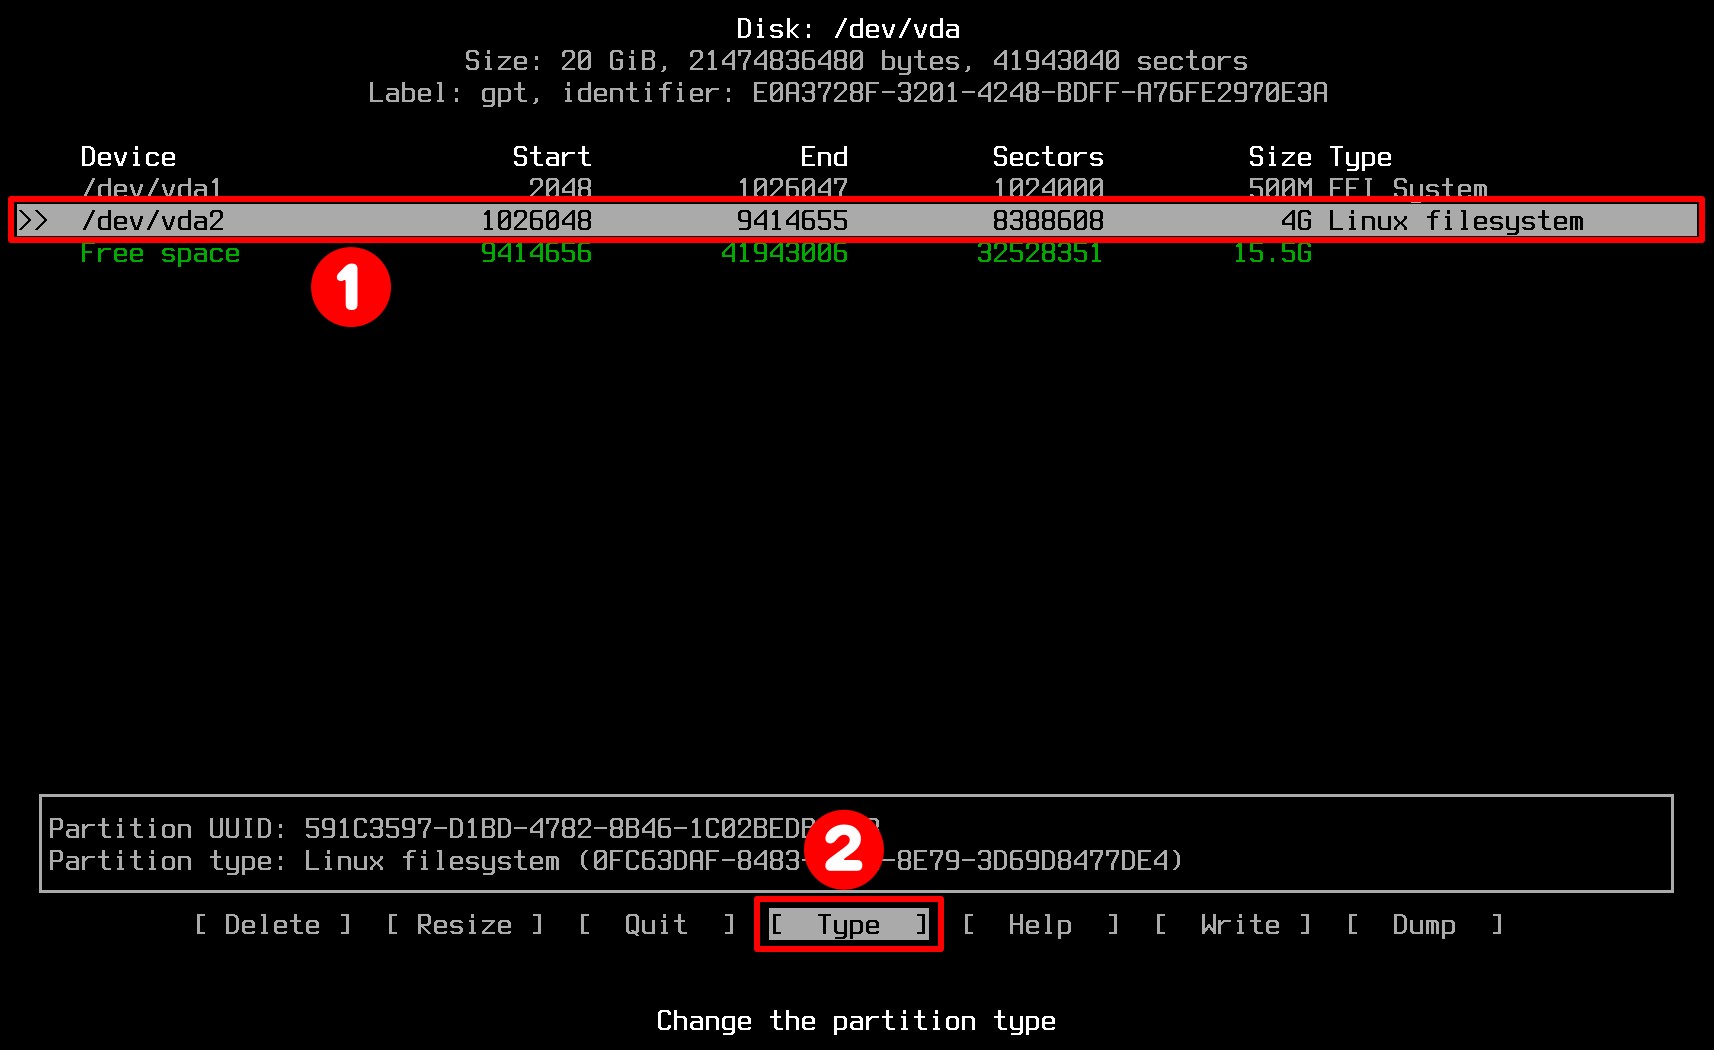
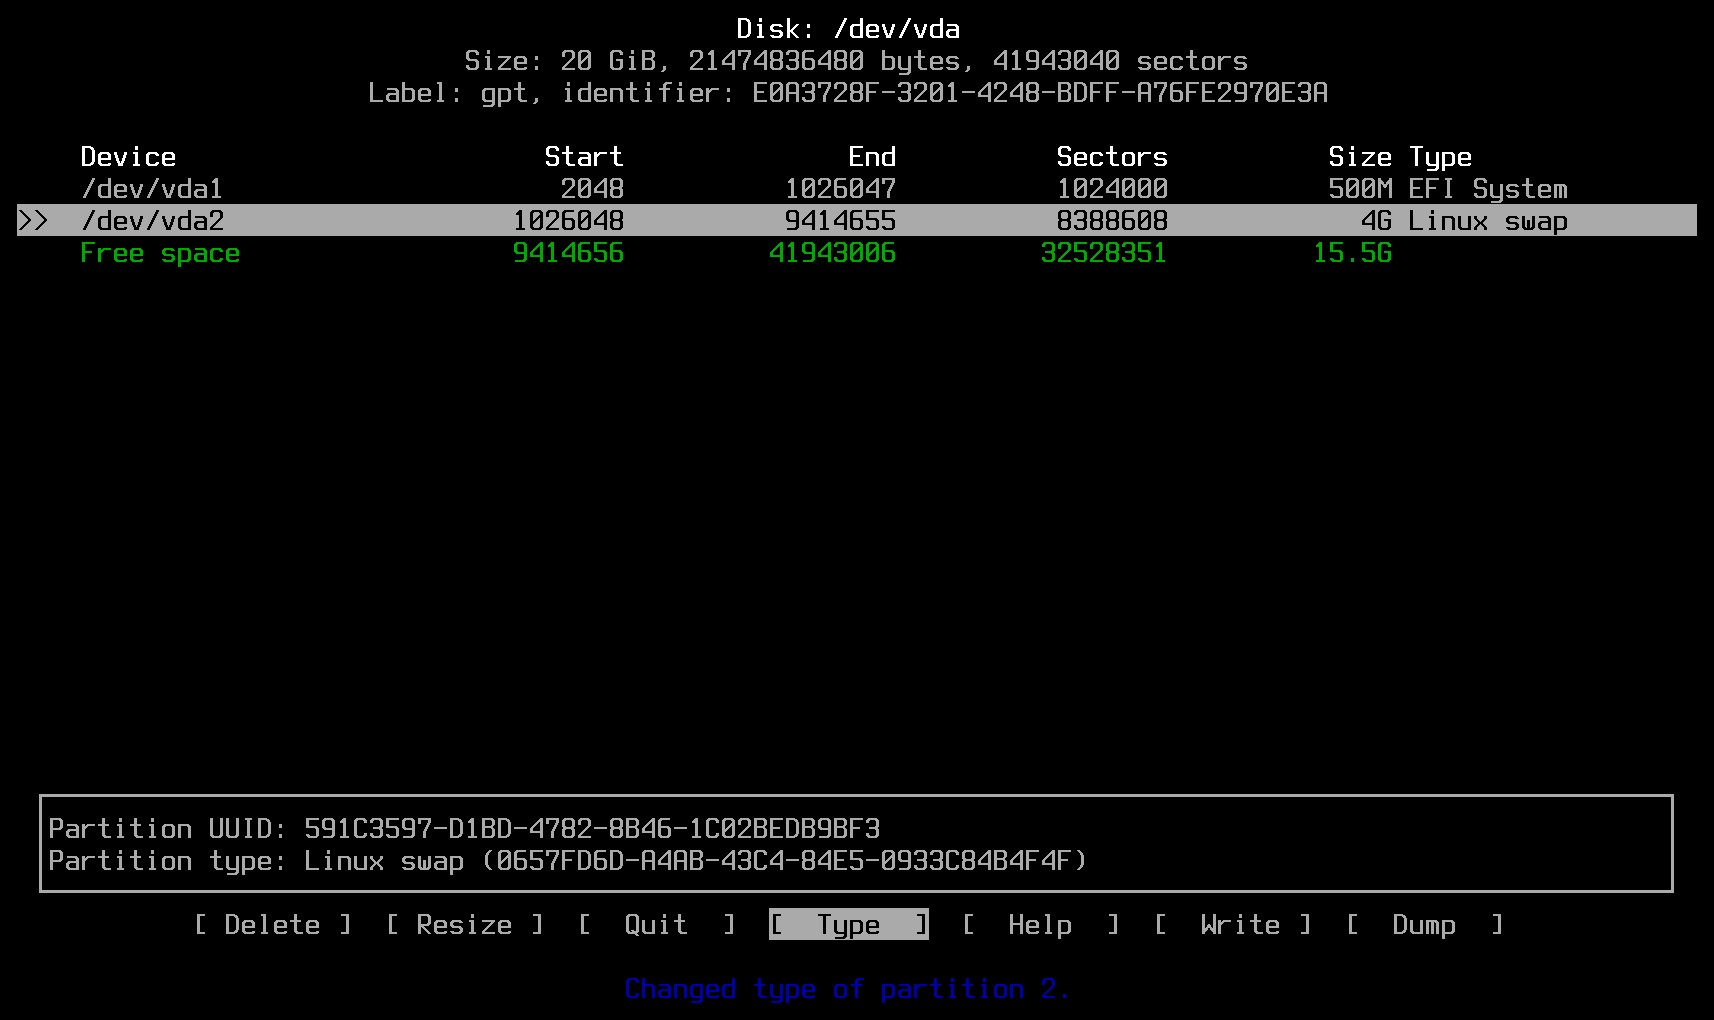
You’ve finished configuring the swap partition.
5.3 Create Root Partition
Finally, you must create the root (“/“) partition. Once again, for the last time – I promise, highlight the “Free space” row and hit “New.”
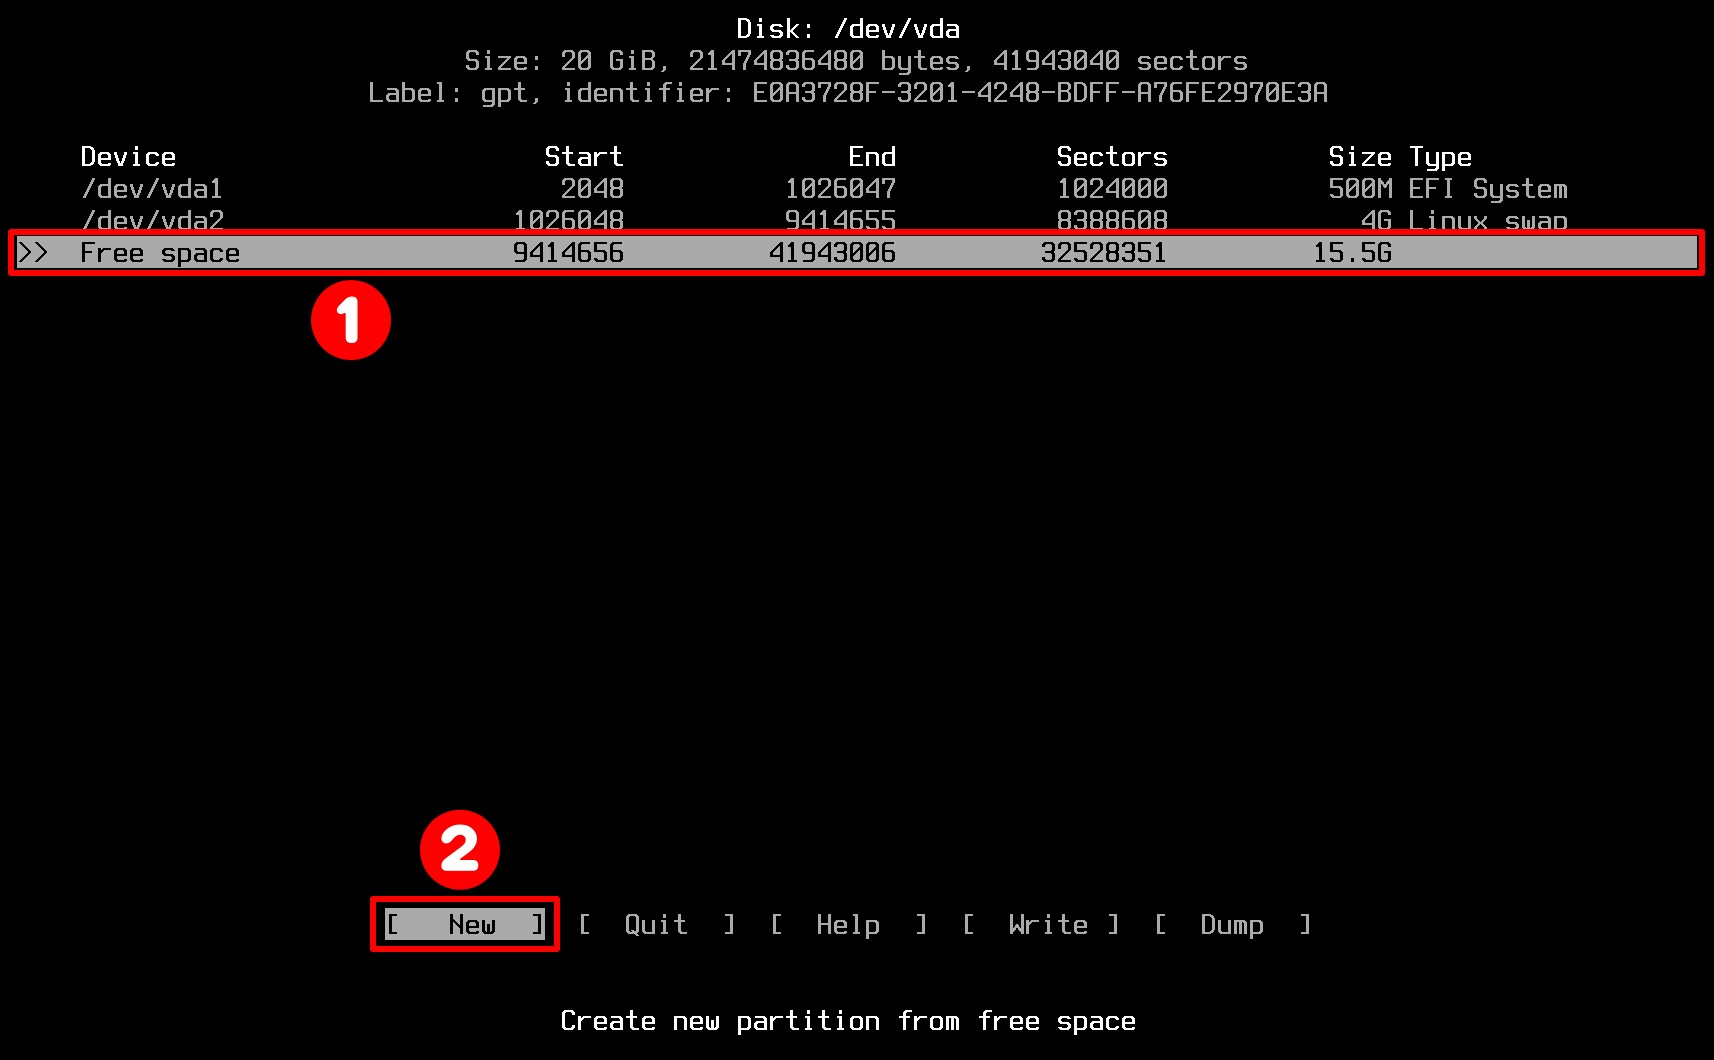
For size, leave the default size value. This means all the remaining free space to be used. Next, press the “Enter” key.
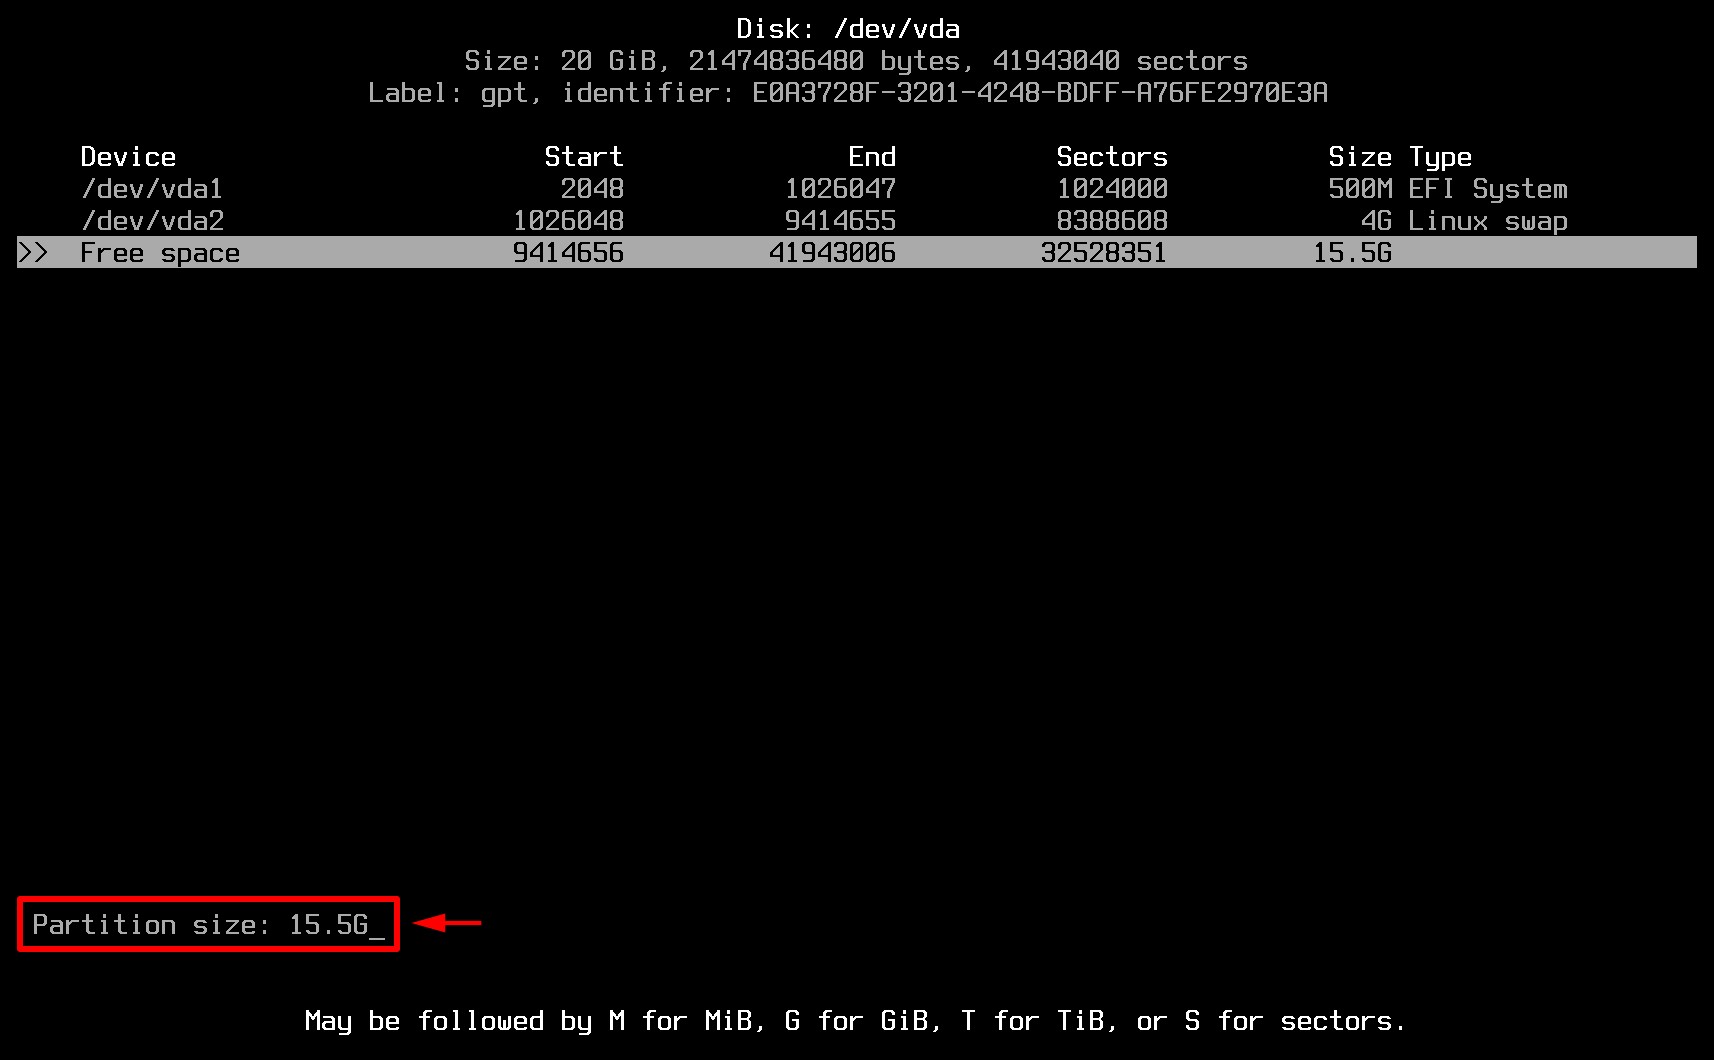
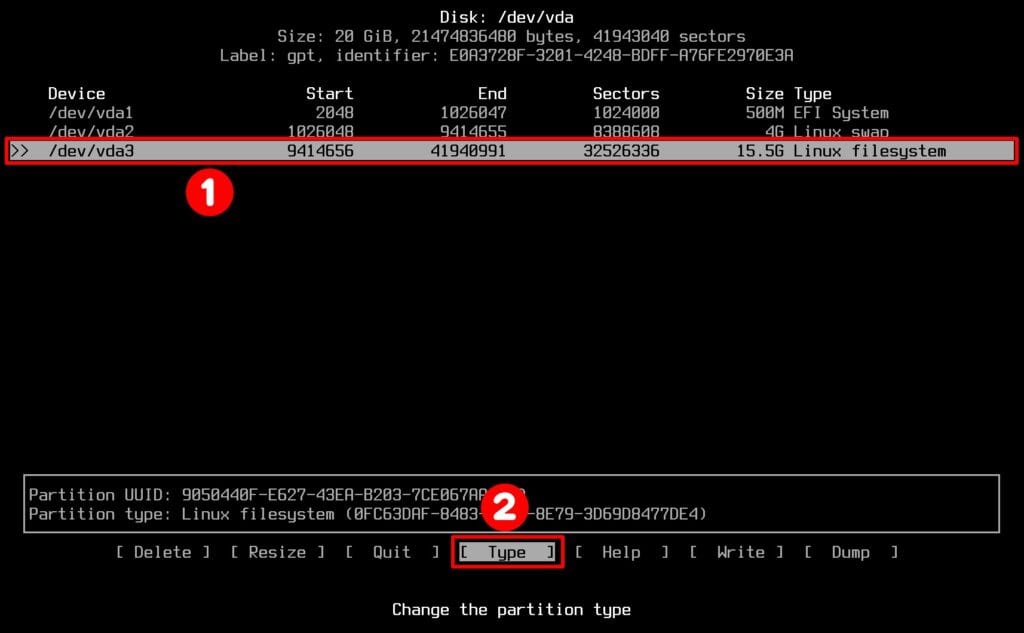
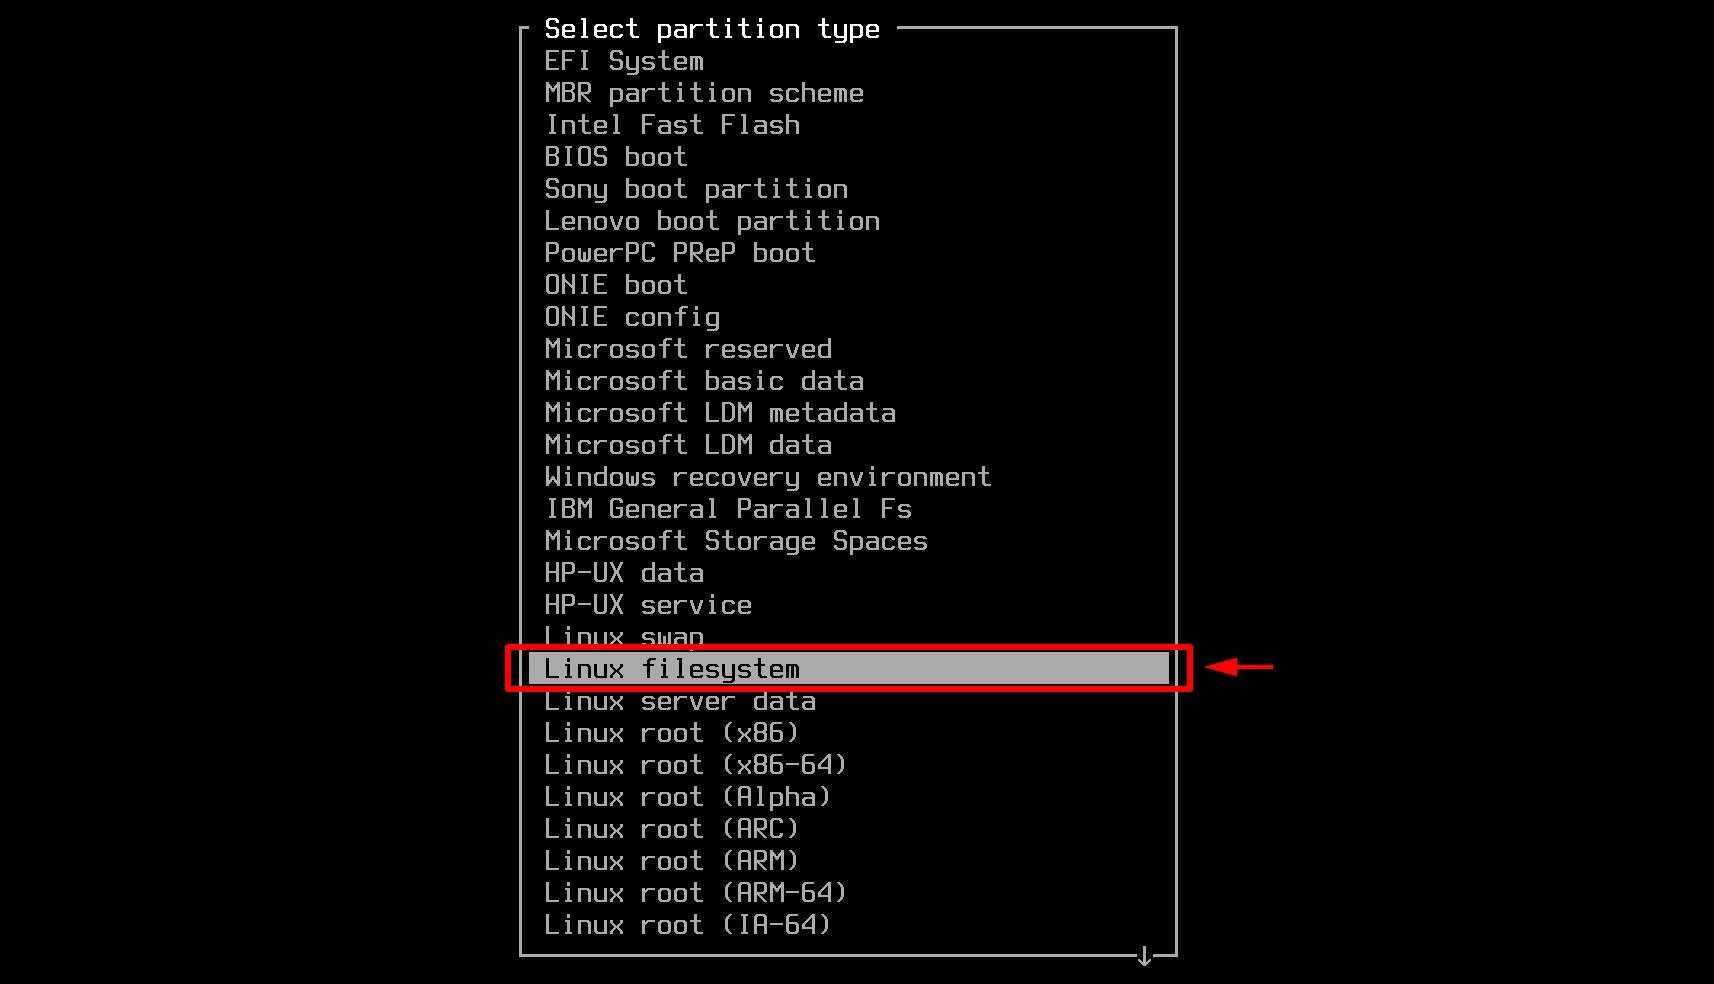
With the “/dev/vda3” row still selected, select “Type” and choose the “Linux filesystem” partition type.
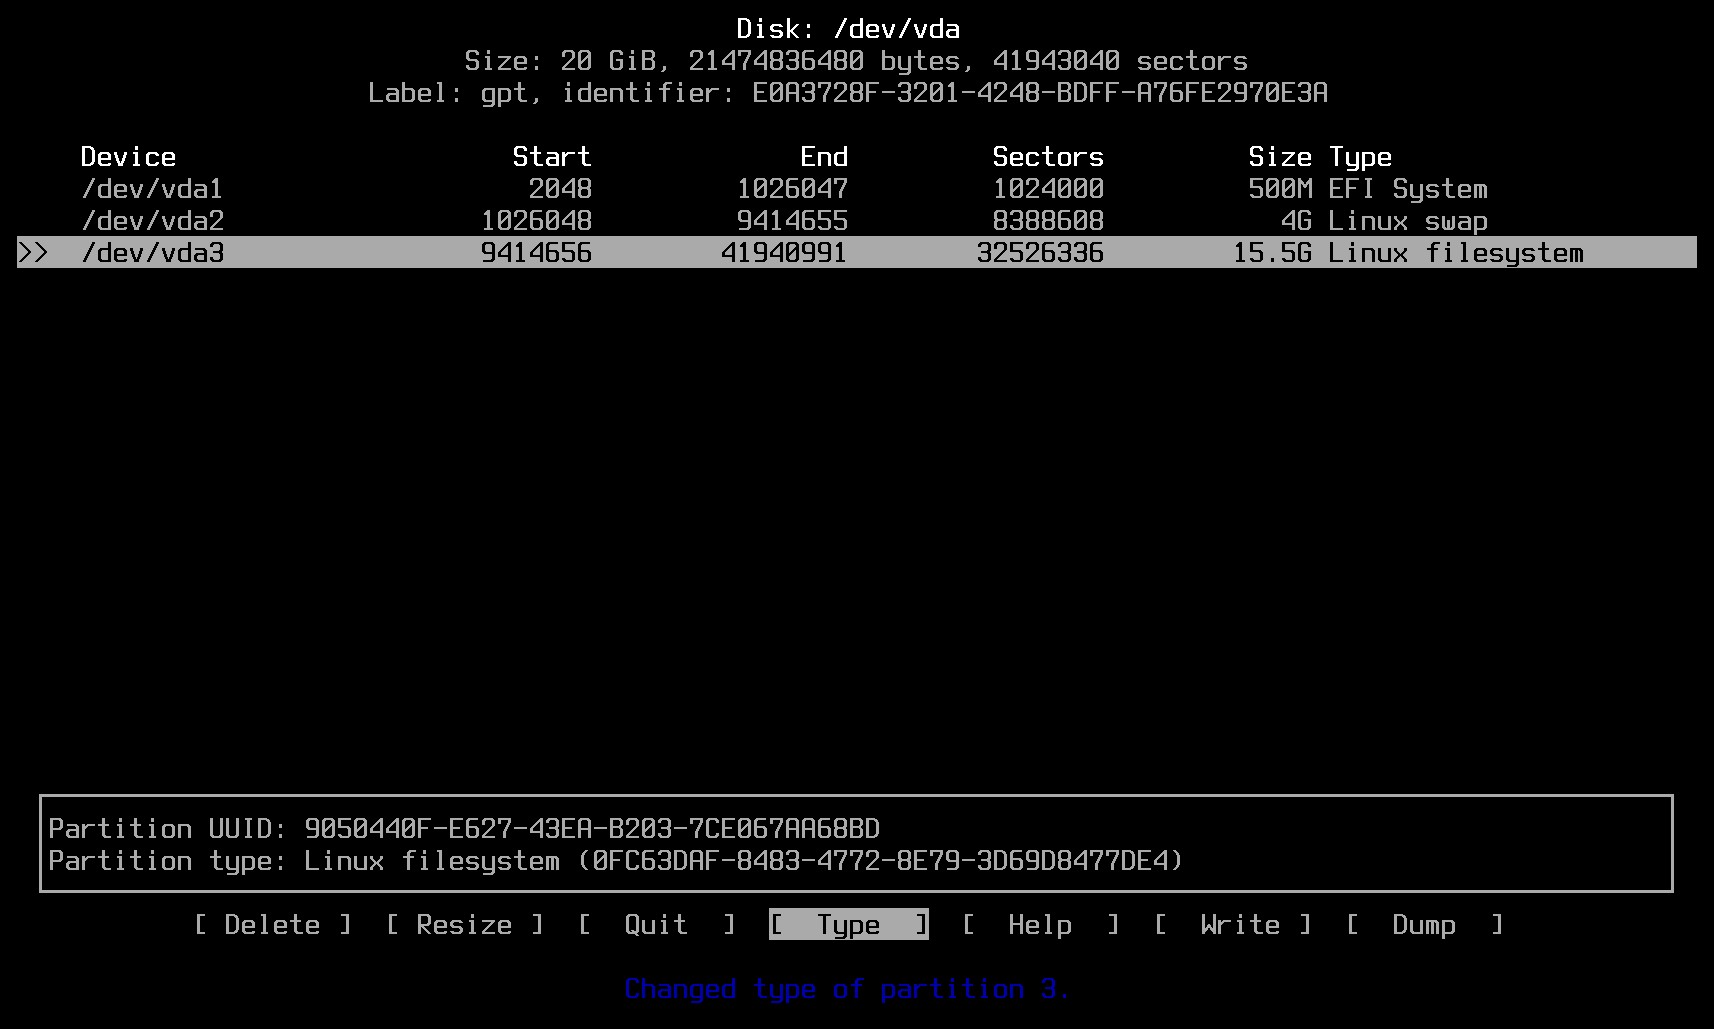
Configuring the root partition is done. You’re all set.
5.3 Write Changes to Disk
Next, you need to save the changes made. Choose “Write” from the menu at the bottom and hit “Enter.”
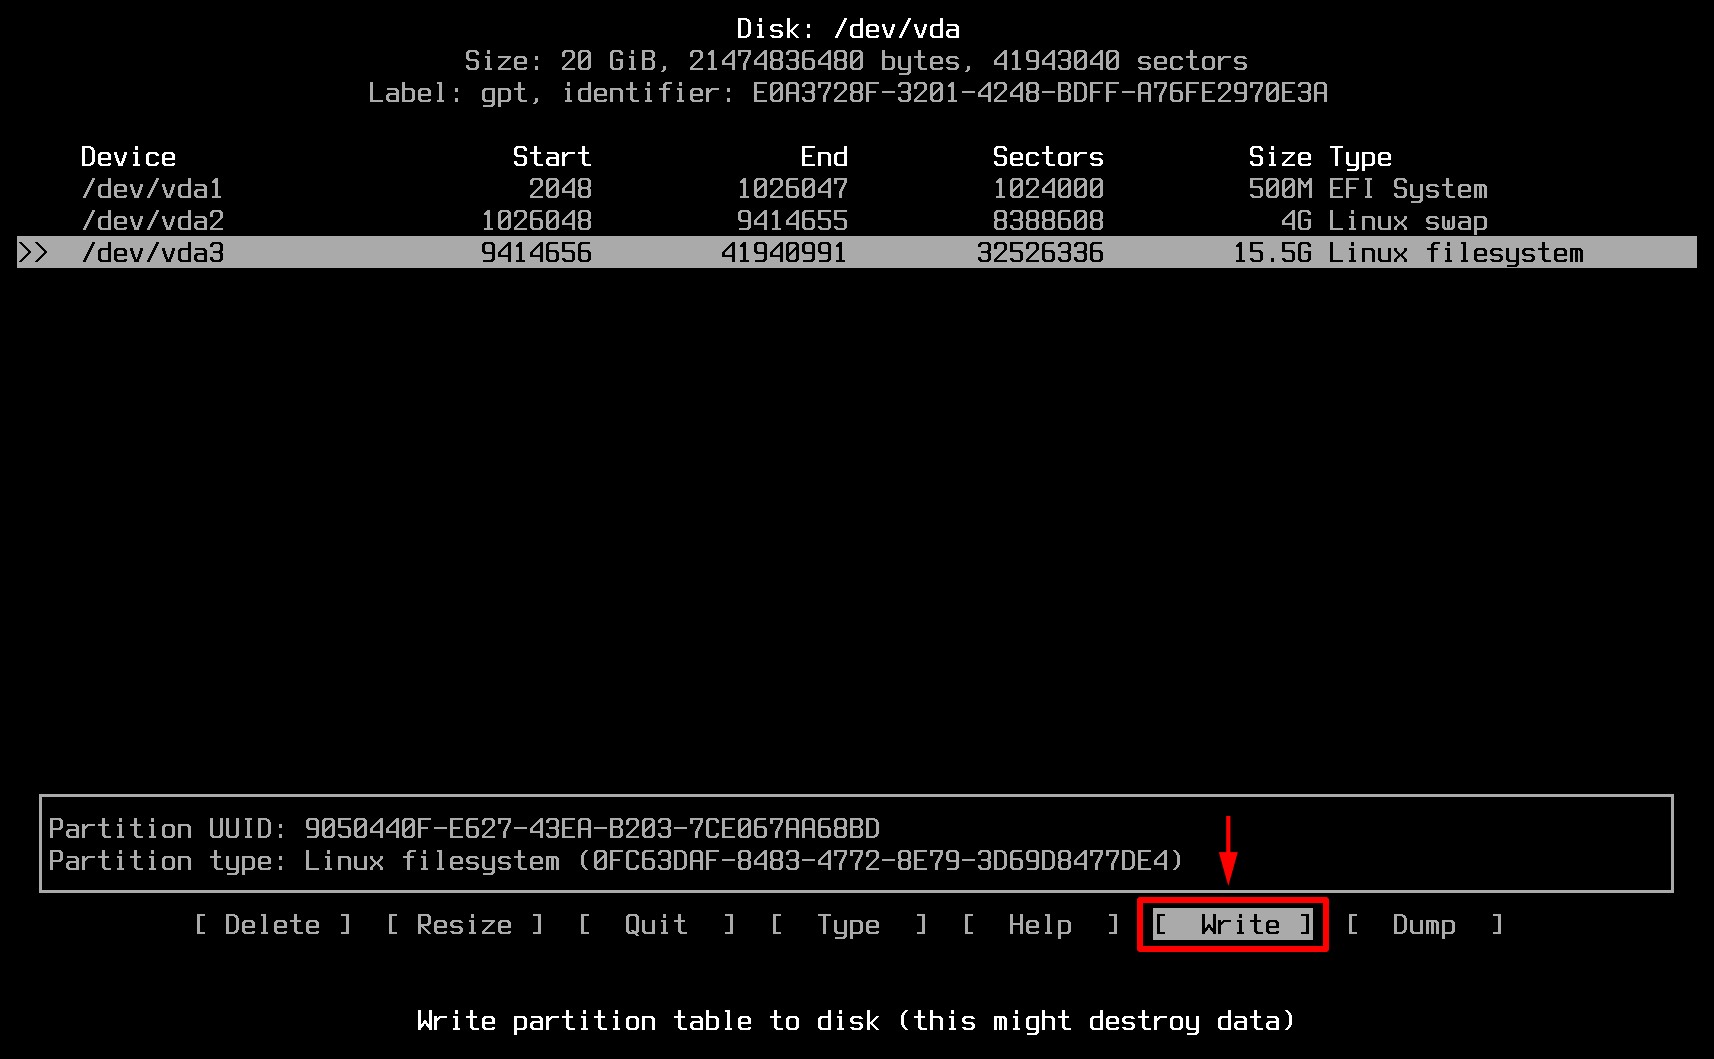
When asked, type “yes” and press the “Enter” key.
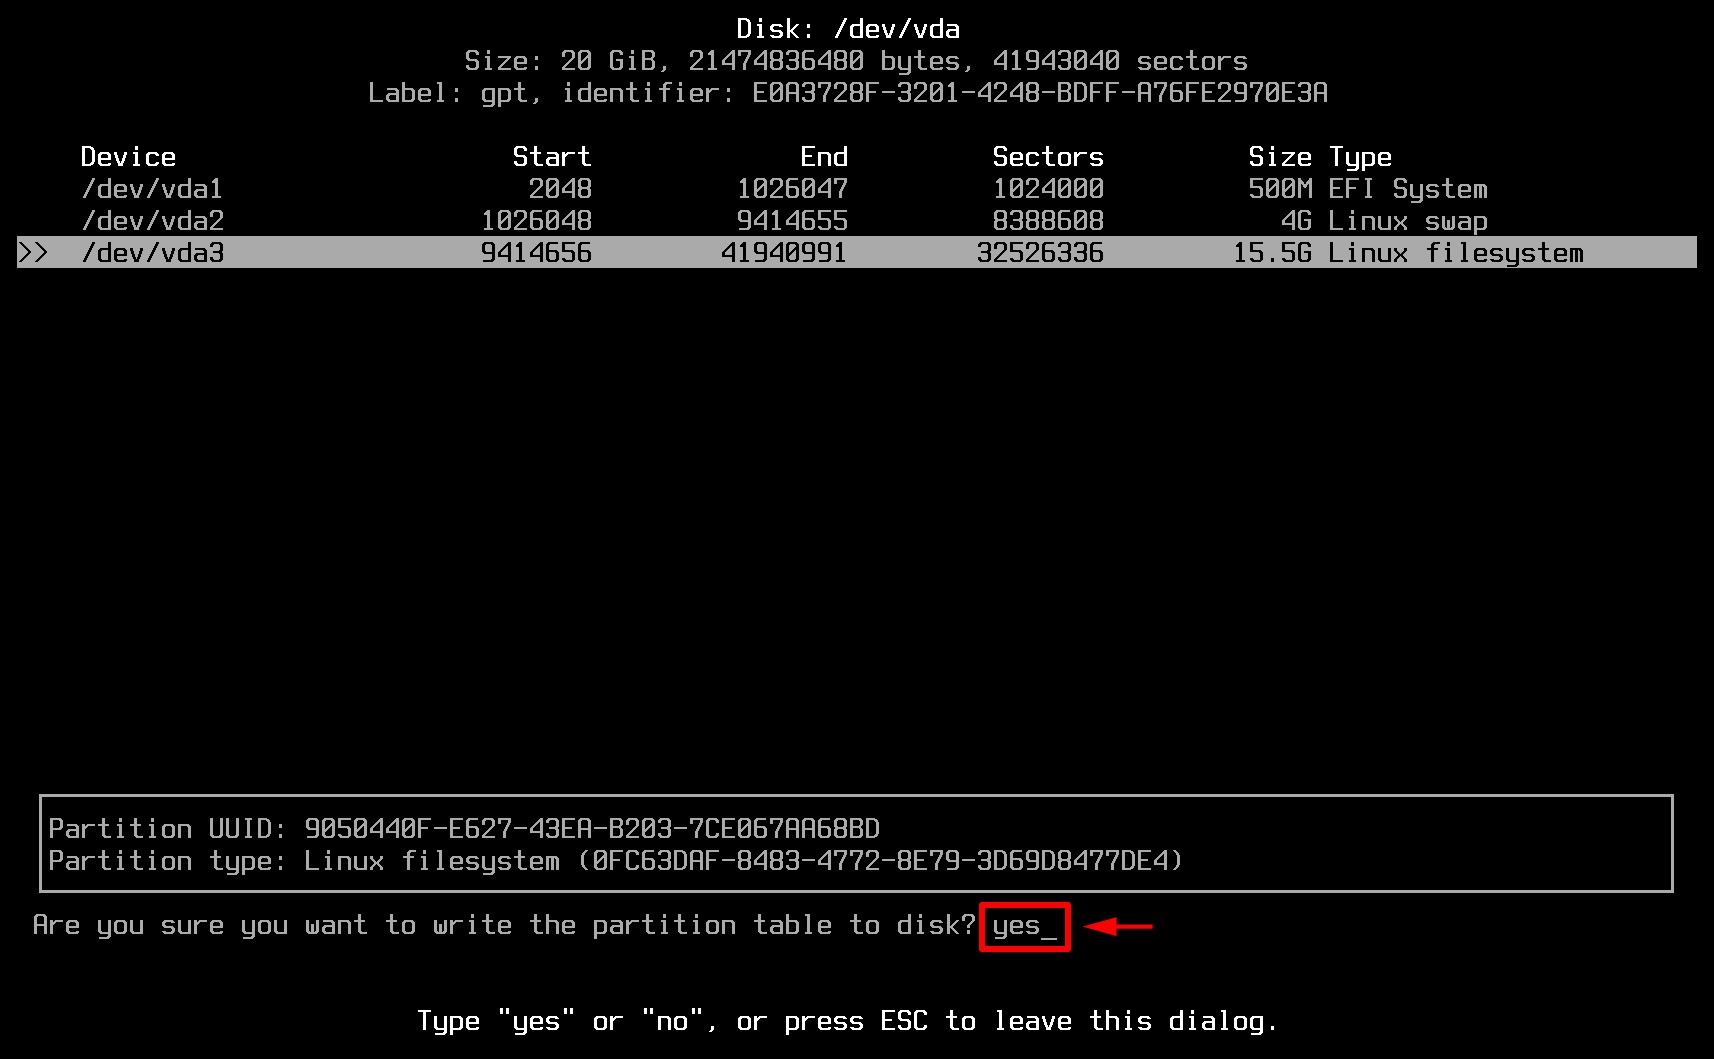
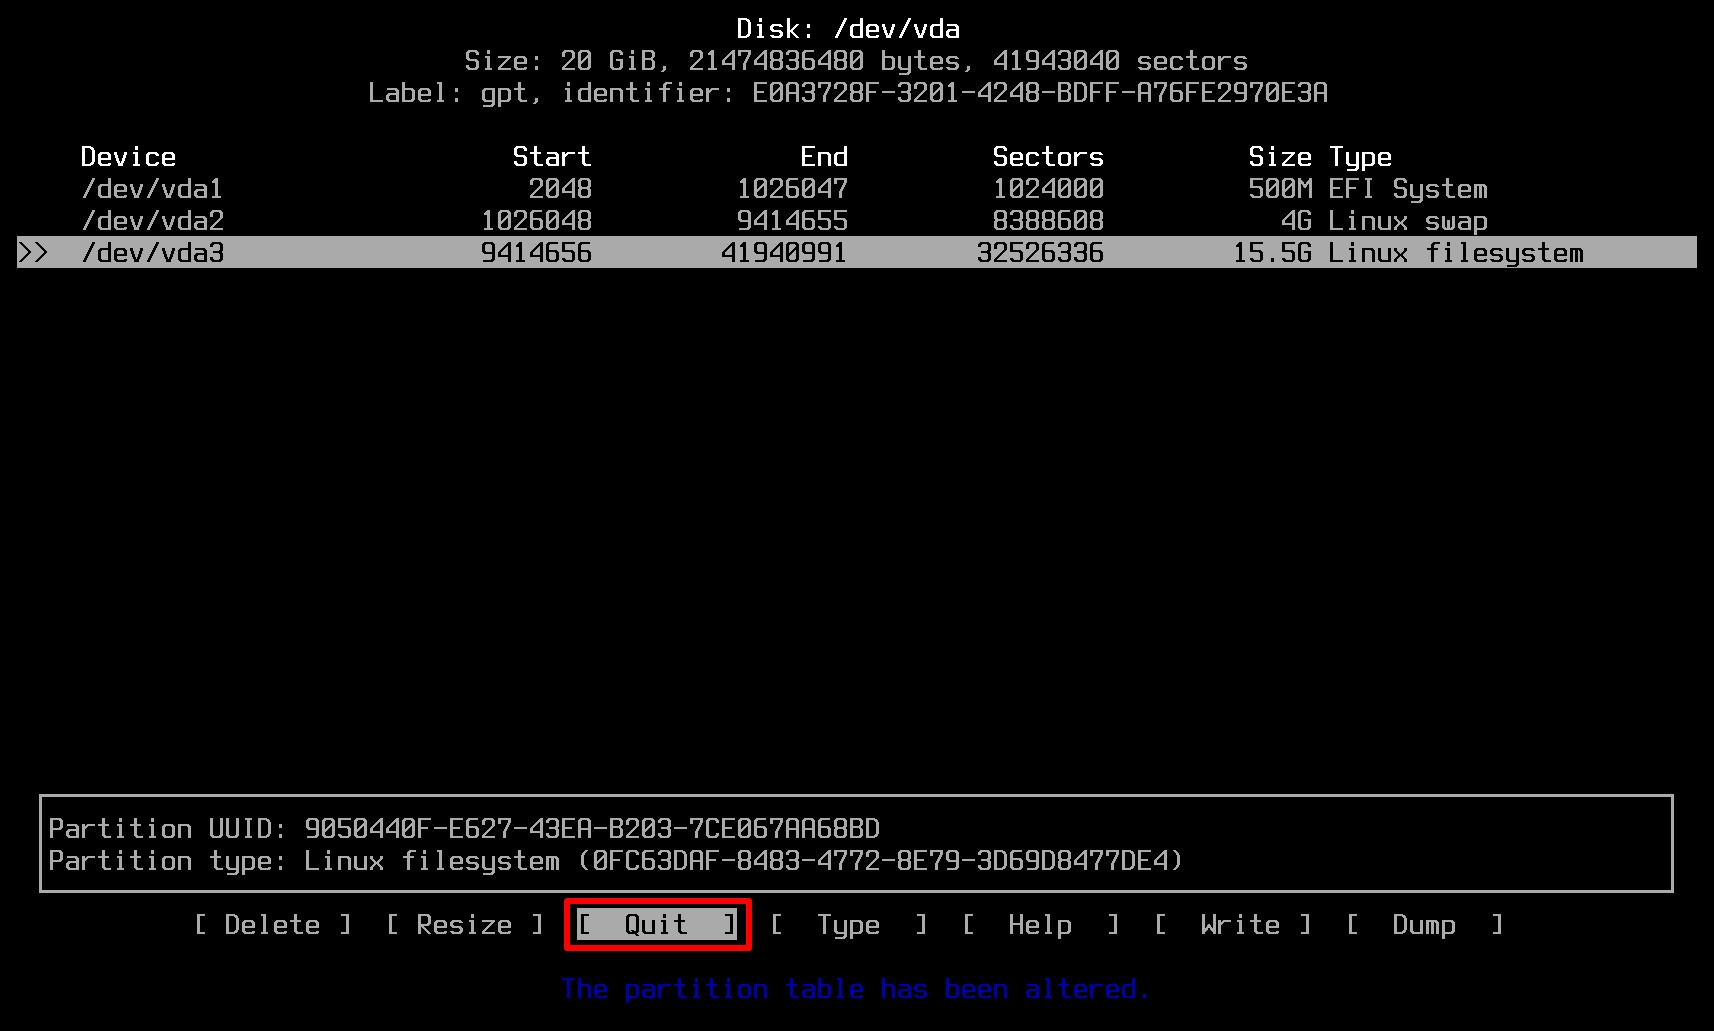
We’re done here. Select “Quit” and press “Enter” to do so.
6. Create File System
With all partitions ready, it’s time to create the file system. But first, let’s review the partition table summary by running the following:
fdisk -lCode language: Bash (bash)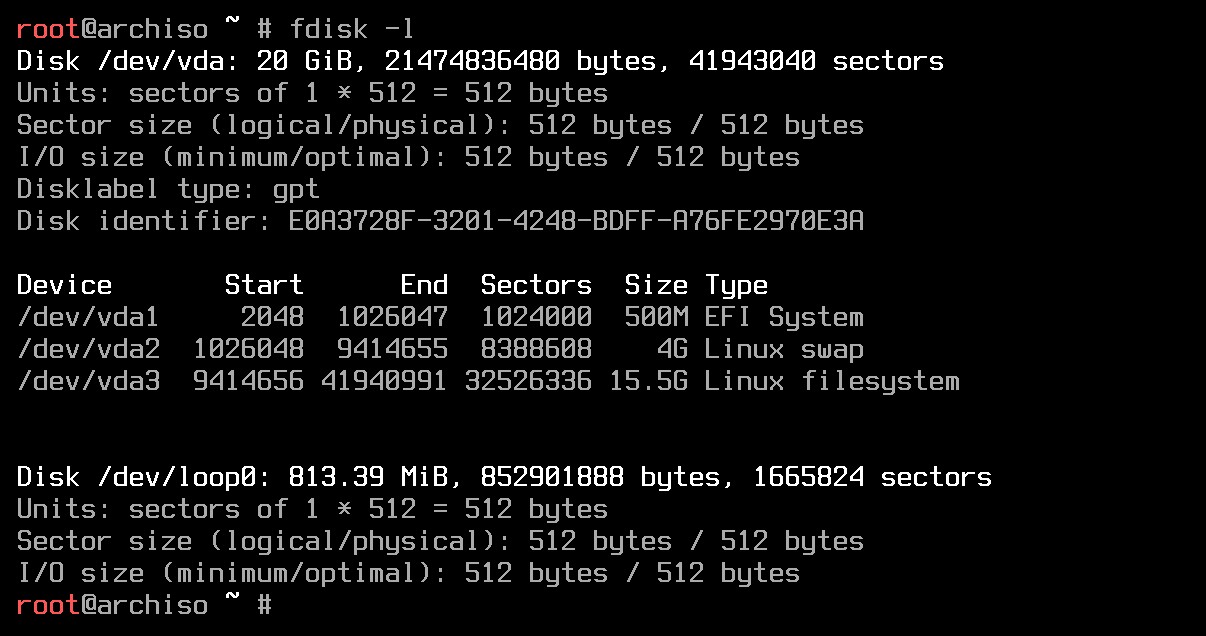
The “/dev/vda” disk now has three partitions (“/dev/vda1,” “dev/vda2,” and “/dev/vda3“) shown above. Good job!
Okay, but what did we just do? In short, the partitions created in the previous steps drew boundaries on the storage space offered by the hard drive and specified the type of space between each boundary line.
It’s time now to format those partitions with the required file systems. For the EFI one (“/dev/vda1“), create a FAT32 file system.
mkfs.fat -F32 /dev/vda1Code language: Bash (bash)
Next stop – the swap partition (“/dev/vda2“):
mkswap /dev/vda2
swapon /dev/vda2Code language: Bash (bash)
Lastly, for the root partition (“/dev/vda3“), create an ext4 file system:
mkfs.ext4 /dev/vda3Code language: Bash (bash)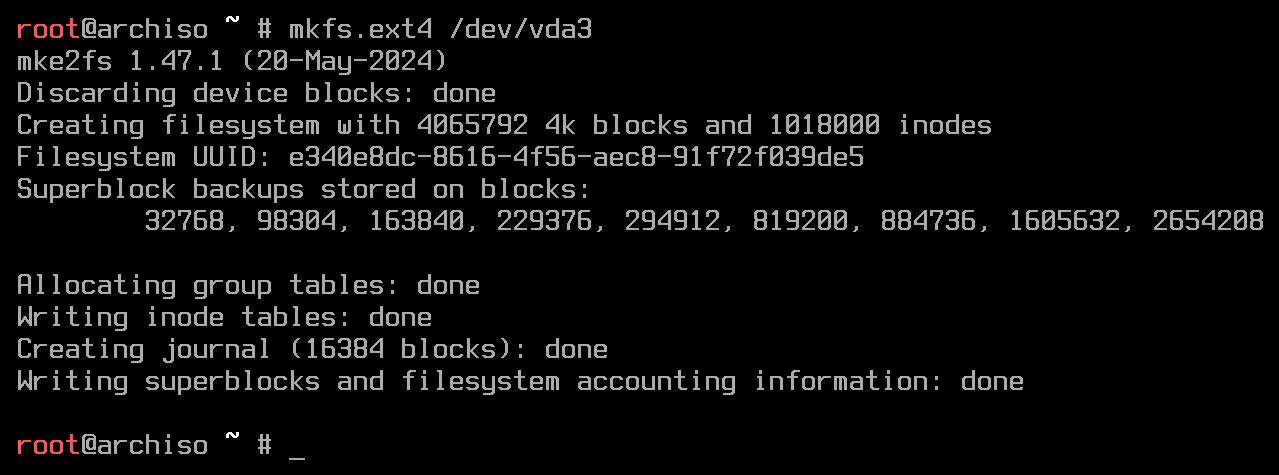
7. Install Arch Linux
Now, after all that somewhat boring disk partitioning and formatting, we’ve finally arrived at the most exciting part—the actual installation of Arch Linux.
First, we must mount the root partition (“/dev/vda3“) to the “/mnt” directory before we can perform any installation.
mount /dev/vda3 /mntNow, let’s set up the EFI partition (“/dev/vda1“) to store the bootloader files. We’ll mount it to “/mnt/boot,” but since that directory doesn’t exist yet, we’ll need to create it first before proceeding with the mount.
mkdir /mnt/boot
mount /dev/vda1 /mnt/boot
You’ll notice that none of the commands above generate any output. This simply means they’ve executed successfully.
Let’s double-check that everything is properly mounted in the right spots.
lsblk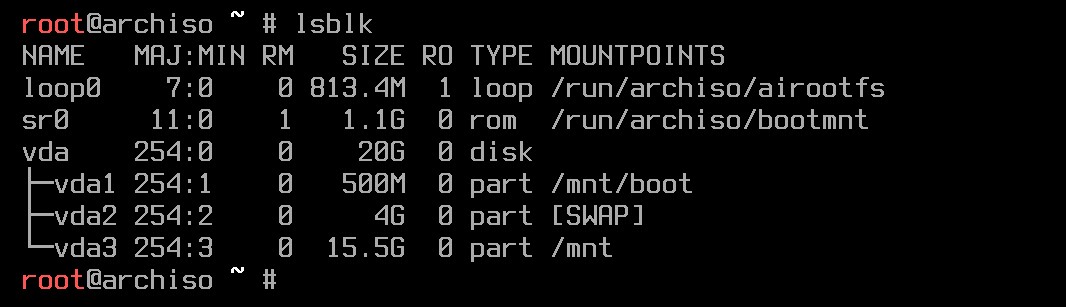
Great! Everything looks as expected. Now, with root and EFI partitions mounted, it’s time to install the core Arch system.
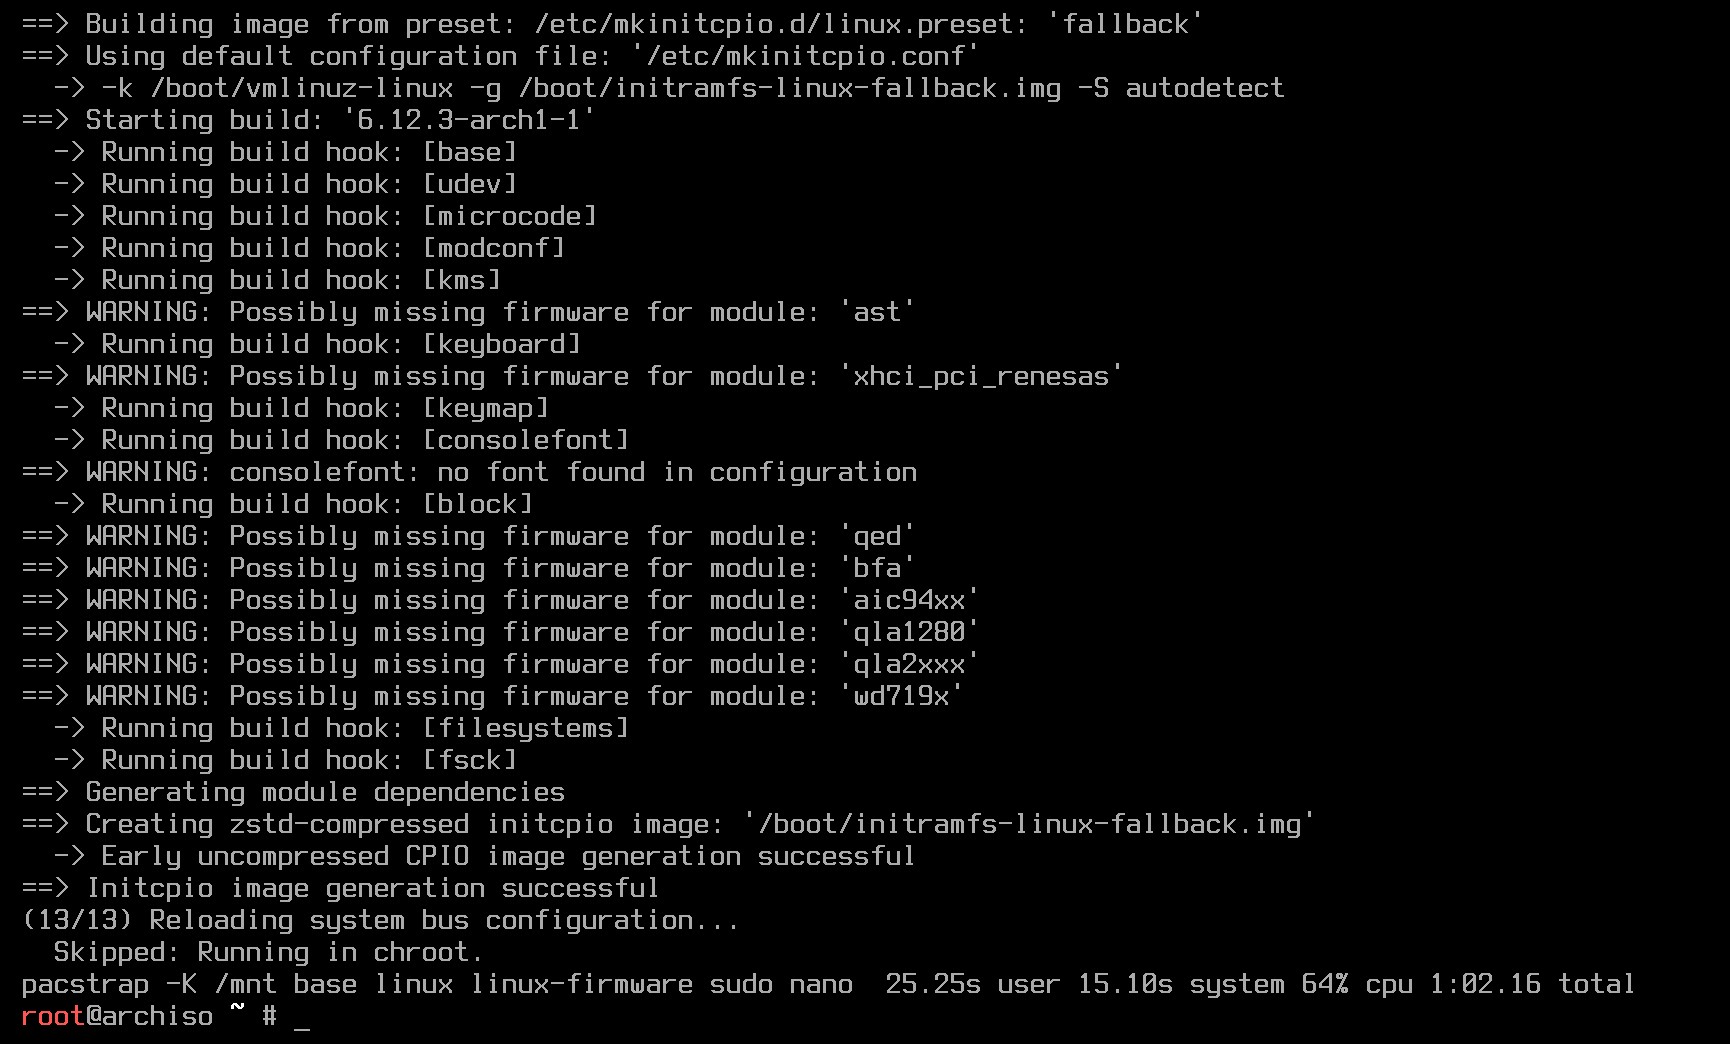
pacstrap -K /mnt base linux linux-firmware sudo nanoCode language: Bash (bash)It will take some time to download and install these packages, so be patient. In the end, you’ll see a screen like the one shown below. Your next stop is system configuration. Let’s move on.
8. Configure the Installed Arch System
After the installation completes, generate a “/etc/fstab” file for your new Arch Linux system by issuing the following command:
genfstab -U /mnt >> /mnt/etc/fstabCode language: Bash (bash)Now that we have Arch installed, we must chroot into the installed root partition (“/dev/sda1“), which is mounted under the “/mnt” directory.
arch-chroot /mntCode language: Bash (bash)From here, let’s first configure the timezone. Find your preferred one (“/usr/share/zoneinfo/Zone/SubZone“) where “Zone/SubZone” is your location, such as “America/New_York,” “Europe/Paris,” “Asia/Bangkok,” and so on. You got the idea.
Create a symbolic link to set the timezone (replace “America/New_York” with your timezone).
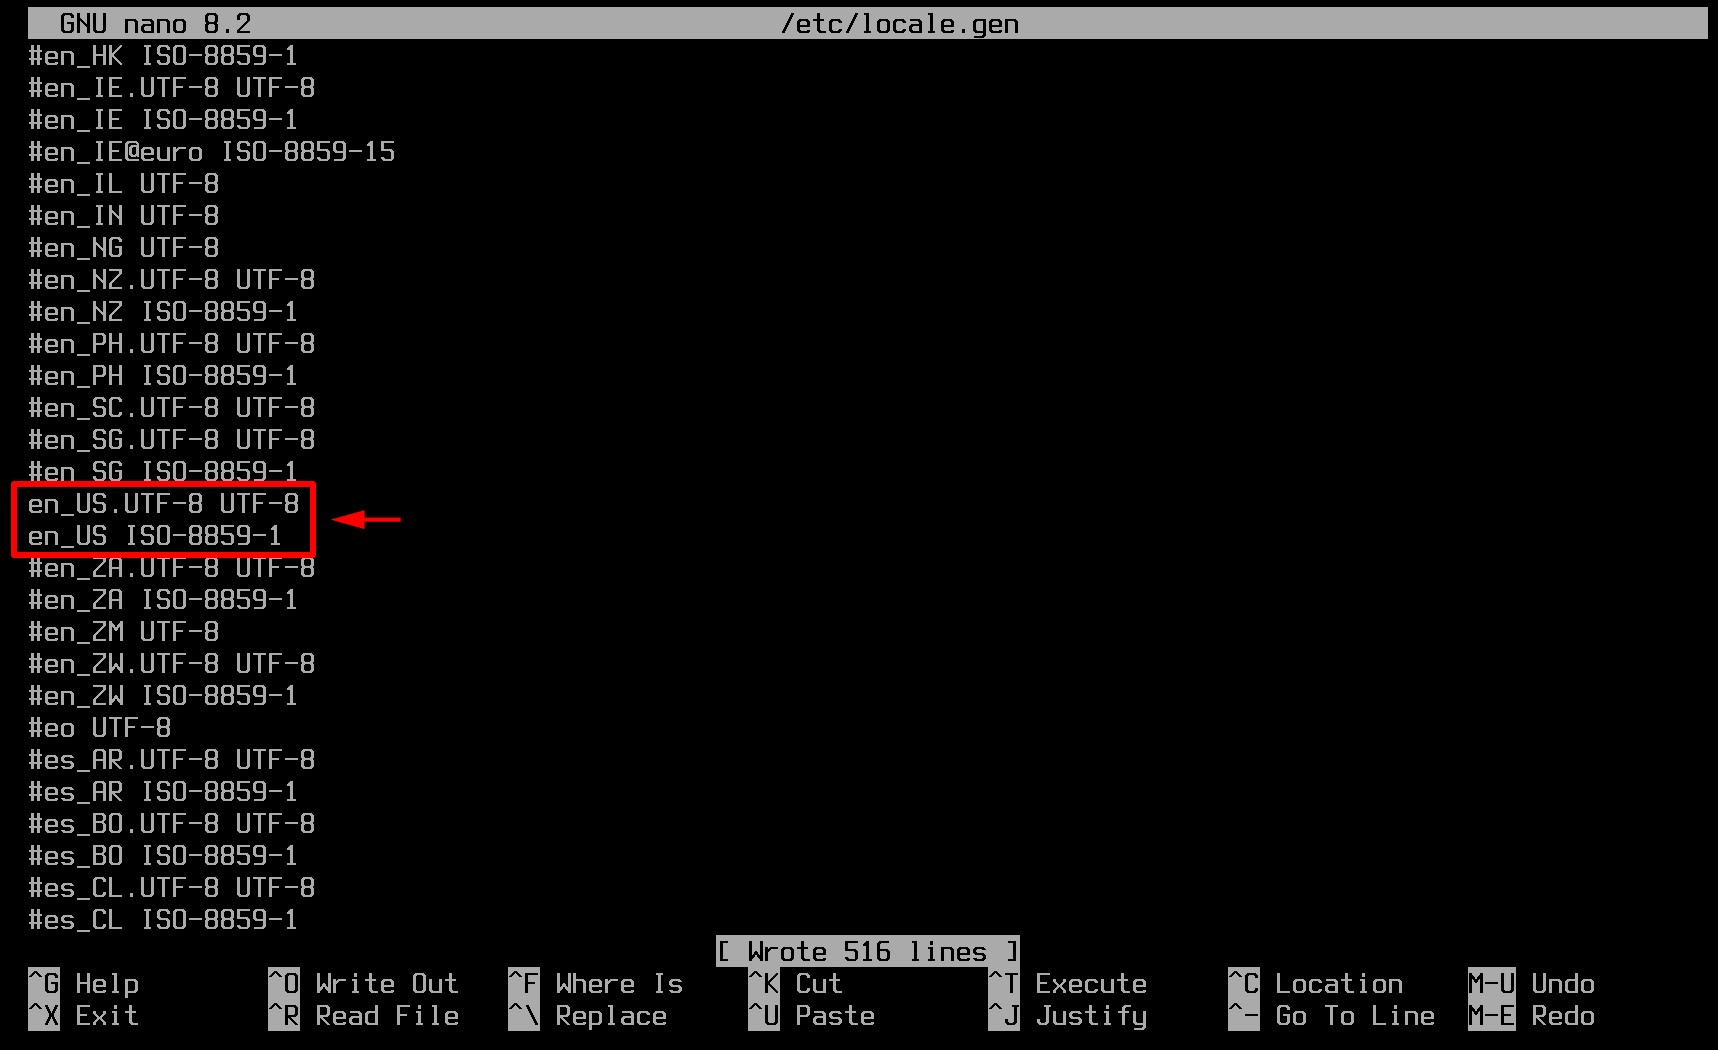
ln -sf /usr/share/zoneinfo/America/New_York /etc/localtimeCode language: Bash (bash)Now, we need to set up the locale. The file “/etc/locale.gen” contains locale settings and system languages with all entries commented by default. So, we must open this file using a text editor and uncomment the line containing the desired locale.
nano /etc/locale.genCode language: Bash (bash)Uncomnent “en_US.UTF-8 UTF-8” and “en_US ISO-8859-1” (by removing the “#” sign), and any other needed locales in “/etc/locale.gen.” Then, press “Ctrl+O” followed by “Enter” to save, and finally, “Ctrl+X” to exit the editor.
Now generate the locale config file using the below command:
locale-genCode language: Bash (bash)
Run the command below to synchronize the hardware clock. It automatically creates a “/etc/adjtime” file containing descriptive information about the hardware mode clock setting and clock drift factor.
hwclock --systohcCode language: Bash (bash)Create and set the “LANG” variable.
echo LANG=en_US.UTF-8 > /etc/locale.confCode language: Bash (bash)Now, we’ll set the hostname. A hostname is the computer’s name. Since I’m not the most creative at choosing names, I’ll opt for “arch.” I’m sure you all could come up with something way better.
echo "arch" > /etc/hostnameCode language: Bash (bash)Add this name to the “/etc/hosts.” Edit the file with Nano and add the following lines (replace “arch” with the hostname you chose earlier).
nano /etc/hostsCode language: Bash (bash)127.0.0.1 localhost
::1 localhost
127.0.1.1 archCode language: Bash (bash)Don’t forget to set the password for the root account:
passwdCode language: Bash (bash)
You’ll be asked to type it twice, but be attentive, as you will see nothing while typing.
9. Install the Bootloader (systemd-boot)
I relied on a good old GRUB as my go-to bootloader for years. But then I discovered systemd-boot, a sleek and lightweight alternative built right into systemd. Honestly, it makes GRUB feel a bit redundant—why pile on extra software when systemd-boot already does the job so efficiently?
Plus, there are some clear advantages to using systemd-boot over GRUB. It loads faster than GRUB because it has a simpler design and fewer features, integrates tightly with UEFI firmware, and uses the UEFI boot manager directly. Moreover, unlike GRUB, systemd-boot does not use scripts, etc.
So, for this guide, we’ll stick with this approach, which I recommend for all systemd-based systems. Let’s first install a single package:
pacman -S efibootmgrCode language: Bash (bash)Setting it up on our fresh Arch installation couldn’t be easier:
bootctl installCode language: Bash (bash)Next, open the “/boot/loader/loader.conf” file and paste the following contents into it:
nano /boot/loader/loader.confCode language: Bash (bash)default arch.conf
timeout 10
console-mode max
editor noCode language: Bash (bash)As a final step, create a file named “arch.conf” inside the “/boot/loader/entries/” directory, adding the following contents to it:
nano /boot/loader/entries/arch.confCode language: Bash (bash)title Arch Linux
linux /vmlinuz-linux
initrd /initramfs-linux.img
options root=/dev/vda3 rwCode language: Bash (bash)Finally, save the file and exit.
10. Install a Desktop Environment on Arch Linux
Our fresh Arch Linux currently contains only the essential software packages needed to manage the system from the command line, with no desktop environment installed. But as you might expect from Arch, it offers all those available in its repositories.
Below, I’ll show you how to install KDE Plasma. Don’t worry—I’m not here to ignite the never-ending debate about which desktop environment reigns supreme.
Plasma just strikes a nice balance between a traditional desktop feel and nearly endless customization options, which fits perfectly with the Arch philosophy. That’s why I’ve chosen it for this guide. So, let’s install it.
pacman -S plasma-meta kde-applications-metaCode language: Bash (bash)Now, let’s talk about video drivers. If you have an NVIDIA GPU, I highly recommend using the proprietary driver—it’s the best way to unlock your GPU’s full potential. Here’s how you can install it:
pacman -S nvidia nvidia-utils nvidia-settingsCode language: Bash (bash)If you’re using an AMD GPU, you’re in luck! Unlike NVIDIA, AMD is strongly committed to open-source development, and Linux supports AMD GPUs right out of the box.
In fact, you only need the “mesa” package, which was automatically installed as a dependency when you set up the KDE Plasma desktop environment a little while ago.
Additionally, for Vulkan support (important for gaming and other GPU-intensive applications), install the following package:
pacman -S vulkan-radeonCode language: Bash (bash)One last important clarification about video support: If you set up Arch Linux as a virtual machine, whether using VirtualBox, KVM, or any other virtualization software, you can skip installing the drivers mentioned above. VMs rely on their own virtual video drivers to handle video support for Linux guests, so there’s no need for additional driver installation.
Finally, enable the SDDM (the default KDE display manager) and Network Manager to start automatically at system boot.
systemctl enable sddm
systemctl enable NetworkManager
11. Create a Regular User Account
Create a regular user account for your daily tasks, replacing “bobby” in the example below with the username of your choice. Additionally, we make it a “wheel” group member to enable the execution of sudo commands, which we’ll set up in just a moment.
useradd -m -G wheel bobbyCode language: Bash (bash)Be sure to set a password for the new user:
passwd bobbyCode language: Bash (bash)
Next, enable sudo privileges for a newly created user:
EDITOR=nano visudoCode language: Bash (bash)Scroll down the screen and find the line shown below, then uncomment it by removing the “#” from the start.
# %wheel ALL=(ALL) ALLCode language: Bash (bash)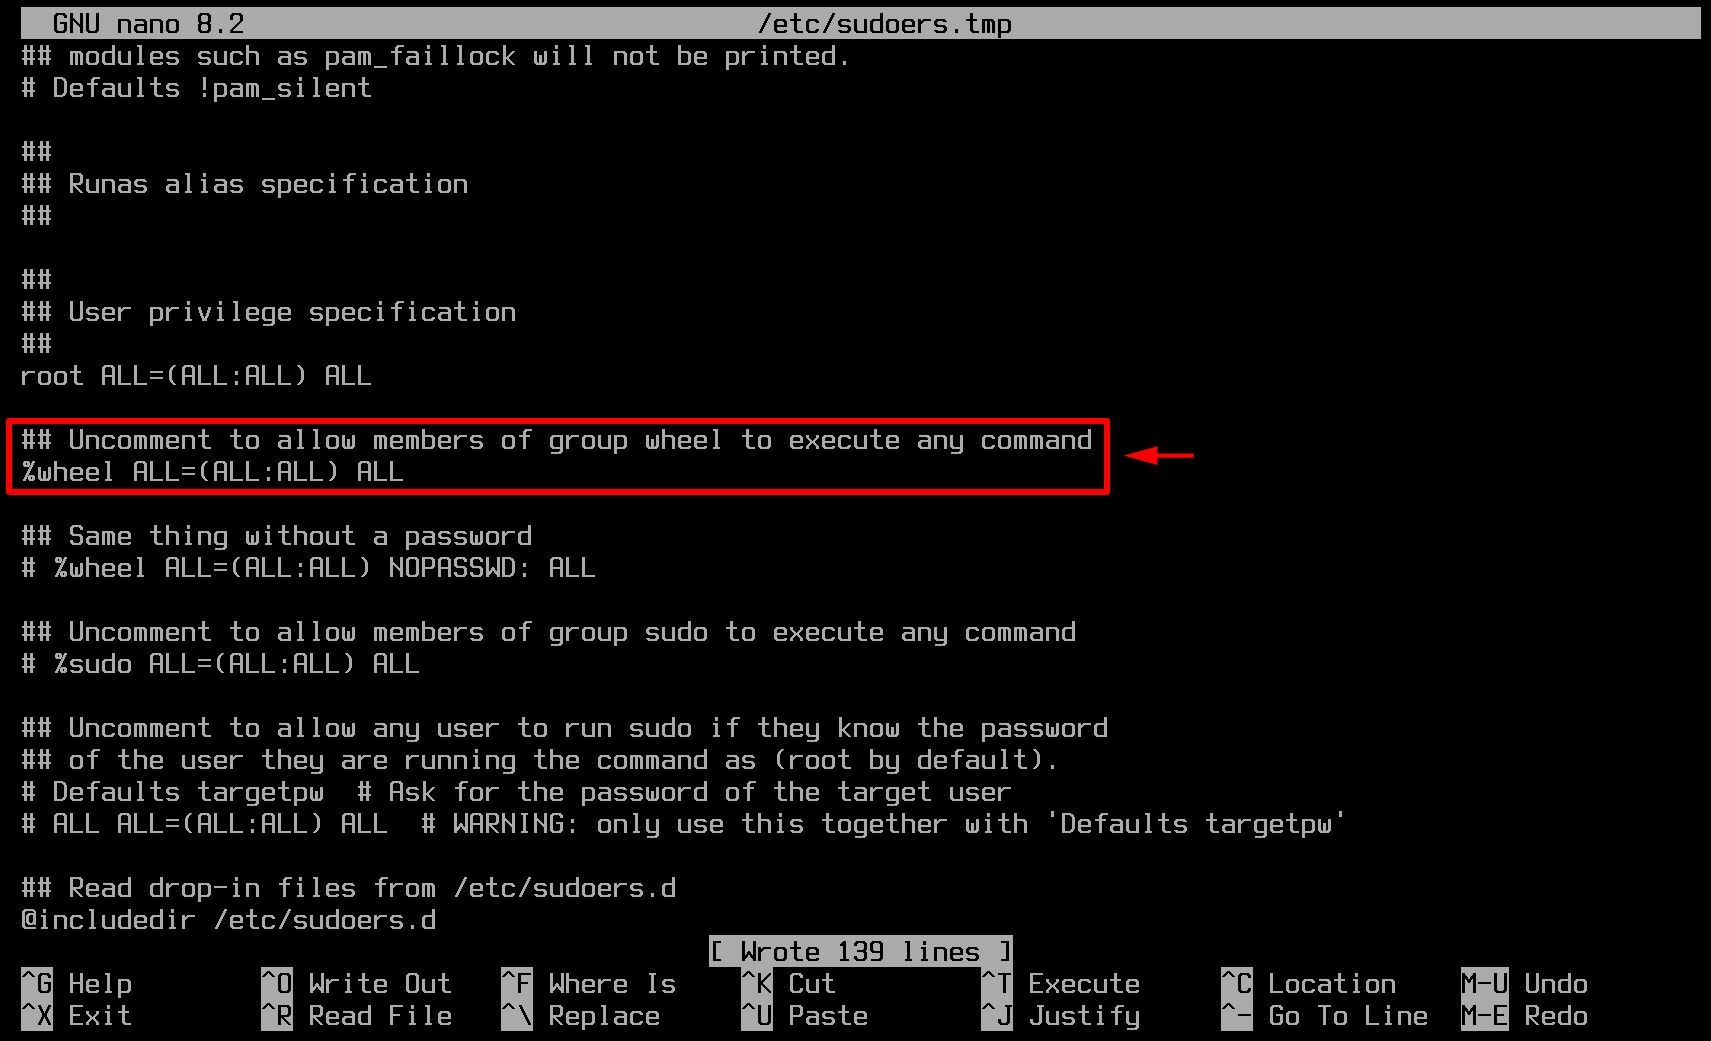
12. Arch Linux Installation is Done
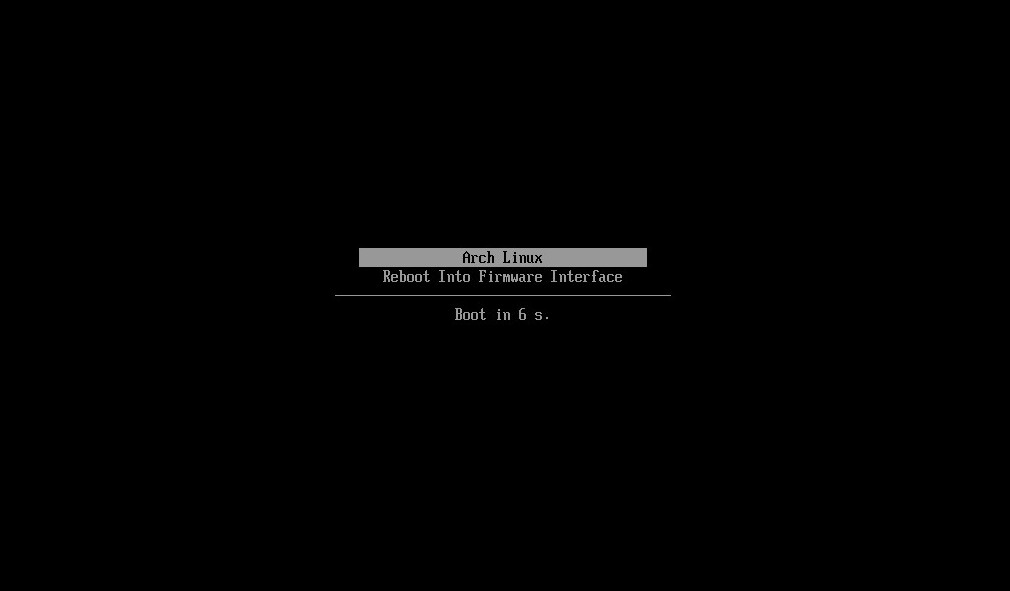
And here we are, wrapping up our fresh Arch installation. The big moment has finally arrived! Unmount the root partition and reboot to your newly installed Arch Linux system.
exit
umount -R /mnt
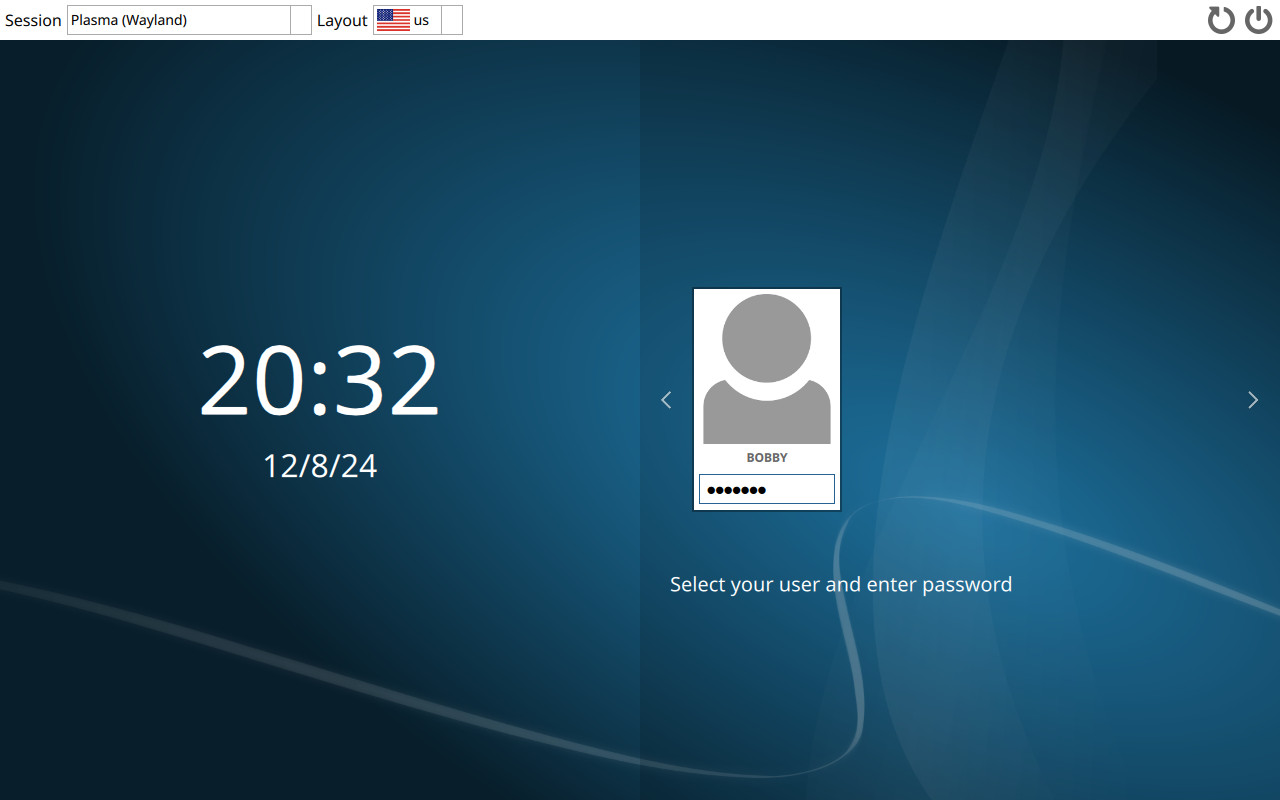
rebootCode language: Bash (bash)The systemd-boot boot manager will greet you. Wait a few seconds or press “Enter” to start loading the operating system.
KDE Plasma’s SDDM login manager will welcome you. Enter the user password to log in and enjoy your freshly installed Arch Linux system in all its glory.
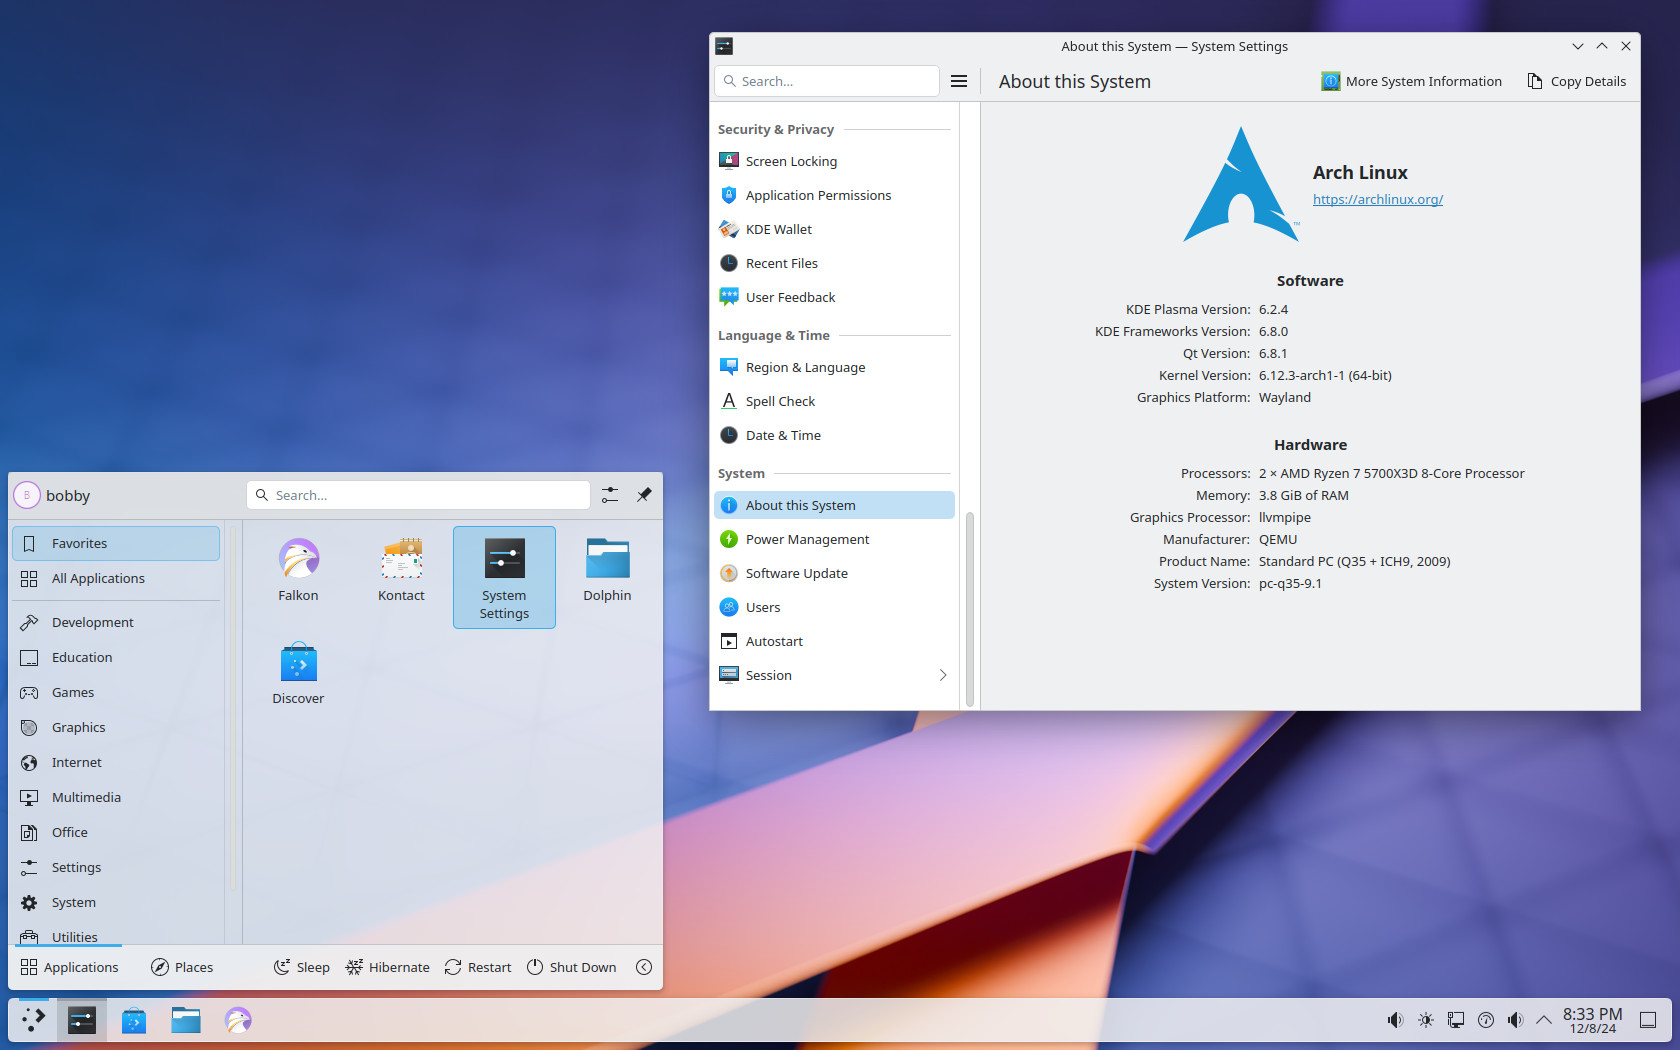
From this point, you can install what you want and configure your Arch Linux according to your needs and preferences. Furthermore, now is the perfect moment to check out our “Arch Linux Post-Installation Essential Steps” guide—it’s a must for getting your Arch journey off to a smooth and hassle-free start.
In addition, our comprehensive “The Beginner’s Guide to Using Pacman on Arch Linux” reading will teach you everything you need to know for managing software, providing you with the confidence, solid knowledge, and clear understanding to navigate and work seamlessly with Arch’s package manager.
Conclusion
And here we are, at the end of our adventure, installing Arch Linux. I know it was a bit long, but I have tried to cover all the steps and explain their essence. Now, you can proudly tell the world, “I use Arch, BTW.” I have to admit… so do I.
In addition, as an Arch user, don’t forget to check out this treasure trove called Arch Wiki. It is so well-composed and maintained that even non-Arch users glean knowledge and solutions daily.
Thank you for your time spent on this guide! I’d love to hear about your experience with the installation process. Feel free to share your thoughts in the comments below—I always enjoy reading what you have to say.


Hi Bobby.
Excellent guide; I’m ditching Windows for good! I also use OpenSUSE alongside it.
I tried using Arch Linux before but couldn’t manage it; after following this guide, I succeeded in installing it.
I’m having login issues—I forgot to set a password for my user account, and now I’m stuck at the login screen.
Is there a way to access the terminal so I can set a password?
I completed steps 1-9, before going into 10, I exited chroot and rebooted.
It says, booting from disk
https://imgur.com/a/GrU5Zxa
I would like to try out Arch linux, i waste to much time with small details : keyboard setting azerty don’t find it.
Thanks anyway.
Hello, i’m on a laptop with integrated graphics. So what about Intel? Is it also built in?
Hi, I tried to name my partitions "nvme0p1", "nvme0p2", etc instead of vda1/vda2 because I am not installing to a virtual system and a little OCD about the naming. I replaced all mentions of vda with nvme in the commands but something is still looking for VDA after reboot.
I would guess you have a reference to vda in either:
/boot/loader/loader.conf
/etc/fstab
I think that many readers could benefit from more explanation about Secure Boot (a name).I also installed Linux on an OEM-laptop, that can be quite a challenge with Secure Boot enabled. You need to install another tool in order to load the bootloader. I forgot the name but this tool is the only tool which Microsoft its Secure Boot accepts so it has to be in between Secure Boot in the UEFI and the bootloader like GRUB, rEFInd or SystemdBoot. To disable SecureBoot on this specific laptop you first have to enter a password for the BIOS, otherwise the option to disable Secure Boot isn't even visible. Good luck guessing that. It might be useful to explain how to install Linux with Secure Boot on if the user can't disable it.
On the topic of an Arch install, mostly it is the same as doing another distro-install but you do everything vai the GUI. However, there are a few extra steps. I highly recommend people to at least do the first install the manual way and this while making sure that you understand what you are doing. It simply helps to maintain your system with more ease when you have already seen certain steps in the install process. In my opinion the user needs to understand on a helicopterlevel what mounting is and how to do it, what chrooting is, how to work with Systemd (or another initsystem) and it helps too if the user knows which software is on his system and he can easily work with pacman via the terminal but the last won't be learned with an Arch-install, that will come with using the system. Also there is value in making (dumb) mistakes. I made a few myself when I was still learning the basics. My funniest and also a pretty dumb mistake is that 1 time I had no sound because I made the .config-directory as the root user. PulseAudio couldn't do its thing because the root owned the directory and even after fixing that PulseAudio won't start itself. A less dumb mistake, the first Arch install I didn't know that you needed to start up the init-service for NetworkManager. There is value in making such mistakes so just install Arch yourself and learn from it and you will get more at ease being your own systemadministrator. Currently I easily keep my Arch system running for many years without any issue other than an occasional broken package which I don't control. Though pacman is a great packagemanager we do get broken packages occasionally. For example, in 2024 we had a broken kernel (segfault while compiling dwm, many users had this), broken glibc (compiled without support for the older hashing method, it broke games) and there was a bug in the kernel caused by a little mistake from an AMD-developer (> vs >=) which made some games not start up, AMD did not find out about this bug until people reported the problem because ironically Resizable Bar camouflaged it on newer systems (Zen3/Zen4 + RDNA2/RDNA3).
Well, when it comes to Secure Boot, the official Arch documentation clearly states:
That's a great guide, pure & back to basics – having used Arcolinux, Endevour and Archinstall. I would be very interested to see btrfs included as well.
It is probably better to just run archinstall 3.0.1 ( GitHub – archlinux/archinstall: Arch Linux installer – guided, templates etc. )
Hey, Arch enthusiasts!
The guide has been fully revamped with even more detailed explanations and some brand-new sections. Just like before, if you follow it step by step, one thing’s for sure—you’ll have a smooth and successful Arch installation. Happy Arching! 😀
How about a guide for us that prefer to use Legacy and not UEFI, how about us?
Well, the main difference lies in the booting mechanism and partitioning scheme. You can use the master boot record (MBR) partitioning scheme and GRUB as a bootloader, installed directly on the disk's MBR.
Since most users and modern hardware rely on UEFI and the GPT partition table, I aimed to make the guide as relevant and helpful as possible for the widest audience.
Great tutorial! I’m an absolute beginner at this, installing Arch on a virtual machine in Virtualbox running on Ubuntu Studio, to practice using command lines. However, while installing Gnome the installation stopped and I couldn’t get past that stage. Is this a known problem?
One thing I would add to this turtorial is for the Gnome instal;
sudo systemctl gdm start
sudo systemctl gdm enable
First time trying Arch, but long time Linux user so not an issue for me, but would be for a lot of people.
Great tutorial though.
ON KVM using Virtual Machine Manager I had to select “UEFI x86_64: /usr/share/OVMF/OVMF_CODE_4M.fd” for firmware instead of “UEFI”. “UEFI” just booted to the BIOS.
Just did the full install per your instructions. Took about 1 1/2 hours I would say (that is with a few breaks.) Had no real issues and I am now logged in and downloading neovim to it. Thank you!
what newbie could be bothered with all those commands when there are GUI installers in other distros
Your set-by-step guide was flawless. I appreciate the work that went into it.
You would not believe how many instruction posts end with disaster after spending 30 minutes following it.
Yours work like a charm, and that deserves this comment. Thanks !
Paul
Hey Paul,
Your comment made my day! 🙂
Thank you very much for sharing your opinion. I’m glad you found the guide helpful.
Best,
Bobby
Thanks for the great article, Bobby.
I tried using it to install Arch Linux in a virtual machine. It worked perfectly until the end when I realized my virtual machine was not set up to do UEFI boots. Have you (or could you) publish any similar instructions for installing Arch Linux to start from a non-UEFI boot?
I did everything exactly like in tutorial, but stuck at
“grub-install –target=x86_64-efi –bootloader-id=grub_uefi”, it just printed something (see link) and stuck, I am worried. Help please
Link to photo: https://drive.google.com/drive/folders/1dgH4cVUZKjcLLtu4Ib6c7valrUtcl6Qa
“EFI variables are not supported on this system.
EFI variables are not supported on this system.
grub-install: error: efibootmgr failed to register the boot entry: No Such file or directory.”
if you have this error and you are installing Arch on vmware workstation you need to this:
– first shutdown the VM
– then open .vmx file and add this to file: firmware=”efi” .
Just wondering if there’s a printer friendly arc Linux how to with just text so I can print it ahead of time and install
Hi Bobby, Thanks for the excellent explanation very detailed and nicely done with pictures. I wonder if you have faced this is issue where after installing gnome when I finally rebooted everything was fine except one thing. I could not open any programs. I kept trying to open “terminal” and it didn’t work.
Secondly, if I say install XFCE or KDE instead of Gnome should i install a login manager, separately ? I did no see you installing any, login manager with GNOME
The enabling EFI in VM is very important step. I tried to install Arch several times and each time I used to get stuck at the GRUB install menu. Since I was using and KVM in Gnome called Boxes ( which does not have and advanced mode) I was not able to enable that feature. Thus I would always get stuck. Finally I tried install arch linux in Virtual Box and it worked. If you must use Boxes or if you don’ want to enable efi then you can use some other bootloader like LILO to boot your system which woks fine.
I was successful creating a proxmox archlinux vm with uefi following these instructions. Set bios to OVMF (UEFI) and create a EFI disk in the VM settings. Once you are done following these instructions issue “poweroff” instead of “reboot” and remove the iso installation media and start the VM. It should boot from newly created grub efi partition.
Hi again.
I have installed successfully archlinux following this tutorial before.
I am installing it again in other pc but now the process is not going well this time, actually I repeated the full process twice.
In the point 8 (genfstab) is not genereting the expected output… I have created the partitions exactly like this guide suggest and when the /mnt/etc/fstab is generated it only shows /dev/sda3 (ext4) and /dev/sda2 (root and swap respectivly) but not /dev/sda1 (-F32, for boot)…
the fstab file shows the UUID of those partitions. When I run the command blkidI can see that /dev/sda2 and /dev/sda3 have normal UUID tags but /dev/sda1 has a short one (/dev/sda1 UUID=”61D6-B9f7″) while the other two UUID are a larger UUID… Could this be the problem?
Did I missing something?
What can be causing this?
Thanks.
Hi Bobby!
Hi everyone!
Great tutorial, thanks for this effort.
I have been following but I’m stuck in point 9:
# grub-install –target=x86_64-efi –bootloader-id=grub_uefi
The expected output is not showing up, instead I get this:
Installing for x86_64-efi platform.
EFI variables are not supported on this system.
EFI variables are not supported on this system.
grub-install: error: efibootmgr failed to register the boot entry: No Such file or directory.
** I’m installing the system natively on a macbook pro 13″ mid 2012
** The only different thing I did from this tutorial was the installation of the linux kernel in point 7:
# pacstrap /mnt base linux linux-firmware sudo nano
for linux-lts kernel:
# pacstrap /mnt base linux-lts linux-firmware sudo nano
I need some help to solve this.
Thanks in advance.
Hi,
Looks like the efivarfs kernel module was not loaded.
If you are chrooted in to your new install, exit out, and then try to enable efivarfs:
modprobe efivarfs
and then chroot back in:
arch-chroot /mnt
Once you back in, test again:
efivar-tester
This will no longer report an error, and you can install grub the same way you did before:
grub-install –target=x86_64-efi –bootloader-id=grub_uefi
Hi!
I finally solved it.
Like I said before, I was installing ArchLinux natively via usb drive.
The instruction I needed was the next one:
grub-install –target=x86_64-efi –bootloader-id=GRUB –efi-directory=/boot/efi –no-nvram –removable
That was all. The last part of configurations occurred normally.
Thanks!
Great article, I have never installed Arch before. Your write-up made it easy. Thank you for for making this.
Thank you for your kind words, John!
Hi Bobby,
Of course arch linux is very deferent distu.
but i had viewed a lot of tutorials for it even videos and i can say here is a very simple and pointed tutorial.
anyway thank you bro and really i appreciate your efforts.
have a good time.
Thank you for your kind words, Hudaiby!
It’s great that you are using Arch!
Hi,
Thank you so much for your instruction. I think Archlinux is installed but I have a problem with archlinux login. I don’t know what are my username and password. I didn’t change them while installing and creating the account, I mean I used the same username and pass as you used here (linuxiac) but it doesn’t work. Would you please let me know what should I do now?
Best,
Hi Zahra,
Thank you for using this guide!
Look again at the things described in step 11. With the line below you create the user account.
useradd -m -G wheel linuxiac
In this guide I’ve used ‘linuxiac’ for the username, but of course you can choose anything else you want, for example ‘john’.
Next you need to set a password for the newly created user account:
passwd john
However, if you forgot to set a password during the installation process, but you created one for the user root (step 8), you can boot your newly installed Arch Linux system, switch to terminal mode ‘Ctrl+Alt+F3’, ‘Ctrl+Alt+F4’ etc, login as user root and set a password for your user:
passwd linuxiac
Replace ‘linuxiac’ with the username you chose to create during installation.
Best,
Bobby
Hi Bobby,
Thank you so much for your response. It works. I have another question, I have found that I have made some mistakes during the installation process. Now I want to uninstall everything. Is there any command for uninstalling and deleting everything?
Best,
Zahra
Hi Zahra,
Glad to help! 🙂 My best advice is just to delete the whole installation and do it again. It’s best to do it a few times on a virtual machine so you can gain the experience and confidence you need. From there on, you’ll do it with ease.
Best,
Bobby
Yes, I agree with you but how can I uninstall it completely? When I turn on the system, it asks me about my login information, and then there is nothing except [root@archlinux ~]# which is waiting for entering something. Is there any command line that can do the installation?
Best,
Zahra
Pretty good guide for installing Arch. Of course you could make your partitions with gparted from a live distro to make it a little easier.
Beats me why folk are using the modern UEFI installation method and then installing old tech GRUB. The way to go is to use rEFind or EFISTUB or systemd-boot. Really folks this is 2021 not 1999 😉
How do I install KDE Plasma instead of GNOME? I’ve stopped at this point because I don’t want gnome.
Hi Dorian,
In order to install KDE Plasma instead of GNOME, please use the command shown below:
pacman -S plasma-meta plasma-wayland-session
Once installed, enable SDDM (Simple Desktop Display Manager):
systemctl enable sddm.service
Best,
Bobby
Thank you this worked
Wow! Best archlinux installation guide ever!
I was thrilled to see a concise and short Arch Linux install; however, after installing (virtualbox) there’s no internet connection. Even though ping -c 3 did work during the initial setup, it’s lost when you chroot into the system. No network tools are installed! Bummer.
Hi Michael,
Please make sure that you do not forget to execute the command mentioned in point 10:
systemctl enable NetworkManager
You can run the following commands after restarting the system to make the network connectivity automatically available:
sudo systemctl start NetworkManager
sudo systemctl enable NetworkManager
To install the network tools so that they are available immediately after installation, you can perform during installation (while you are in a chroot environment):
pacman -S net-tools
Regards
Thank you! I cannot believe I missed network manager. Installation is now complete with internet. I’m not a big fan of Gnome. So, I chose xfce. Only problem is I cannot get a display manager to work. I tried Slim and it errors. I guess I need to configure a conf file. Thanks again!
Glad to help. 🙂
Installing arch is not hard, just time consuming.
Follow the wiki.
Hit a problem.
Follow the wiki.
Hit a problem.
Follow the wiki.
Repeat until you can boot arch and your networking works.
Then you can keep incrementally fixing it every time anything goes wrong by… following the wiki.
What a garbage and mystification of installation. This returns us to stone age…
The best and simplest way is to download and run calam-arch-installer (from Surceforge) with all of this described in text above but with GUI way.
Enjoy!
Where is nano? Step “8. Configure the Installed Arch System”
bash: nano: command not found
Oh forgot the trailing sudo nano in pacstrap (was using instructions in https://wiki.archlinux.org/title/Installation_guide)
Fixed by installing missing package
pacman -S nano micro vim
I know that most people who in stall Arch want a minimal system or to control what is installed. However, Arch needs an install script or graphical installer that takes you through the install, and at the end of it you should have a working system where you have at least one user set up, and ALL of the system hardware is functional. Part of the install script or installer should let you install a GUI desktop of your choice and install it if you choose to.
I’m going to give you the benefit of the doubt here and assume this isn’t baiting the bear that is the Arch userbase, at least not deliberately.
Arch does have an install script shipped with it nowadays; you can start it with ‘archinstall’. There are dozens of guides that can walk you through that script. There are, however, a lot of people who want to install it the hard way like this, to understand what is involved in an installation process and have full control over it. You absolutely can use the archinstall script and I wouldn’t hold it against you (though there are many who will). This guide is for the traditional, manual method and I’ve found it’s very useful for that.
That was excellent, thank you. I’m a longtime Ubuntu and Linux Mint user and have always feared installing Arch. The only thing that would keep me from trying the steps in this tutorial is worrying how to keep my /home directory intact, which I have set up on a separate partition.
Why this difficult way. Every newby will be shocked. Better use the live system and start the installation with GUI from there?
Hi Marcel,
Arch doesn’t come with its own native GUI installer. Generally speaking, there is no such thing in Arch.
Of course, Arch-based distros such as Manjaro or EndeavorOS, offer exactly what you’re talking about.
Best,
Bobby
A good beginners’ tutorial! You could probably have mentioned *how* to find your timezone, which in my case I knew was Europe/Berlin – but maybe others don’t know that?
For dual boot (with Windows): I stopped after creating the EFI partition. If you install Windows first, it will install a 100MB EFI partition which would be usable (worked for me in a dual boot scenario for many years), but could be a bit small for more advanced stuff. After leaving the Arch installer, install Windows first, then make it smaller, then install Arch using the already created EFI partition (rest as you wrote).
For triple boot (which is what I did): do the dual boot steps like above, but leave /make room and more partitions. The Arch installer will not automatically detect other installed Linux distributions, so I would:
1. create that EFI partion like above
2. install indows, then make it smaller with its own tools (disk manager)
3. create more partitions with the Arch installer (I used separate swap and root for each)
4. install Arch as described in this nice guide
5. install your second Linux (in my case, Debian Bullseye) which will detect the already installed Arch and won’t touch it
Cheers,
Wolfgang
Hi Wolfgang,
Thank you very much for your remarks. An explanation has been added especially for the time zones.
You can use the os-prober command that lists other operating systems. It is used during installation and reconfiguration to create a GRUB boot menu that shows other installed OSes.
Then just regenerate GRUB with:
grub-mkconfig -o /boot/grub/grub.cfg
Тhank you again for your valuable explanations!
Best,
Bobby
U FORGOT TO MOUNT THE EFI PARTITION
Hi,
The EFI partition mount is specified in point 9:
mount /dev/sda1 /boot/efi
Regards
Hi, thanks for your excelent tutorial! I have a question, when I run point 8 (genfstab -U /mnt >> /mnt/etc/fstab) , the fstab file does not included or added the /boot/efi partition, only swap and root partition. When I rebooted, it works perfectly but does not mount /boot/efi. It’s that ok or I needed to mount manually this partition to fstab file? Thanks
The problem is that in this guide the efi partition is mounted after the creation of fstab file. We need to mount efi at the begining when mounting other partitions.
Hi Roberto,
It’s OK and you should have no worries.
If you mounted your EFI partition during installation, and set it to /boot/efi, it’s not going to be an issue.