
This guide has been completely rewritten using wg-easy as the foundation since it’s an actively maintained project and is much easier to use. The old version was based on wireguard-ui, which no longer seems to receive support.
WireGuard is one of the best VPN choices for self-hosting enthusiasts who want reliable and secure communication. It encrypts your internet traffic and routes it through a private network, making it impossible for anyone to intercept your data.
What makes it such a popular and preferred choice? It’s simple – compared to most options, WireGuard offers reliability, simplicity, speed, and security, hard to beat. However, setting it up from scratch can be a complicated process. For example, here’s how to do it on Ubuntu.
And here is the moment where wg-easy steps in. It’s a free and open-source tool designed to simplify the deployment and management of a WireGuard VPN server, providing a user-friendly web-based interface that streamlines the configuration and management of WireGuard connections.
In this guide, I’ll show you how to set up WireGuard using wg-easy with Docker Compose, making it as simple as possible for you to configure and manage your VPN server and clients.
By the end, you’ll have a fully functional VPN solution with an easy-to-use web-based management interface. Trust me, if you follow the steps below, you’ll have everything set up in just 20–30 minutes. Yes, it’s that easy with wg-easy.
But before we proceed to action, let me briefly introduce a bit of theory to help you better understand wg-easy and WireGuard and how they relate to each other.
- WireGuard + wg-easy: A Match in Heaven
- Step 1: Ensure You Have Docker and Docker Compose Installed
- Step 2: Set Up WireGuard VPN Server & wg-easy with Docker Compose
- Step 3: Run the Container with Docker Compose
- Step 4: WireGuard VPN Server Initial Setup
- Step 5: Create a New WireGuard Client Configuration
- Step 6: Setting Up WireGuard Client
- Conclusion
WireGuard + wg-easy: A Match in Heaven
First and foremost, it’s crucial to understand that wg-easy contains and runs WireGuard, but it does so indirectly, with the help of the host system.
The core WireGuard functionality — meaning the actual VPN engine — is still handled by the Linux host because WireGuard itself is a module built directly into the Linux kernel (wireguard.ko) or a cross-platform user-space implementation (wireguard-go) for systems where the native WireGuard kernel module is unavailable.
In simple terms, wg-easy “orchestrates” WireGuard, handling all the complicated tasks, such as setting up firewall rules, managing the VPN interface, maintaining WireGuard server/client configuration files, etc., with just a few simple clicks.
However, if your Linux distribution doesn’t have WireGuard’s module available in the kernel, wg-easy alone won’t work properly because it doesn’t include a WireGuard kernel module inside the container. It just uses this module, which must already be available on the host operating system.
The good news is that kernel 5.6 (released in March 2020) and later versions include it by default. This means that, almost certainly, the distribution you are going to install WireGuard and wg-easy on already has everything you need to move on. Of course, you can always check your kernel version by running uname -r in the terminal.
Okay, I think that’s enough as an explanation. Now, let’s move on to the actual installation.
Step 1: Ensure You Have Docker and Docker Compose Installed
Docker is a platform for creating and running applications in lightweight containers, which makes deploying and managing software much more effortless.
At the same time, Docker Compose, which can be thought of as an add-on to Docker, is a tool used for defining and running multi-container Docker deployments “packaged” as a single application or running a single container more conveniently and descriptively, using “docker-compose.yml” files so that we will use it in that case.
The first step is to ensure that Docker is installed on your machine. The easiest way to do this is by running:
docker --versionCode language: Bash (bash)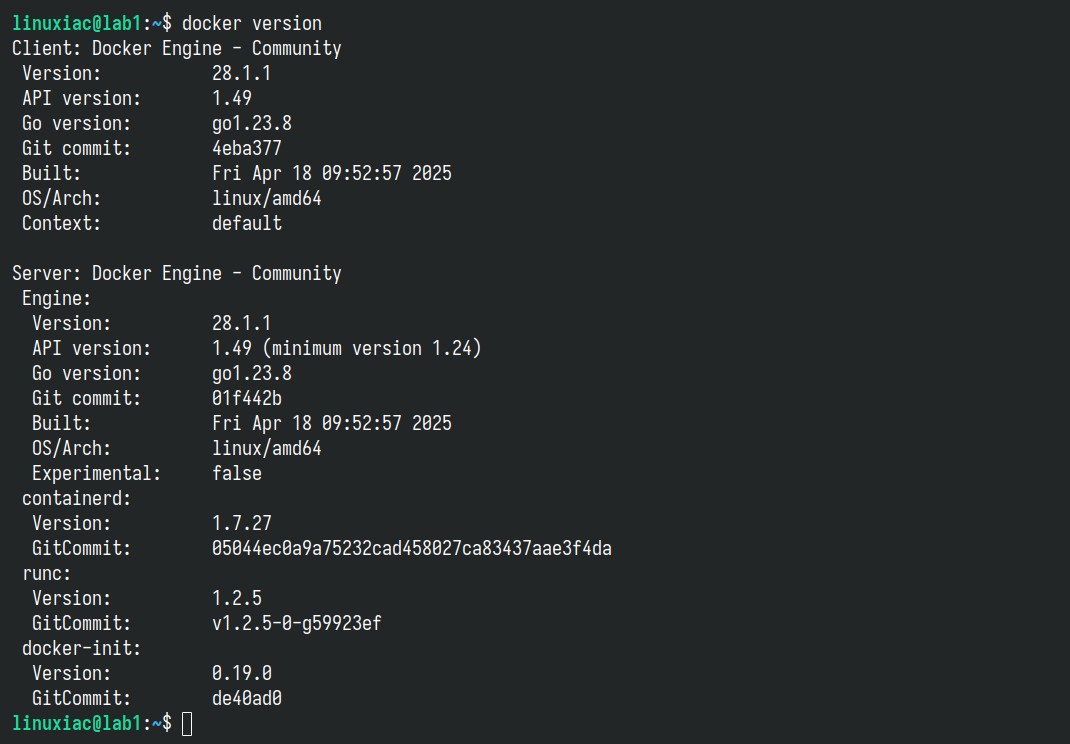
If you receive a message like the one above, all is well. You have Docker installed on your system.
However, if you get something like “bash: docker: command not found…” in response, there’s no room for worry. We’ve got you covered. Our detailed guides on installing Docker on Ubuntu, Debian, Arch, Linux Mint, Fedora, AlmaLinux, Rocky Linux, and Raspberry Pi will help you get it up and running on your system quickly and easily.
The next step is to ensure that Docker Compose is also installed on your system. Similar to the above example, run:
docker-compose --versionCode language: Bash (bash)
If the command output is similar, congratulations! You have everything you need to install the WireGuard VPN server with the wg-easy web interface by using Docker Compose.
However, if the message is something like “bash: docker-compose: command not found…” just run the two commands below, and you will have Docker Compose installed on your system in seconds.
sudo curl -L "https://github.com/docker/compose/releases/latest/download/docker-compose-linux-$(uname -m)" -o /usr/local/bin/docker-compose
sudo chmod +x /usr/local/bin/docker-composeCode language: Bash (bash)
In that case, remember, when running the tool, to type docker-compose instead of docker compose.
Additionally, to be clear, Compose only works if Docker is already installed and running. For an in-depth introduction, check out our comprehensive guide.
Step 2: Set Up WireGuard VPN Server & wg-easy with Docker Compose
As we already said, Docker Compose allows you to deploy containers by using a “docker-compose.yml.” So, first, create a “wireguard” directory and switch to it.
mkdir wireguard
cd wireguardCode language: Bash (bash)
Then, using your preferred text editor, create a file named “docker-compose.yml” (inside the “wireguard” directory):
vim docker-compose.ymlCode language: Bash (bash)Add the following content, then save and exit the file.
services:
  wg-easy:
    environment:
      - INSECURE=true
    image: ghcr.io/wg-easy/wg-easy:15
    container_name: wg-easy
    restart: unless-stopped
    networks:
      wg:
        ipv4_address: 10.42.42.42
        ipv6_address: fdcc:ad94:bacf:61a3::2a
    volumes:
      - ./data:/etc/wireguard
      - /lib/modules:/lib/modules:ro
    ports:
      - 51820:51820/udp
      - 51821:51821/tcp
    cap_add:
      - NET_ADMIN
      - SYS_MODULE
    sysctls:
      - net.ipv4.ip_forward=1
      - net.ipv4.conf.all.src_valid_mark=1
      - net.ipv6.conf.all.disable_ipv6=0
      - net.ipv6.conf.all.forwarding=1
      - net.ipv6.conf.default.forwarding=1

networks:
  wg:
    driver: bridge
    enable_ipv6: true
    ipam:
      driver: default
      config:
        - subnet: 10.42.42.0/24
        - subnet: fdcc:ad94:bacf:61a3::/64Code language: YAML (yaml)
Before we move on, let me clarify a couple of things about the deployment setup shown above. Specifically, this part:
environment:
  - INSECURE=trueCode language: YAML (yaml)
This line is only necessary if you plan to access the wg-easy web UI over an unsecured HTTP connection, which, to be clear, is not recommended. This setting is meant for testing purposes only. You should not use it in a real production environment.
Here’s the catch: when you first deploy wg-easy, it walks you through an initial setup wizard (shown below) to create your admin username and password and set up some configuration settings. However, if “INSECURE=true” isn’t set, and you’re not using HTTPS, you won’t be able to log in—because by default, wg-easy disables login over plain HTTP.
To keep this guide simple, I’m using “INSECURE=true” so you can get through the initial setup without needing HTTPS right away. But once you’re ready for real-world use, place wg-easy behind a reverse proxy, such as Nginx Proxy Manager, Caddy, Traefik, etc., that provides secure HTTPS access. That way, you can safely remove “INSECURE=true” (by removing the entire “environment” snippet) from your “docker-compose.yml” and log in securely via the web UI.
Leave the IP addresses “10.42.42.42” and “fdcc:ad94:bacf:61a3::2a ” as they are. These fall within the private network ranges, so they’re perfectly safe and well-suited for internal IPv4 and IPv6 use.
Also, port 51820, which WireGuard uses, must be open and accessible from the Internet. If you’re running any firewalls, make sure this port isn’t being blocked. As for port 51821, that’s the one the wg-easy web interface lives on. I highly recommend locking it down—ideally, only trusted IP addresses should be allowed to access it.
Finally, it is essential to note that the Docker volume preserving the WireGuard configuration settings (“data“) will be created and made available in the current “wireguard” directory. If you want it somewhere else, modify the file above, for example, “/srv/my-wireguard-conf:/etc/wireguard.”
Step 3: Run the Container with Docker Compose
Okay, we are ready to run our WireGuard VPN server using Docker Compose. To do this, execute the following command from the current “wireguard” directory where the “docker-compose.yml” file is located.
docker compose up -dCode language: Bash (bash)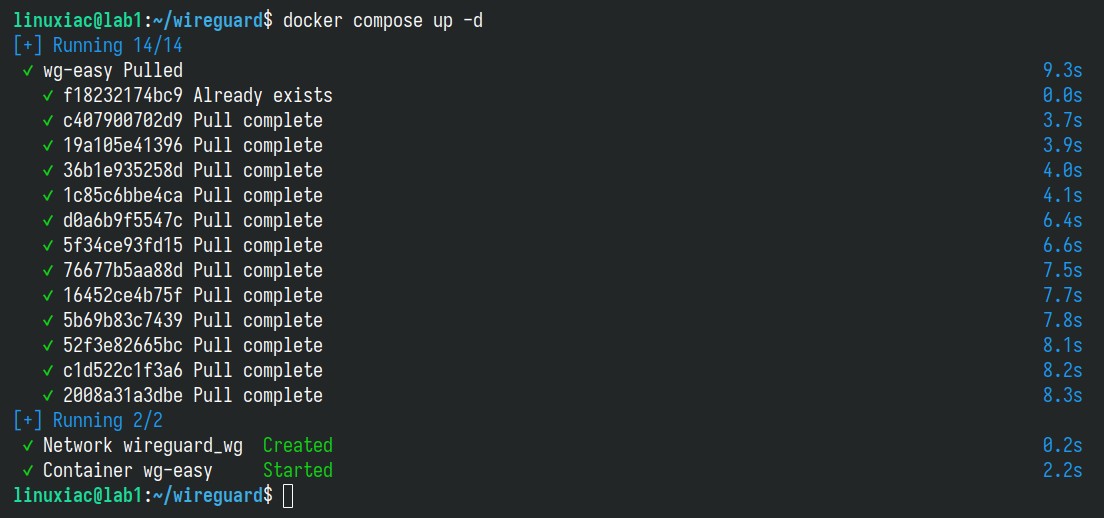
The Docker image will start downloading. At the end, you should see a screen similar to the one above confirming that your wg-easy installation has been successfully deployed and that the container is up and running.
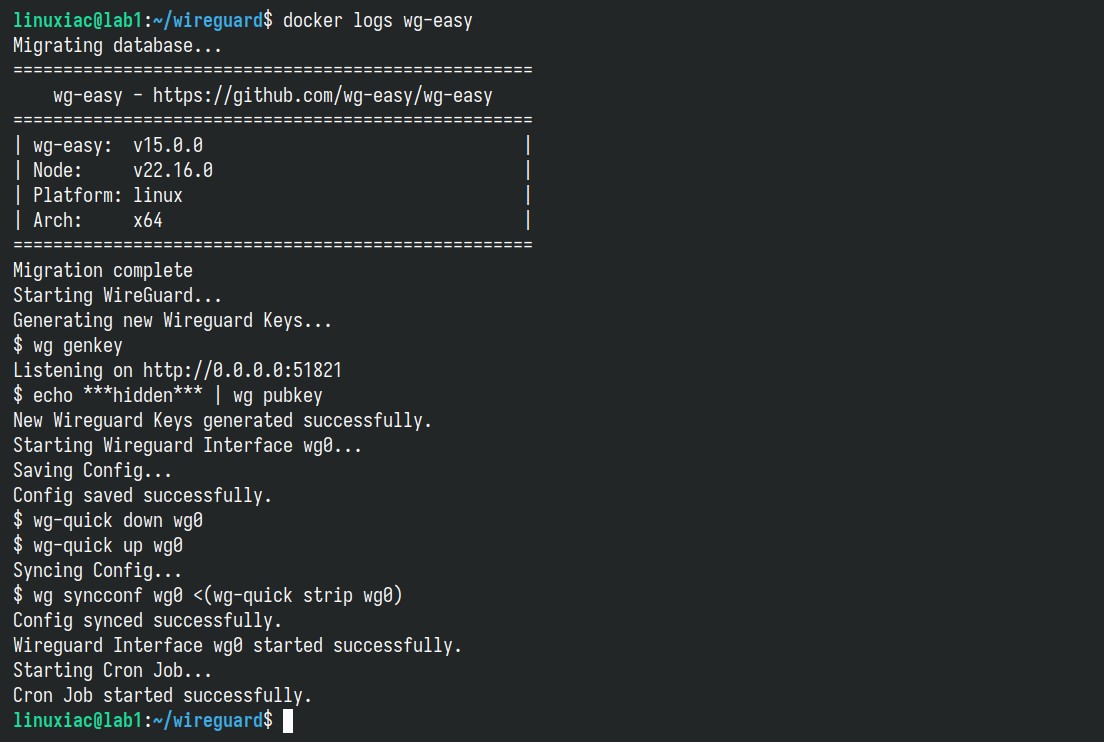
However, if something goes wrong (for some reason), no worries—you can quickly figure out what’s going on by checking the container logs.
docker logs wg-easyCode language: Bash (bash)If everything’s running smoothly, the output should look something like this:
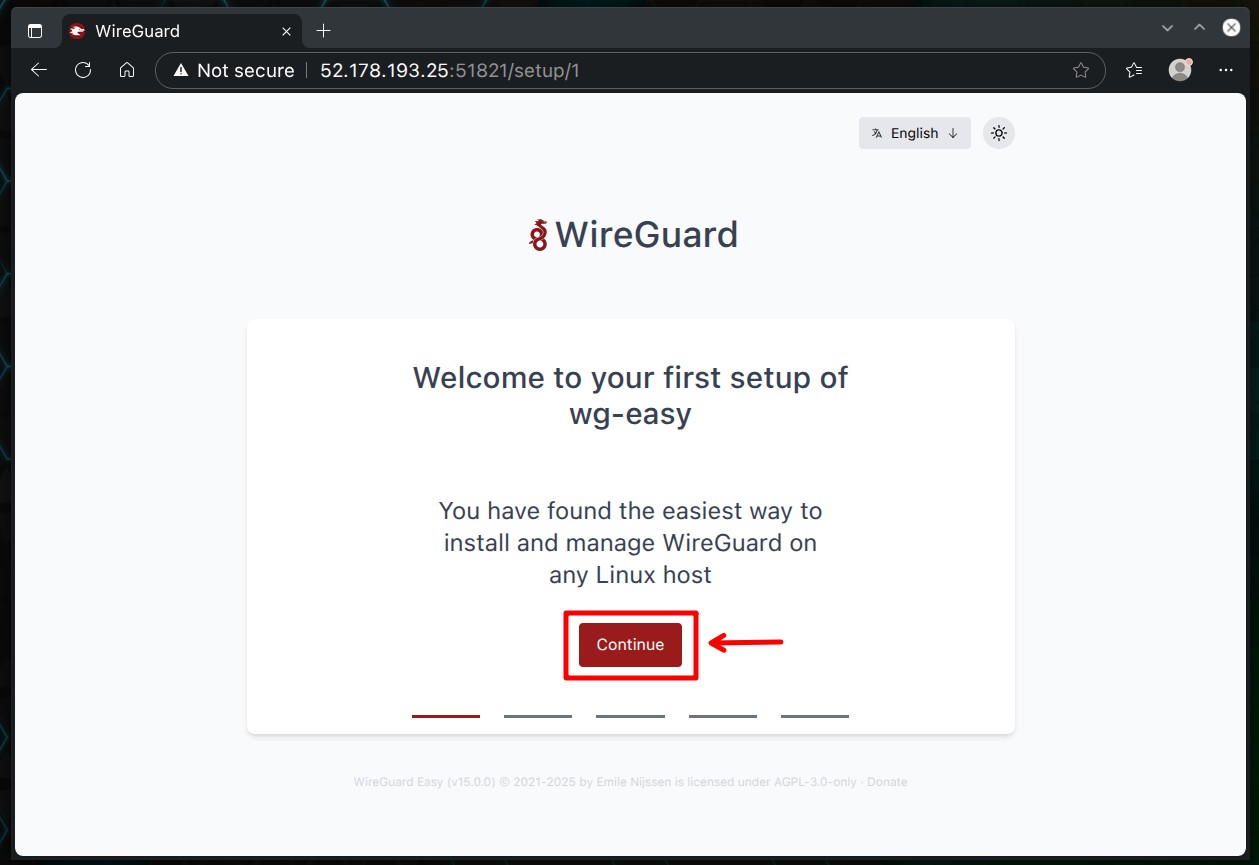
Step 4: WireGuard VPN Server Initial Setup
You can now open your browser and navigate to “http://server-ip-address:51821.” You’ll see the wg-easy setup wizard screen. Just click “Continue” to move forward.
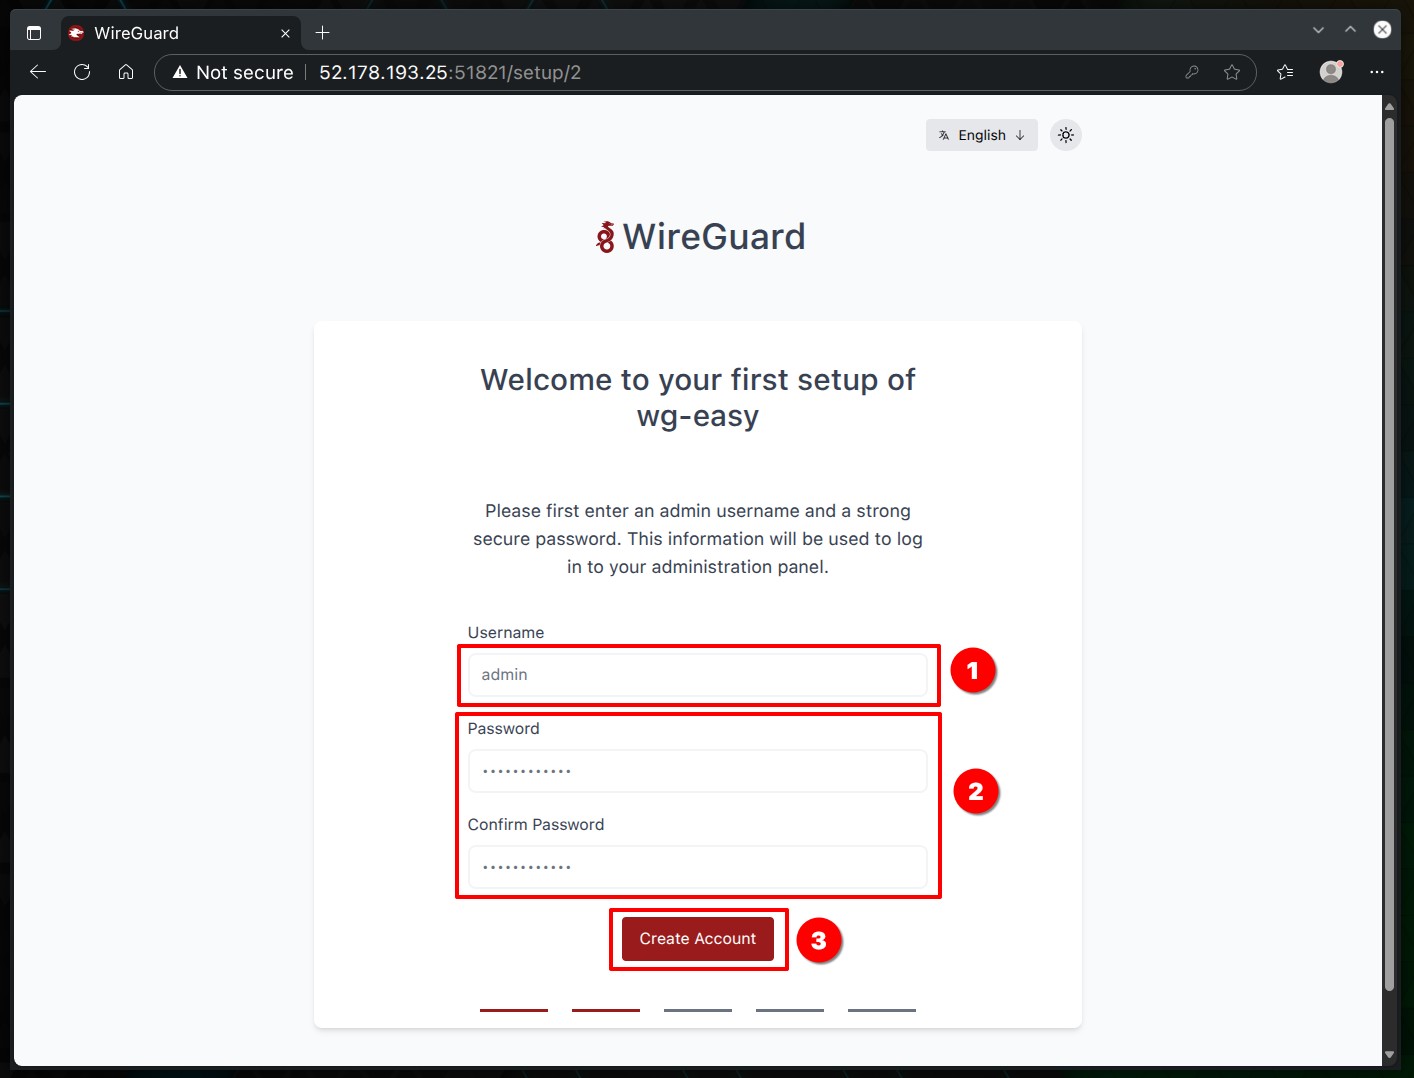
The next screen is where you’ll set up your administrator account. Choose a username and a password (the password must be at least 12 characters long), then click the “Create Account” button to continue.
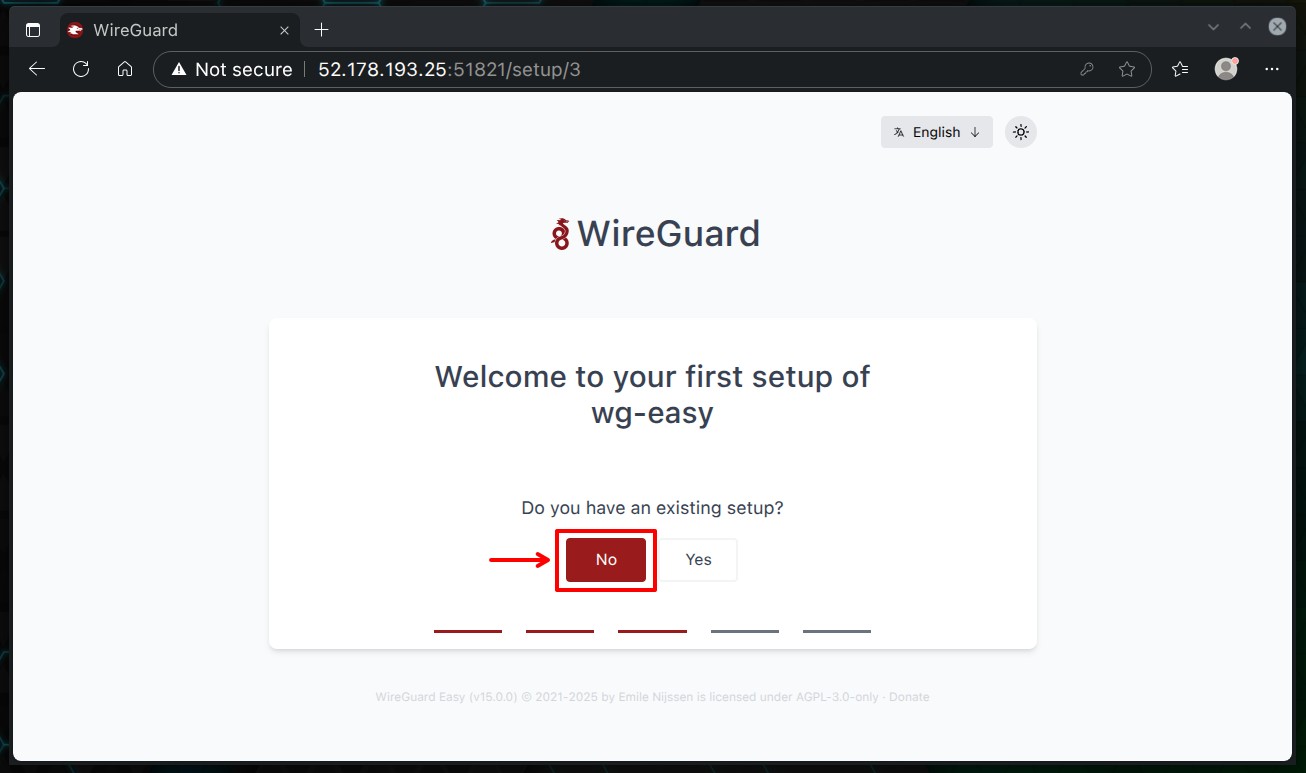
Since this is an inline installation, go ahead and choose “No” on the screen below — meaning we’re not importing any existing WireGuard settings.
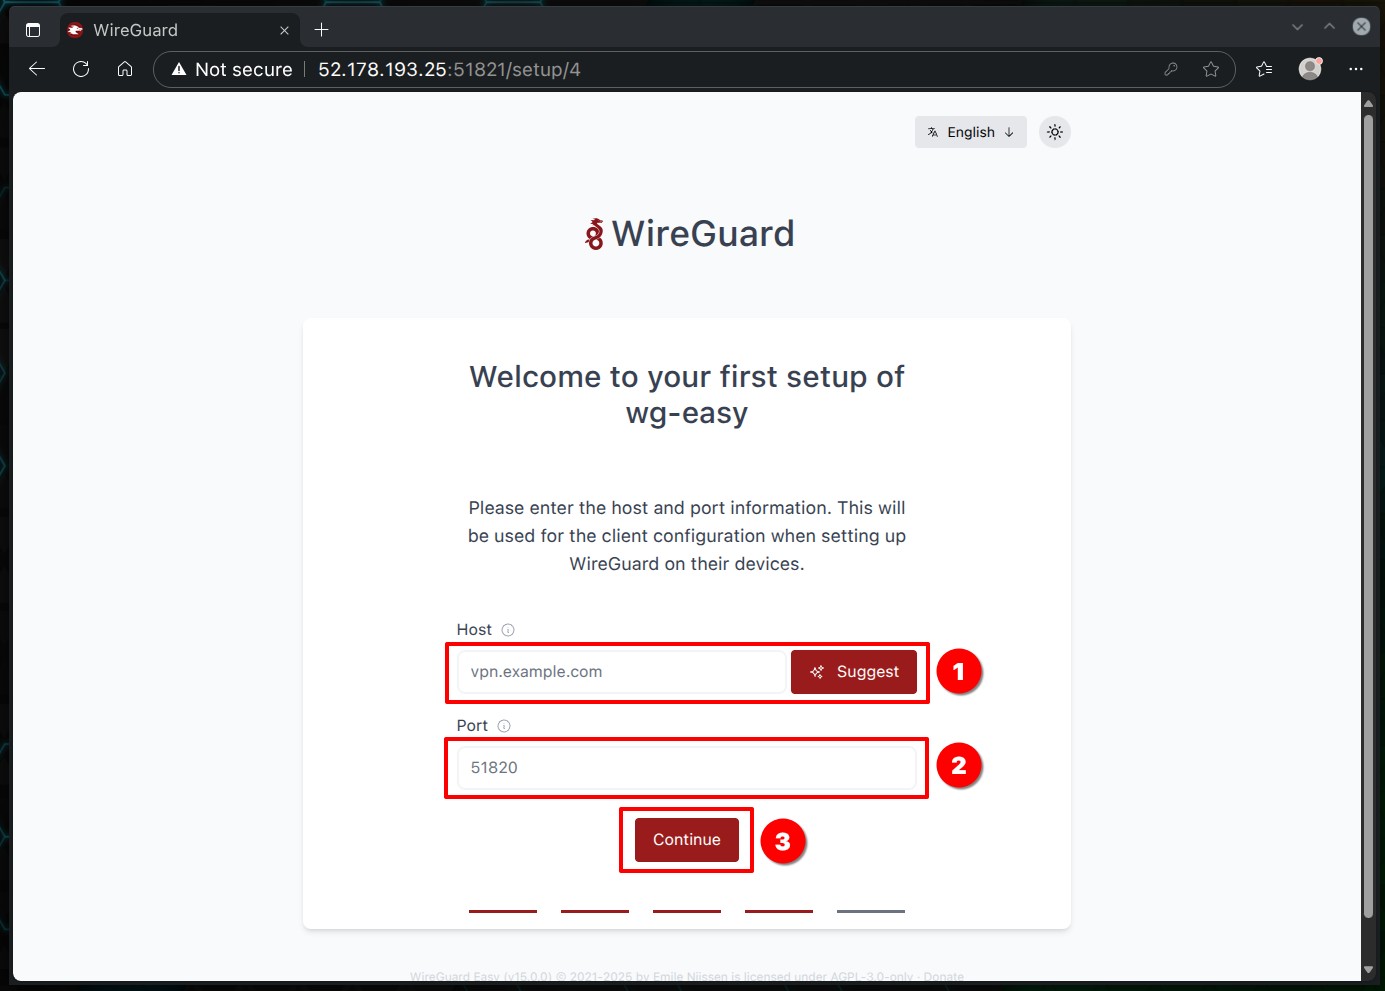
On the next screen, type in the public IP address of the server — the one that’s reachable from the internet, where you set up wg-easy. Of course, if you control a domain name—for example, “vpn.example.com“—you can use it as a valid FQDN instead of an IP address (which is actually the recommended approach for production deployment).
Keep port 51820 the default, then click the “Continue” button to move on.
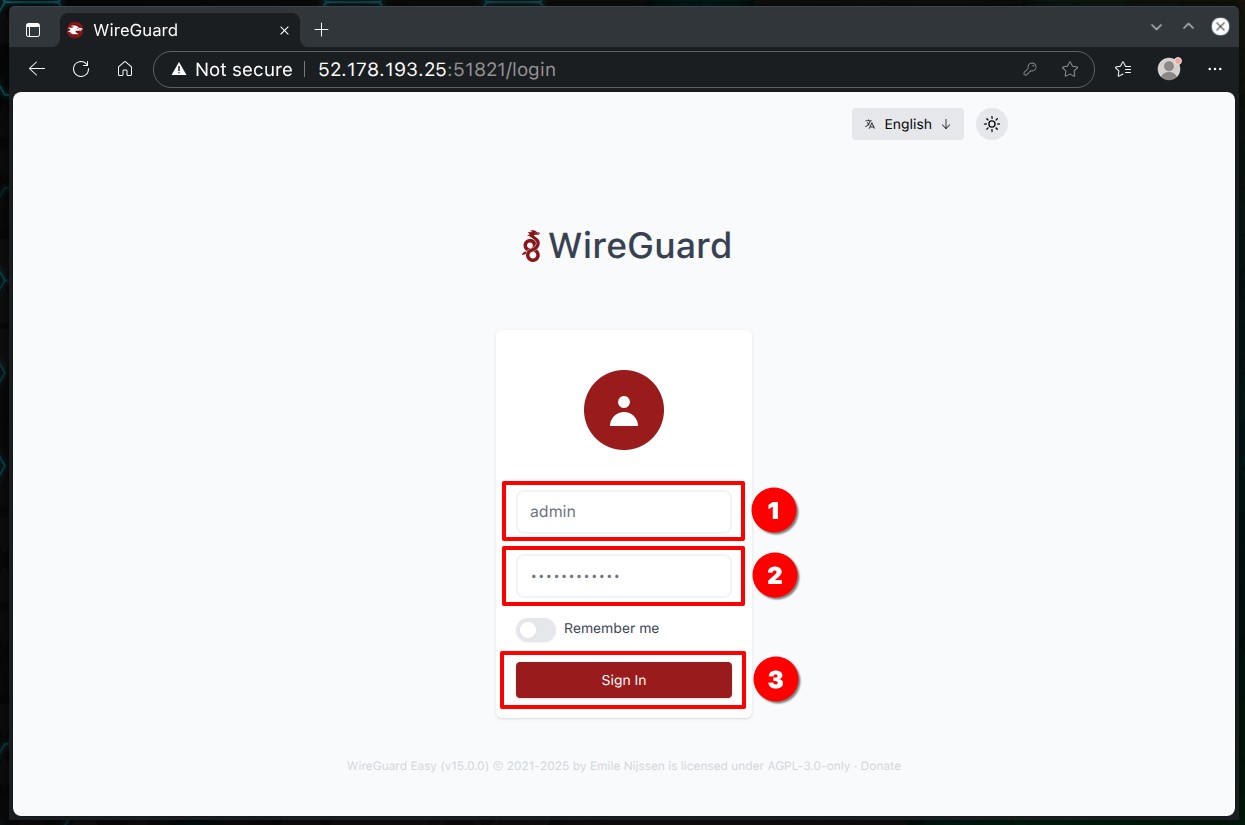
That’s it — you’re all set with the initial setup! Just click “Sign In” to head over to the login screen.

Enter the username and password you created in the previous steps, and log in to the wg-easy admin web interface.
Step 5: Create a New WireGuard Client Configuration
Click the “+ New Client” button to set up the configuration for your first VPN client, which will connect to the WireGuard server to establish a VPN connection. In a moment, I’ll show you how to import it onto your workstation or mobile phone.
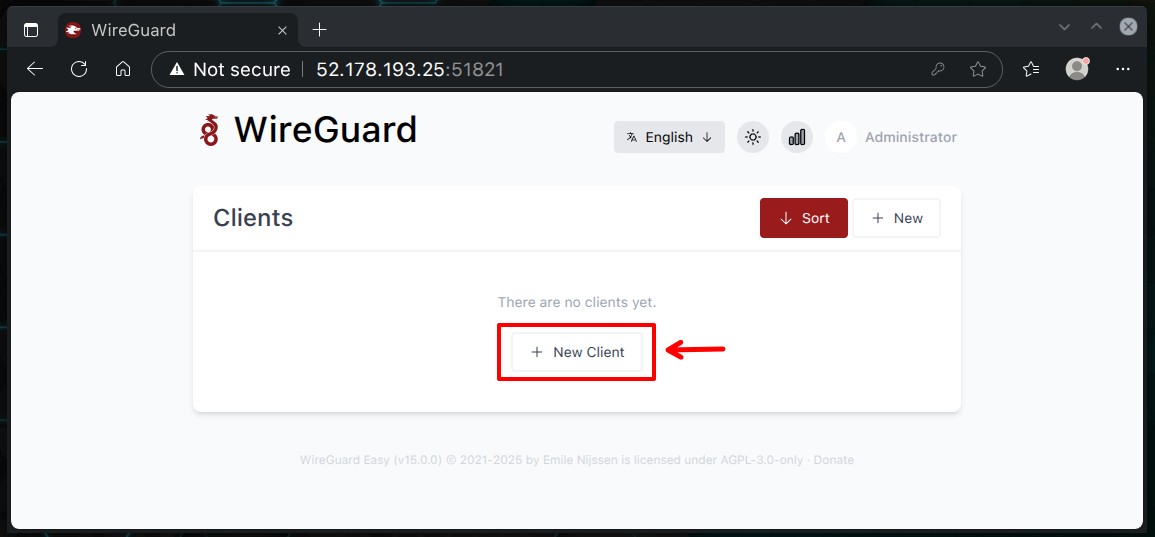
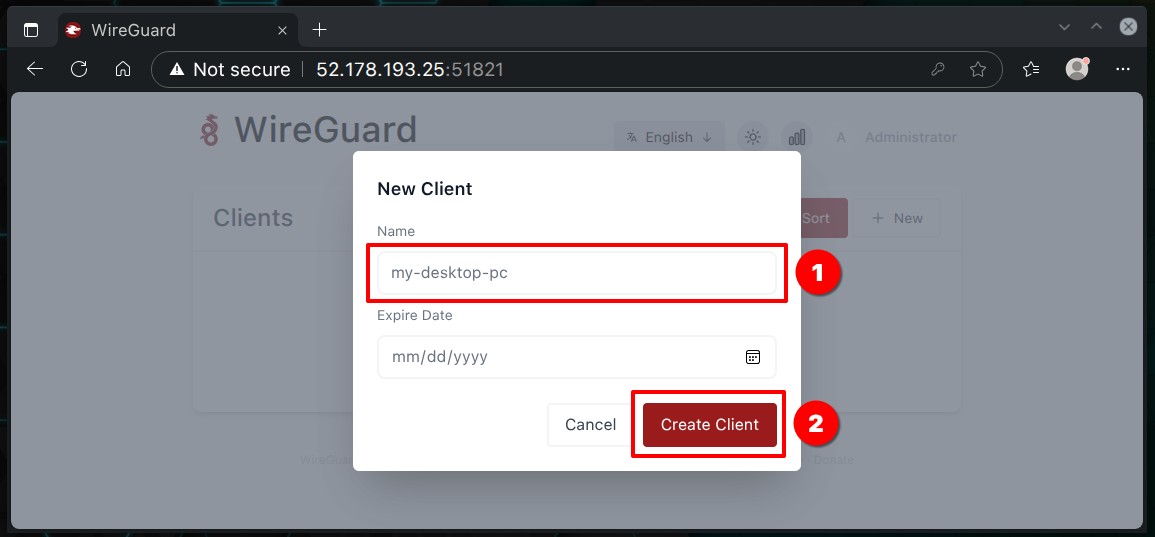
In the opened modal window, type a name for the WireGuard client. Leave the “Expire Date” field empty—unless you want to set a specific date after which the VPN client won’t be able to connect to the server anymore. Finally, click the “Create Client” button.
This is where the real magic of wg-easy shines. It automatically takes care of everything you need to set up the WireGuard client behind the scenes. And trust me, that’s no small task — generating public and private keys, setting up the IP range and addresses, configuring the DNS server used, firewall routing rules, specifying the endpoint server, and more.
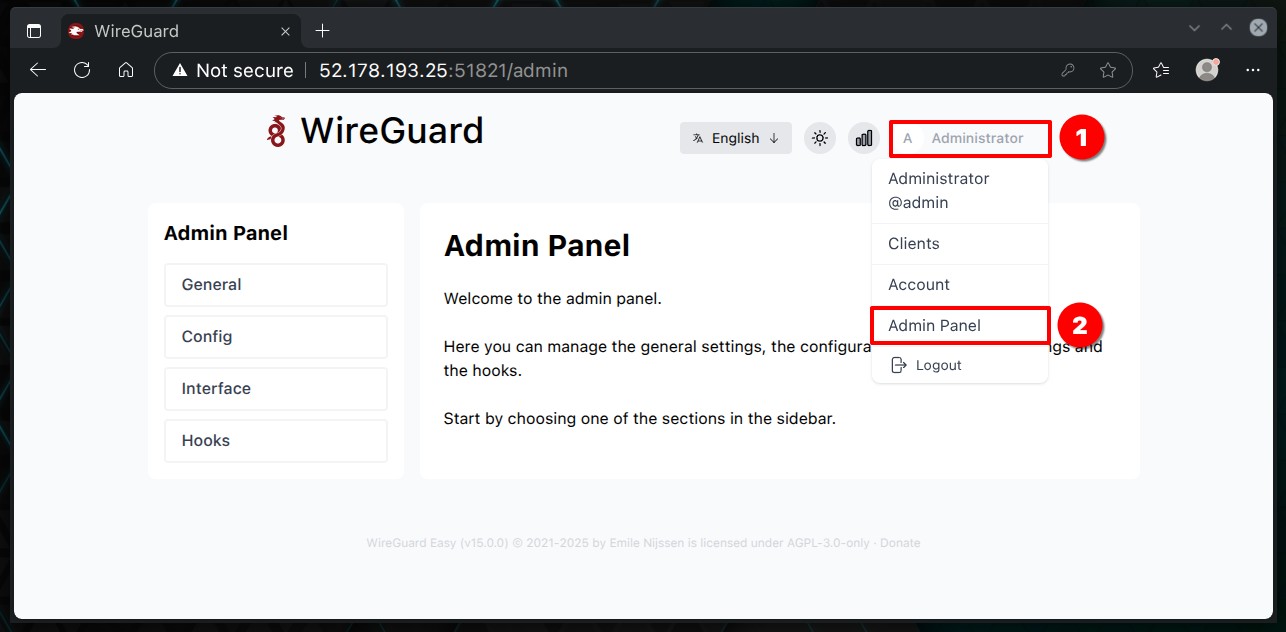
Of course, you can also manually take care of any of the tasks mentioned above through the admin panel. Head to the “Administrator” menu in the top-right corner and select “Admin Panel” from the dropdown. However, since these settings go beyond the scope of this guide, we won’t be covering them here.
I’ll just mention that they’re a powerful, convenient, and flexible way to fine-tune your WireGuard VPN server. But – if you opt for them, ensure you know what you’re doing.
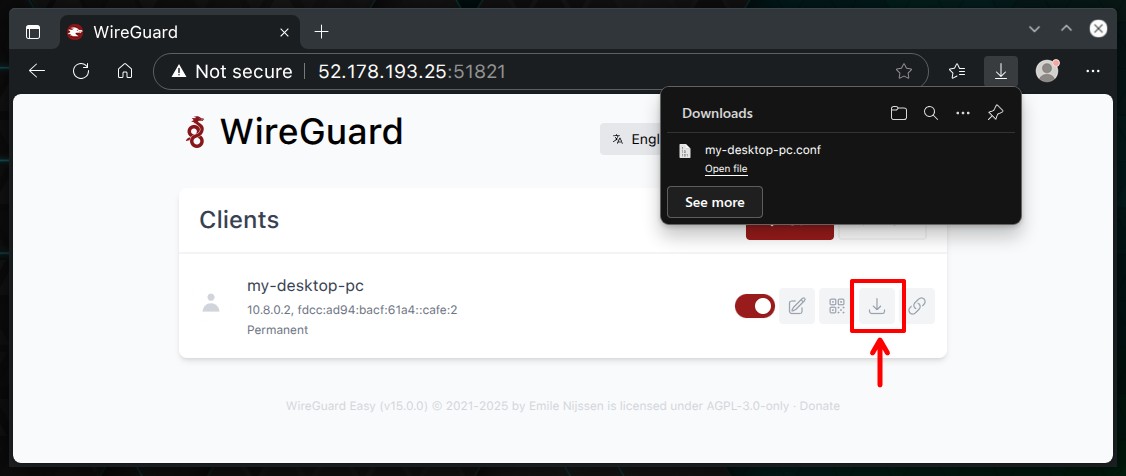
Now, let’s move on to one of the most exciting parts — the WireGuard client configuration file. You only need to click the download button to grab it. It’ll save a file locally on your computer, like in the “my-desktop-pc.conf” example below.
Next, it’s time to take a look at how to import this file into the device we want to securely connect to the WireGuard server to keep our online presence safe and private.
Step 6: Setting Up WireGuard Client
This is, without a doubt, the most exciting part for a simple reason—it’s when we’ll see the results of our efforts so far, setting up the client and connecting it to the WireGuard VPN server.
From here on, the approach is specific as to whether we will initiate an encrypted VPN connection from a mobile device, such as a phone or tablet, or a desktop workstation, laptop, etc. I’ll cover both cases.
Connecting to WireGuard from a Linux PC using Network Manager
Importing the file is super easy with NetworkManager’s command-line tool, nmcli. Just run the command below, making sure to use the path to your WireGuard client configuration file as the final argument.
nmcli connection import type wireguard file my-desktop-pc.confCode language: Bash (bash)
Go and look at the available network connections on your Linux system – you will see that our new WireGuard VPN connection is added and ready to use. Connect and enjoy a private online presence.
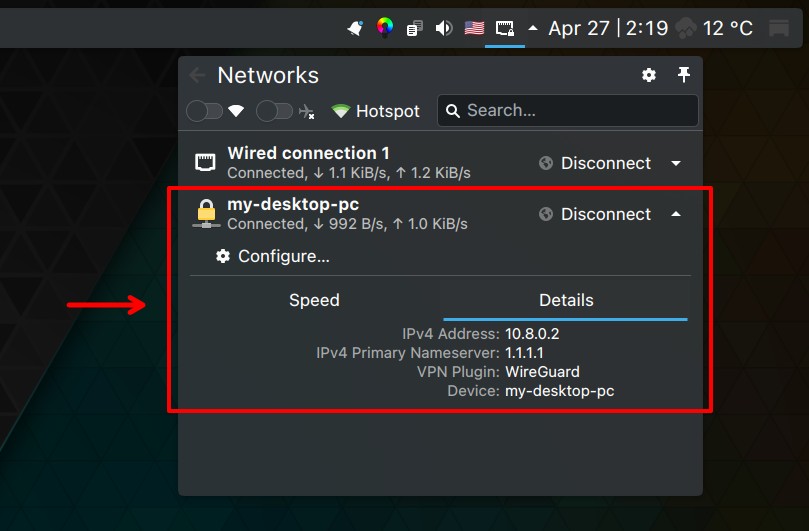
To ensure everything works properly, send a ping from your desktop (WireGuard client) machine to the WireGuard server’s private network address (10.8.0.1 by default).
ping -c 3 10.8.0.1Code language: Bash (bash)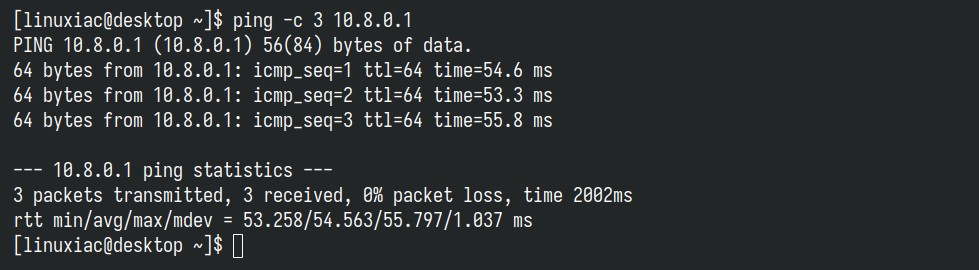
Something here is the moment when you have every reason to congratulate yourself because your WireGuard VPN tunnel is working as expected.
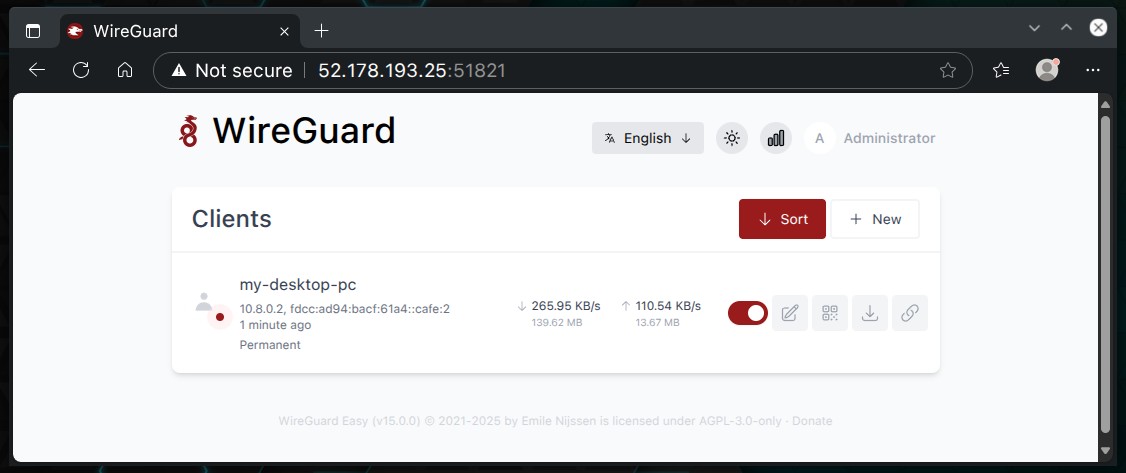
If you head back to the wg-easy interface, you’ll see a small dark red dot blinking next to the avatar for the profile you just connected. That’s your sign that the client is online. You can also double-check by looking at the data transfer stats — they won’t be stuck at zero anymore.
Flip the toggle switch off to stop the client from communicating with the WireGuard VPN server.
Connecting to WireGuard from a Windows PC
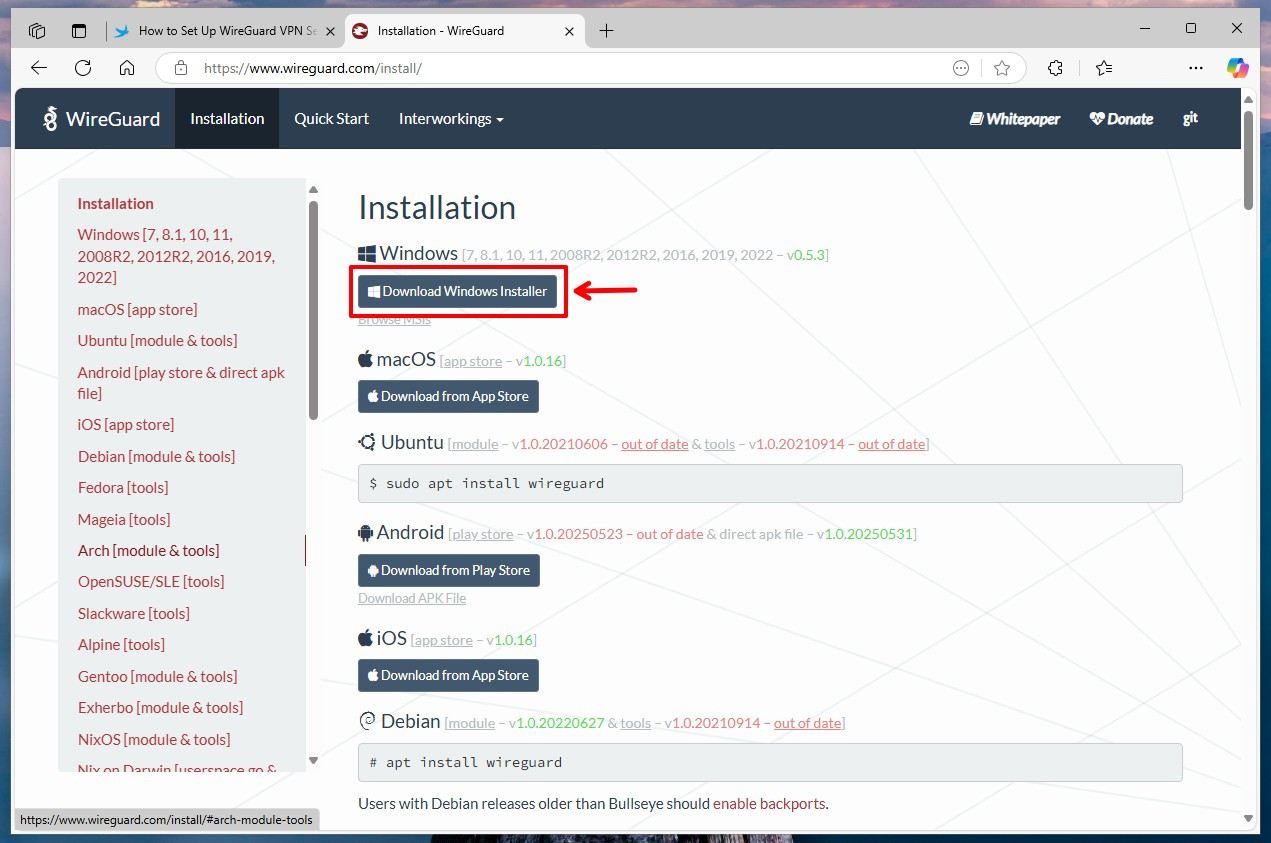
To connect a Windows computer to your VPN server, go to the WireGuard download page and click the “Download Windows Installer” button. After the download finishes, install WireGuard’s Windows client.
The app will then open automatically. Just click on “Import tunnel(s) from file” and find the file you downloaded from the wg-easy web interface for your WireGuard client. Once you select it, the tunnel will be imported automatically.
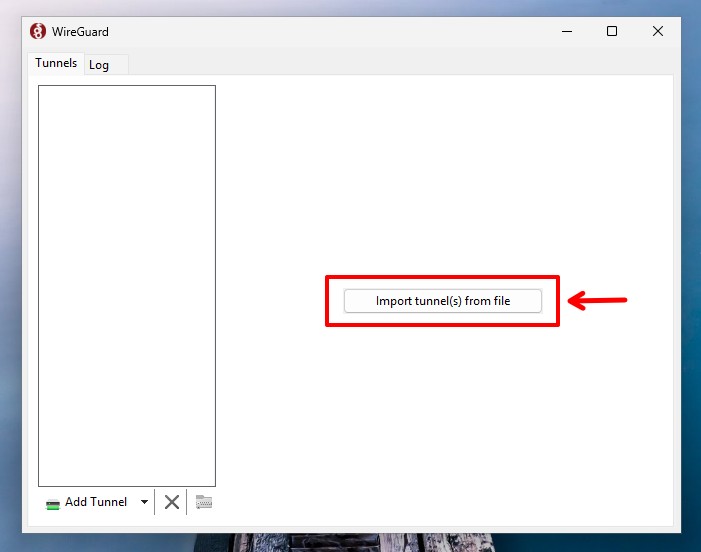
Finally, just press the “Activate” button.
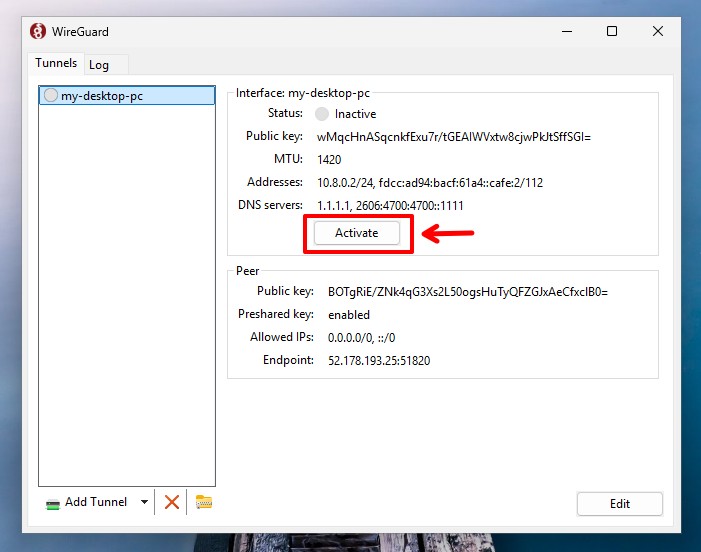
Enjoy a secure and private online experience.

Connecting to WireGuard from a Mobile Device
Things are considerably easier when you need to connect your mobile device to the WireGuard VPN server. You only need to download the official WireGuard client for your operating system. iOS users should visit the Apple App Store, while Android users should go to the Google Play Store.
After installing the app on your mobile device, from the wg-easy UI, click the corresponding user’s “Show QR Code” button, which displays the QR code containing all the information required to import WireGuard’s VPN profile.
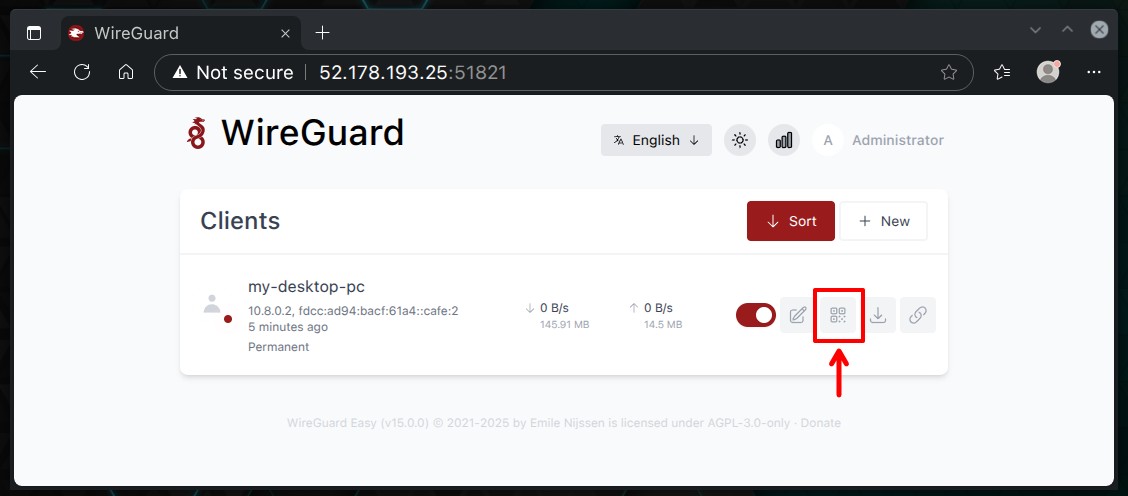
Next, open the WireGuard app on your mobile device, select “Add a tunnel,” then “Create from QR code.” Scan the code displayed on the monitor screen, and that’s it. The profile will be imported automatically.
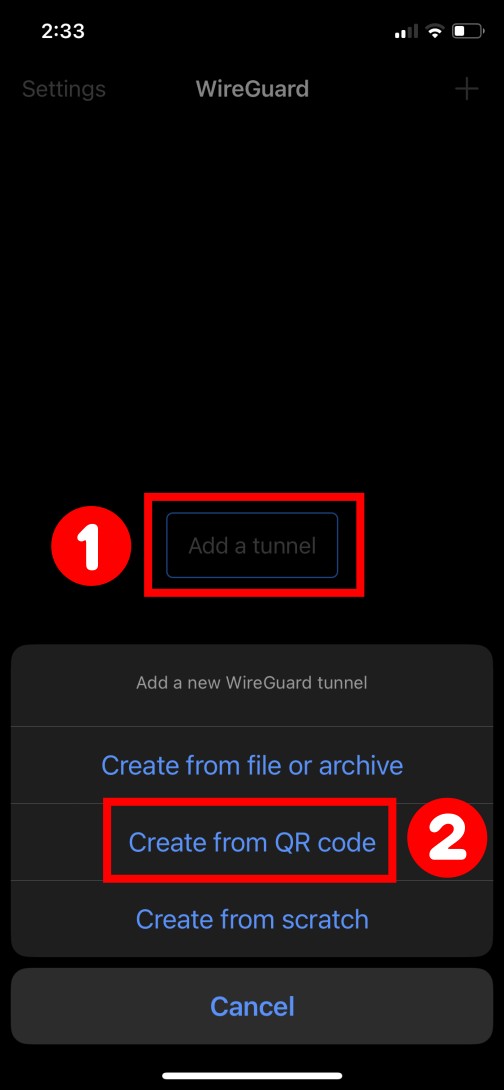
Then, switch on the profile, and your device will connect to the WireGuard VPN server.
Conclusion
Well, that’s all from me for now, folks. With its modern cryptography, simplicity, and high-performance capabilities, WireGuard has quickly become a go-to choice for VPN solutions, appealing to countless Internet privacy advocates and businesses that want to protect their personal and confidential information from prying eyes, hackers, and cybercriminals.
If you’d like to customize your WireGuard server even further with various additional options, you can check out all the details here.
Thank you for using this guide and for your time! I hope I have been helpful. Any opinions and comments are most welcome in the section below.


This is by far one of the best tutorial for Wireguard docker install since you properly explained everything including the ports and how some of the environment variables affect the access and future setup. I did mine without the “INSECURE = true” and just set Apache reverse proxy with my own subdomains then set HTTPS using certbot before accessing the web-based setup.
Thanks!
Hey folks,
I’ve completely rewritten this, focusing on wg-easy as the go-to solution for setting up WireGuard. It’s incredibly simple to use and works seamlessly right out of the box. The previous version of the guide was based on wireguard-ui, but unfortunately, that project hasn’t received an update in quite a while.
With this new approach, if you follow the steps outlined here, you should have WireGuard up and running in no time, without any headaches.
Thanks! I have been banging my head against the wall trying to get WireGuard working using the linuxserver.io wireguard docker image and got nowhere for hours. Using your guide and thanks to the wg-easy docker image I hadup and running in minutes.
This might be a dumb question, but is WireGuard essentialy a free VPN? I have been trying to create a QBitttorrent docker container along with a VPN docker container (using TorGuard and WireGuard), to route the QBittorrent traffic through the VPN and while this tutorial doesn’t help with that exact problem, it’s really interesting to see that it seems like you don’t need anything other than WireGuard, is that correct?
I followed this to the letter 3 times and no server page appears myserverip:5000
I have similar issue, can connect but no surfing or accessing my internal devices. Where do I have to apply this static route? Thanks!
Me again, sorry! Followed your tut, everything seems to work, I can connect to Wireguard server but I can't surf the web nor reaching any of my devices in my internal network. What I'am missing? Thanks!
Thanks for the tutorial! I have no static public IP, it changes from time to time. How can I implement a DDNS-Domain into the config? Thanks in advance!
Same for me, this is the log lines:
Does anybody find a solution to this?I think I’ll be back to this tutorial that works perfectly, although it is not docker.
Followed all the steps, several times, but all I get as a handshake. Can’t ping anything.
Hello ! I have installed it and all services are working, but when I access the web UI and enter the login account user: admin / password: password, I get an error saying I can’t log in. I don’t know what’s wrong, I tried. Changed user/password but still can’t log in, please help me
Nice article! Docker on Openwrt on X86 (and Pi4), wouldn’t work. Errors per wg0 issues. Suspected the O’rt busybox config. Updated yaml (above) substituting Linuxserver’s recommend – via nano or Portainers ‘App Template’ editor. Add SYS_MODULE (mentioned in ngoduykhanh/wireguard-ui troubleshoot), UID and GID settings (per ‘derk’ above). Changed server port to choice. REM’d out ‘PEERS=1’ (you’ll do this later). Mapped internal to external ‘ports:’, per server port. UI looks to ‘server configs for GUI port (5000:5000) so retain. Start. Append iptables rules per recommend. Restart. Works fine…
when this doesnt work the fix is to add
environment:
– PUID=1000
– PGID=1000
– PEERS=1
underneath
cap_add:
– NET_ADMIN
Ignore me – this dont work. it will get you access to the ui but you wont be able to create peers.
note: only necessary to do this in the top container (wireguard:latest)
I solved the problem. In the yaml file it is necessary to change this
image: linuxserver/wireguard:latest
to
image: linuxserver/wireguard:v1.0.20210914-ls6
More info on github https://github.com/ngoduykhanh/wireguard-ui/issues/473#issuecomment-1792791050
I did step 1-3 successfully. Step 4 without success. I do not use any firewall in the LAN.
I use the Linux container LXC Debian 12. I installed everything according to the plan. Now when I want to log in to the wireguard-ui website, nothing happens. (IP: http://address_where docker_is_running:5000)
I use several dockers and they all work, e.g. portainer drawio etc…
Same here also, been looking for a solution
Same here. Everything works fine, aceppt Wireguard-UI under Port 5000. UFW is temporarely disabled. Nothings happens.
Many thanks Bobby for this tutorial!
In my case, I had manually include a static route ‘inside’ the wireguard container, pointing to the local LAN (e.g. 192.168.1.0/24) so that it would know how to get out. Connections from outside are only successful after configuring this route. Would you expect this?
Hey, I found, that dockers IP is 172.18.0.2 but
I can’t connect with UI, i think because I didn’t understood last part,
–> where I have to add “iptables -A FORWARD -i wg0 -j ACCEPT; iptables -t nat -A POSTROUTING -o eth0 -j MASQUERADE” ?
if I put it directly in my console, I have : bash: iptables: command not found (even if I know – newest version is installed)
Thanks a lot for help.
You should be able to connect with the UI if you use the IP address of the machine hosting the docker container. Check the IP of the host where your docker container is running and browse to that IP, on port 5000 (e.g. http://192.168.1.5:5000, if 192.168.1.5 is the IP of the host where docker containers are running)
Attention! The tutorial is not correct due to the latest update of wiregurad projects form 03.10.23:
Potentially Breaking Change: Support for multiple interfaces added. Wireguard confs moved to /config/wg_confs/. Any file with a .conf extension in that folder will be treated as a live tunnel config and will be attempted to start. If any of the tunnels fail, all tunnels will be stopped. Tunnels are started in alphabetical order. Managed server conf will continue to be hardcoded to wg0.conf.
If you want follow the turtorial above change the image from linuxserver/wireguard:latest to linuxserver/wireguard:v1.0.20210914-ls6 (in the docker-compose.yaml file).
How about another idea?
Reposting because I didn’t put my email in above accidentally (sigh, long day).
Hi there, followed all the instructions and I have WG and WG-UI setup. One thing though, while I can get my client to connect and authenticate, I cannot hit any resources locally. Doesn’t seem to matter what I do. I cannot ping the server (the IP assigned under server interface addresses), cannot ping any endpoints on my network. I do have allowed IPs to be the range that’s specified for the VPN + the IPs of my local network (192.168.1.0/24). I did setup the post up and down scripts, followed the instructions, but I’m pretty stuck. Any ideas?
Is this documentation based on a ubuntu server installation or another linux dist? I’ve tried it with debian 12 and I’ve got problems with that documentation. Maybe because I only have docker version “Docker version 20.10.24+dfsg1, build 297e128”.
Hi,
In practice, the distribution used has little to do with the WireGuard implementation itself, as it relies on Docker, making it kind of distro-agnostic. As for Docker itself, its current, up-to-date version is 24.0.7. If you’re using Debian 12, please follow this guide, “How to Install Docker on Debian 12 (Bookworm),” to get it. Of course, you need to remove the version of Docker you are currently using first.
Best,
Bobby
Hi Bobby,
Thanks for your effort.
I have a question regarding network configuration “network_mode: service:wireguard”. Wireguard-UI couldn’t access under this network configuration.
Once separated network for Wireguard-UI, then I can access.
May I have your suggestion?
Thanks
Great Instructions, everything worked out fine. But one Question, how can I configure the Docker to be started automatically after Reboot of the RaspberryPi? At the Moment I always have to start the Docker Container manually with docker-compose up -d…
Hi Tobi,
To get the containers to start automatically, you only have to add each service’s “restart: unless-stopped” directive in the YAML file. The guide has now been updated.
Best,
Bobby
Please help. it doesnt work for me. i can’t browse the internet.
i downloaded wireguard app, scan the QR code, it appears on Status: Connected Peers but Received and Transmitted data is 0B.
Please help
OK. the guide works as long as you don’t use named volumes. Named volumes breaks stuff in strange and unexpeted ways because of the scripting in the individual projects.
Also if you want docker to restore after a reboot you need to add “restart:always” twice.
It all works until you make the first client.
After that the gui on port 5000 is not accessible anymore.
the wireguard-ui container is listening on port tcp 5000 but somehow does not answer syn packets
docker logs wireguard-ui
Wireguard UI
App Version : dev
Git Commit : 6bbe230
Git Ref : N/A
Build Time : 07-14-2023 20:01:11
Git Repo : https://github.com/ngoduykhanh/wireguard-ui
Authentication : true
Bind address : 0.0.0.0:5000
Email from :
Email from name : WireGuard UI
Custom wg.conf :
Base path : /
⇨ http server started on [::]:5000
wg-quick: `/etc/wireguard/wg0.conf’ does not exist
Warning: `/config/wg0.conf’ is world accessible
[#] ip link add wg0 type wireguard
[#] wg setconf wg0 /dev/fd/63
[#] ip -4 address add 10.252.1.0/24 dev wg0
[#] ip link set mtu 1450 up dev wg0
[#] ip -4 route add 192.168.0.0/24 dev wg0
[#] iptables -A FORWARD -i wg0 -j ACCEPT; iptables -t nat -A POSTROUTING -o eth0 -j MASQUERADE
root@vpn2023 [ ~/containers/wireguard ]# docker exec -it wireguard-ui bash
bash-5.1# netstat -ltup
Active Internet connections (only servers)
Proto Recv-Q Send-Q Local Address Foreign Address State PID/Program name
tcp 0 0 localhost:41889 0.0.0.0:* LISTEN –
tcp 0 0 :::5000 :::* LISTEN 10/wg-ui
udp 0 0 localhost:34118 0.0.0.0:* –
udp 0 0 0.0.0.0:51820 0.0.0.0:* –
udp 0 0 :::51820 :::* –
bash-5.1#
I have solved it using named volumes like this. Tewh config above to me seems extremely ducttapish
volumes:
– Wdb:/app/db
– Wconfig:/etc/wireguard
– Wconfig2:/config
volumes:
Wconfig:
Wconfig2:
Wdb:
i don’t follow this. would you mind sharing yaml file?
These is a volume that non of the services uses (db). Will that work?
If this guide would better explain what volumes are supposed to be shared between the services trouble shooting would be much easier.
Could you please add that information?
I would like to add the following log:
wg-quick: `/etc/wireguard/wg0.conf’ does not exist
I receive this log back even if the config folder mounted on the container is the same as the one of the wireguard container.
Hello, I followed your tutorial, wireguard is working fine but I have no access to the gui. myipadress:5000 gives me ERR_CONNECTION_REFUSED
any clue on what is wrong ?
I have the same issue, and I would like to understand why the ui gives me back ERR_CONNECTION_REFUSED.
I had the same issue it was the network created by the docker, need to change to public network
Oops, sorry, I forget to update the interface of my server in the IPTABLES rules UP/DOWN, It works ! Thanks for your tutorial
Thank you for this note! I thought the interface on these rules was referring to the container interface, and was having the same issue. We have to configure the actual server interface.
Hey André,
The pleasure is mine! I’m glad that everything is fine.
Best,
Bobby
Unfortunately, I can’t brows the internet… I receive a timeout connection
Hi, I followed your guide and installed the server on an Azure Ubuntu virtual machine and it seems to be working. I downloaded the client configuration to my android phone with the official WireGuard app and it all works.
Instead when I download the configuration of another client on my windows pc the connection does not work. Windows can go to the internet but not connect to the VPN.
Do you have any idea of the solution?