
WireGuard is an open-source, free, fast VPN server with state-of-the-art cryptography. It passes traffic over UDP with better performance than the typical two tunneling protocols, i.e., OpenVPN and IPsec.
WireGuard is a peer-to-peer VPN explicitly made for the Linux kernel. It runs inside the Linux kernel and allows you to create fast, modern, and secure VPN tunnel.
WireGuard works by creating a network interface on each peer device that acts as a tunnel. Peers authenticate each other by exchanging and validating public keys, mimicking the SSH model.
Step 1: Enable IP Forwarding on the Server
You need to enable IP forwarding for the VPN server to route packets between VPN clients and the Internet. Open the /etc/sysctl.conf file by using your preferred editor:
sudo vim /etc/sysctl.confComment out (remove the # character before it) the following line:
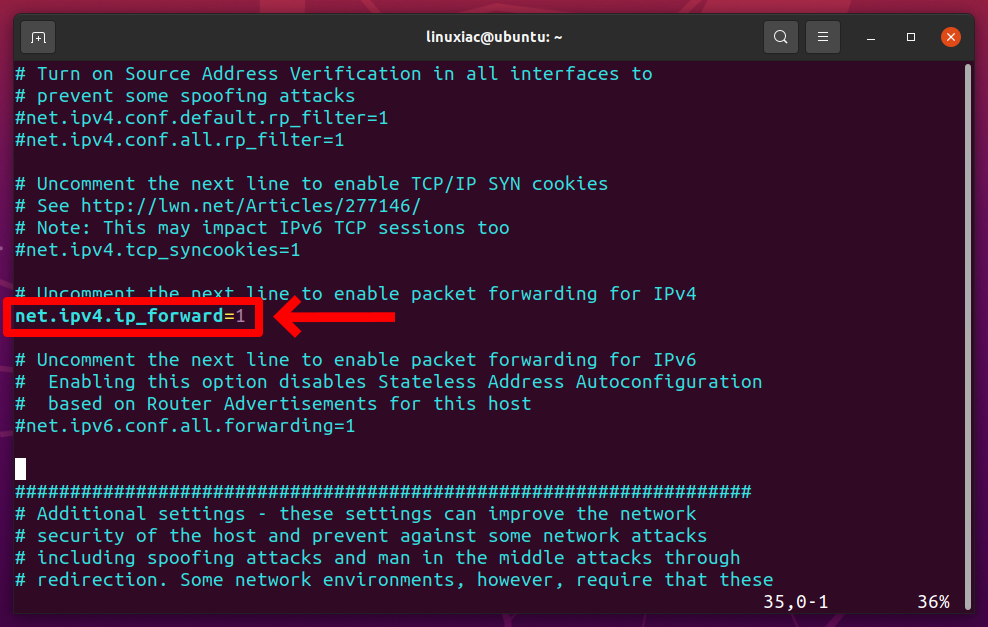
Save the file and apply the change:
sudo sysctl -p
Step 2: Install WireGuard on Ubuntu
The next step in this tutorial is installing WireGuard on your Ubuntu machine and setting it up as a server. By default, the WireGuard package is available in the Ubuntu default repository.
sudo apt install wireguard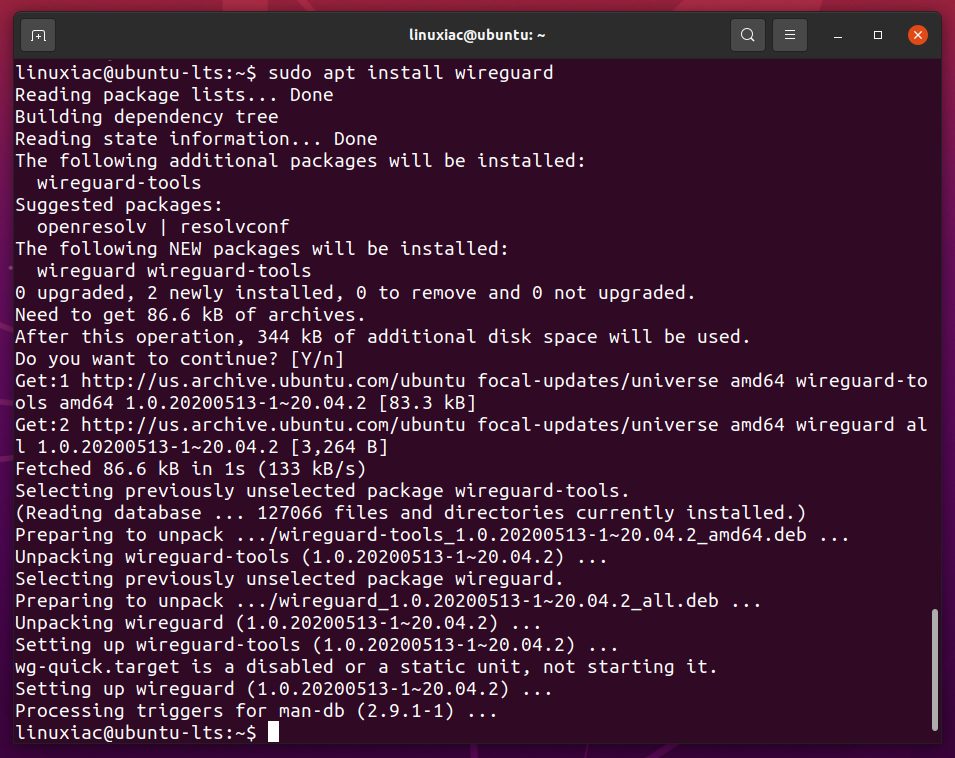
Once the WireGuard package has been installed, you can proceed to the next step.
Step 3: Configure WireGuard VPN Server on Ubuntu
WireGuard works by exchanging public keys between each device in the WireGuard network. Now that you have WireGuard installed, the next step is to generate a private and public key pair for the server.
Step 3.1: Generate Public/Private Keypair
Run the following command to create a public/private key pair. The files will be saved under /etc/wireguard/ directory.
wg genkey | sudo tee /etc/wireguard/server_private.key | wg pubkey | sudo tee /etc/wireguard/server_public.key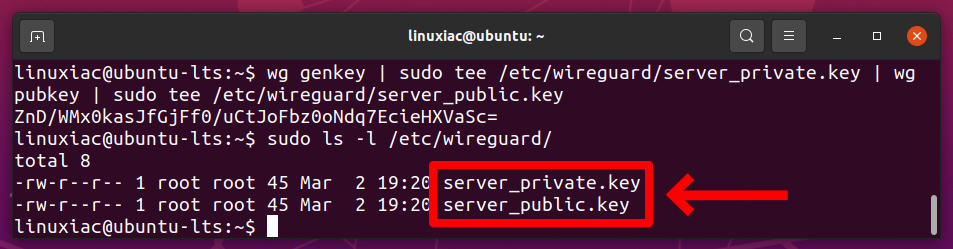
The wg command is WireGuard’s build-in configuration utility for getting and setting WireGuard’s configurations. When you run the command, you will receive a single line of base64 encoded output, the public key (server_public.key) for your WireGuard server.
Remember, the private key (server_private.key) should never be shared with anyone and always be kept secure.
Step 3.2: Configure Tunnel Device
Next, you will need to create a network interface for WireGuard. Use a command-line text editor like vim to create a WireGuard configuration file. The network interface name will be wg0.
sudo vim /etc/wireguard/wg0.confAdd the contents indicated below:
[Interface]
## Private IP address for the wg0 interface ##
Address = 10.0.0.1/24

## VPN server listening port ##
ListenPort = 51820

## VPN server private key ##
PrivateKey = mPIoWfKQWZP8lie2ISEZ6ul7vyESH9MqpFvxk1cxIWQ=

## Firewall rules ##
PostUp = iptables -A FORWARD -i wg0 -j ACCEPT; iptables -t nat -A POSTROUTING -o enp1s0 -j MASQUERADE
PostDown = iptables -D FORWARD -i wg0 -j ACCEPT; iptables -t nat -D POSTROUTING -o enp1s0 -j MASQUERADECode language: PHP (php)
Of course, you need to replace the PrivateKey with the content of the one you generated, stored in the /etc/wireguard/server_private.key file.
You can display the content of the private key with the following command:
sudo cat /etc/wireguard/server_private.key
Make sure to replace enp1s0 after -A POSTROUTING -o ... to match the name of your public network interface. You can find it easily with:
ip -o -4 route show to default | awk '{print $5}'Code language: JavaScript (javascript)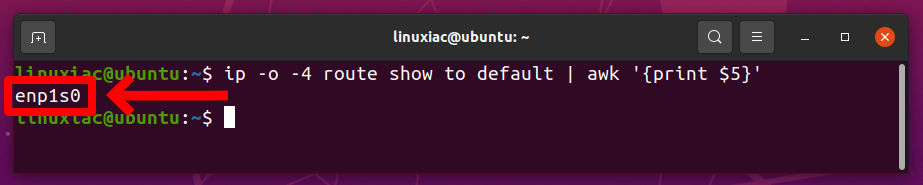
Save and close the wg0.conf file. Additionally, change the file permission mode to only the root user can read the files.
sudo chmod -R 600 /etc/wireguard/Step 4: Enable and Start WireGuard VPN Service
Run the following command on the server to enable auto-start at system boot time and start WireGuard.
sudo systemctl enable wg-quick@wg0
sudo systemctl start wg-quick@wg0Code language: CSS (css)
Check its status with the following command. You should see active in the output:
sudo systemctl status wg-quick@wg0.serviceCode language: CSS (css)
To check the interface state and configuration, enter:
sudo wg show wg0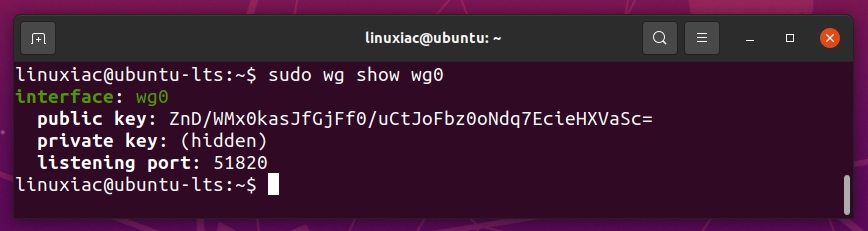
Step 5: Install and Configure WireGuard Client
First, you must install the WireGuard package on the client machine. It is similar to setting up the WireGuard server.
sudo apt install wireguard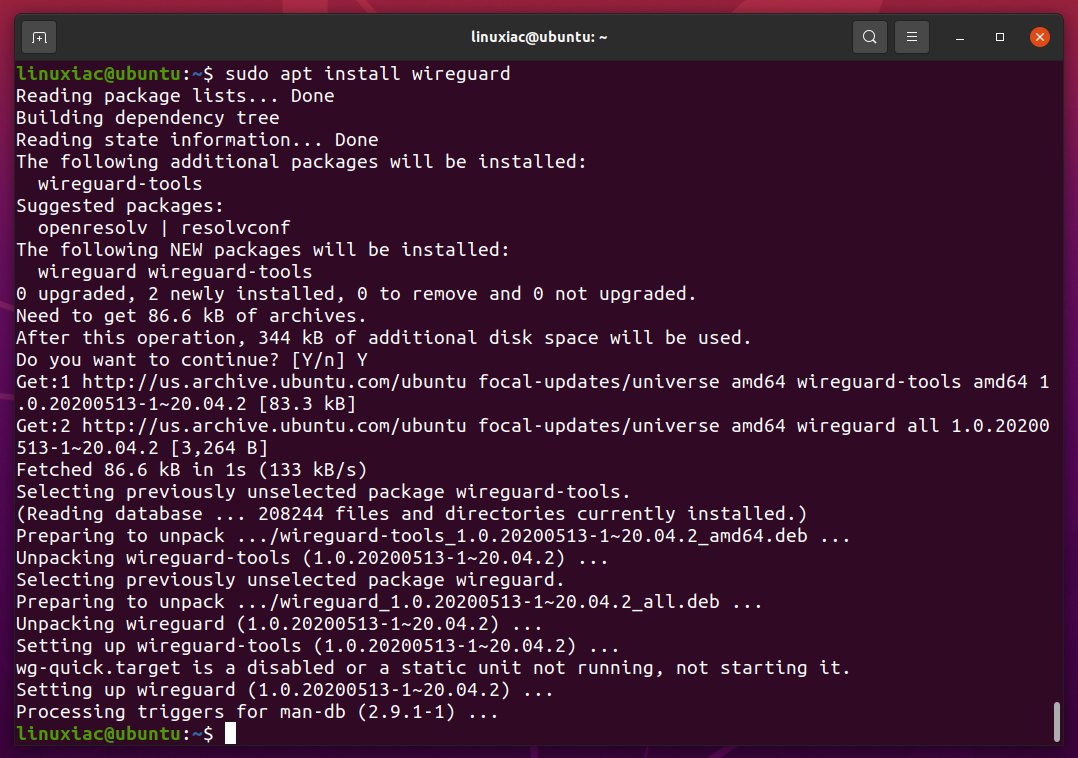
Next, you’ll need to generate a public/private key pair on the peer using the exact steps you used on the server.
wg genkey | sudo tee /etc/wireguard/client_private.key | wg pubkey | sudo tee /etc/wireguard/client_public.key
Open a new /etc/wireguard/wg0.conf file on the WireGuard client machine using your preferred editor:
sudo vim /etc/wireguard/wg0.confAdd the following lines to the file:
[Interface]
## VPN client private IP address ##
Address = 10.0.0.2/24

## VPN client private key ##
PrivateKey = 0COkq1GMM86CmlF5blPFDYhU84iTX8iJ7lWoC1gLfnk=

[Peer]
## VPN server public key ##
PublicKey = ZnD/WMx0kasJfGjFf0/uCtJoFbz0oNdq7EcieHXVaSc=

## VPN server public IP address and port ##
Endpoint = 192.168.122.101:51820

## Route all the traffic through the VPN tunnel ##
AllowedIPs = 0.0.0.0/0

## Key connection alive ##
PersistentKeepalive = 15
Replace the PrivateKey with the content of the one you generated, stored in the /etc/wireguard/client_private.key file on the client machine.
sudo cat /etc/wireguard/client_private.key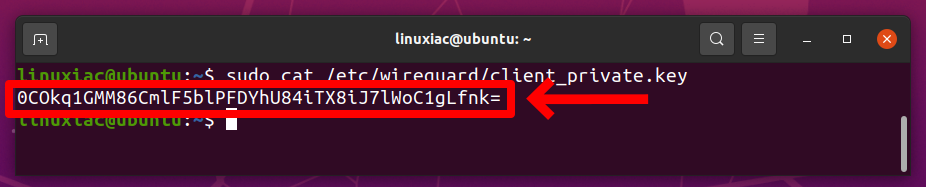
Replace the server’s public key, which can be found in the /etc/wireguard/server_public.key file on the server.
Replace the Endpoint value (192.168.122.101:51820) with your server’s public IP address and port.
Finally, save and close the file.
You need to configure the server-side VPN option to allow a connection between the client (Peer) computer and the server. So, go back to the server and edit the /etc/wireguard/wg0.conf file to add client information as follows:
sudo vim /etc/wireguard/wg0.conf[Peer]
## Client public key ##
PublicKey = 6FLtyfBQie9+EB3QYF55CR1FASca7vVYPReynlEccAo=
## Client IP address ##
AllowedIPs = 10.0.0.2/24Code language: PHP (php)Replace the PublicKey with the file’s content stored in the /etc/wireguard/client_public.key file on the client machine.
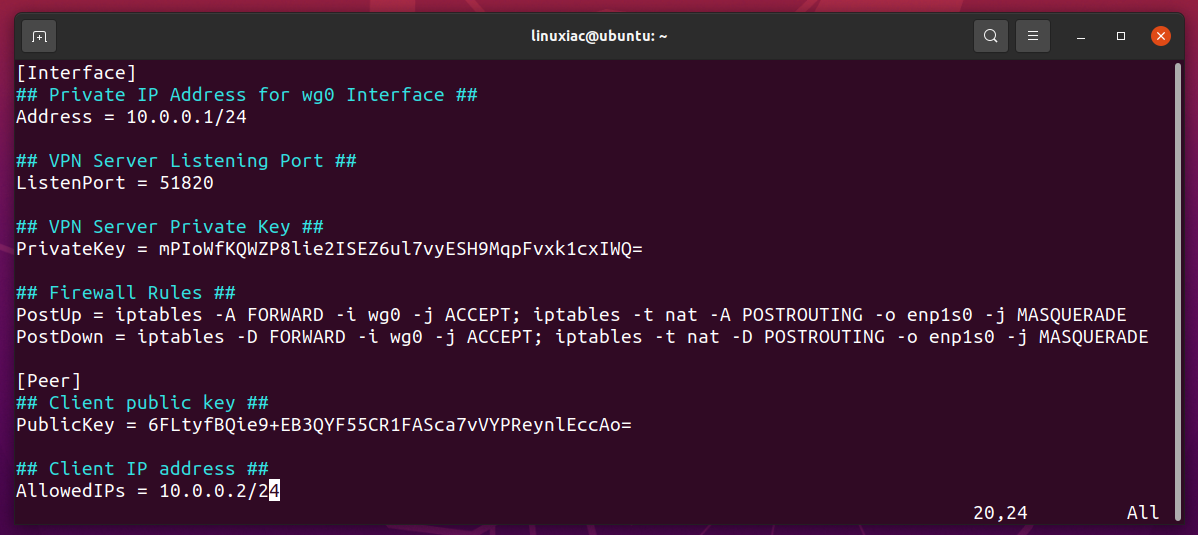
The final version of the server configuration file should look like this:
Save the file and restart the VPN server to apply the changes:
sudo systemctl restart wg-quick@wg0.serviceCode language: CSS (css)Step 6: Connecting the WireGuard Client to the Server
Run the following command on the client machine to connect the VPN client to the VPN server:
sudo systemctl start wg-quick@wg0Code language: CSS (css)Now you should be connected to the WireGuard VPN server, and the traffic from your client machine should be routed through it.
That’s all! Both client and server must be connected securely using a peer-to-peer WireGuard VPN on Ubuntu.
To test the connection, return to the VPN client and ping from it (10.0.0.2) to the VPN server (10.0.0.1) to see if the tunnel works.
ping -c 3 10.0.0.1Code language: CSS (css)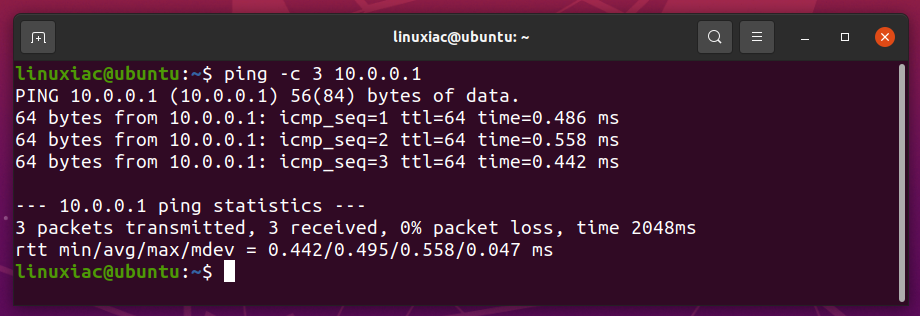
Additionally, you can check the connection with:
sudo wg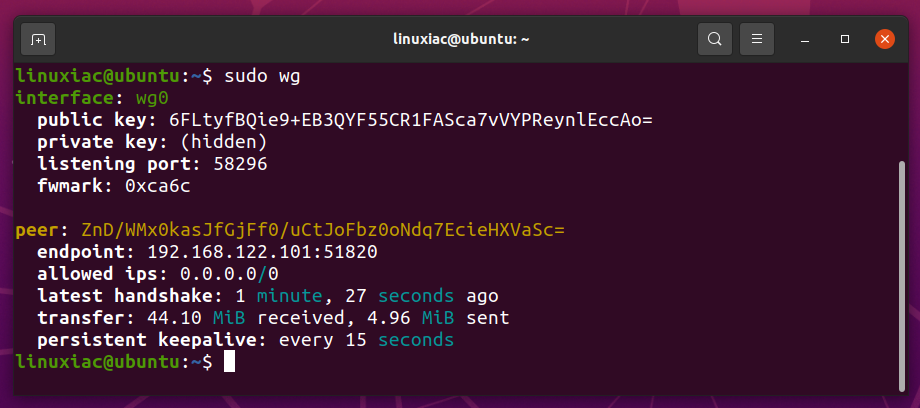
To stop the tunneling, bring down the service on the client machine:
sudo systemctl stop wg-quick@wg0Code language: CSS (css)Conclusion
Congratulation! I hope this tutorial helped you install and configure the WireGuard VPN server and client on Ubuntu. This setup lets you to surf the web anonymously by keeping your traffic data private.
I strongly suggest that you read the WireGuard project documentation here.
If you found this post helpful or facing any problems, feel free to comment.


Hello, I want to replace the interface through the command sudo vim /etc/wireguard/wg0.conf , I go in, but I don’t know how to save it, please tell me
I have done all the configuration and everything has worked correctly. The only thing I would like to know is how I could make the vpn client give access to another virtual machine that is connected to the
HI For several weeks I have been trying to get wireguard using GUI networkmanager raspberry pi 4 to work
my VPN is surfshark they do not have people who understand linux which is a pity!
I have included the two how tos that I have tried using I have been using openvpn with surfshark for all most a year SS have on there site manual set up for wireguard so used that to get the private and public keys and other information to put into the GUI you go VPN then config + and that gets you to wireguard GUI in networkmanager
https://www.xmodulo.com/wireguard-vpn-network-manager-gui.html
https://www.ivpn.net/setup/linux-wireguard-netman/
Thanks J
Hello,
I made it to Step 4 above while installing Wireguard on my VPS and then received the following error:
Job for wg-quick@wg0.service failed because the control process exited with error code.
See “systemctl status wg-quick@wg0.service” and “journalctl -xe” for details.
I ran journalctl -xe and it shows:
Defined-By: systemd
— Support: http://www.ubuntu.com/support
—
— A start job for unit wg-quick@wg0.service has begun execution.
—
— The job identifier is 8265.
Oct 24 09:53:32 racknerd-a195ad wg-quick[40868]: wg-quick: `wg0′ already exists
Oct 24 09:53:32 racknerd-a195ad systemd[1]: wg-quick@wg0.service: Main process exited, code=exited, status>
— Subject: Unit process exited
— Defined-By: systemd
— Support: http://www.ubuntu.com/support
—
— An ExecStart= process belonging to unit wg-quick@wg0.service has exited.
—
— The process’ exit code is ‘exited’ and its exit status is 1.
Oct 24 09:53:32 racknerd-a195ad systemd[1]: wg-quick@wg0.service: Failed with result ‘exit-code’.
— Subject: Unit failed
— Defined-By: systemd
— Support: http://www.ubuntu.com/support
—
— The unit wg-quick@wg0.service has entered the ‘failed’ state with result ‘exit-code’.
Oct 24 09:53:32 racknerd-a195ad systemd[1]: Failed to start WireGuard via wg-quick(8) for wg0.
— Subject: A start job for unit wg-quick@wg0.service has failed
— Defined-By: systemd
— Support: http://www.ubuntu.com/support
—
— A start job for unit wg-quick@wg0.service has finished with a failure.
—
— The job identifier is 8265 and the job result is failed.
What does this error mean?
Thanks