
PostgreSQL is a free and open-source, object-relational database management system. It has been around for over 30 years and advertises itself as “the most advanced open-source relational database in the world.”
At the same time, Docker has become the IT industry standard for easy packaging, deploying, and running distributed applications. It provides an excellent opportunity to containerize your database and prevent system clutter with dependencies resulting from local package installation.
But before we move on, let’s answer a few essential questions.
Why Use PostgreSQL on Docker?
There are several reasons why using PostgreSQL on Docker can be advantageous:
- Portability: Docker provides a consistent environment for running PostgreSQL across different systems and platforms. This means you can ensure your application runs the same way regardless of the underlying infrastructure. In addition, it is easier to test and debug your apps in different environments and ensures that they will run consistently in production.
- Isolation: Docker containers provide an isolated environment for running PostgreSQL instances, so you can run multiple instances on the same host without worrying about conflicts or dependencies.
- Scalability: Docker makes deploying PostgreSQL instances on any platform easy and scaling them as needed. This allows for greater flexibility in managing database resources, as you can easily spin up new instances or adjust the number of containers running at any given time.
Why Use Docker Compose?
Docker Compose is a tool that allows you to run multi-container Docker applications. It is a command-line utility that simplifies the process of orchestrating Docker containers by using a YAML file to define an application’s services, networks, and volumes.
In other words, Docker Compose allows you to define all the services that make up your application in a single file and then use the docker-compose command to start, stop, and manage those services. This makes it easy to set up and manage complex applications that rely on multiple containers.
This is what we will do in this guide when we deploy in parallel PostgreSQL and pgAdmin – the most popular open-source administration and management tool for the PostgreSQL database. That will allow us to immediately start managing and administering our PostgreSQL instance without wasting time searching for additional tools to manage it.
Step 1: Install Docker Compose
Presumably, you already have Docker installed on your system. If you don’t, the following links will show you how to quickly and easily install it for the distribution you are using, such as Ubuntu, Debian, AlmaLinux, or Rocky Linux.
The other essential component is Docker Compose. Remember, it is provided separately from Docker. Therefore, you must Install Docker before adding Docker Compose; otherwise, Compose will not function.
Installing it is pretty simple, even if it is not already on your Linux system. Type the following commands:
sudo curl -L "https://github.com/docker/compose/releases/download/v2.16.0/docker-compose-linux-$(uname -m)" -o /usr/local/bin/docker-compose
sudo chmod +x /usr/local/bin/docker-composeCode language: JavaScript (javascript)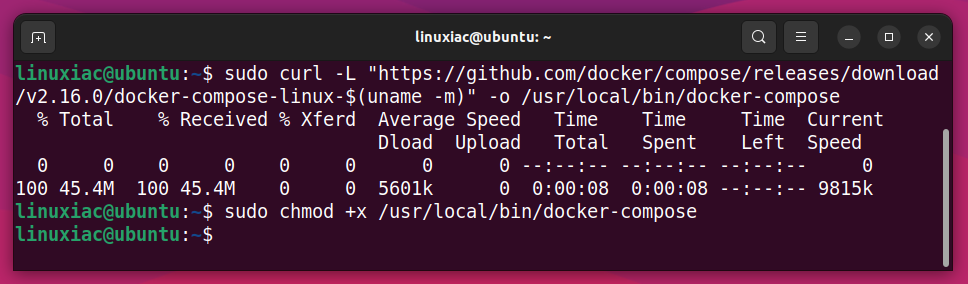
At the time of writing, we were using Docker Compose 2.16.0. To check if there is a new one, follow this link and replace the “2.16.0” part in the first command above with the one you want.
Next, run the command below to ensure Docker Compose is installed and functioning correctly. You should receive a response similar to the one shown.
docker-compose version
Everything seems fine, so let’s get to the actual part.
Step 2: Create a Docker Compose File
As mentioned in the guide’s beginning, Docker Compose allows you to build and run stacks of multiple containers. To use it, you must first create a “docker-compose.yaml” file that configures the containers for your application. Then, you can use a single command such as “docker-compose up” to start all the containers and link them together.
So let’s create our master file describing the PostgreSQL and pgAdmin services for our containerized stack. First, we’ll create a directory with a name of our choice, for example, “pg,” then, with your preferred text editor, create a file named “docker-compose.yaml” inside it:
mkdir pg && cd pg
vim docker-compose.yamlCode language: CSS (css)
Then, add the following content to it:
version: "3.8"
services:
  postgres:
    image: postgres
    restart: always
    ports:
      - "5432:5432"
    environment:
      POSTGRES_USER: postgres
      POSTGRES_PASSWORD: mypgdbpass
    volumes:
      - postgres_data:/var/lib/postgresql/data
  pgadmin:
    image: dpage/pgadmin4
    restart: always
    ports:
      - "5050:80"
    environment:
      PGADMIN_DEFAULT_EMAIL: admin@pgadmin.com
      PGADMIN_DEFAULT_PASSWORD: mypgadminpass
    volumes:
      - pgadmin_data:/var/lib/pgadmin
    depends_on:
      - postgres

volumes:
  postgres_data:
  pgadmin_data:Code language: JavaScript (javascript)
Save and close the file. Don’t be worried if something in its contents is unclear to you. Now I will explain it, so let’s break down this syntax.
- services: Define the two services Docker needs to run, “postgres” and “pgadmin.”
- image: Specifies the Docker Hub images that will be downloaded and used for our services. We don’t apply a tag for them since we want to use the most recent versions. However, if you need a specific one, you can look at the available for PostgreSQL and pgAdmin and use it, specifying it as, for example, “postgres:15.2-alpine.”
- restart: Configure the Docker container always to restart if it stops unexpectedly.
- ports: Map the TCP port on your host machine to the container port. This way, the containerized service is exposed outside the container and can be accessed remotely.
- environment: Set environment variables for application authentication and setup. Be sure to change the values of the “POSTGRES_PASSWORD” environment for the PostgreSQL’s “postgres” admin user and pgAdmin (“PGADMIN_DEFAULT_EMAIL” and “PGADMIN_DEFAULT_PASSWORD“) to what you want.
- volumes: Mount named Docker volumes for application files to persist your data. Otherwise, the data will be lost when the container restarts.
- depends_on: Allows you to run services in order. In our case, the “pgadmin” service will not start until “postgres” is not up and running.
Step 3: Run PostgreSQL and pgAdmin as Docker Containers
Finally, we are ready to run PostgreSQL and pgAdmin using Docker Compose. To do this, execute the below-given command from the “pg” directory where your “docker-compose.yaml” file resides.
Deploy and run the containers in the background:
docker-compose up -dThe images will start downloading. The entire process can take a few minutes, depending on your internet connection speed. In the end, you should see a screen similar to the one below, informing you that all containers have been successfully created and started.
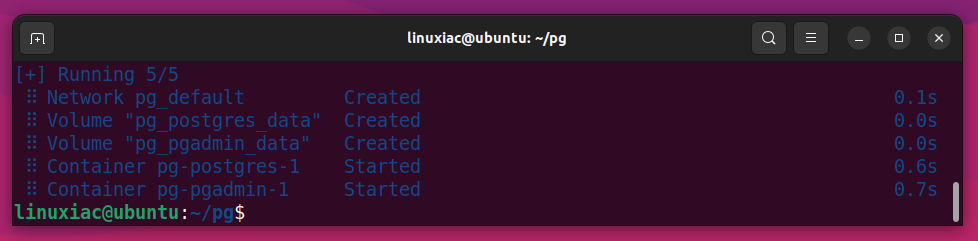
Of course, the delay before the actual start of the PostgreSQL and pgAdmin containers using Docker Compose will only be the first time because it is necessary to download the images from the Internet. All subsequent runs will take seconds since the Docker images are available locally on your Linux system.
Step 4: Connect pgAdmin to the PostgreSQL Container
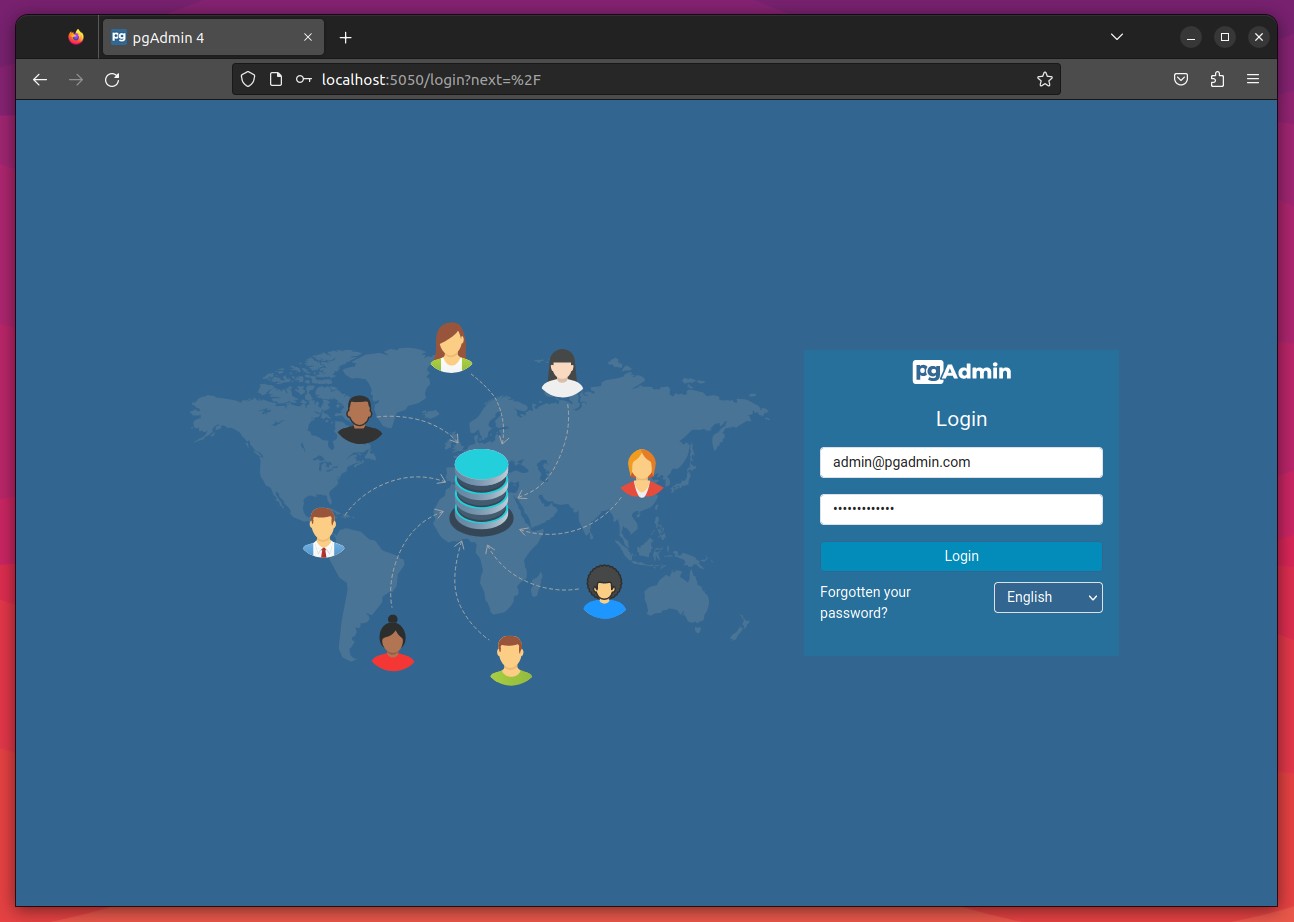
Open your browser and point it to “http://localhost:5050” or “http://ip-address:5050” on the server where you ran the PostgreSQL and pgAdmin Docker containers.
The pgAdmin login page will greet you. Enter the username and password you specified as values for the “PGADMIN_DEFAULT_EMAIL” and “PGADMIN_DEFAULT_PASSWORD” variables in the “docker-compose.yaml” file.
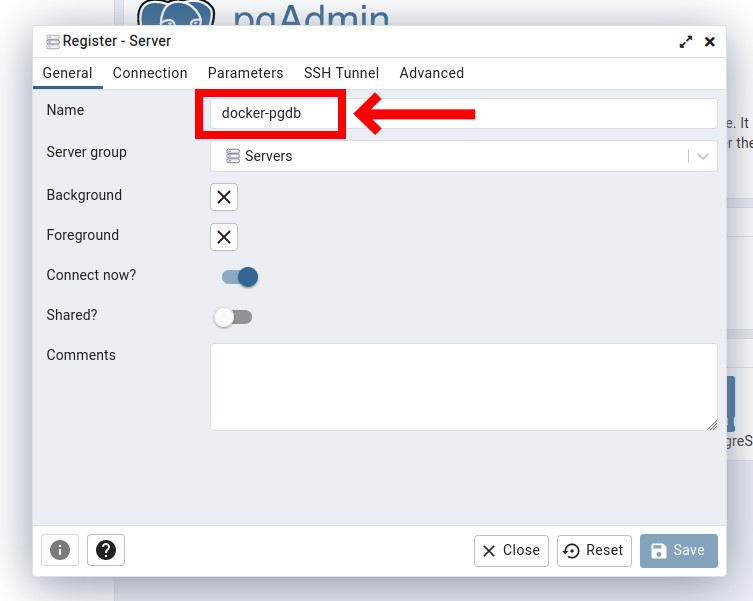
Next, click on “Add New Server.”
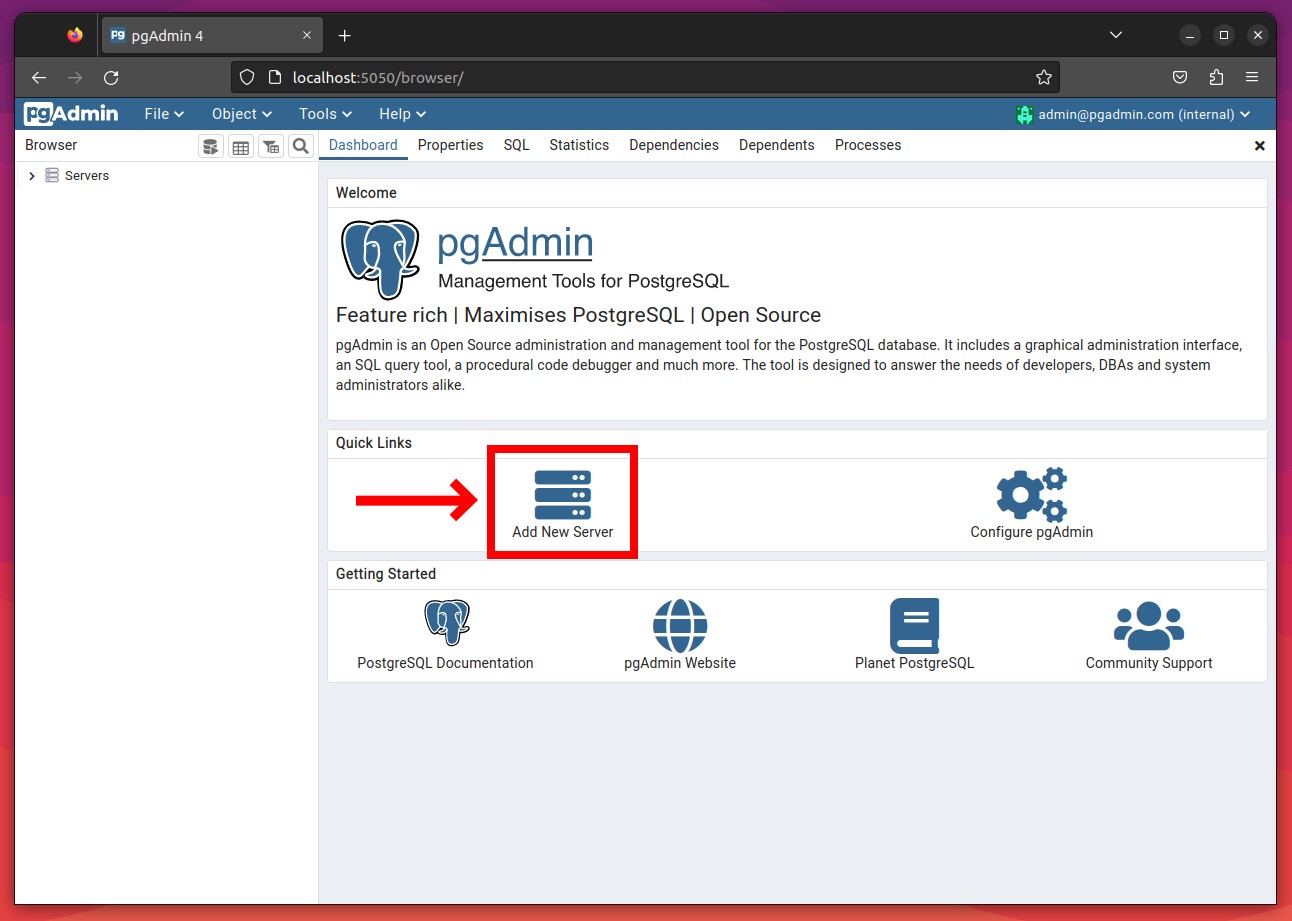
A new modal window will open where you can configure the PostgreSQL server connection settings. First, enter your preferred connection name in the “Name” field.
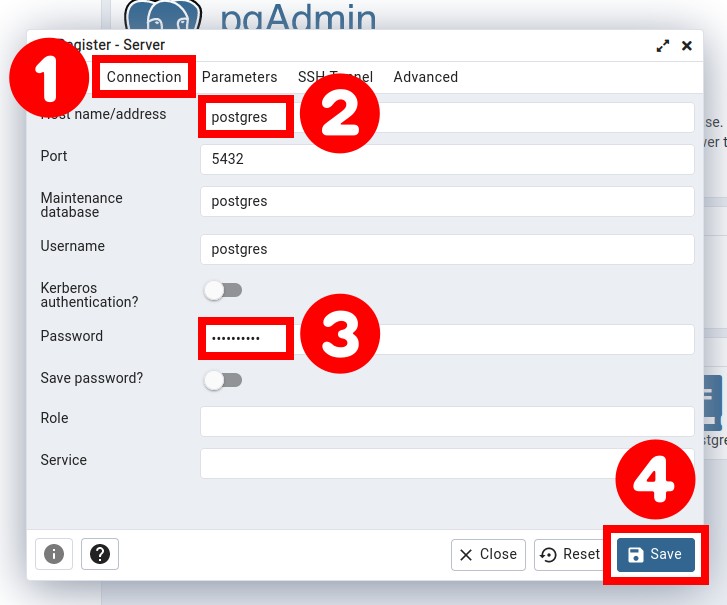
Then select the “Connection” tab. In the “Host name/address” field, enter the name of the Docker’s PostgreSQL container’s service as defined in the “docker-compose.yaml” file. In our case, it is “postgres.” Finally, enter the password given as the value of “POSTGRES_PASSWORD” and save your changes by clicking the “Save” button.
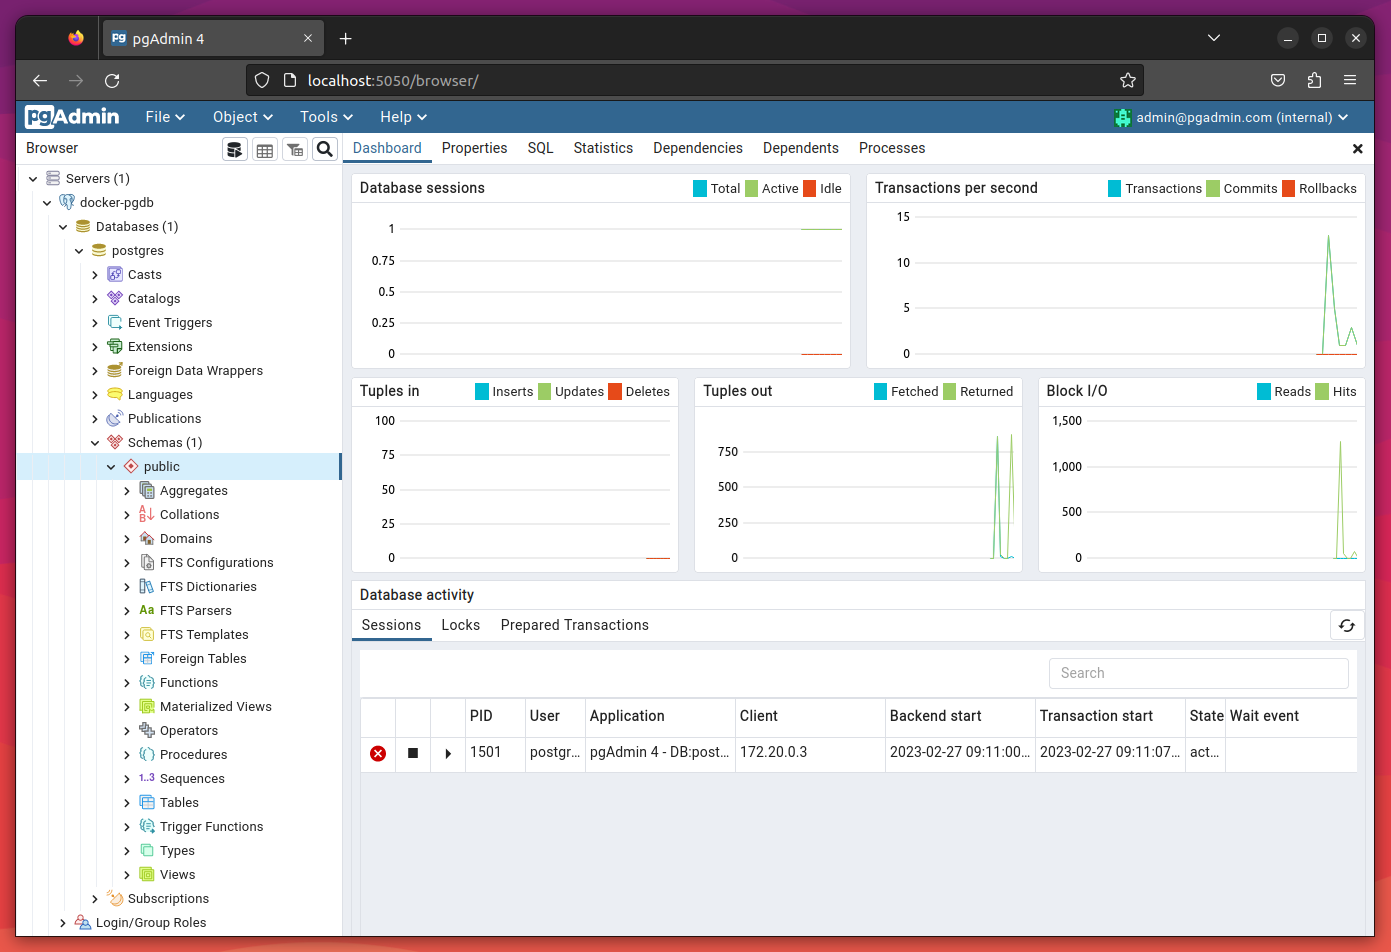
The application will connect to the PostgreSQL Docker container, and you can monitor and administrate the database server using pgAdmin’s feature-rich web interface.
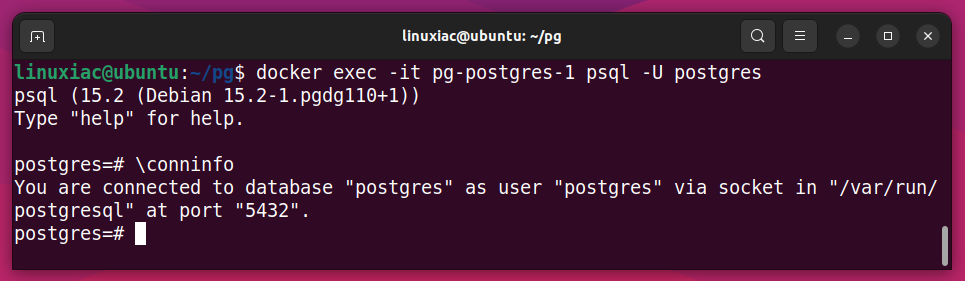
Alternatively, you can gain an interactive PostgreSQL shell by attaching it to the container and running the psql command to interact directly with the PostgreSQL database. To do this, you must first enter the container. However, you need to know its name. To find it, type:
docker ps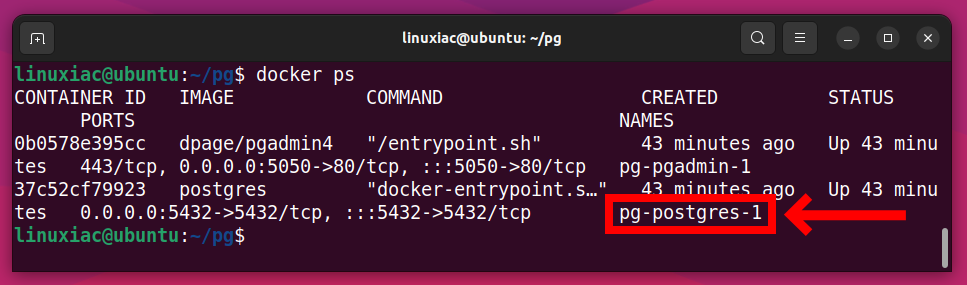
In the example shown, our PostgreSQL container is named “pg-postgres-1.” You can also use the container ID instead of a name, which in the example shown is “37c52cf79923.” To connect directly to it, we need to run the following:
docker exec -it pg-postgres-1 psql -U postgresThis provides the full PostgreSQL command-line interface to use all the familiar commands and flags.
Finally, let me walk you through the essential Docker Compose commands for managing your containerized PostgreSQL/pgAdmin stack.
Essential Docker Compose Commands
The essential Docker Compose commands you can use in practice are shown below with examples. Remember to execute them from the “pg” directory, where the “docker-compose.yaml” resides.
List All Docker Containers
To view a list of all the containers that are currently running in your deployment, type:
docker-compose ps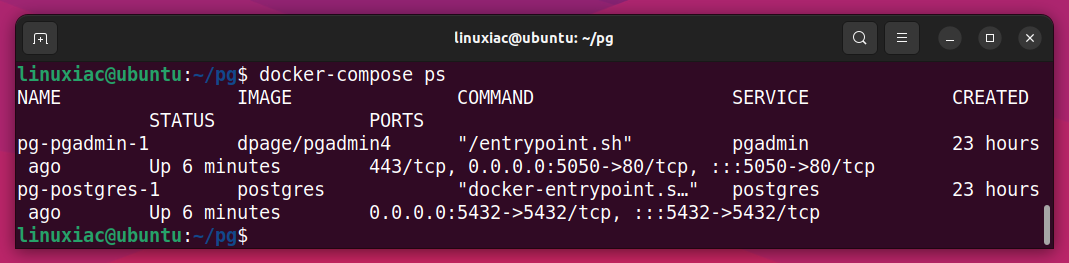
Stop All Docker Containers
To stop all docker containers that are running in the background, use the command as shown below:
docker-compose stop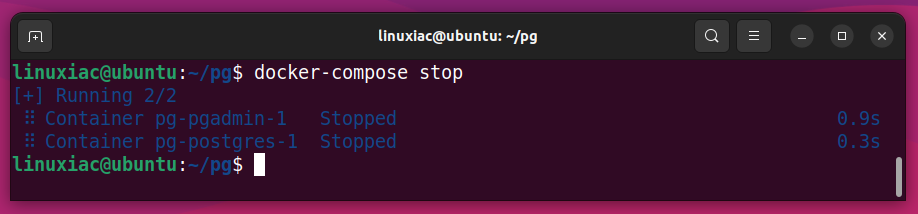
Of course, you can stop only one of the containers, not all of them. Run “docker-compose stop” followed by the service name defined in the “docker-compose.yaml” file. Notice not the container name but the service name.
For example, to stop the PostgreSQL container, defined with the “postgres” service name, type the following:
docker-compose stop postgres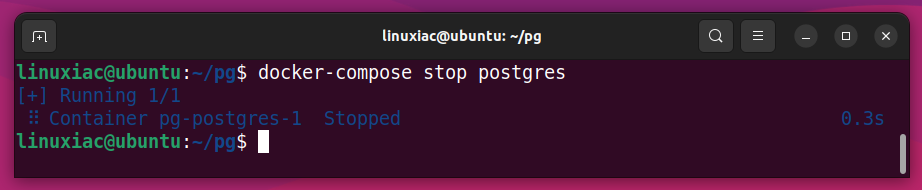
Similarly, you can start it again later by executing “docker-compose start postgres.”
Start All Docker Containers
From your project directory (“pg“), start up your application by running the command as shown below:
docker-compose start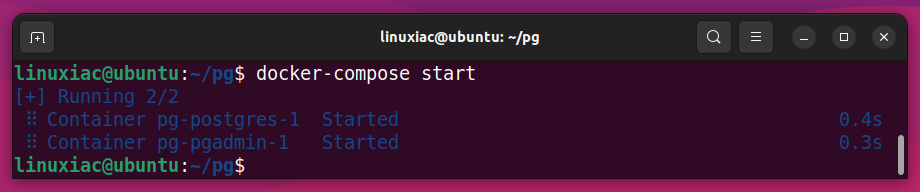
View the Containers’ Logs
The “docker-compose logs” command displays log output from services. For example, run the command followed by the service name to view the PostgreSQL container logs.
docker-compose logs postgresAdditionally, if you want to aggregate the logs of every container in your stack and track what’s happening in them in real-time, type:
docker-compose logs -fStop and Remove All Containers
The following command stops and removes containers and networks created previously by the “docker-compose up” command:
docker-compose down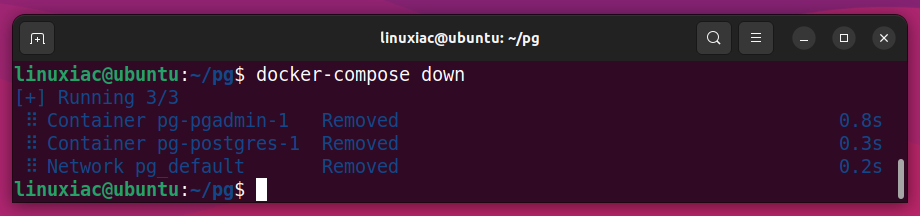
Additionally, if you want to stop and remove containers alongside their associated Docker images, use the following command:
docker-compose down --rmi all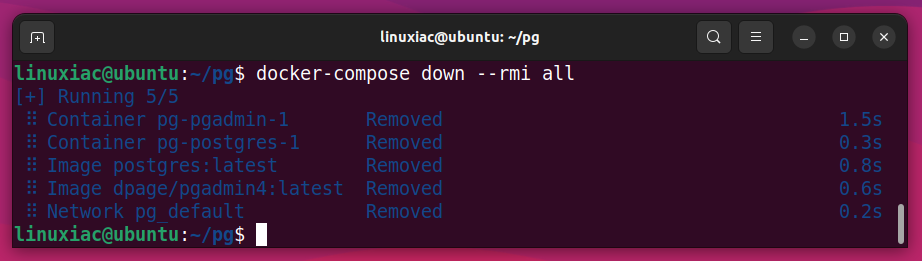
If, in addition to stopping and removing the containers, you want the permanently stored data in the Docker volumes to be also deleted, perform the following:
docker-compose down -v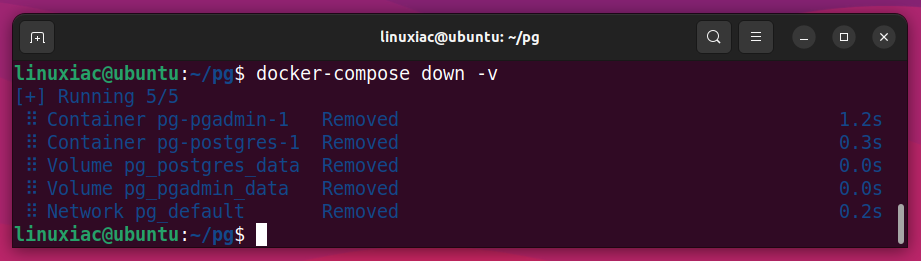
Attention! Note that you will lose all data this way. In this case, the entire contents of the PostgreSQL database (“pgadmin_data” volume). So, think twice before you execute this command.
Conclusion
Docker has revolutionized the way developers deploy and manage applications. One of the most significant use cases using it is the ease of deploying and accessing applications built within containers without worrying about dependencies and installations. With its ability to provide a consistent environment and simplify the deployment process, Docker has become a go-to solution for developers and system administrators.
This tutorial showed you how to quickly run PostgreSQL and the pgAdmin management tool in a Docker container using Docker Compose. Following the step-by-step instructions outlined in this guide, you can have your PostgreSQL and pgAdmin environments up and running in minutes.
Let me know if you have any questions or suggestions in the comments below, and I’ll be happy to follow up with you.


Hi everyone,
I followed the tutorial step-by-step and the result is fine! PostgreSQL and pgAdmin work! Thanks Bobby for the exact and simple instructions!
But there is one problem: when I try to backup a database using pgAdmin tool, the process always fails. The backup file is created, but it is always empty (0 bytes).
Can anyone suggest any way to fix that?
Many thanks in advance!
This is the only method to access postgresql that works. Problem entering a data file, “users.csv” into the database previously devised.
Quick and simple.
Good work, Thanks!
Thanks a lot !!
Helped me al lot.
Greatings
I’m glad to hear that.
Thank you for reading Linuxiac!
Greetings
Thanks man! so useful!!! Greetings from Venezuela.
Thanks! It’s my pleasure.
Greetings to Venezuela.