GNOME Shell is one of the most widely used Linux desktop environments. However, the most standout aspect of GNOME is that it looks nothing like anything you have experienced before. This means that by default, you get this:
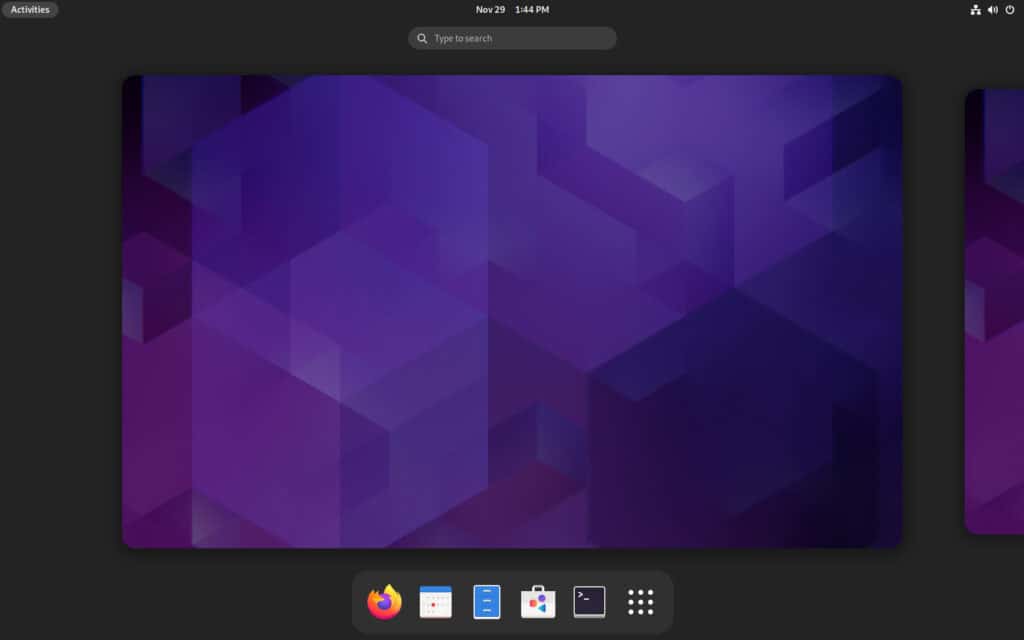
GNOME adheres to its user interaction philosophy, which focuses on maximum simplicity. However, some of its components do not always meet user expectations and preferences. Fortunately, GNOME extensions allow users to customize almost every element to their liking extensively.
Once installed, they will help you add extra functionality to your GNOME Shell desktop and help modify existing features. But before we proceed, let’s explain to our readers what are GNOME Shell Extensions.
What Are GNOME Shell Extensions?
By default, GNOME Shell has features that its developers determine. GNOME Shell extensions build on this by adding or extending the current desktop functionality. They are small pieces of software code written by third-party developers.
Furthermore, users must understand one key moment. The GNOME Extensions are in no way developed or maintained by the GNOME development team. Instead, as previously stated, they result from the voluntary work of third-party developers entirely responsible for their maintenance.
However, with each new GNOME version, there are often functional changes under the hood that can conflict with the code used in some of the extensions. As a result, when a new version of the GNOME desktop environment is released, it is relatively common for some extensions to stop being compatible with it. So, users should wait until the developer adapts the extension code with the new GNOME version.
How to Install GNOME Shell Extensions
The easiest way to install GNOME extensions is via your web browser. The GNOME project has an official website dedicated to extensions: https://extensions.gnome.org.
You can find, install, and manage your extensions from this website itself right from your browser. However, for this to happen, you must have two components preinstalled on your Linux system:
- GNOME Shell Integration Web Browser Add-on
- Native Host Connector
Setting up these two things allows you to interact with the GNOME Extension website. Here’s how to set them up.
1. Install GNOME Shell Integration Web Browser Add-on
Because the GNOME Extensions website uses special add-on functionality, you must access it using Mozilla Firefox, Google Chrome, Chromium, Vivaldi, or Microsoft Edge web browser.
Remember that Ubuntu 21.10 and its subsequent versions switched to the default browser Firefox as Snap. And because Snap packages run in a sandbox by design, unfortunately, they do not have access to the underlying desktop environment.
In other words, if you use Ubuntu, you cannot use Firefox to install and manage GNOME extensions. Therefore, you need to use one of the other browsers listed above. However, if you insist on using Firefox for this purpose, here is a workaround.
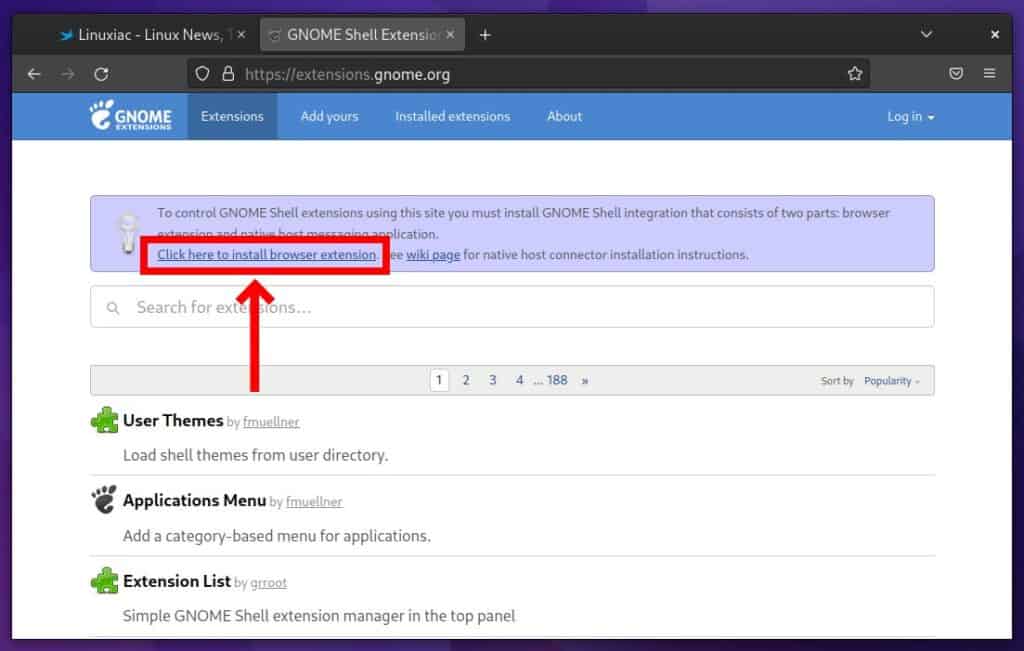
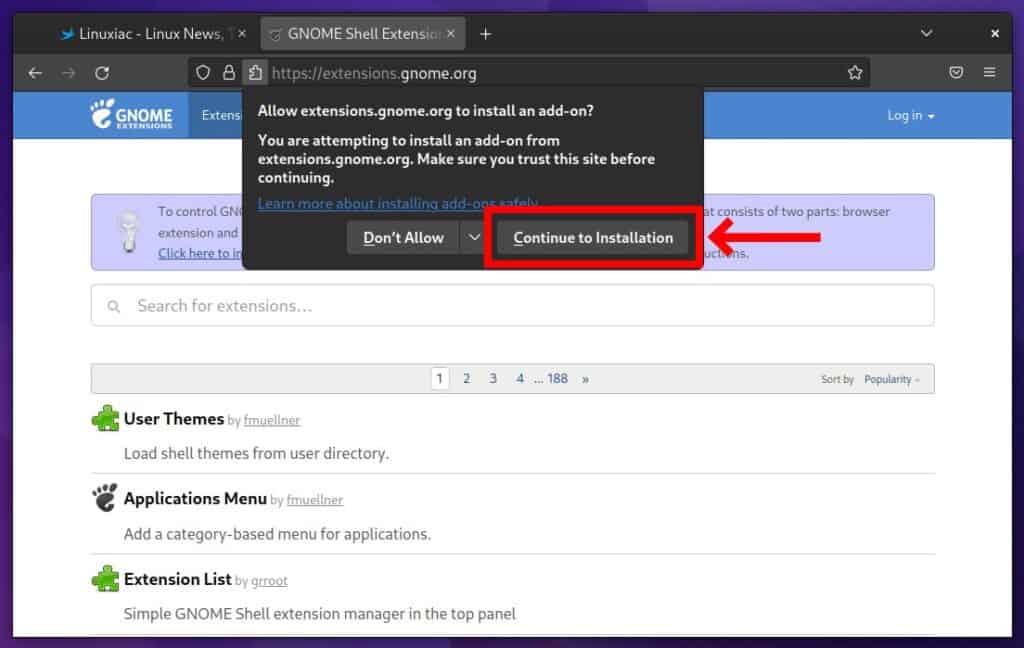
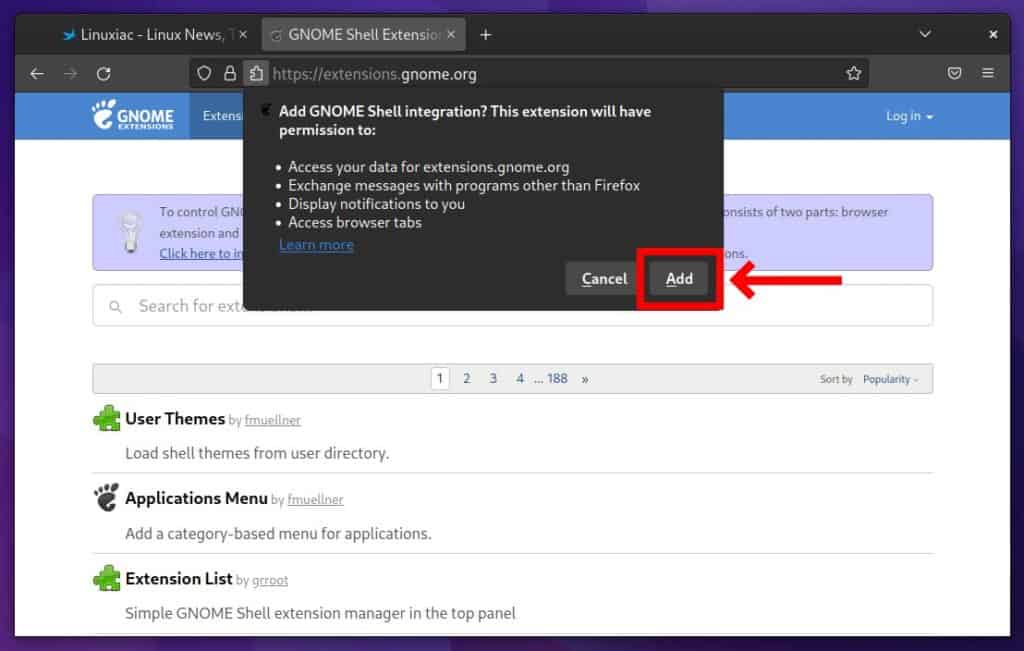
With that out of the way, let’s look at how to install the GNOME Shell Integration browser add-on. First, open a web browser and go to https://extensions.gnome.org. Then, click on the “Click here to install browser extension” link.
Google Chrome, Vivaldi, and Microsoft Edge users can find the GNOME Shell Integration add-on at this link.
Clicking the link above will open a new tab in Google Chrome. Next, hit the “Add to Chrome” button.
You will be asked to confirm that you want to add the extension to Chrome. Then, click the “Add extension” button.
If you refresh the webpage and see this, it means that your Linux distribution has already installed the Native Host Connector, as is the case with Fedora. In that case, you can skip the next section.
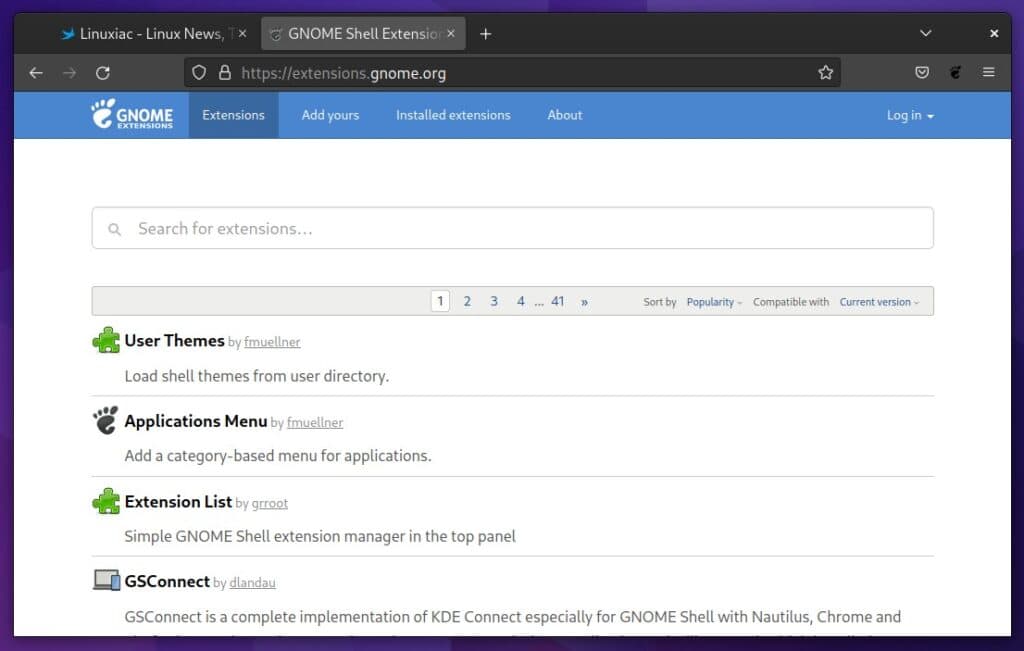
However, if you get the warning below after refreshing the webpage, you must install the Native Host Connector.
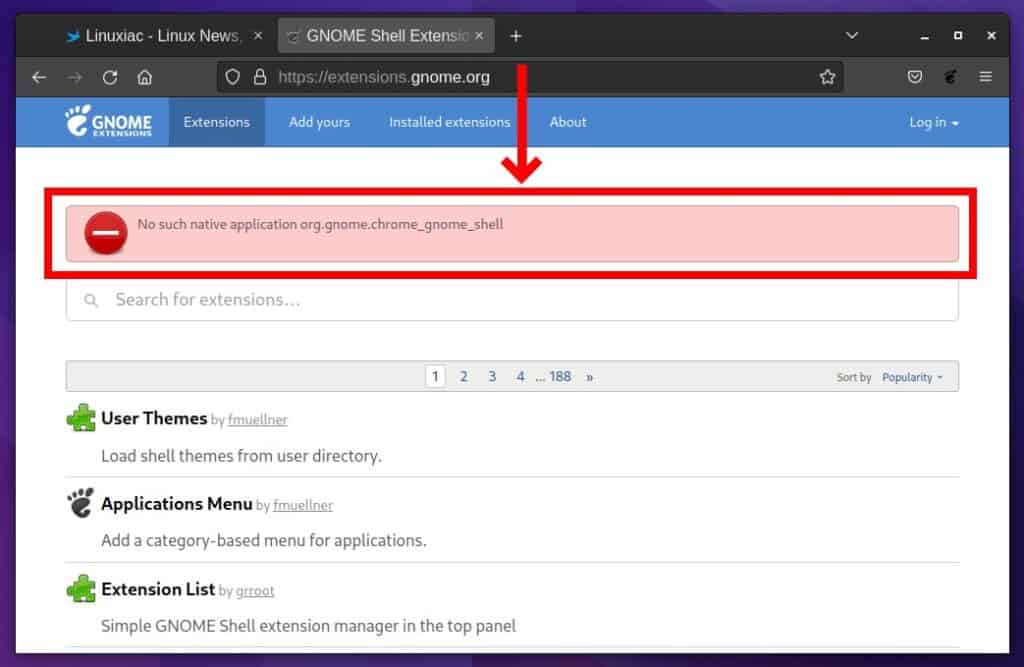
Fortunately, this is an easy task, as its installation is explained in the next section.
2. Install Native Host Connector
Native Host Connector is a software capable of communicating with the browser extension. In other words, it allows the browser to communicate with the GNOME shell.
Debian, Ubuntu users, and all their derivatives need to run in the terminal app:
sudo apt install chrome-gnome-shellAccordingly, users of Rocky Linux, AlmaLinux, and other RHEL-based distributions should type:
sudo dnf install chrome-gnome-shellIt shouldn’t bother you with the “chrome” prefix in the package name. It has nothing to do with Chrome.
Arch Linux and Arch-based distributions users must utilize the AUR repository and install from there using one of the AUR helpers:
yay -S gnome-browser-connector3. Install a GNOME Extension
Now that you have both the browser extension and Native Host Connector installed, you can open the GNOME Extensions website to search for, install, and enable your preferred extensions.
Find an extension you want to install and move the toggle switch to the “ON” position. For example, I will install the “Dash to Dock” extension.
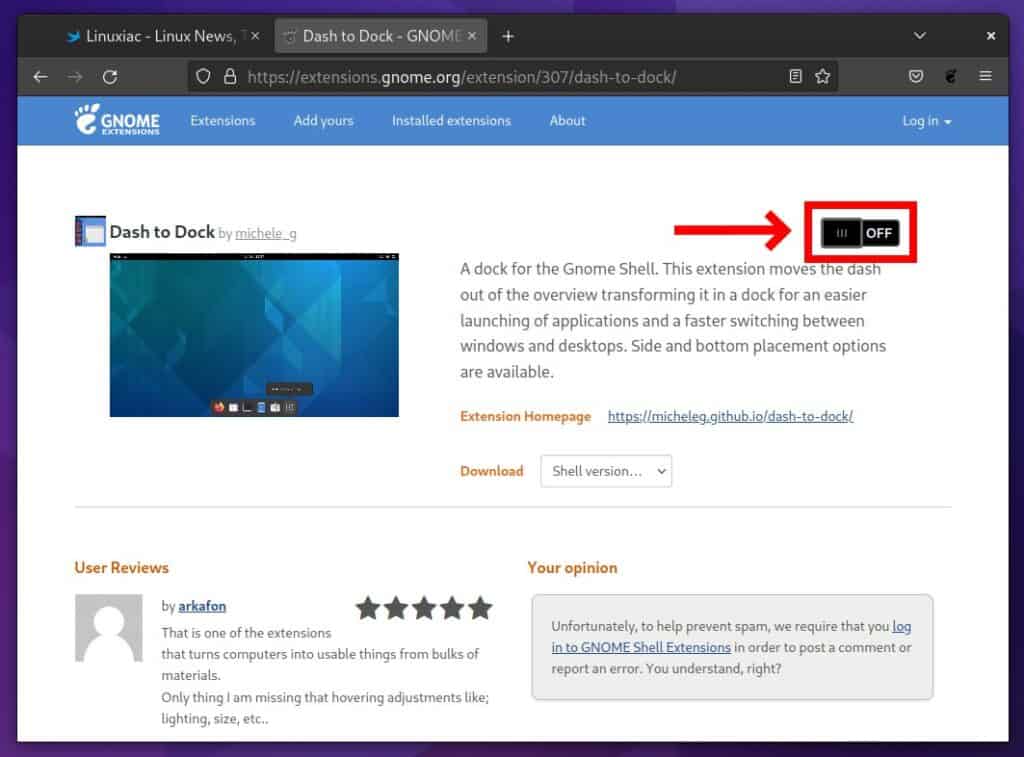
When you toggle the switch, you are prompted with an install message. Select “Install.”
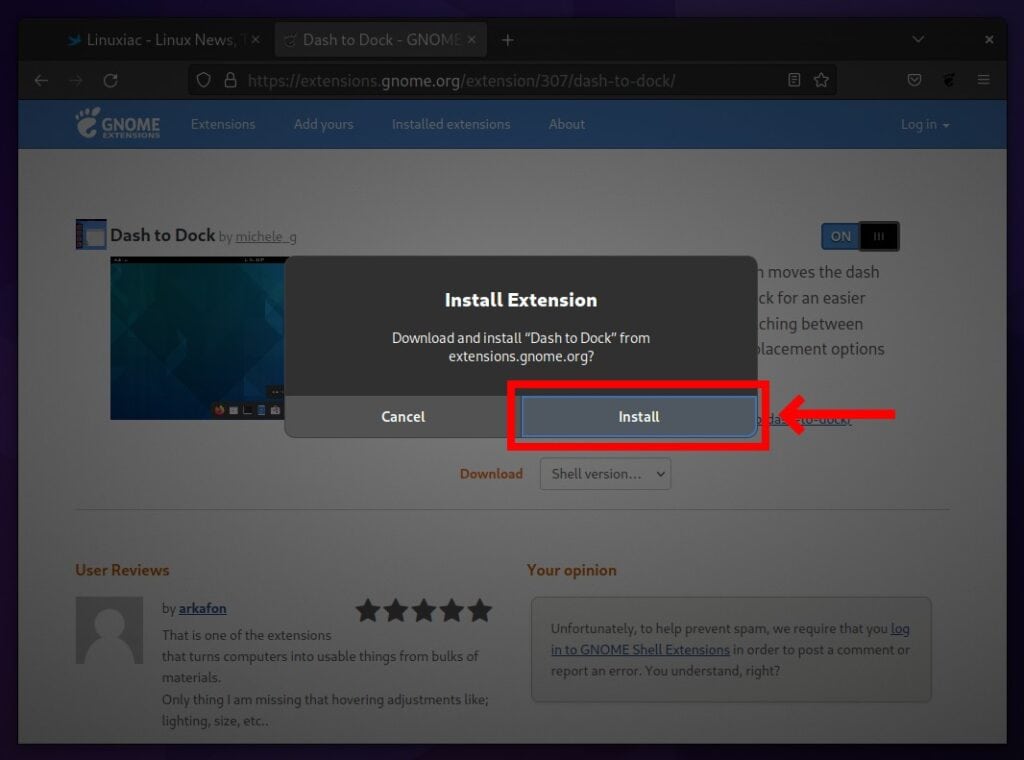
That’s all. The GNOME extension has been installed and is ready to use. Use the ON/OFF switch to enable/disable the extension.
Similarly, you can search and install other extensions as well. How much simpler can it be?
Configure GNOME Shell Extensions
You can see all your installed GNOME extensions on the website under the “Installed extensions” section. From there, you can configure the extension using the setting option.
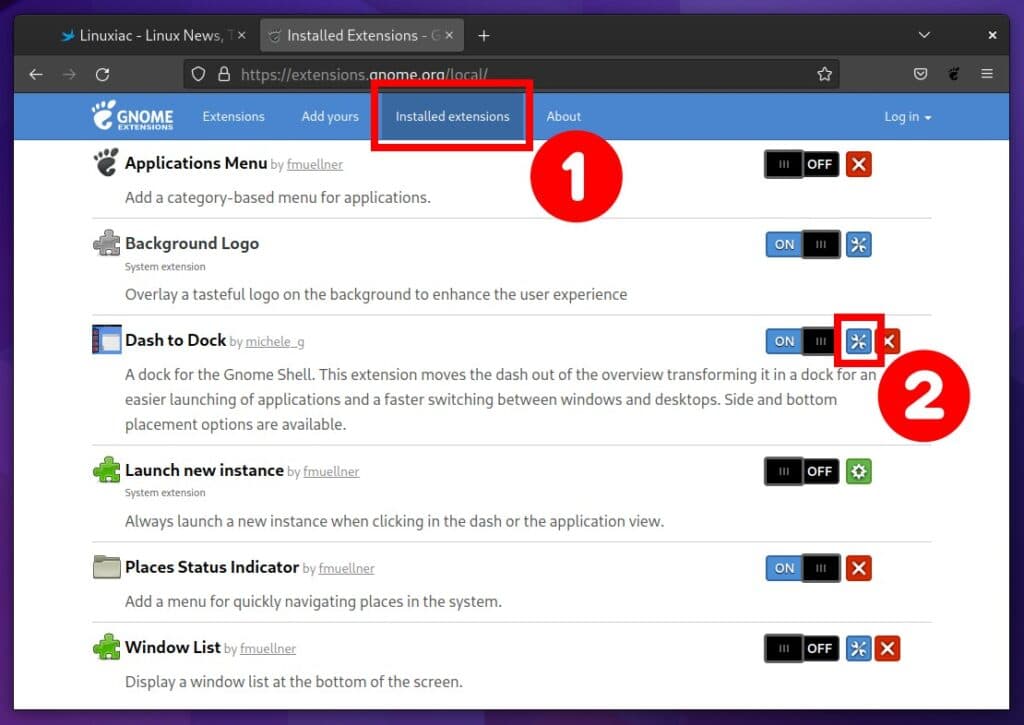
In addition, you only see a green arrow icon when an update is available. To delete the extension, click the red button with the “x” sign.
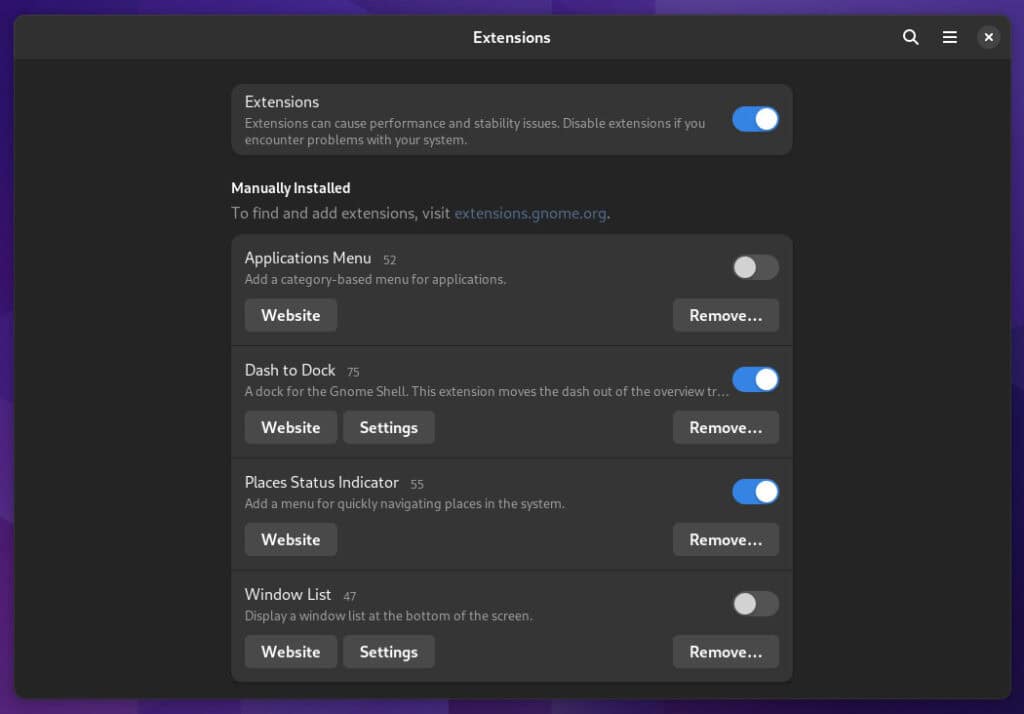
You may also manage them with the GNOME’s Extensions app. However, it is not installed by default in most Linux distributions, so you should install it additionally.
Ubuntu
sudo apt install gnome-shell-extension-managerDebian
sudo apt install gnome-shell-extensions-prefsFedora, Rocky Linux, AlmaLinux
sudo dnf install gnome-extensions-appArch Linux
sudo pacman -S gnome-shell-extensions-prefsThen, launch the Extensions app from the GNOME Dash.

Click the “Settings” button to configure or toggle the switch to enable/disable the extension. As the name suggests, the “Remove” button deletes the extension.
Manual Removal of Extensions
Another dirtier way of removing a GNOME extension is to delete it directly from the file system. By default, all extensions are stored as folders in the “~/.local/share/gnome-shell/extensions” directory.

Therefore, running “rm -rf /path/to/extension” removes it from your system.
Conclusion
You now understand what GNOME Extensions are and how to install, configure, and remove them on your Linux system. So, you may customize your GNOME environment to your tastes and preferences. On the GNOME Extensions website, you can find hundreds of different ones.
If you are interested, here is our ranking of some of the best GNOME extensions.
I hope we were of help to you. We welcome your feedback and suggestions in the comments section below.
