
VirtualBox is a free and open-source virtualization software commonly used at the desktop level to create a test environment. It enables you to create and run virtual machines, which are guest operating systems, including Windows, Linux, Unix, and Solaris.
VirtualBox is available for installation in the Ubuntu 22.04 repositories, but the version is 6.1.38. However, VirtualBox 7 was recently released, and it offers significant advantages over its predecessor, such as:
- Full virtual machine encryption support
- Support for UEFI SecureBoot and TPM 1.2/2.0
- Enhanced 3D support
- Automated virtual machine builder
- Integration with Oracle Cloud Infrastructure (OCI)
Fortunately, there is an effortless way to install VirtualBox 7 on Ubuntu 22.04 LTS, which we will show you in this guide. In addition, it is also compatible with Ubuntu versions 18.04, 18.10, 19.04, and 20.04.
Note! If you came across this guide looking for one for Ubuntu 24.04 LTS (Noble Numbat), you can find it here.
1. Import VirtualBox’s Repo GPG Key
VirtualBox 7, as previously stated, is not available in the Ubuntu 22.04 repositories. So, we’ll add it to our Ubuntu 22.04 Linux system.
First, import the Oracle VirtualBox GPG keys that sign the software.
wget -O- https://www.virtualbox.org/download/oracle_vbox_2016.asc | sudo gpg --dearmor --yes --output /usr/share/keyrings/oracle-virtualbox-2016.gpgCode language: JavaScript (javascript)We can now proceed with importing the official VirtualBox repository.
2. Add VirtualBox Repo to Ubuntu 22.04
After importing the GPG keys, we’ll add the official VirtualBox repository to our Ubuntu 22.04 system. If a new version is released, the update package will be made available with the rest of your system’s regular updates.
echo "deb [arch=amd64 signed-by=/usr/share/keyrings/oracle-virtualbox-2016.gpg] http://download.virtualbox.org/virtualbox/debian $(lsb_release -cs) contrib" | sudo tee /etc/apt/sources.list.d/virtualbox.listCode language: PHP (php)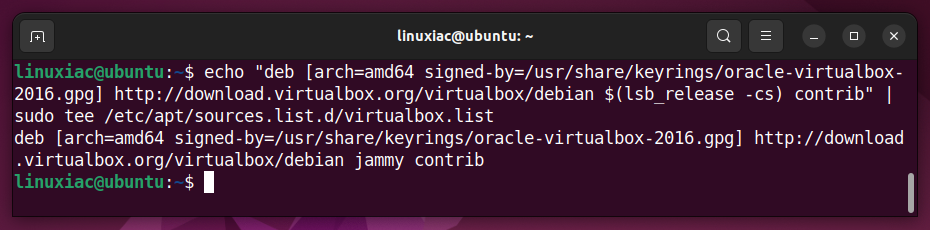
Next, we’ll update the package list.
3. Run System Update
Before we proceed with VirtualBox installation on our Ubuntu 22.04 system, we should update the list of available packages. So, run the below command to update the APT repositories index.
sudo apt update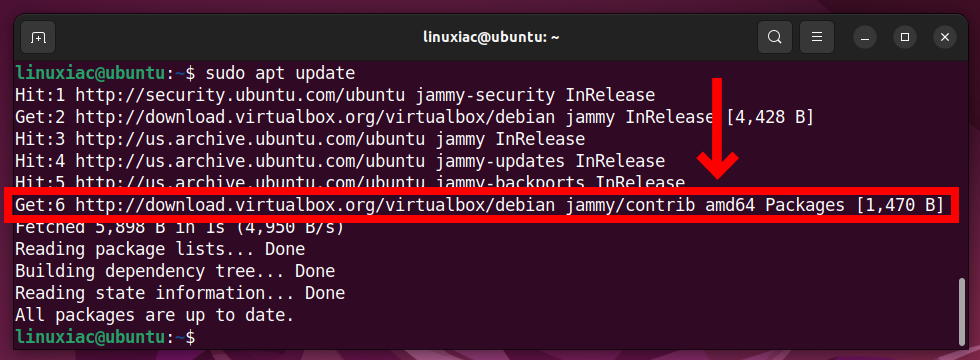
As you can see, our new VirtualBox repository is now available and ready to be used.
4. Install VirtualBox 7 on Ubuntu 22.04
Everything is already prepared for the actual installation. Now, to install VirtualBox on Ubuntu 22.04, run the following commands:
sudo apt install gcc-12 virtualbox-7.0Code language: CSS (css)Type “Y” to confirm that you want to install it, and press “Enter.”

As you can see, in addition to the “virtualbox-7.0” package, we also install “gcc-12 “. We need it so that “vboxdrv,” a kernel module for VirtualBox, can be compiled to get a smoothly running VirtualBox instance.
Wait for the installation to complete. VirtualBox is now installed and ready to be used on your Ubuntu 22.04 Linux system. But hold on before you start – we have a few little things to take care of first.
5. Install VirtualBox Extension Pack
This is an optional step, but I strongly encourage it because it will make working with VirtualBox on your Ubuntu system easier and more convenient. VirtualBox Extension Pack unlocks many great features, such as:
- Oracle Cloud Infrastructure (OCI) integration
- VirtualBox Remote Desktop Protocol (VRDP)
- Host webcam passthrough
- Disk and full VM encryption
Let’s highlight one peculiarity here. It is highly recommended that the version of the VirtualBox Extension Pack installed on your Ubuntu 22.04 system match the version of VirtualBox installed on your system.
So, to verify the exact version of the installed locally VirtualBox, you can use vboxmanage, a build-in VirtualBox’s command:
vboxmanage -v | cut -dr -f1
As you can see, the version of the installed Virtualbox is 7.0.14. Therefore, you must then download the Extension Pack with the same version.
However, if your VirtualBox installation version is different, replace both places containing “7.0.14” in the command below with the actual version. In addition, you can also go straight to the downloads page and look at the available versions.
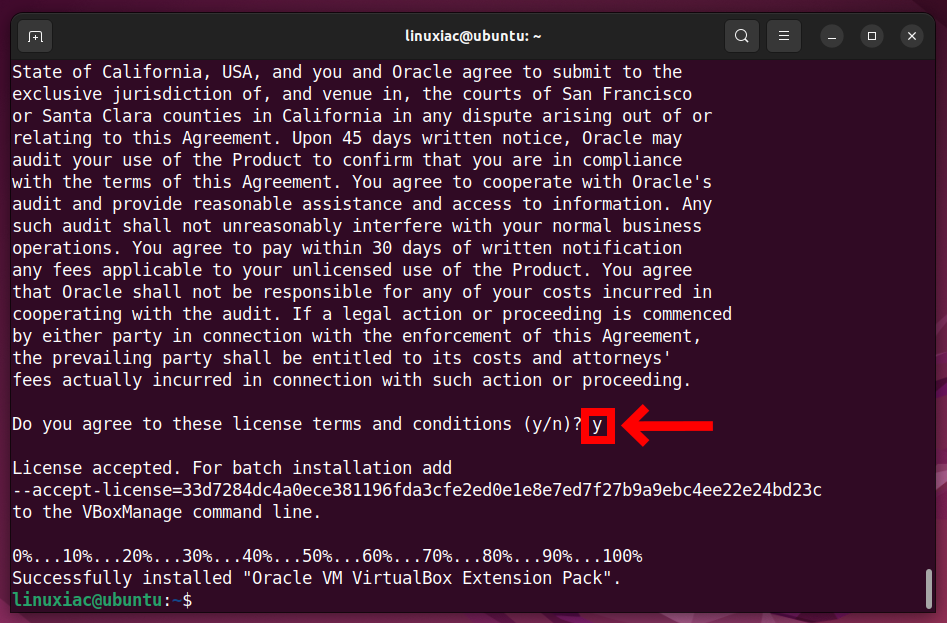
wget https://download.virtualbox.org/virtualbox/7.0.14/Oracle_VM_VirtualBox_Extension_Pack-7.0.14.vbox-extpackCode language: JavaScript (javascript)Next, to install the VirtualBox Extension pack, run the vboxmanage command as follows:
sudo vboxmanage extpack install Oracle_VM_VirtualBox_Extension_Pack-7.0.14.vbox-extpackCode language: CSS (css)You will be prompted to agree to Oracle’s license terms and conditions. So, type “y” to confirm and press “Enter.”
You can verify installed VirtualBox’s extension pack version by running the following:
vboxmanage list extpacksCode language: PHP (php)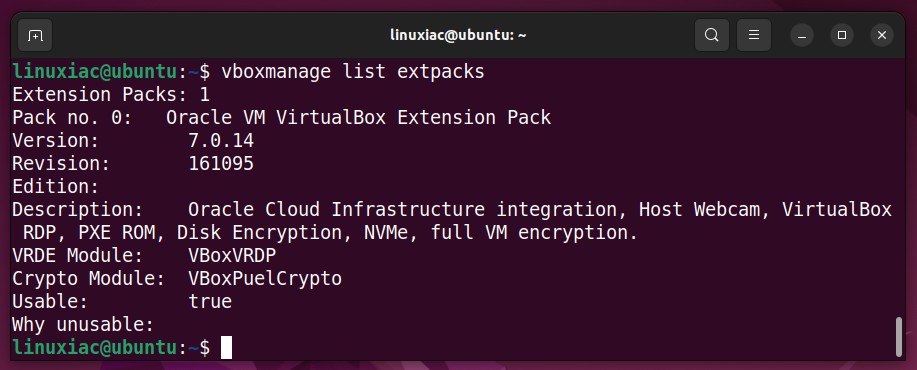
6. Add User to vboxusers Group
Before using VirtualBox, you should add your user account to the “vboxusers” group. This is quick and simple to accomplish by running:
sudo usermod -a -G vboxusers $USERCode language: PHP (php)Now, perform a reboot. After login, check that you are in the “vboxusers” group with this command:
groups $USERCode language: PHP (php)
7. Running VirtualBox on Ubuntu 22.04
You can start using VirtualBox by launching it from the Ubuntu Dash menu.

Conclusion
That concludes our guide on installing VirtualBox on Ubuntu 22.04 LTS ‘Jammy Jellyfish.’ We hope you find this guide useful. Thanks for your time!
We recommend checking the official documentation for individuals who want to learn more about VirtualBox’s features and how to use them effectively.
However, if you decide to use VMware Workstation Player, the other widely popular virtualization solution, our guide on installing it on Ubuntu 22.04 will come in handy.
Finally, you can use VirtualBox in an entirely headless mode to turn your server into a virtualization environment. To learn more about utilizing this VirtualBox feature, check out our guide: “How to Setup and Manage VirtualBox VMs on a Headless Server.”
Thanks for using this tutorial. Your feedback and comments are most welcome.


Got it in a few minutes. Very good.
Well done. Very easy to follow I love it.
Easy to follow instruction, however this has failed for me. I am in Canada and Step 2 / 3 fails.Step 2 puts me into a utility mode with > as a curser. Interestingly when I Cntrl C out of that and run Step 3, the update list Hit:1 and GET:2 are not security releases. My HIT:4 is your HIT:1. My hit 1, 2 and 3 show http://ca.archive yours shows http://us.archive. Do you have any advice? I am stumped.
great job
Super instructions: clear and concise – that’s how I love instructions, especially when everything works.
Thank you very much
Thanx, this is a great manual.
I tried the one for linuxmint first but the pc was too old to be able to cope with a windows vm.
That’s why I switch to other pc.
One thing that puzzled me was the version difference for the extension pack.
In the steps the version for virtualbox is 7.0 and for the ext. pack 7.0.14.
On the download page* is see directory’s 7.0.0 and 7.0.14.
So it seemed to me I need to use this url (and not upgrade virtualbox to 7.0.14, if that is possible at all):
https://download.virtualbox.org/virtualbox/7.0.0/Oracle_VM_VirtualBox_Extension_Pack-7.0.0.vbox-extpack
Maybe add whether virtualbox 7.0 and ext. 7.0.14 can be combined or not, will it work or cause problems.
So using https://download.virtualbox.org/virtualbox/7.0.0/Oracle_VM_VirtualBox_Extension_Pack-7.0.14.vbox-extpack?
I’ll find me windows-vm now.
Cheers!
*) https://download.virtualbox.org/virtualbox/
Many thanks for the great guide. I had a couple extra hoops to jump through…
On starting VirtualBox it complained:
“WARNING: The vboxdrv kernel module is not loaded. Either there is no module
available for the current kernel (6.5.0-25-generic) or it failed to
load. Please recompile the kernel module and install it by
sudo /sbin/vboxconfig
You will not be able to start VMs until this problem is fixed.”
So I tried sudo /sbin/vboxconfig, which complained:
“vboxdrv.sh: failed: Look at /var/log/vbox-setup.log to find out what went wrong.
There were problems setting up VirtualBox. To re-start the set-up process, run
/sbin/vboxconfig
as root. If your system is using EFI Secure Boot you may need to sign the
kernel modules (vboxdrv, vboxnetflt, vboxnetadp, vboxpci) before you can load
them. Please see your Linux system’s documentation for more information.”
In /var/log/vbox-setup.log, I spotted hiding on line 14 of some gobbledy-gook:
/bin/sh: 1: gcc-12: not found
So I did sudo apt install gcc-12, re-ran sudo /sbin/vboxconfig and now all is well with the world!
Thanks again for a great guide,
YoungJules
Thanks so much for the notes! They’re included in the article.
Best,
Bobby
Great article, really clear steps. Unfortunately I got an error relating to three drivers that failed to install and so the vbox kernel module could not start due to a ‘vboxdrv’ issue. Any Ideas?
This is missing the required step of installing the host-side VirtualBox drivers, which are required to be able to attach USB devices to the VMs. The best way is usually to install `virtualbox-dkms`, but there are no host-side drivers for VirtualBox 7.0. The latest available is for 6.1.
Does this work for upgrades from VirtualBox 6.1? Will all my VMs still work fine?
Other than the host-side drivers not being present for VirtualBox 7.0 in any repo, yes. You can just run `sudo apt install virtualbox-7.0` and it will uninstall the 6.1 version and install the 7.0 version. You just have to reboot the system after it’s done.
Be aware however that VirtualBox 7.0 is not actually supported on Ubuntu 22.04 yet. The `virtualbox-extpack` is still only for 6.1, though can be manually installed from the Oracle download site instead, but the required `virtualbox-dkms` has no 7.0 version and no work around.
Great write up – thanks! Unfortunately at the step to download the specific extension pack version it failed. I changed the version in your text line to 7.0.6 but oracle went and changed other parts of the filename too. The fix was to look at https://download.virtualbox.org/virtualbox/7.0.6/ and pick the corresponding file. Thanks for the help!
Hi muteknee,
First, thanks for the kind words. For downloading the VirtualBox Extension Pack, the command downloaded it without problems.
wget https://download.virtualbox.org/virtualbox/7.0.6/Oracle_VM_VirtualBox_Extension_Pack-7.0.6.vbox-extpack
Best,
Bobby
Excellent installation guide. Thank you!
Glad to be of help! 🙂
Best,
Bobby