Using the tar command to create tar.gz archives in Linux is a must-have skill for any Linux administrator. For this reason, in this article, we will show you how to create tar.gz archives in Linux using real-world examples following best practices.
Additionally, if you want to learn how to extract tar.gz files in Linux, check out our excellent guide, “How to Extract tar.gz File in Linux by Using the Command Line.”
You’ve probably already met files with the extensions tar, tar.gz, or tar.bz2, for example. Although they are all archives, there is a difference between them. So, before we get into the practicality, we’d want to shed some light on the difference is between them.
What Is the Difference Between TAR, TAR.GZ, and TAR.BZ2?
Tar stands for “Tape Archive” because it was used to place data on storage tapes when tar was invented. It’s a common file format in the Linux/UNIX systems that packages files together for backup or distribution purposes.
And now something vital to keep in mind. The tar archive is nothing more than an archive. In other words, there is no compression involved, just putting multiple files into a single (tar) file.
Therefore, to obtain a compression of the final TAR archive, an extra tool such as GZIP or BZIP2 must be involved during its creation.
As a result, when GZIP is applied, the resulting file has the tar.gz extension. If BZIP2 is used, the file gets the tar.bz2 extension.
So, having made these clarifications, let’s get to the meat of the subject, how to create a tar.gz archive in Linux using the tar command.
Creating TAR Archive File
The general syntax for the tar command is as follows:
tar [OPTIONS] [ARCHIVE_NAME] [FILE_NAMES]Code language: Bash (bash)In Linux, the tar command has numerous options, but the most important and commonly used ones when creating an archive are listed below:
-c(--create) Create a new tar archive.-v(--verbose) Show the files processed by thetarcommand.-f(--file=) Resulting archive file name.-z(--gzip) Filter the archive through GZIP.-j(--bzip2) Filter the archive through BZIP2.--excludeExclude files matching pattern.
For example, to create a tar archive named myfiles.tar, including the files file1.txt, file2.jpg, and file3.pdf, use the command below:
tar cvf myfiles.tar file1.txt file2.jpg file3.pdfCode language: Bash (bash)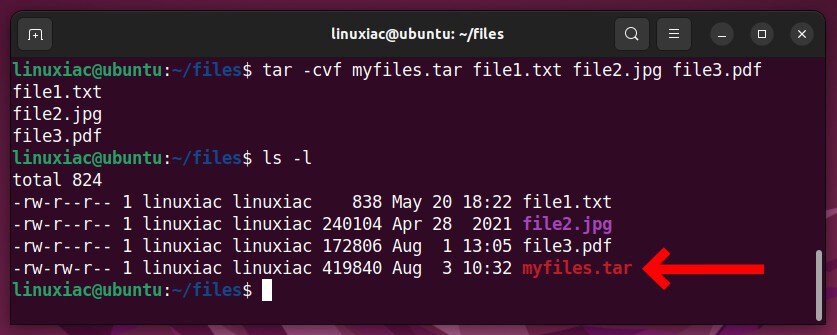
The essential thing to note here is that the -f argument must come last in the argument list because the tar command expects the file’s name to come after it.
As you can see from the example, the arguments do not need to be separated, which makes it easier to type the command. Of course, the command will obtain a completely similar result if it is also executed in the following way:
tar -c -v -f myfiles.tar file1.txt file2.jpg file3.pdfCode language: Bash (bash)Or even more descriptive:
tar --create --verbose --file=myfiles.tar file1.txt file2.jpg file3.pdfCode language: Bash (bash)Now let’s look at how things work when archiving a whole directory. Assume you have a directory called files and want to save it to a file called myfiles.tar. You would type the following command:
tar cvf myfiles.tar files/Code language: Bash (bash)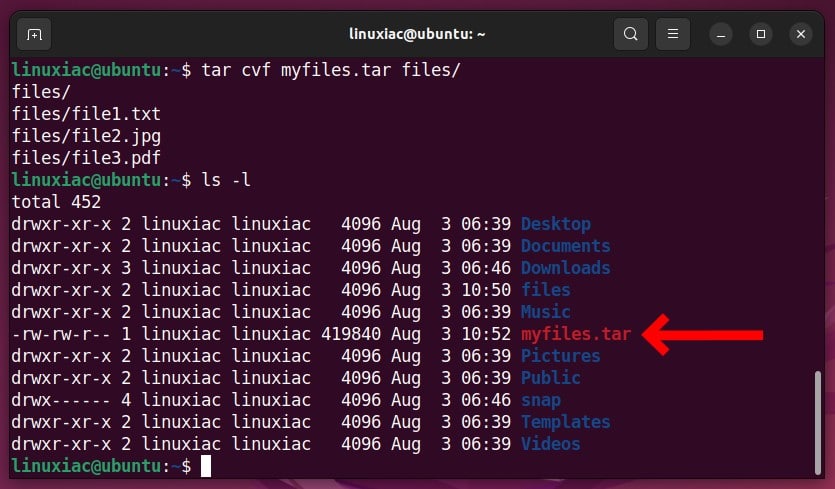
As you can see, the only difference between this command and the last one is that you don’t pass a list of files to the tar command but rather the path to the directory you want to archive.
Similarly, if you wish to archive multiple folders in a single file, list them one after the other with their full or relative path.
tar cvf myfiles.tar files1/ files2/Code language: Bash (bash)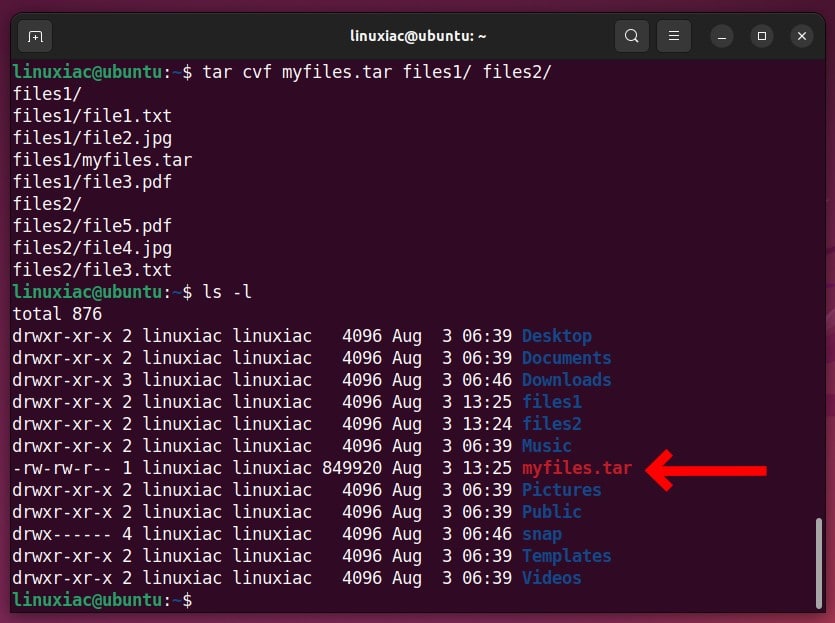
Exclude Files and Directories
Sometimes we need to create an archive while excluding specific files or folders. In such a situation, the --exclude option comes into play.
For example, assume we have the directory named files containing four subdirectories: files1, files2, files3, and files4.
We want to archive the entire files directory, but the final archive should not include the files2 and files3 directories. The command we need to run to accomplish this is as follows:
tar cvf myfiles.tar --exclude=files2 --exclude=files3 files/Code language: Bash (bash)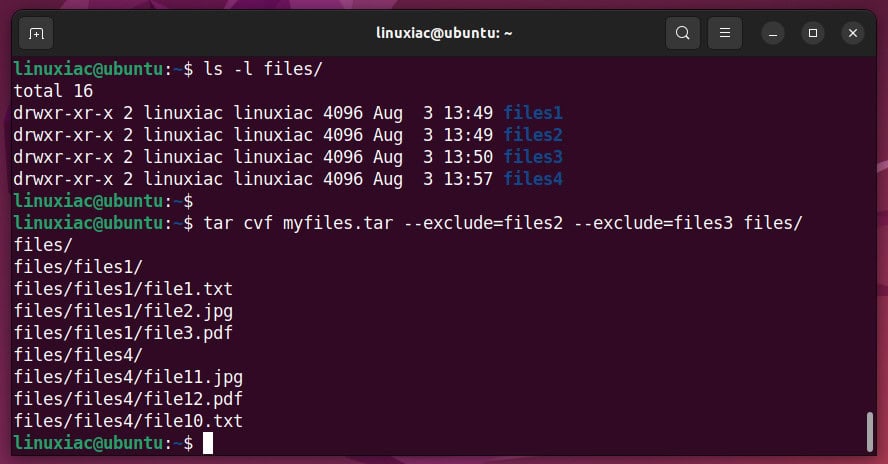
Take note of the use of files2 and files3. Because these strings are actually regular expressions, we don’t include any pathways.
In the same manner, if we wish to exclude just files with the .txt extension from the archive, we can run:
tar cvf myfiles.tar --exclude=*.txt files/Code language: Bash (bash)Creating TAR.GZ Archive File
GZIP is the most widely used tar file compression algorithm. When using GZIP to compress tar archives, the archive name should end with tar.gz.
To use it, add the -z option to the tar command, which instructs the tar to apply GZIP compression. For example, let’s archive file1.txt, file2.jpg, and file3.pdf to an archive named myfiles.tar.gz.
tar cvzf myfiles.tar.gz file1.txt file2.jpg file3.pdfCode language: Bash (bash)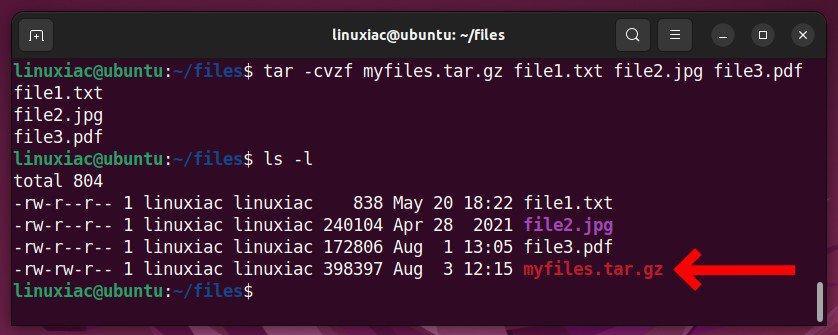
Creating TAR.BZ2 Archive File
BZIP2 is another popular algorithm for compressing tar files. So, when using BZIP2, the archive name should end in tar.bz2.
To use it, add the -j option to the tar command, which instructs the tar to apply BZIP2 compression. For example, let’s archive the files file1.txt, file2.jpg, and file3.pdf to an archive named myfiles.tar.bz2.
tar cvjf myfiles.tar.bz2 file1.txt file2.jpg file3.pdfCode language: Bash (bash)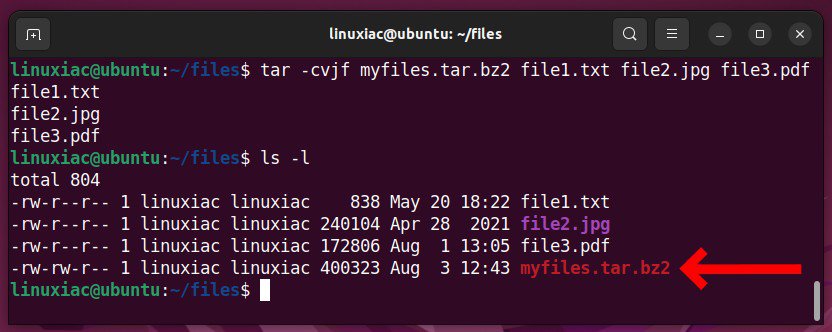
TAR, TAR.GZ, or TAR.BZ – Which One to Use?
Now you’re probably wondering which of the three formats (TAR, TAR.GZ, and TAR.BZ2) to use for creating archives. Well, it all depends on your goals. In other words, it depends on what you are looking for – compression or simple archiving.
If you wish to archive a file or set of files into one without compressing it, the TAR format is what you need.
However, if compression is desired, the other two choices, TAR.GZ and TAR.BZ2 must be considered. So, which of the two is superior?
This is how things are. Using GZIP (tar.gz) compression instead of BZIP2 (tar.bz2) is the faster option. Moreover, it is also memory-efficient.
On the other hand, BZIP2 compression is slightly slower than GZIP, but it applies a higher level of compression. As a result, the file will be up to 15% smaller than the same file archived using GZIP compression.
So, based on this information, each of you can decide where and what compression to use based on the situation’s demands.
Conclusion
This guide explained how to use Linux’s tar command to create tar, tar.gz, and tar.bz2 archives. In addition, you also now have a clear understanding of the differences between them.
Of course, other additional methods exist for creating compressed archives in Linux. However, the ZIP format is the most known to users coming from Windows. Therefore, the two guides below will be handy if you want to learn how to quickly and effortlessly create and unzip zip files in Linux.
- How to Zip Files and Directories on Linux (with Examples)
- How to Unzip Files in Linux (with Examples)
We hope we were of help to you. Any feedback is welcomed in the section below.
You can refer to the tar command man page for more information about it.
