
VirtualBox is free, open-source, and cross-platform virtualization software that creates a virtual machine on top of your OS. This machine will have its own virtualized disk and access to a part of your system’s CPU and memory.
When configuring a virtual machine, the user can specify how many CPU cores and how much RAM and disk space should be devoted to the virtual machine.
Before starting, you need to download the Ubuntu ISO file you want to install from the Ubuntu download page. Once you have the ISO file downloaded, you can proceed to install Ubuntu on a VirtualBox virtual machine.
Setting up a Virtual Machine in VirtualBox
Create New Virtual Machine
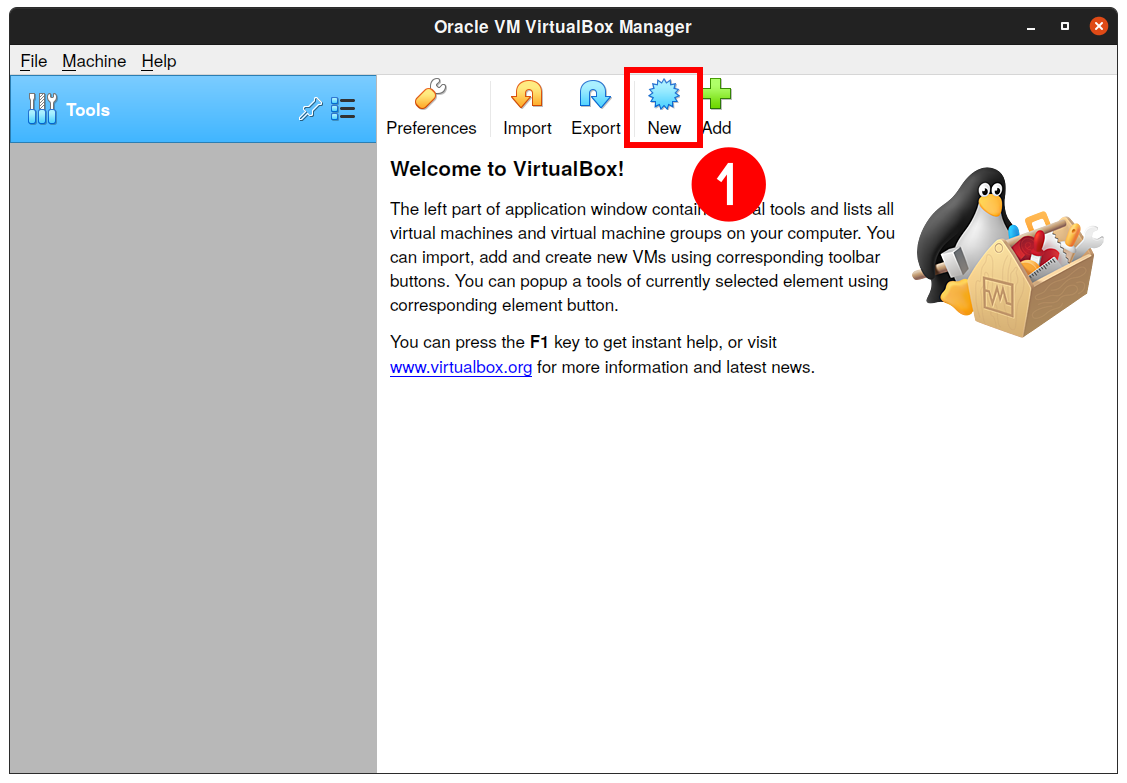
To create a new virtual machine for installing Ubuntu on VirtualBox, open VirtualBox and click “New.”
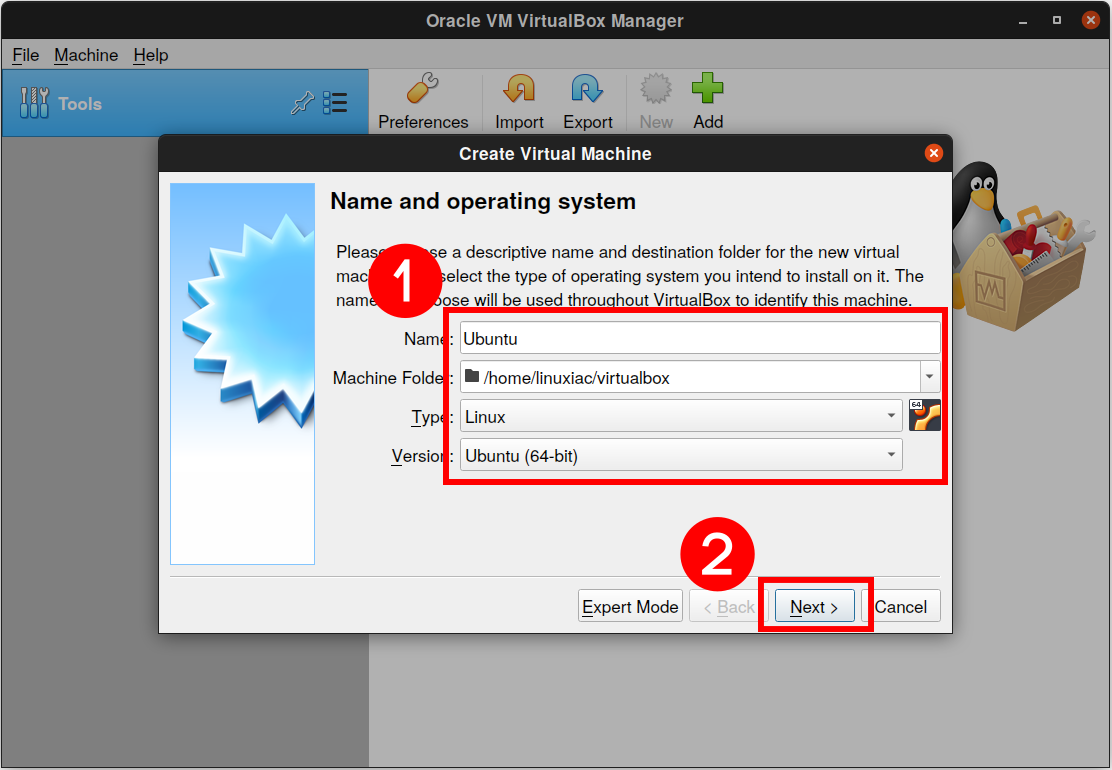
Enter a name for your virtual machine (e.g., Ubuntu), select “Linux” as the type, and select “Ubuntu (64-bit)” as the version.
Allocate RAM
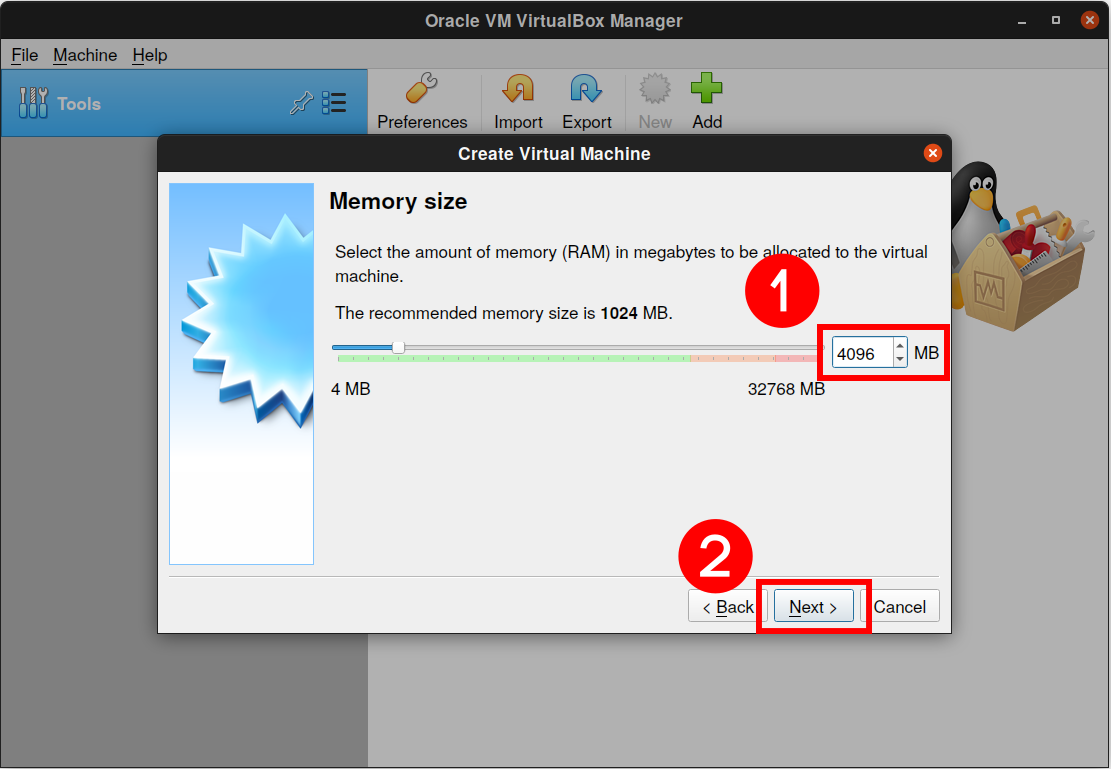
The memory size depends on your host machine’s memory size. As our physical machine used in this example has enough RAM (32 GB), we’ll set 4 GB of RAM for a virtual machine to install Ubuntu on VirtualBox.
You can select any amount of memory you wish, but don’t add more than 50% of your total RAM.
Create Virtual Hard Disk
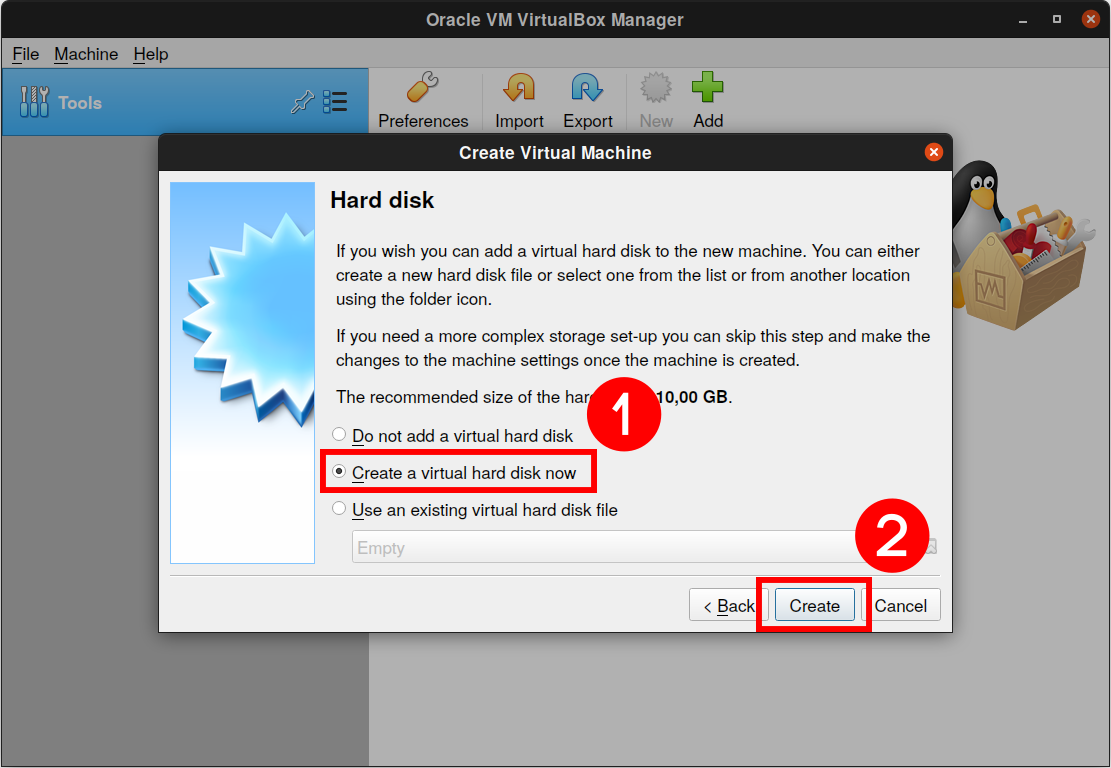
Check the “Create a virtual hard disk now” option, so we can later define our Ubuntu virtual hard disk size and click the “Create” button.
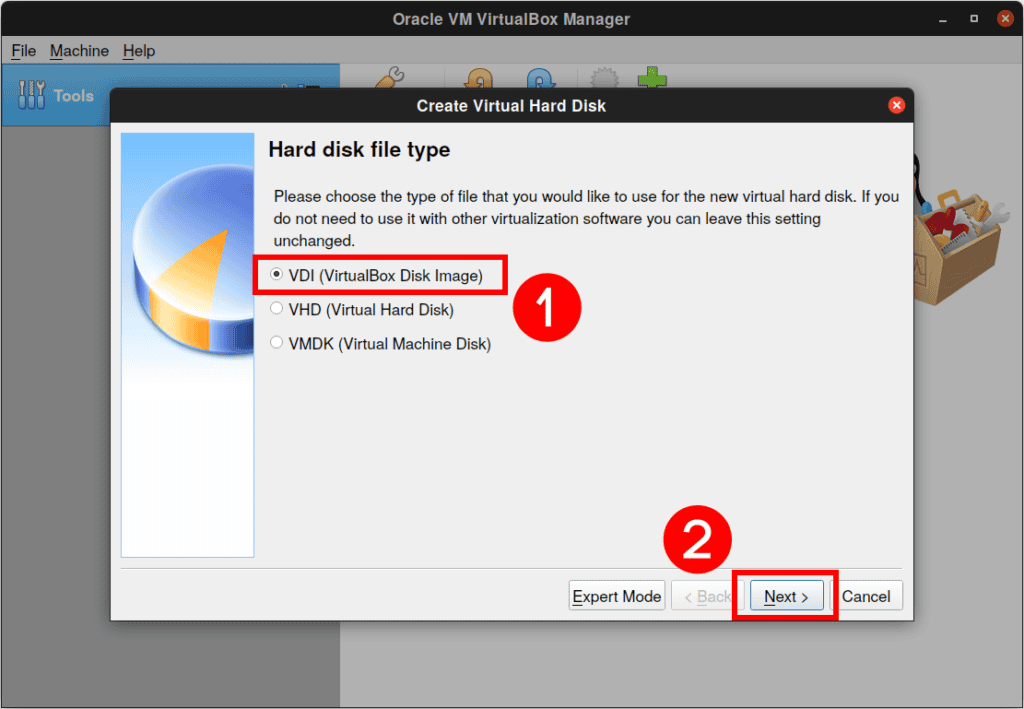
Accept the default “VDI (VirtualBox Disk Image)” drive file type and click the “Next” button.
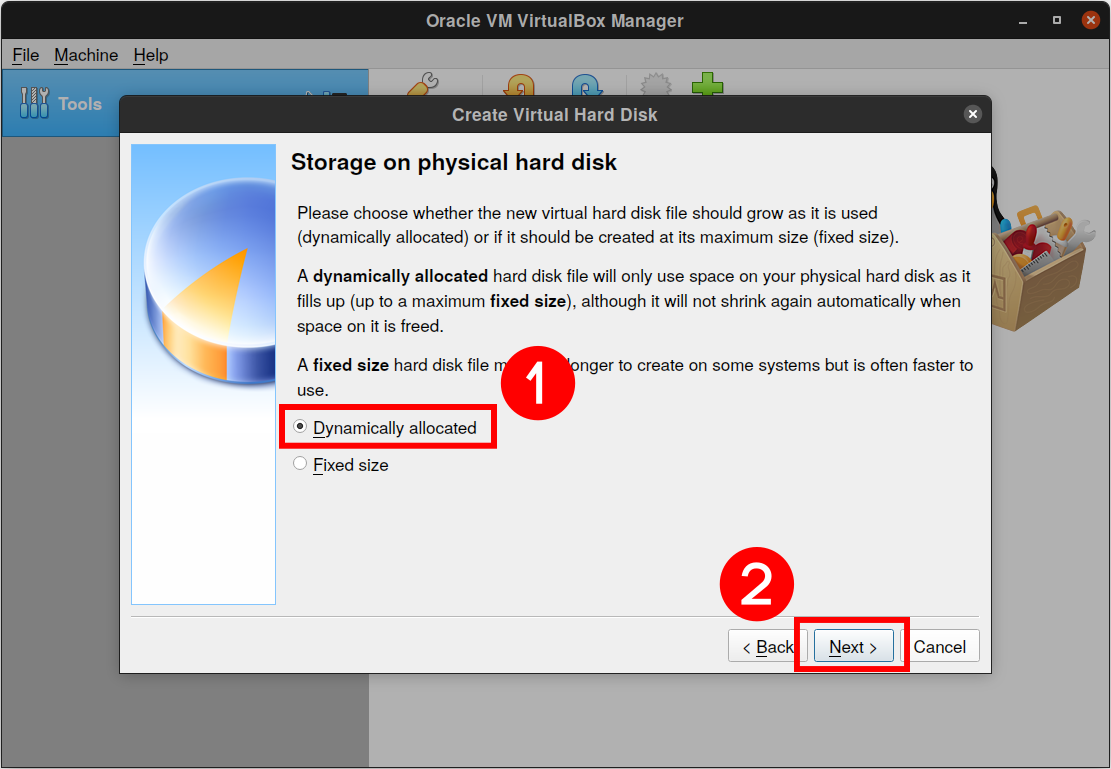
Next, we’ll dynamically allocate storage on our physical disk. This option allows you to save space on your physical disk until the virtual disk grows to its maximum given size. Again, click the “Next” button.
Set the virtual hard drive file location by clicking on the folder-shaped icon. The virtual hard drive is a section of your computer’s hard drive space that will be used to store your virtual machine.
Set the file size of the virtual disk to 20 GB or more.
Click “Create” to finish setting up your Ubuntu virtual machine on VirtualBox.

Start Ubuntu Virtual Machine
The wizard will close and go back to VirtualBox Manager. Select your Virtual Machine and click the “Start” button.

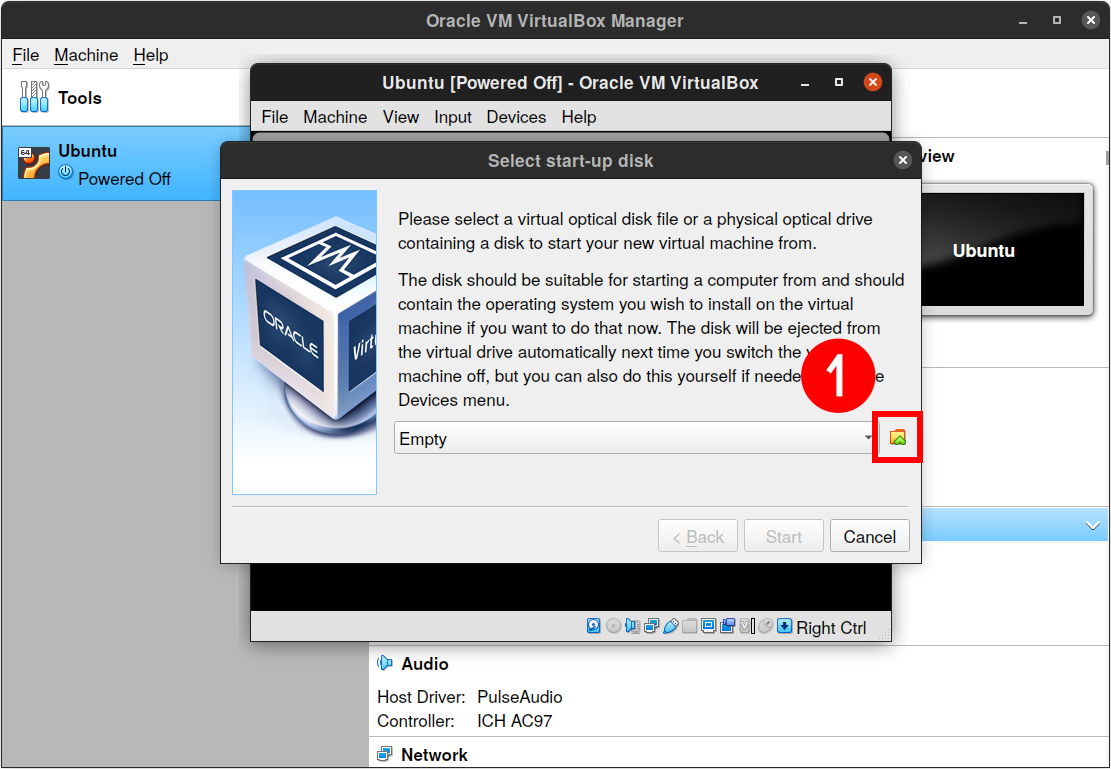
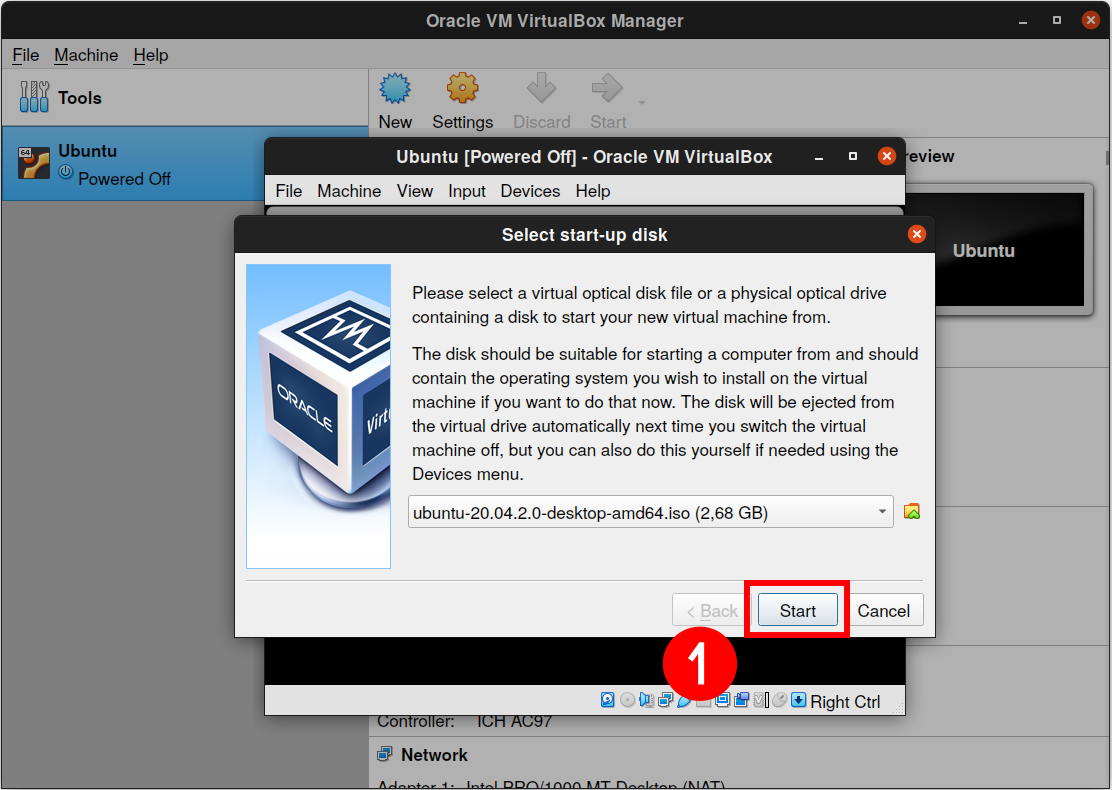
When you first start Ubuntu virtual machine with VirtualBox, you must select a start-up disk. Start this process by clicking the little folder icon.
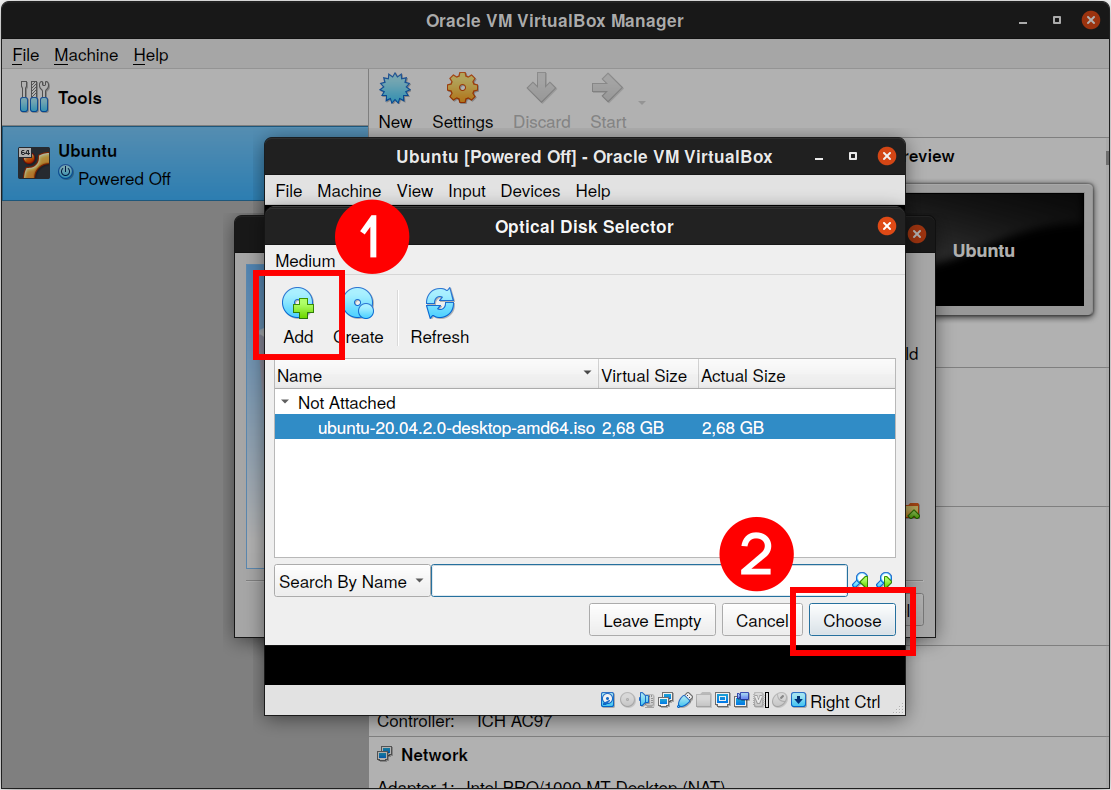
You will need to find and select the Ubuntu image (installation ISO file) you want to install. Next, click the “Add” button to bring up a file dialog box.
Use this file dialog box to find and select the Ubuntu image you downloaded earlier. Confirm your choice by clicking the “Choose” button.
With the Ubuntu ISO installation file selected, click the “Start” button.
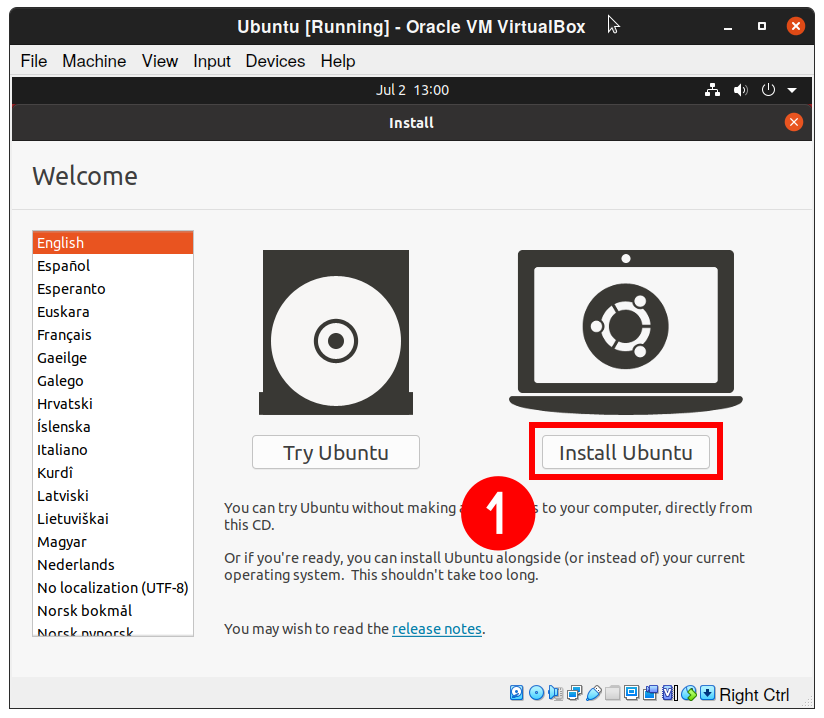
Finally, we can install the Ubuntu operating system to our VirtualBox’s virtual machine. The virtual machine boots from the ISO Ubuntu installation image.
Install Ubuntu in VirtualBox
Things from here are Ubuntu-specific. To go ahead and install, click “Install Ubuntu.”
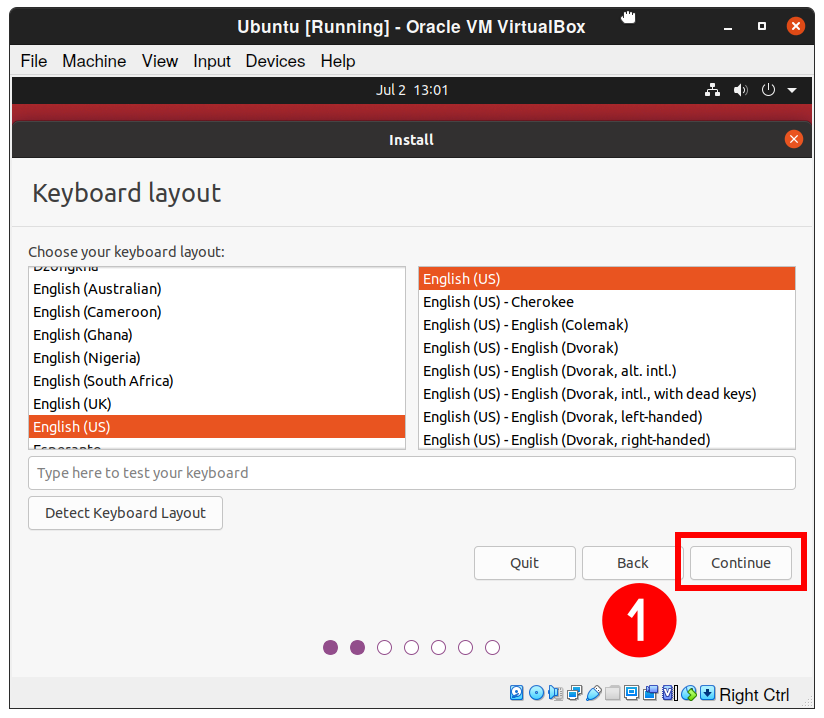
Choose your keyboard layout and click the “Continue” button.
Typically you will want Ubuntu to be installed on your VirtualBox virtual machine as a “Normal installation.”
Make sure “Download updates while installing Ubuntu” and “Install third-party software for graphics and Wi-Fi hardware and additional media formats” options are selected.
This will ensure that everything Ubuntu needs to run will be installed. Click the “Continue” button.

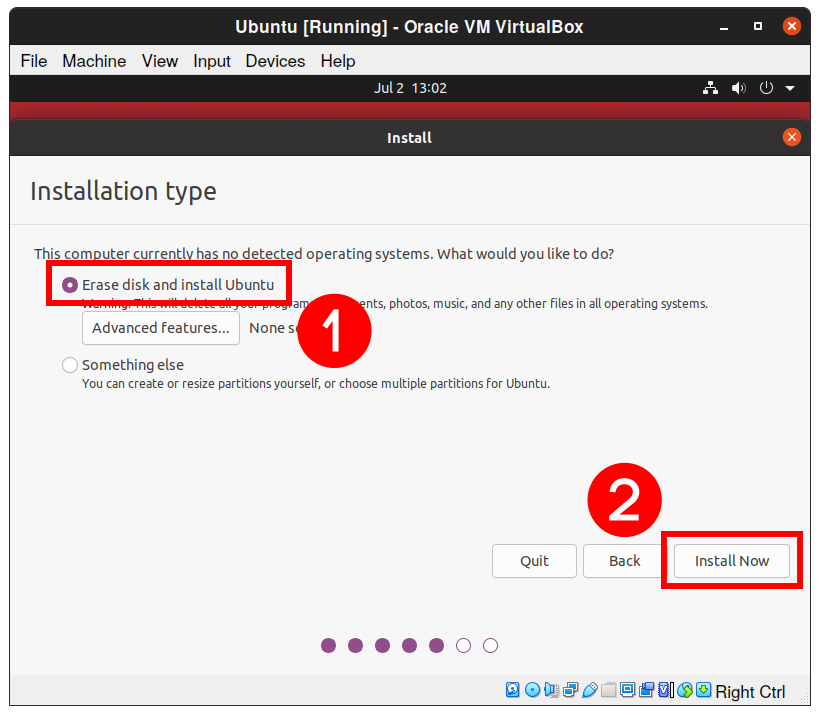
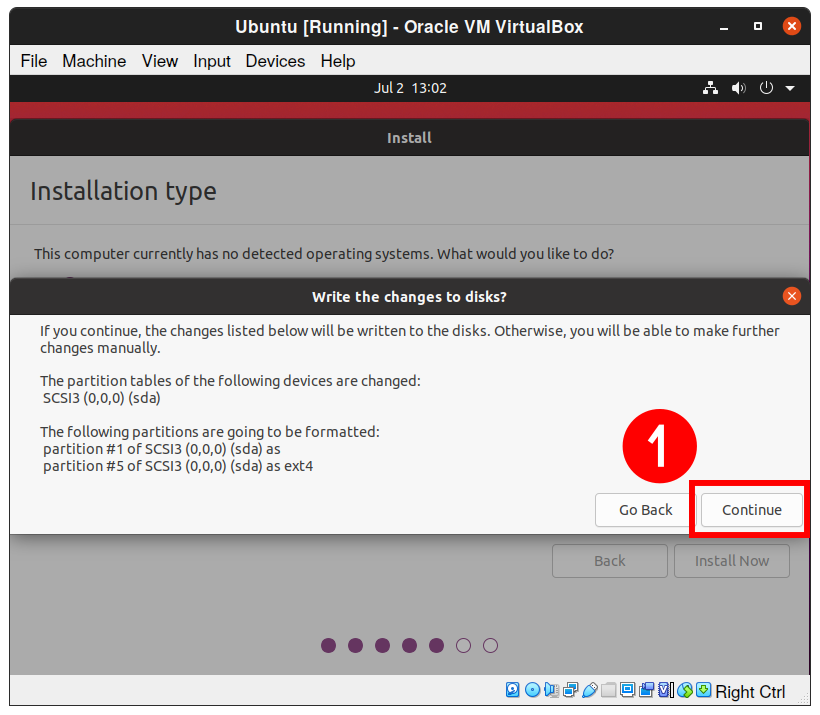
Check “Erase disk and install Ubuntu” and hit the “Install Now” button.
Confirm by clicking on the “Continue” button.
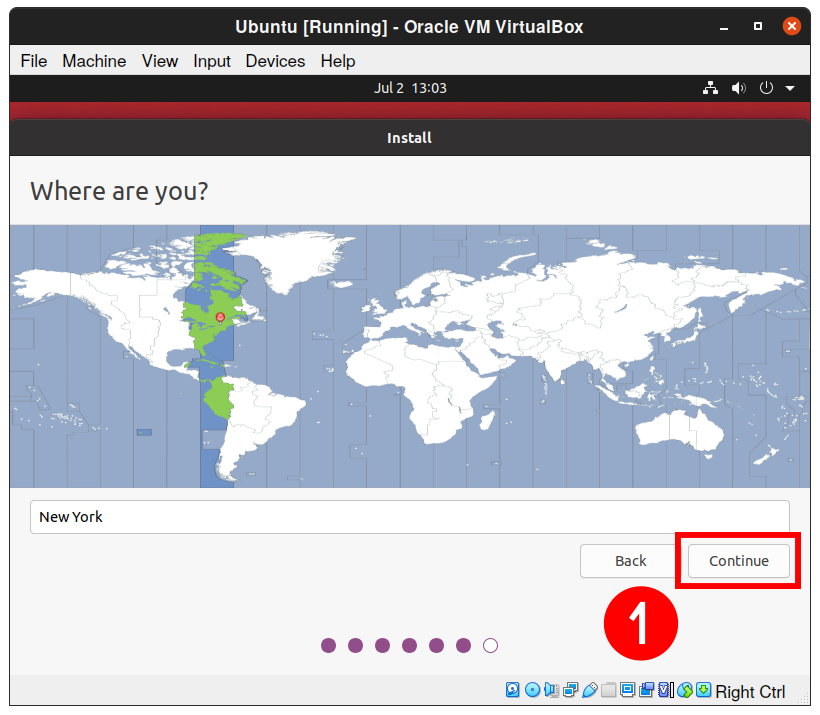
With the correct time zone selected, click the “Continue” button.
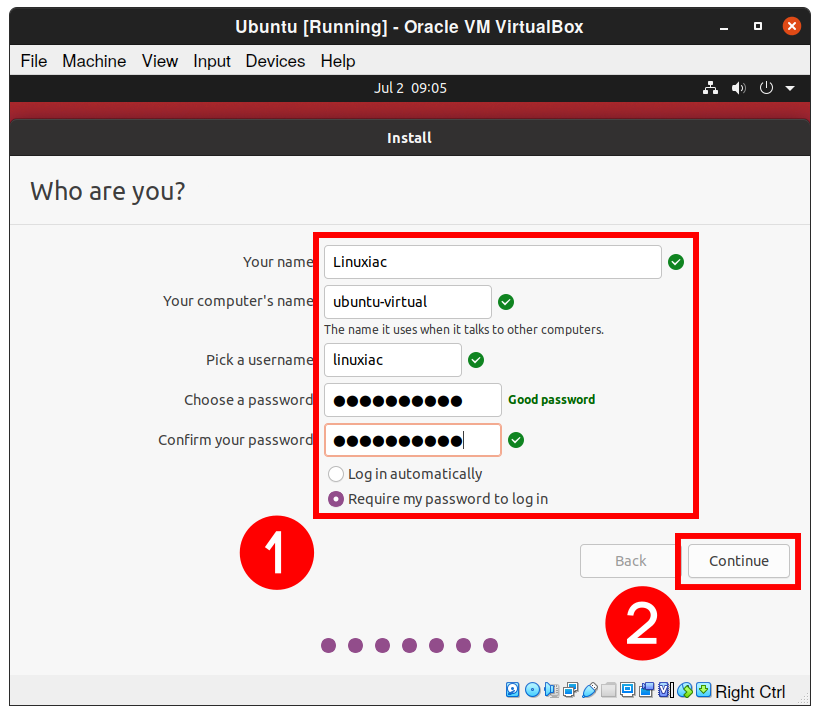
The last thing we need to do is create an account. Enter your preferred name, username, and password. Note that this user will have sudo privilege. Lastly, click the “Continue” button.
The installation will continue until it is finished.
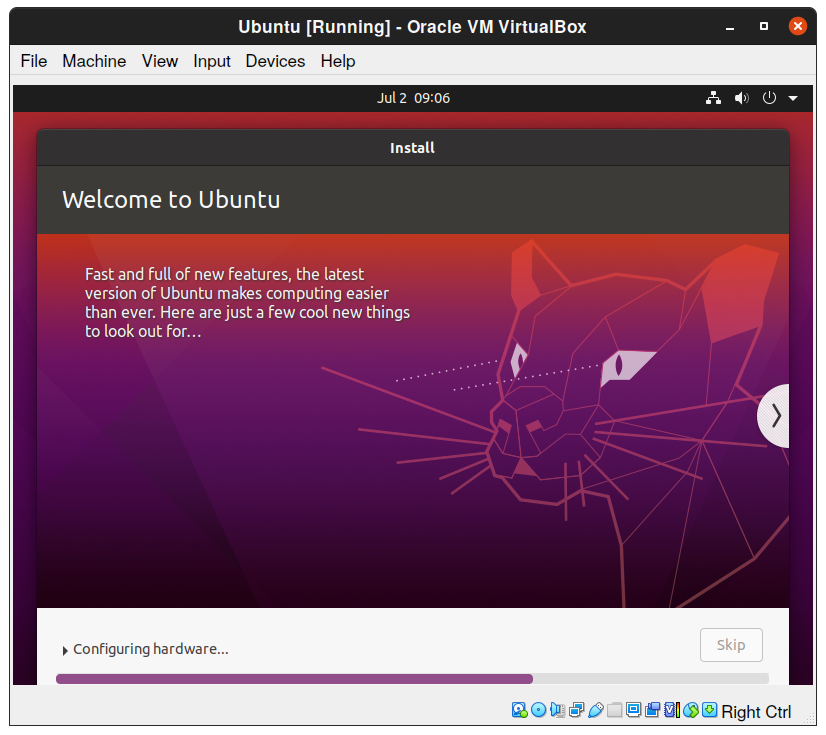
You are almost done. Wait patiently for Ubuntu to be installed on VirtualBox. This process can take anywhere between 5 and 10 minutes.
Once Ubuntu has finished installing itself, you will see a notification window. To proceed, click the “Restart Now” button.

Upon restarting, you will see a message about removing the installation medium. Just press the “Enter” key.
And that’s all. Select your name, then enter your password and sign in to your newly installed Ubuntu on VirtualBox.
Ubuntu will load your desktop as though you were using a separate computer.
Installing VirtualBox Guest Additions on Ubuntu
VirtualBox Guest Additions are drivers and system utilities intended to improve usability, virtual machine performance, and tight integration with a host OS.
The VirtualBox Guest Additions offer the following features:
- Better video support
- Mouse pointer integration
- Shared clipboard
- Shared folders
- Drag and drop support
- Seamless windows
- Generic host/guest communication channels
- Better Time synchronization between guest and host
You need to run these commands in the virtual Ubuntu system.
First, update your Ubuntu guest operating system software packages:
sudo apt update
sudo apt upgrade
Once the upgrade completes, reboot your Ubuntu guest operating system and run:
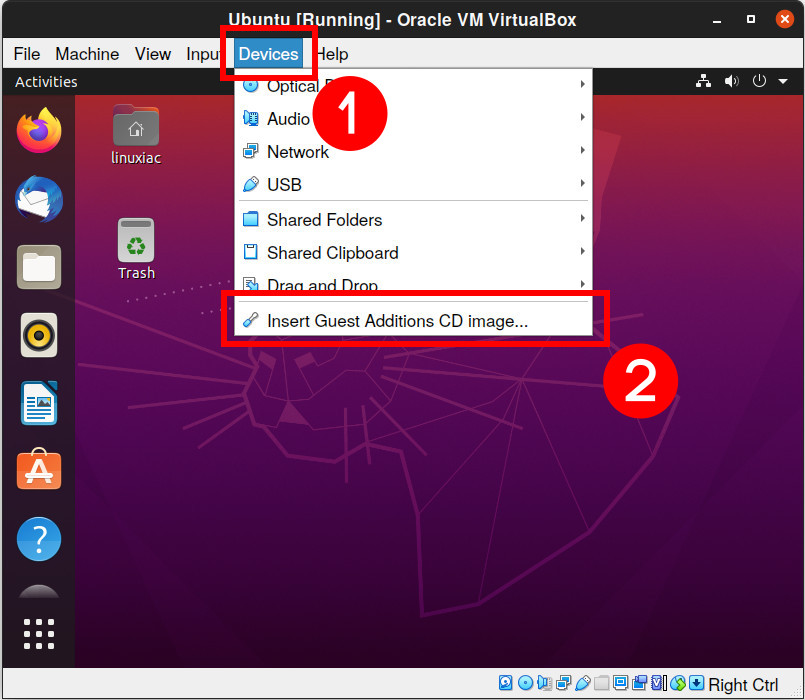
sudo apt install build-essential dkms linux-headers-$(uname -r)Code language: JavaScript (javascript)Next, from the Virtual Machine menu bar, go to “Devices” and click on “Insert Guest Additions CD image.” This helps to mount the Guest Additions ISO file inside your virtual machine.
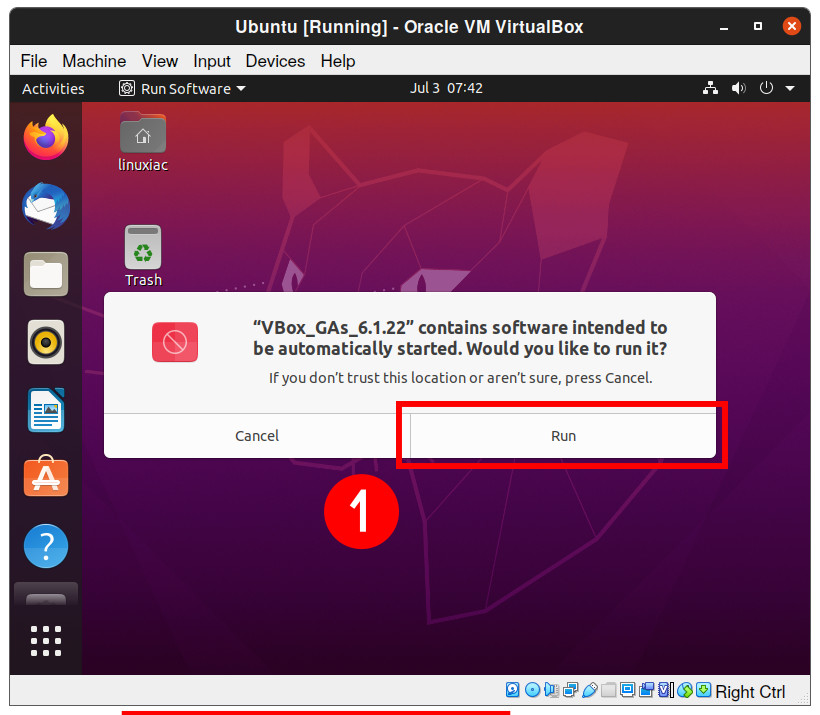
A dialog window will prompt you to “Run” the installer to launch it.
Enter your user’s password and click the “Authenticate” button.

This should open up the installation in a terminal window. Once the installation is complete, press the “Enter” key.
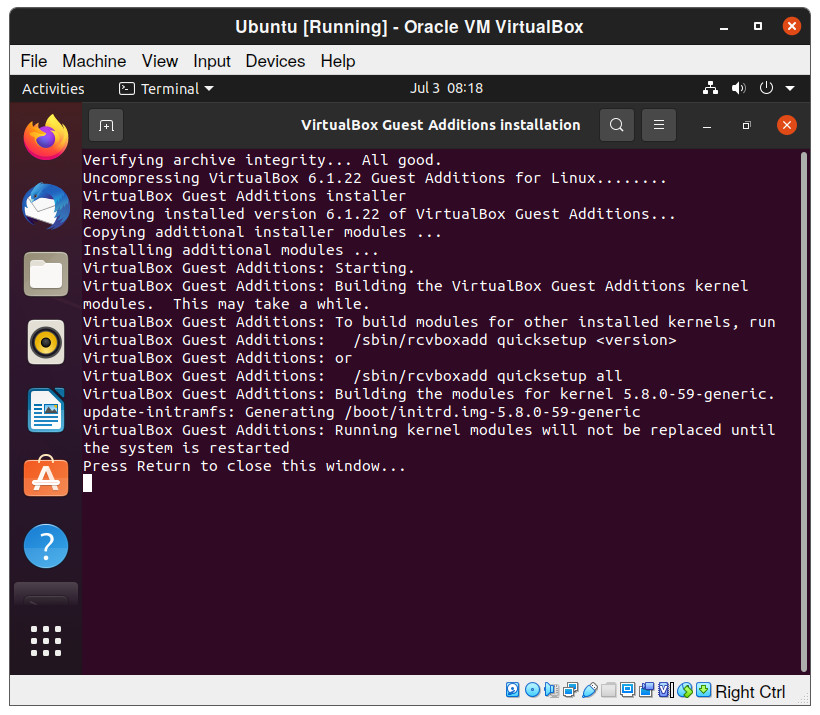
Finally, restart your system to reload kernel modules.
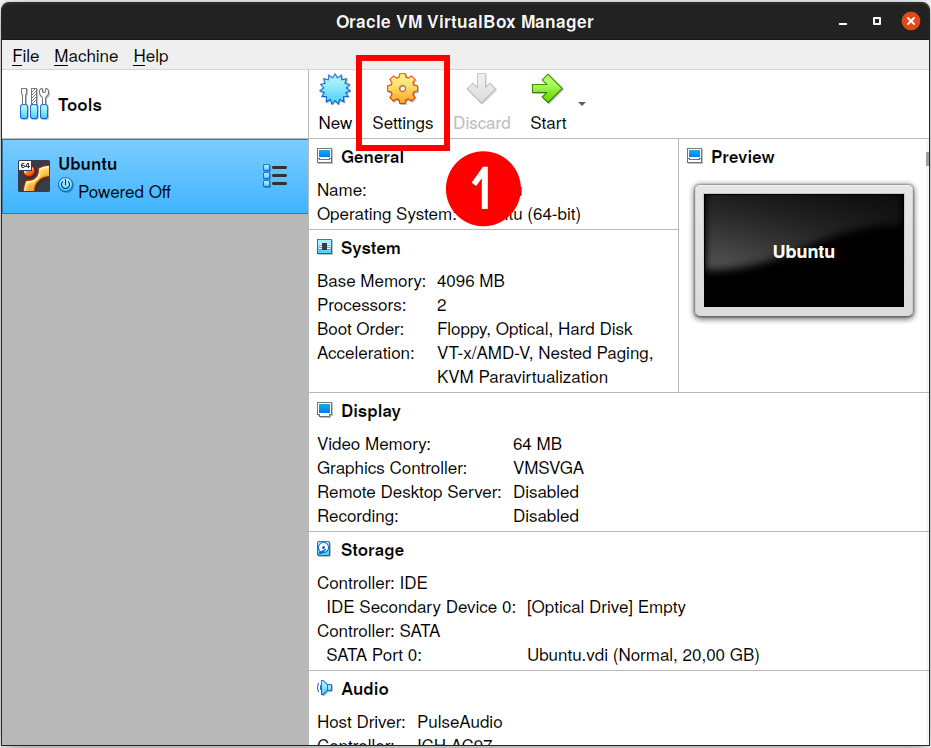
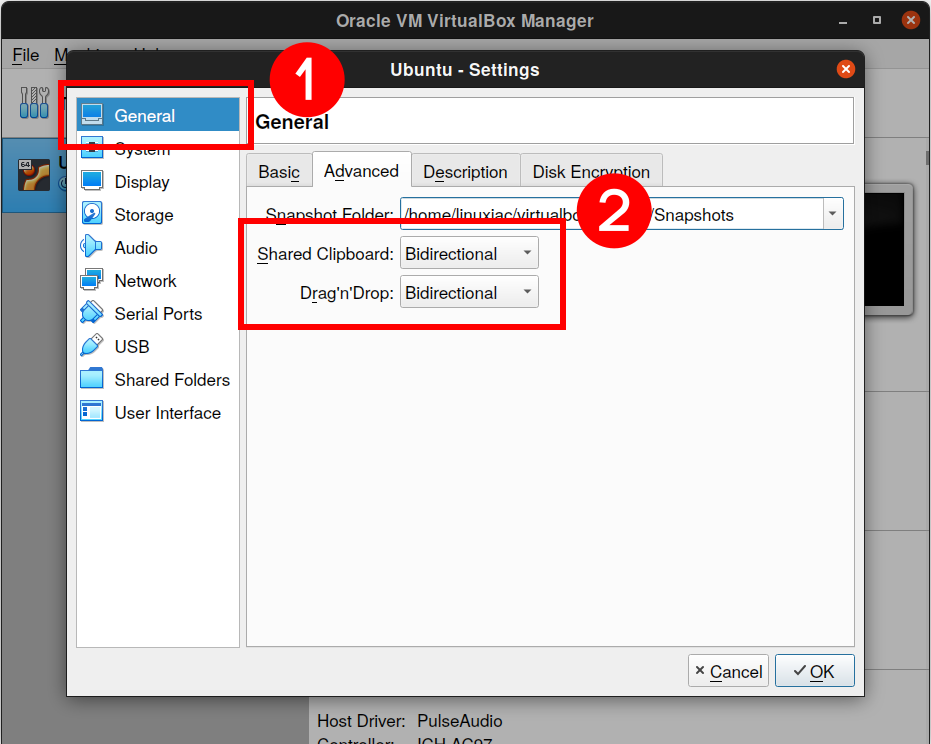
With Guest Additions installed, the clipboard of your guest OS can be shared with your host OS. To enable “Shared Clipboard and Drag’n’Drop functionality”, open VirtualBox Manager and click on “Settings.”
Next, go to “General” -> “Advanced” and enable the two options from the drop-down menu.
Conclusion
VirtualBox is free and is an excellent tool for running multiple operating systems on a single OS. In addition, it is the easiest and safest way to install a “new computer” on your machine with no risk.
Today’s article explained how to install Ubuntu on VirtualBox. If you encounter any issues getting Ubuntu to install as a VirtualBox virtual machine, please feel free to ask your questions in the comment box below.


doesn’t work
after this command : sudo apt install build-essential dkms linux-headers-$(uname -r)
and choosing devices -> inser guest …
installer doesn’t run
Hi, William,
What’s the error message?
If you get an error saying the guest system has no CD-ROM, stop the virtual machine, open the virtual machine settings and from the “Storage” tab, add a new CD-ROM device to the machine by clicking on the plus sign (Adds optical device). Once done, reboot the virtual machine.
Next, open the Ubuntu guest terminal, create a new directory as the mount point for the CD drive, mount the ISO file and run the VBoxLinuxAdditions.run file as shown below:
sudo mkdir -p /mnt/cdrom
sudo mount /dev/cdrom /mnt/cdrom
cd /mnt/cdrom
sudo sh ./VBoxLinuxAdditions.run
I hope this helps you.
Can vitual box for Ubuntu be processed on windows? As you have used Ubuntu in this tutorial
Hi Omotosho,
Yes, of course. Everything shown here can also be done with VirtualBox on Windows.