If you’re using Fedora, keeping your system up to date with the latest software and security patches is important. One way to ensure your system stays current and secure is by setting up automatic updates. This process is simple and requires only a few steps.
Fortunately, Fedora provides a ready-made solution for this case that can be quickly and easily implemented with minimal effort. Following this guide, you can easily set up automatic updates on your Fedora system and never have to worry about manually updating again. So let me show you how.
Step 1: Install the dnf-automatic Package
To enable automatic updates on your Fedora system, you need to install the “dnf-automatic” package and configure it to your needs. So, let’s do it:
sudo dnf install dnf-automaticCode language: Bash (bash)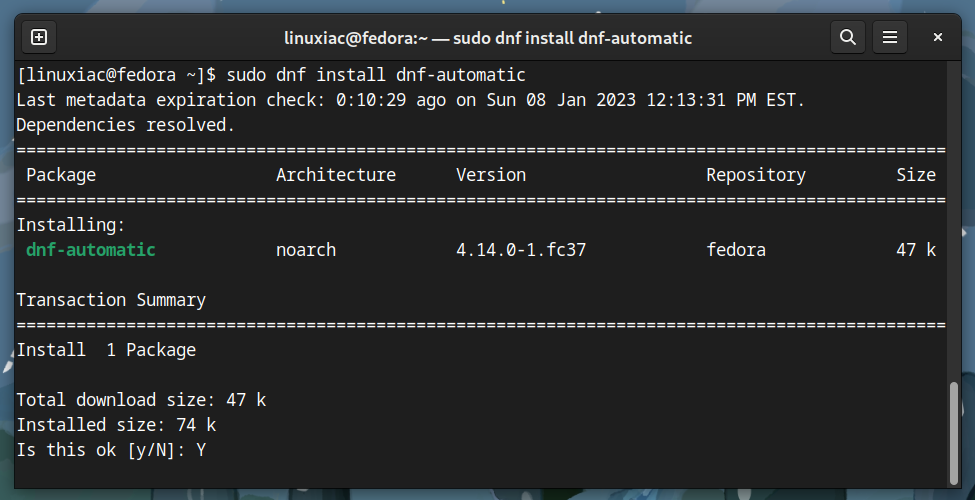
Step 2: Configure Automatic Updates on Fedora
Now that you have the package installed, you need to make the necessary adjustments to your Fedora system’s automated updates according to your preferences.
Copy the /usr/share/dnf5/dnf5-plugins/automatic.conf configuration file to /etc/dnf/. Then, use your preferred text editor to open it for editing:
sudo cp /usr/share/dnf5/dnf5-plugins/automatic.conf /etc/dnf/
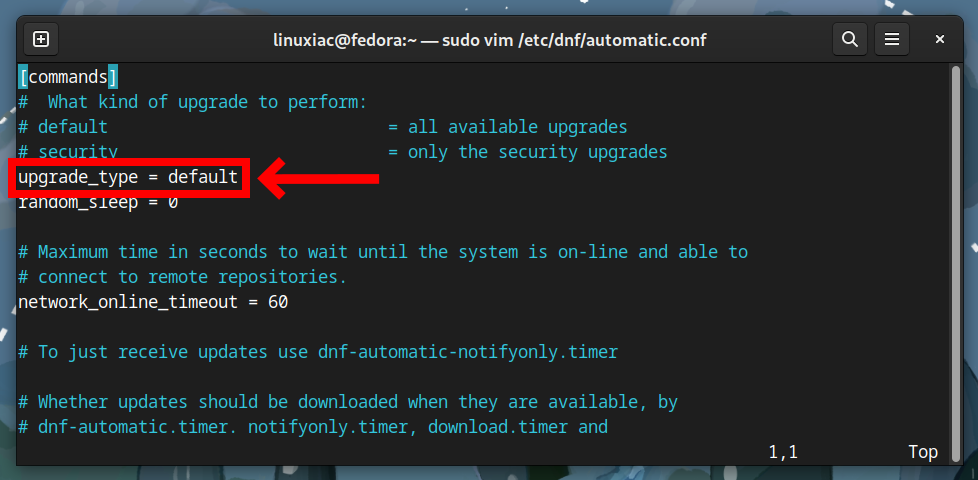
sudo nano /etc/dnf/automatic.confTake a look at the “upgrade_type” option. Here you have two choices: “default” and “security.” Let me explain the difference between them.
Using the “default” option updates all packages. However, this can be risky if some of your applications are sensitive to updates. So you could change it to apply only security updates by replacing the “default” value with “security.”
Nevertheless, if you use Fedora primarily as your desktop system, I recommend sticking with the “default” option.
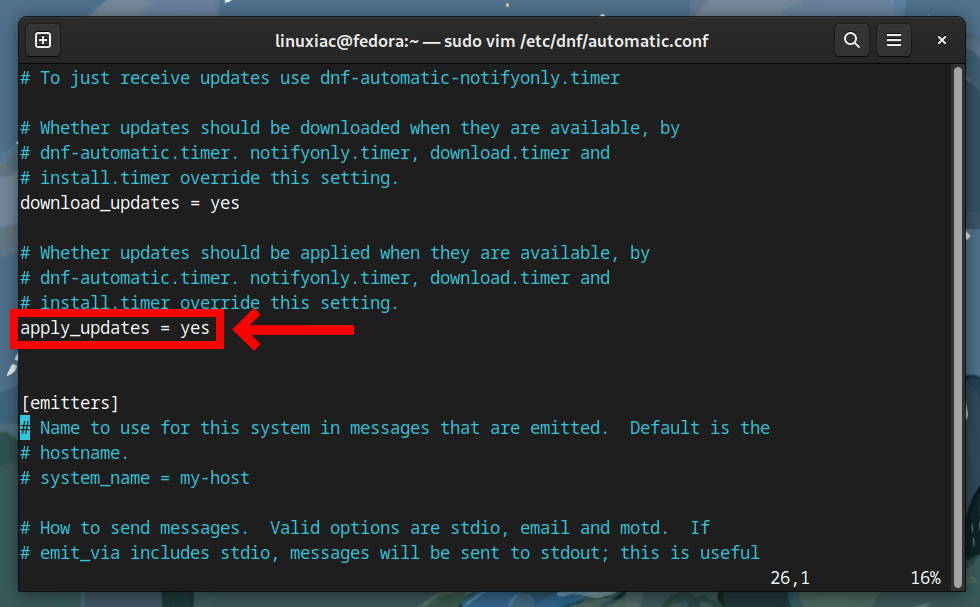
Next, ensure the “apply_updates” option is set to “yes.” By default, its value is “no.” Otherwise, the dnf-automatic service will only download, not install, available updates.
So far, so good. In the next step, you will configure the dnf-automatic.timer service according to your needs.
Step 3: Setting up the dnf-automatic Timer
Unlike some systemd services, dnf-automatic is implemented as a timer rather than a background service that runs perpetually. But what are timers? In short, they are systemd unit files that end in “.timer” and control “.service” files or events and can be used as an alternative to cron.
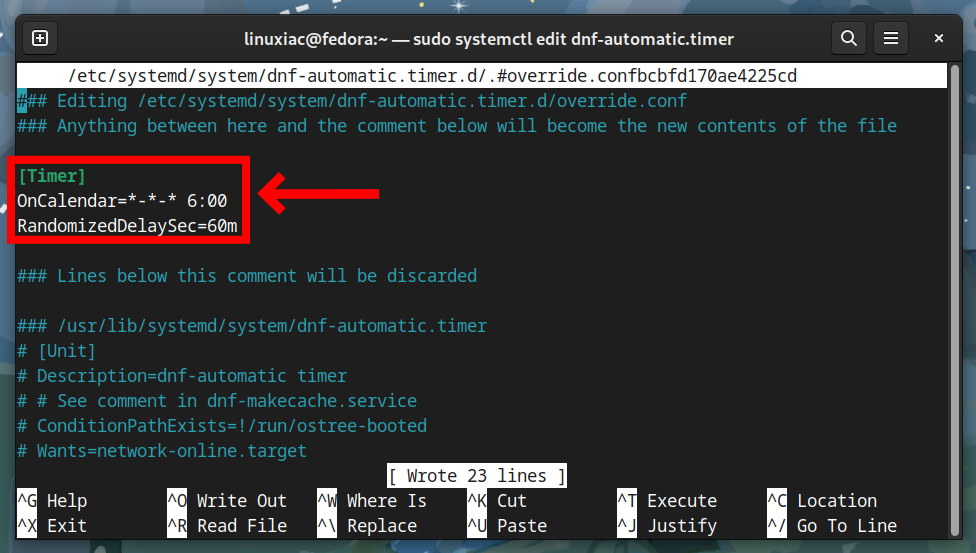
Let’s open it for editing using the following command:
sudo systemctl edit dnf-automatic.timerCode language: Bash (bash)Next, add the following to the file.
[Timer]
OnCalendar=*-*-* 6:00
RandomizedDelaySec=60mCode language: Bash (bash)
Make sure you insert the snippet exactly where it is shown below. Here, the automatic update process on your Fedora system will start between 6:00 am and 7:00 am. The “RandomizedDelaySec=60m” option adds a random extra time delta to prevent all your machines from updating simultaneously.
Finally, to enable and start the dnf-automatic service, use the following command:
sudo systemctl enable --now dnf-automatic.timerCode language: Bash (bash)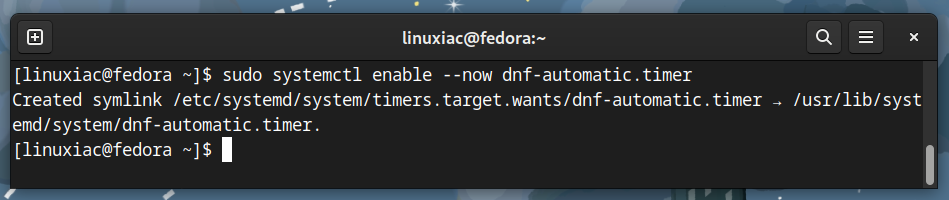
Use the following command to check the status of the automatic update process:
systemctl list-timers *dnf-*Code language: Bash (bash)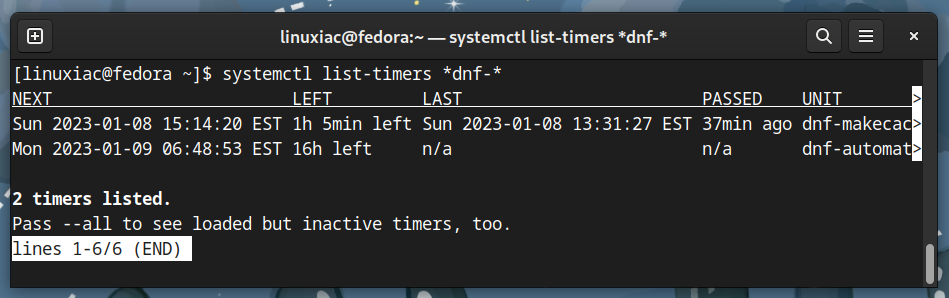
And that’s all! The dnf-automatic service will now automatically install updates on your Fedora system. Additionally, you can find more in-depth information on the individual options here.
Conclusion
Setting up automatic updates on Fedora Linux is straightforward and can be done by following the steps outlined in this article. The dnf-automatic service keeps your system up to date and secure by installing the latest updates and security patches as soon as they become available.
So, no more manually checking for and installing updates. However, as best practice, you should still manually verify that updates are being applied from time to time.
I hope you found this guide helpful. Any suggestions and comments are welcome in the comments section below.


Thanks! I’m still learning Linux (using Fedora since 41) and was using the official documentation to install, configure and run the service but I wasn’t understanding the timer interval and how to change it.
Thank you for the detailed instructions of the entire setup (including screenshots) and for clarifying how the timer works, it is appreciated. Looks like I’ve come a cross a gem of a site, I will for sure be checking out other articles as well.
Thanks for this article!
Do you know of a similar way to upgrade flatpaks?
I’m considering something like this for the PCs at work.