Containers—especially Docker—have completely transformed the tech world. But as powerful as Docker is, one thing it doesn’t offer out of the box is a way to monitor the images you’re using, particularly when it comes to knowing if updates are available.
Of course, that’s not a big deal if you only manage a couple of them. In that case, it’s easy enough to stop them, delete the old images, pull the new ones, and restart everything manually, just like the good old days.
But what if you’re running a home lab with dozens of containers? Or maybe your day job involves managing hundreds of them in a production environment? In that case, manually updating everything quickly becomes a nightmare.
That’s where a centralized monitoring system comes in—a tool that keeps an eye on all your containers, notifies you when updates are available, or even updates them automatically in the background.
For years, I relied on Watchtower to handle this task (here’s our guide), and it did a fantastic job. Unfortunately, it hasn’t seen any updates since November 2023. That got me looking for a new solution—and that’s when I discovered What’s Up Docker (WUD).
In this guide, I’ll walk you through installing and setting it up so you’ll have a reliable way to stay informed about the Docker images you’re running. But before we dive into the setup, let’s take a quick look at what WUD is all about.
A Brief Introduction to What’s Up Docker (WUD)
What’s Up Docker (WUD) is a free, open-source, self-hostable tool designed to simplify Docker container maintenance by monitoring image updates.
The way it works is pretty straightforward: WUD regularly checks running containers against Docker registries to detect newer image versions. It accomplishes this by periodically pulling metadata about the latest available tags and comparing it against your deployed containers.
When updates are identified, WUD can automatically trigger notifications through various communication channels, including email, Slack, Discord, webhook integrations, etc.
One of the things I personally love about WUD is its flexibility—you can set it up to run in two different modes.
The first is a notification-only mode. When WUD detects that a new version of a Docker image is available, it simply lets you know. That way, you stay in full control of when and how to update your containers.
The second mode—let’s call it fully automated—takes things a step further. When an update is available, WUD will automatically stop the running container, pull the updated image, and restart the container using the new version. It all happens quietly in the background and usually takes just a few seconds.
Also, WUD can automatically update your “docker-compose.yml” file to point to the new image. Pretty handy, right?
And now, here comes the cherry on top: WUD lets you fine-tune this behavior on a per-container basis. For example, you might want to keep full control over critical containers and only receive update notifications for those, with no automatic actions. At the same time, less critical containers can be set to update automatically without any manual intervention.
Which mode you use is totally up to you. All of this is controlled through environment variables in the WUD container itself and by assigning specific labels to the containers you want it to watch. I’ll walk you through exactly how to set this up a bit further down. But now, let’s do some work.
Install What’s Up Docker with Docker Compose
The first step is to create the project directory in which our Docker Compose deployment file will be placed. Then switch to it.
mkdir wud
cd wudCode language: Bash (bash)
Next, open your favorite terminal text editor, create a “docker-compose.yml” file, paste the content below into it, save the file, and then exit the editor.
services:
  whatsupdocker:
    image: getwud/wud
    container_name: wud
    environment:
      - WUD_WATCHER_LOCAL_CRON=0 6 * * *
      - WUD_AUTH_BASIC_MY_USER=<YOUR_USERNAME>
      - WUD_AUTH_BASIC_MY_HASH=<YOUR_PASSWORD>
    ports:
      - 3000:3000
    volumes:
      - /var/run/docker.sock:/var/run/docker.sockCode language: YAML (yaml)
As you can see, the deployment setup is pretty simple. The key part is the “environment” section. The “WUD_WATCHER_LOCAL_CRON” variable uses standard CRON syntax to define how often WUD should check your Docker containers for updates. In this example, it’s set to run every day at 6:00 AM—but of course, you can adjust that to fit your own schedule.
But before we go any further, let’s take a moment to talk about one of the WUD’s core pieces — the so-called “watchers.” In simple terms, watchers define how WUD scans containers.
They follow this pattern (for CRON, specifically): “WUD_WATCHER_{watcher_name}_CRON,” where “{watcher_name}” can be any name you like. For example, I used “LOCAL” in my setup, but feel free to choose something else—it’s totally up to you.
WUD actually supports several types of watchers, which you can check out at this link. I highly recommend taking a look since understanding these is important for the next steps, where I’ll walk you through specific examples using them. Now, back to our deployment.
The next two variables, “WUD_AUTH_BASIC_MY_USER” and “WUD_AUTH_BASIC_MY_HASH,” are used to set a username and password for accessing the WUD web interface. After all, we don’t want just anyone poking around and seeing which containers we’re running, right?
You can use whatever you like for the username—totally up to you. The fun begins when it comes to setting the password. The “WUD_AUTH_BASIC_MY_HASH” environment variable expects a value using the Apache-style MD5 hashing algorithm, so we must generate that first.
Now, if your system already has the “apache” package installed (which includes the htpasswd tool), this is super easy. But installing the whole Apache just to create a password hash? Yeah… that’s overkill, to put it mildly. Luckily, there’s another way to do it.
We will use the command below, which generates a hashed password using the Apache MD5-based password algorithm, also known as APR1.
openssl passwd -apr1Code language: Bash (bash)You’ll be prompted to enter a password, then repeat it, and finally, the command will output a string like this:
$apr1$zv6vdUFS$g0mH9DjK7ON4FGtps1Xpt0Code language: PHP (php)
Now here’s the tricky part: you need to take this string and, every time you see a “$” symbol (which usually shows up in three spots), add another “$” right next to it. So, the original string:
$apr1$zv6vdUFS$g0mH9DjK7ON4FGtps1Xpt0Code language: PHP (php)Turns into this:
$$apr1$$zv6vdUFS$$g0mH9DjK7ON4FGtps1Xpt0Code language: PHP (php)Now that we’ve got our password, let’s update the “docker-compose.yml” file by replacing “<YOUR_USERNAME>” and “<YOUR_PASSWORD>” with the actual username and the password we just created. In the end, it should look something like this:
- WUD_AUTH_BASIC_MY_USER=bobby
- WUD_AUTH_BASIC_MY_HASH=$$apr1$$zv6vdUFS$$g0mH9DjK7ON4FGtps1Xpt0Code language: YAML (yaml)
Finally, save the changes and run the container in the background (detached mode):
docker compose up -dCode language: Bash (bash)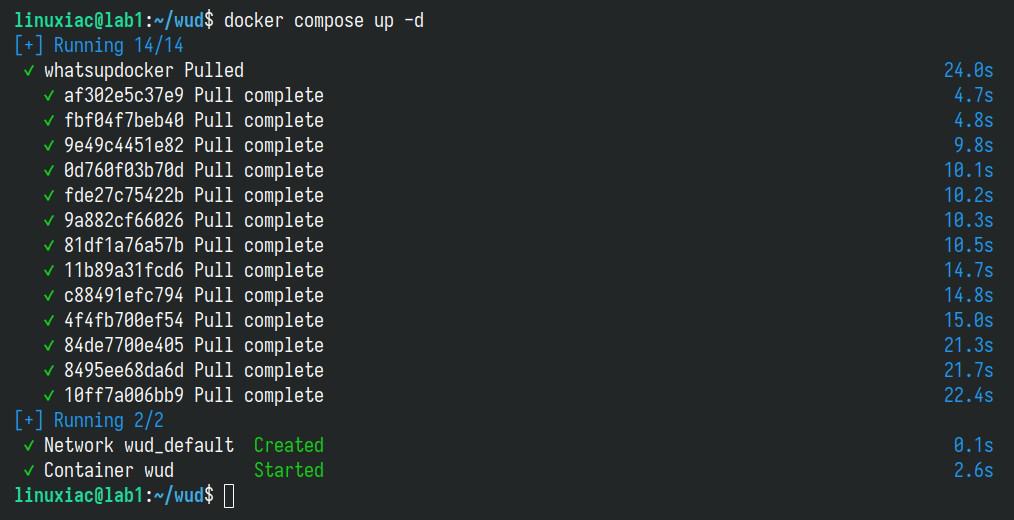
If, for some reason, something goes wrong, you can easily figure out what happened by checking the container log with this simple Docker command:
docker logs wud -fCode language: Bash (bash)Open the WUD Web UI
Just a quick heads-up: As you can see below, I’m using an unencrypted HTTP connection here—this is only for the sake of the demo. In a real production setup, always put WUD behind a reverse proxy (like Nginx, Nginx Proxy Manager, Caddy, Traefik, HAProxy, or any other option you prefer) and serve it over a secure HTTPS connection. Now, back to the guide.
Open your browser and navigate to “http://localhost:3000” (if you access WUD from the same host) or “http://<server-ip-address>:3000“ (if you access it remotely). Of course, replace the “<server-ip-address>” part with your actual server’s IP address. The WUD login page will welcome you.
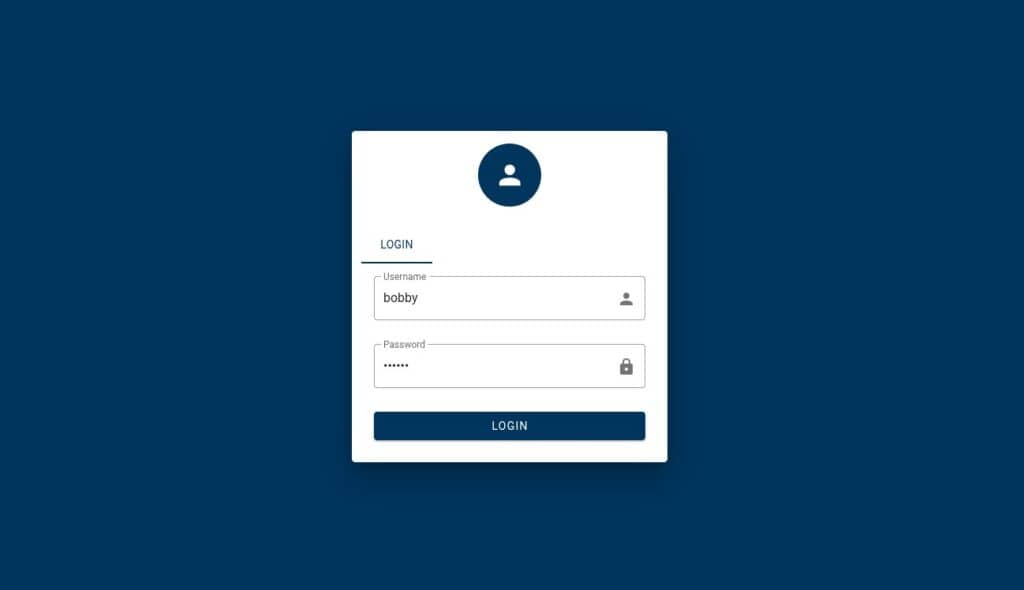
Enter your username and password and hit the “LOGIN” button.
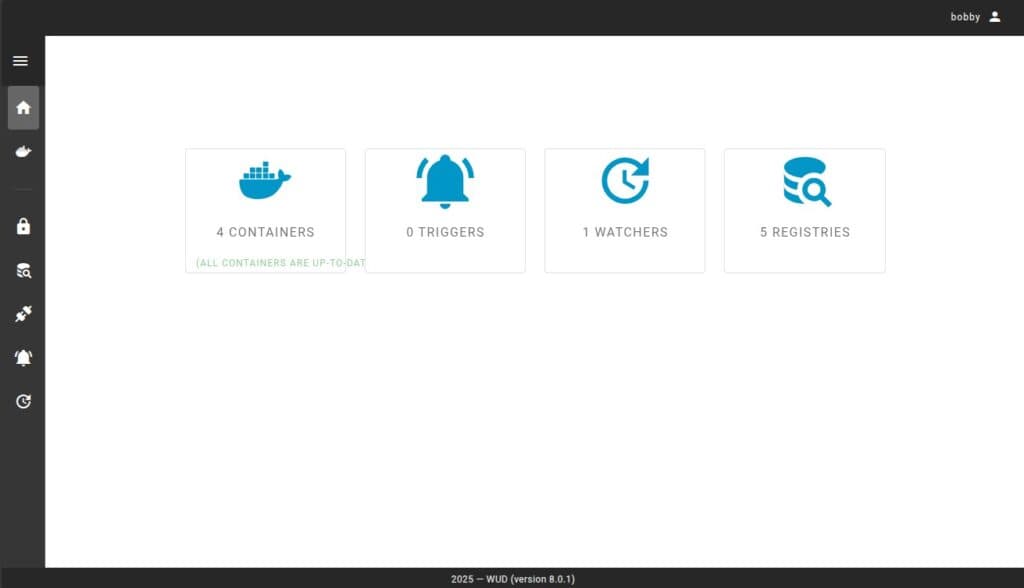
And before you get too excited, let me pump the brakes a little. Honestly, we haven’t really done much yet—the real work is just getting started.
Configure WUD
As I mentioned, we’ve successfully set up WUD, and it’s running fine in the background. But here’s the thing—we haven’t actually told it how we want it to do its job yet. Most importantly, we haven’t set up any way to get notified when there are container updates, which is the main reason we installed it in the first place.
Now’s also a good time to mention something else: The settings we need aren’t configurable through the WUD web interface – think of it more as a dashboard than a control panel. Instead, all the configurations are done by setting the right environment variables on the WUD container itself or by adding labels to the containers it watches.
So, let’s review several strategies and you decide which ones to use for your needs.
WUD Notification Setup
Of course, we first want to set up notifications to let us know when a container update is available. This is handled through what WUD calls triggers, which are mechanisms that kick in and perform actions when a new version of a container is detected.
WUD supports almost every notification method you can think of: Apprise, Discord, Gotify, Ntfy, Pushover, Slack, SMTP, Telegram—you name it. In this example, I’ll walk you through setting up notifications the old-school way (yep, I’m that kind of guy): by email, using SMTP. Of course, if you’d rather use something else, check out the documentation for the trigger that fits your needs.
However, if you want to use Gmail in this case, you’ll first need to create an app-specific password. To be clear, this isn’t the same as your regular Gmail password. It’s a separate one, a special 16-character password that Google generates for use with third-party apps (like WUD), made just for this purpose. Creating one is super easy – just click on this link and follow the instructions.
Now that you’ve generated the application password, open your “docker-compose.yml” file. Then, add the following under the “environment” section:
services:
  whatsupdocker:
    image: getwud/wud
    ...
    environment:
      - WUD_TRIGGER_SMTP_GMAIL_HOST=smtp.gmail.com
      - WUD_TRIGGER_SMTP_GMAIL_PORT=465
      - WUD_TRIGGER_SMTP_GMAIL_USER=<YOUR-GMAIL-ACCOUNT>
      - WUD_TRIGGER_SMTP_GMAIL_PASS=<THE-APP-PASSWORD>
      - WUD_TRIGGER_SMTP_GMAIL_FROM=<YOUR-GMAIL-ACCOUNT>
      - WUD_TRIGGER_SMTP_GMAIL_TO=<YOUR-GMAIL-ACCOUNT>
      - WUD_TRIGGER_SMTP_GMAIL_TLS_ENABLED=true Code language: YAML (yaml)
Just make sure to replace “<YOUR-GMAIL-ACCOUNT>” with your actual Gmail address in all three spots, and swap out “<THE-APP-PASSWORD>” with the app password you just generated.
Finally, if the WUD container is already running, run the two commands below to redeploy it and apply the changes:
docker compose down
docker compose up -dCode language: Bash (bash)
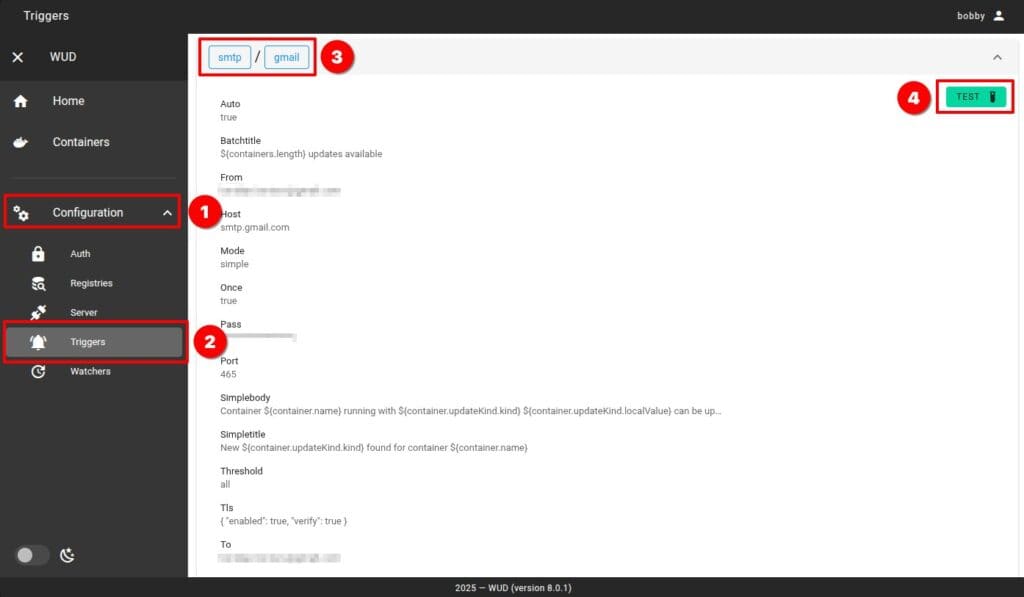
Head back to the WUD web interface to check if notifications are working properly. In the left-hand menu, go to “Configuration” > “Triggers.” Next, click on the “smtp/gmail” trigger, click the “TEST” button, and then confirm by selecting “RUN TRIGGER.” You should receive a test email confirming that your SMTP notification settings are all set up correctly.
Container Update or Just Notifications?
The next big decision you need to make is how you want WUD to behave—should it just notify you when updates are available for your Docker containers, or should it automatically update them, too?
This is where the “WUD_TRIGGER_DOCKER_{trigger_name}_PRUNE” setting, whose default value is “false,” comes into play, and it’s crucial to understand how it works.
If you don’t include “WUD_TRIGGER_DOCKER_{trigger_name}_PRUNE=true” in the “environment” section of your “docker-compose.yml” file, WUD will run in notification-only mode.
But if you do include it with the “true” value set, WUD will not only notify you—it’ll take care of the entire update process: it will pull the new Docker image, stop the running container, remove the old image, and start the container again with the updated image—full automatic updates mode.
So, if you only want to be notified, you can skip adding that line—there’s nothing more to say here. But if you’d like to enable automatic updates, add “WUD_TRIGGER_DOCKER_{trigger_name}_PRUNE=true” under the “environment” section in your “docker-compose.yml” file.
For example, if you want to name this trigger “LOCAL,” the line you need to include would look like this:
environment:
  ...
  - WUD_TRIGGER_DOCKER_LOCAL_PRUNE=true
  ...Code language: YAML (yaml)
And just like that, you’re all set for a fully automated process that keeps your containers running the latest Docker images.
Dealing with Docker Compose Files
But what if your Docker Compose deployments use hardcoded image versions and you have instructed WUD to update your containers automatically? Let me show you a really simple example to illustrate the point:
services:
  web:
    image: nginx:1.27
    ports:
      - "80:80"
Code language: YAML (yaml)
Let’s say, Nginx version 1.28 just dropped. WUD will detect the update, pull the new image, and automatically restart the container using it. But here’s where things can get a little tricky: the next time you manually reload your deployment using something like:
docker compose down
docker compose up -dCode language: Bash (bash)
Docker will proceed with your “docker-compose.yml” file, pointing to image version 1.27, and spin up the container with the older version. Not exactly what we want, right?
Thankfully, WUD has a smart way to handle this. The Docker Compose trigger can automatically update your “docker-compose.yml” file on the fly, simply by swapping out the image tag with the latest WUD discovered. That way, when you redeploy, everything’s in sync and your setup ends up looking just like this:
services:
  web:
    image: nginx:1.28
    ports:
      - "80:80"
Code language: YAML (yaml)
To make this work, you’ll need to mount the correct “docker-compose.yml” file into your WUD deployment and use the “WUD_TRIGGER_DOCKERCOMPOSE_{trigger_name}_FILE” trigger. For example, if you name your trigger “NGINX,” here’s what that would look like in practice.
services:
  whatsupdocker:
    image: getwud/wud
    ...
    environment:
      ...
      - WUD_TRIGGER_DOCKERCOMPOSE_NGINX_FILE=/wud/nginx/docker-compose.yml
      - WUD_TRIGGER_DOCKERCOMPOSE_NGINX_PRUNE=true
      ...
    volumes:
      ...
      - /compose/file/location/docker-compose.yml:/wud/nginx/docker-compose.yml
      ...

Code language: YAML (yaml)
As you can see, in the “volumes” section, we’re mounting our actual “docker-compose.yml” file into the WUD container at our chosen location. Then, in the “environment” section, we tell WUD where to look for that file by setting the “WUD_TRIGGER_DOCKERCOMPOSE_NGINX_FILE” variable to its path inside the container.
I can already hear your next question: What if I have two, three, or ten Docker Compose deployments? No worries—just create a separate trigger for each one, following the pattern below.
services:
  whatsupdocker:
    image: getwud/wud
    ...
    environment:
      ...
      - WUD_TRIGGER_DOCKERCOMPOSE_ONE_FILE=/wud/one/docker-compose.yml
      - WUD_TRIGGER_DOCKERCOMPOSE_ONE_PRUNE=true
      - WUD_TRIGGER_DOCKERCOMPOSE_TWO_FILE=/wud/two/docker-compose.yml
      - WUD_TRIGGER_DOCKERCOMPOSE_TWO_PRUNE=true
      - WUD_TRIGGER_DOCKERCOMPOSE_THREE_FILE=/wud/three/docker-compose.yml
      - WUD_TRIGGER_DOCKERCOMPOSE_THREE_PRUNE=true
      ...
    volumes:
      ...
      - /compose/file/location/one/docker-compose.yml:/wud/one/docker-compose.yml
      - /compose/file/location/two/docker-compose.yml:/wud/two/docker-compose.yml
      - /compose/file/location/three/docker-compose.yml:/wud/three/docker-compose.yml
      ...
      Code language: YAML (yaml)
Of course, none of the above needs to be applied if you’re using the “latest” image tag for your Compose deployments. In that case, there’s no need to modify the “docker-compose.yml” file since you’re always pulling the most current version of the image anyway.
However, once again, here’s the moment where things get a little tricky. If you open up the WUD UI and look at the triggers for each container, you might be unpleasantly surprised—they’ve all been automatically applied to every container.
Yep, the Nginx trigger we created earlier shows up across the board, which definitely isn’t what we had in mind.
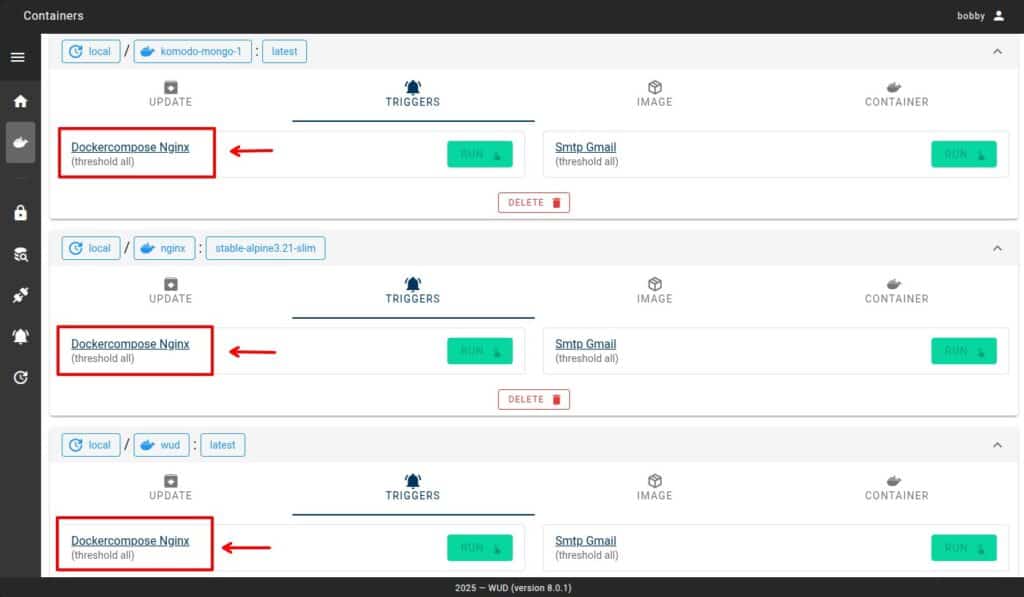
This brings us to an important concept in WUD: by default, all triggers are global. That means any trigger you create gets applied to all containers, unless you explicitly tell WUD otherwise.
Thankfully, there is a way to control this, and that’s where WUD watcher’s labels come into play. Keep reading, I’ll walk you through the solution in the next section.
Include & Exclude Triggers
The solution to the problem above lies in using labels in your containers—something WUD understands and uses to let you fine-tune watchers’ actions more precisely on a per-container basis. Around a dozen labels are available, but we’re mostly interested in “wud.trigger.include” and “wud.trigger.exclude.”
When neither of the two above-mentioned is explicitly defined to a container, all triggers apply to every container by default. This is important to understand.
So, what are we trying to do? We want our notification trigger to stay active for all containers, but we only want the Nginx-specific trigger to run for the Nginx container. The best way to handle this is by using the “wud.trigger.include” label. This tells WUD to apply only the triggers you explicitly list for that particular container, and nothing else.
So, we will open the deployment file (“docker-compose.yml“) for the Nginx container, add the label we need, and list the triggers as values to this label we want to apply to it.
services:
  web:
    labels:
      wud.trigger.include: smtp.gmail,dockercompose.nginx
    image: nginx:stable-alpine3.21-slim
    container_name: nginx
    ports:
      - "80:80"
Code language: YAML (yaml)
Of course, you’ll need to do the same for all your other containers. But the difference is that in each one, the line should include only “wud.trigger.include: smtp.gmail” along with any container-specific triggers you’ve set up in WUD—if there are any.
Remember to restart your containers after making any changes. There’s no need to restart WUD itself—it automatically picks up changes to the containers it’s watching on the fly.
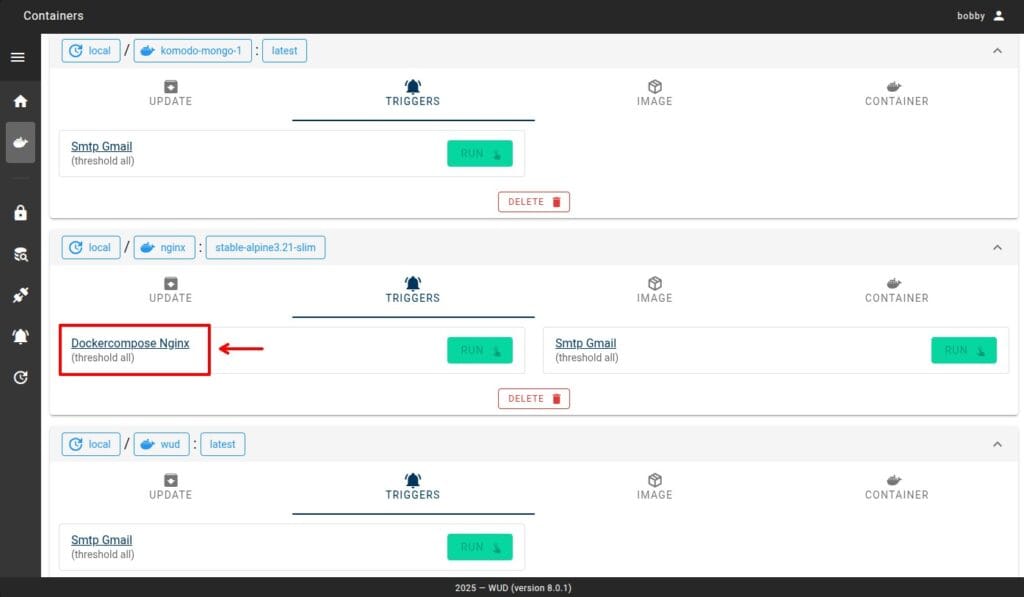
Now, if we head back to the WUD UI and take a quick look, we’ll see that the Nginx trigger (“dockercompose.nginx“) is now applied only to that specific container, while our Gmail (“smtp.gmail“) notification trigger is available to all others.
Launching Triggers from the WUD Dashboard
By default, WUD runs quietly in the background unless you tell it otherwise. But in many cases, I’ve found it most convenient to let WUD notify me when there’s a new version of a container, have it set to auto-update, but only apply the update after I give the green light through the UI.
This way, you get the best of both worlds: first, you can check out what’s new in the updated image before applying it, so you don’t get hit with any unexpected changes. And second, you skip the hassle of jumping into the terminal to stop and redeploy the container manually.
To do this, just set the “WUD_TRIGGER_{trigger_type}_{trigger_name}_AUTO” option to “false” (it’s “true” by default). This turns off the automatic execution of the corresponding trigger.
To clarify, let’s use our Nginx deployment as an example. In your WUD “docker-compose.yml” file, add the following line to disable the automatic trigger execution—so you can run it manually through the WUD web UI whenever you see fit:
services:
  whatsupdocker:
    image: getwud/wud
    ...
    environment:
      ...
      - WUD_TRIGGER_DOCKERCOMPOSE_NGINX_FILE=/wud/nginx/docker-compose.yml
      - WUD_TRIGGER_DOCKERCOMPOSE_NGINX_PRUNE=true
      - WUD_TRIGGER_DOCKERCOMPOSE_NGINX_AUTO=false
      ...
    volumes:
      ...
      - /compose/file/location/docker-compose.yml:/wud/nginx/docker-compose.yml
      ...
Code language: YAML (yaml)
From now on, if updates are available, the WUD dashboard will show them, and the “RUN” button will be active. Just click it, and WUD will update the Docker image and automatically start the container with the new version.
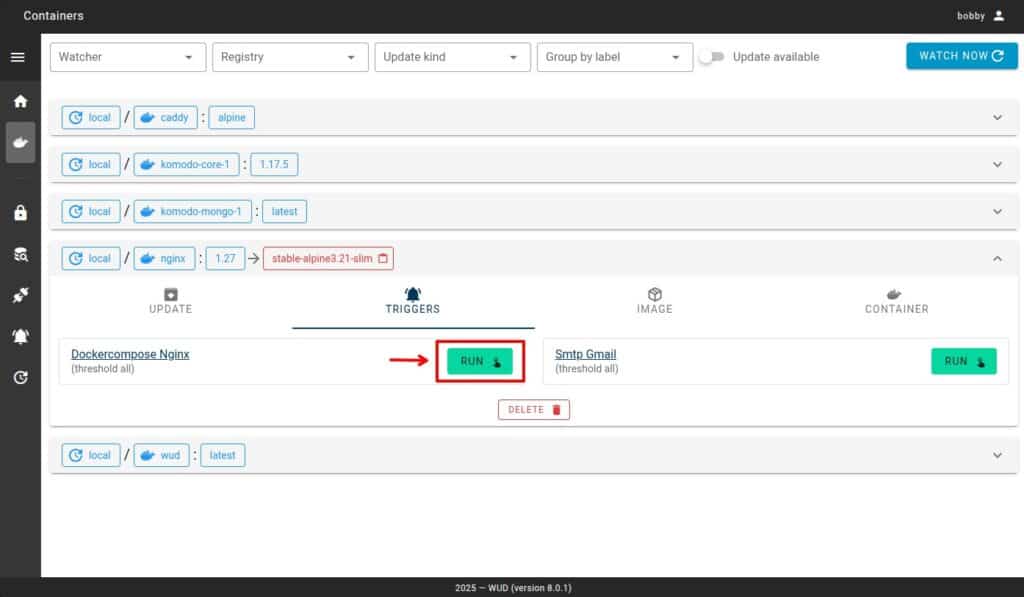
Then, click the blue “WATCH NOW” button in the top-right corner to refresh the screen and see the changes take effect.
Exclude Container from Monitoring
WUD lets you exclude specific containers from monitoring, meaning it will completely ignore them and take no action. It’s super easy to set up—add the label “wud.watch: false” to the container’s deployment. For example, if you’re using Nginx, it would look like this:
services:
  web:
    labels:
      wud.watch: false
    image: nginx:1.27
    container_name: nginx
    ports:
      - "80:80"
Code language: YAML (yaml)
The opposite setup is also possible — you can tell WUD not to monitor any containers by default. Just set “WUD_WATCHER_LOCAL_WATCHBYDEFAULT=false” in the WUD’s “docker-compose.yml” file. Then, for each container you do want WUD to keep an eye on, add the label “wud.watch=true.”
Docker Images Tag Handling in WUD
The last — but definitely one of the most important — cases I want to cover when setting up WUD is how to handle Docker image tags. Chances are, many of you use deployments that look something like this:
services:
  web:
    image: nginx:latest
    container_name: nginx
    ...
Code language: YAML (yaml)
In this case, when you’re using the “latest” tag, WUD checks Docker images based on their digest. The problem is that it does this by sending an extensive number of requests to Docker Hub, which can quickly hit their rate limits.
Beyond that, though, it’s generally a better idea to monitor a specific image version for updates. WUD makes this easier by offering two tags—”wud.tag.include” and “wud.tag.exclude“—that you can apply directly to your deployment to control which tags WUD should consider or ignore.
The values these labels take are regular expressions. The key thing to keep in mind is that different software projects use different versioning schemes for their images. So, you’ll need to tailor each deployment to match the specific versioning style used by that image.
For instance, you might see the classic “major.minor.patch” (semver) format, like “1.27.2.” But in other cases, it could be something like “2025.04.2,” or “1.27.2-alpine“—there’s a lot of variation out there.
The point is, you’ll need to write a regex that matches the format used in your specific case. I highly recommend testing your expression with an online regex validator, like Regex101, to ensure it works as expected before adding it to your deployments.
Here’s a real-world example. Let’s say we’re watching Nginx Docker images that follow the “major.minor.patch” (“1.27.2,” for example) version pattern. In that case, the regular expression in our Docker deployment would look something like this:
services:
  web:
    image: nginx:latest
    container_name: nginx
    labels:
      'wud.tag.include=^\d+\.\d+\.\d+$'
    ...
Code language: YAML (yaml)
In simple words, this regex means: only watching tags that look like semantic versions (e.g., “1.27.2“). However, if the image we want to monitor is something like “1.27.2-alpine,” then our regex should already look like this:
services:
  web:
    image: nginx:latest
    container_name: nginx
    labels:
      'wud.tag.include=^\d+\.\d+\.\d+-alpine$'
    ...
Code language: YAML (yaml)
You get the idea—the same goes for the “wud.tag.exclude” label. It lets you clearly list specific image versions WUD should skip when checking for updates.
Conclusion
Yeah, I know—configuring WUD can seem a little confusing at first. But once you get the hang of how it all works, it starts to make sense, and everything clicks into place pretty quickly. It is a great piece of software, probably the best in its class at the moment.
Of course, WUD offers plenty of other features, such as monitoring remote Docker instances via “WUD_WATCHER_{watcher_name}_HOST” watcher. Remember that if you decide to use this capability, you should expose the Docker daemon to the outside world only over a secure VPN connection. Otherwise, you could leave your containers wide open to unauthorized access.
WUD’s configuration options give you a ton of flexibility when monitoring updates for your Docker images. In this guide, I’ve walked through the main use cases, but if you’re looking for more in-depth details, check out the official WUD documentation.
Thanks for your time and for using this tutorial. As always, your feedback and comments are most welcome. Happy monitoring!
Just started with wud and found this article most helpful – many thanks
That’s a great article.
Many thanks for this excellent writeup and introduction to WUD.
I will have a look and see if it will replace my current container checker dockcheck.