Void Linux is a systemd-free, rolling-release distribution with a strong UNIX vibe. It’s one of the rare, truly original distros—built from scratch rather than based on another project—and it’s earned a loyal following, especially among more experienced Linux users.
Much like Arch, Void gives you full control to tweak every aspect to fit your needs and understanding, making it a great developer environment. And when we talk about development, we can’t help but mention containerization, specifically Docker.
While many Linux distributions offer straightforward Docker installation methods, Void Linux—known for its simplicity, speed, and runit-based init system—requires a slightly different approach. But don’t worry, because you’ve come to the right place.
Whether you’re new to Void or a seasoned Linux user looking to leverage Docker’s power, I’ll walk you through the installation process step by step in this guide. In just a few minutes, you’ll have Docker up and running smoothly on your Void system, ready to build, ship, and easily run your containers.
Install Docker on Void Linux
Step 1: Refresh the Package Base
First, let’s refresh the package base on our Void system to make sure we’re using the latest versions of the software available in the distro’s repos.
sudo xbps-install -SuCode language: Bash (bash)
Make sure there aren’t any packages waiting to be updated. If there are, just hang tight and let them finish installing first.
If you’re unsure about using Void’s XBPS package manager, I highly recommend checking out our guide, “How to Use the XBPS Package Manager on Void Linux.” It’s a great resource that’ll have you feeling confident in no time. Now, back to the topic.
Step 2: Install Docker
Now we can go ahead and install Docker itself—it’s available right from the official Void repositories. All you need to do is install the “docker” package, which will automatically pull in all the dependencies it needs to run smoothly.
sudo xbps-install -S dockerCode language: Bash (bash)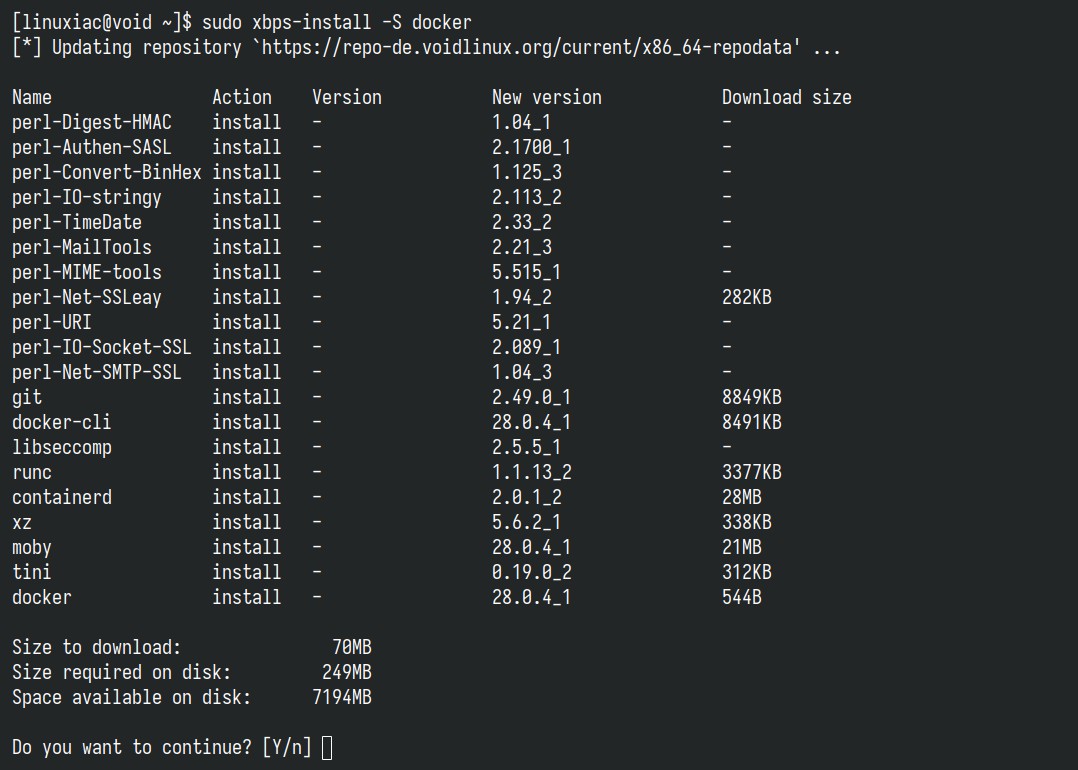
This installs the following main Docker components:
- docker: The Docker engine itself.
- docker-cli: A command line tool that lets you talk to the Docker daemon.
- containerd: A container runtime that manages the container’s lifecycle.
That’s all! Docker should now be installed. However, before it can work, we must enable and start the Docker service. But as we mentioned at the beginning, Void Linux doesn’t use systemd—it’s a systemd-free distro—so things work a bit differently here.
Instead of systemd, Void relies on runit to manage services – a simple and lightweight init and service management daemon. To enable and start the Docker service, we use:
sudo ln -s /etc/sv/docker /var/serviceCode language: Bash (bash)Now, let’s check the service status. Here, we can’t just run systemctl status docker, because… well, there’s no such thing here. Instead, we rely on the service management tools provided by runit—specifically, the sv command.
sudo sv status dockerCode language: Bash (bash)
As you can see from the command output, the Docker service is running and will start automatically every time the system boots.
Step 3: Verify Installation
The moment of truth. Let’s check if our new Docker installation works correctly by running a simple containerized application called “hello-world.”
sudo docker run hello-worldCode language: Bash (bash)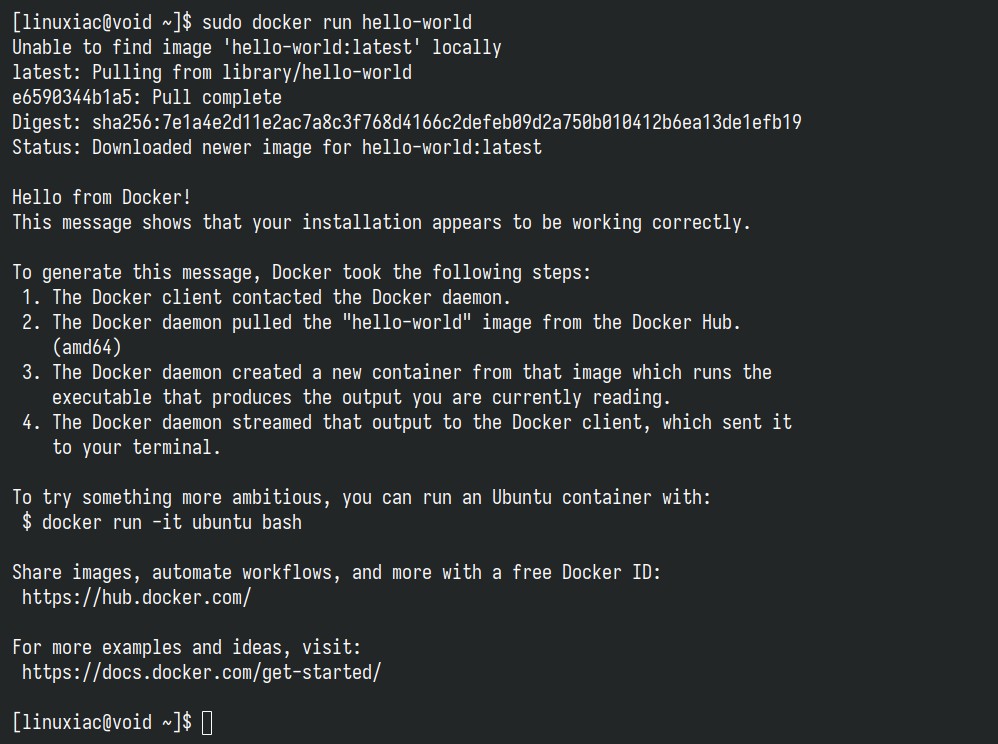
Congratulations! As we can see, everything works as expected.
Enabling Non-root Users to Run Docker Commands
We have successfully installed Docker on our Void Linux system so far. However, by default, only root and users with sudo privileges can execute Docker commands.
In other words, if you attempt to run the docker command without prefixing it with sudo, you’ll get an error message like this:

But there is no room for worries. To run Docker commands as a non-root user, you must first add your user to the “docker” group. It is a simple task. To do that, type in the following:
sudo usermod -aG docker ${USER}Code language: Bash (bash)In the above command, “${USER}” is a system environment variable that contains your username. Then, run the following command to activate the changes to the group:
newgrp dockerCode language: Bash (bash)You can then execute docker commands without prefixing them with sudo.

Remember that this solution will work only for your current terminal session. In other words, if you close the terminal, you will either have to execute the newgrp command above again or prefix docker commands with sudo. To make this change last permanently, restart your Void system.
Conclusion
As you can see, installing Docker on Void Linux is actually pretty straightforward. Following the steps in this guide, you should have everything up and running in just 10 to 15 minutes—ready to jump right into your containerized projects.
To learn more about Docker, check out its official documentation. Additionally, if you encounter any other difficulties, you can always consult the excellent documentation provided by the Void developers—it’s a great resource.
That was all from me. If you have any questions, let me know in the comments section below. Thank you for following this tutorial, and happy Dockerizing!