
If you use Arch Linux, you’ve probably noticed that after a while, and especially after system updates, files with the .pacnew extension start showing up on your system. And since you’re reading this, that’s likely what brought you here: to figure out what these files are, why they appear, and what you’re supposed to do with them.
Well, you’ve come to the right place. In the lines below, I’ll try to explain everything clearly and straightforwardly. So, let’s start with the main question.
What Are .pacnew Files in Arch Linux?
When you update your Arch Linux system by issuing something like pacman -Syu, some already installed packages include configuration files, typically stored in /etc. However, if you’ve customized one of these files and the package maintainer changes it in an updated version, Arch (of course) will not overwrite your locally installed version.
This is a safety measure that prevents your local changes from being lost. Instead, under the hood, Pacman creates a .pacnew file — a “new” version of the config file shipped with the updated package, thus providing you with access to the updated configuration that the package now offers. Think of it like this:
- Your current config = your custom settings.
- The
.pacnewfile = the maintainer’s updated version.
For example, if /etc/pacman.conf was modified upstream, after updating, you will see /etc/pacman.conf.pacnew. You can then open both files side by side (more on this below) and copy over the important differences.
Then, once you’ve merged or replaced the file, you can safely delete the .pacnew version to keep things tidy. The ultimate goal is to keep your system’s configuration up to date without losing your custom tweaks. And if you’re already wondering how to do the merge itself, just keep reading. It’s actually a pretty simple job.
How to Compare and Merge .pacnew Files in Arch Linux
Now that we’ve covered the theory, it’s time to get hands-on. The first step, expectably, is to check which .pacnew files are present on our Arch system. For that, Arch provides a handy little tool called pacdiff, which takes care of finding them for you.
It’s not included by default, though—it’s part of the pacman-contrib package, so let’s start by installing that.
sudo pacman -S pacman-contribCode language: Bash (bash)Pretty simple, right? Now that we’ve got pacdiff ready, let’s take a look at all the .pacnew files available on our Arch system.
pacdiff -oCode language: Bash (bash)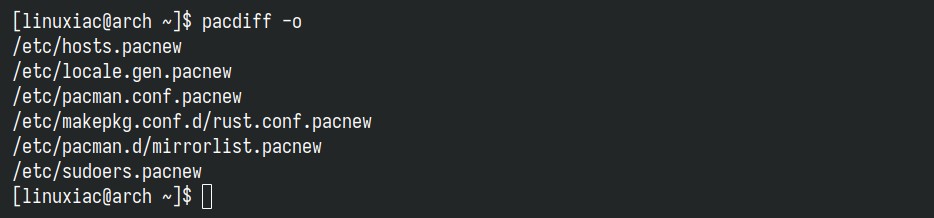
As you can see in the picture above, the system updates have quietly created six .pacnew files—just sitting there, waiting for us to deal with them. Here’s what we can do from here on out.
The easiest and most obvious thing to do — which you’ve probably already thought of — is just to copy (or move) the .pacnew file over the original one. Something like:
cp /etc/example.conf.pacnew /etc/example.confCode language: Bash (bash)Then, you can delete the .pacnew file and proceed. Sure, that may work in some cases, but generally, it’s not a good idea, and I strongly recommend against it.
Here’s why: first, it leaves you completely in the dark about what actually changed in the new version. You’re just blindly trusting that it won’t break anything. Second, this approach only works — and I mean only — if you’re absolutely sure you haven’t previously modified that file by yourself, because if that’s the case, you’ll lose all your valuable manually made modifications.
But most importantly, you’re an Arch user (BTW). That means you are supposed to be immune to the usual concerns that the command line causes (unfortunately) in some users. So instead of taking shortcuts, I suggest following a proper, consistent procedure for handling .pacnew files, which I immediately show you.
To compare the differences between your original file and its .pacnew version—and to merge any changes—you can use the handy vimdiff tool, which comes with the vim package. So, if you don’t have it installed yet, just run:
sudo pacman -S vimCode language: Bash (bash)I’m sure that many are already ready to complain, so why not make things easier and use one of the many GUI apps available for this purpose? The reason is simple — those usually pull in a ton of extra dependencies, such as Qt or GTK, depending on your desktop environment, which is not ideal for every setup. I prefer a universal solution, and for this job, the terminal-based vimdiff fits perfectly.
So, execute the following, and pacdiff will call vimdiff by default:
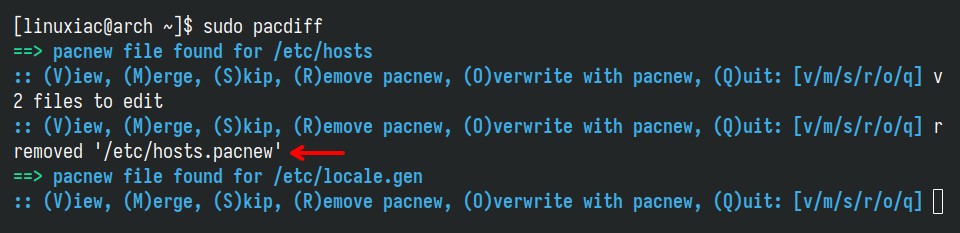
sudo pacdiffCode language: Bash (bash)
To clarify, this will process all the .pacnew files it finds, one by one. Unfortunately, pacdiff itself doesn’t take a filename argument. The key thing here is the options you’ve got:
- (V)iew: Opens a side-by-side comparison of your current file and the
.pacnewversion. - (M)erge: Tries to merge the
.pacnewand existing file interactively. - (S)kip: Ignores this file for now and moves to the next one.
- (R)emove pacnew: Deletes the
.pacnewfile without touching your current configuration. - (O)verwrite with pacnew: Replaces your existing configuration file with the
.pacnewversion. - (Q)uit: Exits
pacdiffimmediately without processing the rest of the files.
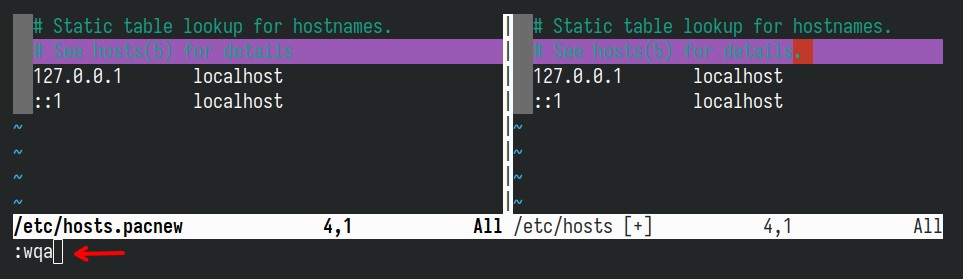
The next step, of course, is to review the differences. Press “v”, hit “Enter“, and you’ll be taken to the next vimdiff screen showing the first file pacdiff found—in this example, /etc/hosts.

The key thing to remember, as it forms the basis for what we’ll do next, is that the left pane displays the .pacnew file, while the right pane shows your current original file, which the system is actually using.
Here, you can move changes between the two compared files using powerful diff commands, dp and do.
dp: Copies (puts) the difference from the current file into the other one. Think: “I want to push this change over there.”do: Copies (obtains) the difference from the other file into the current one. Think: “I want to take that change and bring it over here.”
Simply move your cursor to the line that differs and type one of the two commands above to make the desired changes. When you’re done, type the Vim command :wqa (write and quit all) and press “Enter” — this will take you back to the main screen.
Since we’ve already applied all our edits, it’s safe to remove the .pacnew file by typing r, and hit “Enter“. The file will be removed, and pacdiff will automatically move on to the next one, where you’ll be asked again what you want to do next.
As you can see, you can skip all of this by simply merging or directly overwriting the file, but I strongly recommend against doing so. The safest (and professional) approach is to review each change yourself and decide how you want to handle it.
Finally, just a quick note: when you’re in comparison mode (vimdiff), you can switch between panes by pressing Ctrl + W, then using the left or right arrow key to move the cursor to the pane you want.
Bottom Line
Managing .pacnew files is simply part of maintaining a healthy and predictable Arch Linux system. As you already learned, these files appear to protect your custom configurations from being overwritten, but they also signal that something upstream has changed. It’s entirely up to you to review and decide how those changes should be integrated.
For more information, I also recommend consulting the Arch Wiki.
Thank you for your time! I hope you find my tips helpful. As always, any feedback is much appreciated.


pamac, the GUI package manager of Manjaro, handles this very transparently. I just got it on an update a few minutes ago, and you get a pop-up offering options on how to handle pacnew, including a nice difference viewer with colored highlights.
Either way, this is a very useful guide, thanks for the article.
Thank you! I had learned something new. I’m an Arch user for some time and always appreciate to learn more about Linux.