
Are you a Linux user looking to create a bootable USB drive for Windows 10 or 11? You’re in the right place!
Whether you’re dual-booting, performing a clean install on a Windows machine, or just need a Windows recovery drive, this article delves into the proper way to achieve this, ensuring a hassle-free process.
You might be wondering why we emphasize the “proper way” in our guide. Chances are, you’ve already attempted to create a Windows bootable USB using methods you’re comfortable with in Linux, like the dd command, which works great for Linux distribution ISOs.
But if you’ve tried this with a Windows ISO and found yourself with a USB that won’t boot, don’t worry – it’s a common hurdle. This is entirely normal, and there’s a good reason for it.
The ISO images for Windows and Linux have some key differences, so before we jump into the practical steps, let’s start with a bit of essential theory to clear things up.
Linux’s ISOHybrids vs. Windows ISOs
The differences between Linux and Windows installation ISO images and the concept of an “isohybrid” image are essential to understand, especially if you’re working with bootable USB drives.
Linux ISO Images
Many Linux distributions use ISO images that are “isohybrid.” It’s a type of ISO file that combines features of a traditional ISO 9660 CD-ROM and a hard disk image.
Unlike traditional ISO images, such as Windows ones, an isohybrid image contains special code in its boot sector that allows it to be bootable when written directly to a USB flash drive and bootable when written to a CD or DVD.
As a result, they are generally more flexible regarding the methods used for creating bootable USB drives. Here’s why tools like dd can directly write these ISO images to USB drives, and the drives will boot correctly.
Windows ISO Images
Windows installation ISOs are typically not isohybrid. They are designed with the assumption that they will be burned to a DVD. As such, simply writing these ISOs directly to a USB drive using a method like dd will not make them bootable.
Why? Because the bootloader setup in Windows ISOs is different from most Linux distributions. This requires a specific process to create a bootable USB that involves extracting the contents of the ISO and then correctly setting up the bootloader on the USB drive.
Fortunately, Linux offers excellent tools that are ideally suited for this job. We highly recommend WoeUSB, which we will use in the following example to create a Windows bootable USB from an ISO file.
Install WoeUSB on Linux
WoeUSB is a free, open-source software tool for creating a bootable USB drive from a Windows ISO file. It’s designed for use on Linux systems and is particularly useful for users who need to create a Windows installation USB drive but are working within a Linux environment.
The tool can handle various versions of Windows ISOs, including Windows Vista, 7, 8, 10, and 11. WoeUSB’s key feature is its ability to properly format and prepare the USB drive so that it’s bootable and can be used to install Windows on a computer.
Just a heads-up: besides its excellent command line capabilities, WoeUSB comes with a WoeUSB-NG version, too, and guess what? It has a handy graphical interface! But you know us Linux folks, we love our command line, right?
The command line version of WoeUSB is incredibly dependable and thoroughly tried and tested over time. Plus, it’s surprisingly easy for anyone, even if you’re just starting in the Linux universe. That’s exactly why it’s our go-to choice. So, let’s install it!
Ubuntu / Linux Mint / Pop!_OS
WoeUSB is available through a PPA repository. Run the three commands below to add it to your Ubuntu, Linux Mint, or Pop!_OS system and install WoeUSB.
sudo add-apt-repository ppa:tomtomtom/woeusb
sudo apt update
sudo apt install woeusbCode language: Bash (bash)
Fedora
Fedora users can find WoeUSB within the official distribution repositories. To install it, execute the following command:
sudo dnf install WoeUSBCode language: Bash (bash)Arch Linux
For Arch users, WoeUSB is available in the AUR repository. To install it, they should use an AUR helper like yay, executing the following command:
yay -S woeusbCode language: Bash (bash)Debian
Unfortunately, WoeUSB is not available in the software-rich Debian repositories. Thus, it cannot be installed via the APT package manager. However, following the steps below, you can quickly install it on your Debian system.
First, install the following dependencies:
sudo apt install dosfstools findutils grep gawk grub-common grub-pc-bin ntfs-3g p7zip-full parted util-linux wget wimtoolsCode language: Bash (bash)Then, run the following command to download and install the software in the correct location on your system.
sudo curl -L "https://github.com/WoeUSB/WoeUSB/releases/download/v5.2.4/woeusb-5.2.4.bash" -o /usr/bin/woeusbCode language: Bash (bash)Finally, set the correct permissions:
sudo chmod +x /usr/bin/woeusbCode language: Bash (bash)Create a Windows 10 /11 Bootable USB on Linux
We’ll assume you have the Windows installation ISO image and a USB flash drive to copy it to and make it bootable. The first step after plugging it into the computer is to identify the drive’s designated name. This is simple to accomplish using the lsblk command:
lsblkCode language: Bash (bash)
As we can see, our USB drive is mounted under the name “sda,” i.e., as device “/dev/sda.” That’s all we need to know to make it a bootable Windows USB stick using WoeUSB. So, let’s do it!
Then, make sure the device is not mounted by unmounting it.
sudo umount /dev/sda*Code language: Bash (bash)Finally, we must pass two parameters to the woeusb command to make a Windows bootable USB. The first is “–device,” followed by the ISO image’s name. Specify ISO’s full path if it’s not in the current working directory.
The second one is the USB drive’s filesystem mount point, which, as we saw in our case, is “/dev/sda.” So, our command would look like this:
sudo woeusb --device Win11_23H2_EnglishInternational_x64.iso /dev/sdaCode language: Bash (bash)Important! Double-check to make sure you specify the correct path to the USB device. A misstep here, such as accidentally directing the path to your local drive, could lead to a corrupted and unusable operating system.
Wait patiently for the bootable Windows installation USB creation process to finish. The result will be similar to the one shown below.
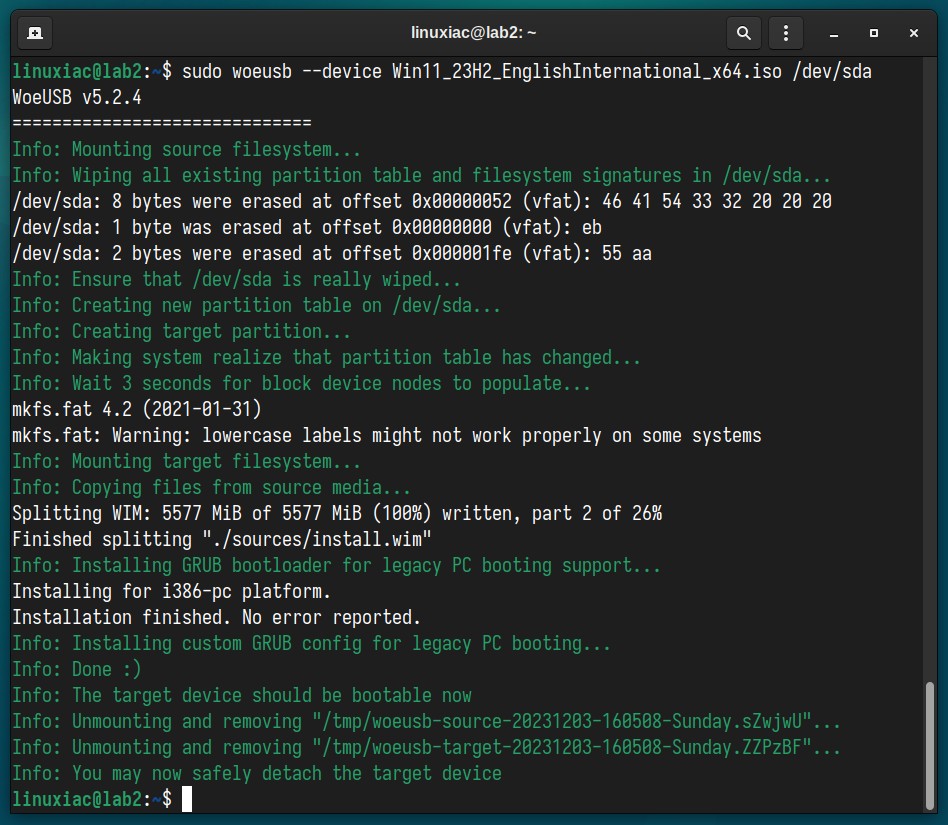
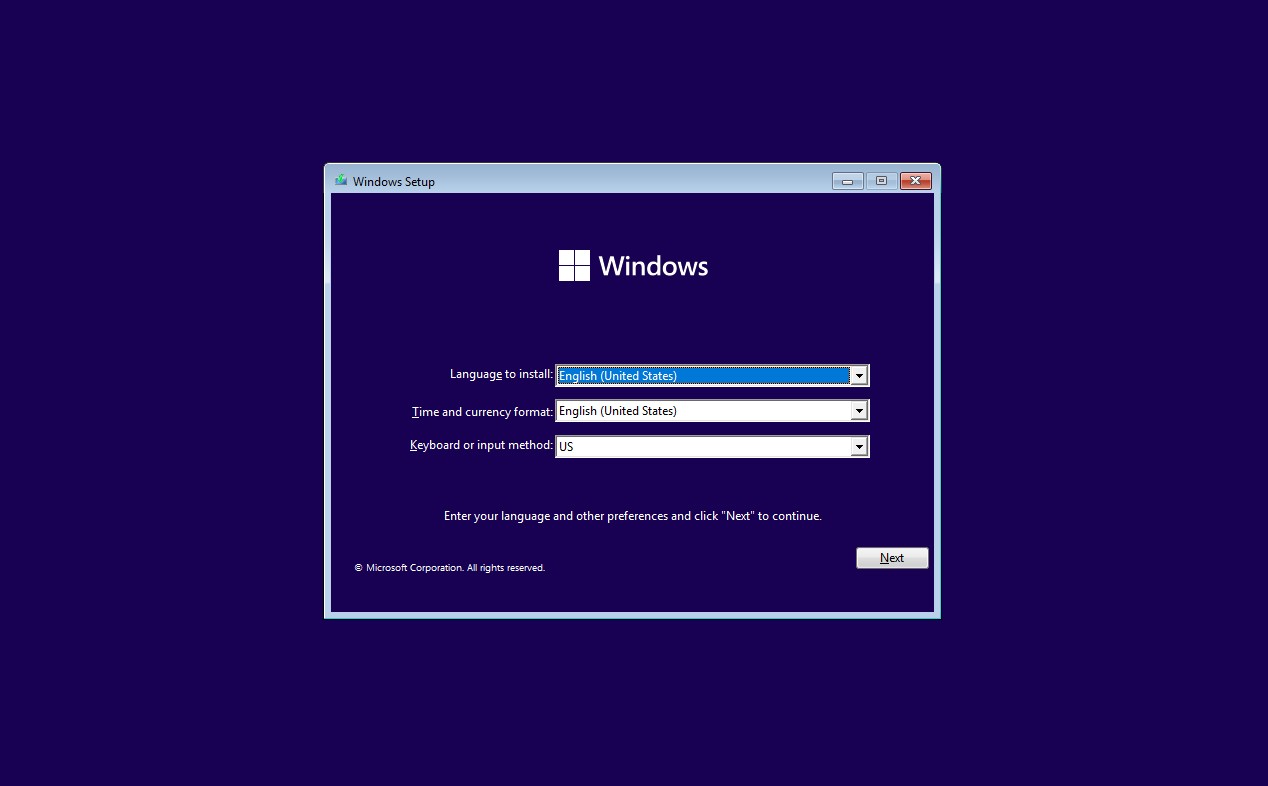
And that’s it! Remove the USB drive and plug it into the laptop or computer where the installation is intended. Ensure the system’s BIOS is set to boot from the USB drive. Then, you can proceed with installing your brand-new Windows operating system.
Conclusion
As you can see, with the right tool, such as WoeUSB, creating a Windows 10/11 bootable USB drive on Linux is an easy task to accomplish. By following the steps outlined in our guide, you can ensure a smooth and efficient installation process, leading to a successful Windows setup.
Moreover, we’ve delved into the necessary theoretical background, understanding the distinct differences between Linux isohybrid and Windows ISO images. We hope we’ve been helpful.
Of course, while there are other tools like Ventoy or UNetbootin for creating a bootable Windows USB flash drive, we prefer WoeUSB for its reliable performance, which has never given us any issues.
Thanks for your time! As always, your feedback and comments are most welcome.


It didn’t work. Keeps saying the source media is not found. Also when running lsblk I get a long list of items. I have the ISO in the download folder, should it be somewhere else?
I didn’t see any replies so I thought I’d try and help. Did you open your terminal window in the downloads folder where the iso is at?
overall this worked, however i keep running into a roadblock. every time i get to the install screen for windows 10, i receive this error “Windows cannot be installed to this hard disk space. Windows must be installed to a partition as NTFS. Windows cannot be installed to this hard disk space. The partition is of an unrecognized type.” if anyone can help that would be appreciated!
I’ve tried many times to get some settings right using the GUI version, but the result is the same; Windows’ setup will not load. These settings include having all the options (boot flag, NTFS, and skip legacy GRUB bootloader) unchecked, and having them all checked.
Hey! The GUI version is unmaintained and you are going to want to use the CLI version.
it works thanks
This guide is invaluable. The developer for WoeUSB should just link to this instead of using his nightmare-ish miasma of an instructional guide. This has helped me save my mothers computer. Thank you for everything. I’m saving this page for posterity.
I wonder how that would look in a terminal environment? Rufus has a GUI, which makes it easy to tick on and off the options that you want to have.
Followed step by step and worked flawlessly!
IMPORTANT DISCOVERY: Like many people, a lot of the PC I run across are pretty old and have been upgraded over the years. After nearly 10 attempts to create a Bootable Windows 10 flash drive on a 128GB new Flash Drive device on a LInux PC, I was about ready to quit because not a single one of them would boot my old Dell Desktop PC.
Every attempt to create the Flash Drive appeared to be successful because I never received any error messages during the creation, but none of them would boot the PC.
Only by accident did I discover that the Windows 10 and 11 Bootable Flash Drive appears to be designed to ONLY boot to a PC with the Bios Configured as UEFI Secure Boot rather than the LEGACY MBR boot mode that most older PC's are configured for currently. Only after changing the selection to UEFI was I able to finally get the PC to boot into the Windows 10 or 11 startup screens which then allowed me to access a COMMAND Prompt Screen to fix a lost password issue. It should be clearly stated in all of these articles that the Linux Created Windows Bootable Flash Drives are designed for and will likely ONLY work on PC's that have UEFI configured as the Boot Method.
Once I booted the PC in the UEFI Mode with the Flash Drive, I was able to access the PC's Hard Drive and successfully access the drive and data and also change the Password on the PC for future access by the user.
I hope this helps others who think that the Windows Bootable Flash Drive they have created on a Linux PC doesn't work because it likely will work once the PC's Bios Boot mode is changed from LEGACY MBR over to UEFI boot mode.
just use Ventoy. or get an old Windows laptop with Windows 10 or 11. I'm not doing programming terminal backflips just to run WoeUSB.
You came here to say that?
Sad
I tried woeusb from aur but keep getting error. While I was trying fedora 41, stumbled upon this article, I manage to write windows 10 usb using woeusb from fedora's repo!
amazing…
Very good tut! I installed linux distro on my win10 laptop but I ended up not liking it (fedora). I’ve used other methods but did not work. When I red your article it all made sense!
helped me do what other websites could not.A++
Sir, recently I’ve been trying to install windows on a linux machine, and have failed in doing so! But visiting this website have hugely helped me to download windows. W sir
Or simple use Ventoy install ventoy to the pendrive or usb stick, and copy paste the simple windows/linux iso to the Ventoy folder on the usb and boot what you want…. Voila
This app is almost perfect! I’d like to see some more functions added like the “disable telemetry” and “patch hardware requirements” like Rufus has.
Excellent article – it saved me a huge headache. Thanks v much
Thank you very much, this was a big help.
Windows destroys your grub if you have a Linux-version installed . Write something about fixing grub after installing windows 10/11. And how to avoid losing your Linux os.
If you are using two different drives, just go into bios and make sure to set it to boot off of the non-linux drive first. That way, Windows doesn’t know about the bootloader issue.