Linux Mint is a popular Ubuntu-based Linux distribution known for its with-user-in-mind approach, user-friendly interface, and stability. One of the key Mint’s features is its ability to update itself automatically, ensuring that your system is always up-to-date with the latest security patches and software updates.
However, while keeping your system updated with the latest security patches and bug fixes is always a good idea, manually checking for updates and installing them can be tedious and time-consuming.
For this reason, this tutorial will guide you through configuring automatic updates on Linux Mint 22 or 21 so your system stays secure and up-to-date, eliminating the need for constant manual interventions.
(Optional) Set Automated System Backup
We strongly recommend you set up automated system backups before configuring automatic updates on your Linux Mint system. This ensures that you can quickly restore the system to its previous working state if something goes wrong with the updates.
Linux Mint offers a great tool for this, which is included by default in the distro – the Timeshift app. It is a system restore tool that allows users to take snapshots of their system at different points in time. In addition, Timeshift can also be used to back up and restore user data, such as documents, pictures, and music.
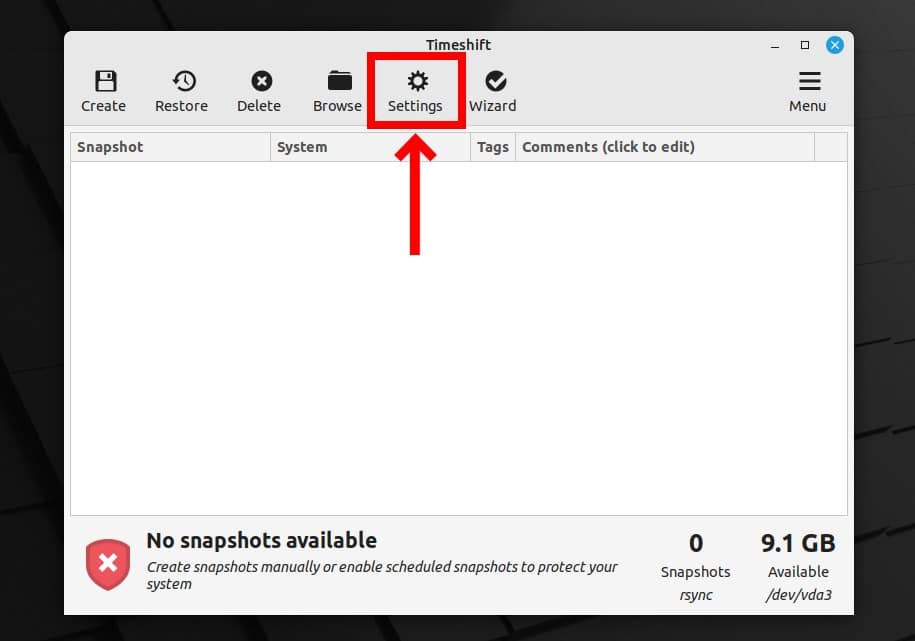
Launch the application and click the “Settings” button to set automatic backups with Timeshift.
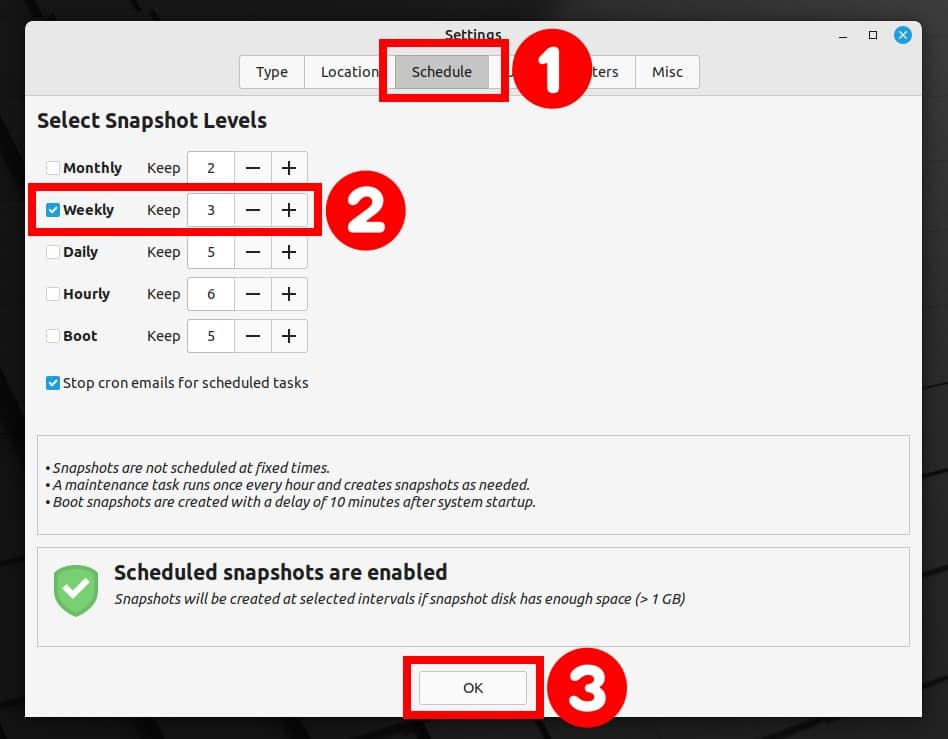
Set the backup type on the “Schedule” tab. We recommend you choose “Weekly,” which is entirely reasonable. Finally, click the “OK” button.
Remember that the system snapshots are saved into a newly created “timeshift” directory on the root “/” partition, so make sure you have enough free space. Because system snapshots are incremental, only the first snapshot takes up a lot of space. After that, all subsequent ones only take up space for changed files.
Setting Automatic Updates on Linux Mint 22/21
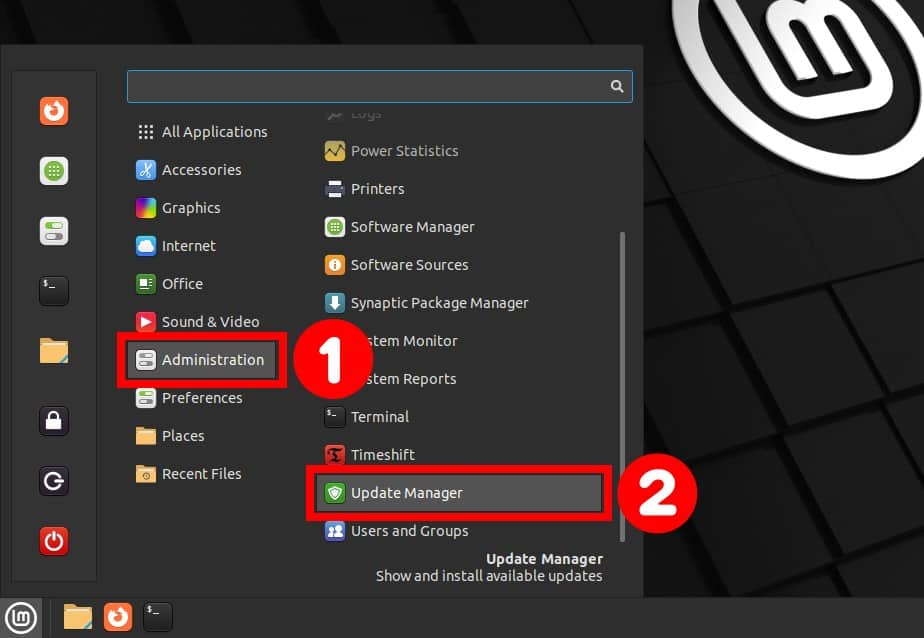
Configuring automatic updates on your Linux Mynt system is easy and can be done through the Update Manager application. Select “Administration” from the start menu to open it, then pick “Update Manager.“
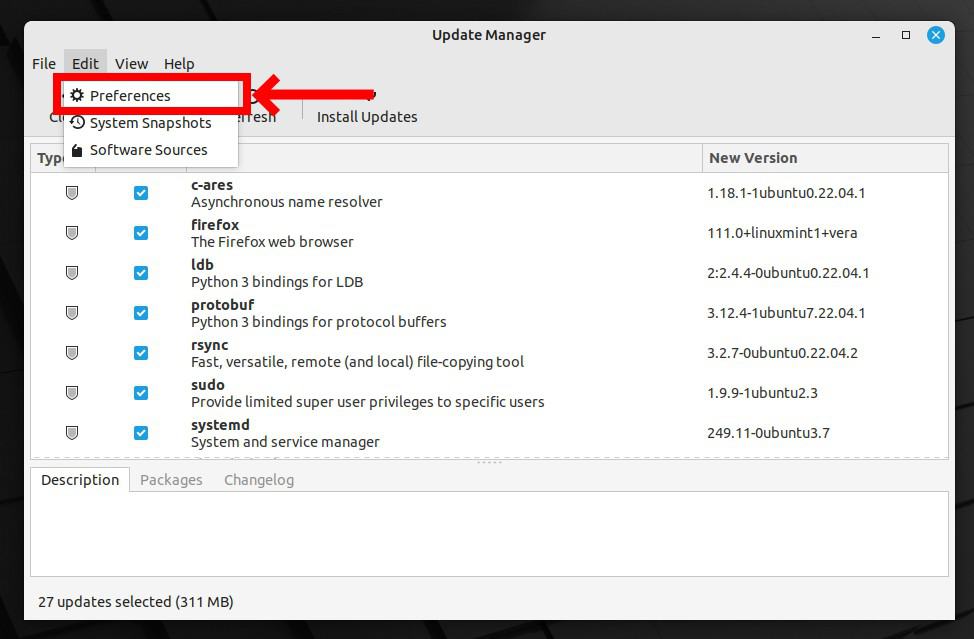
When the application opens, choose “Preferences” from the “Edit” menu.
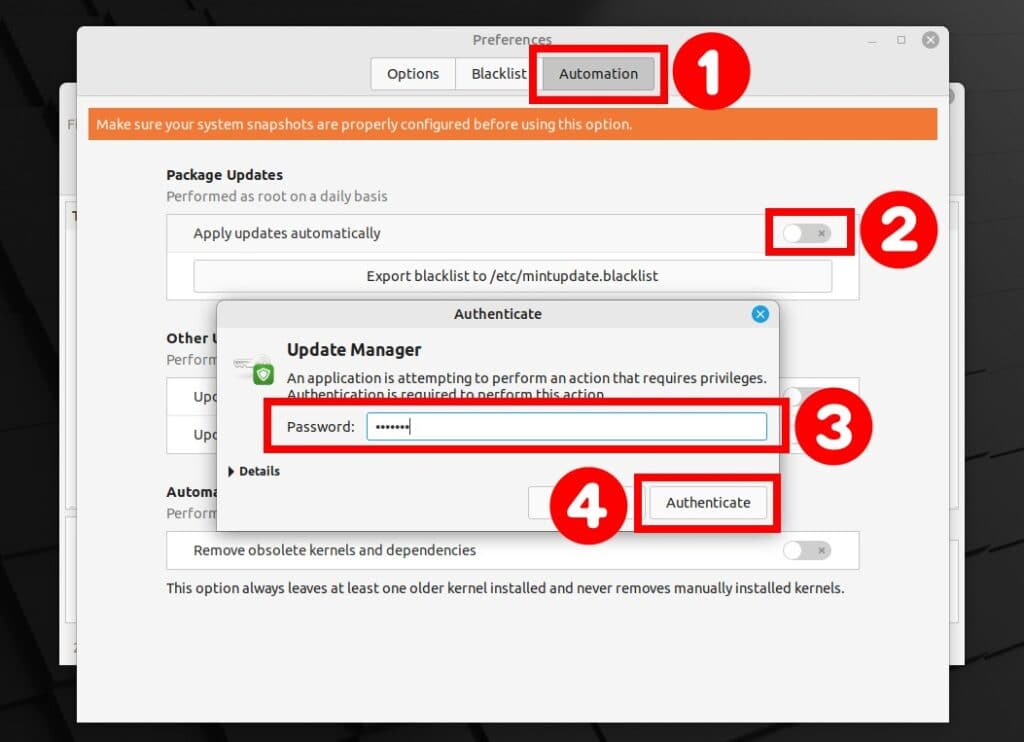
Select the “Automation” tab, then turn on the toggle switch for “Apply updates automatically.“ The Update Manager app will ask you for your password. Enter it and hit the “Authenticate” button to confirm.
You’re almost ready. Switch on the other three options listed on the screen below; explanations of each are provided below. Finally, close the window.
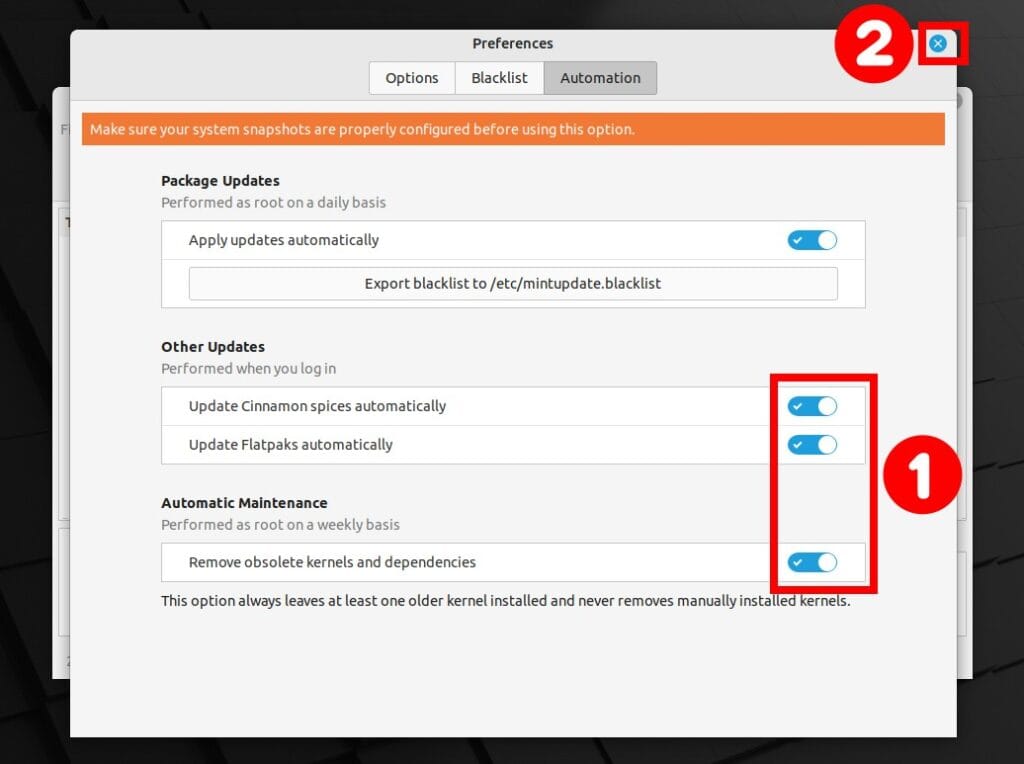
Mint’s Cinnamon spices are additional software components that can be installed on top of the Cinnamon desktop environment in Linux Mint. These spices can add new features, enhance existing ones, or customize the desktop experience according to the user’s preferences.
Some Linux Mint Cinnamon Spices examples include applets, desklets, extensions, themes, and icons. Enabling the “Update Cinnamon spices automatically” option ensures you’ll always have the most up-to-date, bug-free user experience.
“Update Flatpaks automatically” is another helpful feature in Linux Mint. As a result, any extra Flatpak applications you install will always stick to their latest versions.
Over time, new Linux kernel updates appear. However, when you install them, the older versions are not automatically removed, and even though they are no longer in use, they use disk space.
The “Remove obsolete kernels and dependencies” option automatically removes unused Linux kernel versions from your Mint system. But don’t worry – your manually installed kernels will not be removed automatically.
Allow Mint’s Automatic Updates Using Command Line
In addition to the graphical interface of the Update Manager application, Linux Mint lets you set automatic updates via the command line with a single command.
sudo mintupdate-automation upgrade enableCode language: Bash (bash)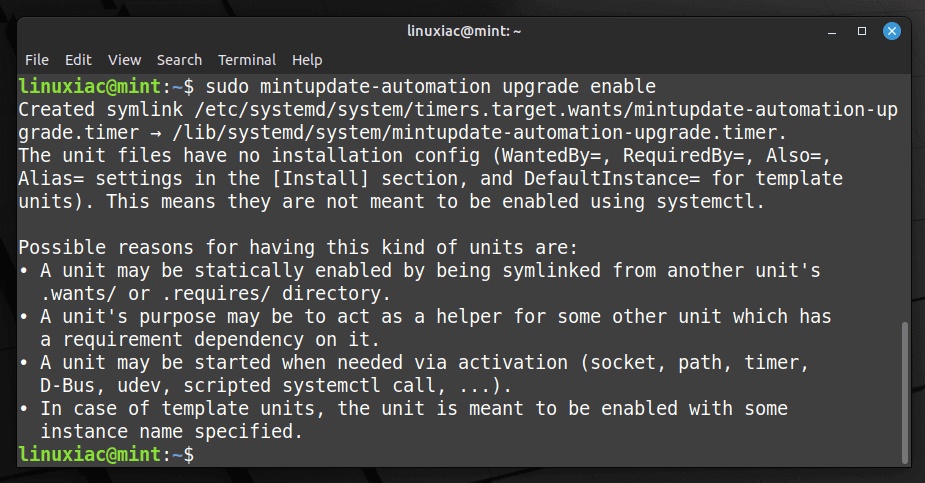
However, only automatic updates will be enabled; the other three options, updating Cinnamon spices, Flatpak apps, and automatically cleaning up old Kernel versions, will remain disabled by default.
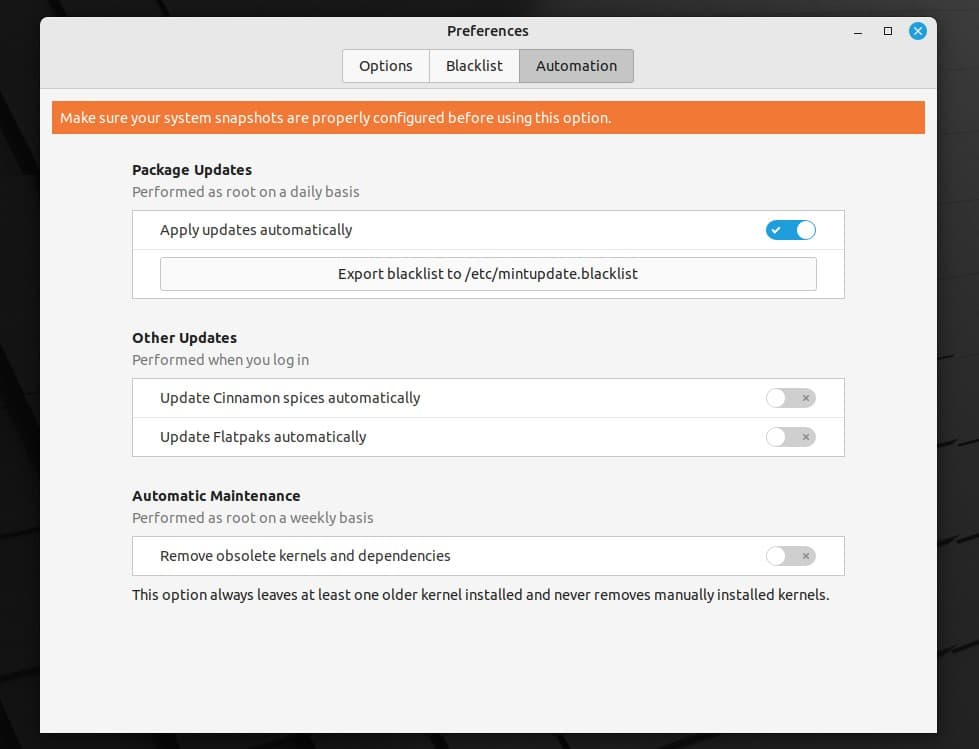
To enable them, follow the above steps via the Update Manager GUI.
Conclusion
Configuring automatic updates in Linux Mint is essential to maintaining your system’s security and stability. By enabling them, you can ensure your system is always up-to-date with the latest security patches and bug fixes without manually checking for updates.
It is worth noting that while automatic updates can help ensure your system’s security and stability, they can also introduce new issues or conflicts.
That’s why, it is always recommended to have a backup plan in place, such as regularly backing up your data or creating system restore points, in case any issues arise during the update process. We’ve shown you how to do this using the Timeshift app.
I hope you found this guide helpful. Any suggestions and comments are welcome in the comments section below.

Greetings,Well done! The information I was seeking laid out in clear concise & easy to follow instruction style. Only one thing missing, (in my opinion) & that is any time I request or seek terminal commands I always appreciate an additional command “with” parameters, switches, etc to “DISABLE or UNDO” THE PROCEDURE. To make certain the system can be “returned” to its original state. Please Note; I do not want this to come across as an admonishment or scolding you. This is/was truly fine work on your part & I & certainly many others benefited. That said after 40+ years in IT I have undoubtedly gotten extremely anal. You know, everything MUST BE LETTER PERFECT! This article saved me a ton of time going back through saved materials. Now retired & suffering some health issues my brain is no longer up to par. Command(s) & command structure no longer roll off the top of my head as they once did. I GREATLY APPRECIATE YOUR WORK!! 🙂
Be well,Douglas Swinhart