One of the best things about Arch Linux is its incredible flexibility and customization options. And as you know, the kernel is the heart of any Linux distro, and Arch is no exception.
However, many Arch users stick with the default one that comes with the distribution and rarely, if ever, explore alternatives. There’s absolutely nothing wrong with this—after all, the default kernel is always the latest and greatest, offering support for the newest hardware.
But what if I told you that switching to a different kernel could unlock even more potential you can squeeze from your system? Because sometimes, the newest kernel isn’t necessarily the best fit.
For example, after a recent upgrade on one of my Arch desktop systems, my Razer keyboard and mouse peripherals (guilty, I’m gaming a lot) started acting up. A quick investigation revealed a compatibility issue between the open-razer module and the latest kernel.
So, what do you think I did? Switching to Arch’s LTS kernel instantly resolved the issue. Later, an updated version of the latest kernel fixed the problem for good. This is just one of many scenarios where Arch’s flexibility to use different kernels can make a real difference.
But before we move on to the purely technical part, let me give you a quick rundown of the official Linux kernels Arch provides, along with a few popular unofficial ones you might come across.
Official Kernels
Arch provides five official kernel packages to cater to different user needs. They are maintained and distributed by the Arch Linux development team or trusted contributors as part of the official repositories.
Default Stable Kernel (linux)
This is the standard vanilla kernel that comes with the Arch default install. It provides the latest stable release from the mainline Linux kernel and is best for general use. This is your go-to kernel if you want the newest features and hardware support without compromising stability.
Command to install it + header files:
sudo pacman -S linux linux-headersCode language: Bash (bash)Long-Term Support (LTS) Kernel (linux-lts)
Arch as a server? Why not? The LTS kernel focuses on stability and long-term maintenance, receiving updates primarily for security fixes and critical bugs. It usually is several versions behind the latest mainline one. Suitable for systems where stability is paramount, like servers or production environments. It’s also great if you prefer a “set it and forget it” approach.
Command to install it + header files:
sudo pacman -S linux-lts linux-lts-headersCode language: Bash (bash)Hardened Kernel (linux-hardened)
As the name suggests, security is the priority here. This kernel includes additional patches and configurations to harden the system against vulnerabilities, thus minimizing the risk of exploits. So, if you are paranoid about security, this is probably your choice.
Command to install it + header files:
sudo pacman -S linux-hardened linux-hardened-headersCode language: Bash (bash)Realtime Kernel (linux-rt)
Designed for real-time applications, this kernel ensures minimal latency and predictable task scheduling. It is best for audio production, video editing, and other time-sensitive tasks where delays can be disruptive.
Command to install it + header files:
sudo pacman -S linux-rt linux-rt-headersCode language: Bash (bash)Zen Kernel (linux-zen)
Zen kernel is a community-driven project that aims to provide a more optimized and responsive Linux kernel for everyday systems. On a personal note – it’s my favorite and go-to choice.
It incorporates numerous performance enhancements, scheduler tweaks, and other modifications to improve desktop interactivity and system responsiveness. Best for desktop users, gamers, and multimedia enthusiasts.
Command to install it + header files:
sudo pacman -S linux-zen linux-zen-headersCode language: Bash (bash)Unofficial Kernels
In addition to the officially supported above, Arch gives users even more choices and control over their system’s behavior, performance characteristics, and philosophical alignment than the official upstream options.
While the official kernels (like the stable, LTS, Hardened, Zen, and Realtime variants) already cater to a broad range of scenarios, unofficial kernels fill specialized niches and explore alternative optimizations that might not be part of the standard Arch offerings. Below is a list of the most commonly used.
It’s important to note that these kernels aren’t part of the official Arch repositories, but you can install them through the AUR. To do this, you’ll need an AUR helper, such as yay. If you’re unsure how to set one up, don’t worry—our guide covers you.
One more thing to keep in mind: since these kernels are available in the AUR, installing them means the process involves compilation. That requires a bit of patience, as the process can take some time, depending on the power of your hardware.
Liquorix Kernel (linux-lqx)
Liquorix is a highly optimized kernel (based on Zen) for desktop performance and responsiveness, including tweaks for gaming and multimedia. Best for gamers and desktop users looking for a snappier experience.
Command to install it + header files:
yay -S linux-lqx linux-lqx-headersXanMod Kernel (linux-xanmod)
XanMod is another unofficial kernel optimized especially for desktop usage and high-performance computing experience. It includes patches and scheduler tweaks to reduce latency and improve responsiveness, making it great for gaming, multimedia, and heavy multitasking.
Command to install it + header files:
yay -S linux-xanmod linux-xanmod-headersCode language: Bash (bash)Libre Kernel (linux-libre)
A version of the Linux kernel that removes all proprietary firmware and drivers, adhering strictly to free software principles. It’s best suited for software freedom advocates who wish to run a system entirely composed of open-source software.
Command to install it + header files:
yay -S linux-libre linux-libre-headersCode language: Bash (bash)Clear Linux Kernel (linux-clear)
This kernel, originating from Intel’s Clear Linux Project, includes performance optimizations and patches for Intel hardware. It can improve performance for users with Intel CPUs who want to maximize performance, especially in compute-intensive tasks.
Command to install it + header files:
yay -S linux-clear linux-clear-headersCode language: Bash (bash)CK Kernel (linux-ck)
CK kernel features the MuQSS scheduler and other performance enhancements to improve system responsiveness under load. It is best for users who multitask heavily and want smoother performance during intense workloads.
Command to install it + header files:
yay -S linux-ck linux-ck-headersCode language: Bash (bash)Switching Between Kernels on Arch Linux
Okay, by running the following command, we’ve added two extra Linux kernels, LTS and Zen, to our Arch system.
sudo pacman -S linux-lts linux-zenCode language: Bash (bash)It’s important to remember that simply installing these kernels doesn’t automatically make them ready to use on your system. To get your Arch box running with them, you’ll need to make the bootloader aware of them.
Not sure how to do it? Don’t worry—I’ll walk you through the process for the two most common options: GRUB and systemd-boot.
Switching Kernels with GRUB
GRUB doesn’t dynamically scan for new kernels each time you boot. Instead, it relies on a “grub.cfg” configuration file. To make it aware and use them during boot, you’ll need to give it a little nudge. Thankfully, it’s super simple.
Just run the command below to regenerate the GRUB configuration file. This process scans the contents of the “boot” directory for new kernel images and associated initramfs files, then updates “grub.cfg” with new entries.
When you reboot, GRUB reads from this updated configuration file and shows the newly installed kernels in its menu.
sudo grub-mkconfig -o /boot/grub/grub.cfgCode language: Bash (bash)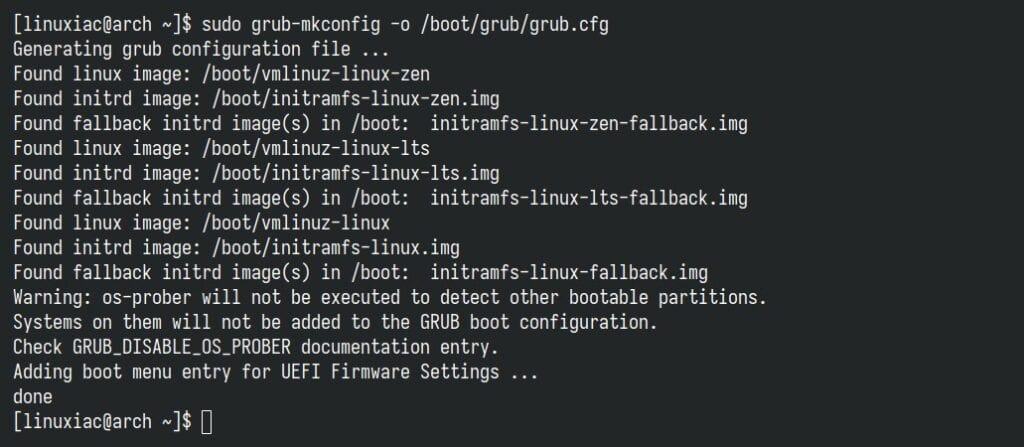
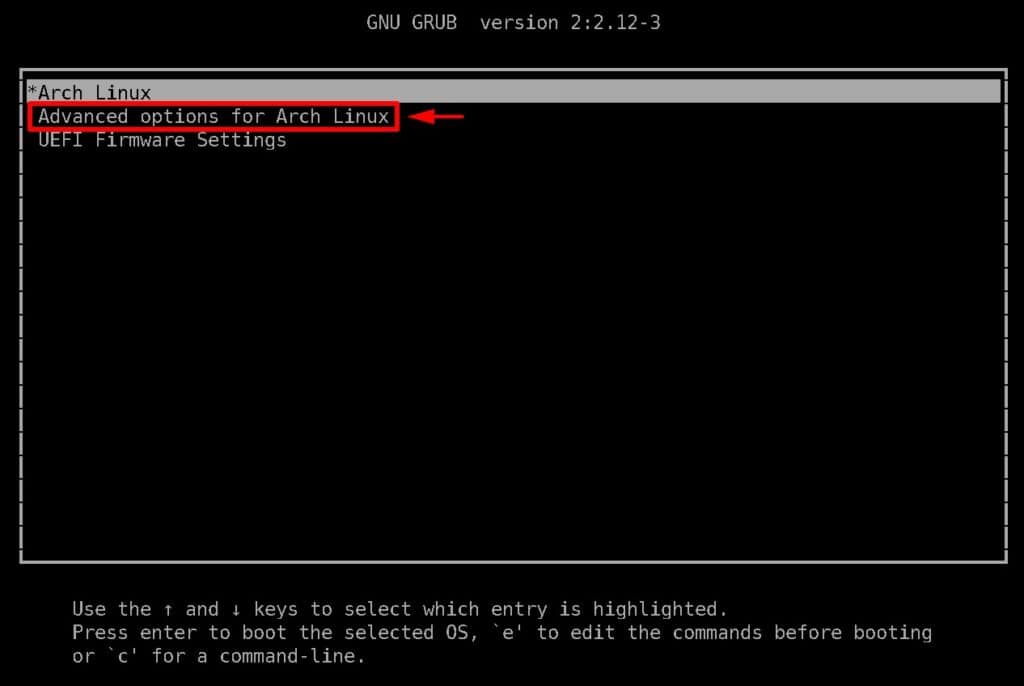
After rebooting, you’ll find the newly added kernels under the “Advanced options for Arch Linux” submenu GRUB section. Just use the arrow keys on your keyboard to navigate to it, then press “Enter” to access it.
Here, you’ll see a list of the kernels you’ve just installed—like the LTS and Zen ones we set up earlier. Use the arrow keys on your keyboard to highlight the kernel you want your Arch system to boot with, then press “Enter.” And that’s all.
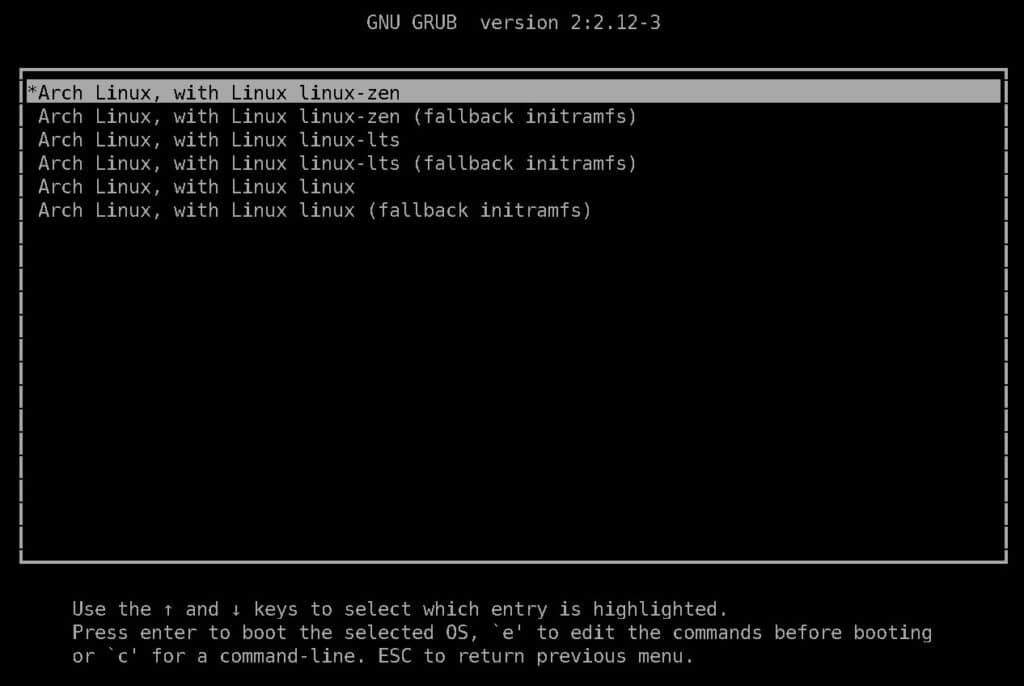
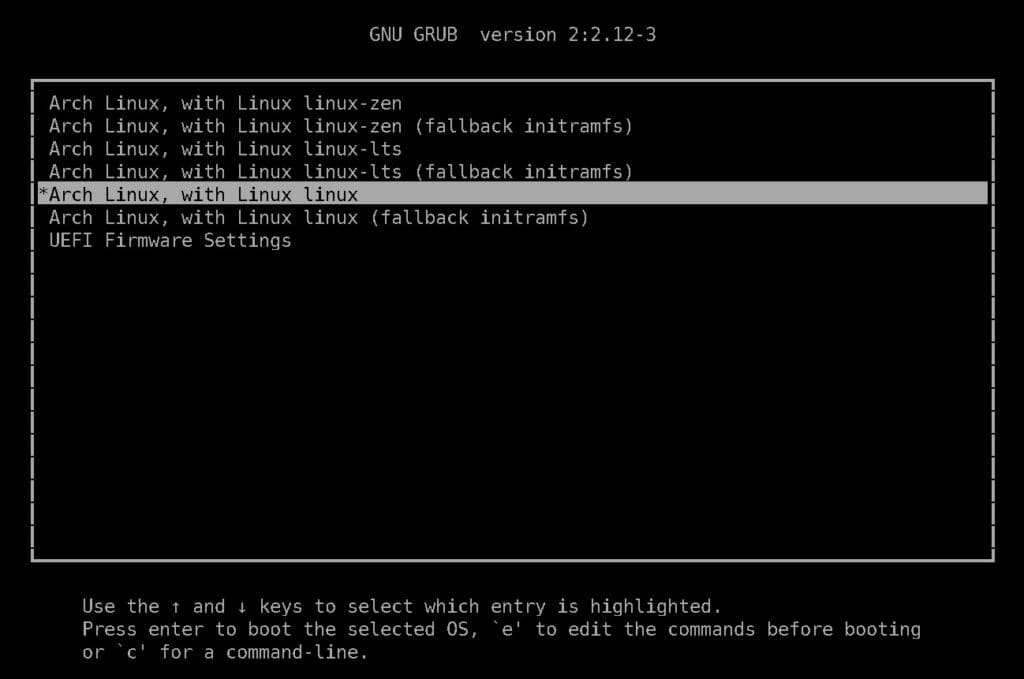
But let’s make things a bit more user-friendly! I find it inconvenient to have a submenu in GRUB that I need to navigate just to see all the available kernel options. Instead, let’s set it up so all the kernels are displayed right on the main screen. You’d be surprised how easy this is to achieve.
Open the GRUB configuration file with your preferred terminal text editor:
sudo nano /etc/default/grubCode language: Bash (bash)Change the “GRUB_DEFAULT” options from “0” to “saved.”

Next, remove the “#” symbol at the start of the lines for “GRUB_SAVEDEFAULT” and “GRUB_DISABLE_SUBMENU” so that both options are uncommented.
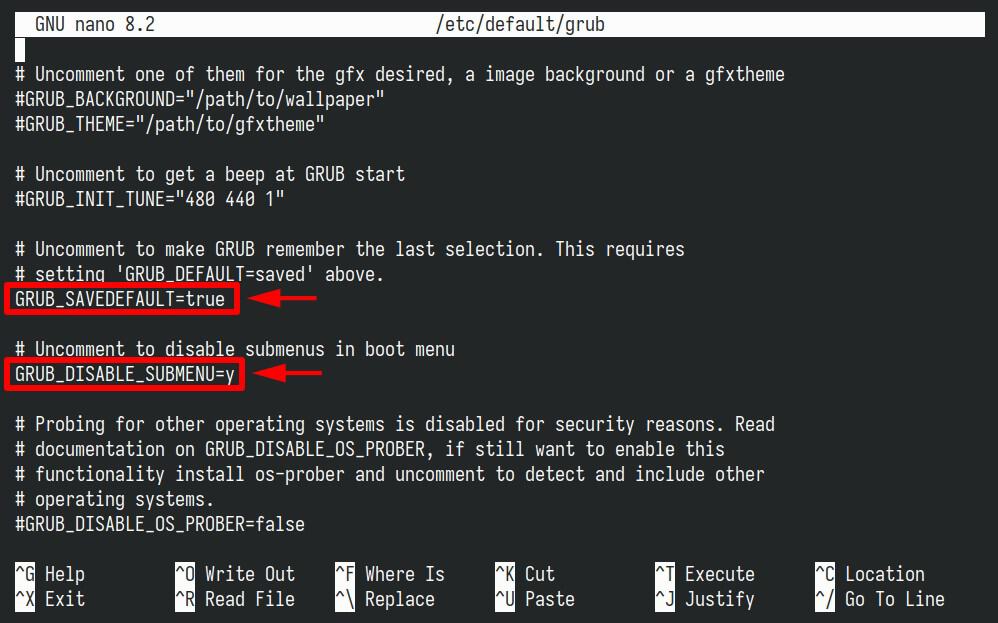
Finally, save the changes and recreate the “grub.cfg” file.
sudo grub-mkconfig -o /boot/grub/grub.cfgCode language: Bash (bash)Reboot, and just like that, the magic happened. All your kernels are now conveniently displayed right on the main GRUB screen of your Arch system. Even better, the bootloader will remember the last kernel you used and automatically boot into it next time—unless you decide to pick a different one from the list.
Switching Kernels with systemd-boot
Systemd-boot is a lightweight bootloader that integrates seamlessly with Arch Linux and UEFI systems. Switching between kernels using systemd-boot involves installing the desired kernels and configuring the bootloader entries.
We assume you’ve already taken care of the first part, installing the additional kernels. Now, let’s walk you through setting up systemd-boot to boot your system with them.
Verify if the respective new kernels and initramfs images have been generated in the “/boot” directory:
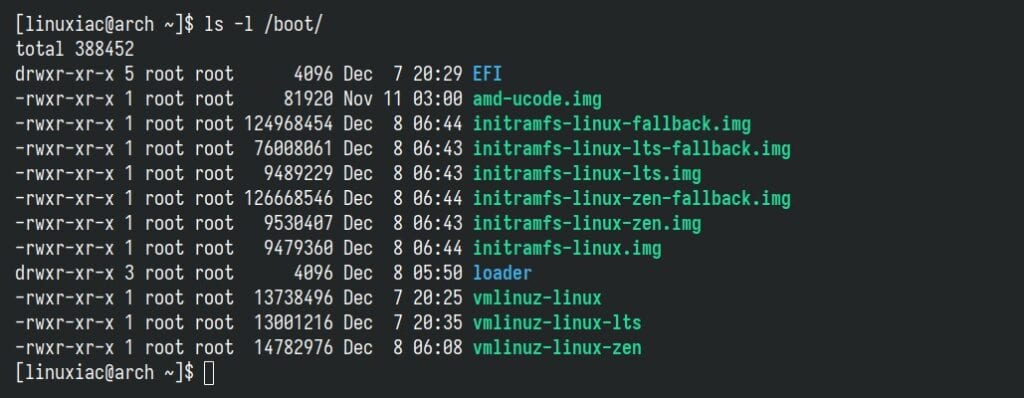
Great! As you can see, our extra LTS and Zen kernels have also generated the necessary files in the “/boot” directory alongside the main Arch kernel.
Since you’re using systemd-boot, I’m guessing you’re already familiar with its basics—but just in case, let me give you a quick refresher. Each kernel needs its own entry in “/boot/loader/entries/” (if “/boot” is your ESP (EFI System Partition) mount point—which is usually the most common case). These files define how the systemd-boot handles each kernel.
Next, for every additional kernel you install, you must manually create an entry inside the “/boot/loader/entries/” directory, which is just a simple configuration file. Its name can be whatever you want; the mandatory condition is that the file has a “.conf” extension. Let’s do it for the LTS kernel.
sudo nano /boot/loader/entries/arch-lts.confCode language: Bash (bash)And put the following content in it:
title Arch Linux LTS
linux /vmlinuz-linux-lts
initrd /initramfs-linux-lts.img
options root=UUID=45d61aea-cda7-4e55-a5f5-32ab4518a6dd rwCode language: Bash (bash)
Of course, you must replace the “45d61aea-cda7-4e55-a5f5-32ab4518a6dd” part with the UUID of your root (“/”) filesystem. You can find it using:
lsblk -o NAME,UUID,FSTYPE,MOUNTPOINT
Additionally, if using Intel or AMD CPUs, include the microcode initrd (if you have already installed it and have the corresponding file available in “/boot“) before the main initramfs. For example:
title Arch Linux LTS
linux /vmlinuz-linux-lts
initrd /amd-ucode.img
initrd /initramfs-linux-lts.img
options root=UUID=45d61aea-cda7-4e55-a5f5-32ab4518a6dd rwCode language: Bash (bash)
That’s it! Save the file and exit. Finally, let’s quickly double-check to ensure everything looks good.
bootctl listCode language: Bash (bash)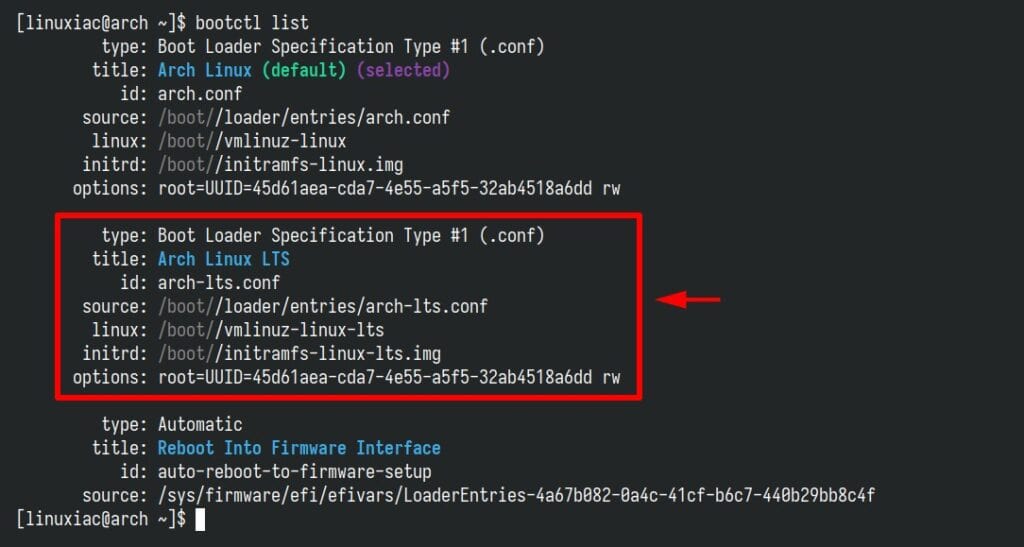
We’re all set. Reboot the system:
sudo rebootCode language: Bash (bash)The newly added “Arch Linux LTS” should now be available in the systemd-boot menu. Highlight it and hit “Enter” to boot your Arch system with the LTS kernel.

Finally, here’s a handy little trick to make your life easier: you can set systemd-boot to remember the last kernel you booted into, so you don’t have to pick it from the boot menu every time. Just open the “/boot/loader/loader.conf” file and set the “default” option to “@saved.”
sudo nano /boot/loader/loader.confCode language: Bash (bash)
Conclusion
That’s all from me for now, folks. You’ve just taken another step toward unlocking Arch Linux’s full potential. The ability to install and switch between different kernels empowers you to fine-tune your system for performance, stability, or cutting-edge features—whatever best suits your needs.
So, reboot into your kernel of choice and keep exploring everything Arch has to offer—your system, your way.
If you have any questions or feedback, feel free to reach out in the comment section below. Happy Arching!

Great guide, although had some problems because of btrfs I use on system partition.
Couple hints from me:
– use “blkid” to obtain uuid and partuuid. I used kde partitionmanager but uids shown are capitalized thus leads to errors.
– /@ is not always default subvolume. Either set it as default subvolume, or add rootflags=subvol=@, and rootfstype=btrfs settings to options.
Great article. I have just installed the second kernel in systemd-boot. Thank you.