If you’re looking to get Java up and running on your Arch Linux system, you’re in the right place. This guide will take you through everything you need step by step. By the end, you’ll have a fully set up development environment ready to run or build Java applications.
But before installing Java on your Arch box, let me share a bit of theory that will clarify what follows.
Which Java Version Should You Install?
Arch includes different OpenJDK (an open-source implementation of the Java Platform) releases in its repositories. So, if you search for available Java packages, you will find a long list of choices for versions 8, 11, 17, and 21, which are LTS (Long-Term Support) releases plus the newest v23.
I know this may be a bit confusing. Which version should I install? Don’t worry; let me help you make the right choice.
The Java LTS releases have a 5-year support period. In comparison, the non-LTS ones, for example, Java 23, get only six months of support. Therefore, the best choice is to pick an LTS release. Okay, but which one?
According to the table below, Java 8 and 11 have already reached the end of their active support, leaving us with two LTS versions to choose from – 17 and 21.
| Java Version | Active Support | Extended Support |
|---|---|---|
| 8 (LTS) | March 31, 2022 | December 21, 2030 |
| 11 (LTS) | September 30, 2023 | September 30, 2026 |
| 17 (LTS) | September 30, 2026 | September 30, 2029 |
| 21 (LTS) | September 30, 2028 | September 30, 2031 |
While Java 17 is currently the more widely adopted, looked at in the long run, v21 is expected to become the primary one that developers will depend on in the years ahead. So, this fact is completely enough to make it our logical choice for installation.
JDK or JRE (Headless)?
The second key decision is choosing the right Java implementation. You’ve got two options: JRE (Java Runtime Environment) and JDK (Java Development Kit). The JRE also comes in two versions—full and headless. Here’s what they’re for.
- JRE (Headless) is a minimal Java runtime environment needed to execute only non-GUI (Graphical User Interface) Java programs.
- JRE (Full) is a full Java runtime environment for running both non-GUI and GUI Java applications.
- JDK includes the JRE plus development tools like the Java compiler, debugger, and other utilities necessary to develop and run Java applications.
In other words, if you only want to run Java applications, the JRE alone is enough. However, if you are running a modern Java application, installing the JDK ensures you have all the necessary components. Of course, if you plan to develop Java apps, installing JDK is a must.
Arch Linux Java Packages
Before we move on to the installation, let’s take a quick look at the Java packages available in Arch Linux’s repositories. Here they are.
| Version | JRE (Headless) | JRE (Full) | JDK |
|---|---|---|---|
| 23 | jre-openjdk-headless | jre-openjdk | jdk-openjdk |
| 21 | jre21-openjdk-headless | jre21-openjdk | jdk21-openjdk |
| 17 | jre17-openjdk-headless | jre17-openjdk | jdk17-openjdk |
| 11 | jre11-openjdk-headless | jre11-openjdk | jdk11-openjdk |
| 8 | jre8-openjdk-headless | jre8-openjdk | jdk8-openjdk |
As I mentioned earlier, I recommend installing Java 21. For the best experience, I highly suggest using the JDK, which we’ll install in this guide.
One more thing—if you just install the “jdk-openjdk” package without specifying a version, Arch will automatically install the latest available Java implementation from its repositories. Right now, that would be version 23.
However, that’s not what we want. We specifically need “jdk21-openjdk.” So, always include the version number in the package name to get the right one.
Install Java on Arch Linux
First, ensure Java is not already installed on your Arch system.
javaCode language: Bash (bash)
You should see the message “java: command not found.” If you get something different, you probably have another Java implementation installed. In that case, uninstall it first before proceeding.
Next, install OpenJDK version 21 using the following command:
sudo pacman -S jdk21-openjdkCode language: Bash (bash)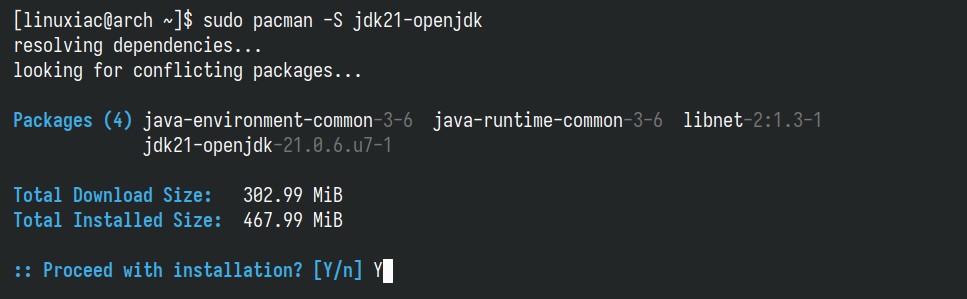
Once the packages are installed, use the below command to verify that everything works as expected.
java -versionCode language: Bash (bash)
And just like that, as you can see from the image above, we now have OpenJDK 21 successfully installed on our Arch Linux system.
Set Default Java Version
Java lets you have multiple versions installed on your Arch system at the same time. You can switch between them easily by setting the default Java version you want to use. Here’s how to do it.
First, run the archlinux-java command to see which Java versions are installed on your Arch system.
archlinux-java statusCode language: Bash (bash)
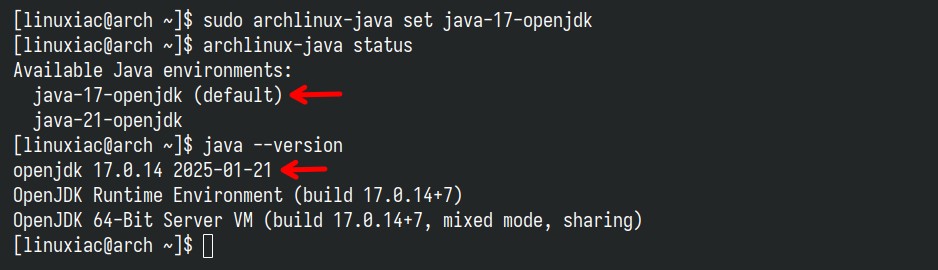
As can be seen, we have installed a mix of Java 17 and 21 versions; as you can see from the command output, 21 is set as the default. Let’s switch the default version to use from 21 to 17.
It’s super easy—just run the following using the desired Java version from the previous ‘status’ command as an argument:
sudo archlinux-java set java-17-openjdkCode language: Bash (bash)If we now do a quick check using some familiar commands, we’ll see that the default Java version on our Arch Linux system has already switched from 21 to 17.
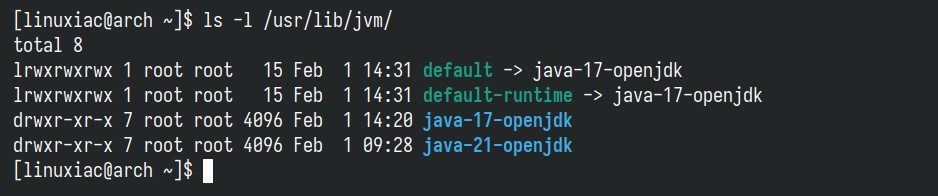
If you’re curious about what this command actually does, it works behind the scenes by creating a symbolic “default” link in the “/usr/lib/jvm” directory that dynamically updates to point to the installed Java version you choose.
Set JAVA_HOME Environment Variable
Various applications use the “JAVA_HOME” environment variable to locate the JDK installation directory. However, setting it is not strictly necessary on Arch Linux because the system automatically detects Java installations if they are installed via Pacman.
But if an application explicitly requires “JAVA_HOME,” you can add it to your shell configuration by editing the “~/.bashrc” file:
nano ~/.bashrcCode language: Bash (bash)Add the following snippet to specify the full path to the directory where your desired Java version is installed.
export JAVA_HOME=/usr/lib/jvm/java-21-openjdk
export PATH=$JAVA_HOME/bin:$PATHCode language: Bash (bash)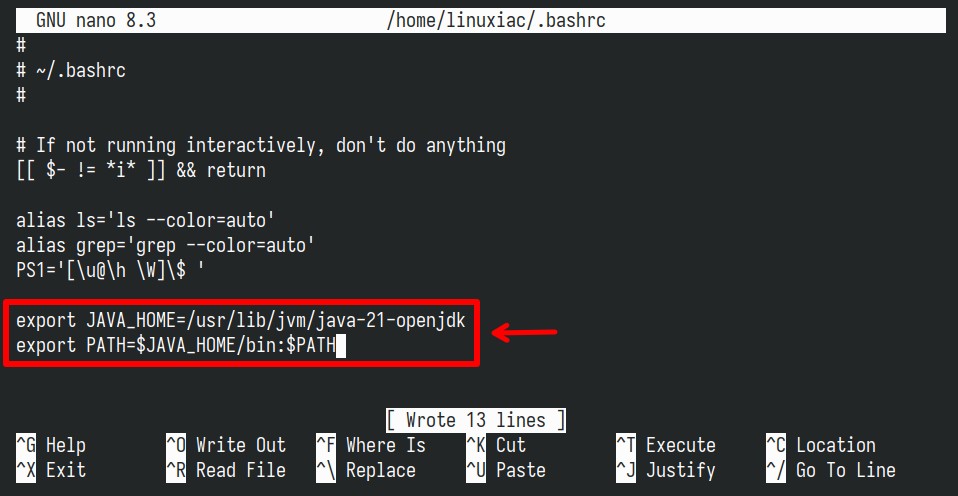
Save the file and exit. Finally, source it and check if “JAVA_HOME” is already part of the environment.
source ~/.bashrc
echo $JAVA_HOMECode language: Bash (bash)
Uninstall Java on Arch Linux
If you want to remove Java from your Arch system, first use Pacman’s command below to find out all installed Java packages.
pacman -Qs 'jre|jdk'Code language: Bash (bash)
Then just uninstall them:
sudo pacman -Rns jdk17-openjdk jdk21-openjdkDon’t forget also to remove the “JAVA_HOME” variable (if you set it) from the “~/.bashrc” file by simply opening it and deleting the line containing it.
Conclusion
Arch is a great choice for any developer, as it always provides the latest and most up-to-date software. Now, you are all set to run Java applications, develop Java programs, and enjoy the many benefits of this powerful programming language.
Thanks for your time! I hope you find this guide helpful. As always, your feedback and comments are most welcome. Happy coding!